Chapter 4. Managing Your Kindle Content
As your Kindle content grows, you quickly discover that you need a way to manage that content. You can manage content on your Kindle using collections, and the easiest way to manage content obtained from sources other than the Kindle store is to use Calibre, a free program for your computer. You learn how to use both collections and Calibre in this chapter.
Using Archived Items
One of the most common questions I hear from Kindle users is, “What do I do with a book after I finish reading it?” Although that question might sound a little strange, it’s actually a good question. Why have content listed on your Kindle Home screen if you’ve already read it or listened to it?
If you’re like most Kindle users, you quickly collect a large amount of content for your Kindle, and that content can quickly become cumbersome to manage. Cleaning up items you are no longer interested in, content you’ve already read or listened to, and clippings you no longer need becomes a necessity. Fortunately, Amazon provided a tool called Archived Items that enables you to easily manage all your Kindle content from your Home screen.
When you select Archived Items from your Home screen, the Kindle lists all the Kindle books purchased from your Amazon account not currently on your Kindle. These books are stored at Amazon, so you can easily transfer them to your Kindle when you’re ready to read them.
You can simply click an item to download it to your Kindle. When you do, the item is opened for reading at the furthest page read using Amazon’s Whispersync service. If a furthest page isn’t synchronized, the item is opened at the beginning.
You can also copy an item from Archived Items to your Kindle by moving the cursor to an item, pressing the 5-way to the right, and selecting Add to Home. When you use this method, the item is copied to your Home screen, but you remain on the Archived Items screen so you can copy additional items to your Kindle.
You don’t have to turn on wireless to access Archived Items, but wireless is necessary to copy an item to your Kindle.
Tip
To move an item from your Kindle’s Home screen to Archived Items, move the cursor to the item on your Home screen, and press the 5-way to the left. Choose Remove from Device, and the item is removed from the Kindle. It is then visible in Archived Items. Remember, this capability is only available for books purchased from the Kindle Store. It isn’t available for books you copied to your Kindle or for subscription items.
One feature that is missing from Archived Items is the ability to easily access a description of an item. I like to keep only a few books on my Kindle, so when I am looking for something new to read, I like to browse through my Archived Items. It would be nice to have easy access to the Kindle Store page for books in Archived Items without first copying the book to my Kindle. Such a feature isn’t currently available, but I hope that Amazon adds it in a future Kindle update.
Using Amazon’s Your Media Library
Your Media Library is a special section of Amazon’s website that contains entries for all your digital content purchased from Amazon. You can find your Kindle content, MP3s, Amazon Amazon Video on Demand, Amazon Upgrade books, and other items you’ve purchased from Amazon. Using Your Media Library, you can send purchased books, magazines, newspapers, and blogs to your Kindle (assuming you have a Whispernet connection) or to the Kindle application running on another device. You can also download content to your computer, where it can be transferred to the Kindle using a USB connection.
Note
This book covers using Your Media Library with Kindle content only. For information on using Your Media Library to manage other Amazon content, such as hardcover books, see Amazon’s help page at www.amazon.com/gp/help/customer/display.html/ref=yml_topnav_help?ie=UTF8&nodeId=200128600.
To access Your Media Library, browse to https://www.amazon.com/gp/library and log in with your Amazon username and password.
The main page of Your Media Library displays all your digital content. If you check the box next to one or more items, you see a pop-up dialog offering several options for the selected items, as shown in Figure 4.1.
Figure 4.1. Several options are available for selected items.

You can share an item by clicking the Share Selected Items button. Shared items can be visible to other Amazon users who view your profile. If you want to stop sharing an item, select it and click the Make Selected Items Private button.
If you click the Move to Trash button, selected items are moved to the trash. You can access items in the trash by clicking the View drop-down in the upper-left corner and selecting Trash. You can return an item in the trash to your collection by selecting it and clicking the Return to Your Collection button.
Kindle content cannot be permanently removed from Your Media Library because doing so would prevent you from transferring that content back to your Kindle. If you try to permanently delete your Kindle content, a message notifies you that the item cannot be deleted.
Using Amazon’s Manage Your Kindle
The Your Media Library page provides tools to manage your Kindle content. Amazon also enables you to manage the Kindle by using the Manage Your Kindle page.
To access the Manage Your Kindle page, click the Manage Your Kindle link on the Kindle home page located at www.kindle.com or browse to www.amazon.com/manageyourkindle. The Manage Your Kindle page is divided into several sections.
Your Kindle(s)
The Your Kindle(s) section lists all the Kindles registered to your Amazon account. Although there is no limit to the number of Kindles you can register to a single Amazon account, you can share books with only up to six Kindles registered to the account. Sharing content between multiple Kindles does not extend to subscription content. In other words, if you subscribe to a newspaper, magazine, or blog for one Kindle, that subscription cannot be shared with other Kindles on your account.
Tip
If you have more than one Kindle or if you have the Kindle application on another device, you can select which device you want to send files to when you use Your Media Library or when you purchase content in the Kindle Store.
Your Computer and Other Mobile Device(s)
If you have registered the Kindle application on a computer or a mobile device, it is listed on the Manage Your Kindle page.
Your Kindle-Approved Email List
When you register a Kindle, you are given a Kindle email address. You can email files to your Kindle email address, and they are automatically converted for you and transferred to your Kindle over Whispernet.
There’s a charge (currently 15 cents per megabyte in the United States and 99 cents per megabyte outside of the United States) for sending converted documents directly to your Kindle, so to prevent unauthorized people from sending mail to your Kindle email account, only those people you have approved can send mail to your Kindle email address. You can add new approved emails in this section. (You can convert documents for free using your name@free.kindle.com email address, but those items are made available via a download link sent to you in email rather than being sent directly to your Kindle.)
Tip
If you send a PDF document to your Kindle, Amazon can transfer it to your Kindle in PDF format. If you’d like for Amazon to convert the PDF to the Kindle’s native format, enter Convert as the subject of the mail.
You might want to convert a PDF to the Kindle’s native format if the native PDF format isn’t formatted well for reading on the Kindle.
Your Personal Document Charge Limit
Amazon charges 15 cents per megabyte within the United States and 99 cents per megabyte outside of the United States when you send personal documents to your Kindle email address for conversion. By setting a personal document charge limit, you can ensure that charges for this service don’t exceed the specified amount.
The limit that you specify here is a per document limit.
Your Default 1-Click Payment Method
Purchases in the Amazon Kindle Store are completed using Amazon’s 1-Click. Before you can buy content from the Kindle store using your Kindle, you have to enter a credit card to be used with 1-Click.
You can edit the payment method by clicking Edit. The credit card you enter here must be issued by an institution located in the United States.
Tip
If you have current subscriptions on your Kindle, the payment method on those subscriptions is not automatically updated when you change your 1-Click payment method. To change subscription payment methods, you need to edit the individual subscription.
Your Country
Your Kindle is associated with the country in which you live. If you move to another country, you can change the country associated with your Kindle by clicking the Edit link in the Your Country section.
Your Active Kindle Subscriptions
Subscriptions to magazines, newspapers, and blogs are managed in Your Active Kindle Subscriptions section. If you want to cancel a current subscription, click the Cancel Subscription link. This is currently the only way to cancel a Kindle subscription.
You can also edit a subscription’s payment method in this section.
Open Orders
Your orders that have not yet been completed display here. In my experience, no orders ever appear in this section.
Your Orders
Amazon maintains a full list of all the Kindle content you’ve purchased. You can view an order summary page for any of these items in the section Your Orders and Individual Charges section by clicking the plus sign next to an item and then clicking View Order Details on Amazon.com. You can see when the item was purchased, and you can print an invoice for the item from the order summary page. Amazon also provides a direct link to Your Media Library on the order summary page.
You can send an item to your Kindle or to the Kindle application installed on another device by selecting your device from the Deliver To drop-down.
Your Individual Charges
This section lists any charges incurred for document conversion and sending documents directly to your Kindle via Whispernet. Amazon also charges for access to Whispernet if you access content overseas, and those charges appear in this section.
Tip
For full information on what fee-based services Amazon provides, see http://www.amazon.com/gp/help/customer/display.html?nodeId=200505540.
Manage Synchronization Between Devices
To manage Whispersync between your devices, click the Manage Synchronization Between Devices link. Amazon provides guidance on when you might want to turn synchronization off. In my experience, it’s often easier to manually control Whispersync using the Sync to Furthest Page Read menu item on the Kindle or other device, but if you want Whispersync to keep your devices synchronized automatically, you need to leave synchronization turned on.
Transferring Files To and From Your Kindle
The easiest method of transferring files to your Kindle is to send them to your Kindle email address. This technique not only transfers them to the Kindle, but also converts them if necessary. However, you might not always have access to Whispernet. In those cases, you need to transfer the files using the USB cable that came with your Kindle.
Tip
The Kindle uses a micro-USB cable instead of the typical mini-USB cable that most USB devices use.
To transfer files to your Kindle using the USB, simply insert the small plug of the USB cable into the Kindle and the larger plug into the USB port on your computer. You don’t need to turn off the Kindle first.
After you plug in the USB cable, the Kindle switches into USB mode, and a new drive appears on your computer. Depending on your computer settings, you might see a pop-up dialog asking you what you want to do with the new drive. If not, you can open My Computer or Windows Explorer and browse the drive.
You can transfer files to and from your Kindle by simply dragging and dropping them. For example, if you want to copy a book you’ve converted to your Kindle, drop it into the Documents folder on the Kindle.
After you finish transferring your files, simply unplug the USB cable from your computer and the Kindle. You might see a faint remnant of the screen that was shown on the Kindle when it was in USB mode. This is normal and disappears when you begin using the Kindle and the screen refreshes.
Note
You can also transfer eBooks to and from your Kindle using Calibre. For information on doing that, see “Using Calibre” later in this chapter.
Organizing Kindle Content
Your eBook library can quickly become cumbersome without some means of organizing your content. Books on your Kindle are easily organized using collections. Books you’ve obtained from third-party sources (and are, therefore, not available in Archived Items) are best organized using Calibre. In this section, you learn how to use both of these powerful organization tools.
Using Collections
Collections provide a means of categorizing the books on your Kindle. You can think of collections as folders into which you can place nonsubscription Kindle content so that you can easily locate what you want to read. However, unlike what you would expect with folders, an item can be placed into more than one collection. For example, you might place a book into a collection called Novels and in another collection called Fiction. By enabling you to add an item to multiple collections, Amazon has provided a flexible and powerful organization tool for the Kindle.
To create a new collection, select Create New Collection from the Home screen menu. Enter the name you’d like to use for your collection and then click Save. Your new collection now appears on the Home screen.
Tip
When you create your first collection, your Kindle switches to sorting the Home screen by collections. This causes all collections to appear first on the Home screen.
To add an item to a collection, use the 5-way to underline the item; then press the 5-way to the right. Select Add to Collection, highlight the desired collection, and select Add to This Collection. (You also have the option to create a new collection from this screen.)
To remove an item from a collection, use the 5-way to underline the collection; then press the 5-way to open the collection. Underline the item you want to remove, and press the 5-way to the left. Choose Remove from Collection to remove the item from the collection.
You can also add multiple items to a collection and remove multiple items from a collection following these steps.
- Using the 5-way, move the underline to the collection you want to edit, and press the 5-way to the right to display the Collection Details Page.
- Select Add/Remove Items.
- Move the 5-way to underline the item that you want to add or remove.
- Select Add to This Collection to add an item and Remove from This Collection to remove an item, as shown in Figure 4.2.
Figure 4.2. The Add/Remove screen.
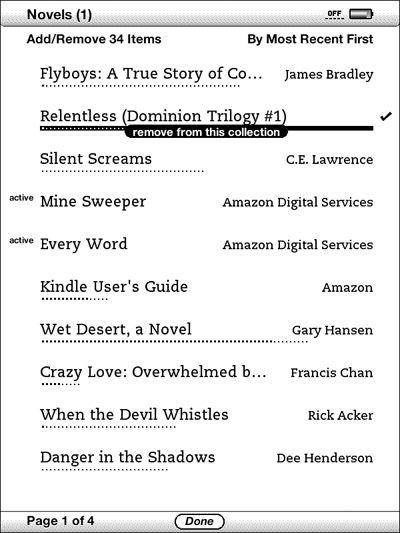
- Select Done at the bottom of the screen to finish editing the collection.
When in the Add/Remove screen, a check mark appears to the right of items that have been added to the collection.
Tip
You can rename or delete a collection from the Collection Details Page by selecting Rename Collection or Delete Collection. Deleting a collection does not delete the books within that collection. It simply returns them to the Home screen.
Using Calibre
As you’ve seen, Amazon provides some great tools for managing eBooks that are in your Amazon library, but you’ll likely have plenty of eBooks that were downloaded from places other than Amazon. Several tools are available for managing these eBooks, but the best by far is a free application called Calibre.
Tip
You can download Calibre for your PC, Mac, or Linux computer by browsing to www.calibre-ebook.com.
Calibre enables you to do all the following.
• Catalog your eBook library.
• Edit the title of your eBooks or author name.
• Easily download cover graphics for your eBooks.
• Convert eBooks into a format suitable for your Kindle.
• Transfer eBooks to and from your Kindle using USB.
When you first launch Calibre, it creates an eBook catalog in a folder on your computer. When you add books to your Calibre library, it adds them to your catalog and displays them in the Calibre interface.
Tip
Calibre also asks you to specify your eBook device when you first launch it. Be sure to select the Kindle so that Calibre will be configured for use with your Kindle.
Calibre uses metadata to display information about the books in your library. The metadata for a book contains the title, author name, publisher, where to find the cover image, and so on.
Editing Metadata
Some eBooks may contain incorrect metadata. For example, the author name may not be correct or may be missing entirely. It’s helpful to edit the metadata in such cases so that the eBook displays properly on your Kindle’s Home screen.
To edit the metadata for an eBook, select the eBook in Calibre, and click the Edit Metadata button on the Calibre toolbar to display the Edit Meta Information dialog, as shown in Figure 4.3.
Figure 4.3. Calibre’s Edit Meta Information Dialog.

In some cases, you can automatically populate the metadata by clicking the Fetch Metadata from Server button in Calibre’s Edit Meta Information dialog. If Calibre cannot locate information on your eBook automatically, you can manually enter the information into the Edit Meta Information dialog.
Tip
Removing an eBook’s ISBN number from the metadata often give you better results when attempting to automatically populate metadata because the same book may have been published by a different publisher under a different ISBN number.
You can also download a cover graphic for your eBook by clicking the Download Cover button. If a cover cannot be found, you can manually add one by clicking the Browse button and selecting a cover image. You can also have Calibre automatically generate a generic cover by clicking the Generate Cover button.
Converting eBooks with Calibre
Calibre can convert eBooks to and from most popular eBook formats, including the MOBI format, the format most suitable for use on your Kindle. Calibre can automatically convert eBooks if necessary when you transfer them to your Kindle, but you can also manually convert eBooks.
To manually convert books using Calibre, select one or more books in your library, and click the Convert Books button on the toolbar. Select the output format using the drop-down in the upper-right corner of the Convert dialog (select MOBI for books you want to transfer to your Kindle) and click OK to start the conversion.
While Calibre is converting your books, it displays a rotating cursor in the lower-right corner of the main dialog. It also displays the number of jobs currently in the queue. If you want to see a status of all the Calibre’s jobs, click the rotating cursor.
Note
If you selected the Kindle as your device when you first launched Calibre, it automatically selects MOBI for you.
Calibre has many options available when converting books. You can leave all the options set to the default value, and everything will work fine for your Kindle. However, if you want to learn more about all the available options, read the Calibre Quick Start Guide automatically included in your Calibre library, or click the Help button on the toolbar to display the Calibre documentation.
Transferring Books with Calibre
You can use Calibre to transfer eBooks to and from your Kindle. If you transfer a book that isn’t already converted to a format suitable for the Kindle, Calibre automatically converts it prior to transferring it to your Kindle.
To transfer eBooks to your Kindle, launch Calibre and plug your Kindle into your computer using the USB cable. Select the eBooks that you want to transfer to your Kindle, and click the Send to Device button. Calibre adds the transfers to the jobs queue and begins the process of converting (if necessary) and transferring your eBooks. You can see a status of the transfer process by clicking the rotating cursor in the lower-right of the Calibre interface.
Calibre can also transfer eBooks from your Kindle to your computer. If you click the Device button on the Calibre toolbar, you can see a listing of all the eBooks on your Kindle. If you select an eBook and click the Save to Disk button, Calibre copies the eBook to your computer.
Tip
Calibre doesn’t enable you to save an eBook directly from your Kindle into your Calibre library. If you want to add an eBook on your Kindle to your Calibre library, first save the eBook to another folder on your computer, and then use the Add Books button in Calibre to add it to your library.
You can add eBooks that you purchase from the Kindle Store to your Calibre library. You might want to do this to keep a local backup copy of the eBook. You can also use Calibre to edit the metadata of an eBook you purchased from the Kindle Store. You can then transfer the eBook from your Calibre library back to your Kindle. However, if you later remove the eBook from your device and then restore it from Archived Items, you’ll be restoring the original eBook and not the copy that was edited using Calibre.
Calibre has a lot more functionality than what is covered here, so you should to review the Quick Start Guide and view the online documentation. If you find Calibre to be useful, you can donate to Calibre’s developer by clicking the Heart button on the toolbar.