Chapter 6: VBA Language Elements
Visual Basic for Applications (VBA) has its origins in Visual Basic, a programming language developed by Microsoft. It is important to understand that VBA is not a standalone program, meaning that you cannot compile code and run it as a separate program outside the MS Office environment.
Its main reason for existence is the customization of the MS Office host applications in which it runs: Word, Excel, Access, PowerPoint, Visio, and Publisher. Companies such as Corel also make use of VBA to allow customization of their applications.
Customization involves the recording and creating of macros to automate repetitive tasks. It is also used to generate custom forms, including event-driven buttons and fields.
Like any language, you need to understand the structure of VBA, which is a programming language. It starts with vocabulary. From there, you learn what effects certain words, also known as commands, will have. The more you use the language, the better you understand it. So, if you want to use VBA to its full potential, this chapter will empower you, in every sense of the word, in doing the following:
- Adding comments
- Declaring variables
- Declaring constants
- Working with data types in variables and constants
- Scoping variables
- Declaring arrays
By the end of this chapter, you will be able to use VBA language elements.
Technical requirements
This cookbook was written and designed to be used with MS Office 2019 and MS Office 365, installed on either Windows 8, 8.1, or 10. If your hardware and software meet these requirements, you have everything you need.
Demonstration files can be downloaded from https://github.com/PacktPublishing/VBA-Automation-for-Excel-2019-Cookbook.
Please visit the following link to check out the CiA videos: https://bit.ly/3jQRvVk.
Adding comments
In this recipe, we will be working with comments. Before we start, you need to understand three important principles about comments:
- VBA code does not depend on comments, meaning that macros will run flawlessly without a single comment.
- At the same time, comments are an important and often-ignored element in code.
- The most important reason why you need to leave comments in code is two-fold.
Comments, or notes, serve as a reminder to yourself. You sometimes create complex sequences for a client, save the file, and move on. When you later see that macro again and need to make adjustments, you will be shocked to realize how little you remember of the thinking process you went through to create that macro.
Comments also serve as an explanation for someone else that might have to amend your coding. Instead of trying to waste time on trying to figure out your thought process, comments make a world of difference for that person.
- Finally, when you record a macro, certain comments will be inserted automatically, courtesy of the VBA recorder. However, nothing prevents you from adding extra comments.
Getting ready
Open Excel and make sure that Book1 is active. Save the file as Comments.xlsm.
How to do it…
Let's start with the steps:
- Enter the following data in Book1, Sheet1:

Figure 6.1 – Sample data
- Next, record a new macro with the following specifications:
a. Call the macro Comments.
b. Add a shortcut key: Ctrl + Shift + Q.
c. In the Comments section, type Demonstrate the use of comments.
d. Format cells A1:E1 as bold, 12pt, and center.
e. Format cells A2:E7 as Accounting.
f. For cells A7:E7, add a single line to the top and a double line at the bottom.
g. Select cell F1 before stopping the recording.
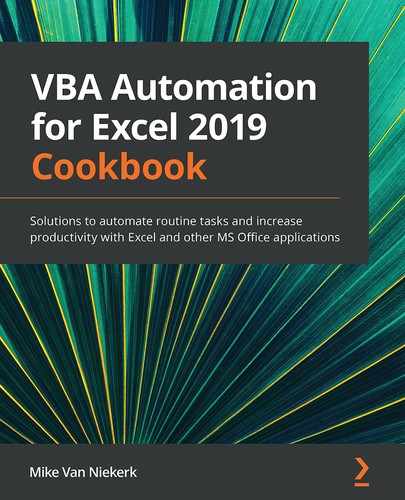
- Switch to the VBA Editor to view the code. After deleting the redundant lines, your code should look like this:
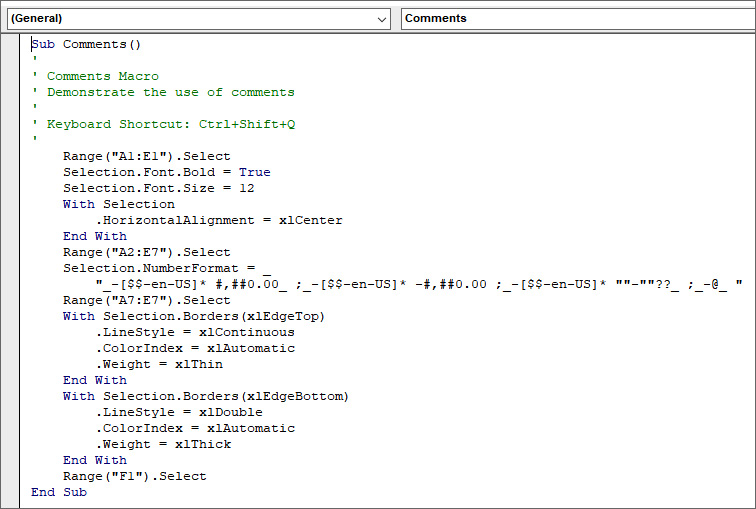
Figure 6.2 – Auto-inserted comments
The first six comments were automatically added during the recording of the macro.
- Add extra comments, as per the following example:

Figure 6.3 – Manually inserted comments
How it works…
When recording a macro, the VBA Editor will insert some comments automatically. Extra comments can be added manually. Start a comment by first inserting the single apostrophe symbol ('). The VBA Editor will not interpret text following the apostrophe as code.
Comments can be inserted anywhere you want in either of the following ways:
- As a line of text before the VBA code
- As an added comment after a line of code
- After the last line of code
There is an exception to this rule, however. You cannot insert a comment in the middle of a line of code, because the apostrophe will cancel out all the code following it.
Declaring variables
Before confusing you with the definition of what a variable is, it helps a lot to first understand where and how variables can be used. Let's use the following example.
Imagine you are capturing data on a standard Excel spreadsheet. The fields expect users to enter their name, the department they work in, and age, all on Sheet1 of a workbook. The captured data must then be stored on a separate sheet, most likely Sheet2 of the same workbook.
The longest, most difficult way of doing that would be to copy the data from Sheet1 and paste it manually into Sheet2. It is quite clear that automation would save a lot of time.
The question is how to achieve this automation. Without some way of automatically copying and then storing that data somehow, somewhere, and then pasting it in the new position, you will never get around to doing any other work than just that.
Automation would be something like the following. You enter your details on Sheet1, and then run a macro to copy the details in order to automatically populate the table on Sheet2. Enter data, copy and store, then paste—all in one action!
The problem here is how to copy and store the entries from Sheet1. That is where variables come in. A variable is simply a line of VBA coding with the purpose of storing information on a temporary basis. This stored information can be accessed repeatedly while the Excel file is open, but is not stored when the application is closed.
There is a lot more to be said about variables, such as naming conventions, data types, and scope, but more about that later.
In this recipe, we will be declaring and using variables.
Getting ready
Open Excel and make sure that Book1 is active.
How to do it…
The steps to create or declare a variable are as follows:
- With Sheet1 active, enter the following data:
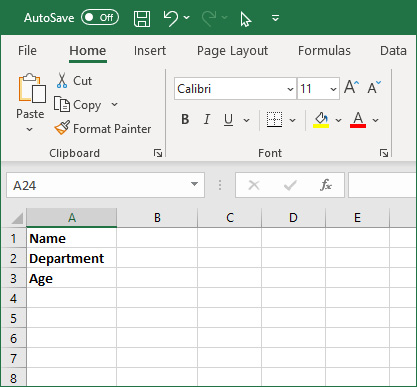
Figure 6.4 – Headings on Sheet1
- Insert a new sheet, Sheet2, then enter the following data:
Figure 6.5 – Headings on Sheet2
- Save the workbook as a macro-enabled file. Call it Variables.xlsm.
- Activate the VBA Editor with Alt + F11 or click on Developer | Code | Visual Basic.
- In the editor, click on Insert | Module to create a new module in Variables.xlsm.
- In the code window for Module1, create a new Sub procedure called Form_Data:
Sub Form_Data()
End Sub
- Next, declare variables for the three values that will be entered on Sheet1 in cells B1, B2, and B3:
Sub Form_Data()
Dim Name As String
Dim Dept As String
Dim Age As Integer
End Sub
We will discuss data types in the next recipe.
- The variables have been named, but are still empty. Let's assign a value to each by setting it equal to the values in cells B1, B2, and B3:
Sub Form_Data()
Dim Name As String
Dim Dept As String
Dim Age As Integer
Name = Sheet1.Range("B1").Value
Dept = Sheet1.Range("B2").Value
Age = Sheet1.Range("B3").Value
End Sub
- The final step is to transfer the captured data from Sheet1 to Sheet2. Type the following code:
Sub Form_Data()
Dim Name As String
Dim Dept As String
Dim Age As Integer
Name = Sheet1.Range("B1").Value
Dept = Sheet1.Range("B2").Value
Age = Sheet1.Range("B3").Value
Sheet2.Range("A2").Value = Name
Sheet2.Range("B2").Value = Dept
Sheet2.Range("C2").Value = Age
End Sub
- To test the macro, enter data on Sheet1, in cells B1, B2, and B3. You can type any values you want, but for the purpose of this exercise, I am adding the following:

Figure 6.6 – Data on Sheet1
- Run the macro by clicking Developer | Code | Macros. From the Macro dialog box, select the only macro, Form_Data, then click on Run.
- Switch to Sheet2 and confirm that the values from Sheet1 have been placed on Sheet2.
How it works…
Let's have a look at what happened in the background for these variables to work the way they did:
- Press Alt + F11 to activate the VBA Editor.
- With the VBA Editor open, click View | Locals Window:

Figure 6.7 – Activate the Locals window
The Locals window will be visible at the bottom of the application:

Figure 6.8 - The Locals window
- We're going to use the Step Into functionality in the VBA Editor to see how each line is executed. Click on the first line of code in the code window, then click Debug | Step Into (note that the keyboard shortcut is F8).
- The first line of code is now highlighted in yellow. At the same time, in the Locals window at the bottom, the three variables are displayed. Only the names and data types are displayed because we have not assigned any values to them:
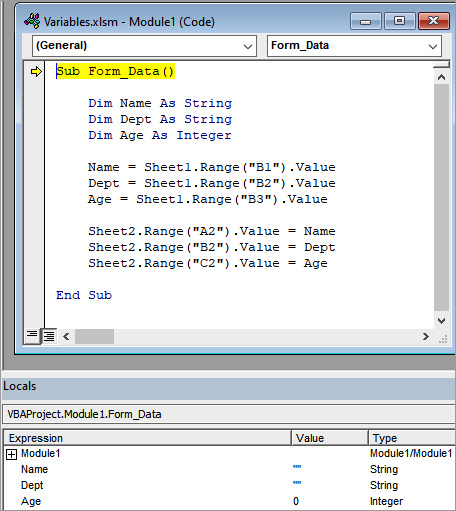
Figure 6.9 – Step Into
- By pressing F8, the next line of code is highlighted:
Name = Sheet1.Range("B1").Value.
Take note that variables are not executable code but containers for data. There are no changes in the Locals window either because the highlighted line has not been executed yet.
- Press F8 again. This time, the first line of code is executed. Proof of that can be found in the Locals window, where the Sue text value, found in cell B1, is displayed after the Name variable.
- At the same time, the next line of code is highlighted:
Dept = Sheet1.Range("B2").Value
- When you press F8 again, the value in cell B2 is assigned to the Dept variable, and the next line of code is highlighted:
Age = Sheet1.Range("B3").Value
- Pressing F8 will execute this line, assigning the value in cell B3 to the Age variable:
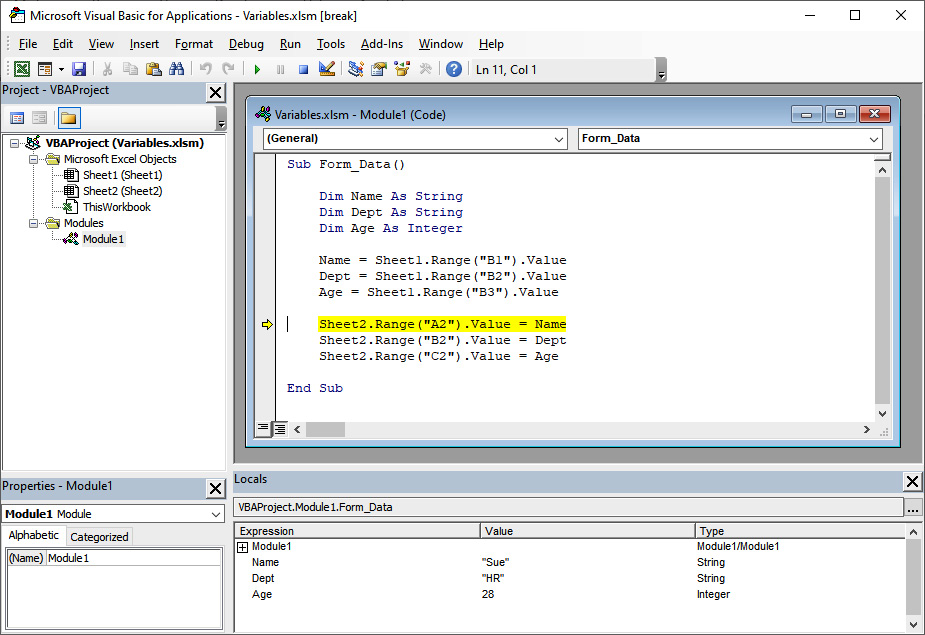
Figure 6.10 – Values assigned to variables
- The following line is now selected:
Sheet2.Range("A2").Value = Name
When we press F8 next, it will take the value Sue, which has been assigned to the Name variable, and place it in cell A2 of Sheet2.
- The next line is now selected:
Sheet2.Range("B2").Value = Dept
As with the previous line, the next variable, Dept, with the value HR assigned to it, will be placed on cell B2 of Sheet2.
- The last line is now selected:
Sheet2.Range("C2").Value = Age
The last variable, Age, with the value 28 assigned to it, will be placed in cell C2 of Sheet2.
- By pressing F8 for the very last time, the procedure is ended, and the Locals window is cleared of all variable data. That is in line with the definition of a variable being a temporary storage space.
- If you go back to Sheet1 now, you can type different values into cells B1, B2, and B3. By running the macro again, these new values will be assigned to the variables and placed on Sheet2.
The coding in this example can be improved upon because the macro will simply overwrite the values on Sheet2. In later recipes, we will write code to find the first open line under the data in Sheet2 and place it there.
Declaring constants
If a variable is a line of VBA coding with the purpose of storing information on a temporary basis, a constant is a line of coding that stores information on a permanent basis.
Let's work with a practical example again.
Doing calculations in Excel is easy; you use a function or a formula and the problem is solved. But let's say you have to calculate the tax for products sold in a store on a daily basis. The data is not only on one spreadsheet, and people often randomly ask you to do these tax calculations.
As simple as it is to add a short formula, this is a waste of time. If you could click on a button with a macro assigned to it to do the calculation for you automatically, it would make your life much easier.
The tax rate can be stored as a permanent value in a constant and, depending on the VBA code, you can click on a cell and run the macro to calculate the tax for that specific item.
Getting ready
Open Excel and make sure that Book1 is active.
How to do it…
The steps to declare a constant are the following:
- With Sheet1 active, enter the following data:

Figure 6.11 – Entries on Sheet1
- Save the workbook as a macro-enabled file. Call it Constants.xlsm.
- Activate the VBA Editor with Alt + F11 or click Developer | Code | Visual Basic.
- In the Editor, click Insert | Module to create a new module in Book1.
- In the code window for Module1, create a new Sub procedure called Tax:
Sub Tax()
End Sub
- Next, declare a constant for the tax percentage that must be added to a price:
Sub Tax()
Const Tax As Double = 0.1
End Sub
By typing Const, VBA will treat this line of code as a constant. After this keyword, we type the name of the constant – in this case, Tax. The data type is Double. Most importantly, the value for the constant is added in the same line.
- Once done, enter the last line of code:
Sub Tax()
Const Tax As Double = 0.1
ActiveCell.Value = ActiveCell.Offset(0, -1) * Tax
End Sub
- To test the macro, switch back to Sheet1 by pressing Alt + F11.
- Click on cell B2 on Sheet1.
- Run the macro by clicking Developer | Code | Macros.
- There is only one macro available: Tax. Click Run.
The calculated value appears in cell B2.
How it works…
Here is an explanation for each step as the macro was executed:
- Press Alt + F11 to activate the VBA Editor.
- Make sure that the Locals window is still active in the VBA Editor.
- The Step Into function will take us through the execution process again. Click on the first line of code and press F8:
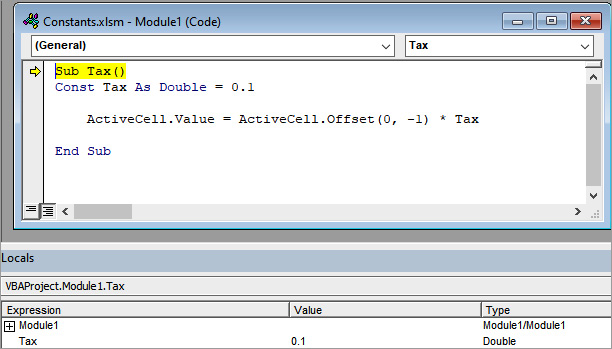
Figure 6.12 – Step Into
- The first line of code is active and highlighted in yellow. The Locals window shows us that the value 0.1 has been assigned to the Tax constant. Press F8 again.
- The constant is not highlighted, but the next line is. This line of code is what will make things happen on Sheet1.
- Cell B2 is the active cell on Sheet1. The value we want to appear in that cell must be equal to the cell directly to the left, multiplied by 0.1, or 10% – the constant. The Offset values, (0,-1), mean move 0 rows down and one column to the left.
- By pressing F8, the code is executed and the calculated value appears in the active cell, cell B2.
There's more…
By clicking on another open cell, cell B3, you can run the macro again, this time without using Step Into:
- Activate Sheet1 and click on cell B3.
- Run the Tax macro and observe the calculated value appear in B3.
To speed things up, you can add a button to Sheet1 and assign the Tax macro to it:
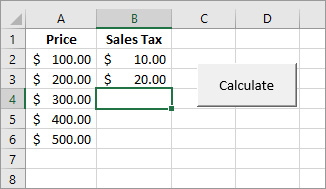
Figure 6.13 – Button with assigned macro
This way, it will be much easier to run the macro in order to do the calculations.
Working with data types in variables and constants
In this recipe, we will be investigating the different data types you can assign to variables and constants.
Getting ready
Open Excel and make sure that Book1 is active, and save the file as DatTypes.xlsm. Open the VBA Editor by pressing Alt + F11. In the VBA editor, click Insert | Module to create a new module in Book1. On the menu bar, click View | Locals Window, if the Locals window is not already active.
How to do it…
- In the code window for Module1, create a new Sub procedure called Data_Types:
Sub Data_Types()
End Sub
- Once done, declare the following variables. Ensure that the data types are added exactly as per the example:
Sub Data_Types()
Dim Small As Byte
Small = 75
Dim Big As Integer
Big = 3333
Dim Large As Long
Large = 800011100
Dim Yes As Boolean
Yes = True
Dim Dec As Double
Dec = 3.14159
Dim Text As String
Text = "MyName"
Dim DOB As Date
DOB = #12/25/1990#
Dim Price As Currency
Price = 24.55
'Variant
Dim Name
Name = Range("A1")
End Sub
- With everything done, press F8 to step into the procedure.
- The first line is highlighted, and all the variables are recognized in the Locals window.
- Press F8 repeatedly to step through each variable declaration. Observe how each variable's value is assigned, and how the data type affects the value.
How it works…
It is important to assign data types to variables because it helps your code run faster, and also because memory is allocated more efficiently. In simple English, it means that you will be wasting memory if, for instance, you assign a Long data type if you could get away with an integer.
The following table explains the size of data types:


Table 6.1 – Data types and sizes
As a final remark, you need to understand that you can declare a variable without a data type. However, by doing that, VBA will automatically assign the Variant data type to that variable. An integer would have used 2 bytes of memory, while a variant would grab a minimum of 16 bytes per entry.
Make sure that you have a good understanding of this table and get into the good habit of always assigning data types.
Scoping variables
In this recipe, we will be working with the range of effect, or scope, of variables.
Whenever you declare a variable in a module, you would expect that variable to at least have an effect within that module. You can also say you would expect your macro to work on the sheet where you created the macro, at the very least.
What has not been said before is that a workbook can accommodate any number of VBA modules and a module can accommodate any number of Sub and Function procedures. This information is merely academic.
This knowledge becomes important when you have more than one procedure in a module, several modules in the workbook, and more than just one worksheet in a workbook. The questions are: which macro will have an effect in which module, and is it possible for one macro to work in more than one module, or even in several sheets?
All depending on what you want to achieve with your macro, you can set the scope of a procedure with certain keywords. Let's see what those keywords are.
Getting ready
Open Excel and make sure that Book1 is active. Save the file as Scope.xlsm. Open the VBA Editor by pressing Alt + F11. In the VBA editor, click Insert | Module to create a new module in Book1.
How to do it…
- In the code window, declare the following procedure-only variables:
Sub Proc_Level()
Dim Distance As Integer
Dim Number As Long
Dim Fraction As Double
Dim Name As String
End Sub
- Take note that more than one variable, as in the following example, can be declared with a single Dim statement:
Sub Proc_Level2()
Dim Distance As Integer, Number As Long, _
Fraction As Double, Name As String
End Sub
- If a line of code is too long, you can insert a line continuation character, which is an underscore (_). A line continuation character will only work if you insert a space immediately before it and press Enter immediately afterward.
- Insert a new module. To declare module-level variables, make sure that you declare all variables before the module's first Sub or Function statement:

Figure 6.14 – Module-level variables
- To check the scope of these variables, click on the Sub procedure and press F8. The declared variables do not appear in the Locals window in the usual way; you have to click on the + sign to the left of Module1 to expand the contents. This is an indication that these variables are available in every procedure throughout the module.
- Insert yet another module. Public variables, also referred to as global variables, are declared by using the Public keyword:
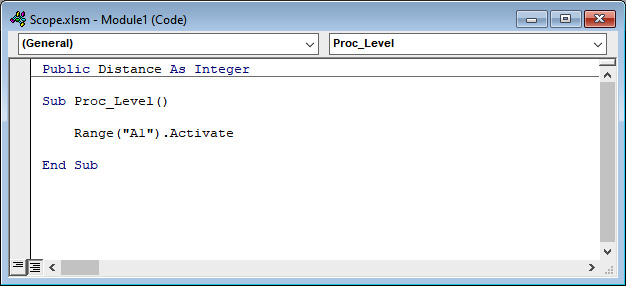
Figure 6.15 – A public-level variable
This variable will be available in all procedures and all modules of the workbook.
How it works…
- Procedure-only variables have the lowest level of scope for a variable. In other words, they can only be used in the procedure that they were declared. It is also important to understand that this type of variable will no longer exist once the procedure ends. However, when you execute the procedure again, it will become active again but with a new value, because the previous value was cleared from memory.
- Module-only variables are used in a situation where you want one or more variables to be available to all procedures in a module. It saves a lot of coding to declare variables this way. The alternative would be to declare the same variables repeatedly in every procedure of that specific module.
- Public variables are also known as global variables, indicating their scope. Like module-level variables, they must be declared before the first Sub procedure. The difference is that you need to use the Public keyword to indicate its status and the Dim keyword is not used.
Declaring arrays
Arrays are variables of a specific type. While a variable can store only one value at a time, arrays store multiple values, or elements. An array is therefore a group of variables sharing a common name. One example of an array would be the days of the week typed in a single column in Excel.
Like variables, arrays are also declared with a Dim statement. The rest of the line of code differs in the sense that with arrays, you have to specify the number of elements in the array.
In its simplest form, the elements consist of a first and last index number, separated with the To keyword, all in parentheses. This is known as a one-dimensional array, which stores a single line of values. Multidimensional arrays stores multiple rows and columns of values.
In this recipe, we will be discussing three types of arrays:
- One-dimensional arrays
- Multidimensional arrays
- Dynamic arrays
Getting ready
Open Excel and make sure that Book1 is active. Save the file as Arrays.xlsm.
On Sheet1, enter the days of the week in cells A1 to A7.
Open the VBA Editor by pressing Alt + F11. In the VBA editor, click Insert | Module to create a new module in Book1.
How to do it…
To create a one-dimensional array, do the following:
- Start by creating a new Sub procedure called StatArray:
Sub StatArray()
End Sub
- Next, declare a variable and call it WeekArray:
Sub StatArray()
Dim WeekArray(0 To 2) As String
End Sub
When you declare a variable, it is not always necessary to declare both the upper and lower index of the elements. The following declaration would mean exactly the same as the preceding one:
Dim WeekArray(2) As String
In this case, VBA assumes that 0 is the lower index. It must be mentioned that it is more reliable to declare both elements, though.
- Let's now populate the array:
Sub StatArray()
Dim WeekArray(0 To 2) As String
WeekArray(0) = Range("A1").Value
WeekArray(1) = Range("A2").Value
WeekArray(2) = Range("A3").Value
End Sub
- To demonstrate how to read from an array and write values to cells, add code to create a new worksheet. Then, pass the array values to cells A1 to A3 on the new sheet. Type the following code:
Sub StatArray()
Dim WeekArray(0 To 2) As String
WeekArray(0) = Range("A1").Value
WeekArray(1) = Range("A2").Value
WeekArray(2) = Range("A3").Value
Worksheets.Add.Activate
Range("A1").Value = WeekArray(0)
Range("A2").Value = WeekArray(1)
Range("A3").Value = WeekArray(2)
End Sub
Populating an array like this, with only three values in it, can easily be done manually. However, when you want to work with an array with hundreds, or even thousands, of values, this technique will clearly not be effective.
In a future recipe, where we will be explaining loops, this problem will be addressed. With loops, you can write code that can handle any number of elements in an array.
For a multidimensional array, do the following:
- Switch to Excel. Insert a new sheet, then enter the following data:
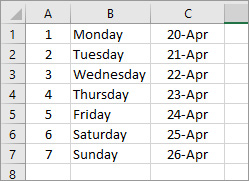
Figure 6.16 – Multidimensional array
- Switch back to the VBA Editor by pressing Alt + F11. In the VBA editor, create a new Sub procedure under the existing one:
Sub MultiArray()
End Sub
- Declare a multidimensional array:
Sub MultiArray()
Dim TableArray(0 To 6, 0 To 2) As Variant
End Sub
- We are only going to populate the first row. Type the following code:
Sub MultiArray()
Dim TableArray(0 To 6, 0 To 2) As Variant
TableArray(0, 0) = Range("A1").Value
TableArray(0, 1) = Range("B1").Value
TableArray(0, 2) = Range("C1").Value
End Sub
- Open the Locals window by selecting View | Locals. Press F8 to step into the procedure. Observe how only the values in row one are assigned.
Populating the rest of the rows can be done in the same manual way, but creating loops would once again be much more effective.
Declaring dynamic arrays
So far, we've been working with static or fixed arrays. In other words, we knew how many rows and columns there were in the Excel sheet and did not expect it to change. But what do we do if the data is not fixed? Let's say users have access to the data and have to add details. The ideal would be to use an array where the size can be changed while a program is running. That, by definition, is what a dynamic array is.
To declare a dynamic array, you simply leave the parentheses empty:
Dim MyDynamic () as Integer
Take the following steps:
- Create a new Sub procedure and declare a dynamic array:
Sub DynamicArray()
Dim Days() As String
End Sub
- To define the number of elements in the array, use the ReDim statement. In this case, use the value 6 to include all 7 entries in the column:
Sub DynamicArray()
Dim Days() As String
ReDim Days(6)
End Sub
How it works…
By going through the steps for a one-dimensional array as they are executed in the VBA Editor, the process will become clear:
- With the VBA Editor open, press F8. The three elements of the array will be displayed in the Locals window, although without values:

Figure 6.17 – Array elements
- Press F8 another four times, and observe how the values on cells A1 to A3 are assigned to the array elements:

Figure 6.18 – Assigned values
- Press F8 yet again to add a new worksheet. Then, press it another three times to write the values of elements WeekArray(0) to WeekArray(2) to cells A1 to A3 on the newly inserted worksheet.
- By pressing F8 one last time, the Sub procedure will end, and all the values of the array will be cleared.
The steps for a multidimensional array can also be observed in the Locals window:
- While you are still working in the VBA Editor, and with the Locals window active, press F8. In the Locals window, expand the first two objects – TableArray and TableArray(0):
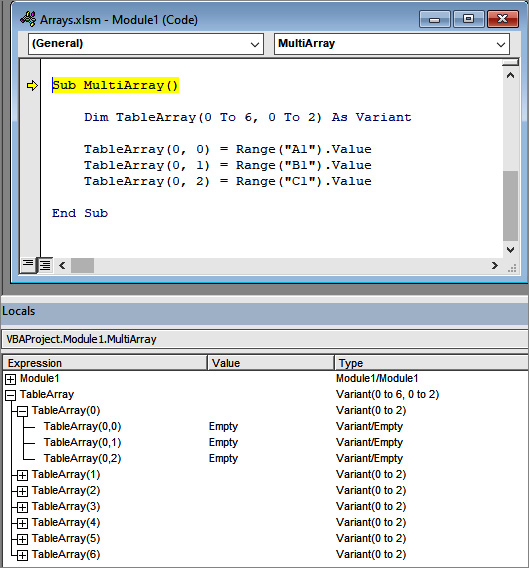
Figure 6.19 – Multiple arrays
- Press F8 four times until the first elements of the array have been populated.
Once again, populating the rest of the row manually will become more and more laborious and time-wasting. In the Using Loops recipe in Chapter 9, Implementing Program Flow, we will show you how to populate multiple rows with great efficiency.
Dynamic arrays
As with the two fixed arrays, it is best to see how it works in the Locals window:
- When a dynamic array is declared, no values are assigned to the elements.
- Press F8 to step through the code until you get to the End statement:
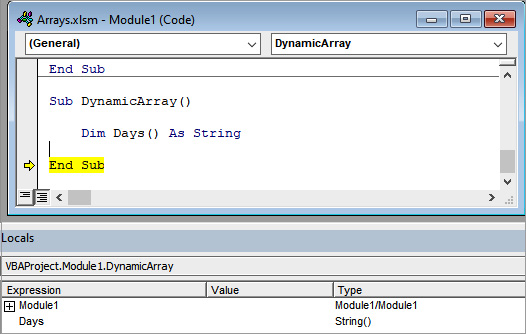
Figure 6.20 – Empty dynamic array
- By using the ReDim statement, you create the requested number of elements:
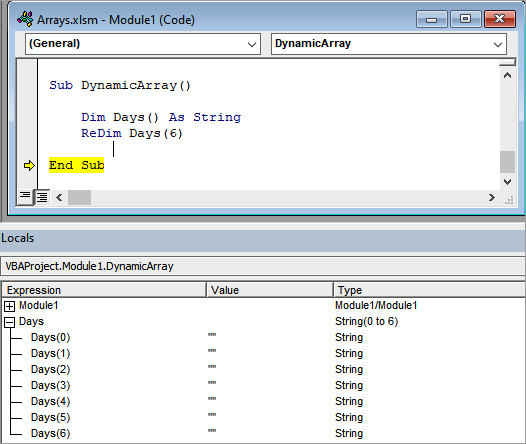
Figure 6.21 – Using the ReDim statement
Where the Days array was previously empty, there are now seven elements added.
We are not going to populate the values because it will be easier to do so with a Loop statement.