Chapter 5: Next Level Recording
Doing a basic recording is simple. There is, however, more to recording a macro than meets the eye. Planning plays a role, and so does relativity. Understanding and using absolute or relative references when recording a macro can make or break your procedure. It is also useful to understand that macro recordings are limited to direct actions taken in a worksheet. Functions, IF statements, loops, and custom dialog boxes, to name a few, cannot be recorded.
Relative referencing in macros opens up a new world of functionality. Most importantly, it allows you to run a macro on specific, chosen cells, instead of being limited to one location. You can, in other words, record a macro starting in cell A1, but when it comes to executing, you can choose the starting cell to be any other cell on the sheet.
In this chapter, we will cover the following recipes:
- Setting the macro recorder for absolute or relative reference
- Recording options
By the end of this chapter, you will be able to record macros with relative or absolute referencing.
Technical requirements
This cookbook was written and designed to be used with MS Office 2019 and MS Office 365, installed on either Windows 8, 8.1, or 10.
If your hardware and software meet these requirements, you have everything you need.
Demonstration files can be downloaded from https://github.com/PacktPublishing/VBA-Automation-for-Excel-2019-Cookbook.
Please visit the following link to check out the CiA videos: https://bit.ly/3jQRvVk.
Setting the macro recorder for absolute or relative reference
In this recipe, we will be working with relative macro recordings.
The default setting for a macro recording is absolute. In simple English, this means that the execution of your macro will always start on the same cell where the recording was done.
With a relative setting, you can record a macro and choose a different starting point when executing the macro. Unlike the absolute reference macro, you are not restricted to a specific range or starting point.
Getting ready
Open Excel and make sure that Book1 is active.
How to do it…
To record a macro in relative mode, do the following:
- Click in cell A1. Activate the Developer ribbon.
- In the Code group, select the Use Relative References option:

Figure 5.1 – The Use Relative Refences option
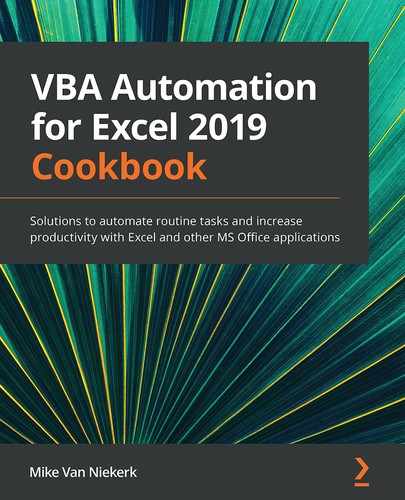
- Still in the Code group, click on Record Macro. The Record Macro dialog box appears:
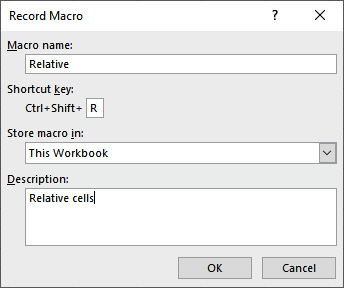
Figure 5.2 – The Record Macro dialog box
- In the Macro name textbox, type Relative. Set the shortcut key to Ctrl + Shift + R, store the macro in this workbook, and add a short description in the bottom textbox.
- Click on OK. You are now in recording mode.
- With cell A1 selected, type Heading and then press Enter.
- Click on the Stop Recording option in the Code group:
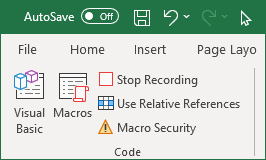
Figure 5.3 – The Stop Recording button in the Code group
How it works…
The steps for recording a macro with relative references are exactly the same as those for a macro with absolute references. The difference will only become evident when we run or execute the macro.
Recording in relative mode means that you can record entering a value in cell A1, but when you run the macro, you can click on any other cell, and whatever you recorded will appear in the selected cell.
Let's see what happens when we run a macro with relative references:
- With Excel open, click in cell D10.
- In the Code group, click on Macros. The familiar Macro dialog box appears.
Since there is only one macro, called Relative, it will already be selected. Click on Run.
- Observe how Heading now appears in cell D10. If the recording was done as an absolute reference, the text would have appeared on A1 again, where it was recorded:
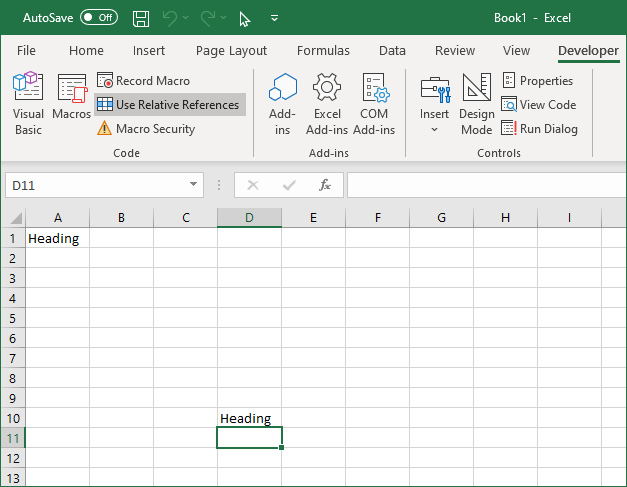
Figure 5.4 – Relative placement
There are many more possible ways of using relative referencing when recording a macro. As long as you understand the principles, you should be able to apply and use it effectively.
Recording options
Whenever we record a macro, there are a number of options to consider. Beyond the choice between absolute and relative references, there are other settings we need to take note of.
In this recipe, we will be looking at different options when recording a macro.
Getting ready
Open Excel and make sure that Book1 is active.
How to do it…
Here are the steps to set options for recording a macro:
- With Sheet1 active, click on Developer | Code | Record Macro. The Record Macro dialog box appears:
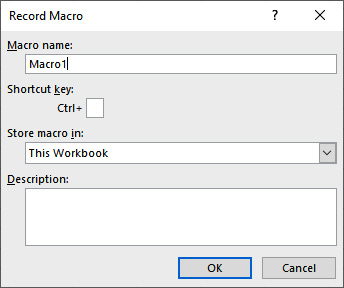
Figure 5.5 – The Record Macro dialog box
- The Macro name, Shortcut key, Store macro in, and Description options can all be changed, based on personal choice and need.
How it works…
The details of each option will now be discussed in the following subsections.
Macro name
All macros must have a name. There is, however, a specific naming convention that we need to follow. Macro names follow these conventions:
- Must begin with a letter
- Must contain only letters, numbers, and underscores
- Cannot contain any spaces
- Should not be the same as cell references, to avoid errors
- Cannot be the same as existing Excel functions or keywords, such as Sum, Average, Copy, and Paste
Shortcut key
You can use any combination of keys in this section. There are certain constraints you should be aware of:
- Try to use unique keyboard shortcuts, such as Ctrl + Q.
- If you use an existing keyboard shortcut for a macro – for example, Ctrl + C – it will override the Copy shortcut in Excel (for that specific worksheet).
- If you run out of keyboard shortcut options using Ctrl, combine it with Shift. Ctrl + Shift + C will not influence any existing shortcuts.
Where to store the macro
You can store the macro in one of three places:
- Personal Macro Workbook: Storing a macro in this location will make it available to multiple Excel workbooks on your PC. The Personal Macro Workbook is a hidden workbook named Personal.xlsb.
- New Workbook: If you select this option, Excel will open a new, blank workbook for you to record and save the macro in.
- This Workbook: Excel will store your macro, by default, in a module in the active workbook. It will be available on all sheets of that workbook, but not for any other Excel workbooks.
Description
The Description box is a good starting point to save comments. You can, of course, also store comments directly in the recorded macro.
The point is that comments are an important and often ignored element in code. You might think that you will remember what you did in a specific procedure, but believe me when I tell you that you do not always remember. You sometimes create complex sequences for a client, save the file, and move on. When you later see that macro again and need to make adjustments, you will be shocked to realize how little you remember of the thinking process you went through to create that macro. Comments will save you a lot of time and frustration.
Finally, if you don't want to leave comments for yourself, think about the possibility of someone else having to amend your coding. Once again, comments would make a world of difference for that person.