
Chapter 7
Manage and Administer Virtual Machines and vApps
VCP5 Exam Objectives Covered in This Chapter:
- Manage Virtual Machine Clones and Templates
- Identify Cloning and Template options
- Clone an existing virtual machine
- Create a template from an existing virtual machine
- Deploy a virtual machine from a template
- Update existing virtual machine templates
- Deploy virtual appliances and/or vApps from an OVF template
- Import and/or Export an OVF template
- Determine the appropriate deployment methodology for a given virtual machine application
- Identify the vCenter Server managed ESXi hosts and Virtual Machine maximums
- Administer Virtual Machines and vApps
- Identify files used by virtual machines
- Identify locations for virtual machine configuration files and virtual disks
- Configure virtual machine options
- Configure virtual machine power settings
- Configure virtual machine boot options
- Configure virtual machine troubleshooting options
- Identify common practices for securing virtual machines
- Determine when an advanced virtual machine parameter is required
- Hot Extend a virtual disk
- Adjust virtual machine resources (shares, limits and reservations) based on virtual machine workloads
- Assign a Storage Policy to a virtual machine
- Verify Storage Policy compliance for virtual machines
This chapter will cover the objectives of sections 4.3 and 4.4 of the VCP5 exam blueprint. This chapter will focus on managing and administering virtual machines and vApps.
This chapter will first cover identifying the cloning and template options, and you will learn how to clone an existing virtual machine. The chapter will also cover how to create a template from an existing VM and how to deploy a VM from a template. Updating existing templates will also be covered. The chapter will cover how to deploy virtual appliances and vApps from an OVF template. How to import an OVF template will also be covered. Determining the appropriate deployment methodology for a given virtual machine application will be covered. The first section of this chapter will end with covering the configuration maximums for ESXi hosts and virtual machines.
In the final section of this chapter, I will identify the files used by virtual machines and the locations for VM configuration files and virtual disks. I will cover configuring virtual machine options, power settings, boot options, and troubleshooting options. I will identify common practices for securing VMs and cover how to determine when an advanced VM parameter is required. The steps to hot extend a virtual disk will be explained. How to adjust a virtual machine's resources based on workload will also be covered. The chapter will end with assigning a storage policy to a virtual machine and verifying VM storage policy compliance.
Managing Virtual Machine Clones and Templates
Virtual infrastructure administrators can use clones and templates to both save time and ensure consistency of deployed virtual machines. Knowing how to manage virtual machine clones and templates is an essential task for any virtual infrastructure administrator. The first topic I will cover in this chapter is identifying cloning and template options.
Identifying Cloning and Template Options
Cloning in vCenter Server is the process of creating an exact copy of a virtual machine, including the virtual hardware and the guest OS. A clone can be taken of a powered-on or powered-off virtual machine. Clones are often useful for testing purposes. For example, a production server could be cloned while online, and then the clone could be used in a test environment. The cloned virtual machine is its own virtual machine and in no way depends on the original.
A virtual machine can also be converted to a template in vCenter Server, and once converted, the templates cannot be powered on or have their configurations changed. Templates can be used in vCenter Server to provide simplified provisioning of virtual machines. A typical use for templates is to set up a master image of a frequently deployed server operating system, for example Windows Server 2008 R2. This virtual machine can be modified to form a standard build for your environment, and then all future Windows Server 2008 R2 servers can be deployed from this virtual machine template. An additional feature of deployment from a template is the ability to customize the guest operating system. Using templates both simplifies builds and nearly eliminates mistakes in the process.
Many different options can be specified during either a clone operation or when deploying from a template:
- You can select a datacenter.
- You can select a cluster or an ESXi host.
- You can select a resource pool.
- You can select a virtual disk format.
- You can select a datastore.
- You can select a storage profile.
- You can select whether to disable Storage DRS.
- You can select whether to customize the guest OS.
- You can select whether to power on the VM after creation.

Now that I have identified cloning and template options, I will cover each in more detail. First I will cover cloning an existing virtual machine.
Cloning an Existing Virtual Machine
In Exercise 7.1, you will use the vSphere Client to clone an existing Windows Server 2008 R2 virtual machine. For the purpose of the exercise, I will assume that this Windows Server 2008 R2 virtual machine is your master image that is used for deploying new virtual machines.

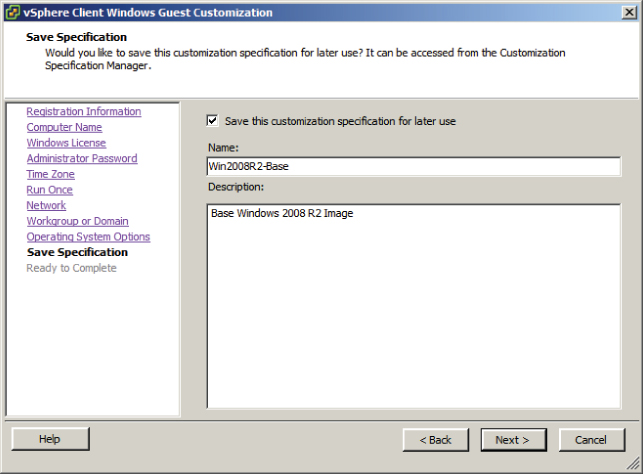
Note the Edit Virtual Hardware (Experimental) option on the Ready To Complete screen. Experimental options are those that may find their way into future versions of the product, but there is no guaranteed support from VMware for them. It is not recommended that you use experimental features on production systems.

I just covered cloning a virtual machine and how to use the customization specifications included in vCenter Server. In the following section, I will cover creating a template from an existing virtual machine.
Creating a Template from an Existing Virtual Machine
In the previous exercise, you cloned a master virtual machine in order to deploy a new virtual machine from it. This process works and is acceptable, but what if another administrator were to power on the master image and make changes to it? One solution to the problem of keeping master images from being modified is to convert these virtual machines to templates.
Once a virtual machine is converted to a template, it cannot be powered on in vCenter Server. When a virtual machine is converted to a template, the .vmx file extension changes to .vmtx. The .vmtx file extension designates a template VM. This is shown in Figure 7.1.
Figure 7.1 Template VM in Datastore Browser

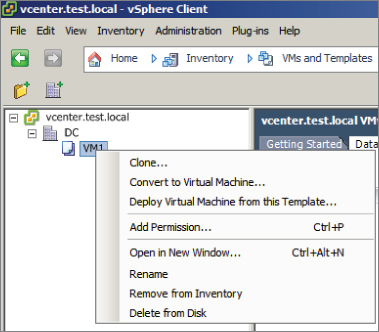
Templates are also not visible in the Hosts and Clusters view in the vSphere Client. Converting virtual machines to templates is a simple process in vCenter Server. In Exercise 7.2, you will create a template from an existing virtual machine. For the purpose of the exercise, I will assume that the same Windows Server 2008 R2 virtual machine from Exercise 7.1 will be used as your master image.

The template is now ready to use. In the next section, you will learn how to deploy a virtual machine from the template you just created.
Deploying a Virtual Machine from a Template
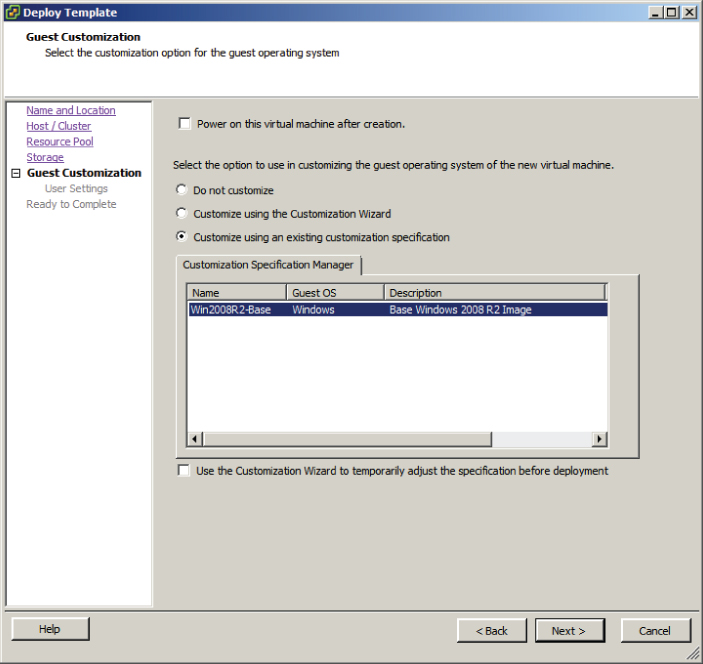
The process of deploying a virtual machine from a template is very similar to the process of cloning a virtual machine. In Exercise 7.3, you will deploy a virtual machine from the template created in Exercise 7.2.
I just covered deploying a virtual machine from a template. In the next section, I will cover how to update templates.
Updating Existing Virtual Machine Templates
After a virtual machine is converted to a template, it is not able to be powered on. Although this provides a degree of protection for the master virtual machine image, over time this template will certainly become stale. Build guides may change, vendor-supplied updates will likely need to be applied, and any number of changes will need to happen to get the master virtual machine image compliant with the current standards.
To address these issues, a template can simply be converted back to a virtual machine. Once the template is converted to a virtual machine, it is able to be powered on and updated as necessary. Exercise 7.4 will cover the steps required to convert a template to a virtual machine so that it can be updated.
At this point, the template is no more. Browsing the datastore would reveal that the .vmtx file has been replaced with a .vmx file. The virtual machine is now visible again in the Hosts and Clusters view. Because you are now working with a virtual machine, its configuration can be edited. The virtual machine can also be powered on, and updates can be applied to the guest OS. When all of these changes have been made, the virtual machine can be powered off and again converted to a template.
You have now learned how to update templates. In the next section, I will discuss how to deploy virtual appliances and vApps from an OVF template.
Deploying Virtual Appliances and vApps from an OVF Template
Virtual appliances are preconfigured and ready-to-use virtual machines that include an operating system and/or applications. VMware provides a virtual appliance marketplace at www.vmware.com/appliances where virtual appliances can be downloaded. Virtual appliances offer convenience and portability and are often optimized for virtual infrastructures.
![]()
Virtual appliances may sound similar to an exported vApp, which was covered in Exercise 6.20, and that is because they are. vApps are built on an industry-standard format, the Open Virtualization Format (OVF). This is the same format used for the vast majority of the virtual appliances in the VMware virtual appliance marketplace.
Deploying a virtual appliance is a simple task. If you think back to the very first exercise in this book, then you may recall that you have already deployed a virtual appliance. In Exercise 2.1, you deployed the vCenter Server Appliance. The vCenter Server Appliance was packaged in the “folder of files” format, where the OVF template consisted of a set of files.
If you don't recall Exercise 2.1, don't go back there just yet. In the next section, I will cover importing OVF templates, and the procedure is exactly the same as deploying virtual appliances.
Importing and Exporting an OVF Template
In Exercise 6.20 from Chapter 6, you exported an OVF template for a vApp. There is no import function in the vSphere Client, and an exported OVF template is simply imported using the Deploy OVF Template function in the vSphere Client.

In Exercise 7.5, you will import the OVF template you created in Exercise 6.20.
I have now covered using the Deploy OVF Template Wizard to import a vApp. I will next discuss how to determine the appropriate deployment methodology for a given VM application.
Determining the Appropriate Deployment Methodology for a Given Virtual Machine Application
Determining the appropriate deployment methodology for the virtual machines in your environment will be determined by a variety of factors. Another phrase that can be used to describe the deployment methodology is virtual machine provisioning. Table 7.1 covers the provisioning methods and use cases.
Table 7.1 Deployment methodology for VMs
| Provisioning | Use cases |
| On-demand | One-off deployments
Small environments with few VMs Specific configurations used for testing Initially creating a VM to be used as a template |
| Clones | Making copies for testing
Avoiding repetition of tasks |
| Templates | Deploying multiple consistent images from a protected virtual machine |
| OVF/virtual appliances | Using preconfigured virtual machines or vApps
Creating portable/packaged applications |
Now that I have covered determining the appropriate deployment methodology for a given virtual machine application, I will move on to identifying the vCenter Server–managed ESXi and virtual machine configuration maximums.
Identifying the vCenter Server–Managed ESXi Hosts and Virtual Machine Maximums
Knowing the configuration maximums is an important part of working in a vSphere environment. The configuration maximums are used to determine the maximum supported values for a variety of different components in the ESXi hosts and the virtual machines. Table 7.2 lists some of the ESXi and virtual machine configuration maximums.
Table 7.2 ESXi host configuration maximums
| Item | Maximum |
| Logical CPUs per ESXi host | 160 |
| vCPUs per ESXi host | 2,048 |
| RAM per ESXi host | 2TB |
| Virtual disks per ESXi host | 2,048 |
| iSCSI LUNs per ESXi host | 256 |
| Fibre Channel LUNs per ESXi host | 256 |
| NFS mounts per ESXi host | 256 |
| VMFS volumes per ESXi host | 256 |
| e1000 1Gb Ethernet ports (Intel PCI-x) per ESXi host | 32 |
| e1000e 1Gb Ethernet ports (Intel PCI-e) per ESXi host | 24 |
| Combination of 10Gb and 1Gb Ethernet ports per ESXi host | Six 10Gb and four 1Gb ports |
| Total virtual network switch ports per ESXi host (vDS and vSS) | 4,096 |
| vCPUs per VM | 32 |
| RAM per VM | 1TB |
| Virtual SCSI adapters per virtual machine | 4 |
| Virtual disk size | 2TB minus 512 bytes |
| Virtual NICs per virtual machine | 10 |
| USB devices connected to a VM | 20 |
This list is just a small sampling of the information contained in the vSphere 5 “Configuration Maximums” document. This document is an essential reference for the VCP 5 exam, and you can download it here:
www.vmware.com/pdf/vsphere5/r50/vsphere-50-configuration-maximums.pdf
The “Configuration Maximums” document is the definitive source for finding the supported maximums of a configuration for either an ESXi host or a virtual machine running on the ESXi host. The document also includes maximums for vCenter Server, VMware FT, vCenter Update Manager, and more.
Now that I have covered identifying the configuration maximums for ESXi hosts and the virtual machines running on them, you can move to the next section of this chapter. In this section, I will cover administering virtual machines and vApps.
Administering Virtual Machines and vApps
Once virtual machines are deployed, they will need to be administered. Administering virtual machines and administering vApps are among the more common tasks that most virtual infrastructure administrators perform on the job. Knowing how to administer virtual machines and vApps is an important set of skills to have for any virtual infrastructure administrator and is equally important for the VCP5 exam. In the following section, I will discuss administering virtual machines and vApps.
Identifying Files Used by Virtual Machines
Virtual machines consist of a set of files stored on a storage device. The minimum files required for a virtual machine are a configuration file (VMX), a virtual disk file (VMDK), and an NVRAM file (BIOS or EFI). While these three files alone can constitute a virtual machine, there are many more file types that may be visible in a virtual machine's directory on a datastore. Some of these additional files are described in Table 7.3.
Table 7.3 Virtual machine files
| File | Description |
| .vmx | Virtual machine configuration file. This file contains every aspect of the virtual machine, including the virtual hardware assigned to it. |
| .vmxf | Virtual machine supplemental configuration file. |
| .vmdk | Virtual disk characteristics. This is a small text file that contains descriptive data about the -flat.vmdk file. |
| -flat.vmdk | Virtual disk contents. This is the actual contents of the virtual hard disk and will be significantly larger than the VMDK file. |
| -delta.vmdk | Snapshot delta files. These files can also be referred to as delta links, redo logs, and child disks. Note that when viewed from the ESXi Shell, snapshot delta files will also be visible with the -00000#-delta.vmdk extension. |
| .nvram | Virtual machine BIOS or EFI configuration file. |
| .vmsd | A database that stores information and metadata about snapshots for a virtual machine. |
| .vmsn | Stores the memory state at the time of the snapshot. |
| .vswp | The virtual machine's swap file. |
| .vmss | Virtual machine suspend file. |
| .log | The current virtual machine log file. |
| -#.log | Archived (rotated) virtual machine log files. |
| -ctk.vmdk | Holds change block tracking (CBT) information for a corresponding VMDK file. |
| -aux.xml | Snapshot manifest metadata file. In vSphere 5, this file is no longer required but is still created. The .vmsd file is now used instead. |
| .vmtx | Virtual machine template configuration file. |
| .hlog | vCenter marker file for a vMotion operation. |
| .psf | Persistent state file, used with vSphere Replication feature of SRM 5 to keep pointers for changed blocks. |
It is also important to note that when viewing file types in the Datastore Browser, the virtual disk file information is abstracted. Figure 7.2 shows a listing of the files for VM1, as viewed in the Datastore Browser.
Figure 7.2 Virtual disks viewed in Datastore Browser

Notice that there is a single VMDK file listed that represents both the .vmdk and -flat.vmdk files. To view both of these actual files and their attributes, you can use the ESXi Shell. Figure 7.3 shows the listing of .vmdk files for the virtual machine VM1.
Figure 7.3 Virtual disks viewed in ESXi Shell

Note that in this listing the .vmdk and -flat.vmdk files are both visible. Always be aware of the level of abstraction present in the Datastore Browser when working with virtual disks.
Now that I have identified the various files used by virtual machines, I will cover identifying locations for virtual machine configuration files and virtual disks.
Identifying Locations for Virtual Machine Configuration Files and Virtual Disks
When a virtual machine is created, using any of the available methods, one of the options is to select destination storage for the virtual machine files. This location will be a VMFS or NFS datastore in your vSphere environment. The files used by the virtual machine will be stored on this datastore in a directory specified during the creation and will typically have the same name as the virtual machine. However, it is possible to store the virtual machine swap file and virtual disks in different directories.
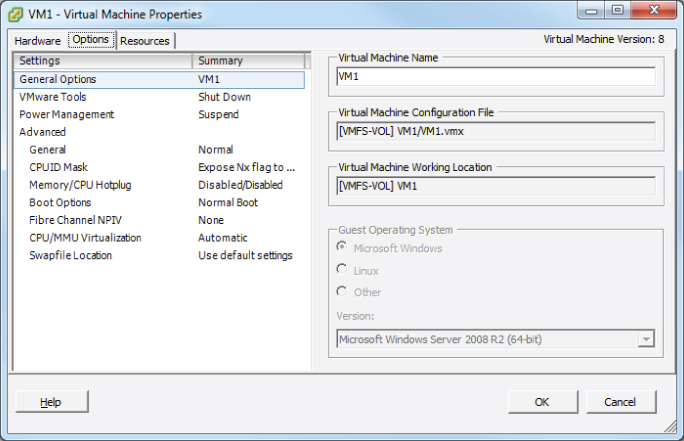
The virtual machine swap (.vswp) file is created when a virtual machine is powered on. This file is used only if the ESXi host runs out of physical memory and is used to allow overcommitment of virtual memory for virtual machines running on the ESXi host. Initially, the .vswp file will be equal to the amount of virtual machine–assigned memory minus the memory reservation set for the VM. These files can be large, and in some cases, like when troubleshooting or using replication, it is better to have them on their own storage locations and not in the same working location as the virtual machine. (The working location is the directory where the virtual machine's configuration files are stored.) Figure 7.4 shows the virtual machine working location field.
Figure 7.4 Virtual machine working location
Virtual machine swap files can be placed in the following locations:
In addition to the virtual machine swap file, the virtual disks for a virtual machine can be stored in different datastores. When a new virtual disk is added to a virtual machine, the virtual disk location can be specified as part of the process. It is also possible to add virtual disks to a virtual machine from an existing directory, which would allow virtual disks to be in different datastores. Cold migrating or using Storage vMotion are two supported ways that a virtual disk could be moved to different datastores.
Now that the locations for virtual machine configuration files and virtual disks have been identified, I will cover configuring virtual machine options.
Configuring Virtual Machine Options
Virtual machine options are used to configure a variety of additional virtual machine properties. These options are accessed using the Options tab of the Virtual Machine Properties editor. You might recall that the Options tab was shown in Figure 7.4, where the virtual machine working location was identified. The properties that can be configured on the Options tab include the following:
- Virtual machine name
- Guest operating system
- VMware Tools
- Power management
- Logging, debugging, and statistics
- Configuration parameters
- CPUID mask
- Memory hot add and CPU hot plug
- BIOS and/or EFI
- NPIV
- Virtual machine monitor execution modes
- Swap file location
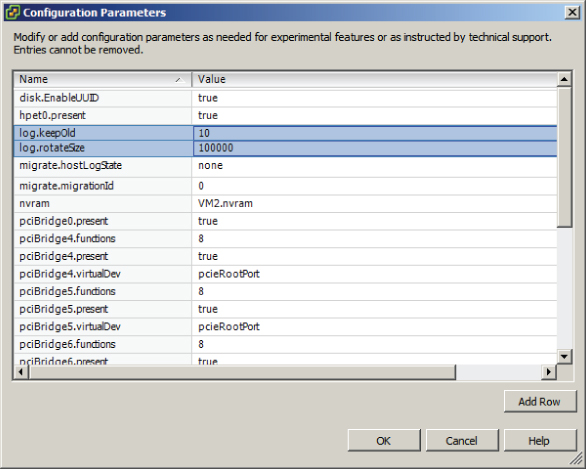
In Exercise 7.6, you will modify a virtual machine's configuration file (.vmx) by using the Configuration Parameters functionality in the Options tab. In this exercise, you will add two configuration parameters intended to limit the number and size of the virtual machine log files.
This configuration parameter ensures that a new log file will be created when the current log file reaches the size of 1000 bytes. This size is purposefully small for this exercise and would normally be much larger. In the next steps, you will configure log rotation settings.
This configuration parameter ensures that no more than 10 log files will be maintained. Older log files will be deleted as necessary.
log.keepOld = “10”
log.rotateSize = “1000”
These two lines are the formatted result of the two rows you added in steps 6 to 10.
Now that I have covered configuring advanced options by using the configuration parameters function, I will cover configuring additional options for the virtual machine. I will start with the power settings.
Configuring Virtual Machine Power Settings
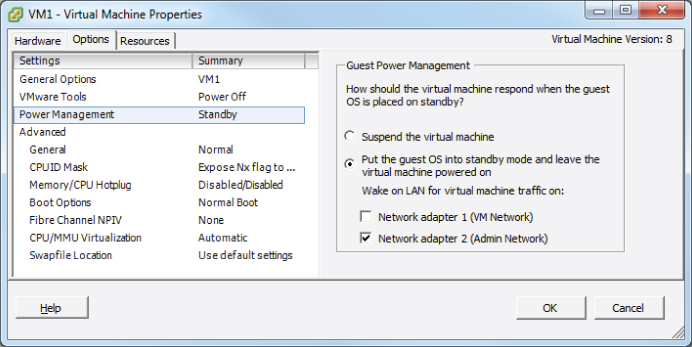
A virtual machine has power options that are used to determine whether the virtual machine is suspended or left powered on when the guest OS is placed in standby mode. It is important to note that these options are not applicable to all guest operating systems and that Wake on LAN is supported only for Windows guest operating systems. Figure 7.5 shows the guest power management settings for a virtual machine running a 64-bit CentOS 5 guest operating system.
Figure 7.5 Wake on LAN Absent for CentOS VM

In addition to only supporting Windows guests, Wake on LAN also has the following NIC requirements:
- Flexible (VMware Tools required)
- vmxnet
- Enhanced vmxnet
- vmxnet 3
In Exercise 7.7, you will configure the power settings for a powered-off virtual machine. Powering the VM off is a prerequisite to changing the power settings.
Now that I have covered configuring the power settings for a virtual machine, I will cover configuring the virtual machine boot options.
Configuring Virtual Machine Boot Options
You can use the virtual machine boot options to control how a virtual machine starts. These options can be useful for obtaining access to a virtual machine's BIOS or EFI settings or for providing additional time to press the Esc key in order to obtain a boot menu. The virtual machine boot options can be configured using either the vSphere Client or the vSphere Web Client. In Exercise 7.8, you will configure the boot options for a powered-off virtual machine using the vSphere Web Client.

Now that I have covered how to configure a virtual machine's boot options, I will cover how to configure troubleshooting options for virtual machines.
Configuring Virtual Machine Troubleshooting Options
As reliable as virtual machines are, occasionally it is necessary to troubleshoot them. Fortunately, several options are available for configuring virtual machine troubleshooting. One of these options was covered in Exercise 7.6, where you ensured that virtual machine logging was enabled. Just as the virtual machine logging options were configured in the virtual machine properties' Options tab, the other available troubleshooting options are also located here. These options, as shown in the vSphere Client, are shown in Figure 7.6.
Figure 7.6 Virtual machine troubleshooting options

In addition to logging, the other item in the Settings field is the Disable Acceleration option. You can use this option to slow down a virtual machine if there is a problem running or installing software in the virtual machine. If the problem with the software is then resolved, you can turn off the Disable Acceleration option.
In the Debugging And Statistics section, you can configure virtual machines to obtain additional debugging or statistical information. These options are typically used when working with VMware support.
I have now covered configuring troubleshooting options for virtual machines and will next cover identifying common practices for securing virtual machines.
Identifying Common Practices for Securing Virtual Machines
Because the virtual infrastructure can encompass so much of the physical infrastructure, securing virtual machines can seem like a daunting task. Consider that securing a virtual machine can involve all of the following items:
- Guest operating systems
- Virtual machine
- ESXi hosts
- Storage units connected to ESXi hosts
- Networks connected to the ESXi hosts
- vCenter Server or other management applications
- Backup servers or applications
Securing virtual machines is in many ways no different from securing physical machines. Operations such as hardening the guest operating systems, installing periodic guest operating system updates, and updating antivirus and other applications are all good examples of this. Beyond the practices used to protect the guest OS, there are some specific protections that must be provided to the virtual machines themselves.
Virtual machines can be hardened in many additional ways. Earlier in this chapter, in Exercise 7.6, you added log rotation to a virtual machine. This is an example of one of the many hardening practices that can be applied to virtual machines. These options can be found in the most current version of the vSphere Security Hardening Guide. The following are some of the virtual machine–specific hardening options that can be added to the virtual machine configuration file:
- Preventing virtual disk shrinking
- Preventing other users from spying on administrator remote consoles
- Ensuring that unauthorized devices are not connected (unless needed/required)
- Preventing unauthorized removal, connection, and modification of devices
- Disabling VM-to-VM communication through VMCI
- Limiting VM log file size and number
- Limiting informational messages from the VM to the VMX file
- Disabling certain unexposed features
- Disabling remote operations within the guest
- Not sending host performance information to guests
- Controlling access to VMs through VMsafe
The ESXi hosts also need to be protected in order to protect the virtual machines. ESXi hosts should be patched and hardened using the information contained in the vSphere Security Hardening Guide. ESXi hosts also include a firewall, which should be configured properly. ESXi hosts should use a syslog server and persistent logging and should also be configured for NTP to ensure accurate time. Management consoles should be on isolated networks dedicated to server management. The security of the virtual machines on the ESXi host is only as good as the security on the ESXi hosts used to run them. Much like with physical servers, if local access is obtained to the ESXi host, then the security battle is already lost.
In addition to the ESXi hosts, the storage and networks attached to them need to be secured to protect virtual machines. vMotion traffic is sent over the network in clear text, so to protect virtual machines, this traffic should be isolated. Hosts may have access to multiple networks, and understanding these networks is important in ensuring that virtual machines are not misconfigured. Virtual switch security should also be configured appropriately to minimize risks. Ethernet-based storage networks should use authentication mechanisms and be isolated. Fibre Channel SAN environments should make use of zoning and LUN masking practices to ensure that only authorized hosts have access to the storage devices.
Management applications, like vCenter Server, will also need to be secured to protect the virtual machines. By default vCenter Server installed on a Windows server puts the local Administrators group in the Administrator role for vCenter Server. If a standard default password is used for the local Administrator account in Windows, then more people may have potential access to your VMs than you think. VM sprawl can be another problem for virtual machine security. As virtual machines are deployed and then not tracked or not placed in life-cycle management systems, there could be VMs that are forgotten. Giving virtual infrastructure operations personnel the least amount of privileges can also be helpful in securing virtual machines. This can prevent operators from performing actions such as connecting VMs to the wrong networks, attaching disks, or worse.
One final consideration for securing virtual machines is to look at the backup applications or scripts that are used to back up complete virtual machine images. A backup of a complete system is a truly portable copy of a complete working system. Encryption or other methods of protecting the backups can be useful in protecting systems with sensitive data. For systems that utilize a Windows proxy server, it is also critical that the proper precautions are taken to ensure that Windows does not write signatures to your VMFS volumes. In addition, backup operators and other administrators who use this machine need to understand these implications.
Now that I have covered securing virtual machines, I will cover determining when an advanced virtual machine parameter is required.
Determining When an Advanced Virtual Machine Parameter Is Required
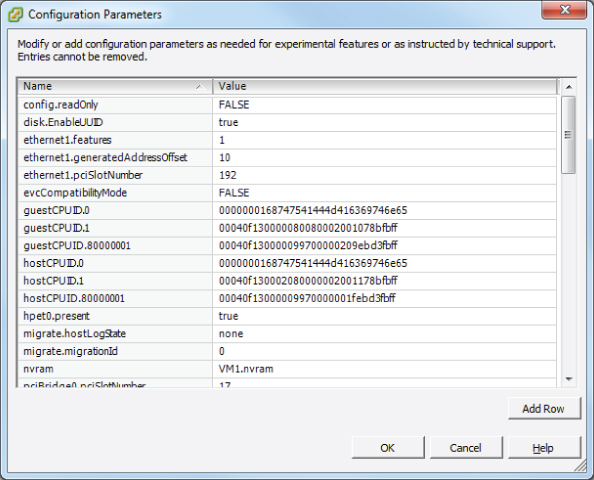
In the previous section, I covered the virtual machine configuration file security hardening options. If any of the virtual machine hardening best practices listed in the vSphere Security Hardening Guide were to be applied to a virtual machine, then it could be accomplished by adding advanced configuration parameters to the virtual machine. In Exercise 7.6, you added two of these advanced configuration parameters to a virtual machine. Figure 7.7 shows the two advanced configuration parameters that were added in Exercise 7.6.
Figure 7.7 Advanced configuration parameters
Another time when advanced configuration parameters might be added to a virtual machine is when working with VMware support. Advanced parameters can also be used to gain access to experimentally supported features and to create unsupported configurations. Those that have built a vSphere environment in a VMware Workstation lab have likely used some of these unsupported options to be able to test advanced features of vSphere.
![]()
Now that I have covered determining when advanced virtual machine configuration parameters are required, I will move on to hot extending a virtual disk.
Hot Extending a Virtual Disk
Hot extending a disk means increasing its capacity while the guest OS is running. Hot extending a virtual disk is a task that every virtual infrastructure administrator has probably already performed. This process is simple, and end users appreciate this capability as much as the virtual infrastructure administrator does. In Exercise 7.9, the steps to hot extend a virtual disk using the vSphere Web Client will be covered. This exercise will use a Windows Server 2008 R2 virtual machine.
If the extended space is not visible, right-click the Disk Management icon in the left pane and choose the Rescan Disks option from the context menu that appears.


It is also important to remember that virtual disks may not be hot extended if the virtual machine has an active snapshot, and the disk options will even be grayed out in the Virtual Machine Properties editor. Now that I have covered hot extending a disk, I will show how to adjust virtual machine resources based on virtual machine workloads.
Adjusting Virtual Machine Resources (Shares, Limits, and Reservations) Based on Virtual Machine Workloads
Sometimes a virtual machine needs additional resources; for example, at month end, the finance application may require significantly more CPU and memory resources. Fortunately, there are ways to adjust the virtual machine resources for these types of situations.
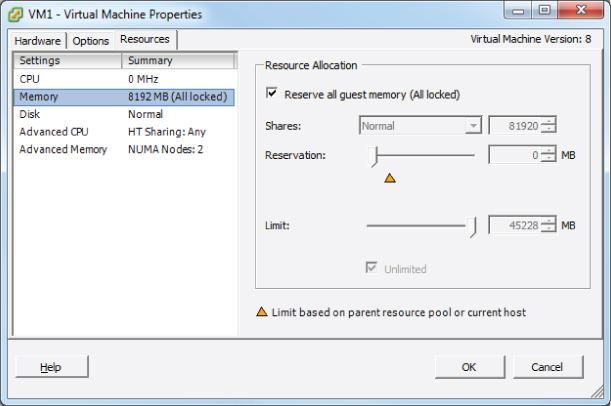
You might recall the section on configuring disk shares in Chapter 6. Shares are used to specify the relative importance of a virtual machine as it pertains to a specific resource. In addition to the disk, the other two resources that may be configured for the virtual machine are CPU and memory. Just like disk shares, both CPU and memory resources can be adjusted on the Resources tab of the Virtual Machine Properties editor. This tab is shown in Figure 7.8. I will briefly define each of these resource types, and I will cover this subject in great detail in Chapter 8.
Figure 7.8 Resources tab for virtual machine

As discussed in the previous chapter, shares are used to specify relative importance of specific resources. Shares can have the values of Low, Normal, High, and Custom. Each of these values will be compared to the sum of all shares for all VMs on the host. Virtual machines with the highest share values will be able to consume more resources in periods of resource contention on the ESXi host.
In addition to shares, reservations can be used to guarantee a minimum allocation of CPU and memory for a virtual machine. This setting is used to claim a specific amount of the resource for the virtual machine so that these resources will always be available. Memory reservations can also be used to avoid overcommitment of physical memory resources. Memory reservations are required for virtual machines running in a vSphere Storage Appliance cluster, for example.
Limits are used to set an upper bound for resources. This prevents a virtual machine from using more resources than specified. This setting is by default set to Unlimited for both CPU and memory. Using this setting will ensure that the virtual machine uses close to the vCPU and memory allocations it has been granted.
Exercise 7.10 will cover the steps required to adjust virtual machine resources using the vSphere Client. For the purpose of this exercise, assume that the workload requires memory reservations to be set.
Now that I have covered adjusting virtual machine resources, I will next cover assigning a storage policy to a virtual machine.
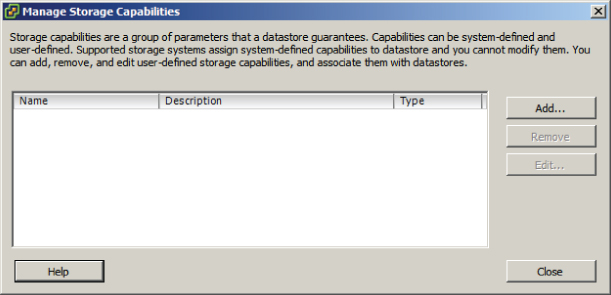
Assigning a Storage Policy to a Virtual Machine
Profile-driven storage is used to provide guaranteed service levels to virtual machines. This works by using storage capabilities and VM storage profiles. Storage capabilities are divided into two types:
Where the storage capabilities define the capabilities of the storage, VM storage profiles are used to define different levels of storage requirements for virtual machines.
Exercise 7.11 will cover the steps required to prepare the virtual infrastructure to use storage profiles.
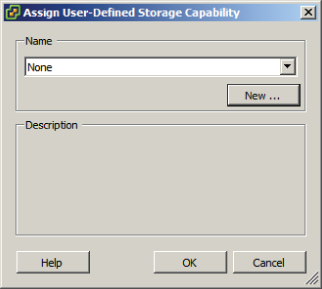


At this point, storage profiles are created and enabled. The next step is to create a VM storage profile that will be later used to define the storage requirements for a virtual machine and its virtual disks.

Next you will apply this VM storage profile to a virtual machine and its virtual disks.

I have now covered assigning a storage policy to a virtual machine. In the next section, I will cover the steps to verify storage policy compliance for a virtual machine.
Verifying Storage Policy Compliance for Virtual Machines
After establishing VM storage policies, it is often necessary to check virtual machines for compliance to the policy. In step 26 of the previous exercise, I covered how to check an individual virtual machine for VM storage profile compliance. In Exercise 7.12, I will cover the steps to determine whether all virtual machines and their virtual disks are using datastores that are compliant with their associated VM storage profile.

If any virtual machines or virtual disks report a status of Non-Compliant, the corrective action would be to use cold migration or Storage vMotion to move these items to compliant datastores.
I have now covered how to check virtual machine compliance for VM storage profiles, and with that, this chapter is complete.
Summary
This chapter covered managing and administering virtual machines. Knowing how to manage and administer virtual machines is essential knowledge for any virtual infrastructure administrator. Also in this chapter, I identified the different cloning and template options. You cloned an existing virtual machine and created a template from a virtual machine. Deploying virtual machines from templates was covered, in addition to updating existing virtual machine templates. I covered deploying virtual appliances and vApps from an OVF template. Importing and exporting OVF templates were each covered. I discussed how to determine the appropriate deployment methodology for a given virtual machine application. Identifying the vCenter Server–managed ESXi hosts and virtual machine maximums wrapped up the first section of this chapter.
The second part of this chapter focused on administering virtual machines and vApps. The files that make up virtual machines were identified, along with the locations where these files can be stored. I covered configuring different virtual machine options, including power settings, boot options, and troubleshooting options. Common practices for securing virtual machines were discussed. Determining when advanced configuration parameters are required was also covered. Hot extending a virtual disk was covered. Adjusting virtual machine resources was discussed. This chapter concluded with assigning a storage policy to a virtual machine and verifying the compliance of the storage policy.
Exam Essentials
Review Questions
A. Clone
B. Add Permission
C. Rename
D. Convert to Virtual Machine
A. RAM per ESXi host
B. RAM per virtual machine
C. Virtual disk size
D. Virtual compatibility mode RDM size
A. Create four virtual machines one at a time.
B. Create one virtual machine and clone it three times.
C. Create one virtual machine and then convert it to a template. Deploy the remaining VMs from this template.
D. Create a vApp.
A. Power off the virtual machine and add the options to the VM using the Configuration Parameters button in the virtual machine properties.
B. Add the options to the VM using the Security Parameters button in the virtual machine properties.
C. Power off the virtual machine and clone it. Specify these options as part of the cloning process.
D. Clone the virtual machine and specify these options as part of the cloning process.
A. Disable Acceleration
B. Limit
C. Shares
D. Reservation
A. System-defined
B. Storage-defined
C. Profile-defined
D. User-defined
A. OVA
B. OVF
C. OVT
D. OVX
A. Guest Operating System
B. Force BIOS Setup
C. CPUID Mask
D. Power Management
A. Using the vSphere Client, convert the template to a virtual machine, power on the virtual machine, make changes to the virtual machine as required, power off the virtual machine, and convert the virtual machine to a template.
B. Using the vSphere Client, power on the virtual machine template, make changes to the virtual machine as required, and power off the virtual machine template.
C. Using the vSphere Client, rename the virtual machine template using the Datastore Browser, power on the virtual machine, make changes to the virtual machine as required, power off the virtual machine template, and rename the virtual machine using the Datastore Browser.
D. Using the vSphere Client, convert the template to a virtual machine using VMware Converter, power on the virtual machine, make changes to the virtual machine as required, power off the virtual machine, and convert the virtual machine to a template.
A. Use Storage vMotion to move the virtual machines to compliant datastores.
B. Cold migrate the virtual machines to compliant datastores.
C. vMotion these virtual machines to new hosts in the cluster.
D. Power cycle the virtual machine.
A. Virtual machine configuration files
B. vMotion network(s)
C. vCenter Server permissions
D. ESXi hosts
A. Shares
B. Limits
C. Reservations
D. Allocations
A. .vmx
B. .vmxf
C. .vmtx
D. .vmsd
A. Add another virtual disk to the virtual machine and instruct the virtual machine owner to move some of her data to it.
B. Hot extend the virtual disk in the vSphere Client and then extend the volume in Windows using the Disk Manager.
C. Instruct the user to schedule downtime and power down the virtual machine's guest OS. Hot extend the disk.
D. Clone the virtual machine and resize the disk.
A. Specify a different boot firmware.
B. Set a Power On Boot Delay value.
C. Select the Force BIOS Setup option.
D. Set a Failed Boot Recovery value.
A. VSWP
B. LOG
C. VMX
D. VMDK
A. .vmss
B. .vmsn
C. .vswp
D. .vmsd
A. vCenter Server
B. vSphere Client
C. vSphere Web Client
D. VMware Converter
A. Windows guest OS and vmxnet
B. Windows guest OS and vmxnet 2
C. Windows guest OS and vmxnet 3
D. Linux guest OS and vmxnet 3
A. Virtual appliances
B. Virtual disks
C. vTeam
D. vApps