Chapter 9
Maintain Service Levels
VCP5 Exam Objectives Covered in This Chapter:
- Migrate Virtual Machines
- Migrate a powered-off or suspended virtual machine
- Identify ESXi host and virtual machine requirements for vMotion and Storage vMotion
- Identify Enhanced vMotion Compatibility CPU requirements
- Identify snapshot requirements for vMotion/Storage vMotion migration
- Configure virtual machine swap file location
- Migrate virtual machines using vMotion/Storage vMotion
- Utilize Storage vMotion techniques (changing virtual disk type, renaming virtual machines, etc.)
- Backup and Restore Virtual Machines
- Identify snapshot requirements
- Create/Delete/Consolidate virtual machine snapshots
- Install and Configure VMware Data Recovery
- Create a backup job with VMware Data Recovery
- Perform a test and live full/file-level restore with VMware Data Recovery
- Determine appropriate backup solution for a given vSphere implementation
- Patch and Update ESXi and Virtual Machines
- Identify patching requirements for ESXi hosts and virtual machine hardware/tools
- Create/Edit/Remove a Host Profile from an ESXi host
- Attach a Host Profile to an ESXi host or cluster
- Performing Compliance Scanning, Applying Host Profiles And Remediating An ESXi Host Using Host Profiles
- Install and Configure vCenter Update Manager
- Configure patch download options
- Create/Edit/Delete an Update Manager baseline
- Attach an Update Manager baseline to an ESXi host or cluster
- Scan and remediate ESXi hosts and virtual machine hardware/tools using Update Manager
- Stage ESXi host updates
This chapter will cover the objectives of sections 5.4, 5.5, and 5.6 of the VCP5 exam blueprint. This chapter will focus on migrating, backing up, and restoring virtual machines, in addition to patching ESXi hosts and updating the virtual machine hardware and the VMware Tools.
This chapter will first cover migrating virtual machines. I will cover migrating a powered-off or suspended virtual machine. The ESXi and virtual machine requirements for vMotion and Storage vMotion will be identified. The CPU requirements for EVC will be identified, along with virtual machine snapshot requirements for use with vMotion and Storage vMotion. I will cover how to configure the virtual machine swap file location and discuss the impact this can have on vMotion and Storage vMotion operations. Migrating virtual machines using vMotion and Storage vMotion will be covered, along with using Storage vMotion to change virtual disk types, renaming virtual machines, and more.
The second section of this chapter will cover backing up and restoring virtual machines. Snapshot requirements will be identified. The procedure to create, delete, and consolidate snapshots will be covered. I will cover installing and configuring VMware Data Recovery, along with creating backup jobs and restores with VMware Data Recovery. Determining the appropriate backup solution for a given vSphere implementation will also be discussed.
The final section of this chapter will focus on patching and updating ESXi and virtual machines. Patching requirements for ESXi hosts and virtual machine hardware and the VMware Tools will be identified. I will show how to create, edit, and remove a host profile from an ESXi host, attach/apply a host profile to a cluster, and perform compliance scanning and remediation of an ESXi host using host profiles. vSphere Update Manager will be installed and configured, and the patch download options will be configured. I will show how to create, edit, and delete an Update Manager baseline and attach an Update Manager baseline to a cluster. Scanning and remediating ESXi hosts and virtual machine hardware and the VMware Tools using Update Manager will be covered, along with staging ESXi host updates.
Migrating Virtual Machines
The ability to migrate virtual machines is a feature that all virtual infrastructure administrators can appreciate. Migration is defined as the process of moving a VM from one ESXi host or datastore to another. Migration allows the virtual infrastructure to be both more dynamic and highly available. The first topic I will cover in this chapter is migrating powered-off or suspended virtual machines.
Migrating a Powered-Off or Suspended Virtual Machine
Before the steps to migrate a powered-off virtual machine are covered, the different types of migration need to be covered. Four types of migration are possible in vCenter Server, as described in Table 9.1.
Table 9.1 VM migration options
| Cold migration |
Used to migrate a powered-off virtual machine to a new host and/or datastore. Cold migration can be used to move VMs to different datacenters. |
| Migrate a suspended VM |
Used to migrate a suspended virtual machine to a new host and/or datastore. Suspended VMs can be migrated to different datacenters. |
| vMotion migration |
Used to migrate a powered-on virtual machine to a new host with no disruption. vMotion cannot be used to move VMs to different datacenters. |
| Storage vMotion migration |
Used to migrate the virtual disk files of a powered-on virtual machine to a new datastore with no disruption. |

Migration means “move.” Do not confuse migrate with copy operations such as cloning, where a new virtual machine will be created.
Exercise 9.1 covers the steps to migrate a powered-off virtual machine.
Exercise 9.1: Migrating a Powered-Off Virtual Machine Using the vSphere Client
1. Connect to a vCenter Server with the vSphere Client.
2. Locate a powered-off virtual machine.
3. Right-click it and choose the Migrate option from the context menu that appears.
4. The Migrate Virtual Machine Wizard will launch.
5. Select the Change Host option and click Next to continue.
6. Select a cluster and a host to move this virtual machine to and click Next to continue.
7. If applicable, select a resource pool and click Next.
8. Review the information on the Ready To Complete screen and click Finish.
9. A Relocate Virtual Machine task will begin.
10. When this task completes, verify on the virtual machine's Summary tab that the new ESXi host is listed in the Host field.
The process to migrate a suspended virtual machine is similar to the process used to migrate a powered-off virtual machine. Exercise 9.2 covers the steps to migrate a suspended virtual machine.
Exercise 9.2: Migrating a Suspended Virtual Machine Using the vSphere Web Client
1. Open a web browser and connect to the FQDN of the vCenter Server that will be used for this exercise.
2. Click the blue Log In To vSphere Web Client link.
3. When the vSphere Web Client loads, enter your credentials.
4. Locate a suspended virtual machine in the left pane.
5. Right-click it and choose the Inventory ⇒ Migrate option from the context menu that appears.
6. The Migrate VM Wizard will launch.
7. Select the Change Both Host And Datastore option and click Next to continue.
If the virtual machine is powered on, the option to choose both the host and datastore will be grayed out.
8. Select a cluster or resource pool and click Next.
9. Select a destination host and click Next to continue.
10. Select a different datastore for the virtual machine. Verify that the Compatibility field lists Compatibility Checks Succeeded. Click Next to continue.
11. Choose the Same Format As Source option for the disk format. These options will be covered in detail later in this chapter. Click Next to continue.
12. Review the information presented in the review and click Finish to migrate the suspended virtual machine to a new ESXi host and datastore.
13. A Relocate Virtual Machine task will begin.
14. When this task completes, verify on the virtual machine's Summary tab that the new ESXi host is listed in the Host field and that the new datastore is listed.
15. Right-click the virtual machine in the left pane and choose the Power ⇒ Power On option.
16. Open the virtual machine console and verify that it is operating properly.

Suspended virtual machines must be able to resume execution on the target host using an equivalent instruction set. The Migrate Virtual Machine Wizard includes a compatibility check and will not allow incompatible migrations to proceed.
Now that I have covered migration and migrating powered-off and suspended virtual machines, I will move on to using vMotion. However, I will first identify the ESXi host and VM requirements for vMotion and Storage vMotion.
Identifying ESXi Host and Virtual Machine Requirements for vMotion and Storage vMotion
Before you can use vMotion or Storage vMotion, the ESXi hosts must satisfy several requirements:
- ESXi hosts must be licensed to use vMotion.
- ESXi hosts must have access to the same shared storage.
- ESXi hosts must have VMkernel networking established for the vMotion traffic.
- ESXi hosts must be licensed to use Storage vMotion.

Using Storage vMotion Without a License
A virtual infrastructure administrator is building a new environment. The environment will consist of an iSCSI SAN, three ESXi servers, vCenter Server in a virtual machine, and vSphere Essentials Plus licensing. The servers have arrived, but the SAN has been delayed. The virtual infrastructure administrator notices that the ESXi servers each contain two 300GB SAS drives.
The virtual infrastructure administrator decides to go ahead and get an early start on building out the environment. He installs ESXi on each of the three servers. He then creates a new virtual machine to install vCenter Server on and stores the virtual machine on the local storage of one of the ESXi hosts. When he installs vCenter Server, he does not enter his Essentials Plus license keys and instead elects to run the environment in evaluation mode for 60 days. He deploys another server to be used for vSphere Update Manager and also deploys the vSphere Management Appliance. All three of these virtual machines are on local storage on different ESXi hosts.
The SAN arrives a few days later, and the virtual infrastructure administrator configures the VMkernel networking for it and gets each of the three hosts connected to this shared storage. He then uses Storage vMotion to move his vCenter Server, vSphere Update Manger, and vMA virtual machines to the shared storage. Once these Storage vMotion operations are complete, he enters his vSphere Essentials Plus licensing information in vCenter Server. The 60-day evaluation mode option chosen during the vCenter Server installation allowed him to use features he was not licensed for and ultimately complete his work without waiting for the SAN to arrive.
Just as there are requirements to use vMotion and Storage vMotion on the ESXi hosts, there are also virtual machine requirements for vMotion and Storage vMotion:
- Virtual machines that use raw disks for clustering cannot be migrated.
- Virtual machines that use a virtual device backed by a device that is not accessible on the destination host cannot be migrated.
- Virtual machines that use a virtual device backed by a device on the client computer cannot be migrated.
- Virtual machines that use USB pass-through devices can be migrated, but only if the devices are enabled for vMotion.
- Virtual machines that use NPIV are not supported with Storage vMotion.
- You can vMotion virtual machines that utilize NPIV, only if the RDM files are all located on the same datastore.
- Virtual machine disks must be in persistent mode or be RDMs for Storage vMotion.
- Virtual machines in the process of having a VMware Tools upgrade cannot be migrated.
Now that I have identified the ESXi host and virtual machine requirements for vMotion and Storage vMotion, I will identify the EVC CPU requirements.
Identifying Enhanced vMotion Compatibility CPU Requirements
The EVC requirements were discussed in Chapter 8. As a review, the following requirements exist for EVC CPUs:
- All hosts in the cluster must have only Intel or only AMD processors. Mixing Intel and AMD processors is not allowed.
- CPU features, such as hardware virtualization support (AMD-V or Intel VT) and AMD No eXecute (NX) or Intel eXecute Disable (XD), should be enabled consistently across all hosts in the cluster.
- All of the ESXi hosts in the cluster must contain supported CPUs for the desired EVC mode.
For more information on EVC processor support, check the VMware KB article “Enhanced VMotion Compatibility (EVC) processor support” at
http://kb.vmware.com/kb/1003212.
Now that I have reviewed the EVC CPU requirements, I will identify the snapshot requirements for vMotion and Storage vMotion.
Identifying Snapshot Requirements for vMotion/Storage vMotion Migration
There are currently no requirements for using virtual machine snapshots with vMotion or Storage vMotion in a homogeneous vSphere 5 environment. As long as the virtual machine is located on an ESXi 5 host and the vSphere environment meets the vMotion or Storage vMotion requirements, either of these two approaches can be used to migrate powered-on virtual machines with snapshots.
If your vSphere environment has a mix of ESX or ESXi hosts running different versions, then Storage vMotion can be used only for virtual machines with snapshots if these virtual machines are running on an ESXi 5 host. For more information, check VMware KB 1035550.
I have now identified the snapshot requirements for vMotion and Storage vMotion. In the next section, I will configure the virtual machine swap file location.
Configuring Virtual Machine Swap File Location
Virtual machine swap files were discussed in detail in Chapter 7. Before the steps to configure the virtual machine swap file location are covered, a brief review will be provided.
The virtual machine swap (.vswp) file is created when a virtual machine is powered on. This file is used only if the ESXi host runs out of physical memory and is used to allow overcommitment of virtual memory for virtual machines running on the ESXi host. Initially the .vswp file will be equal to the amount of virtual machine–assigned memory minus the memory reservation set for the VM. These files can be large, and in some cases, such as when troubleshooting or using replication, it is better to have them in their own storage locations and not in the same working location as the virtual machine. The working location is the directory where the virtual machine's configuration files are stored.
Virtual machine swap files can be placed in the following locations:
Default Selecting this option will store the virtual machine swap file at the default location as defined in the host or cluster where the VM currently resides.
Always Store With The Virtual Machine Selecting this option will store the virtual machine swap file in the working location. This is the same location where the VM's configuration file is stored.
Store In The Host's Swapfile Datastore Selecting this option will store the virtual machine swap file in the swap file datastore as defined on the host or cluster where the VM currently resides. Otherwise, the virtual swap file will be stored in the virtual machine's working location.
The virtual machine swap file location is important in migrations with vMotion, because it affects vMotion compatibility. For example, in migrations between ESX/ESXi 3.5 and newer hosts, if the swap file is located in a different location on the destination host, the swap file must be copied to this new location. This can slow down vMotion operations.
The virtual machine swap file location can be configured in up to three separate locations. These locations are the cluster, host, and virtual machine. In Exercise 9.3, the steps to configure the virtual machine swap file location for each of these locations will be covered. I will begin with setting the swap file location at the cluster level and will then change the swap file location on an ESXi host that is a member of the cluster. Finally, a virtual machine will have its swap file location modified.
Exercise 9.3: Configuring the Virtual Machine Swap File Location
1. Connect to a vCenter Server with the vSphere Client.
2. Select an ESXi host that is a member of a cluster from the left pane. Select the Configuration tab in the right pane.
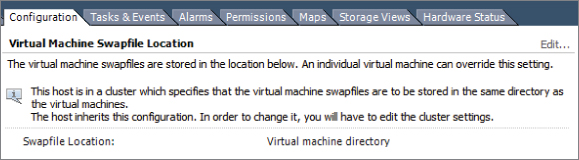
3. Click the blue link for Virtual Machine Swapfile Location located in the Software panel.
4. Review the information presented for the Virtual Machine Swapfile Location. Note that the Edit link is grayed out.
Also note that the default configuration is for the cluster to define the virtual machine swap file location.
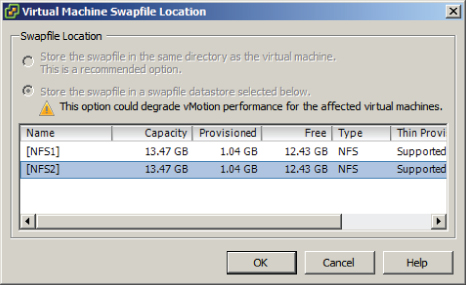
5. Select the cluster that this ESXi host is a member of in the left pane and right-click it. Select the Edit Settings option from the context menu that appears. The Cluster Settings window will appear.
6. Select the Swapfile Location item in the left pane. The default, and recommended, setting is to store the swap file in the same directory as the virtual machine. Change this option to Store The Swapfile In The Datastore Specified By The Host.
7. Click OK to save this change. A Reconfigure Cluster task will begin.
You have now changed the virtual machine swap file location for the cluster. The ESXi hosts will now need to have a datastore configured to store swap files.
8. Select the same ESXi host that was used in step 2 and return to the Virtual Machine Swapfile Location.
9. Notice that now the Edit link is blue and active. Click it.
10. A Virtual Machine Swapfile Location window will appear.
11. Select a datastore and click OK to continue. An Update Local Swap Datastore task will begin.
12. Verify on the Configuration tab that the datastore selected is listed in the Swapfile Location field.
The virtual machine swap file location has now been configured at the ESXi host level. In the next set of steps, I will verify that this change works as expected.
13. Locate a powered-off virtual machine that is a member of the cluster and that is located on the ESXi host used in the previous steps.
14. On the virtual machine's Summary tab, locate the datastore listed in the Resources pane.
15. If this is the same datastore that was selected in step 11, a different virtual machine or use Storage vMotion to migrate the VM to a different datastore before proceeding.
16. Power on the virtual machine. Note in the Resources pane that the datastore configured in step 11 is now listed as a second datastore.
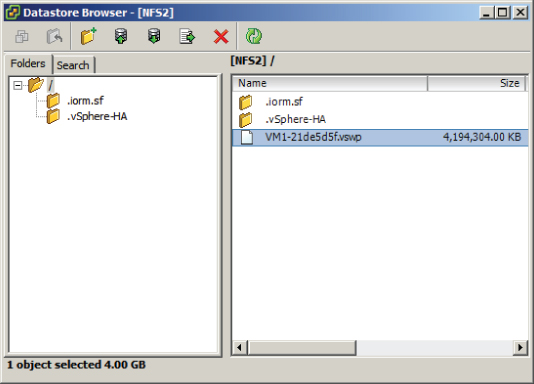
17. Right-click this datastore and choose the Browse Datastore option from the context menu that appears.
18. The virtual machine's swap file will be listed in the root of the datastore, as shown here.
19. Close the datastore browser and shut down this virtual machine.
You will now change the virtual machine's individual swap file location setting. This setting will override the swap file location setting specified at either the ESXi host or cluster level.
20. Right-click the virtual machine and choose the Edit Settings option from the context menu that appears.
21. Click the Options tab and select the Swapfile Location item listed in the left pane. Review the information presented in the right pane.
22. Change the Swapfile Location to the Always Store With The Virtual Machine option.
23. Click OK in the Virtual Machine Properties editor to save the swap file location change. A Reconfigure Virtual Machine task will begin.
24. Power on the virtual machine again.
25. Note in the Resources pane that the datastore configured in step 11 is now no longer listed.
26. Right-click the remaining datastore and choose the Browse Datastore option from the context menu that appears.
27. The virtual machine's swap file will be listed in the virtual machine's working location, as shown here.
28. As a final step, restore all virtual machine swap file location settings to their defaults, which are the recommended settings from VMware.
As noted per the Virtual Machine Swapfile Location setting in the Configuration tab for the ESXi host, an individual virtual machine swap file location setting will override the setting specified on an ESXi host or cluster.
Now that I have covered configuring the virtual machine swap file location, I will cover migrating virtual machines using vMotion and Storage vMotion.
Migrating Virtual Machines Using vMotion/Storage vMotion
Migrating virtual machines with vMotion is a relatively simple operational task. Most virtual infrastructure administrators have surely performed a migration with vMotion, as VMware reports that 80 percent of its customers have vMotion in use in production environments. Exercise 9.4 covers the steps to migrate a powered-on virtual machine with vMotion using the vSphere Web Client.
Exercise 9.4: Migrate a Virtual Machine with vMotion Using the vSphere Web Client
1. Open a web browser and connect to the FQDN of the vCenter Server that will be used for this exercise.
2. Click the blue Log In To vSphere Web Client link.
3. When the vSphere Web Client loads, enter your credentials.
4. Locate a powered-on virtual machine in the left pane and select it. Note in the Summary tab the ESXi host that this VM is running on.
5. Right-click the virtual machine and choose the Inventory ⇒ Migrate option from the context menu that appears.
6. The Migrate <Virtual Machine Name> Wizard will launch.
7. Select the Change Host option and click Next to continue.
8. Select a cluster or resource pool. Verify the compatibility status and also note that there is a check box located at the bottom of the screen that allows a specific ESXi host to be selected. Selecting this check box will add another step to the wizard.
9. Select the Allow Host Selection Within This Cluster option, and click Next to continue.
10. Select a host by clicking it. Review any compatibility messages that appear in the lower portion of the window and click Next.
11. Accept the default and recommended vMotion priority of Reserve CPU For Optimal vMotion Performance.
The Perform With Available CPU Resources can be useful if the environment is currently CPU constrained.
12. Click Next to continue.
13. Review the information in the summary and click Finish to begin the vMotion migration.
14. A Relocate Virtual Machine task will begin. When this task completes, verify that the virtual machine has been moved to a different host on the virtual machine's Summary tab.
Migrating a virtual machine using Storage vMotion is another relatively simple task. Exercise 9.5 covers the steps to migrate a virtual machine with Storage vMotion using the vSphere Client.
Exercise 9.5: Migrate a Virtual Machine With Storage vMotion Using the vSphere Client
1. Connect to a vCenter Server with the vSphere Client.
2. Locate a powered-on virtual machine in the left pane and select it. Note in the Summary tab the datastore that this virtual machine is stored on.
3. Right-click the virtual machine and choose the Migrate option from the context menu that appears.
4. The Migrate Virtual Machine Wizard will launch.
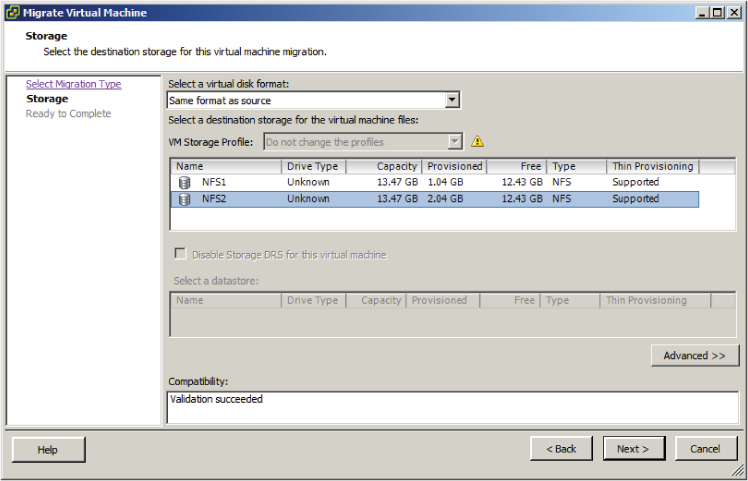
5. Select the Change Datastore option and click Next to continue.
6. Leave Select A Virtual Disk Format at the default. Select a datastore and verify that the compatibility field at the bottom of the screen reports Validation Succeeded.
7. Click Next to continue.
8. Review the information on the Ready To Complete screen and click Finish.
9. A Relocate Virtual Machine task will begin.
10. When this task completes, verify on the virtual machine's Summary tab that the new datastore is listed in the Datastore field.
Additional advanced options can also be used with the Migrate Virtual Machine Wizard when migrating a virtual machine to a new datastore. In the next section, I will cover these advanced options.
Utilizing Storage vMotion Techniques
The advanced options available when performing a Storage vMotion can allow the virtual disk format to be changed, a storage profile to be changed, and disks and configuration files to be divided into separate datastores.
In prior versions of vSphere, it was possible to rename a virtual machine and then cold migrate or perform a Storage vMotion migration to another datastore to update both the directory and filenames. This behavior has changed in vSphere 5, and at the time this book was written, only the directory will be renamed with this operation. The result is shown in Figure 9.1, where VM1 was renamed VM199 and then migrated.
Exercise 9.6 covers the advanced options that can be used to migrate a virtual machine with Storage vMotion. This exercise will use the vSphere Client, but you can also use the vSphere Web Client. To simplify this exercise, use a virtual machine that has a single virtual disk assigned to it.
Exercise 9.6: Performing a Storage vMotion with Advanced Techniques
1. Connect to a vCenter Server with the vSphere Client.
2. Locate a powered-on virtual machine in the left pane and select it. Note in the Summary tab the datastore that this virtual machine is stored on.
3. Right-click this virtual machine and choose the Edit Settings option from the context menu that appears.
4. The Virtual Machine Properties editor will appear. Select Hard Disk 1 from the left pane. Review the Disk Provisioning information in the right pane to determine the disk type. The disk type will be reported as either Thin Provision, Thick Provision Lazy Zeroed, or Thick Provision Eager Zeroed. Remember the type of virtual disk, because you will need it later in this exercise.
5. Close the Virtual Machine Properties editor.
6. Right-click the virtual machine and choose the Migrate option from the context menu that appears.
7. The Migrate Virtual Machine Wizard will launch.
8. Select the Change Datastore option and click Next to continue.
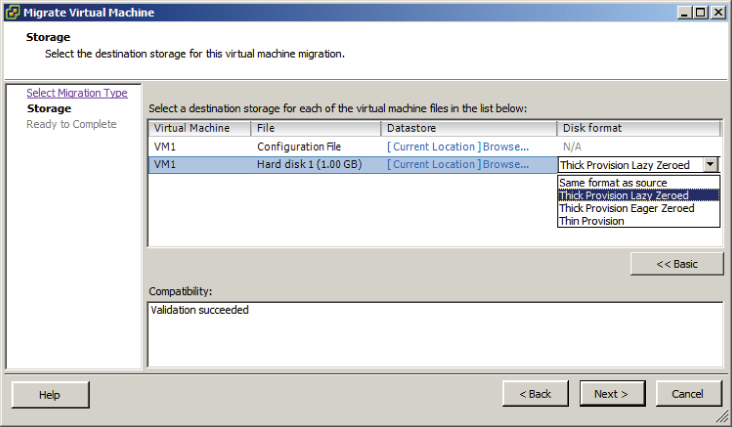
9. The next step of the Migrate Virtual Machine Wizard is to select the destination storage. To access the advanced options, click the Advanced button located toward the lower-right side of the window.
The view will change and look similar to this.
10. Select the virtual disk file by clicking it.
11. Click in the Disk Format column in the highlighted row to access a drop-down menu. Change the virtual disk format to a different type than what was shown in step 4 of this exercise.
Setting this option will change the virtual disk format as part of the migration. Note that the configuration file is listed as N/A, since it is a .vmx file and not a .vmdk file.
12. Click in the Datastore column. A Select A Datastore Or Datastore Cluster window will appear. The datastore that the virtual machine is currently located on will be selected by default.
13. Pick a new datastore for this virtual disk file to be moved to by clicking the datastore. Once the new datastore is highlighted, click OK.
The datastore column will update to reflect the new location. The final configuration should appear similar to this.
14. Click Next and then review the information on the Ready To Complete screen. Click Finish to begin the Storage vMotion.
15. A Relocate Virtual Machine task will begin. When this task completes, verify that there are two datastores listed on the Summary tab in the Resources pane.
16. Browse each datastore and verify that the contents are as expected.
Changing the virtual disk format with NFS servers may not always be possible. If the NFS server supports the VAAI NAS extensions that enable reserve space, then thick-provisioned disks on NFS are possible. If not, then the option to change virtual disk formats will be grayed out.
The various forms of migration have now been covered. In the next section of this chapter, I will move on to backing up and restoring virtual machines.
Backing Up and Restoring Virtual Machines
As a VMware Certified Professional, you will be expected to know how to back up and restore virtual machines using VMware Data Recovery. VMware Data Recovery is VMware's backup appliance that is included in all editions of vSphere except the Essentials edition. Another common operational task that virtual infrastructure administrators must know is how and when to use VMware snapshots. In this section, I will cover snapshots and VMware Data Recovery and discuss how to determine appropriate backup solutions.
Identifying Snapshot Requirements
Snapshots are used in vSphere to preserve state and data in a virtual machine. A virtual machine snapshot will preserve the following:
- Virtual machine settings
- Power state
- Disk state
- Memory state (optional)
Snapshots are very useful for short-term protection from changes made to a virtual machine. For example, a virtual machine can be placed in snapshot mode prior to software upgrades, operating system updates, or any virtual machine configuration changes. If the upgrade, update, or other change were to fail or otherwise be found unsuitable, then the virtual machine could be quickly and easily returned to its previous state. The key thing to remember with VMware snapshots is that they are intended for short-term use only. They are not a replacement for backups, and snapshot delta disks alone may not be used as backups.
To better understand why snapshots are not suitable replacements for backups, it helps to understand how snapshots work. When a snapshot is taken, a delta disk is created for the virtual disk(s) in the virtual machine. This delta disk is used for all disk writes, since the original VMDK file is placed in read-only mode to preserve its state. If the memory is also preserved in the snapshot, then an additional file will be created that contains the memory and power state. These delta disks are also referred to as differencing disks, and they contain only the differences between the original virtual disk or parent snapshot (if multiple snapshots are being used). This is why snapshot files cannot be used as backups. Another key thing to understand about delta disks is that they expand with each disk write and can grow to the same size as the original virtual disk. Know that there is also a performance penalty when using snapshots. This penalty will depend on the workload, the number of snapshots used, and the duration of the snapshot(s).
Taking a snapshot will create VMDK, -00000#-DELTA-VMDK, VMSD, and VMSN files. These files are detailed in Table
7.3 in Chapter 7.
When used with VMware Tools, snapshots also provide the ability to provide varying degrees of consistency for powered-on virtual machines running certain versions of the Window OS. Table 9.2 shows these abilities.
Table 9.2 VM snapshot consistency abilities
Windows XP 32-bit
Windows 2000 32-bit |
Sync Driver |
File-system consistent |
Windows Vista 32-bit/64-bit
Windows 7 32-bit/64-bit |
VMware VSS |
File-system consistent |
| Windows 2003 32-bit/64-bit |
VMware VSS |
Application consistent |
Windows 2008 32-bit/64-bit
Windows 2008 R2 |
VMware VSS |
Application consistent |
Windows 2008 snapshots will be application consistent only when the following conditions are met:
- ESX 4.1 or newer hosts are used
- The UUID attribute is enabled
- SCSI disks are used in the virtual machine
- Dynamic disks are not supported
The VMware Tools provide drivers to allow running applications to have their I/O paused during snapshot operations. This feature, also known as quiescing, can be used to ensure at least some level of consistency for virtual machines that will have snapshots applied. Most backup applications leverage snapshots as part of image-level backups of virtual machines. The level of consistency achieved will vary, and it is extremely important to understand your workloads, their VSS support capability, and their specific behaviors when using them with virtual machines that will utilize snapshots. Just as you would with backup jobs, you will always want to test the consistency of applications when used with powered-on virtual machine snapshots. I will revisit consistency at the conclusion of this section on backups.
In addition to understanding how snapshots work, there are several restrictions when using snapshots:
- Raw disks, physical compatibility mode RDM disks, or iSCSI initiators being used inside a guest OS are not supported.
- PCI vSphere Direct Path I/O devices are not supported.
- Independent disks are not supported, unless the virtual machine is powered off.
- Virtual machines that use bus sharing are not supported.
- Machines protected with VMware FT are not supported.
- Sufficient free space in the datastore is required for delta files.
There is also some overhead involved when using snapshots. The overhead is approximately 2GB per 256GB. Table 9.3 lists the overheads and the resulting maximum VMDK sizes that can be used with snapshots.
Table 9.3 Snapshot overheads
| 256GB to 512 bytes |
∼ 2GB |
254GB (VMFS-3 only) |
| 512GB to 512 bytes |
∼ 4GB |
508GB (VMFS-3 only) |
| 1024GB to 512 bytes |
∼ 8GB |
1016GB (VMFS-3 only) |
| 2048GB to 512 bytes |
∼ 16GB |
2032GB (VMFS-3, VMFS-5) |
Because of these overheads, VMware recommends that the maximum size of any VMDK be based on a value that adjusts for the overhead involved. Not following this recommendation could lead to VMDK files that cannot be placed in snapshot mode or failed operations that depend on the use of snapshots.
Now that I have covered snapshots and identified the requirements for using them, I will move on to creating, deleting, and consolidating virtual machine snapshots.
Creating, Deleting, and Consolidating Virtual Machine Snapshots
Creating snapshots is a simple operational task that can be performed with either the vSphere Client or the vSphere Web Client. In most cases, Snapshot Manager is the tool that you will use to create, delete, and review snapshots for a virtual machine. Exercise 9.7 covers the steps to create and revert to a snapshot.
Exercise 9.7: Creating a Virtual Machine Snapshot and Then Revert To It
1. Connect to a vCenter Server with the vSphere Client.
2. Select a powered-on virtual machine that has the VMware Tools installed from the left pane and right-click it. Choose the Snapshot ⇒ Take Snapshot option from the context menu that appears.
3. Snapshot Manager will open.
4. Provide the snapshot with a descriptive name and description.
5. Ensure that the Snapshot The Virtual Machine's Memory option is selected.
6. Ensure that the Quiesce Guest File System (Needs VMware Tools Installed) option is selected.
7. Click OK to create the snapshot. A Create Virtual Machine Snapshot task will begin.
8. When this task completes, open Snapshot Manager again by right-clicking the virtual machine and choosing the Snapshot ⇒ Snapshot Manager option from the context menu that appears.
9. Review the information shown in Snapshot Manager and then close Snapshot Manager.
A snapshot has now been created for this virtual machine. In the next part of this exercise, you will make changes to both the virtual machine configuration and the guest OS file system.
10. Open the console to the virtual machine and create a directory on the root file system. Name this directory SNAPSHOT.
11. Open the Virtual Machine Properties editor and click the Options tab.
12. Select the Boot Options item in the left pane.
13. Select the Force BIOS Setup option.
14. Click OK and wait for the Reconfigure Virtual Machine task to complete.
In the remainder of the exercise, assume that the changes made to this VM were unsuccessful and you would now like to return the virtual machine to its prior state.
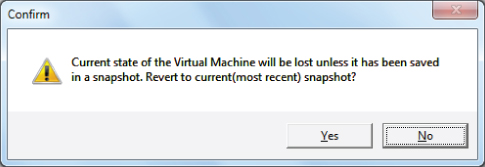
15. Open Snapshot Manager again by right-clicking the virtual machine and choosing the Snapshot ⇒ Revert To Current Snapshot option from the context menu that appears.
A dialog box will appear prompting you to confirm this action.
16. Click Yes to revert to the current snapshot.
17. A Revert To Current Snapshot task will begin. When this task completes, open the console of the virtual machine. Verify that the directory created in step 10 is not there.
18. Open the Virtual Machine Properties editor and click the Options tab.
19. Select the Boot Options item in the left pane.
20. Verify that the Force BIOS Setup option is no longer selected.
21. Open Snapshot Manager and verify that the snapshot still exists.
I have now shown how to create a snapshot for a powered-on virtual machine and covered how to revert to the snapshot. Exercise 9.8 covers the steps to delete this snapshot.
Exercise 9.8: Deleting a Virtual Machine Snapshot
1. Connect to a vCenter Server with the vSphere Client.
2. Open the console of the virtual machine used in the previous exercise and create a directory on the root file system. Name this directory SNAPSHOT.
3. Open the Virtual Machine Properties editor and click the Options tab.
4. Select the Boot Options item in the left pane.
5. Select the Force BIOS Setup option.
6. Click OK and wait for the Reconfigure Virtual Machine task to complete.
These are essentially the same steps performed in the previous exercise, but this time assume that the changes made to this VM were successful. The remainder of this exercise will cover the steps to commit the current state of the virtual machine by deleting the snapshot.
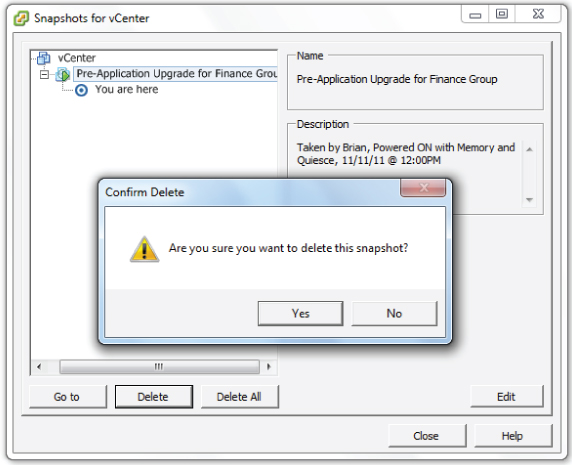
7. Open Snapshot Manager by right-clicking the virtual machine and choosing the Snapshot ⇒ Snapshot Manager option from the context menu that appears.
8. Snapshot Manager will open. Verify that the snapshot from the previous exercise is listed and selected.
9. Click the Delete button at the bottom of the Snapshot Manager window.
A dialog box will appear prompting you to confirm this action.
10. Click Yes to delete the snapshot.
11. A Remove Snapshot task will begin. Wait for this task to complete, and do not close Snapshot Manager.
12. When the Remove Snapshot task completes, verify that the snapshot is no longer listed in Snapshot Manager. Close Snapshot Manager.
Deleting the snapshot will commit the current state of the virtual machine. The remainder of this exercise will verify that the changes made to the virtual machine were committed successfully.
13. Open the console of the virtual machine and verify that the SNAPSHOT directory exists on the root file system.
14. Open the Virtual Machine Properties editor and click the Options tab.
15. Select the Boot Options item in the left pane.
16. Verify that the Force BIOS Setup option is selected.
You have now deleted a snapshot for a powered-on virtual machine. If the delete operation is successful, then no further action is required. In most cases, snapshot commit operations work as expected, but there can sometimes be problems. An example of this is if there was inadequate datastore free space during a snapshot commit. In the past, these failed operations required either workarounds with new snapshots and the Delete All option in Snapshot Manager or placing support calls to VMware. One of the new features in vSphere 5 is the consolidate option for snapshots. The consolidate functionality essentially provides a way to notify virtual infrastructure administrators to this failed commit condition and provide a method to handle any failed snapshot commits. If a snapshot commit operation fails, a message will appear on the virtual machine's Summary tab. Figure 9.2 shows this message.
Exercise 9.9 covers the steps to consolidate virtual machine snapshots. This exercise will utilize the Windows PowerShell v2 and the vSphere PowerCLI in order to create the consolidate condition. The consolidate operation can be performed with either the vSphere Client or the vSphere Web Client.
Exercise 9.9: Consolidating Virtual Machine Snapshots
1. Connect to a vCenter Server with the vSphere Client.
2. Locate a powered-on virtual machine in the left pane and right-click it. Choose the Snapshot ⇒ Take Snapshot option from the context menu that appears.
3. When Snapshot Manager opens, take a snapshot of the VM.
You have now created a snapshot of the virtual machine. In the following steps, you will install the vSphere PowerCLI. The PowerCLI will be used to force a snapshot consolidate condition.
4. Ensure that you have Windows PowerShell v2 on the system that the vSphere PowerCLI will be installed on.
6. Once the download completes, launch the setup file.
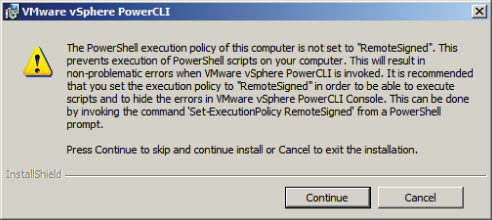
7. A dialog box may appear stating that the VMware VIX will be installed automatically. If so, click OK to continue.
You may also receive a message about the PowerShell execution policy, as shown here.
8. Review this information and then click the Continue button.
9. On the Welcome screen, click Next to begin.
10. Click Next on the Patents screen.
11. Accept the terms of the license agreement and click Next to continue.
12. Choose the destination folder and click Next to continue.
13. Click the Install button to install the vSphere PowerCLI.
14. When the installation completes, click Finish.
15. Using the newly created VMware vSphere PowerCLI icon on the Windows desktop, launch the vSphere PowerCLI.
The first thing that needs to be addressed is the execution policy. This was pointed out by the installer in step 7 of this exercise. In the following steps, you will set the PowerShell execution policy to require that downloaded scripts and configuration files be signed. This is a security feature of PowerShell.
16. When the vSphere PowerCLI opens, enter the following command:
Set-ExecutionPolicy RemoteSigned
17. Review the information presented and then press the Y key. Press Enter to continue.
Now that the execution policy is set, you will use the vSphere PowerCLI to remove the snapshot but not commit the changes. This will result in a condition where consolidation is needed. Note that the following steps would be used only to simulate this exact condition.
18. Type the following command, to connect to the vCenter Server used in step 1 of this exercise:
Connect-VIServer
19. At the Server[0] prompt, enter the FQDN of the vCenter Server and press Enter.
20. At the Server[1] prompt, press Enter.
21. Type the following command, replacing <VM-Name> with the name of the virtual machine used in step 3 of this exercise:
$VM = get-VM <VM_Name> | Get-View
22. Enter the following command to remove the snapshot listing in the Snapshot Manager but leave the delta disks in the virtual machine's working location.
23. Open Snapshot Manager and verify that the snapshot taken in step 3 of this exercise is not listed.
24. Browse the datastore that the virtual machine is located in, and confirm that there are still delta disks present for this virtual machine.
You have now simulated a failed snapshot commit. In the remaining steps of this exercise, you will use the Consolidate function to clean up the delta disks that were left behind. This is the important part of this exercise, because all of the previous steps only created the error condition.
25. Locate the virtual machine that you have been working with in the left pane and select it. Verify that a configuration issue is reported.
26. Right-click the virtual machine in the left pane and choose the Snapshot ⇒ Consolidate option from the context menu that appears.
27. A Confirm Consolidate window will appear. Click the Yes button to continue.
28. A Consolidate Virtual Machine Disk Files task will begin. When this task completes, verify that the message on the virtual machine's Summary tab is no longer present.
29. Open Snapshot Manager and confirm that there are no snapshots listed.
30. Open the datastore browser and navigate to the virtual machine's directory. Verify that the delta disk files have been removed.
In a real consolidation scenario, always investigate the virtual machine's datastore(s) to ensure that adequate free space is available before performing the consolidation operation.
Now that snapshots have been covered, I will move on to installing and configuring VMware Data Recovery.
Installing and Configuring VMware Data Recovery
VMware Data Recovery is a disk-based backup and recovery solution provided by VMware in all editions of vSphere except for Essentials. VMware Data Recovery supports deduplication stores of up to 1TB in size, which allows for space savings on these disk-based backups. Three components make up the VMware Data Recovery solution:
- vSphere Client plug-in, installed on a Windows system
- Backup appliance, installed on ESXi host
- File Level Restore client, installed in supported VM guest OS
Before you can begin to install any of the VMware Data Recovery components, you need to meet the following system requirements:
- vCenter Server is required.
- The vSphere Client is required.
- ESX/ESXi 4 or newer hosts are required.
- The ESXi host that the backup appliance runs on must be managed by vCenter Server.
- You must use supported storage, such as NAS, SAN, or CIFS.
- You need storage space equal to the used space in all VMDKs that are intended to be backed up.
- You need a minimum of 10GB of free space, and VMware highly recommends 50GB of free space. Unless your environment is very small, you will very likely need more than 50GB to actually use VMware Data Recovery.
- The backup appliance must have access to vCenter Server web services (ports 80 and 443).
- The VMware Data Recovery client plug-in and File Level Restore (FLR) client both connect to the backup appliance on port 22024.
- The backup appliance connects to ESX/ESXi hosts on port 902.
- The ESX/ESXi host names must be resolvable in DNS.
- Appropriate security credentials must be used by each of the VMware Data Recovery components.
- CIFS shares on servers that have other roles, like the vCenter Server, should not be used.
- CIFS shares connected to a virtual machine should not be used.
- The same CIFS shares should not be used on multiple backup appliances.
Each VMware Data Recovery backup appliance can back up 100 virtual machines, but only 8 virtual machines can be backed up simultaneously.
The first component that will be installed is the VMware Data Recovery Client plug-in; Exercise 9.10 covers the required steps.
Exercise 9.10: Installing the VMware Data Recovery Client Plug-in
1. Connect to a system that the VMware Data Recovery client plug-in will be installed on and obtain console access. This is a system that already has the vSphere Client installed.
2. Insert or mount the VMware Data Recovery media and launch the Data Recovery Installer.
3. Click the blue Data Recovery Client Plug-In link on the installer screen to begin.
4. On the setup splash screen, click Next to begin.
5. On the Welcome screen, click Next.
6. On the Patent screen, click Next.
7. Accept the terms of the license agreement and click Next.
8. Click Next to begin the install.
9. Review the information on the Installation Complete screen and click the Close button.
10. Open the vSphere Client and connect to a vCenter Server.
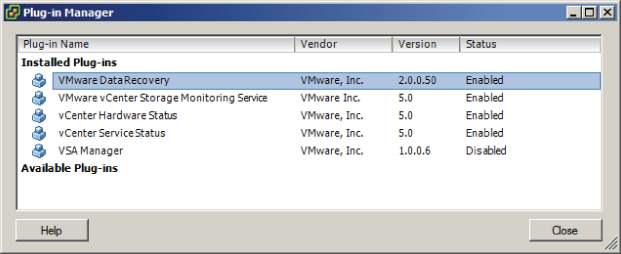
11. Select the Plug-ins menu and choose the Manage Plug-ins option.
12. The Plug-in Manager will launch.
13. Verify that the VMware Data Recovery plug-in is listed and shows a status of Enabled.
14. Close the Plug-in Manager and click the Home icon in the navigation bar.
15. Verify that a VMware Data Recovery icon appears in the Solutions And Applications section.
The VMware Data Recovery client plug-in and backup appliance versions must match.
Now that the VMware Data Recovery client plug-in is installed, the backup appliance needs to be installed. Exercise 9.11 covers the steps to deploy the VMware Data Recovery backup appliance.
Exercise 9.11: Installing the VMware Data Recovery Backup Appliance
1. Connect to a vCenter Server with the vSphere Client.
2. Insert or mount the VMware Data Recovery media.
3. Select File ⇒ Deploy OVF Template.
4. Click the Browse button and then locate the VMwareDataRecovery_OVF10.ovf file in the VMwareDataRecovery-ovf-x86_64 directory on the VMware Data Recovery media.
5. Click Next on the Source screen of the Deploy OVF Template Wizard.
6. Review the OVF Template Details and click Next.
7. Click the Accept button to accept the license agreement and then click Next to continue.
8. Provide a unique and descriptive name for the VMware Data Recovery appliance and select an inventory location. Click Next to continue.
9. Choose the appropriate cluster, host, and/or resource pool and click Next to continue.
10. Select a storage destination for the virtual appliance and then click Next.
If a VMFS datastore is chosen and VMFS-3 datastores are in use in the environment, be sure to select a VMFS datastore that uses the largest VMFS block size currently in use in the environment.
11. Select the virtual disk format for the VMware Data Recovery backup appliance and click Next to continue.
12. Select a network mapping and click Next to continue.
These network mappings can be changed after deployment by using the Virtual Machine Properties editor. The backup appliance has two NICs by default, with the intention of using one for management and one for network storage access. You may or may not require this second NIC in your environment.
13. Accept the default time zone of UTC for the Timezone Setting option. Click Next to continue.
14. Review the information on the Ready To Complete screen and click Finish to deploy the VMware Data Recovery backup appliance.
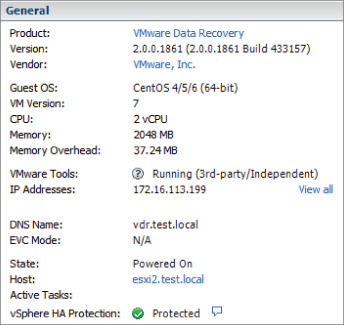
15. When the backup appliance is deployed, select it in the left pane. Review the information on the Summary tab for the backup appliance.

The deployed VMware Data Recovery backup appliance's Summary tab will have the annotation of VMware Data Recovery Module. It is essential that this annotation not be modified in any way, because the backup appliance is recognized by this annotation.
The VMware Data Recovery backup appliance has now been installed, but it still needs a storage location to use for the backups. Adding virtual hard disks to the backup appliance is a quick and easy way to provide this storage. VMware recommends the use of virtual disks or RDMs for deduplication stores, instead of CIFS shares.
Deduplication stores are limited to 1TB for virtual disks and RDMs. Deduplication stores are limited to 500GB for CIFS network shares.
Exercise 9.12 covers how to add a virtual hard disk to the backup appliance.
Exercise 9.12: Adding a Virtual Disk to the VMware Data Recovery Backup Appliance
1. Connect to a vCenter Server with the vSphere Client.
2. Locate the backup appliance in the left pane. Right-click it and choose the Edit Settings option from the context menu that appears.
3. On the Hardware tab, click the Add button. The Add Hardware Wizard will appear.
4. Select Hard Disk from the list of devices and click Next.
5. Choose the Create A New Virtual Disk option and click Next.
6. Give the disk a capacity suitable for your environment and choose the Thick Provision Lazy Zeroed option for Disk Provisioning. Click Next to continue.
7. Set the Virtual Device Node to the value of 1:0, as shown here.
8. Click Next to continue.
9. Review the information presented on the Ready To Complete screen and click Finish to add the virtual disk to the backup appliance.
10. Click OK in the Virtual Machine Properties editor and wait for the Reconfigure Virtual Machine task to complete.
This virtual disk can be easily extended later, using the Virtual Machine Properties editor. There is a single-click option in the VMware Data Recovery backup appliance to complete the disk extend.
The VMware Data Recovery backup appliance is now installed, and a virtual disk has been added to it. The final component of VMware Data Recovery, the File Level Restores (FLR) client, will now be installed. The term install is a misnomer, though, because the FLR client consists of a single file. This file is copied from the VMware Data Recovery media to the supported guest operating system running in the virtual machine. The supported guest operating systems include the following:
- Red Hat Enterprise Linux (RHEL) 5.4/CentOS 5.4
- Red Hat 4.8/CentOS 4.8
- Ubuntu 8.04
- Ubuntu 8.10
- Ubuntu 9.04
- Windows XP
- Windows Vista
- Windows 7
- Windows Server 2003
- Windows Server 2008
Installing the FLR client in a Windows guest OS is as simple as copying a single file. Browse the VMware Data Recovery media and locate and then copy the file WinFLRVMwareRestoreClient.exe to a location on the supported guest OS. Note that the FLR client on Windows requires the .NET Framework 2.0 or newer.
VMs that use GUID partition tables (GPTs) will not work with FLR.
The steps to install the FLR client in a Linux guest operating system are a bit more involved. In either 32-bit or 64-bit supported Linux guest operating systems, the FLR client has the following requirements:
- 32-bit version of FUSE 2.5 or newer
- LVM
These utilities must be available and added to PATH. Once these prerequisites are covered, the FLR client can be installed. Exercise 9.13 covers these steps using Ubuntu.
Exercise 9.13: Installing the FLR Client in Ubuntu
1. Connect to the virtual machine via console, SSH, or your preferred method of access.
2. Mount the VMware Data Recovery ISO to the virtual machine.
3. In either a terminal window or the local console, enter the following command:
cd /media/VMwareDataRecovery/LinuxFLR
4. Create a directory for the FLR client on the local filesystem:
mkdir ∼/vDR-FLR
5. Copy the archive file to the local filesystem, with the following command:
cp VMwareRestoreClient.tgz ∼/vDR-FLR
6. Change to the directory the VMwareRestoreClient.tgz file was copied to with the following command:
cd ∼/vDR-FLR
7. Enter the following command to extract the files from the archive:
tar xvzf VMwareRestoreClient.tgz
8. Change into the extracted file directory with the following command:
cd VMwareRestoreClient
9. Issue the following command to view the files in this directory:
ls
Note the two filenames of vdrFileRestore and VdrFileRestore. Remember that Linux is case-sensitive and these are two separate files. The VdrFileRestore file is the one that will be used later in this chapter to restore files to a virtual machine.
With the setup of the FLR client complete, all three of the VMware Data Recovery components are now installed. I will now move on to configuring the VMware Data Recovery backup appliance.
Exercise 9.14 covers the steps to configure the VMware Data Recovery backup appliance.
Exercise 9.14: Configuring the VMware Data Recovery Backup Appliance
1. Connect to a vCenter Server with the vSphere Client.
2. Locate the backup appliance in the left pane. Right-click it and choose the Open Console option from the context menu that appears.
3. When the console window opens, power on the backup appliance.
4. When the backup appliance loads, be sure that the console window has focus and then press Enter to log in.
5. Enter the username root and press Enter.
6. Enter the password vmw@re and press Enter.
7. Once logged in, enter the command passwd.
8. Enter the new password for the root account.
9. Reenter the new password for the root account.
10. Once the root password has been changed, enter the command exit.
11. You will be returned to the VMware Data Recovery backup appliance configuration screen.
12. If you have DHCP running on the network segment that the VMware Data Recovery backup appliance is running on, then note the URL on the configuration screen and skip to step 26. Note that you should consider using a static address for the VMware Data Recovery backup appliance.
13. If you do not have DHCP running on the network segment that the VMware Data Recovery backup appliance is running on, then the networking will need to be configured.
14. On the configuration screen, select the Configure Network option and press Enter.
15. You will first be prompted to configure an additional IPv6 address. Press the n key and press Enter.
16. You will next be prompted to choose between DHCP and static IP addressing. Press n and press Enter.
17. Enter the IP address for the backup appliance and press Enter.
18. Enter the appropriate subnet mask and press Enter.
19. Enter the gateway address and press Enter.
20. Enter the first DNS server address and press Enter.
21. Enter the second DNS server address and press Enter.
22. Provide a hostname and press Enter.
23. You will be prompted to specify whether an IPv4 proxy server is necessary to reach the Internet. Choose the appropriate response and press Enter to continue.
24. You will be prompted to review the information just entered and confirm whether it is correct. If the information is correct, press y and then press Enter on keyboard.
25. The networking will be reconfigured, and you will be returned to the configuration screen. Verify that the URL field is now populated with the correct address.
26. Enter this URL in a web browser and verify that you can connect and log in to the VMware Data Recovery backup appliance via its web management interface.
27. Take some time and explore this management interface.
You have now changed the password, configured networking, and spent some time exploring the web management interface for the backup appliance. Exercise 9.15 will cover the steps to connect the backup appliance to a vCenter Server.
Exercise 9.15: Connecting the VMware Data Recovery Backup Appliance to vCenter Server
1. Connect to a vCenter Server with the vSphere Client.
2. In the vSphere Client, click the Home icon in the navigation bar.
3. Choose the VMware Data Recovery icon from the Solutions And Applications section at the bottom of the screen.
4. Expand the inventory list in the left pane and select the appropriate backup appliance. The name of the virtual appliance will be populated into the drop-down menu in the right pane.
5. Click the Connect button.
6. You will be prompted to provide the password for the account you are currently signed into vCenter Server with. Enter the password and click OK.
These credentials will be stored and used to connect to vCenter Server to perform backup and restore operations. You may want to consider creating and using a service account or be mindful of the password expiration settings used on this account.
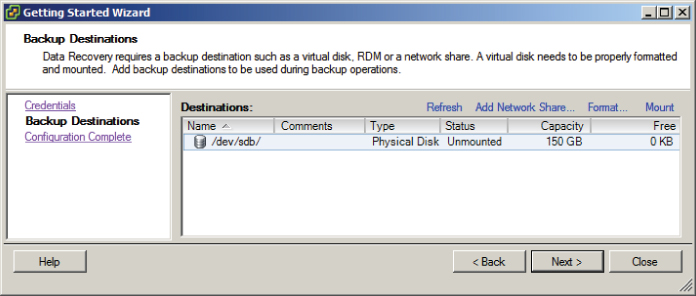
7. Since this is the first time a vSphere Client has connected to the backup appliance, the Getting Started Wizard will be launched.
8. Verify that the current credentials are reported as valid. If not, enter an appropriate set of credentials. Click Next to continue.
9. Review the backup destinations. Specifically, look for the virtual disk that was added to the backup appliance in Exercise 9.12. Use the blue Refresh link at the top of the window if the disk is not visible.
10. Click the disk to highlight it. Click the blue Format link at the top of the window to format this disk. A Format warning window will appear. If you are sure that the correct disk is selected, click OK to format this disk.
11. Monitor the progress of the format status in the Status column. When the format is complete, the device name will change to SCSI-1:0, and the Status column will change to Mounted.
12. Click Next to continue.
13. Review the information on the Ready To Complete screen. Remove the check from the Create A New Backup Job After Completion option and click the Close button to complete the Getting Started Wizard.
14. Click the Configuration tab and then click the blue Set vCenter Server Or ESXi Host Credentials link. A Set vCenter Server Or ESXi Host Credentials window will appear. If the credentials ever need to be modified, this is the location to make the change.
Regardless of the VMware Tools status reported for the VMware Data Recovery backup appliance, do not update the VMware Tools on this appliance.
Now that the steps to install and configure the VMware Data Recovery backup appliance have been covered, I will now cover the steps required to create a backup job with it.
Creating a Backup Job with VMware Data Recovery
Backup jobs can be created using the VMware Data Recovery client plug-in from the vSphere Client. These backup jobs can specify the virtual machine(s), the destination, and the retention period. Exercise 9.16 covers the steps to create a backup job with VMware Data Recovery. For this exercise, choose a guest OS that the FLR client is supported on. This virtual machine will be used in additional exercises in this chapter. The supported guest operating systems for use with the FLR client were listed earlier in this chapter.
Exercise 9.16: Creating a Backup Job with VMware Data Recovery
1. Connect to a vCenter Server with the vSphere Client.
2. In the vSphere Client, click the Home icon in the navigation bar.
3. Choose the VMware Data Recovery icon from the Solutions And Applications section at the bottom of the screen.
4. Expand the inventory list in the left pane and select the appropriate backup appliance. Click the Connect button in the right pane.
5. Click the Backup tab in the right pane.
6. Click the blue New link located in the upper-right section of this tab.
7. A Backup Job # – Backup Wizard will launch. Provide the backup job with a descriptive name and click Next.
8. Select a single virtual machine from the inventory and click Next to continue.
Note that you can also use the Virtual Machine Name filtering options at the top to help locate virtual machines. Entering characters in this text box will filter the virtual machines listed below in real time. This is a perfect example of a feature that would be extremely useful in an environment with hundreds or thousands of virtual machines.
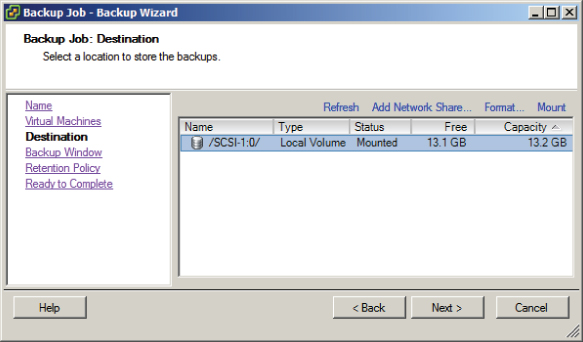
9. Select a destination to store the backup and click Next. Notice the blue Add Network Share link, which can be used to add a CIFS destination.
Make sure you select a virtual machine that will fit on the disk added to the backup appliance when making the choice here.
10. Review the default schedule. Accept the default options for the backup window and click Next to continue.
11. Review the default and available options for retention. Accept the default options for the retention policy and click Next to continue.
12. Review the information on the Ready To Complete screen and click Finish to add the backup job.
13. The backup job should run immediately, and if it does, you can skip step 14.
14. If the backup job doesn't start immediately, then right-click the backup job and choose the Backup Now ⇒ All Sources option from the context menu that appears. Verify that the backup job begins.
15. Ensure that the backup job completes before moving on to the next exercise.
The Reports tab in the right pane of the VMware Data Recovery application interface in the vSphere Client can be used to verify when backup jobs have completed.
Now that I have covered creating a backup job with VMware Data Recovery, I cover how to perform both a test and live full and file-level restore.
Performing a Test and Live Full/File-Level Restore with VMware Data Recovery
Once VMware Data Recovery creates a backup job, restores of the entire virtual machine or individual files are possible. It is also possible to clone a backup to a new virtual machine. Exercise 9.17 covers the steps to restore an individual file to a virtual machine. This exercise will use the virtual machine backed up in Exercise 9.16 and will cover a Windows guest OS.
Exercise 9.17: Performing an Individual File-Level Restore Using the FLR Client
1. Connect to the console of the virtual machine that was backed up in Exercise 9.16. Be sure you have Administrator privileges on this virtual machine.
2. Browse the VMware Data Recovery media and copy the file WinFLRVMwareRestoreClient.exe to the virtual machine.
3. Launch VMwareRestoreClient.exe and wait for the VMware Data Recovery Restore Client window to open. Enter the IP address of the VMware Data Recovery backup appliance.
Note the Advanced check box in the lower-left corner of this screen. The Advanced Mode of FLR can be used to access restore points from multiple virtual machines. The Standard Mode of FLR will only allow the virtual machine to see its own restore points.
4. Select the Advanced option. Additional login options will now become available.
5. Enter the FQDN of the vCenter Server and provide appropriate credentials. Click the Login button to continue.
6. Locate the same virtual machine that you are currently logged in to in the list and expand it to show the restore points. Select a restore point by clicking it.
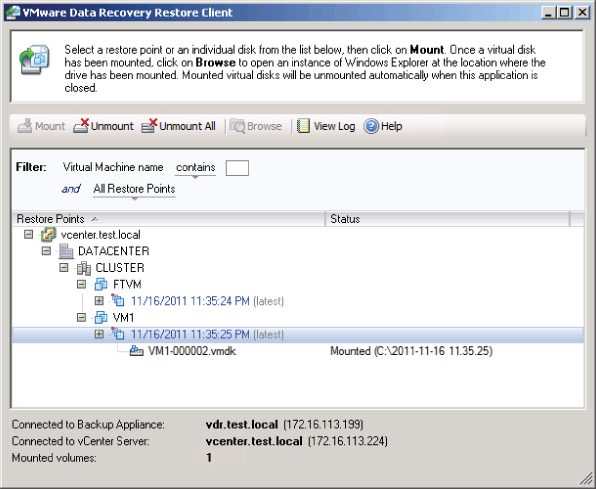
7. Click the Mount button located in the upper-left corner. The Status column will begin reporting Mounting. Wait for the Status column to update and show a value of Mounted. The path to the mount will also be shown in the Status column, as shown here.
8. Select a virtual disk file listed below the restore point and then click the Browse button on the top toolbar to browse to the path of the mount.
9. Locate the file(s) to be restored.
10. The file(s) may simply be copied from this path to the desired location.
11. When all files have been restored, return to the VMware Data Recovery Restore Client window and click the Unmount All button.
12. The Status column will no longer report any value, and the Mount button will again be active in the top toolbar.
13. Close the VMware Data Recovery FLR client.
I have now covered file-level restores for a Windows guest OS. While file-level restores may often solve a problem, sometimes an entire virtual machine may need to be restored. Exercise 9.18 covers the steps to restore a virtual machine. This exercise will overwrite an existing virtual machine, so please make sure to use a test system.
Exercise 9.18: Restoring a VM with VMware Data Recovery
1. Connect to a vCenter Server with the vSphere Client.
2. In the vSphere Client, click the Home icon in the navigation bar.
3. Choose the VMware Data Recovery icon from the Solutions And Applications section at the bottom of the screen.
4. Expand the inventory list in the left pane and select the appropriate backup appliance. Click the Connect button in the right pane.
5. Click the Restore tab in the right pane.
6. Click the blue Restore link located at the top of the right pane. The Virtual Machine Restore Wizard will launch.
7. Locate the virtual machine to be restored and expand its contents by clicking the plus sign in the box located to the left of the VM name. Locate the desired restore point and select it.
8. Click Next to continue.
9. On the Destination Selection screen, there are many options and items that need to be discussed. The right pane of the Destination Selection screen is shown here.
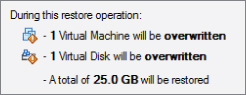
The first things to note are the alerts overlaying the virtual machine icons. Hovering the mouse over the alert state items produces the text This virtual disk will be overwritten shown in the previous image. Note that the Datastore, Virtual Disk Node, Restore Configuration, Reconnect NIC, and Power On columns can all be changed by clicking the values. Clicking these values will produce a drop-down menu where you can specify the available options. You can also right-click the virtual machine to rename it or move it to a different location. The virtual disk(s) on this screen can also be right-clicked to change the restore location.
10. Accept the defaults for all of the available options and click Next to continue.
11. Review the information presented on the Ready To Complete screen and pay particular attention to the notes listed at the bottom of this screen. These notes will look similar to what is shown here.
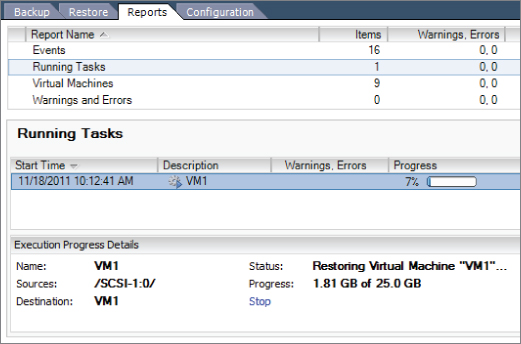
12. Click the Restore button to begin the restore operation. The Reports tab will now be shown in the right pane.
13. A series of tasks will be launched in vCenter Server, and the progress of the restore can be monitored in the Reports tab.
14. When the restore operation completes, verify that the virtual machine is working as expected.
I have now covered the steps to restore a virtual machine using VMware Data Recovery. With any backup software, it is good to know that the backups can be restored. Testing restoration is, or should be, common practice in most environments. This ensures that when it is time to restore a virtual machine, there will be no surprises or unexpected behaviors. VMware Data Recovery provides a built-in way to test the restore process, known as restore rehearsal from last backup. Exercise 9.19 covers the steps to perform this operation.
Exercise 9.19: Testing the Restore of a VM with VMware Data Recovery
1. Connect to a vCenter Server with the vSphere Client.
2. In the vSphere Client, click the Home icon in the navigation bar.
3. Choose the VMware Data Recovery icon from the Solutions And Applications section at the bottom of the screen.
4. Expand the inventory list in the left pane and select the appropriate backup appliance. Click the Connect button in the right pane.
5. Locate a virtual machine in the left pane and right-click it.
6. Choose the Restore Rehearsal From Last Backup option from the context menu that appears.
7. The Virtual Machine Restore Wizard will launch.
8. Locate the virtual machine to be restored and expand its contents by clicking the plus sign in the box located to the left of the VM name. Locate the desired restore point and select it.
9. Click Next to continue.
10. On the Destination Selection screen, right-click the virtual machine name and select Rename from the context menu that appears. Rename it as appropriate for your environment.
11. In the Datastore column, click the --SELECT-- text to choose the desired datastore for the virtual machine's VMX and VMDK file(s).
12. Note that the default option for the Reconnect NIC is No. Ensure that this is selected and also change the value of Power On to No.
13. Review the information presented on the Ready To Complete screen.
14. Click the Restore button to begin the restore operation. The Reports tab will now be shown in the right pane.
15. A series of tasks will be launched in vCenter Server, and the progress of the restore can be monitored in the Reports tab.
16. When the restore operation completes, open the Virtual Machine Properties editor for the virtual machine.
17. Verify that the virtual machine's configuration was restored properly by comparing it to the original virtual machine. Also ensure that the virtual machine's NIC is not set to Connect At Power On.
18. Power on the virtual machine and verify that the virtual machine works as expected.
I have now covered how to perform a test restore, or a restore rehearsal from last backup, using VMware Data Recovery. In the next section, I will cover determining an appropriate backup solution for a given vSphere implementation.
Determining Appropriate Backup Solution for a Given vSphere Implementation
Determining the appropriate backup solution for a given vSphere implementation will ultimately come down to understanding the workloads, the business requirements, and many more environment-specific factors. There are a multitude of questions that should be asked:
- Will disk-based backup, tape backup, or both be used?
- If disk-based backup is used, is deduplication a requirement?
- How much data must be backed up?
- What is the estimated annual growth of backed-up data?
- With what frequency must the data be backed up?
- What are the data retention requirements?
- Is there a requirement to encrypt the backup data?
- What are the characteristics of the backup window?
- Are there SLAs in place that dictate TTR or RPO objectives?
- Is the backup solution for both VMs and physical servers?
- Are remote systems in need of backup?
- How many virtual machines must be backed up?
- How many VMs must be backed up simultaneously?
- Is vCenter Server in the environment?
- Which edition of vSphere is in use?
- What level of consistency is required for each workload?
- Are backup agents desired or required for certain workloads?
- Are the applications running in the VMs VSS aware?
- Is VMware FT in use in the environment?
- Are file-level restores required?
- Which operating systems and versions are in the environment?
- Do any virtual machines use iSCSI initiators in the guest OS?
- Is the ability to replicate backups required?
- Are multiple definable restore points required?
- Can or should existing backup software be leveraged?
- Is the IT staff already trained in a particular backup product?
- What is the budget for the backup solution?
- Are their snapshot solutions provided by the storage vendor?
- How will the backup software be accessed and by whom?
Choosing Backup Software
A virtual infrastructure administrator is looking for a backup solution for her new virtual infrastructure. The environment currently contains multiple virtual machines with Windows 2000, SQL Server 6.5, and a custom in-house developed application running in them. These virtual machines were P2V converted from older hardware that was failing, and while not an ideal situation, these VMs are used in production. The business requires consistent backups of these virtual machines. Currently the virtual machines are backed up with a third-party application that utilizes an agent to get consistent SQL Server backups.
The virtual infrastructure administrator wants to use a backup solution that can capture a complete and application-consistent image of these virtual machines. She has investigated VMware Data Recovery but discovered that application consistency was not possible for these virtual machines. She investigates the capabilities of the third-party backup application and discovers that it too will not be able to provide application-consistent image-level backups of these virtual machines.
The virtual infrastructure administrator ultimately decides to continue to use the existing third-party backup application for daily backups of the data in these virtual machines. She also decides to use the third-party software to capture an image-level backup of the virtual machine. This image-level backup will be performed monthly, during a scheduled maintenance window. This image-level backup will be taken with the application and SQL Server services stopped in order to provide an application-consistent image-level backup. This approach allows her to recover the server to within 30 days but have much more current data.
Just like with many aspects of virtualization, there is no single backup solution that will fit every environment. Finding the right solution is more about understanding the particular requirements of the environment and delivering a backup/recovery solution that can meet those exact needs.
Patching and Updating ESXi and Virtual Machines
As a VMware Certified Professional, you will be expected to know how to patch and update ESXi hosts. Another item you will be expected to know is how to update the virtual machine hardware and the VMware Tools. Both of these practices are important in ensuring a highly available and highly performing virtual infrastructure. In this section, I will cover how to keep ESXi hosts up-to-date and how to keep the VMware Tools and virtual machine hardware up-to-date.
Identifying Patching Requirements for ESXi Hosts and Virtual Machine Hardware/Tools
Patching ESXi 5 hosts can be accomplished in different ways, but the two most common methods are the following:
- Using vSphere Update Manager
- Manually with the esxcli command
Regardless of the method used to patch an ESXi 5 host, the process is basically the same. The host will need to be placed in maintenance mode, and the patch or patches need to be applied and then verified. vSphere Update Manager can automate this multistep process, which can be quite helpful.
When patching ESX/ESXi hosts, vSphere Update Manager has the following requirements:
- Only ESX/ESXi 3.5 and newer hosts are supported.
- Upgrades/migrations require ESX/ESXi 4 and newer.
- vCenter Server is required.
- vSphere Update Manager requires its own database.
The esxcli command can be used from the ESXi Shell, the vMA, the vSphere PowerCLI, or the vSphere CLI. The requirements for patching ESXi hosts with the esxcli command are to ensure that you have both the access and the proper permissions to the ESXi host being patched.
Updating the VMware Tools and virtual machine hardware versions can also be accomplished in a variety of ways. These include the following:
- Using vSphere Update Manager
- Manually using the vSphere Client or the vSphere Web Client
Regardless of the method used to update the virtual machine hardware or the VMware Tools, the process is the same. Windows guests will have the VMware Tools uninstalled, a new version of the VMware Tools will be installed, and then a reboot will be required. As discussed in the upgrade sequence in Chapter 2, the VMware Tools upgrade should happen prior to the virtual machine hardware upgrade. This sequence ensures that any new virtual machine hardware will already have drivers available. The virtual machine hardware upgrade will also require both a shutdown and a subsequent reboot for Windows guests.
vSphere Update Manager has the following requirements to update virtual machine hardware versions and the VMware Tools:
- ESX/ESXi 4 and newer hosts are supported.
- Virtual machine patch operations are not supported.
When manually updating the virtual machine hardware or the VMware Tools with either the vSphere Client or the vSphere Web Client, the requirements are to have the appropriate privileges at the virtual machine level and the guest OS level.
While host profiles cannot be used to apply patches to ESXi hosts, they can be used to update settings on ESXi hosts. You may recall applying permissions to ESXi hosts in Exercise 3.12 in Chapter 3. There are a variety of settings that can be configured and checked for compliance. Using host profiles can be a powerful solution for updating configuration changes to multiple ESXi hosts. Host profiles have the following requirements, when patching ESX/ESXi hosts:
- Only ESX/ESXi 4 and newer hosts are supported.
- Enterprise Plus licensing is required.
Now that the requirements for patching ESX/ESXi hosts and virtual machine hardware and the VMware Tools have been covered, I will cover how to create, edit, and remove a host profile from an ESXi 5 host.
Creating, Editing, and Removing a Host Profile from an ESXi Host
The first step in using host profiles to monitor compliance for your ESXi hosts is to create a host profile. Exercise 9.20 covers the steps to create an ESXi host profile.
Exercise 9.20: Creating an ESXi Host Profile
1. Connect to a vCenter Server with the vSphere Client. Ensure that Enterprise Plus licensing is available or that the vCenter Server is running in evaluation mode.
2. Select the reference ESXi host and right-click it. Choose the Host Profile ⇒ Create Profile From Host option from the context menu that appears.
3. When the Create Profile From Wizard begins, give the host profile a descriptive name and a brief description. Click Next to continue.
4. Review the summary information on the Ready To Complete The Profile screen and click Finish. A Create A Host Profile task will start. Wait for this task to complete before continuing.
5. Leave the vSphere Client open, because it will be used in the next exercise.
You have now created a host profile, but you need to edit some of its settings. For the purpose of this exercise, assume that the NTP server in your environment has been changed. I will cover how to edit the NTP settings of the host profile to reflect this change in Exercise 9.21.
Exercise 9.21: Editing an ESXi Host Profile
1. Click the Home icon in the navigation bar at the top of the screen in the vSphere Client. Click the Host Profiles icon, located under the Management section.
2. In the left pane, select the profile that was created in the previous exercise. Right-click the profile and choose the Edit Profile option.
3. When the Edit Profile window launches, expand the Date And Time Configuration policy in the left pane. Select the Time Settings item in the right pane and verify the information presented in the Configuration Details tab.
If the NTP settings have been previously configured, then the drop-down menu will show Configure A Fixed NTP Configuration and show the configured NTP server. If no NTP server was previously configured for the reference ESXi host, then the drop-down menu will show User Must Explicitly Choose The Policy Option.
4. Ensure that the drop-down menu is set to Configure A Fixed NTP Configuration and enter the new NTP server address.
5. Click the Compliance Details tab. Ensure that the Validate That List Of NTP Servers Isoption is selected. You can click the blue server link to view the configured NTP server(s).
Choosing this option ensures that a compliance check will verify this setting.
6. Click OK to save these changes to the host profile.
7. An Update Host Profile task will begin. When this task completes, the policy is ready to be used.
To remove a host profile, simply right-click the host profile and choose the Delete Profile option from the context menu that appears. You will be prompted to confirm the delete.
Now that creating, editing, and removing host profiles have each been covered, the next step is to attach the host profile to an ESXi host.
Attaching and Applying a Host Profile to an ESXi Host or Cluster
Once a host profile is created, it needs to be attached to another ESXi host or cluster. Exercise 9.22 will cover the steps to attach the host profile you created to the reference ESXi host.
Exercise 9.22: Attaching a Host Profile to an ESXi Host
1. Connect to a vCenter Server with the vSphere Client. Ensure that Enterprise Plus licensing is available or that the vCenter Server is running in evaluation mode.
2. Right-click the ESXi host and choose the Host Profile ⇒ Manage Profile option from the Host Profile menu.
3. In the Attach Profile window, choose the profile created in Exercise 9.20 and click OK.
4. An Attach Host Profile task will start. When it completes, click the Summary tab for this ESXi host and verify that the correct host profile is listed in the General section.
Since the host profile was edited after you initially created it, the host profile now needs to be applied to the reference ESXi host. This will ensure that the reference ESXi host will be compliant in the next exercise.
5. ESXi hosts must be in maintenance mode to have a host profile applied, so right-click the reference ESXi host and choose the Enter Maintenance Mode option from the context menu that appears.
6. Once the ESXi host is in maintenance mode, right-click the ESXi host and choose the Host Profile ⇒ Apply Profile option from the Host Profile menu.
7. The Apply Profile window will appear. Wait for the configuration change to load and then review the change listed in the Apply Profile window.
8. Click Finish to apply the host profile.
9. Check the Time Configuration in the Configuration tab to see that the NTP server information is updated.
You have now attached and applied the modified host profile to the reference ESXi host. In the next section, you will check a second ESXi host for compliance and remediate it.
Performing Compliance Scanning and Remediating an ESXi Host Using Host Profiles
Now that you have attached and applied the host profile to your reference host, you are set to leverage the power of host profiles. This power is in one configuration change to the host profile that can then be applied to many ESXi hosts. Although changing multiple ESXi hosts is possible, Exercise 9.23 covers the steps to check a single ESXi host for compliance and remediate it.
Exercise 9.23: Compliance Scanning and Remediating an ESXi Host
1. Connect to a vCenter Server with the vSphere Client. Ensure that Enterprise Plus licensing is available or that the vCenter Server is running in evaluation mode.
2. Right-click a second ESXi host and choose the Host Profile ⇒ Manage Profile option from the Host Profile menu.
3. In the Attach Profile window, choose the profile created in Exercise 9.20 and click OK.
4. An Attach Host Profile task will start. When it completes, click the Summary tab for this ESXi host and verify that the correct host profile is listed in the General section.
5. Place this ESXi host in maintenance mode.
6. Now that the profile is attached to the host, you will check the host for compliance with the profile. Click the Home icon in the navigation bar at the top of the screen. Click the Host Profiles icon, located under the Management section.
7. In the left pane, select the profile you just attached to the ESXi host. In the right pane, click the Hosts And Clusters tab.
8. Select each of the two ESXi hosts listed by clicking them while holding down the Ctrl key. Click the Check Compliance link in the top of the pane.
9. A Check Compliance task will start for each host. Wait for these tasks to complete and verify that the Host Profile Compliance or Compliance – Last Checked columns report different values. The results should look similar to this.
10. Now that you know the second host is noncompliant, the final step is to apply the profile to the host.
11. Select the noncompliant ESXi host listed in the Entity Name column and click the blue Apply Profile link at the top of the screen.
12. The Apply Profile window will appear. Review the changes listed and click Finish.
13. An Apply Host Configuration task will start, followed closely by a Check Compliance task. Wait for both of these tasks to complete and then verify that the Host Profile Compliance is now reported as Compliant for both ESXi hosts.
You have now checked an additional ESXi host for compliance to the host profile and then remediated it. Remember that the power in host profiles is in maintaining consistency across multiple ESXi hosts from a much fewer number of host profiles. Now that I have covered configuration consistency, I will move on to maintaining patch levels for ESXi hosts and updates for virtual machine hardware and the VMware Tools.
Installing and Configuring VMware vSphere Update Manager
VMware vSphere Update Manager is an automated patch management solution used to simplify the management of VMware vSphere environments. Update Manager can automate patches for ESXi hosts, virtual machine hardware, and the VMware Tools.
Before installing Update Manager, first verify membership in the Administrators group on the system and verify that the Update Manager system requirements are met. It's recommended to have a separate drive or volume to store the downloaded patch files. Other prerequisites are as follows:
- vCenter Server installation media should be available.
- The .NET Framework 3.5 SP1 or newer is required.
- vCenter Server should be installed and working properly.
- An Oracle or Microsoft SQL Server database should be used. Environments smaller than 5 hosts and 50 VMs can use the bundled SQL Server 2008 R2 Express database.
- A 64-bit Windows system is required for installation.
- A 32-bit DSN is required for database connectivity, if not using the bundled SQL Express database.
- vSphere Update Manager 5 is compatible only with vCenter Server 5.
- The Update Manager server and client plug-ins must be running the same version.
- Update Manager, vCenter Server, and the vSphere Client must be running compatible versions.
While vSphere Update Manager and vCenter Server can use the same database, VMware recommends that separate databases be used.
Once the prerequisites have been met for Update Manager, installation can begin. Exercise 9.24 will cover the steps to install vSphere Update Manager.
Exercise 9.24: Installing vSphere Update Manager
1. Connect to a console session on any supported Windows client or server and log on with an Administrator account.
Note that vSphere Update Manager can be installed on the vCenter Server or its own dedicated server.
2. Launch the vCenter Server Installer and select VMware vSphere Update Manager from the list of VMware Product Installers.
3. Click the Install button to begin.
4. When the installation wizard starts, select the desired language and click OK.
5. On the Welcome screen, click Next to begin.
6. Click Next on the End-User Patent Agreement screen to continue.
7. Accept the terms of the license agreement and click Next.
8. Deselect the Download Updates From Default Sources Immediately After Installation option, as shown here.
9. Click Next to continue.
10. On the vCenter Server Information screen, enter valid credentials for vSphere Update Manager to use to connect to vCenter Server. Ensure that the vCenter Sever name and port information are both correct. Click Next to continue.
11. Choose the appropriate database/credentials; note that if you use a stand-alone Oracle or SQL database, a 32-bit DSN is required.
12. Use the drop-down menu to specify the network interface that will be used for vSphere Update Manager and select the Yes, I Have Internet Connection And I Want To Configure Proxy Settings Now option.
13. Click Next to continue.
14. Configure the proxy server as necessary and click Next to continue. If you do not have a proxy server, simply deselect the Configure Proxy Settings option and click Next.
15. Select the destination folder for the Update Manager installation and the location for downloading patches. Click Next to continue.
Note that a best practice is to change the location for patch downloads to a different volume than where the operating system is installed. This practice can help prevent OS volume disk full errors from occurring. This location can be changed after installation by manually editing the <patchStore> information contained in the C:Program Files (x86)VMwareInfrastructureUpdate Managervci-integrity.xml file.
16. Review the information on the Ready To Complete screen and click the Install button to install vSphere Update Manager.
17. Click Finish when the installation completes.
vSphere Update Manager has now been installed, but the vSphere Client plug-in still needs to be configured. The remaining steps of this exercise will cover enabling this plug-in.
18. Connect to a vCenter Server with the vSphere Client.
19. Select the Plug-ins menu and then choose the Manage Plug-ins menu option. The Plug-in Manager window will appear.
20. The VMware vSphere Update Manager Extension is listed under the Available Plug-ins section. Click the blue Download And Install link in the Status column. The Status value will change to Downloading while the file is downloaded locally.
21. When the installer launches, select the desired language and click OK to continue.
22. On the Welcome screen, click Next.
23. Accept the terms of the license agreement and click Next.
24. Click the Install button to begin the install.
25. Click Finish on the Installation Complete screen.
26. Verify that the VMware vSphere Update Manager Extension is now listed under the Installed Plug-ins section of the Plug-in Manager.
27. You will also be prompted with a certificate warning. Handle this as appropriate for your environment.
28. Close the Plug-in Manager.
29. Click the Home icon in the navigation bar of the vSphere Client.
30. Verify that Update Manager is now listed under Solutions And Applications.
31. Click this icon to open Update Manager; review the interface options available.
Now that I have covered installing the vSphere Update Manager, I will cover how to configure its network settings in Exercise 9.25.
Exercise 9.25: Configuring vSphere Update Manager Network Settings
1. Connect to a vCenter Server using a vSphere Client with the vSphere Update Manager plug-in installed.
2. Click the Home icon in the navigation bar of the vSphere Client.
3. Click the Update Manager icon located in the Solutions And Applications section.
4. Click the Configuration tab.
5. The Network Connectivity settings are displayed by default. Review the current settings, as shown here.
6. If the IP Address Or Host Name For The Patch Store option has a value other than an IP address, use the drop-down menu to change this value to the IP address of the system where vSphere Update Manager is installed.
VMware recommends using an IP address here. Also note that IPv6 is not supported for scanning and/or remediation of virtual machines or virtual appliances.
7. After changing the value of the Address Or Host Name For The Patch Store option to the IP address of the vSphere Update Manager system, click the Apply button to save the change.
8. When the Apply button is grayed out, the change has been saved.
The network settings have now been configured, and I will next cover configuring the virtual machine settings. Note that the download settings will be covered in detail in the next section of this chapter.
The virtual machine settings are used to enable and disable the snapshot functionality and to define the retention period. By default, a snapshot will be taken of virtual machines before the updates are applied. This feature can be used to protect individual virtual machines in the event that an update causes a problem. By default, this snapshot will also be set to allow unlimited growth. As discussed earlier in this chapter, use caution with this default setting, because it could lead to very large snapshot files and the problems associated with them.
vSphere Update Manager can take snapshots of virtual machine hardware version 4 and newer only.
Exercise 9.26 will cover the steps to configure the virtual machine settings.
Exercise 9.26: Configuring vSphere Update Manager Virtual Machine Settings
1. Connect to a vCenter Server using a vSphere Client with the vSphere Update Manager plug-in installed.
2. Click the Home icon in the navigation bar of the vSphere Client.
3. Click the Update Manager icon located in the Solutions And Applications section.
4. Click the Configuration tab.
5. Click the blue Virtual Machine Settings link in the Settings panel on the left.
6. Select the Keep For Hours option and enter an acceptable value for your environment. This will not allow snapshots to grow forever and is a good best practice to implement.
7. Click the Apply button to save these changes. When the Apply button is grayed out, the changes have been saved.
You have now configured the snapshot behavior for virtual machines used with vSphere Update Manager. I will next cover the ESXi host and cluster settings in Update Manager.
The ESXi host and cluster settings are used to control the maintenance mode behavior of ESXi hosts, cluster settings, and boot settings for ESXi hosts that utilize PXE boot. These settings can be configured to allow vSphere Update Manager to perform updates to ESXi hosts that are members of a cluster with DRS and/or HA enabled.
Figure 9.3 shows the default maintenance mode settings.
These options can be used to control how virtual machines behave when a host is placed in maintenance mode. The VM Power State drop-down menu allows the configuration to set virtual machines to power off, suspend, or be migrated. There are also retry settings, in the event that the ESXi host does not successfully enter maintenance mode, and the ability to temporarily disable removable media devices. Each of these options can be configured to work as desired for the specific environment.
The next section of the ESXi Host/Cluster settings is the Cluster Settings. Exercise 9.27 covers the steps to configure these settings.
Exercise 9.27: Configuring vSphere Update Manager Cluster Settings
1. Connect to a vCenter Server using a vSphere Client with the vSphere Update Manager plug-in installed.
2. Click the Home icon in the navigation bar of the vSphere Client.
3. Click the Update Manager icon located in the Solutions And Applications section.
4. Click the Configuration tab.
5. Click the blue ESX Host/Cluster Settings link in the Settings panel on the left.
6. If DPM is configured on the cluster, ensure that the Distributed Power Management (DPM) option is selected. This will prevent DPM from interrupting vSphere Update Manager operations.
7. If your environment is very large, you may be able to speed the time to remediation by selecting the Enable Parallel Remediation For Hosts In Cluster option. This will allow Update Manager to update ESXi hosts simultaneously, as compared to sequentially when this option is not used.
8. Review the other settings listed here and determine whether they should be used in your environment.
The final setting in the ESX Host/Cluster settings is PXE Booted ESXi Host Settings. This setting can be used to allow vSphere Update Manager to update stateless ESXi hosts. This could be useful in cases where updates do not require a host reboot. This setting is disabled by default.
The last vSphere Update Manger setting is for vApps. There is one configurable option, known as Enable Smart Reboot After Remediation. This setting is shown in Figure 9.4.
This setting is enabled by default and will attempt to fulfill the startup order listed in the vApp, if any virtual machine in the vApp is remediated and requires a reboot. This is a useful setting, since rebooting a single virtual machine in the vApp could lead to failure of a tiered application.
Now that I have configured most of the vSphere Update Manager settings, I will move on to what are arguably the most important settings: the download options.
Configuring Patch Download Options
vSphere Update Manager can be configured to obtain files from three different download sources:
Direct Connection to Internet This method can be used if vSphere Update Manager is installed on a server that has either direct or proxied Internet access.
Use a Shared Repository This method can be used when vSphere Update Manager is installed on a server that does not have Internet access. It requires installing and configuring the Update Manager Download Service (UMDS) on an additional server that has Internet access.
Import Patches This method can be used to import a ZIP file with the required patches.
It is important to remember that either Internet downloads or a shared repository can be used, but they cannot be used simultaneously. It is strictly an either/or option.
Exercise 9.28 will cover the steps to configure the download settings for vSphere Update Manager.
Exercise 9.28: Configuring vSphere Update Manager Download Settings
1. Connect to a vCenter Server using a vSphere Client with the vSphere Update Manager plug-in installed.
2. Click the Home icon in the navigation bar of the vSphere Client.
3. Click the Update Manager icon located in the Solutions And Applications section.
4. Click the Configuration tab.
5. Click the blue Download Settings link in the Settings panel on the left. The default Download Settings are shown here.
6. The first option in Download Sources is used when Update Manager is installed on a server with a connection to the Internet. Review the Enabled, Update Type, Component, Download Source, Description, and Connectivity Status columns.
7. If you recall from setup in Exercise 9.23, the option was chosen to not download the files. Download the files by clicking the Download Now button.
8. A dialog box will appear informing you that a download task has been started. Verify in the Recent Tasks pane that a Download Patch Definitions task has started.
9. While the patches download, note the second available option in the Download Sources section titled Use A Shared Repository. This option would be used with the UMDS mentioned earlier.
10. Look just below the Use A Shared Repository option, and you will see the third option, which is a blue Import Patches link.
11. Look in the Proxy Settings section in the lower part of the screen. These options can be configured as necessary when using the Direct Connection To Internet option in Download Settings.
12. There is also a Test Connection button included to test the proxy settings. If you use a proxy server, enter values for the Proxy Settings and click Test Connection to verify Internet connectivity.
13. When the Download Patch Definitions completes, browse to the directory that contains these files. If you accepted the default, the path will be C:ProgramDataVMwareVMware Update ManagerData.
14. Review the directory structure and files contained here.
Now that the download sources and proxy settings have been covered, I will cover the download schedule, which determines when vSphere Update Manager will actually download files.
15. Click the blue Download Schedule link in the Settings panel on the left.
16. Review the information here and notice that the scheduled downloads can also be disabled using the Enabled Scheduled Download option.
17. Take note of the date and time listed for the Next Run.
18. Click the blue Edit Download Schedule link to modify the schedule.
19. The Schedule Update Download Wizard will appear, as shown here.
20. Change the Start Time and Interval setting to suit the needs of your environment. Click Next to continue.
21. If you want to be notified via email when new patches are downloaded, then enter an email address here. Click Next.
22. Review the information presented on the Summary screen and click Finish to modify the schedule.
23. Verify that the new schedule shows in the Download Schedule section of the Configuration tab.
Now that the download schedule has been covered, I will cover the Notification Check Schedule option. The notification check schedule is used to check for information about patch recalls, new fixes, and alerts.
24. Click the blue Notification Check Schedule link in the Settings panel on the left.
25. Review the information here and notice that the scheduled downloads can also be disabled using the Enabled Scheduled Download option.
26. The schedule can also be modified using the Schedule Update Wizard that was used previously in this exercise.
Now that the vSphere Update Manager download options have been covered, the next section will cover creating, editing, and deleting an Update Manager baseline.
Creating, Editing, and Deleting an Update Manager Baseline
vSphere Update Manager is used to scan hosts, virtual machines, and virtual appliances against a baseline or baseline group to determine their compliance level. A baseline is a collection of one or more patches, extensions, or upgrades, and a baseline group is a collection of baselines.
Baselines can be either dynamic or fixed. Dynamic baselines will update automatically as new patches are released, where fixed baselines are static and will not automatically include any newly released updates. Fixed baselines would typically be used when the virtual infrastructure administrator wants more control over what patches are installed.
The first type of baseline is the patch baseline. There are two patch baselines used for scanning hosts included with Update Manager by default. These baselines can be viewed on the Update Manager Baselines And Groups tab with the Hosts view. These two host baselines are as follows:
Critical Host Patches These are used to check ESX/ESXi hosts for compliance with all critical patches.
Non-Critical Host These are used to check ESX/ESXi hosts for compliance with all optional patches.
The second type of baseline is the extension baseline, which is used to deploy VMware or third-party software. An example of this might be vendor-specific CIM providers or a multipathing plug-in.
The third type of baseline is the upgrade baseline. There are three upgrade baselines used for scanning virtual machines and virtual appliances included with Update Manager by default. These baselines can be viewed on the Update Manager Baselines And Groups tab with the VMs/VAs view. The three upgrade baselines are as follows:
VMware Tools Upgrade to Match Host Used to check virtual machines for compliance with the latest version of VMware Tools available on the ESX/ESXi 4 or newer host.
VM Hardware Upgrade to Match Host Used to check the virtual hardware of a virtual machine for compliance with the most current version supported on the ESXi 5 host.
VA Upgrade to Latest Used to check virtual appliance compliance with the latest available version of the virtual appliance.
Upgrade baselines can also be used in vSphere Update Manager to upgrade ESXi 4 hosts and to migrate ESX 4 hosts.
vSphere Update Manager cannot be used to upgrade an ESX 4 host that was upgraded from ESX 3.x. A fresh install will instead be required.
vSphere 5 surely has patches available for it. At the time this book was written, there were three patches already available for ESXi 5. Exercise 9.29 covers the steps to create a dynamic patch baseline for patching an ESXi 5 host to the latest release. This exercise will require a single ESXi 5 host that is not at the latest patch level.
Exercise 9.29: Creating a Dynamic Patch Baseline for ESXi 5
1. Connect to a vCenter Server using a vSphere Client with the vSphere Update Manager plug-in installed.
2. Click the Home icon in the navigation bar of the vSphere Client.
3. Click the Update Manager icon located in the Solutions And Applications section.
4. Click the Baselines And Groups tab. Note that the default view is the Hosts view.
5. On the Hosts view screen, click the blue Create link. The New Baseline Wizard will launch.
6. Give the baseline a descriptive name and provide a description for it in the Baseline Name And Description section. Ensure that the Host Patch option is selected in the Baseline Type section. The final settings should appear similar to what is shown here.
7. Click Next to continue.
8. Ensure that the Dynamic option is chosen for the baseline type and click Next to continue.
9. On the Dynamic Baseline Criteria screen, choose the Any option for the Patch Vendor. Select embeddedEsx 5.0.0 for Product. Accept the defaults for Severity and Category and do not specify any date ranges. The final settings should appear similar to what is shown here.
10. Note at the bottom of the screen that the number of patches that meet the selected criteria are listed. Click Next to continue.
11. On the Patches To Exclude screen, note the available patches are listed. The Patch Name, Release, Type, Severity, Category, Impact, and Vendor columns can each be used to discover more information about the available patches.
12. Accept the defaults and click Next to continue.
13. On the Additional Patches screen, review the additional patches that are available in the repository. Click Next to continue.
14. Review the information presented on the Ready To Complete screen. Expand Patches Matching Criteria Currently In The Repository and verify that the information listed is correct.
15. Click Finish and then verify that the new baseline is listed in the Hosts view of the baselines with the correct value in the Content column.
You have now created a dynamic baseline that can be used to update your ESXi 5 hosts to the latest version. I also included the Cisco Nexus 1000V in this baseline, and it's very likely that most test labs do not include this dvSwitch. If your lab does, then good for you! Exercise 9.30 covers how to edit the baseline just created to remove the Cisco Nexus 1000V patch.
Exercise 9.30: Editing a Dynamic Patch Baseline for ESXi 5
1. Connect to a vCenter Server using a vSphere Client with the vSphere Update Manager plug-in installed.
2. Click the Home icon in the navigation bar of the vSphere Client.
3. Click the Update Manager icon located in the Solutions And Applications section.
4. Click the Baselines And Groups tab. Note that the default view is the Hosts view.
5. On the Hosts view screen, locate the baseline created in the previous exercise. Right-click the baseline and choose the Edit Baseline option from the context menu that appears.
6. The Edit Baseline Wizard will appear. Note that on the Baseline Name And Type screen, you cannot edit the Baseline Type. Click Next to continue.
7. Leave the baseline as Dynamic and click Next to continue.
8. In the Dynamic Baseline Criteria settings, ensure that embeddedEsx 5.0.0 is selected for Product. Click Next to continue.
9. On the Patches To Exclude screen, select the Cisco Nexus 1000V patch by clicking it. Using the arrow buttons in the middle of the screen, move this patch to the Patches To Exclude section at the bottom of the screen.
10. Once the patch is moved, a red X will show beside it in the leftmost column in the top portion of the screen.
11. Click Next to continue.
12. On the Additional Patches screen, click Next.
13. Review the information presented on the Ready To Complete screen. Expand Patches Matching Criteria Currently In The Repository and Patches Matching Criteria To Exclude and verify that the information listed is correct.
14. Click Finish and verify that the baseline is listed with the updated value in the Content column.
You have now created and edited a dynamic baseline. In the event that a baseline ever needs to be deleted, simply select the baseline to highlight it and then click the blue Delete link at the top of the screen. You will be prompted to confirm the deletion, as shown in Figure 9.5.
In the next section, I will cover attaching a vSphere Update Manager baseline to an ESXi host.
Attaching an Update Manager Baseline to an ESXi Host or Cluster
Attaching a baseline to an object allows you to view compliance information and remediate the object. Attaching baselines is performed from the Update Manager Client Compliance view. It is considered a best practice to attach baselines to a container object, such as a cluster, because this will help ensure consistency of all ESXi hosts in the cluster. In Exercise 9.31, this best practice will not be used. Instead, the steps to attach a baseline to a single ESXi host will be covered.
Exercise 9.31: Attaching a Baseline to an ESXi Host
1. Connect to a vCenter Server using a vSphere Client with the vSphere Update Manager plug-in installed.
2. Click the Home icon in the navigation bar of the vSphere Client.
3. Click the Hosts And Clusters icon.
4. Select an ESXi host in the left pane and then select the Update Manager tab in the right pane.
5. Click the blue Attach link in the upper right. The Attach Baseline Or Group windows will appear.
6. Select the baseline created in Exercise 9.28. The final configuration should appear similar to what's shown here.
7. Click the Attach button.
8. Verify that the Update Manager tab has been updated.
Now that the baseline has been attached to an ESXi host, the next operation is to scan and remediate the ESXi host. The steps required to do this will be covered next.
Scanning and Remediating ESXi Hosts and Virtual Machine Hardware/Tools Using Update Manager
Scanning is how vSphere Update Manager discovers the compliance of hosts, virtual machines, or virtual appliances in the inventory. In the previous exercise, I covered how to attach a baseline to an ESXi host. The next step in patching this ESXi host is to scan it to check for compliance to the baseline you created. Scanning can be performed manually, or it can be scheduled using the Scheduled Tasks feature in vCenter Server.
ESXi host updates are all-inclusive, which means that the most recent update will contain all previous patches.
Exercise 9.32 covers the steps to perform a manual scan of an ESXi host.
Exercise 9.32: Manually Scanning an ESXi Host for Compliance
1. Connect to a vCenter Server using a vSphere Client with the vSphere Update Manager plug-in installed.
2. Click the Home icon in the navigation bar of the vSphere Client.
3. Click the Hosts And Clusters icon.
4. Select an ESXi host in the left pane and choose the Scan For Updates option from the context menu that appears.
5. A Confirm Scan dialog will appear, as shown here.
6. Ensure that the Patches And Extensions option is selected, and click the Scan button.
7. A Scan Entity task will begin. When this task completes, click the Update Manager tab in the right pane. The result should appear similar to what is shown here.
8. Review the information presented here in the Update Manager Compliance view.
The ESXi host should now be reported as noncompliant. The next and final step in the patching process of the ESXi host is to remediate it. Like scanning, remediating can also be performed manually or scheduled using the Scheduled Tasks feature in vCenter Server. Exercise 9.33 covers the steps to perform a manual remediation of an ESXi host.
Exercise 9.33: Manually Remediating a Noncompliant ESXi Host
1. Connect to a vCenter Server using a vSphere Client with the vSphere Update Manager plug-in installed.
2. Click the Home icon in the navigation bar of the vSphere Client.
3. Click the Hosts And Clusters icon.
4. Select an ESXi host in the left pane and right-click it. Choose the Remediate option from the context menu that appears.
5. The Remediate Wizard will begin.
6. On the Remediation Selection screen, ensure that the proper baseline is selected and that the proper ESXi host is listed at the bottom of the screen.
7. Click Next to continue.
8. Review the list of patches that will be applied and click Next.
9. Provide the task with a descriptive name and schedule. Ensure that the Remediate The Selected Hosts option is set for Immediately. Click Next to continue.
10. Review the Host Remediation Options settings. You may recall this same set of options from when the Update Manager configuration was originally performed.
11. Configure the Host options as appropriate for your specific test environment and click Next to continue.
12. Review the Cluster Remediation Options settings. You may recall this same set of options from when the Update Manager configuration was originally performed.
13. Configure the Cluster options as appropriate for your specific test environment and click Next to continue.
14. Review the information presented on the Ready To Complete screen and click Finish to begin the remediation of the ESXi host.
15. A Remediate Entity task will begin, and it can be followed by many others depending on how your test environment is set up.
You should see Install, Check, Enter Maintenance Mode, Initiate Host Reboot, and Exit Maintenance Mode tasks as vSphere Update Manager remediates the host.
16. When the Remediate Entity task completes, verify that the ESXi host is reporting Compliant in the Compliance view.
As with any patching operation, always test the patches in a test environment before applying them in production.
I have now covered patching an ESXi host with vSphere Update Manager. I will next cover how to use vSphere Update Manger to update the VMware Tools and virtual machine hardware for a VM running on this ESXi host. To accomplish the VMware Tools and virtual hardware update as a single Update Manager operation, I will first create a baseline group. Exercise 9.34 covers the steps to create the baseline group and attach it to a virtual machine. This exercise will require a virtual machine with virtual hardware version prior to 8 and an older version of the VMware Tools installed.
Exercise 9.34: Creating a Group Baseline and Attaching It to a Virtual Machine
1. Connect to a vCenter Server using a vSphere Client with the vSphere Update Manager plug-in installed.
2. Click the Home icon in the navigation bar of the vSphere Client.
3. Click the Update Manager icon in the Solutions And Applications section.
4. Click the Baselines And Groups tab. Note that the default view is the Hosts view.
5. Switch to the VMs/VAs view by using the view toggle buttons at the top of the tab.
6. In the VMs/VAs view, locate the Baseline Groups section on the right. Click the blue Create link. The New Baseline Wizard will launch.
7. In the Baseline Group Type section, select Virtual Machines And Virtual Appliances Baseline Group. Give the baseline group a descriptive name and then click Next.
8. In the VA Upgrades section, ensure that the None option is selected. In the VM Hardware Upgrades section, ensure that the VM Hardware Upgrade To Match Host (Predefined) option is selected. In the VMware Tools Upgrades section, ensure that the VMware Tools Upgrade To Match Host (Predefined) option is selected. The final configuration should look like this.
9. Click Next. Review the information on the Ready To Complete screen and then click Finish to create the baseline group.
10. Verify that the new baseline group is listed in the right pane. Expand it and ensure that both baselines are included.
You have now created the baseline group. The next step is to attach this baseline group to a virtual machine.
11. Click the Home icon in the navigation bar of the vSphere Client.
12. Select the VMs And Templates icon.
13. Locate the virtual machine that will be upgraded in the left pane and select it.
14. Select the Update Manager tab from the right pane.
15. Click the blue Attach link in the upper portion of the screen.
16. An Attach Baseline Or Group window will appear. Select the baseline group created earlier in this exercise. The baseline group will be located in the lower portion of the window. The final configuration will look similar to this.
17. Click the Attach button.
18. Verify that the Update Manager tab has been updated and that the virtual machine is reported as noncompliant.
The baseline group containing the predefined baselines for both the VMware Tools and the virtual machine hardware has now been attached to a virtual machine. The next step is to scan the virtual machine for compliance and to remediate it. Exercise 9.35 covers these steps.
Exercise 9.35: Manually Scanning and Remediating a Virtual Machine
1. Connect to a vCenter Server using a vSphere Client with the vSphere Update Manager plug-in installed.
2. Click the Home icon in the navigation bar of the vSphere Client.
3. Select the VMs And Templates icon.
4. Locate the virtual machine that will be upgraded in the left pane and select it.
5. Select the Update Manager tab in the right pane.
6. Select the virtual machine in the left pane and right-click it. Choose the Scan For Updates option from the context menu that appears.
7. A Confirm Scan dialog will appear. Deselect the Virtual Appliance Upgrades option and select the VM Hardware Upgrades and VMware Tools Upgrades options.
8. Click the Scan button to continue.
9. A Scan Entity task will begin. Verify the expected results are displayed on the Update Manager tab.
10. Right-click the virtual machine and choose the Remediate option from the context menu that appears.
11. The Remediate Wizard will launch.
12. Ensure that the baseline group is selected and that both of the included baselines are selected. Highlight the virtual machine in the bottom pane. The final configuration should appear similar to this.
13. Click Next.
14. Provide a detailed task name and description for this operation and choose the Immediately option for the scheduling. Click Next to continue.
15. Ensure that the Take Snapshot option is enabled. You may recall these settings from when vSphere Update Manager was initially configured. Provide a detailed name and description for the snapshot and choose whether to include the virtual machine's memory as part of the snapshot. Click Next to continue.
16. Review the information on the Ready To Complete screen and click Finish to begin the remediation.
17. A Remediate Entity task will begin, followed by a series of tasks that will be determined by which options were selected in the previous steps.
18. Watch the Recent Tasks list for entries; open the virtual machine's console, and watch the progress there as well.
19. When the Remediate Entity task completes, verify that the Compliance view reports the virtual machine as compliant.
20. Use the virtual machine's Summary tab to verify that the virtual machine hardware version and the VMware Tools have both been updated.
Remediation of the VMware Tools and the virtual machine hardware will initiate multiple virtual machine reboots.
I have now covered updating the VMware Tools and virtual machine hardware using vSphere Update Manager. In the next section, I will discuss staging ESXi updates.
Staging ESXi Host Updates
Earlier in this chapter, I showed how to use vSphere Update Manager to remediate an ESXi host. There is an additional option that can be used as part of the remediation process. Staging is the process of copying the patch files to the ESXi host, prior to the remediation task being run. This allows the files to be downloaded to the ESXi host before the remediation is performed and can save significant time in the remediation process. Exercise 9.36 covers the process to stage ESXi host updates.
Exercise 9.36: Staging ESXI Host Updates
1. Connect to a vCenter Server using a vSphere Client with the vSphere Update Manager plug-in installed.
2. Click the Home icon in the navigation bar of the vSphere Client.
3. Click the Hosts And Clusters icon.
4. Select an ESXi host in the left pane and right-click it. Choose the Stage Patches option from the context menu that appears.
5. The Stage Wizard will begin.
6. On the Baseline Selection screen, ensure that the proper baseline is selected and that the proper ESXi host is listed at the bottom of the screen.
7. Click Next to continue.
8. Deselect any undesired patches and click Next.
9. Review the information presented on the Ready To Complete screen and click Finish to stage the patches to the ESXi host.
10. A Stage Patches To Entity task will begin. When the Stage Patches To Entity task completes, the patches have been successfully staged to the ESXi host.
ESX/ESXi 4 and newer hosts are supported for staging patches and extensions. PXE-booted ESXi 5 hosts are also supported, but Update Manager will not apply an update to a PXE-booted ESXi 5 host if an update requires a host reboot.
Staging ESXi patches concludes this chapter on maintaining service levels for ESXi and virtual machines.
Summary
The first part of this chapter focused on migrating virtual machines. This chapter began with discussing the procedure to migrate a powered-off or suspended virtual machine. Identifying ESXi host and virtual machine requirements for vMotion and Storage vMotion was covered, along with identifying Enhanced vMotion Compatibility CPU requirements. Snapshot requirements for vMotion and Storage vMotion were identified. Configuring the virtual machine swap file location was also covered. Migrating virtual machines using vMotion and Storage vMotion was covered, along with how to utilize Storage vMotion to change virtual disk types and the virtual machine working location and to rename virtual machines.
The second part of this chapter focused on backing up and restoring virtual machines. Snapshot requirements were identified. Creating, deleting, and consolidating virtual machine snapshots were all covered. VMware Data Recovery was installed, and a backup job was created with it. A test and live full/file-level restore with VMware Data Recovery was also covered. This section concluded with a discussion on determining an appropriate backup solution for a given vSphere implementation.
The final part of this chapter focused on patching and updating ESXi and virtual machines. This section began with identifying patching requirements for ESXi hosts, virtual machine hardware, and the VMware Tools. Creating, editing, and removing a host profile from an ESXi host were all covered, along with how to attach/apply a host profile to an ESXi host. I also performed compliance scanning and remediation of an ESXi host using host profiles. vSphere Update Manager was installed and configured, and the patch download options were also configured. I created, edited, and deleted an Update Manager baseline and attached an Update Manager baseline to an ESXi host or cluster. Scanning and remediating ESXi hosts, virtual machine hardware, and the VMware Tools using Update Manager were all also covered. This chapter concluded with staging ESXi host updates.
Exam Essentials
Know how to migrate virtual machines. Know how to migrate a powered-off or suspended virtual machine. Be able to identify ESXi host and virtual machine requirements for vMotion and Storage vMotion. Be able to identify Enhanced vMotion Compatibility CPU requirements and snapshot requirements for vMotion and /Storage vMotion. Know how to configure the virtual machine swap file location and understand the implications of doing so. Be able to migrate virtual machines using vMotion and Storage vMotion. Know how to utilize Storage vMotion to change virtual disk types, rename virtual machines, and change the working directory of a virtual machine.
Know how to back up and restore virtual machines. Be able to identify snapshot requirements and know how to create, delete, and consolidate virtual machine snapshots. Know how to install and configure VMware Data Recovery and create a backup job with it. Be able to perform a test and live full/file-level restore with VMware Data Recovery. Understand how to determine an appropriate backup solution for a given vSphere implementation.
Know how to patch and update ESXi and VMs. Be able to identify patching requirements for ESXi hosts, virtual machine hardware, and the VMware Tools. Know how to create, edit, and remove a host profile from an ESXi host. Know how to attach and apply a host profile to an ESXi host or cluster. Understand how to perform compliance scanning and remediation of an ESXi host using host profiles. Be able to install and configure vSphere Update Manager. Know how to configure patch download options and create, edit, and delete an Update Manager baseline. Know how to attach an Update Manager baseline to an ESXi host or cluster. Be able to scan and remediate ESXi hosts, virtual machine hardware, and the VMware Tools using Update Manager. Know how to stage ESXi host updates.
Review Questions
1. You have a virtual machine stored on a datastore on an ESXi host's local disks. The host that this VM is running on needs maintenance, and your vCenter Server is licensed for vSphere Standard. Which of the following methods can be used to migrate this virtual machine with no downtime?
A. Cold migration
B. vMotion
C. Storage vMotion
D. None of these
2. Which of the following are supported for use with snapshots?
A. A powered-on virtual machine that is protected with VMware FT
B. A powered-on virtual machine that has an independent disk
C. A powered-on virtual machine with an RDM in physical compatibility mode
D. A powered-on virtual machine with an RDM in virtual compatibility mode
3. Which of the following components are part of VMware Data Recovery? (Choose all that apply.)
A. Client plug-in
B. Backup appliance
C. File Level Restore client
D. vSphere Management Assistant
4. A virtual infrastructure administrator plans to manually update the virtual machine hardware and the VMware Tools in a maintenance window for a virtual machine with a Windows Server 2008 R2. How many times will the guest OS need to be restarted in this process?
A. Three: one for the virtual machine hardware update and two for the VMware Tools update
B. Three: two for the virtual machine hardware update and one for the VMware Tools
C. Two: one for the virtual hardware and one for the VMware Tools
D. Two: two for the virtual hardware
5. Which of the following are available vMotion priority options? (Choose two.)
A. Reserve CPU For Optimal vMotion Performance
B. Limit CPU For Optimal vMotion Performance
C. Perform With Available CPU Resources
D. Perform With Optimal vMotion Performance
6. A cluster has the virtual machine swap file option configured to store the swap file in the datastore specified by the host. The ESXi hosts in the cluster are configured to place the swap file on a datastore named NFS-SWAP. A newly created virtual machine located in this cluster has its virtual machine swap file option configured to always store with the virtual machine. The newly created virtual machine is located on NFS-VOL1. Where will this virtual machine's swap file be located when the virtual machine is powered on?
A. The NFS-SWAP datastore
B. The NFS-VOL1 datastore
C. Both NFS-SWAP and NFS-VOL1
D. None of these
7. Which of the following are download sources that can be used with vSphere Update Manager? (Choose all that apply.)
A. Direct Connection To Internet
B. Use A Shared Repository
C. Proxy Settings
D. Import Patches
8. You want to update the VMware Tools and virtual machine hardware in one scheduled task. Which of the following will allow this?
A. Create one scheduled task in vCenter and provide it the two update steps.
B. Create a baseline to update the virtual machine hardware version, and the VMware Tools will be automatically updated.
C. Create a baseline group that contains both of the predefined update baselines. Schedule the remediation using the baseline group.
D. This is not possible.
9. You edited an Update Manager dynamic baseline specific for ESXi 5 hosts to exclude a patch, and after these edits, the baseline is reporting a much higher value in the Content column than was previously reported. What is the most likely reason for this?
A. In the Fixed Baseline Criteria settings, the Product value was set to Any.
B. In the Fixed Baseline Criteria settings, the Product value was set to embeddedEsx 5.0.0.
C. In the Dynamic Baseline Criteria settings, the Product value was set to Any.
D. In the Dynamic Baseline Criteria settings, the Product value was set to embeddedEsx 5.0.0.
10. You have a vSphere 5 environment with 250 virtual machines. Which of the following backup solutions can you use?
A. VMware Consolidated Backup
B. VMware Data Recovery
C. VMware snapshots
D. None of these
11. You need to move a virtual machine with an active snapshot to a different datastore. You intend to use Storage vMotion to accomplish this task, and all of hosts are ESXi 5. Which of the following statements is accurate in regards to this plan?
A. This plan will work.
B. This plan will work, but proceed with caution.
C. This plan will work but is unsupported.
D. This plan will not work.
12. Which of the following are required to apply a host profile to an ESXi host? (Choose all that apply.)
A. Enterprise Licensing
B. Enterprise Plus Licensing
C. ESX/ESXi host in maintenance mode
D. vSphere Update Manager
13. A virtual infrastructure administrator has taken a single snapshot of a virtual machine. The snapshot requestor has asked that the virtual machine be reverted, and the snapshot requestor no longer needs the virtual machine to be in snapshot mode. Which set of actions should the virtual infrastructure administrator now take?
A. Revert to the current snapshot. Delete the snapshot using the Delete All button in Snapshot Manager.
B. Revert to the current snapshot.
C. Delete the snapshot using the Delete button in Snapshot Manager.
D. None of these.
14. Which of the following guest operating systems are supported for use with the VMware Data Recovery FLR client? (Choose all that apply.)
A. Ubuntu 8.04
B. Windows XP
C. Solaris 10
D. Windows 2008 R2
15. What is the proper sequence in which vSphere Update Manager processes updates?
A. Scan object, create baseline, attach baseline, remediate object
B. Create baseline, scan object, attach baseline, remediate object
C. Create baseline, attach baseline, scan object, remediate object
D. Remediate object, scan object, create baseline, attach baseline
16. You have two virtual machines that need to be moved to a new datacenter. Which of the following migrations will allow you to do this? (Choose all that apply.)
A. Migrating a powered-off VM
B. Migrating a suspended VM
C. Migrating with vMotion
D. Migrating with Storage vMotion
17. Which of the following statements are true about EVC? (Choose two.)
A. Mixing Intel and AMD processors in the same cluster is allowed.
B. Mixing Intel and AMD processors in the same datacenter is allowed.
C. Mixing Intel and AMD processors in the same cluster is not allowed.
D. Mixing Intel and AMD processors in the same datacenter is not allowed.
18. You plan to install vSphere Update Manager on a dedicated server and use a remote SQL Server database. Which of the following are required on the server that vSphere Update Manager will be installed on? (Choose two.)
A. 32-bit operating system
B. 64-bit operating system
C. 32-bit DSN
D. 64-bit DSN
19. You have a vSphere environment that utilizes only NFS datastores, and your storage vendor does not support the VAAI NAS extensions that enable reserve space. When performing a Storage vMotion, which of the following options are available? (Choose all that apply.)
A. Change Datastore Location
B. Change Virtual Disk Format
C. Change Storage Profile
D. Disable Storage DRS
20. Which of the following can be used to create backup jobs with VMware Data Recovery?
A. The vSphere Web Client
B. The vSphere Client
C. The vSphere Client with the VMware Data Recovery client plug-in
D. vSphere Management Assistant