Let’s take a moment to visualize what happens during
clone and pull operations. A few
pictures should also clarify the often confusing uses of the same name
in different contexts.
Let’s start with the simple repository shown in Figure 11-1 as the basis for discussion.
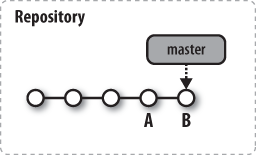
As with all of our commit graphs, the sequence of commits flows
from left to right and the master label points to the
HEAD of the branch. The two most recent commits are
labeled A and B. Let’s follow
these two commits, introduce a few more, and watch what occurs.
A git clone command yields two separate repositories, as shown in Figure 11-2.
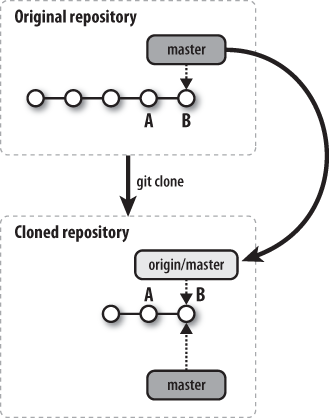
This picture illustrates some important results of the clone operation:
All the commits from the original repository are copied to your clone; you could now easily retrieve earlier stages of the project from your own repository.
The development branch named
masterfrom the original repository is introduced into your clone on a new tracking branch namedorigin/master.Within the new clone repository, the new
origin/masterbranch is initialized to point to themasterHEADcommit, which isBin the figure.A new development branch called
masteris created in your clone.The new
masterbranch is initialized to point toorigin/HEAD, the original repository’s active branchHEAD. That happens to beorigin/master, so it also points to the exact same commit,B.
After cloning, Git selects the new master
branch as the current branch and checks it out for you. Thus, unless
you change branches, any changes you make after a
clone will affect your
master.
In all of these diagrams, development branches in both the original repository and the derived clone repository are distinguished by a lightly shaded background, and tracking branches by a darker shaded background. It is important to understand that both the development and tracking branches are private and local to their respective repositories. In terms of Git’s implementation, however, the lightly shaded branch labels belong to the refs/heads/ namespace, while the darker ones belong to refs/remotes/.
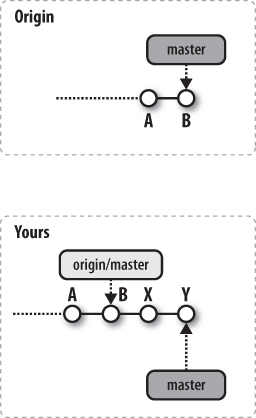
Once you have cloned and obtained your development
repository, two distinct paths of development may result. First, you
may do development in your repository and make new commits on your
master branch, as shown in Figure 11-3. In this picture, your
development extends the master branch with two new
commits, X and Y, that are based
on B.
In the meantime, any other developer who has access to the
original repository might have done further development and pushed her
changes into that repository. Those changes are represented in Figure 11-4 by the addition of
commits C and D.
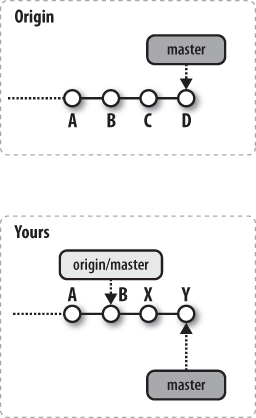
In this situation, we say that the histories of the repositories
have diverged, or
forked, at commit B. In much
the same way that local branching within one repository causes
alternate histories to diverge at a commit, a repository and its clone
can diverge into alternate histories as result of separate actions by
possibly different people. It is important to realize that this is
perfectly fine and that neither history is “more correct”
than the other.
In fact, the whole point of the merge operation is that these different histories may be brought back together and resolved again. Let’s see how Git implements that!
If you are developing in a repository model in which you
have the ability to git push your changes into the
origin repository, you might attempt to push your
changes at any time. This could create problems if some other
developer has previously pushed commits.
This hazard is particularly common when you are using a shared repository development model in which all developers can push their own commits and updates into a common repository at any time.
Let’s look again at Figure 11-3, in which you have made new
commits X and Y, based, on
B.
If you wanted to push your X and
Y commits upstream at this point, you could do so
easily. Git would transfer your commits to the
origin repository and add them on to the history at
B. Git would then perform a special type of merge
operation called a fast-forward on the master branch, putting in your
edits and updating the ref to point to Y. A
fast-forward is essentially a simple linear history advancement
operation. It was introduced in Degenerate Merges.
On the other hand, suppose that another developer has already
pushed some commits to the origin repository and that the picture is
more like Figure 11-4 when you
attempted to push your history up to the
origin repository. In effect, you are attempting to
cause your history to be sent to the shared repository when there is
already a different history there. The origin
history does not simply fast-forward from B. This
situation is called the non-fast-forward push
problem.
When you attempt your push, Git rejects it and tells you about the conflict with a message like this:
$ git push
To /tmp/Depot/public_html
 ! [rejected]        master -> master (non-fast-forward)
error: failed to push some refs to '/tmp/Depot/public_html'
So what are you really trying to do? Do you want to overwrite the other developer’s work? Or do you want to incorporate both sets of histories?
Tip
If you want to overwrite all other changes, you can! Just use
the -f option on your git push. We just hope you won’t need
that alternate history!
More often, you are not trying to wipe out the existing
origin history but just want your own changes to be
added. In this case, you must perform a merge of the two histories in
your repository before pushing.
For Git to perform a merge between two alternate histories, both must be present within one repository on two different branches. Branches that are purely local development branches are a special (degenerate) case of their already being in the same repository.
However, if the alternate histories are in different
repositories because of cloning, the remote branch must be brought
into your repository via a fetch operation. You can carry out the
operation through a direct git fetch command or as
part of a git pull command; it doesn’t matter. In
either case, the fetch brings the remote’s commits, here
C and D, into your repository.
The results are shown in Figure 11-5.
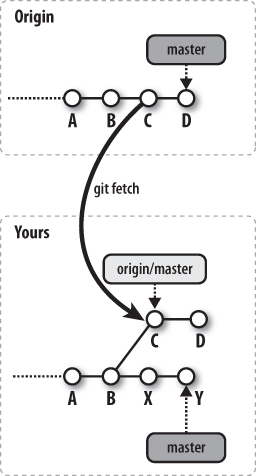
In no way does the introduction of the alternate history with
commits C and D change the
history represented by X and Y;
the two alternate histories both now exist simultaneously in your
repository and form a more complex graph. Your history is represented
by your master branch, and the remote history is
represented by the origin/master tracking
branch.
Now that both histories are present in one repository,
all that is needed to unify them is a merge of the
origin/master branch into the
master branch.
The merge operation can be initiated either with a direct git merge origin/master command, or as the second step in a git pull request. In both cases, the techniques for the merge operation are exactly the same as those described in Chapter 9.
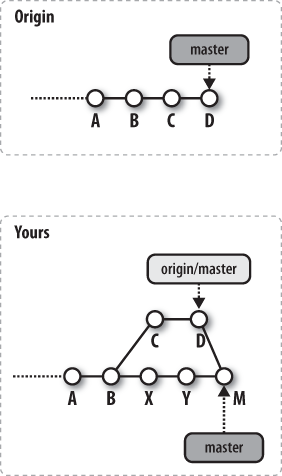
Figure 11-6 shows the commit
graph in your repository after the merge has successfully assimilated
the two histories from commits D and
Y into a new commit, M. The ref
for origin/master remains pointing at
D because it hasn’t changed, but
master is updated to the merge commit, M, to indicate that the merge was
into the master branch; this is where the new
commit was made.
Occasionally, there will be merge conflicts between the alternate histories. Regardless of the outcome of the merge, the fetch still occurred. All the commits from the remote repository are still present in your repository on the tracking branch.
You may choose to resolve the merge normally, as covered in
Chapter 9, or you may choose to abort the merge
and reset your master branch to its prior
ORIG_HEAD state using the command git
reset --hard ORIG_HEAD. Doing so in this example would move
master to the prior
HEAD value, Y, and change your
working directory to match. It would also leave
origin/master at commit
D.
Tip
You can brush up on the meaning of
ORIG_HEAD by reviewing refs and symrefs; see also its use in Aborting or Restarting a Merge.
If you’ve performed all the steps shown so far, your
repository has been updated to contain the latest changes from both
the origin repository and your repository. But the
converse is not true: the origin repository still
doesn’t have your changes.
If your objective is only to incorporate the latest updates from
origin into your repository, you are finished when
your merge is resolved. On the other hand, a simple git
push can return the unified and merged history from your
master branch back to the origin
repository. Figure 11-7 shows
the results after your git push.
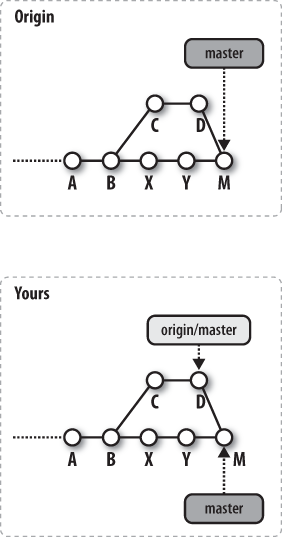
Finally, observe that the origin repository
has been updated with your development even if it has undergone other
changes to it that cause you to have to merge them first. Both your
repository and the origin repository have been
fully updated and are synchronized.