
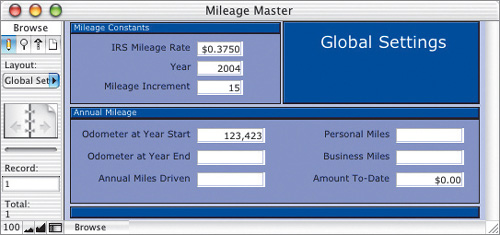
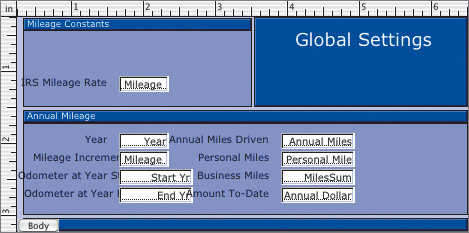
The Global Settings layout serves two functions. First, it’s where you’ll enter all the constants that will be used in calculations. When we defined these fields in Chapter 2, we made them global—meaning that they were intended to store a single value for the database, rather than a different value for each record. You’ll use these fields to record the IRS mileage rate for the current year (Mileage Rate), current year (Year), length of your default trip (Mileage Increment), and odometer readings at the start and end of the year (Start Mileage and End Mileage).
Second, a variety of calculations are performed on this layout. You can switch to this layout whenever you want to check the business miles driven to-date (MilesSum), as well as their dollar value (Annual Dollar). When you enter your year-end odometer reading, you’ll be able to see the total miles driven for the year (Annual Miles), the split between personal and business miles (Personal Miles and MilesSum), and the dollar value of the business miles (Annual Dollar).
You don’t have to use the New Layout/Report wizard to create every layout. Because the Global Settings layout will use many of the same design elements as the Data Entry layout, we’ll create this layout by duplicating the Data Entry layout and then making the necessary changes.
![]() Switch to Layout mode (View > Layout Mode).
Switch to Layout mode (View > Layout Mode).
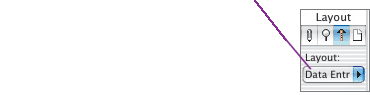
![]() Ensure that the Data Entry layout is displayed. If it isn’t, choose its name from the layouts menu at the top of the status area.
Ensure that the Data Entry layout is displayed. If it isn’t, choose its name from the layouts menu at the top of the status area.
![]() Choose Layouts > Duplicate Layout. A duplicate is created named Data Entry Copy and becomes the active layout.
Choose Layouts > Duplicate Layout. A duplicate is created named Data Entry Copy and becomes the active layout.
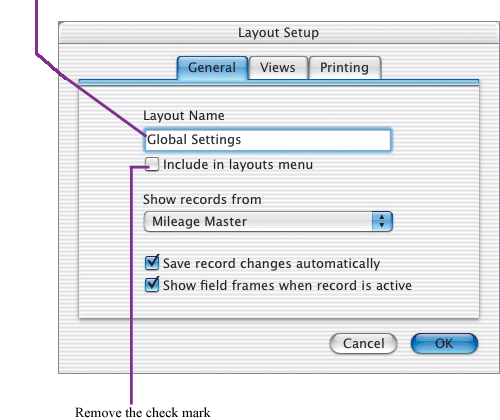
![]() To rename the layout, choose Layouts > Layout Setup.
To rename the layout, choose Layouts > Layout Setup.
![]() Type Global Settings in the Layout Name text box, remove the check mark from include in layouts menu, and click OK.
Type Global Settings in the Layout Name text box, remove the check mark from include in layouts menu, and click OK.
We’ll make both of these layouts the same size. Doing so will make switching between them less visually jarring. Because the Data Entry layout will eventually contain buttons at its top (currently represented by blank space), we’ll need to enlarge some of the background graphics on the Global Settings layout.
![]() Switch to Layout mode and make the Global Settings layout active.
Switch to Layout mode and make the Global Settings layout active.
![]() Select the Business Mileage text and press
Select the Business Mileage text and press ![]() /
/![]() to delete it.
to delete it.
![]() To enlarge the title block, select it, hold down
To enlarge the title block, select it, hold down ![]() , and drag one of the top handles upward until you reach the top of the layout. To change the block’s width, select one of the handles on its left side, hold down
, and drag one of the top handles upward until you reach the top of the layout. To change the block’s width, select one of the handles on its left side, hold down ![]() , and drag to the right (width: 2.972 inches).
, and drag to the right (width: 2.972 inches).

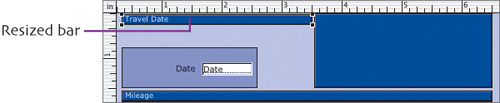
![]() Now select both the Travel Date text and its blue bar by holding down
Now select both the Travel Date text and its blue bar by holding down ![]() as you click them, and then drag them to the top of the screen. When they’re in position, click a blank area of the background to deselect the two items.
as you click them, and then drag them to the top of the screen. When they’re in position, click a blank area of the background to deselect the two items.
![]() Select only the bar (without its text). To widen it,
Select only the bar (without its text). To widen it, ![]() -drag a right handle. Stop dragging just before it reaches the title block (width = 3.181 inches).
-drag a right handle. Stop dragging just before it reaches the title block (width = 3.181 inches).
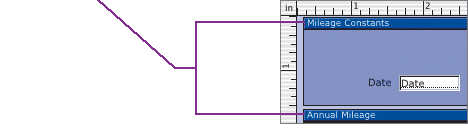
![]() We’ll resize the purple block next. Select the block and drag its upper-right handle until it’s the size shown here. (Note that the block’s top edge meets the bottom edge of the bar.)
We’ll resize the purple block next. Select the block and drag its upper-right handle until it’s the size shown here. (Note that the block’s top edge meets the bottom edge of the bar.)

![]() Now we can edit the text in the two bars. Double-click the text in the top bar. (Doing so switches to the Text Tool.) Drag-select the text and type: Mileage Constants. Then insert the word Annual in front of the Mileage text in the middle bar.
Now we can edit the text in the two bars. Double-click the text in the top bar. (Doing so switches to the Text Tool.) Drag-select the text and type: Mileage Constants. Then insert the word Annual in front of the Mileage text in the middle bar.
![]() The layout stills needs a title. Choose a font from the Text Formatting toolbar (such as Verdana 18 pt. white), select the Text Tool, click in the title block to set the insertion point, and type Global Settings.
The layout stills needs a title. Choose a font from the Text Formatting toolbar (such as Verdana 18 pt. white), select the Text Tool, click in the title block to set the insertion point, and type Global Settings.
When you’re done, click outside the title text. The text is surrounded by handles. Drag the text to approximately this position in the title block.

Although we won’t be using any of the duplicated fields, it’s simple to substitute the correct fields for ones already on the layout.
![]() While any field can be replaced with another using the procedure that follows, field labels can’t be replaced.
While any field can be replaced with another using the procedure that follows, field labels can’t be replaced. ![]() -click all field labels on the layout and then press
-click all field labels on the layout and then press ![]() /
/![]() to delete them.
to delete them.
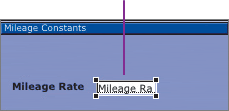
![]() Double-click the Date field. In the Specify Field dialog box, select the Mileage Rate field, click the Create field label check box, and click OK.
Double-click the Date field. In the Specify Field dialog box, select the Mileage Rate field, click the Create field label check box, and click OK.
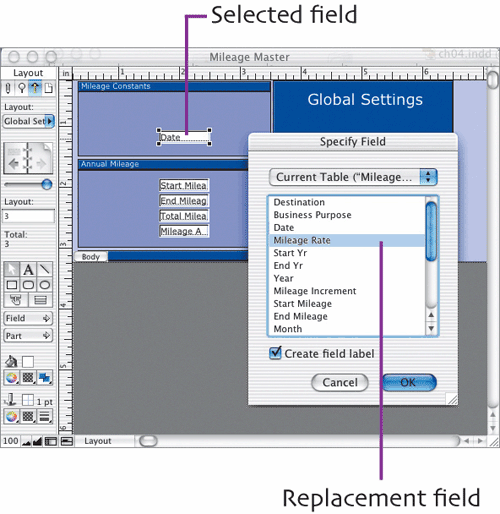
The Mileage Rate field replaces the Date field on the layout. The formatting originally applied to the Date field is retained.
![]() Using the same technique, replace Start Mileage with Year, End Mileage with Mileage Increment, Total Mileage with Start Yr, Mileage Amount with End Yr, Destination with Annual Miles, and Business Purpose with Personal Miles. Be sure to click the Create field label check box for each one.
Using the same technique, replace Start Mileage with Year, End Mileage with Mileage Increment, Total Mileage with Start Yr, Mileage Amount with End Yr, Destination with Annual Miles, and Business Purpose with Personal Miles. Be sure to click the Create field label check box for each one.
![]() Two more fields need to be added to the layout: MilesSum and Annual Dollar. To match the formatting of the other fields on the layout, the simplest way is to duplicate existing fields. Select the Personal Miles field on the layout, and choose Edit > Duplicate. In the Specify Field dialog box, select the MilesSum field, ensure that Create field label is checked, and click OK. On the layout, select the MilesSum field and its label, and drag them beneath the Personal Miles field.
Two more fields need to be added to the layout: MilesSum and Annual Dollar. To match the formatting of the other fields on the layout, the simplest way is to duplicate existing fields. Select the Personal Miles field on the layout, and choose Edit > Duplicate. In the Specify Field dialog box, select the MilesSum field, ensure that Create field label is checked, and click OK. On the layout, select the MilesSum field and its label, and drag them beneath the Personal Miles field.
![]() Repeat Step 4 to duplicate a field (any field in the second column will do), but this time select Annual Dollar in the Specify Field dialog box. Drag the Annual Dollar field and its field label beneath the MilesSum field.
Repeat Step 4 to duplicate a field (any field in the second column will do), but this time select Annual Dollar in the Specify Field dialog box. Drag the Annual Dollar field and its field label beneath the MilesSum field.
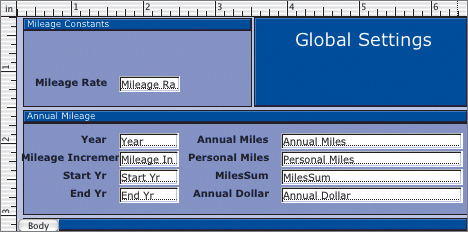
The layout should now look something like this. Don’t worry about the exact placement and spacing of fields. We’ll rearrange them shortly.
To complete the layout, we need to reformat the labels; edit the label text; set the size, alignment, and formatting for the fields; and move the label/field pairs to the proper spots. The table below shows many of the important format settings for the fields and labels.
![]() Select all field labels and set these options on the Text Formatting toolbar: Verdana, 10 pt. (Mac), 9 pt. (PC), not bold, black, right-aligned. (We want to duplicate the label formatting from the Data Entry layout. If you chose a different font or size for that layout, use the same formatting here, too.)
Select all field labels and set these options on the Text Formatting toolbar: Verdana, 10 pt. (Mac), 9 pt. (PC), not bold, black, right-aligned. (We want to duplicate the label formatting from the Data Entry layout. If you chose a different font or size for that layout, use the same formatting here, too.)
![]() One by one, select the Mileage Rate, Year, and Mileage Increment field. Set each one’s width to 0.681 inches. Then select each remaining field on the layout, and set its width to 1.014 inches.
One by one, select the Mileage Rate, Year, and Mileage Increment field. Set each one’s width to 0.681 inches. Then select each remaining field on the layout, and set its width to 1.014 inches.
Field Name | Field Label | Number Formatting Options |
|---|---|---|
Mileage Rate | IRS Mileage Rate | Format as decimal, 4 decimal digits; Use notation: Currency (leading/inside), $ symbol; no thousands separator |
Year | Year | Format as decimal, 0 decimal digits; no thousands separator |
Mileage Increment | Mileage Increment | Format as decimal, 0 decimal digits; no thousands separator |
Start Yr | Odometer at Year Start | Format as decimal, 0 decimal digits; thousands separator:, (comma) |
End Yr | Odometer at Year End | Format as decimal, 0 decimal digits; thousands separator:, (comma) |
Annual Miles | Annual Miles Driven | Format as decimal, 0 decimal digits; thousands separator:, (comma) |
Personal Miles | Personal Miles | Format as decimal, 0 decimal digits; thousands separator:, (comma) |
MilesSum | Business Miles | Format as decimal, 0 decimal digits; thousands separator:, (comma) |
Annual Dollar | Amount To-Date | Format as decimal, 2 decimal digits; Use notation: Currency (leading/inside), $ symbol; thousands separator:, (comma) |
![]() Select all fields and set their paragraph alignment to right-aligned.
Select all fields and set their paragraph alignment to right-aligned.
![]() All fields on this layout will store numbers. Select each field, choose Format > Number, and set the number formatting options listed in the table.
All fields on this layout will store numbers. Select each field, choose Format > Number, and set the number formatting options listed in the table.
![]() Using the Text Tool, edit the field labels as indicated in the table.
Using the Text Tool, edit the field labels as indicated in the table.
Sanity check: Your layout should now look similar to this. Because of their length, some labels automatically shifted right in order to remain on the layout. Don’t worry; we’ll fix them in the next section.
Now it’s time to move the fields and their labels into the proper positions.
![]() Select the four fields and matching labels on the right side of the layout, and
Select the four fields and matching labels on the right side of the layout, and ![]() -drag them to the right edge. (They won’t remain there, but we’ll need to get them out of the way to give us room to work.)
-drag them to the right edge. (They won’t remain there, but we’ll need to get them out of the way to give us room to work.)
![]() Select the same four field’s labels (as shown here) by
Select the same four field’s labels (as shown here) by ![]() -clicking them. Press
-clicking them. Press ![]() five times to move the labels closer to their fields.
five times to move the labels closer to their fields.

![]()
![]() -drag the five fields on the left side of the layout slightly to the right, away from their field labels.
-drag the five fields on the left side of the layout slightly to the right, away from their field labels.
![]() After you edited the five field’s labels, their right edges were no longer aligned with one another. Select these five field labels and choose Arrange > Set Alignment. In the Set Alignment dialog box, choose None and Align right edges. Then click OK.
After you edited the five field’s labels, their right edges were no longer aligned with one another. Select these five field labels and choose Arrange > Set Alignment. In the Set Alignment dialog box, choose None and Align right edges. Then click OK.

![]() The Mileage Constants block (top left) will hold three fields: Mileage Rate, Year, and Mileage Increment. Arrange these fields and labels in a single column. Move the labels so they’re closer to their fields, as was done for the previous fields.
The Mileage Constants block (top left) will hold three fields: Mileage Rate, Year, and Mileage Increment. Arrange these fields and labels in a single column. Move the labels so they’re closer to their fields, as was done for the previous fields.
If you increase the zoom level, you’ll find it easier to create the same spacing between fields, as well as center them vertically within the block. Use the arrow keys to nudge them into position, if necessary.

![]() The remaining fields should be arranged in the Annual Mileage block as shown below. (In both columns of three, the right edges of the labels are aligned and the top of each field is aligned with the top of the field in the other column. Use the Size palette to check positions.)
The remaining fields should be arranged in the Annual Mileage block as shown below. (In both columns of three, the right edges of the labels are aligned and the top of each field is aligned with the top of the field in the other column. Use the Size palette to check positions.)
![]() At present, there’s space between the Body tab and the bottom bar. Eliminate the space by dragging the Body tab up to the bottom edge of the lower bar (as shwn above).
At present, there’s space between the Body tab and the bottom bar. Eliminate the space by dragging the Body tab up to the bottom edge of the lower bar (as shwn above).
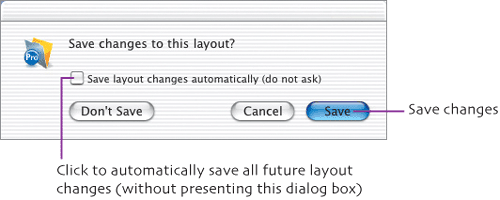
![]() To finalize the layout, choose View > Browse Mode. When prompted to save your changes, click Save. (This dialog box is a new feature in FileMaker Pro 7. If you have an earlier version, the Save changes dialog box won’t appear. Instead, all layout changes are saved automatically.)
To finalize the layout, choose View > Browse Mode. When prompted to save your changes, click Save. (This dialog box is a new feature in FileMaker Pro 7. If you have an earlier version, the Save changes dialog box won’t appear. Instead, all layout changes are saved automatically.)
As is the case with the Data Entry layout, the Global Settings layout isn’t completely finished. In Chapter 8, we’ll add a button that—when clicked—takes you to the Data Entry layout.
Another way to add a field is to click the Insert Field tool and drag the new field onto the layout.
When moving a field and its label, you may want to group the two items to avoid accidentally losing the original alignment and spacing between them. Select the field and label, and choose Arrange > Group.
On a PC, FileMaker Pro initially lists only a handful of fonts in the Format > Font submenu. To add other fonts, choose Format > Font > Configure/More Fonts.
You can open the Number Format dialog box by
 /right-clicking a Number field and choosing Number Format from the menu that pops up.
When applying formatting to Number fields, you can speed up the process by applying it to several fields at once. For example, Year and Mileage Increment share the same Number formatting, so it can be applied to both of them simultaneously.
You can also resize several fields simultaneously by typing values into the Size palette. However, they must initially all be the same size.
After using the Set Alignment dialog box, you can apply the same alignment settings to a new group of selected items by choosing Arrange > Align. Until you specify new settings in the Set Alignment dialog box, the current ones are remembered.
You can also use the Set Alignment dialog box to distribute a group of items (spacing them equidistant from one another). For example, on this layout, group each field and label pair in a column. Move the uppermost and the lowermost fields to their intended spots on the layout. Then select all fields in the column and choose Arrange > Set Alignment. Select Distribute Space in the Top to Bottom section and None in the Left to Right section.