
When you need another report from a database, it isn’t always necessary to create the report from scratch. Many are simply variations of existing reports. We’ve already created a Mileage Report that groups trips by month (refer to Chapter 6). To create a new report that is similar to the first one, we can duplicate the initial report and then make any necessary changes to the fields, Subsummary parts, and sort instructions. In this chapter, we’ll duplicate the Mileage Report and modify the duplicate to create a destination-based report, enabling you to quickly see your year-to-date mileage for each destination, as well as the number of trips to each destination.
![]() Switch to Layout mode (View > Layout Mode).
Switch to Layout mode (View > Layout Mode).
![]() Ensure that the Mileage Report layout is displayed. If it isn’t, choose its name from the layouts menu at the top of the status area.
Ensure that the Mileage Report layout is displayed. If it isn’t, choose its name from the layouts menu at the top of the status area.
![]() Choose Layouts > Duplicate Layout. A duplicate is created named Mileage Report Copy and becomes the active layout.
Choose Layouts > Duplicate Layout. A duplicate is created named Mileage Report Copy and becomes the active layout.
![]() To rename the layout, choose Layouts > Layout Setup. The Layout Setup dialog box appears.
To rename the layout, choose Layouts > Layout Setup. The Layout Setup dialog box appears.
![]() Enter Destination Report in the Layout Name text box, remove the check mark from Include in layouts menu, and then click OK to dismiss the dialog box.
Enter Destination Report in the Layout Name text box, remove the check mark from Include in layouts menu, and then click OK to dismiss the dialog box.
The sort field associated with a Subsummary is responsible for breaking the data into groups. In the Mileage Report, Month is the field on which the leading Subsummary is sorted, resulting in a separate group for each month. Because the Destination Report will be grouped by destination, we need to change the leading Subsummary’s part definition to use Destination as the sort field.
![]() In Layout mode with the Destination Report layout selected, choose Layouts > Part Setup.
In Layout mode with the Destination Report layout selected, choose Layouts > Part Setup.
![]() In the Part Setup dialog box, select Sub-summary by Month (Leading) and click Change.
In the Part Setup dialog box, select Sub-summary by Month (Leading) and click Change.
![]() In the Part Definition dialog box, select Sub-summary when sorted by, select Destination in the field list, ensure that no check boxes are checked, and click OK. Click Done to dismiss the Part Setup dialog box.
In the Part Definition dialog box, select Sub-summary when sorted by, select Destination in the field list, ensure that no check boxes are checked, and click OK. Click Done to dismiss the Part Setup dialog box.
![]() On the layout, delete the Year field from the Subsummary part by selecting the field and pressing
On the layout, delete the Year field from the Subsummary part by selecting the field and pressing![]() /
/![]() .
.
![]() Double-click the Month field to replace it. In the Specify Field dialog box, select the Destination field, ensure that Create field label is unchecked, and click OK. Month is replaced on the layout by Destination.
Double-click the Month field to replace it. In the Specify Field dialog box, select the Destination field, ensure that Create field label is unchecked, and click OK. Month is replaced on the layout by Destination.

![]() Widen the Destination field to 2.5" by selecting the field and
Widen the Destination field to 2.5" by selecting the field and ![]() -dragging one of the handles on its right side.
-dragging one of the handles on its right side.
Delete the Destination field and label. Since the destination is now listed in the leading Subsummary, there’s no point in repeating it within the Body part. We’ll need to delete the field and close up the gap that the deletion leaves.
![]() Select the Destination field in the Body part and press
Select the Destination field in the Body part and press![]() /
/![]() .
.
![]() Select the Destination label in the Header and press
Select the Destination label in the Header and press![]() /
/![]() .
.
![]()
![]() -click the Date field (in the body) and the Date label (in the Header) to select them as a pair. Drag the pair to the right to close up the gap made by the deletion of the Destination field.
-click the Date field (in the body) and the Date label (in the Header) to select them as a pair. Drag the pair to the right to close up the gap made by the deletion of the Destination field.
Correct the title. Using the Text Tool, edit the title to read Destination Report. Drag the title to center it on the 5.5″ mark on the horizontal graphic ruler.
Here are the changes you’ve made so far.
Change the title in the trailing Subsummary. Using the Text Tool, edit the Monthly Subtotal text in the trailing Subsummary to read Destination Total. Click the Align Right icon on the Text Formatting toolbar.
Set the color of the Destination Total text to match the color of the Miles Sum and MilesExpSum fields to the right of it.

Align the Destination Total text. Use the Size palette to set the Destination Total text’s position at 8.750 inches from its right edge (aligning it with the right edge of the End Mileage field directly above it).
Modify the Grand Total text. Using the Selection Tool, select the Grand Total text in the Trailing Grand Summary. Click the Align Right icon on the Text Formatting toolbar. Use the Size palette to set the Destination Total text’s position at 8.750 inches from its right edge, aligning it with the Destination Total text.
Color the trailing Subsummary. Click the trailing Subsummary tab and make it the same custom color as the Header, Trailing Grand Summary, and Footer.
Transparent text backgrounds. To make a text string or field blend with the background color, you can either set the string or field’s fill color to the background color or set its pattern to transparent.
Select the three items in the trailing Sub-summary (the Destination Total text and the two fields) and set their fill pattern to transparent.
To make the summary statistics a little more useful, we’ll create a new Summary field that will display the trip count (number of trips) for each destination.
![]() Switch to Layout mode and ensure that the Destination Report layout is displayed. Choose File > Define > Database.
Switch to Layout mode and ensure that the Destination Report layout is displayed. Choose File > Define > Database.
![]() Switch to the Fields tab of the Define Database dialog box. Enter Trips as the Field Name for the new field, choose Summary from the Type pop-up menu, and click Create.
Switch to the Fields tab of the Define Database dialog box. Enter Trips as the Field Name for the new field, choose Summary from the Type pop-up menu, and click Create.

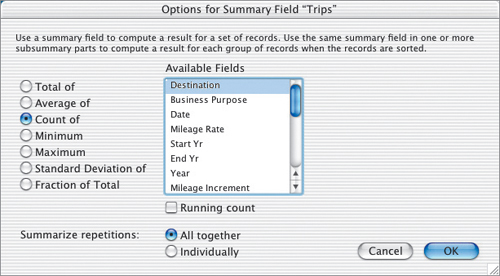
![]() On the Options for Summary Field “Trips” dialog box, select Count of as the summary statistic and select Destination in the Available Fields list as the field to summarize. Click OK and then OK again to dismiss the dialog boxes. The new field and its label are placed in the Body part.
On the Options for Summary Field “Trips” dialog box, select Count of as the summary statistic and select Destination in the Available Fields list as the field to summarize. Click OK and then OK again to dismiss the dialog boxes. The new field and its label are placed in the Body part.
![]()
![]() -select the Trips label and field. Drag them into position in the trailing Subsummary (as shown below). To remove the extra space at the bottom of the Body part, drag the bottom of the Body part up as high as it will go.
-select the Trips label and field. Drag them into position in the trailing Subsummary (as shown below). To remove the extra space at the bottom of the Body part, drag the bottom of the Body part up as high as it will go.
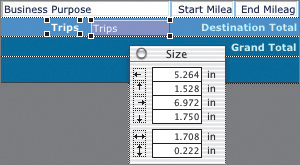
![]() For the label and field, set a distance from the right edge of 6.972 inches and distance from top of 1.528 inches. (Align the field’s right edge with the right edge of the Business Purpose field. Align the top of the Trips label and field with the top of the Destination Total label.)
For the label and field, set a distance from the right edge of 6.972 inches and distance from top of 1.528 inches. (Align the field’s right edge with the right edge of the Business Purpose field. Align the top of the Trips label and field with the top of the Destination Total label.)
![]() Now we need to format the Trips field and label. Select the Destination Total text string, click the Format Painter icon on the Standard toolbar, and click the Trips label. Now select the MilesSum field (beside the Destination Total text string), click the Format Painter icon on the Standard toolbar, and click the Trips field.
Now we need to format the Trips field and label. Select the Destination Total text string, click the Format Painter icon on the Standard toolbar, and click the Trips label. Now select the MilesSum field (beside the Destination Total text string), click the Format Painter icon on the Standard toolbar, and click the Trips field.
![]() Reduce the width of the Trips field by dragging one of its left-hand handles to the right. (The field only needs to be wide enough to show three digits.) Finally,
Reduce the width of the Trips field by dragging one of its left-hand handles to the right. (The field only needs to be wide enough to show three digits.) Finally, ![]() -drag the Trips label to the right to close up the gap.
-drag the Trips label to the right to close up the gap.
![]() Save the Layout by choosing Layouts > Save Layout. Or you can switch to another mode (such as Preview) and save changes when prompted to do so.
Save the Layout by choosing Layouts > Save Layout. Or you can switch to another mode (such as Preview) and save changes when prompted to do so.
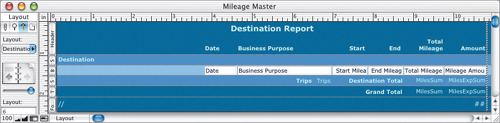
The completed layout (Layout mode).
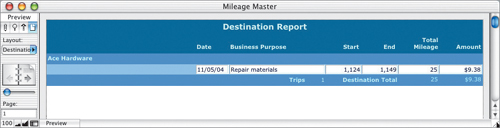
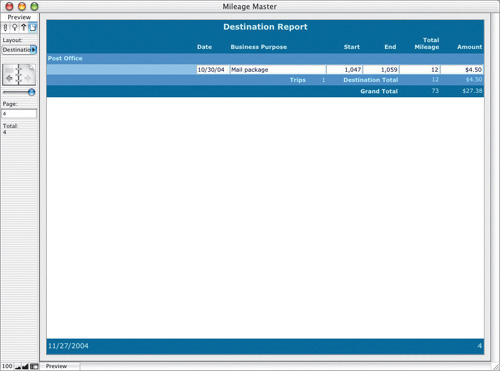
The completed layout (Preview mode).
The Trips field could actually be a count of almost any field in the Body part of the layout, such as Business Purpose or End Mileage.
For the Destination Report to display properly, you’ll have to sort the data. Choose Records > Sort Records, and sort on Destination and Start Mileage.