
Unless you intend to rush home to record your mileage after every business-related trip, you’ll need another way to keep track of trips in your vehicle. Most people simply carry a trip log in the vehicle and record each trip as it occurs.
Although you can buy a trip log at most stationery and business supply stores, it’s just as simple to create one in FileMaker Pro. In this chapter, you’ll create the Blank Forms layout. Later in the book, we’ll create a script that will automatically print a year’s supply of log forms.
Normally, a form like this would be created using FileMaker’s drawing tools (the Line Tool and Rectangle Tool). In fact, that’s the way I did create it. While you’re welcome to re-create it using the same method, it’s considerably more work than most people are prepared to do. To help you put this form together with minimal effort, a graphic version of the form background (blankform.tif) is included in the Web site download (www.siliconwasteland.com/fmp.htm).
In case you want to take a stab at it, here’s the original version of the form as it looks in Layout mode with all objects selected.
The version of the form that we’re about to create only requires that we place the text strings onto the background graphic. Adding the text within FileMaker rather than providing it as part of the graphic ensures that laser printers will treat it as real text instead of just a mass of dots. Thus, it will be clear and crisp.
![]() Switch to Layout mode (View > Layout Mode).
Switch to Layout mode (View > Layout Mode).
![]() Choose Layouts > New Layout/Report.
Choose Layouts > New Layout/Report.
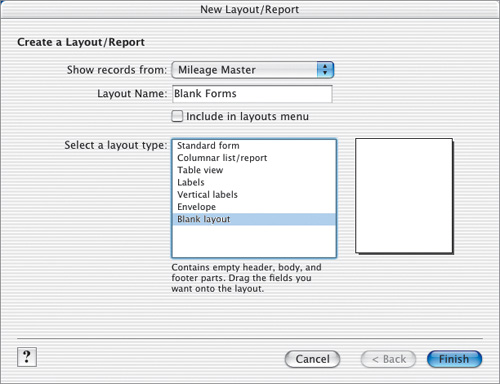
![]() In the New Layout/Report wizard, enter Blank Forms as the Layout Name. Remove the check mark from Include in layouts menu, select the Blank layout from the layout type list, and click Finish. The blank layout appears.
In the New Layout/Report wizard, enter Blank Forms as the Layout Name. Remove the check mark from Include in layouts menu, select the Blank layout from the layout type list, and click Finish. The blank layout appears.
![]() Like the layouts we’ve already created, this one needs only a Body part—not a Header or Footer. Choose Layouts > Part Setup. In the Part Setup dialog box, select and delete the Header part. Then do the same for the Footer part. Click Done to dismiss the dialog box.
Like the layouts we’ve already created, this one needs only a Body part—not a Header or Footer. Choose Layouts > Part Setup. In the Part Setup dialog box, select and delete the Header part. Then do the same for the Footer part. Click Done to dismiss the dialog box.

![]() The layout will fill and be printed on an 8 ½″ × 11″ page. Choose File > Page Setup/Print Setup. Ensure that your destination printer and portrait mode are selected. Choosing the correct printer sets the default margins for the printout.
The layout will fill and be printed on an 8 ½″ × 11″ page. Choose File > Page Setup/Print Setup. Ensure that your destination printer and portrait mode are selected. Choosing the correct printer sets the default margins for the printout.
![]() Increase the height of the document window by dragging the bottom-right corner. Then drag the Body tab downward until it is just above the bottom page break indicator—somewhere between the 10 ⅜″ and 10 ⅞″ marks on the vertical graphic ruler. (If the rulers aren’t visible, choose View > Graphic Rulers.)
Increase the height of the document window by dragging the bottom-right corner. Then drag the Body tab downward until it is just above the bottom page break indicator—somewhere between the 10 ⅜″ and 10 ⅞″ marks on the vertical graphic ruler. (If the rulers aren’t visible, choose View > Graphic Rulers.)
![]() If you haven’t already done so, download the Mac or Windows graphic archive from my Web site: www.siliconwasteland.com/fmp.htm. Extract the contents of the archive to a convenient location, such as the Desktop.
If you haven’t already done so, download the Mac or Windows graphic archive from my Web site: www.siliconwasteland.com/fmp.htm. Extract the contents of the archive to a convenient location, such as the Desktop.
If you are a Macintosh user, you’ll need the free StuffIt Extractor or StuffIt Deluxe (www.allume.com) to open the archive. Windows users can use WinZip; a free trial version is available at www.winzip.com/downwzeval.htm.
![]() To place the image on the layou, choose Insert > Picture. In Insert Picture dialog box, navigate to the folder in which the graphics are stored, select the blankform.tif file, ensure that Store only a reference to the file is not checked, and click Open.
To place the image on the layou, choose Insert > Picture. In Insert Picture dialog box, navigate to the folder in which the graphics are stored, select the blankform.tif file, ensure that Store only a reference to the file is not checked, and click Open.
![]() Center the form image within the margins. You can drag it into position or nudge it by pressing the arrow keys.
Center the form image within the margins. You can drag it into position or nudge it by pressing the arrow keys.
All that’s left is to add the text strings to the top of the four copies of the log form.
![]() Select the Text Tool. Set the insertion point to the left of the line at the top of the first log form and choose font settings from the Text Formatting toolbar (for example, Arial 12 pt., bold, black, left-aligned).
Select the Text Tool. Set the insertion point to the left of the line at the top of the first log form and choose font settings from the Text Formatting toolbar (for example, Arial 12 pt., bold, black, left-aligned).
![]() Type Month: and click in a blank area at the edge of the layout. Doing so will cause the Month text string to be selected.
Type Month: and click in a blank area at the edge of the layout. Doing so will cause the Month text string to be selected.
![]() Choose View > T-Squares. The T-Squares are a pair of lines—horizontal and vertical—that you can drag to new locations and use to help place objects. Drag the vertical line so it runs along the left side of the dark block on the first form. Drag the horizontal line to where it matches the underline above the dark block. Finally, use the arrow keys to nudge the Month text block so its left and bottom edges align with the intersection of the T-Squares.
Choose View > T-Squares. The T-Squares are a pair of lines—horizontal and vertical—that you can drag to new locations and use to help place objects. Drag the vertical line so it runs along the left side of the dark block on the first form. Drag the horizontal line to where it matches the underline above the dark block. Finally, use the arrow keys to nudge the Month text block so its left and bottom edges align with the intersection of the T-Squares.
![]() Select the Text Tool again and set the insertion point inside the black block near its left end. Choose settings for the column heading text from the Text Formatting toolbar (for example, Arial 10 pt., bold, white, left-aligned). The text must be a light color in order for it to be readable within the black block.
Select the Text Tool again and set the insertion point inside the black block near its left end. Choose settings for the column heading text from the Text Formatting toolbar (for example, Arial 10 pt., bold, white, left-aligned). The text must be a light color in order for it to be readable within the black block.
![]() Type Day Destination Start End. Click in a blank area at the edge of the layout, causing the text to be selected. Nudge the text so that Day is just inside of and vertically centered within the black box. Insert spaces or tabs into the text string to position each heading over its column (as shown on the next page).
Type Day Destination Start End. Click in a blank area at the edge of the layout, causing the text to be selected. Nudge the text so that Day is just inside of and vertically centered within the black box. Insert spaces or tabs into the text string to position each heading over its column (as shown on the next page).

![]() Using the Selection Tool,
Using the Selection Tool, ![]() -click the two text strings (Month: and Day Destination Start End) to select them, and then choose Edit > Duplicate. Copies of the two text strings appear. With the copies selected, drag them into position on the blank form to the right. Use the Size palette to ensure that the copies and the originals are the same distance from the top of the layout.
-click the two text strings (Month: and Day Destination Start End) to select them, and then choose Edit > Duplicate. Copies of the two text strings appear. With the copies selected, drag them into position on the blank form to the right. Use the Size palette to ensure that the copies and the originals are the same distance from the top of the layout.
![]() Using the Selection Tool,
Using the Selection Tool, ![]() -click all four text strings to select them, and then choose Edit > Duplicate. Position the copies directly over the originals by pressing
-click all four text strings to select them, and then choose Edit > Duplicate. Position the copies directly over the originals by pressing ![]() and
and ![]() six times apiece. (Zoom in to check their positions.) With all four items selected,
six times apiece. (Zoom in to check their positions.) With all four items selected, ![]() -drag them down into position on the remaining pair of blank forms.
-drag them down into position on the remaining pair of blank forms.
![]() When you’re satisfied with the text string’s positions, choose Edit > Select All to select all items on the layout. Then choose Arrange > Group to treat the graphic and text as a single entity.
When you’re satisfied with the text string’s positions, choose Edit > Select All to select all items on the layout. Then choose Arrange > Group to treat the graphic and text as a single entity.
![]() Choose View > Preview Mode so you can see how the page will look when it’s printed (see page 59). When prompted to save your changes, click Save.
Choose View > Preview Mode so you can see how the page will look when it’s printed (see page 59). When prompted to save your changes, click Save.
While this layout could be included in the layouts menu, it’s a better practice to only include layouts that the user needs to be able to switch to manually. The Blank Forms layout never needs to be viewed; it’s for printing only.
The graphic must fit entirely within the Body part, and the Body must not extend beyond one page. If it’s longer than a page (indicated by a page break indicator at the bottom), each copy of the form will print two pages: one with the form and one blank.
While creating this form, feel free to reset the zoom (magnification). Zoom out to center the image and zoom in to place the text.
When moving
 -clicked items, it’s easy to accidentally deselect one of the items when conducting the move. If you notice this happening, click the deselected item again and then make the move.
You can also duplicate selected items by choosing Edit > Copy followed by Edit > Paste.
Switching to any mode (not just Preview mode) will cause the layout changes to be saved. Prior to making major changes to a layout, it’s a good idea to force a save in this manner. You can also save changes at any time by choosing Layouts > Save Layout

Although we only eyeballed the form graphic when placing it on the layout, the key to whether it’s properly centered is in how it prints. Since everything was grouped at the end, you can easily adjust the entire form’s position without being concerned that the text strings will slip and slide.