
Automation in FileMaker Pro is accomplished via scripts. Scripts are created in a part of FileMaker called ScriptMaker and consist of steps (instructions) that FileMaker executes in sequence. A script can perform a one-step operation, such as switching to a particular layout, or it can contain a complex series of steps, such as selecting a subset of records, sorting them, switching to a report layout, displaying and printing the resulting report, re-sorting the records to their original order, and then returning to the original layout.
There are several ways you can execute a script. First, any script can be listed in the Scripts menu, where it can be chosen in the same way that you choose other menu commands. The first ten listed scripts are assigned a ![]() (Mac) or
(Mac) or ![]() (PC) keyboard shortcut numbered from 1 through 0. Second, you can attach a script to a graphic button on any layout. Clicking the button executes its script.
(PC) keyboard shortcut numbered from 1 through 0. Second, you can attach a script to a graphic button on any layout. Clicking the button executes its script.
In this chapter, we’ll create the scripts needed to automate a variety of useful functions in the Mileage Master database, such as creating and deleting records, switching layouts, and generating reports. In the process, you’ll get a thorough introduction to ScriptMaker. You’ll also learn about creating and using value lists. A value list is a list of data values than can be attached to a field to make data entry easier and ensure consistency.
We’ll start by creating the simplest script in the database. It will be attached to a button that takes you from the Global Settings layout back to the Data Entry layout. Switching layouts by clicking a button is more natural and convenient than choosing the layout from the layouts menu. Because the script has only one step and will be attached to a button, it can be created without using ScriptMaker.
![]() Switch to Layout mode (View > Layout Mode) and select the Global Settings layout from the layouts pop-up menu.
Switch to Layout mode (View > Layout Mode) and select the Global Settings layout from the layouts pop-up menu.
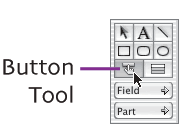
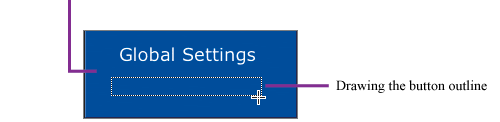
![]() Click the Button Tool. Drag a long button centered beneath the Global Settings text. When you release the mouse button, the Specify Button dialog box appears.
Click the Button Tool. Drag a long button centered beneath the Global Settings text. When you release the mouse button, the Specify Button dialog box appears.
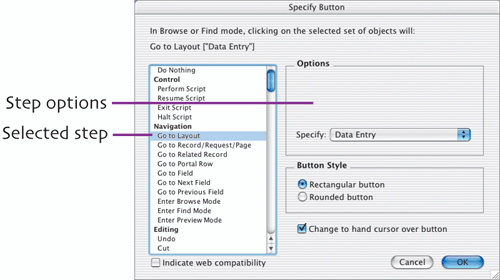
![]() Select Go to Layout as the script step, choose Data Entry as the destination layout (in the Options section), and then click OK. A blinking cursor appears in the center of the blank button, waiting for you to type its label.
Select Go to Layout as the script step, choose Data Entry as the destination layout (in the Options section), and then click OK. A blinking cursor appears in the center of the blank button, waiting for you to type its label.
![]() Type Return to Data Entry as the button’s label. Click away from the button to finalize the text.
Type Return to Data Entry as the button’s label. Click away from the button to finalize the text.
![]() You can optionally select a new button color from the Fill Color palette, as well as change the format of the button text by selecting font settings from the Text Formatting toolbar. Make any desired changes.
You can optionally select a new button color from the Fill Color palette, as well as change the format of the button text by selecting font settings from the Text Formatting toolbar. Make any desired changes.
![]() To test the button, switch to Browse mode (View > Browse Mode) and click the button. The Data Entry screen should appear.
To test the button, switch to Browse mode (View > Browse Mode) and click the button. The Data Entry screen should appear.

It’s time to fill that gap at the top of the Data Entry layout. In the Icons folder of the material you downloaded from my Web site are graphic buttons that you’ll place at the top of the layout. After you place the buttons, you’ll create a script to attach to each button.
![]() Switch to Layout mode and choose the Data Entry layout from the layouts pop-up menu.
Switch to Layout mode and choose the Data Entry layout from the layouts pop-up menu.
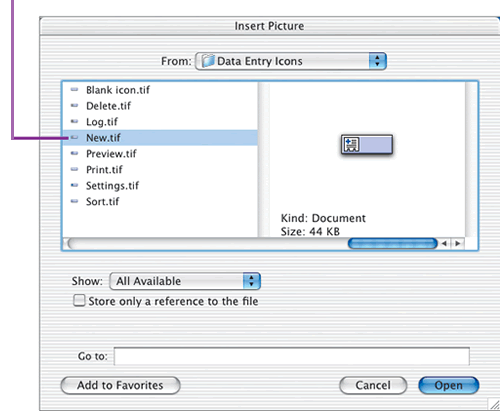
![]() Choose insert > Picture. In the Insert Picture dialog box, navigate to the drive and folder where you extracted the downloaded material. Open the icons folder, select New.tif, and click Open
Choose insert > Picture. In the Insert Picture dialog box, navigate to the drive and folder where you extracted the downloaded material. Open the icons folder, select New.tif, and click Open
![]() Drag the icon to the upperleft position above the layout. Using the arrow keys or the Size palette, align the icon’s left side with the left edges of the items below it.
Drag the icon to the upperleft position above the layout. Using the arrow keys or the Size palette, align the icon’s left side with the left edges of the items below it.


![]() Repeat this procedure to place these remaining icons in a line across the top: Delete.tif, Sort.tif, Log.tif, Preview.tif, Print.tif, Settings.tif. Nudge them into position, spacing them as shown. Align the right edge of the Settings icon with the right edge of the Business Mileage title block below it.
Repeat this procedure to place these remaining icons in a line across the top: Delete.tif, Sort.tif, Log.tif, Preview.tif, Print.tif, Settings.tif. Nudge them into position, spacing them as shown. Align the right edge of the Settings icon with the right edge of the Business Mileage title block below it.
The icons on the buttons are purposely small in order to provide room for text labels.
![]() Select the Text Tool, click the first icon to set the insertion point, and set the font to something small (such as Arial 8 or 9 pt., black). Type New, press
Select the Text Tool, click the first icon to set the insertion point, and set the font to something small (such as Arial 8 or 9 pt., black). Type New, press ![]() to insert a line break, and then type Record. Click away from the text to complete the label.
to insert a line break, and then type Record. Click away from the text to complete the label.
![]() Nudge the selected label into position. If necessary, reduce the width of the text block to ensure that it fits within the bounds of the label.
Nudge the selected label into position. If necessary, reduce the width of the text block to ensure that it fits within the bounds of the label.
![]() Copy/Paste or Duplicate the text block, move the copy into position on the next label, and edit the text. Repeat for the remaining labels. The labels should read Delete Record, Sort, Trip Log, Mileage Report, Print Report, and Settings.
Copy/Paste or Duplicate the text block, move the copy into position on the next label, and edit the text. Repeat for the remaining labels. The labels should read Delete Record, Sort, Trip Log, Mileage Report, Print Report, and Settings.
![]() When the labels are in their final positions, you can group each one with its respective icon to prevent the label from inadvertently moving.
When the labels are in their final positions, you can group each one with its respective icon to prevent the label from inadvertently moving. ![]() -click an icon and its label, and choose Arrange > Group (
-click an icon and its label, and choose Arrange > Group (![]() /
/![]() ).
).
We’ll create two simple button scripts first—ones that consist of only a single step and that can be completely defined in the Specify Button dialog box.
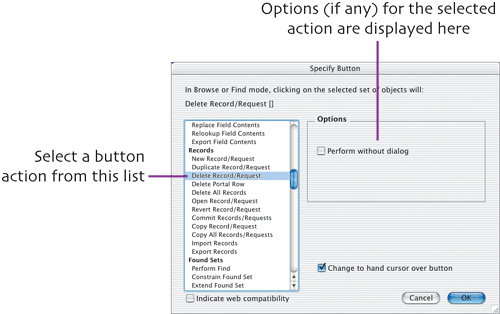
![]() The purpose of the Delete Record button is to delete the current record. Select the Delete Record button on the Data Entry layout and choose Format > Button. In the Specify Button dialog box, scroll down to the Records section of the step list. Select the Delete Record/Request step, do not check the Perform without dialog option, and then click OK. FileMaker attaches the one-step script to the button.
The purpose of the Delete Record button is to delete the current record. Select the Delete Record button on the Data Entry layout and choose Format > Button. In the Specify Button dialog box, scroll down to the Records section of the step list. Select the Delete Record/Request step, do not check the Perform without dialog option, and then click OK. FileMaker attaches the one-step script to the button.
![]() The Settings button switches you to the Global Settings layout. Select the Settings button on the Data Entry layout and choose Format > Button. In the Specify Button dialog box, select the Go to Layout step, choose Global Settings from the Specify drop-down menu, and click OK.
The Settings button switches you to the Global Settings layout. Select the Settings button on the Data Entry layout and choose Format > Button. In the Specify Button dialog box, select the Go to Layout step, choose Global Settings from the Specify drop-down menu, and click OK.
The Sort Records script is used to arrange the records in Start Mileage order—the order in which the trips occurred. While a sort of the current found set (displayed data) can be created entirely within the Specify Button dialog box, there are additional actions that we also want to perform. Because the script contains multiple steps, it must be created in ScriptMaker.
![]() Choose Scripts > ScriptMaker. Because this is the database’s first script, the Define Scripts dialog box is empty. Make sure that Include in menu is checked, and then click New.
Choose Scripts > ScriptMaker. Because this is the database’s first script, the Define Scripts dialog box is empty. Make sure that Include in menu is checked, and then click New.
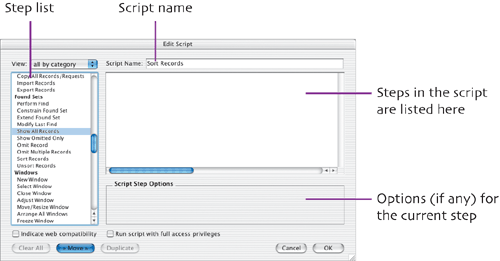
![]() In the Edit Script dialog box, name the script by entering Sort Records in the Script Name text box.
In the Edit Script dialog box, name the script by entering Sort Records in the Script Name text box.
![]() The first script step is Show All Records. Issuing the Show All Records command ensures that the entire database is visible (in case you recently performed a Find and are working with only a subset of the records). To add this step to the script, scroll down to the Found Sets section of the step list, select Show All Records, and click the Move button.
The first script step is Show All Records. Issuing the Show All Records command ensures that the entire database is visible (in case you recently performed a Find and are working with only a subset of the records). To add this step to the script, scroll down to the Found Sets section of the step list, select Show All Records, and click the Move button.
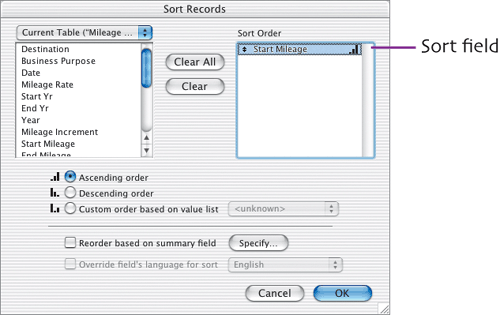
![]() The next script step you’ll add is Sort Records. Move the Sort Records step from the Found Sets section of the step list. Click the Perform without dialog check box, and then click the Specify button to set the sort instructions. The Sort Records dialog box appears. Double-click the Start Mileage field to add it to the Sort Order list (if it isn’t already present), and then click OK to dismiss the dialog box.
The next script step you’ll add is Sort Records. Move the Sort Records step from the Found Sets section of the step list. Click the Perform without dialog check box, and then click the Specify button to set the sort instructions. The Sort Records dialog box appears. Double-click the Start Mileage field to add it to the Sort Order list (if it isn’t already present), and then click OK to dismiss the dialog box.
![]() The final step is to display the last (most recent) record in the database. (Normally, the first record in the current sort order is displayed following a sort.) From the Navigation section of the step list, add the Go to Record/Request/Page step. Choose Last from the Specify pop-up menu.
The final step is to display the last (most recent) record in the database. (Normally, the first record in the current sort order is displayed following a sort.) From the Navigation section of the step list, add the Go to Record/Request/Page step. Choose Last from the Specify pop-up menu.
![]() Click OK to complete the script. Click OK again to dismiss ScriptMaker.
Click OK to complete the script. Click OK again to dismiss ScriptMaker.
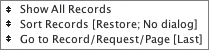
Steps and options for the Sort Records script
![]() Select the Sort button on the layout and choose Format > Button. In the Specify Button dialog box, select Perform Script as the step, click the Specify button, select the Sort Records script, and click OK. Click OK again to dismiss the dialog box.
Select the Sort button on the layout and choose Format > Button. In the Specify Button dialog box, select Perform Script as the step, click the Specify button, select the Sort Records script, and click OK. Click OK again to dismiss the dialog box.
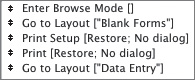
When you need additional trip log forms, this script will print a year’s supply (three copies, four per page).
![]() Choose Scripts > ScriptMaker. Leave Include in menu checked (so the script will also be listed in the Scripts menu), and then click New.
Choose Scripts > ScriptMaker. Leave Include in menu checked (so the script will also be listed in the Scripts menu), and then click New.
![]() In the Edit Script dialog box, name the script Print Blank Forms.
In the Edit Script dialog box, name the script Print Blank Forms.
![]() The first step is to enter Browse mode. (This step is frequently issued to ensure that the correct mode is in effect while a script runs.) Add the Enter Browse Mode step from the Navigation section of the step list. Set no options for the step.
The first step is to enter Browse mode. (This step is frequently issued to ensure that the correct mode is in effect while a script runs.) Add the Enter Browse Mode step from the Navigation section of the step list. Set no options for the step.
![]() Next, we’ll display the layout that we want to print. Add the Go to Layout step from the Navigation section of the step list. Choose Blank Forms from the Specify pop-up menu.
Next, we’ll display the layout that we want to print. Add the Go to Layout step from the Navigation section of the step list. Choose Blank Forms from the Specify pop-up menu.

![]() To ensure that the Page Setup settings are correct, we’ll add a Page/Print Setup command. In the Files section of the step list, select Print Setup and move it into the script. In the Script Step Options area, click Perform without dialog. Then click the Specify button. The Page/Print Setup dialog box appears.
To ensure that the Page Setup settings are correct, we’ll add a Page/Print Setup command. In the Files section of the step list, select Print Setup and move it into the script. In the Script Step Options area, click Perform without dialog. Then click the Specify button. The Page/Print Setup dialog box appears.
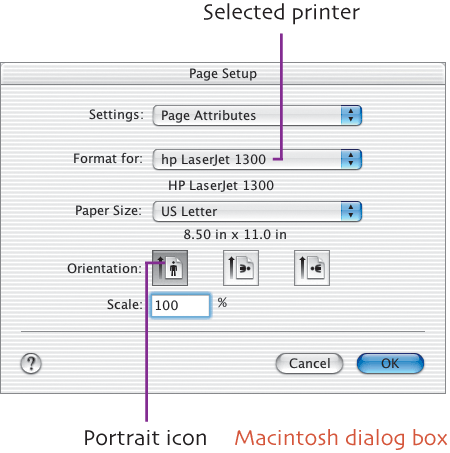
Make sure that the correct destination printer and paper size are selected, and set portrait mode printing. Click OK to close the dialog box.
![]() Now we’ll add the command to print the form. In the Files section of the step list, select the Print step and move it into the script. In the Script Step Options area, click Perform without dialog and then click the Specify button. The Print dialog box appears.
Now we’ll add the command to print the form. In the Files section of the step list, select the Print step and move it into the script. In the Script Step Options area, click Perform without dialog and then click the Specify button. The Print dialog box appears.
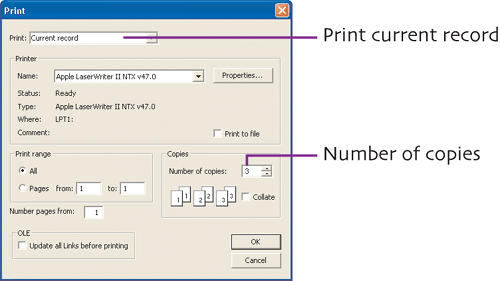
Windows users: In the Print dialog box, choose Current record from the Print drop-down menu. Set Copies to 3. Click OK to close the dialog box.
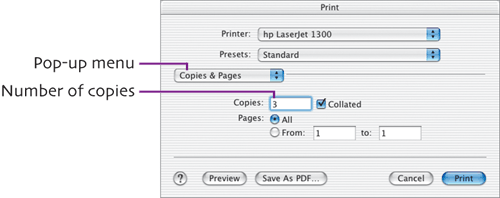
Macintosh users: On the Copies & Pages screen of the Print dialog box, set Copies to 3.
![]() The final step is to return to the Data Entry layout. From the Navigation section of the step list, add the Go to Layout step to the script. Choose Data Entry from the Specify pop-up menu.
The final step is to return to the Data Entry layout. From the Navigation section of the step list, add the Go to Layout step to the script. Choose Data Entry from the Specify pop-up menu.
The Print Blank Forms script
![]() To save the script, click OK. Click OK again to exit ScriptMaker.
To save the script, click OK. Click OK again to exit ScriptMaker.
![]() Switch to Layout mode, select the Trip Log button on the layout, and choose Format > Button. In the Specify Button dialog box, select Perform Script, click the Specify button, select the Print Blank Forms script, and click OK. Click OK again to dismiss the dialog box.
Switch to Layout mode, select the Trip Log button on the layout, and choose Format > Button. In the Specify Button dialog box, select Perform Script, click the Specify button, select the Print Blank Forms script, and click OK. Click OK again to dismiss the dialog box.
Normally, you create a new record by pressing ![]() /
/![]() . In Mileage Master, however, the New Record script also fills in the Start Mileage field by copying and pasting the End Mileage data from the previous record, and then uses your Mileage Increment number to set the End Mileage field. (Even if you’ve done some personal driving since the last business trip, it’s usually quicker to edit these mileage numbers than to enter them manually.)
. In Mileage Master, however, the New Record script also fills in the Start Mileage field by copying and pasting the End Mileage data from the previous record, and then uses your Mileage Increment number to set the End Mileage field. (Even if you’ve done some personal driving since the last business trip, it’s usually quicker to edit these mileage numbers than to enter them manually.)
![]() Create a new ScriptMaker script. Name it New Record.
Create a new ScriptMaker script. Name it New Record.
![]() From the Found Sets section of the step list, move the Show All Records step into the script. This step ensures that you’re working with all records in the database, rather than a subset.
From the Found Sets section of the step list, move the Show All Records step into the script. This step ensures that you’re working with all records in the database, rather than a subset.
![]() Move the Sort Records step from the Found Sets section into the script. Click Perform without dialog, and then click the Specify button to set the sort instructions. In the Sort Records dialog box (see page 98), set Start Mileage as the sort field. Click OK to close the Sort Records dialog box.
Move the Sort Records step from the Found Sets section into the script. Click Perform without dialog, and then click the Specify button to set the sort instructions. In the Sort Records dialog box (see page 98), set Start Mileage as the sort field. Click OK to close the Sort Records dialog box.
![]() From the Navigation section, move the Go to Record/Request/Page step into the script. Choose Last from the Specify pop-up menu. When executed, this step will display the last record in the database (in the current sort order).
From the Navigation section, move the Go to Record/Request/Page step into the script. Choose Last from the Specify pop-up menu. When executed, this step will display the last record in the database (in the current sort order).
![]() From the Editing section of the step list, add the Copy step. Check the Select entire contents check box, and then click the Specify button. In the Specify Field dialog box that appears, select End Mileage and click OK.
From the Editing section of the step list, add the Copy step. Check the Select entire contents check box, and then click the Specify button. In the Specify Field dialog box that appears, select End Mileage and click OK.
![]() From the Records section of the step list, add the New Record/Request step.
From the Records section of the step list, add the New Record/Request step.
![]() From the Editing section, add the Paste step. In the Script Step Options area, check Select entire contents, and click the Specify button. In the Specify Field dialog box, select Start Mileage as the field in which to paste and then click OK.
From the Editing section, add the Paste step. In the Script Step Options area, check Select entire contents, and click the Specify button. In the Specify Field dialog box, select Start Mileage as the field in which to paste and then click OK.

![]() From the Fields section of the step list, add the Insert Calculated Result step. Leave Select entire contents checked. (Doing so ensures that if data is already in the End Mileage field, it will all be replaced with the incremented data.)
From the Fields section of the step list, add the Insert Calculated Result step. Leave Select entire contents checked. (Doing so ensures that if data is already in the End Mileage field, it will all be replaced with the incremented data.)
![]() Click the Go to target field check box to select the field in which the calculated result will appear. In the Specify Field dialog box, select End Mileage and then click OK.
Click the Go to target field check box to select the field in which the calculated result will appear. In the Specify Field dialog box, select End Mileage and then click OK.
![]() Click the Specify button to the right of Calculated result to create the formula. In the Specify Calculation dialog box, create the formula by double-clicking the Start Mileage field, clicking the plus (+) button, and then double-clicking the Mileage Increment field. Here’s how the formula should look:
Click the Specify button to the right of Calculated result to create the formula. In the Specify Calculation dialog box, create the formula by double-clicking the Start Mileage field, clicking the plus (+) button, and then double-clicking the Mileage Increment field. Here’s how the formula should look:
Mileage Master::Start Mileage + Mileage Master::Mileage Increment
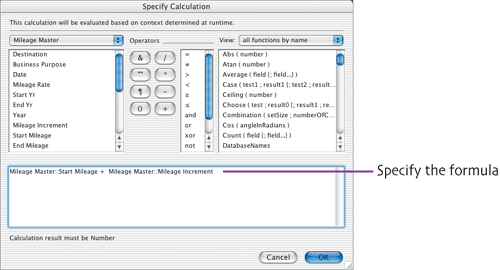
![]() Click OK to close the Specify Calculation dialog box.
Click OK to close the Specify Calculation dialog box.
![]() The last step of the script will position the cursor in the Date field in preparation for entering data. From the Navigation section of the step list, add the Go to Field step. Click the Specify button. Select Date in the Specify Field dialog box and click OK. Close the ScriptMaker dialog boxes by clicking OK twice.
The last step of the script will position the cursor in the Date field in preparation for entering data. From the Navigation section of the step list, add the Go to Field step. Click the Specify button. Select Date in the Specify Field dialog box and click OK. Close the ScriptMaker dialog boxes by clicking OK twice.

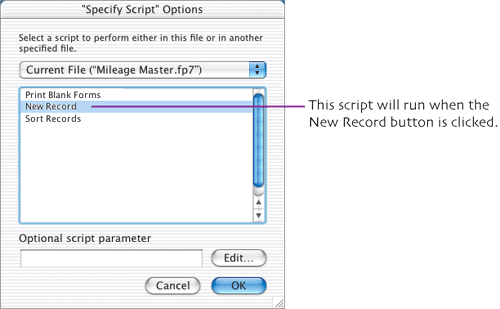
![]() In Layout mode, select the New Record button and choose Format > Button. In the Specify Button dialog box, select Perform Script, click Specify, select the New Record script, and click OK. Click OK to close the Specify Button dialog box. The script is now attached to the New Record button.
In Layout mode, select the New Record button and choose Format > Button. In the Specify Button dialog box, select Perform Script, click Specify, select the New Record script, and click OK. Click OK to close the Specify Button dialog box. The script is now attached to the New Record button.
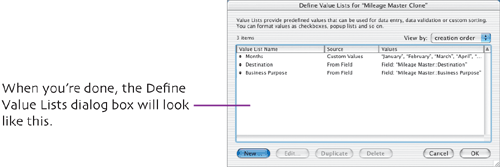
A value list is a list of data values that you can link to a field. The most common use for a value list is to provide a series of choices for the user, formatted as a drop-down list, menu, radio buttons, or check boxes. Value list examples include yes and no, a list of accepted credit cards or shipping methods, and the days of the week. Mileage Master uses three value lists which we’ll create: Months, Destination, and Purpose.
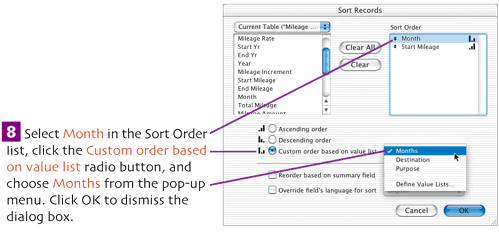
Months value list. At present, sorting by the Months field when preparing the Mileage Report results in the trip data being correctly grouped by month, but in alphabetical order. By creating a Months value list of month names in calendar order, we can use it to arrange the data in the proper order.
![]() Choose File > Define > Value Lists. In the Define Value Lists dialog box, click New. The Edit Value List dialog box appears.
Choose File > Define > Value Lists. In the Define Value Lists dialog box, click New. The Edit Value List dialog box appears.
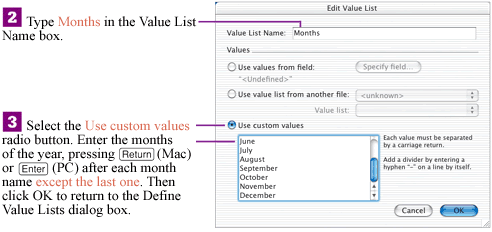
FileMaker won’t sort a custom value list for you. You must enter it in the order in which you want it to be presented.
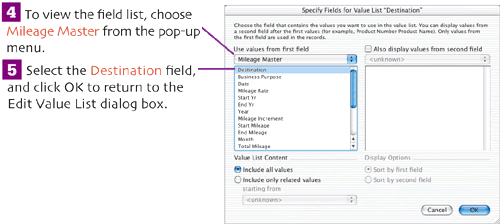
Value lists from field data. A second method of creating a value list is to base it on the contents of a particular field. When you don’t have a preset list of data values, this is an excellent way to effortlessly generate the list. Whenever you enter a new value for the selected field, it is automatically added to the value list. As a bonus, the list is always kept sorted.
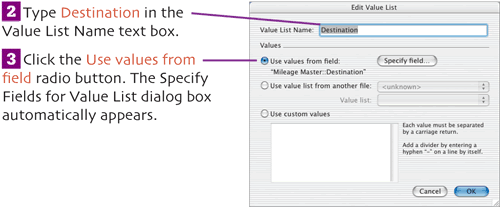
![]() To create the Destination value list, choose File > Define > Value Lists. In the Define Value Lists dialog box, click New. The Edit Value List dialog box appears.
To create the Destination value list, choose File > Define > Value Lists. In the Define Value Lists dialog box, click New. The Edit Value List dialog box appears.
![]() Click OK again to complete the value list definition and return to the Define Value Lists dialog box.
Click OK again to complete the value list definition and return to the Define Value Lists dialog box.
![]() Switch to Layout mode. Select the Destination field on the Data Entry layout, and choose Format > Field Format. The Field Format dialog box appears.
Switch to Layout mode. Select the Destination field on the Data Entry layout, and choose Format > Field Format. The Field Format dialog box appears.

![]() Repeat these steps to define the Business Purpose value list, based on and linked to the Business Purpose field.
Repeat these steps to define the Business Purpose value list, based on and linked to the Business Purpose field.
![]() If you’ve already created some sample records, you can try out the two value lists by switching to Browse mode and tabbing into the Destination and Business Purpose fields on the Data Entry layout.
If you’ve already created some sample records, you can try out the two value lists by switching to Browse mode and tabbing into the Destination and Business Purpose fields on the Data Entry layout.

When you tab into the Destination field, its value list pops up. Click to select an item from the list or type a new destination name.
There will be two versions of the Mileage Report and the Destination Report: one for viewing onscreen and another to be printed. All four reports can be chosen from the Scripts menu. The two Mileage Report versions can also be run by clicking buttons on the Data Entry layout.
Mileage Report - Screen. This script generates the onscreen version of the report.
![]() Choose Scripts > ScriptMaker. Leave Include in menu checked (so the script will also be listed in the Scripts menu), and then click New.
Choose Scripts > ScriptMaker. Leave Include in menu checked (so the script will also be listed in the Scripts menu), and then click New.
![]() In the Edit Script dialog box, name the script Mileage Report - Screen.
In the Edit Script dialog box, name the script Mileage Report - Screen.
![]() Add the Enter Browse Mode step from the Navigation section of the step list.
Add the Enter Browse Mode step from the Navigation section of the step list.

![]() This is a landscape mode report. Add the Print Setup step from the Files section, check Perform with dialog, click the Specify button, set landscape printing in the Page Setup/Print Setup dialog box (see page 99), and click OK.
This is a landscape mode report. Add the Print Setup step from the Files section, check Perform with dialog, click the Specify button, set landscape printing in the Page Setup/Print Setup dialog box (see page 99), and click OK.
![]() From the Windows section of the step list, add the Adjust Window step. Choose Maximize from the Specify pop-up menu.
From the Windows section of the step list, add the Adjust Window step. Choose Maximize from the Specify pop-up menu.
![]() Add the Sort Records step from the Found Sets section, check Perform without dialog, and click Specify. In the Sort Records dialog box, select Month and Start Mileage as the sort fields.
Add the Sort Records step from the Found Sets section, check Perform without dialog, and click Specify. In the Sort Records dialog box, select Month and Start Mileage as the sort fields.
![]() Add the Enter Preview Mode step from the Navigation section of the step list. Click the Pause check box. (This will enable you to flip through the pages of the report by clicking the Book icon.)
Add the Enter Preview Mode step from the Navigation section of the step list. Click the Pause check box. (This will enable you to flip through the pages of the report by clicking the Book icon.)
![]() Add the Enter Browse Mode step from the Navigation section of the step list.
Add the Enter Browse Mode step from the Navigation section of the step list.
![]() Add the Go to Layout step from the Navigation section of the step list. Choose Data Entry from the Specify pop-up menu.
Add the Go to Layout step from the Navigation section of the step list. Choose Data Entry from the Specify pop-up menu.
![]() Add the Adjust Window step from the Windows section of the step list, and choose Restore from the Specify pop-up menu. (Restore makes the window revert to its previous size.)
Add the Adjust Window step from the Windows section of the step list, and choose Restore from the Specify pop-up menu. (Restore makes the window revert to its previous size.)
![]() From the Found Sets section of the step list, add the Sort Records step. Check Perform without dialog, and click the Specify button. In the Sort Records dialog box, set Start Mileage as the sort field. Click OK to dismiss the dialog box.
From the Found Sets section of the step list, add the Sort Records step. Check Perform without dialog, and click the Specify button. In the Sort Records dialog box, set Start Mileage as the sort field. Click OK to dismiss the dialog box.
![]() Add the Go to Record/Request/Page step from the Navigation section of the step list, and choose Last from the Specify pop-up menu. This step will cause the last record in the database (in the current sort order) to be displayed.
Add the Go to Record/Request/Page step from the Navigation section of the step list, and choose Last from the Specify pop-up menu. This step will cause the last record in the database (in the current sort order) to be displayed.
![]() Click OK to close the Edit Script dialog box, and then click OK to close the Define Scripts dialog box.
Click OK to close the Edit Script dialog box, and then click OK to close the Define Scripts dialog box.
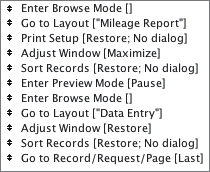
The Mileage Report - Screen script
![]() To link the script to its button, switch to Layout mode, display the Data Entry layout, select the Mileage Report button, and choose Format > Button. In the Specify Button dialog box, select Perform Script, click Specify, select the Mileage Report - Screen script, and click OK. Click OK again to dismiss the dialog box.
To link the script to its button, switch to Layout mode, display the Data Entry layout, select the Mileage Report button, and choose Format > Button. In the Specify Button dialog box, select Perform Script, click Specify, select the Mileage Report - Screen script, and click OK. Click OK again to dismiss the dialog box.
Mileage Report - Printer. Because this script is simply a variation of the previous one, we’ll duplicate the Mileage Report - Screen script, but substitute a Print step for the Enter Preview Mode step.
![]() Choose Scripts > ScriptMaker. In the Define Scripts dialog box, select the Mileage Report - Screen script, and click the Duplicate button. Select the Mileage Report - Screen Copy script, leave Include in menu checked, and click Edit.
Choose Scripts > ScriptMaker. In the Define Scripts dialog box, select the Mileage Report - Screen script, and click the Duplicate button. Select the Mileage Report - Screen Copy script, leave Include in menu checked, and click Edit.
![]() In the Edit Script dialog box, change the script name to Mileage Report - Printer.
In the Edit Script dialog box, change the script name to Mileage Report - Printer.
![]() In the script, select the Enter Preview Mode step and the Enter Browse Mode step below it. Click the Clear button to delete these steps.
In the script, select the Enter Preview Mode step and the Enter Browse Mode step below it. Click the Clear button to delete these steps.
![]() Select the first Sort Records step in the script. From the Files section of the step list, add the Print step to the script. It should appear immediately below the Sort Records step. Check Perform without dialog. Click the Specify button and set the following options in the Print dialog box (see pages 100-101):
Select the first Sort Records step in the script. From the Files section of the step list, add the Print step to the script. It should appear immediately below the Sort Records step. Check Perform without dialog. Click the Specify button and set the following options in the Print dialog box (see pages 100-101):
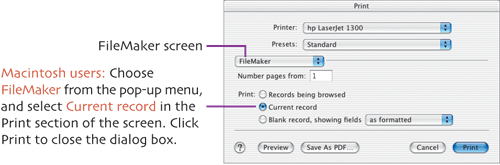
Macintosh users: On the Copies & Pages screen, ensure that the correct printer is selected and that Copies is set to 1. On the FileMaker screen, select Records being browsed. Click Print to close the dialog box.
Windows users: Ensure that the correct printer is selected. Choose Records being browsed from the Print drop-down menu, set Copies to 1, and click OK to close the dialog box.
![]() Click OK to close the Edit Script dialog box, and then click OK to close the Define Scripts dialog box.
Click OK to close the Edit Script dialog box, and then click OK to close the Define Scripts dialog box.
![]() In Layout mode, display the Data Entry layout, select the Print Report button, and choose Format > Button. In the Specify Button dialog box, select Perform Script, click Specify, select the Mileage Report - Printer script, and click OK. Click OK again to dismiss the dialog box.
In Layout mode, display the Data Entry layout, select the Print Report button, and choose Format > Button. In the Specify Button dialog box, select Perform Script, click Specify, select the Mileage Report - Printer script, and click OK. Click OK again to dismiss the dialog box.
Destination Report - Screen. The Destination report is a variation of the Mileage Report that organizes the data according to destination instead of month. As such, its scripts are also very similar to the Mileage Report scripts. Rather than creating the Destination scripts one step at a time, we’ll duplicate the Mileage Report scripts and then make the necessary changes.
![]() Choose Scripts > ScriptMaker. In the Define Scripts dialog box, select the Mileage Report - Screen script and click the Duplicate button. Select the Mileage Report - Screen Copy script, leave Include in menu checked, and click Edit.
Choose Scripts > ScriptMaker. In the Define Scripts dialog box, select the Mileage Report - Screen script and click the Duplicate button. Select the Mileage Report - Screen Copy script, leave Include in menu checked, and click Edit.
![]() In the Edit Script dialog box, change the script name to Destination Report - Screen.
In the Edit Script dialog box, change the script name to Destination Report - Screen.
![]() Select the first Go to Layout step in the script. Select Destination Report from the Specify pop-up menu.
Select the first Go to Layout step in the script. Select Destination Report from the Specify pop-up menu.
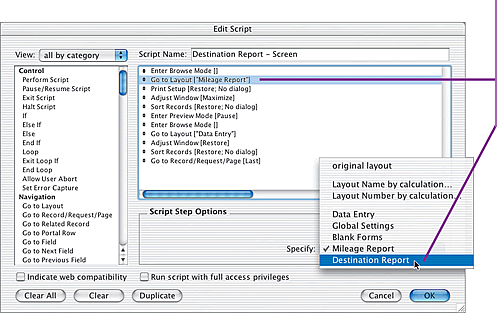
![]() In the script, select the first Sort Records step and click the Specify button. The Sort Records dialog box appears. In order, specify Destination and Start Mileage as the sort fields, and ensure that Ascending order is set for both fields. Click OK to close the Sort Records dialog box.
In the script, select the first Sort Records step and click the Specify button. The Sort Records dialog box appears. In order, specify Destination and Start Mileage as the sort fields, and ensure that Ascending order is set for both fields. Click OK to close the Sort Records dialog box.
![]() Click OK to close the Edit Script dialog box, and then click OK to close the Define Scripts dialog box.
Click OK to close the Edit Script dialog box, and then click OK to close the Define Scripts dialog box.
Destination Report - Printer. The Destination report is for your personal use; that is, the IRS has no interest in its information. Although it’s simple to review the report onscreen (using the Destination Report - Screen script), a printing script is provided here for the sake of completeness.
![]() Choose Scripts > ScriptMaker. In the Define Scripts dialog box, select the Destination Report - Screen script and click the Duplicate button. Select the Destination Report - Screen Copy script, leave Include in menu checked, and click Edit.
Choose Scripts > ScriptMaker. In the Define Scripts dialog box, select the Destination Report - Screen script and click the Duplicate button. Select the Destination Report - Screen Copy script, leave Include in menu checked, and click Edit.
![]() In the Edit Script dialog box, change the name to Destination Report - Printer.
In the Edit Script dialog box, change the name to Destination Report - Printer.
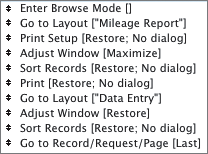
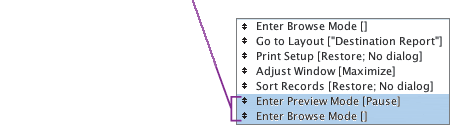
![]() In the script, select the Enter Preview Mode step and the Enter Browse Mode step below it. Click the Clear button. Then select the first Sort Records step in the script.
In the script, select the Enter Preview Mode step and the Enter Browse Mode step below it. Click the Clear button. Then select the first Sort Records step in the script.
![]() From the Files section of the step list, add the Print step to the script. Click the Perform without dialog check box. Click the Specify button and set these options in the Print dialog box (see pages 100-101):
From the Files section of the step list, add the Print step to the script. Click the Perform without dialog check box. Click the Specify button and set these options in the Print dialog box (see pages 100-101):
Macintosh users: On the Copies & Pages screen, ensure that the correct printer is selected and that Copies is set to 1. On the FileMaker screen, select Records being browsed. Click Print to close the dialog box.
Windows users: Ensure that the correct printer is selected. Choose Records being browsed from the Print drop-down menu, set Copies to 1, and click OK to close the dialog box.
![]() Click OK to close the Edit Script dialog box, and then click OK to close the Define Scripts dialog box.
Click OK to close the Edit Script dialog box, and then click OK to close the Define Scripts dialog box.

The Destination Report - Printer script
We’ll create one more script for the database. FileMaker allows you to create two special scripts: a startup and a shutdown script. The former runs automatically whenever you open the database; the latter runs each time you close it. The purpose of both scripts is the same—to prepare the database and put it into a specific state in preparation for this or the next use. The startup script for this database switches to Browse mode, displays the Data Entry layout, ensures that all records in the database are visible and in the correct sort order, and then displays the most recently created record.
![]() Choose Scripts > ScriptMaker. Remove the check mark from Include in menu and then click New.
Choose Scripts > ScriptMaker. Remove the check mark from Include in menu and then click New.
![]() In the Edit Script dialog box, name the script Startup.
In the Edit Script dialog box, name the script Startup.
![]() Add Enter Browse Mode (from the Navigation section of the step list) as the first step.
Add Enter Browse Mode (from the Navigation section of the step list) as the first step.
![]() Add Go to Layout (from the Navigation section of the step list) as the next step. Choose Data Entry from the Specify pop-up menu.
Add Go to Layout (from the Navigation section of the step list) as the next step. Choose Data Entry from the Specify pop-up menu.
![]() Add Set Zoom Level (from the Windows section of the step list) as the next step. From the Specify pop-up menu, select your preferred magnification for this layout, such as 100% or 150%.
Add Set Zoom Level (from the Windows section of the step list) as the next step. From the Specify pop-up menu, select your preferred magnification for this layout, such as 100% or 150%.
![]() Add Move/Resize Window (from the Windows section of the step list) as the next step. Click the Specify button in the Script Step Options area. The “Move/Resize Window” Options dialog box appears.
Add Move/Resize Window (from the Windows section of the step list) as the next step. Click the Specify button in the Script Step Options area. The “Move/Resize Window” Options dialog box appears.
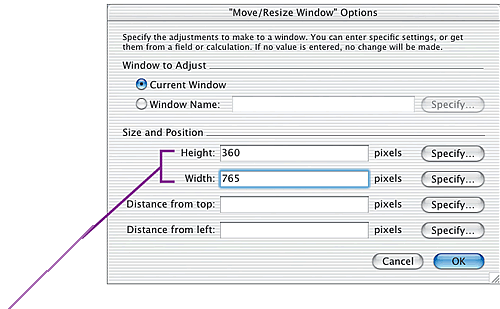
Set the size (in pixels) of the Data Entry window by entering values for Height and Width (see page 119). Click OK to close the dialog box.
![]() To ensure that you’re working with all database records rather than a subset, add the Show All Records step (from the Found Sets section of the step list).
To ensure that you’re working with all database records rather than a subset, add the Show All Records step (from the Found Sets section of the step list).
![]() Add the Sort Records step (from the Found Sets section of the step list). Check Perform without dialog, and click the Specify button. In the Sort Records dialog box, set Start Mileage as the sort field. Click OK to dismiss the dialog box.
Add the Sort Records step (from the Found Sets section of the step list). Check Perform without dialog, and click the Specify button. In the Sort Records dialog box, set Start Mileage as the sort field. Click OK to dismiss the dialog box.
![]() Add the Go to Record/Request/Page step (from the Navigation section of the step list). Choose Last from the Specify pop-up menu.
Add the Go to Record/Request/Page step (from the Navigation section of the step list). Choose Last from the Specify pop-up menu.

![]() Click OK to close the Edit Script dialog box. Click OK again to close the Define Scripts dialog box and return to the layout.
Click OK to close the Edit Script dialog box. Click OK again to close the Define Scripts dialog box and return to the layout.
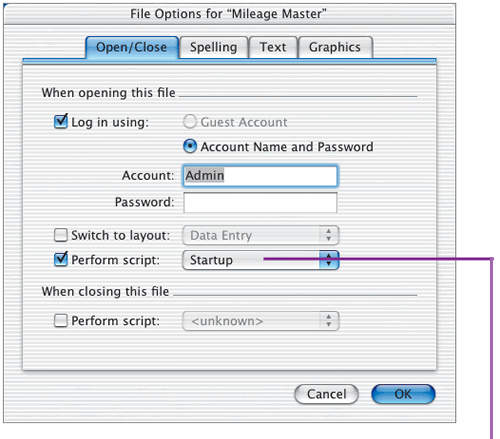
![]() Choose File > File Options. On the Open/Close tab of the File Options dialog box, click the Perform script check box and choose Startup from the pop-up menu. Click OK to close the dialog box.
Choose File > File Options. On the Open/Close tab of the File Options dialog box, click the Perform script check box and choose Startup from the pop-up menu. Click OK to close the dialog box.
The chosen script will run automatically each time you open the database.
Like most user-created lists in FileMaker Pro, you can rearrange the scripts so they’re listed in a more logical order in the Define Scripts dialog box and the Scripts menu. Note, too, that all scripts in the Scripts menu are numbered in order of their position in the Define Scripts dialog box.
![]() Choose Scripts > ScriptMaker. The Define Scripts dialog box appears, listing all scripts created for the database.
Choose Scripts > ScriptMaker. The Define Scripts dialog box appears, listing all scripts created for the database.
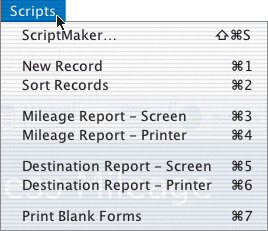
All checked scripts are listed in the Scripts menu. The first ten are assigned keyboard shortcuts.
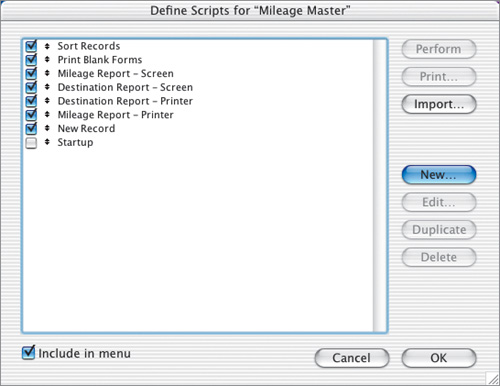
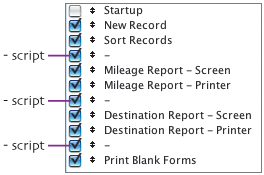
![]() To change a script’s placement in the list, click its double arrow and drag it up or down to a new position. Rearrange the scripts to match the order shown here and click OK.
To change a script’s placement in the list, click its double arrow and drag it up or down to a new position. Rearrange the scripts to match the order shown here and click OK.
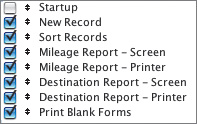
![]() To make it easier to find and choose the desired script from the Scripts menu, you can insert blank lines in the scripts list. To do so, create a new, empty script named - (minus sign). Ensure that the box to the left of the script name is checked. Duplicate the - script twice and position the three in the script list as shown here.
To make it easier to find and choose the desired script from the Scripts menu, you can insert blank lines in the scripts list. To do so, create a new, empty script named - (minus sign). Ensure that the box to the left of the script name is checked. Duplicate the - script twice and position the three in the script list as shown here.
![]() Click OK to close the dialog box. The Scripts menu should now look like this.
Click OK to close the dialog box. The Scripts menu should now look like this.
The default layout created when we defined fields is still around. While it doesn’t hurt anything to simply leave it, I prefer to eliminate clutter: unnecessary layouts, fields that weren’t used, and so on.
![]() Switch to Layout mode. Choose the default layout from the layouts pop-up menu. (In FileMaker Pro 7, the default layout has the same name as the database; in this case, Mileage Master. In earlier versions of FileMaker Pro, it’s named Layout #1.)
Switch to Layout mode. Choose the default layout from the layouts pop-up menu. (In FileMaker Pro 7, the default layout has the same name as the database; in this case, Mileage Master. In earlier versions of FileMaker Pro, it’s named Layout #1.)
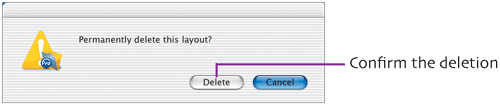
![]() Choose Layouts > Delete Layout. Click Delete in the confirmation dialog box that appears.
Choose Layouts > Delete Layout. Click Delete in the confirmation dialog box that appears.
When using the Button tool, you can make a rectangular button or one with rounded corners by selecting an option from the Button Style section of the Specify Button dialog box (see page 92).
You can create a button without immediately associating it with a script or single action. Choose Do Nothing in the Specify Button dialog box. You can set the script or action when you’re ready.
When inserting images into a layout or record, check Store only a reference to the file in the Insert Picture dialog box when two conditions exist. First, the images’ locations must be constant and accessible to FileMaker Pro. Second, if the original images are huge, storing references to their locations will keep the database from becoming unnecessarily large.
A Blank icon.tif is included in the icon images. Use it if you want to design your own icons.
In addition to creating buttons with the Button Tool and importing icons, you can treat virtually any object as a button, such as a text label, for example.
When creating the action for the Delete button, you’ll note that Perform without dialog was not checked. If you’re a careful user, you can check this option. Note, however, that you cannot Undo deletions. This is why all Delete commands are normally accompanied by a confirmation dialog box.
You can also add a step to a script by double-clicking the step name.
When creating or editing a script in ScriptMaker, you can delete an unwanted step by selecting it and clicking Clear. To change a step’s position in a script, click the double arrow that precedes the step and drag it to a new position.
The best way to view detailed information about a script is to print it. In the Define Scripts dialog box, select the names of the scripts you want to print and click the Print button.
The dimensions to use when setting a window’s height and width will vary from computer to computer—depending on platform and your screen resolution setting. To determine the proper values for your computer, start with the numbers shown in the final script screen shot. Test the value by selecting the Startup script in the Define Scripts dialog box and then clicking Perform. Continue adjusting the values until the window is the desired size.