
Now comes the fun part—and the reason you’ve chosen to painstakingly record your trips in a database. We’re going to create reports to summarize the data. Each report can be set up in the New Layout/Report wizard (with which you’re already very familiar). Like other FileMaker reports, the reports you’ll create can be printed or viewed onscreen in Preview mode.
We’ll create scripts in Chapter 8 so you can generate the two reports: the Mileage Report (monthly totals) and the Destination breakdown report.
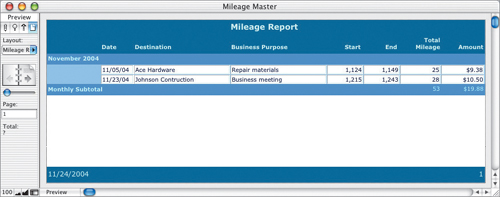
The Mileage Report produces a separate page for each month.
![]() Switch to Layout mode (View > Layout Mode).
Switch to Layout mode (View > Layout Mode).
![]() Choose Layouts > New Layout/Report.
Choose Layouts > New Layout/Report.
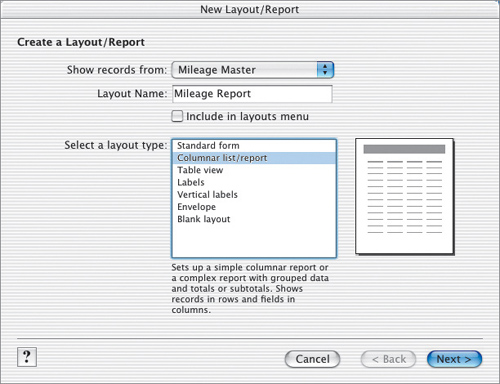
![]() In the New Layout/Report wizard, enter Mileage Report as the name. Remove the check mark from Include in layouts menu, select the Columnar list/report type, and click Next.
In the New Layout/Report wizard, enter Mileage Report as the name. Remove the check mark from Include in layouts menu, select the Columnar list/report type, and click Next.
![]() On the Choose Report Layout screen, select Report with grouped data, click both check boxes, and then click Next.
On the Choose Report Layout screen, select Report with grouped data, click both check boxes, and then click Next.
The report will compute monthly subtotals, as well as a grand total.
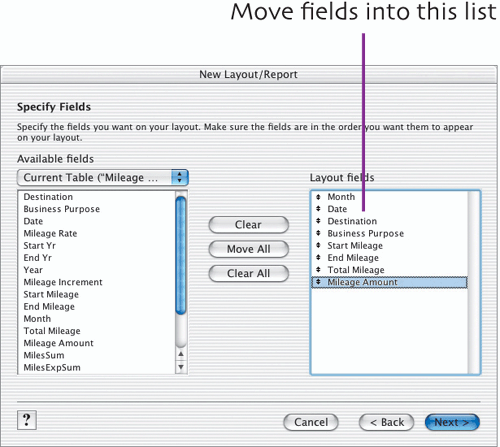
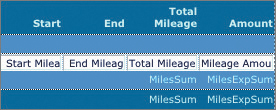
![]() On the Specify Fields screen, select and move fields into the Layout fields list in the following order: Month, Date, Destination, Business Purpose, Start Mileage, End Mileage, Total Mileage, Mileage Amount. Click Next to continue.
On the Specify Fields screen, select and move fields into the Layout fields list in the following order: Month, Date, Destination, Business Purpose, Start Mileage, End Mileage, Total Mileage, Mileage Amount. Click Next to continue.
![]() On the Organize Records by Category screen, select Month as the field on which records will be grouped (summarized). Click Next to continue.
On the Organize Records by Category screen, select Month as the field on which records will be grouped (summarized). Click Next to continue.
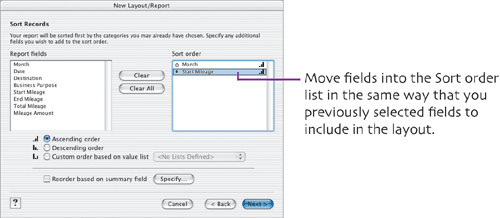
![]() On the Sort Records screen, the Month field is already included in the Sort order list. Move the Start Mileage field into the list, and click Next.
On the Sort Records screen, the Month field is already included in the Sort order list. Move the Start Mileage field into the list, and click Next.
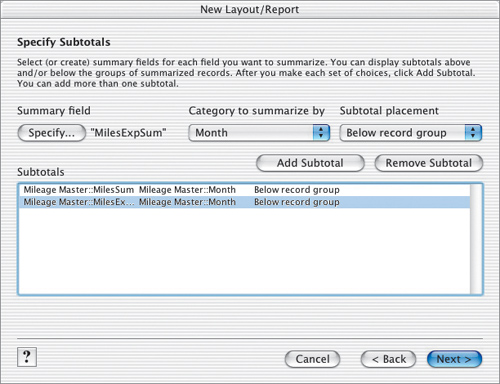
![]() We want monthly subtotals on two Summary fields: MilesSum (total mileage) and MilesExpSum (total mileage dollar value). On the Specify Subtotals screen, set these options: Summary field: MilesSum, summarize by Month, Below record group. Then click Add Subtotal. To create the next subtotal, set MilesExpSum as the Summary field, leave the other settings as they are, and click Add Subtotal. Click Next to continue.
We want monthly subtotals on two Summary fields: MilesSum (total mileage) and MilesExpSum (total mileage dollar value). On the Specify Subtotals screen, set these options: Summary field: MilesSum, summarize by Month, Below record group. Then click Add Subtotal. To create the next subtotal, set MilesExpSum as the Summary field, leave the other settings as they are, and click Add Subtotal. Click Next to continue.
![]() On the Specify Grand Totals screen, we’ll generate grand totals for the report using the same Summary fields: MilesSum and MilesExpSum. Set Summary field: MilesSum, End of report; and then click Add Grand Total. Then set Summary field: MilesExpSum, End of report; and click Add Grand Total. Click Next.
On the Specify Grand Totals screen, we’ll generate grand totals for the report using the same Summary fields: MilesSum and MilesExpSum. Set Summary field: MilesSum, End of report; and then click Add Grand Total. Then set Summary field: MilesExpSum, End of report; and click Add Grand Total. Click Next.
![]() On the Select a Theme screen, we’ll select the initial format for the layout. FileMaker provides two versions of most themes: one for screen and another for print (although they’re occasionally identical). Select Ocean Blue Screen and click Next.
On the Select a Theme screen, we’ll select the initial format for the layout. FileMaker provides two versions of most themes: one for screen and another for print (although they’re occasionally identical). Select Ocean Blue Screen and click Next.
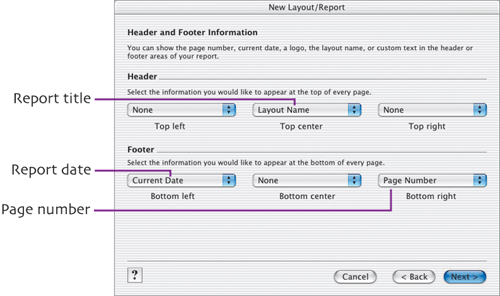
![]() On the Header and Footer Information screen, we’ll specify the text that will appear in the header and footer of each report page. For the header, choose Layout Name as the Top center item. For the footer, choose Current Date for the Bottom left item and Page Number for the Bottom right item. Click Next.
On the Header and Footer Information screen, we’ll specify the text that will appear in the header and footer of each report page. For the header, choose Layout Name as the Top center item. For the footer, choose Current Date for the Bottom left item and Page Number for the Bottom right item. Click Next.
![]() On the Create a Script for This Report screen, select Do not create a script and then click Next. (Although this report will be generated by running a script, we’ll construct the script manually in Chapter 8.)
On the Create a Script for This Report screen, select Do not create a script and then click Next. (Although this report will be generated by running a script, we’ll construct the script manually in Chapter 8.)
![]() On the final screen, select View the report in Layout mode and click Finish.
On the final screen, select View the report in Layout mode and click Finish.
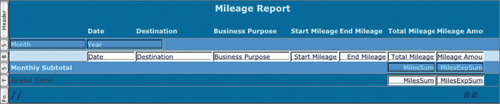
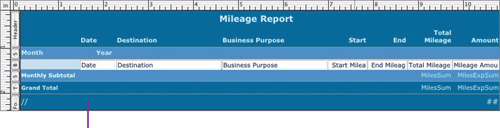
This is how the wizard-generated layout should look.
FileMaker’s theme layouts often leave much to be desired, so I generally modify them. In this section and the ones that follow, we’ll make the changes needed to turn the wizard-generated layout into an attractive report layout.
![]() As you can see, the layout isn’t wide enough to comfortably accommodate all the fields. To correct this, choose File > Page Setup/Print Setup, ensure that the correct destination printer is chosen, and set the orientation to Landscape. (On a PC, the option is labeled Landscape; on a Mac, click the second or third icon.)
As you can see, the layout isn’t wide enough to comfortably accommodate all the fields. To correct this, choose File > Page Setup/Print Setup, ensure that the correct destination printer is chosen, and set the orientation to Landscape. (On a PC, the option is labeled Landscape; on a Mac, click the second or third icon.)
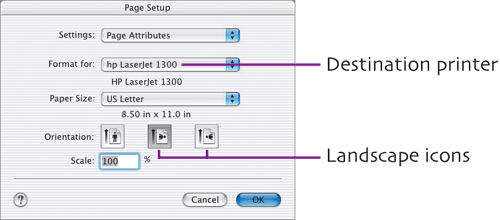
Page Setup dialog (Mac OS X)
![]() To enlarge and fully display the report title, drag one of its handles. Then center the title on the page.
To enlarge and fully display the report title, drag one of its handles. Then center the title on the page.
![]() All Number fields should be right-rather than left-aligned. On the layout, select the Start Mileage field and all fields to the right of it. Click the Align Right icon on the Text Formatting toolbar.
All Number fields should be right-rather than left-aligned. On the layout, select the Start Mileage field and all fields to the right of it. Click the Align Right icon on the Text Formatting toolbar.
![]() Format the Date field (as shown previously on page 42) by selecting it on the layout, choosing Format > Date, and setting these options: Format as 12/25/03, separator: /; Leading Characters: Zero (for both day and month numbers).
Format the Date field (as shown previously on page 42) by selecting it on the layout, choosing Format > Date, and setting these options: Format as 12/25/03, separator: /; Leading Characters: Zero (for both day and month numbers).
![]() Select the Mileage Amount field and the two MilesExpSum fields. Choose Format > Number and set these options: Format as decimal, 2 decimal digits; Use notation: Currency (Leading/Inside), $; Use thousands separator: , (comma).
Select the Mileage Amount field and the two MilesExpSum fields. Choose Format > Number and set these options: Format as decimal, 2 decimal digits; Use notation: Currency (Leading/Inside), $; Use thousands separator: , (comma).
![]() Select the remaining Number fields: Start Mileage, End Mileage, Total Mileage, and the two MilesSum fields. Choose Format > Number and set these options: Format as decimal, 0 decimal digits; Use thousands separator:, (comma).
Select the remaining Number fields: Start Mileage, End Mileage, Total Mileage, and the two MilesSum fields. Choose Format > Number and set these options: Format as decimal, 0 decimal digits; Use thousands separator:, (comma).
![]() For the sake of clarity, each report page should display the year as well as the month. Select the top Month field on the layout and choose Edit > Duplicate. In the Specify Field dialog box, select the Year field, remove the check mark from Create field label, and click OK. Drag the Year field to the right of the Month field.
For the sake of clarity, each report page should display the year as well as the month. Select the top Month field on the layout and choose Edit > Duplicate. In the Specify Field dialog box, select the Year field, remove the check mark from Create field label, and click OK. Drag the Year field to the right of the Month field.

![]() Select the Month and Year fields. Choose Format > Sliding/Printing. In the Set Sliding/Printing dialog box, click the Sliding left check box and then click OK. Setting this option will cause the space between the two text strings to close up when printed or viewed in Preview mode.
Select the Month and Year fields. Choose Format > Sliding/Printing. In the Set Sliding/Printing dialog box, click the Sliding left check box and then click OK. Setting this option will cause the space between the two text strings to close up when printed or viewed in Preview mode.
![]() Delete the Month field in the lower Sub-summary part. Select the Text Tool and add the following text string in the same spot: Monthly Subtotal. Add a Grand Total text string in the Trailing Grand Summary part immediately below it.
Delete the Month field in the lower Sub-summary part. Select the Text Tool and add the following text string in the same spot: Monthly Subtotal. Add a Grand Total text string in the Trailing Grand Summary part immediately below it.
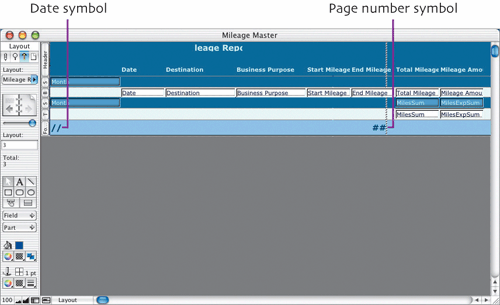
![]() Align the right edge of the page number placeholder with the right edge of the MilesExpSum field, correctly positioning the placeholder for landscape mode printing.
Align the right edge of the page number placeholder with the right edge of the MilesExpSum field, correctly positioning the placeholder for landscape mode printing.

![]() Switch to Browse mode, and save the layout changes when prompted. Choose the Data Entry layout from the layouts pop-up menu in the status area.
Switch to Browse mode, and save the layout changes when prompted. Choose the Data Entry layout from the layouts pop-up menu in the status area.
![]() Create several sample records for at least two months and enter some test data into the fields on the Global Settings layout so you can test the report layout. To create the new records, choose Records > New Record.
Create several sample records for at least two months and enter some test data into the fields on the Global Settings layout so you can test the report layout. To create the new records, choose Records > New Record.
![]() In order for the data to be grouped by month, you must sort the database before previewing or printing the report. Choose Records > Sort Records. Click Sort in the Sort Records dialog box that appears.
In order for the data to be grouped by month, you must sort the database before previewing or printing the report. Choose Records > Sort Records. Click Sort in the Sort Records dialog box that appears.
![]() To display the report, switch to Layout mode, choose Mileage Report from the layouts menu, and then choose View > Preview Mode.
To display the report, switch to Layout mode, choose Mileage Report from the layouts menu, and then choose View > Preview Mode.
Including at least two months in the test data enables the report to be broken into separate months. However, the months are listed alphabetically. In Chapter 8, we’ll define a value list that contains the months in their proper order and modify the sort to use that order.
![]() You’ll note that all months are on the same report page. To display one month per page, return to Layout mode, choose Layouts > Part Setup, double-click Sub-summary by Month (Trailing), click the Page break after every 1 occur-rence check box, click OK, and then click Done.
You’ll note that all months are on the same report page. To display one month per page, return to Layout mode, choose Layouts > Part Setup, double-click Sub-summary by Month (Trailing), click the Page break after every 1 occur-rence check box, click OK, and then click Done.
The Header and both Subsummary parts in this theme are colored with a custom color; that is, it isn’t a standard color in the FileMaker Pro Mac or Windows color palette. We’ll use this custom color to also color the Trailing Grand Summary and Footer parts of the layout. Separate instructions are provided below for working with custom colors on a Macintosh and a PC.
![]() In Layout mode, display the Mileage Report. Click the Header tab.
In Layout mode, display the Mileage Report. Click the Header tab.
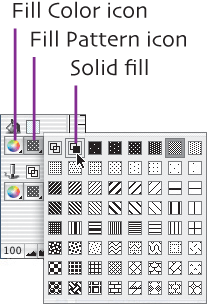
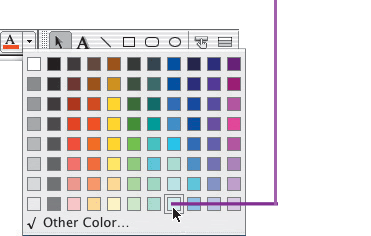
![]() Click the Fill Color icon and choose Other Color (at the bottom of the palette).
Click the Fill Color icon and choose Other Color (at the bottom of the palette).
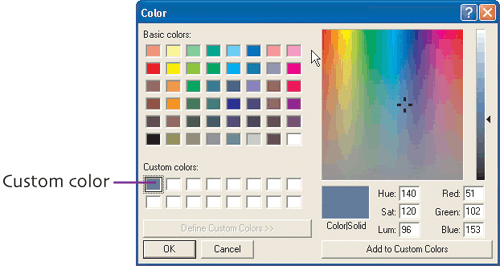
![]() In the Colors dialog box that appears, the Header’s custom color is shown as a color bar.
In the Colors dialog box that appears, the Header’s custom color is shown as a color bar.
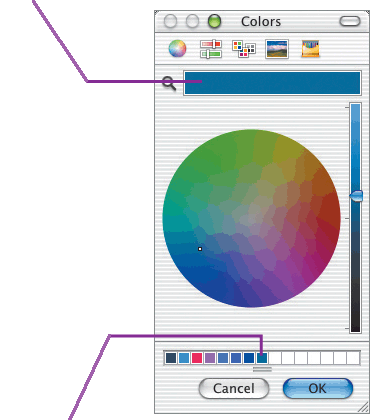
![]() Click the color bar and drag it into the first empty square at the bottom of the dialog box. Click OK. This saves the custom color for later reuse.
Click the color bar and drag it into the first empty square at the bottom of the dialog box. Click OK. This saves the custom color for later reuse.
![]() Click the Trailing Grand Summary tab on the layout. (It’s the section with the Grand Total text.) Click the Fill Pattern icon and select the solid fill pattern. Then choose Other Color from the bottom of the Fill Color palette. Click the custom color’s square at the bottom of the Colors dialog box and then click OK.
Click the Trailing Grand Summary tab on the layout. (It’s the section with the Grand Total text.) Click the Fill Pattern icon and select the solid fill pattern. Then choose Other Color from the bottom of the Fill Color palette. Click the custom color’s square at the bottom of the Colors dialog box and then click OK.
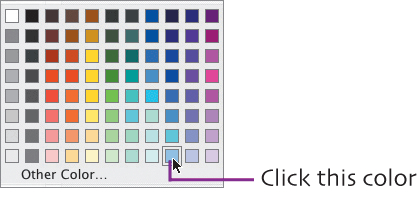
![]() Click the Footer tab, choose Other Color from the bottom of the Fill Color palette, click the custom color’s square in the Colors dialog box, and click OK.
Click the Footer tab, choose Other Color from the bottom of the Fill Color palette, click the custom color’s square in the Colors dialog box, and click OK.
![]() In Layout mode, display the Mileage Report. Click the Header tab.
In Layout mode, display the Mileage Report. Click the Header tab.
![]() Click the Fill Color icon and choose Other Color (at the bottom of the palette).
Click the Fill Color icon and choose Other Color (at the bottom of the palette).
![]() To save the Header’s custom color, click Add to Custom Colors. Click OK.
To save the Header’s custom color, click Add to Custom Colors. Click OK.
![]() Click the Trailing Grand Summary tab on the layout. (It’s the section with the Grand Total text.) Click the Fill Pattern icon and select the solid fill pattern (as shown on the previous page). Then click the Fill Color palette and choose Other Color. In the Color dialog box, click the custom color’s square and then click OK.
Click the Trailing Grand Summary tab on the layout. (It’s the section with the Grand Total text.) Click the Fill Pattern icon and select the solid fill pattern (as shown on the previous page). Then click the Fill Color palette and choose Other Color. In the Color dialog box, click the custom color’s square and then click OK.
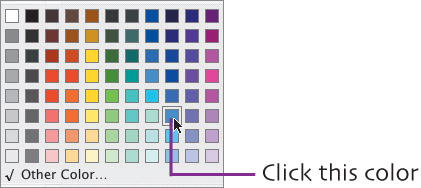
![]() To apply the custom color to the Footer, click the Footer tab, choose Other Color from the bottom of the Fill Color palette, click the custom color’s square in the Color dialog box, and then click OK.
To apply the custom color to the Footer, click the Footer tab, choose Other Color from the bottom of the Fill Color palette, click the custom color’s square in the Color dialog box, and then click OK.
Change the Body color. The blue used for the Body is too light for my taste. Click the Body tab. Click the Fill Color icon and select the shade of blue shown here.
Set the Subsummary color. To color these two parts (the upper one contains the Month and Year fields; the lower contains the Monthly Subtotal text), click each one’s tab and select this color. Also select the two fields in each of these parts and apply the same color to them.
Here’s what the layout should look like now.
Format the section titles. To make the title text in the two Subsummary parts the same, select the Month and Year fields on the layout, and click the Bold icon on the Text Formatting toolbar.
Remove 3-D formatting. Select the fields in both Sub-summary parts (Month, Year, MilesSum, MilesExpSum) and in the Trailing Grand Summary part (MilesSum, MilesExpSum). Set the Effect to None to remove the 3-D formatting that was originally applied to these fields.

Format the Trailing Grand Summary and Footer text. The text in these tow parts should be the same color as the other label text. Select the Grand Total text string, the MilesSum and MilesExpSum fields, and the pair of symbols in the Footer. On the Text Formatting toolbar, select this text color
Set field color in the Trailing Grand Summary. The MilesSum and MilesExpSum fields in the Trailing Grand Summary should be the same custom color as the part. Select both fields, choose Other Color from the bottom of the Fill Color palette, and select the custom color that you previously applied to this layout part.
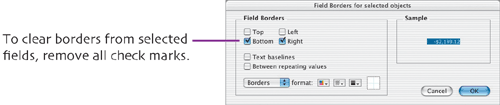
Remove the field borders. Because the fields in the Subsummary (Trailing) and the Trailing Grand Summary are already in a contrasting type color, there’s no need for them to have borders, too. To remove the borders, select the two MilesSum fields and the two MilesExpSum fields, and choose Format > Field Borders. In the Field Borders dialog box, clear all check marks and then click OK.
Format the Footer text. Select both symbols in the Footer. Using the Text Formatting toolbar, reduce the font size to 12 pt. and remove the boldface.

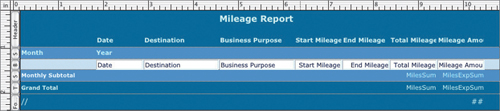
This is how the layout should look now.
Edit the field labels. Four of the field labels in the Header are too long to fit comfortably on the layout. Using the Text Tool, change Start Mileage to Start, End Mileage to End, and Mileage Amount to Amount. Reduce the width of the Total Mileage label until it splits into two lines. Align its bottom edge with that of the other field labels. Eliminate some of the excess width for these labels and right-align their text. Align the right edges of the four labels with the right edges of the corresponding data fields below.

All that’s left to finish the layout is to resize the fields to match the data they’ll contain and then move everything into their final positions.
![]() Using the Size palette, set the following field widths (in inches) in the Body: Date: 0.792, Destination and Business Purpose: 2.333, Start Mileage and End Mileage: 0.875, Total Mileage: 0.986, Mileage Amount: 1.042.
Using the Size palette, set the following field widths (in inches) in the Body: Date: 0.792, Destination and Business Purpose: 2.333, Start Mileage and End Mileage: 0.875, Total Mileage: 0.986, Mileage Amount: 1.042.
![]() Select each of the following labels and then use the Size palette to set its distance from the left edge as follows: Date: 1.486, Destination: 2.292, Business Purpose: 4.639. For each matching field, set the same distance from the left edge.
Select each of the following labels and then use the Size palette to set its distance from the left edge as follows: Date: 1.486, Destination: 2.292, Business Purpose: 4.639. For each matching field, set the same distance from the left edge.

Here are the Date, Destination, and Business Purpose labels and fields in their new positions.
![]() The remaining Body fields and labels are all right-aligned. Select each label, and use the Size palette to set the distance from its right edge as follows: Start Mileage: 7.861, End Mileage: 8.750, Total Mileage: 9.750, Mileage Amount: 10.806. Then select the corresponding field and set the same distance from its right edge.
The remaining Body fields and labels are all right-aligned. Select each label, and use the Size palette to set the distance from its right edge as follows: Start Mileage: 7.861, End Mileage: 8.750, Total Mileage: 9.750, Mileage Amount: 10.806. Then select the corresponding field and set the same distance from its right edge.
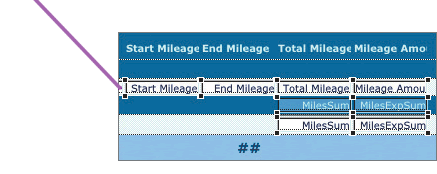
![]() Set the right-edge distance of the two MilesSum fields to 9.750 and the right-edge distance of the two MilesExpSum fields to 10.806.
Set the right-edge distance of the two MilesSum fields to 9.750 and the right-edge distance of the two MilesExpSum fields to 10.806.
These numeric Body fields are right-aligned. Here’s how they’ll look after being moved to their final positions on the layout.
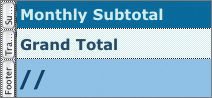
![]() Select the Monthly Subtotal text string and use the Size palette to determine the distance from its left edge. Ensure that Month, Grand Total, and the Date placeholder (//) are all the same distance from their left edges.
Select the Monthly Subtotal text string and use the Size palette to determine the distance from its left edge. Ensure that Month, Grand Total, and the Date placeholder (//) are all the same distance from their left edges.
![]() Select the Page Number placeholder (##) and set its right edge distance to 10.806 inches. Doing so aligns its right edge with the right edge of the layout elements directly above it.
Select the Page Number placeholder (##) and set its right edge distance to 10.806 inches. Doing so aligns its right edge with the right edge of the layout elements directly above it.
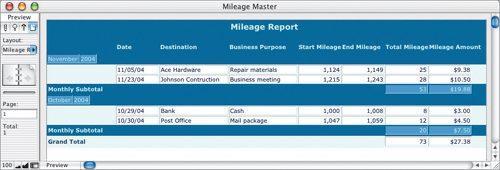
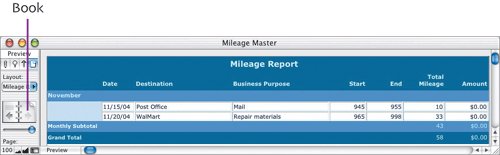
This is the finished layout (above). To view the report it generates (below), switch to Preview mode. Click the Book pages to see any additional report pages.
You’ll note in Step 5 that Month was included in the field list. Although you aren’t required to place it in the final layout, you must include it in the field list in order to use it as the grouping field in Step 6.
Subtotals and grand totals must be based on Summary fields. This is because only Summary fields are designed to perform calculations across multiple records.
The initial position of the page break in the generated layout is determined by the Page Setup or Print Setup setting (portrait or landscape) in effect at the time.
As you make the layout changes, it’s a good idea to periodically switch to Preview mode to see their effect. Be sure to save your layout changes when prompted.
In FileMaker Pro 7, you can also save layout changes by pressing
 or choosing Layouts > Save Layout.
Don’t worry about the accuracy of your sample data. We’ll delete all records before entering the real data.
You can also use the Colors/Color dialog box to create your own custom colors. Select the object to be colored, choose Other Color from the Fill Color palette, and use the dialog box controls to select and add the new color.
You can apply the 3-D Emboss effect to field labels for an attractive look.
Another way to copy formatting from a selected object to another object is to use the Format Painter tool. Select the first object, click the Format Painter icon on the Standard toolbar, and then click the destination object.
When resizing and rearranging fields or labels, it’s easy for them to slip out of alignment. You can use the Arrange > Set Alignment command to align these objects along their bottom edges. Note, however, that all selected objects will be aligned to the lowest of the objects.