
Creating a database from scratch (rather than copying an existing one or using a template) involves many steps, but the first is always to define its fields. Although you don’t have to immediately define every field—FileMaker is perfectly happy if you add, delete, and edit field definitions as you develop and refine the database—I’ll make it easy for you. Since I already know what fields will be needed, we’ll create and set options for all of them in this chapter.
Some fields will be used for gathering data, others for performing calculations, and still others for presenting reports. After naming and specifying a type for each field (such as Text, Number, or Calculation), we’ll set options for the fields. Field options can be divided into the following classes:
Auto-enter. These options let you specify a default value that will automatically be entered for the field whenever you create a new record. An auto-enter value could be the next serial number in a sequence, today’s date, or a fixed value (such as California or 100.00).
Validation. Validation settings are used to prevent unwanted values in a field. For example, you can specify that a field’s value be within a particular range, that the value be unique, or that its length be limited to a maximum number of characters. You can also specify whether a user will be allowed to override the validation criteria.
Storage. You can set storage options to index a field (allowing you to rapidly sort on or search the field) or treat it as a global field (giving it a single value for the entire database, as you might do to set a sales tax percentage).
After we finish defining fields and setting options for them, FileMaker will generate a default layout for the database.
![]() New databases are created in the New Database dialog box. If you’ve just launched FileMaker Pro, the dialog box will appear automatically. If FileMaker is already running, choose File > New Database to open the dialog box.
New databases are created in the New Database dialog box. If you’ve just launched FileMaker Pro, the dialog box will appear automatically. If FileMaker is already running, choose File > New Database to open the dialog box.


![]() The Define Database dialog box appears, open to the Fields tab. To create each new field, enter its name, choose a field type, and click Create.
The Define Database dialog box appears, open to the Fields tab. To create each new field, enter its name, choose a field type, and click Create.

The specific fields you’ll create, as well as their field types and options, will be explained on the pages that follow.
At a minimum, a field definition consists of a field name and a type. The field type determines what kind of data will be stored in the field. Of the eight field types supported by FileMaker Pro 7, Mileage Master uses Text, Number, Date, Calculation, and Summary field types. Define each field listed in the following pages by entering the name in the Field Name box, choosing the designated field type from the Type drop-down menu, and clicking Create. To set any options that are indicated for a field, select the field name on the Fields tab of the Define Database dialog box, click Options, and then click the appropriate tab.
Text fields can store any kind of character data, including letters, numbers, and punctuation. Examples of Text fields include addresses, comments, and phone numbers. (Because phone numbers are generally typed using non-numeric characters, such as minuses and parentheses, they are better represented as Text fields than as Number fields.)
Create two Text fields: Destination and Business Purpose. On the Storage tab of the Options dialog box, set Indexing to Minimal, as described below.
![]() After defining the two Text fields (as shown on the previous page), select one of them in the field list in the Define Database dialog box, click Options, and click the Storage tab on the Options dialog box.
After defining the two Text fields (as shown on the previous page), select one of them in the field list in the Define Database dialog box, click Options, and click the Storage tab on the Options dialog box.
![]() Repeat Steps 1 and 2 for the other Text field.
Repeat Steps 1 and 2 for the other Text field.
Date fields are used to record dates. Although you could also use a Text field to store dates, only a Date field will sort dates properly, make them readily searchable, and enable you to easily use them in date-based calculations.
Create a single Date field named Date. The field will be used to record the date of each trip. Because we want to be able to rapidly sort the database on this field, go to the Storage tab of the Options dialog box and set Indexing to All. We’ll also set the default value for this field to the date on which each new record is created, as described below.
![]() Select the Date field in the field list in the Define Database dialog box, click Options, and click the Auto-Enter tab on the Options dialog box.
Select the Date field in the field list in the Define Database dialog box, click Options, and click the Auto-Enter tab on the Options dialog box.
![]() Click OK to return to the Define Database dialog box.
Click OK to return to the Define Database dialog box.
Although the current date will automatically be entered for every new record, you can still edit it if necessary. (Even if the date is incorrect, it will usually be faster for you to edit it than to type it from scratch.)
Number fields are used to store numeric data: the digits 0-9, a decimal point, and a sign (+ or -). You use a Number field when you want to be able to sort numerically (rather than alphabetically), perform calculations on the field, or use the data in a Summary field (as a summary calculation in a report, for example).
Only two Number fields in this database will have to be entered for each record. They are the beginning and ending mileage for each trip (Start Mileage and End Mileage). All other Number fields are global; that is, each will have one value for the entire database and will be used as a constant in calculations.
We’ll start by creating the five global Number fields: Mileage Rate, Start Yr, End Yr, Year, and Mileage Increment.
![]() In the Define Database dialog box, create the Mileage Rate field by entering its name in the Field Name box, choosing Number from the Type drop-down menu, and clicking Create.
In the Define Database dialog box, create the Mileage Rate field by entering its name in the Field Name box, choosing Number from the Type drop-down menu, and clicking Create.
![]() With the new Number field selected in the field list, click Options, and click the Storage tab on the Options dialog box.
With the new Number field selected in the field list, click Options, and click the Storage tab on the Options dialog box.
![]() Click the check box in the Global Storage section. Then click OK to return to the Define Database dialog box.
Click the check box in the Global Storage section. Then click OK to return to the Define Database dialog box.
![]() Repeat these steps for the other four global Number fields: Start Yr, End Yr, Year, and Mileage Increment.
Repeat these steps for the other four global Number fields: Start Yr, End Yr, Year, and Mileage Increment.
Start Mileage and End Mileage are also Number fields. You’ll use them to record the odometer readings for the start and end of each trip.
![]() In the Define Database dialog box, create the Start Mileage field by entering its name in the Field Name box, choosing Number from the Type drop-down menu, and clicking Create.
In the Define Database dialog box, create the Start Mileage field by entering its name in the Field Name box, choosing Number from the Type drop-down menu, and clicking Create.
![]() Click Options, and then click the Storage tab on the Options dialog box. Set Indexing to All.
Click Options, and then click the Storage tab on the Options dialog box. Set Indexing to All.

![]() To determine if an End Mileage value is correct, it is validated by calculation. When you commit (complete) a record, a check is made to see if End Mileage is greater than or equal to Start Mileage. If it isn’t, the error message from Step 6 is displayed.
To determine if an End Mileage value is correct, it is validated by calculation. When you commit (complete) a record, a check is made to see if End Mileage is greater than or equal to Start Mileage. If it isn’t, the error message from Step 6 is displayed.
To create the validation formula, click the Validated by calculation check box. In the Specify Calculation dialog box that appears, enter this formula:
End Mileage ≥ Start Mileage
You create formulas by typing and/or selecting elements (field names, operators, and built-in functions) from the top half of the dialog box. (At a minimum, it’s safest to select field names by double-clicking them in the field list. Doing so ensures that they’re spelled correctly.) When you’ve completed the formula, click OK. Then click OK again to dismiss the Options dialog box, returning you to the Define Database dialog box.
FileMaker Pro allows you to perform two kinds of calculations: within records and across records. Each is handled by a different field type.
Within-record calculations are accomplished using Calculation fields. A formula may combine other fields, constants, and built-in functions. For example, you could create a Calculation field that computes sales tax by multiplying an invoice total by a sales tax percentage (Invoice Total * Tax Percent) or by a constant (Invoice Total * .075). The computed sales tax would be different for each invoice. Calculations can be performed on Number, Text, Date, Time, or Container fields; the specified result must also be one of these data types. If you change the data in any field on which a calculation is based, the result is automatically recalculated. Unlike other field types, the result in a Calculation field cannot be edited. (You can copy the result, but you can’t change it.)
Calculations that are computed across all or a subset of records in the database are performed using Summary fields. Although Summary fields can be placed in data entry layouts, it’s more common to use them in reports.
As shown in the tables below, Mileage Master has six Calculation fields and two Summary fields. You’ll note that formulas in a few Calculation fields rely on Summary fields and vice versa. Thus, some fields must be created before others.
Calculation Field | Formula | Result Type | Storage Opt. |
|---|---|---|---|
Total Mileage | End Mileage - Start Mileage | Number | |
Mileage Amount | Total Mileage * Mileage Rate | Number | Unstored |
Annual Miles | If(not(IsEmpty(End Yr)); End Yr - Start Yr; ″″) | Number | Global |
Month | MonthName(Date) | Text | |
Personal Miles | If(not(IsEmpty(Annual Miles)); Annual Miles - MilesSum; ″″) | Number | Global |
Annual Dollar | Mileage Rate * MilesSum | Number | Global |
Summary Field | Function and Summarized Field |
|---|---|
MilesSum | Total of Total Mileage |
MilesExpSum | Total of Mileage Amount |
Total Mileage. This Calculation field computes the number of miles for each trip.
![]() In the Define Database dialog box, enter Total Mileage in the Field Name box, choose Calculation as the Type, and click Create. The Specify Calculation dialog box appears.
In the Define Database dialog box, enter Total Mileage in the Field Name box, choose Calculation as the Type, and click Create. The Specify Calculation dialog box appears.
![]() Create the formula. Double-click the End Mileage field in the field list, type a minus sign (-), and then double-click the Start Mileage field.
Create the formula. Double-click the End Mileage field in the field list, type a minus sign (-), and then double-click the Start Mileage field.

Mileage Amount. This Calculation field computes the dollar amount for each trip by multiplying the miles traveled (Total Mileage) by the Mileage Rate (a constant).
![]() Create this Calculation field as you did Total Mileage. But in the Specify Calculation dialog box, use this formula: Total Mileage * Mileage Rate
Create this Calculation field as you did Total Mileage. But in the Specify Calculation dialog box, use this formula: Total Mileage * Mileage Rate
![]() Set the result type to Number, and then click the Storage Options button.
Set the result type to Number, and then click the Storage Options button.
![]() Ensure that indexing is set to Do not store calculation results, click OK, and then click OK again to return to the Define Datavase dialog box.
Ensure that indexing is set to Do not store calculation results, click OK, and then click OK again to return to the Define Datavase dialog box.
Month. This Calculation field extracts the name of the month from each trip’s date (10/14/05 yields October, for example). This data is used in section heads of the Mileage Report when displaying monthly trip totals.
![]() Create a Calculation field named Month. The Specify Calculation dialog box appears when you click Create.
Create a Calculation field named Month. The Specify Calculation dialog box appears when you click Create.
![]() Insert the MonthName function into the formula by double-clicking its name in the function list.
Insert the MonthName function into the formula by double-clicking its name in the function list.
![]() In the formula text box, select the date placeholder text and replace it with the Date field by double-clicking Date in the field list.
In the formula text box, select the date placeholder text and replace it with the Date field by double-clicking Date in the field list.

![]() Set the result type to Text and then click OK.
Set the result type to Text and then click OK.
MilesSum and MilesExpSum. Since the Calculation fields on which these Summary fields are based have been defined, we can create them now. MilesSum computes the total miles traveled each month and the grand total of all miles traveled to-date. MilesExpSum computes the dollar value for the miles traveled each month and the total dollar value of all miles traveled to-date.
![]() Create a Summary field named MilesSum. When you click Create, the Options for Summary Field “MilesSum” dialog box appears.
Create a Summary field named MilesSum. When you click Create, the Options for Summary Field “MilesSum” dialog box appears.
![]() Click the Total of radio button, select Total Mileage in the Available Fields list, and click OK to return to the Define Database dialog box.
Click the Total of radio button, select Total Mileage in the Available Fields list, and click OK to return to the Define Database dialog box.

![]() Now create the MilesExpSum Summary field. When you click Create, the Options for Summary Field “MilesExpSum” dialog box appears.
Now create the MilesExpSum Summary field. When you click Create, the Options for Summary Field “MilesExpSum” dialog box appears.
![]() Click the Total of radio button, select Mileage Amount in the Available Fields list, and click OK to return to the Define Database dialog box.
Click the Total of radio button, select Mileage Amount in the Available Fields list, and click OK to return to the Define Database dialog box.
Annual Dollar. This global Calculation field computes the dollar value of the business miles driven during the year by multiplying the IRS’ Mileage Rate by MilesSum, the total miles for the year.
![]() In the Define Database dialog box, type Annual Dollar in the Field Name box, choose Calculation as the Type, and click Create. The Specify Calculation dialog box appears.
In the Define Database dialog box, type Annual Dollar in the Field Name box, choose Calculation as the Type, and click Create. The Specify Calculation dialog box appears.
![]() Create the formula by double-clicking the Mileage Rate field inthe field list, typing an asterick (*), and then double-clicking the MilesSum field.
Create the formula by double-clicking the Mileage Rate field inthe field list, typing an asterick (*), and then double-clicking the MilesSum field.
![]() Set the result type to Number, and click the Storage Options button.
Set the result type to Number, and click the Storage Options button.
![]() In the Storage Options dialog box, click the Use global storage (one value for all records) check box. Click OK to dismiss the dialog box, and click OK again to close the Specify Calculation dialog box.
In the Storage Options dialog box, click the Use global storage (one value for all records) check box. Click OK to dismiss the dialog box, and click OK again to close the Specify Calculation dialog box.
Annual Miles and Personal Miles. Each of these global Calculation fields computes a single value for the entire database: total miles driven during the year (Annual Miles) and the number of non-business miles driven for the year (Personal Miles). Both fields will be displayed on the Global Settings screen, but only at year end— after you’ve entered the final odometer reading for the year.
![]() In the Define Database dialog box, type Annual Miles in the Field Name box, choose Calculation as the Type, and click Create.
In the Define Database dialog box, type Annual Miles in the Field Name box, choose Calculation as the Type, and click Create.
![]() In the Specify Calculation dialog box, create the following formula:
In the Specify Calculation dialog box, create the following formula:
If (not (IsEmpty (End Yr)); End Yr - Start Yr; “")
Here’s what the formula means. If End Yr (final odometer reading) isn’t blank, subtract Start Yr (the beginning reading) from End Yr. This yields the total miles driven for the year. Otherwise, leave it blank (the two double quotation marks).
![]() Set the result type to Number, and click the Storage Options button.
Set the result type to Number, and click the Storage Options button.
![]() In the Storage Options dialog box, click the Use global storage (one value for all records) check box. Click OK to dismiss the dialog box, and click OK again to close the Specify Calculation dialog box.
In the Storage Options dialog box, click the Use global storage (one value for all records) check box. Click OK to dismiss the dialog box, and click OK again to close the Specify Calculation dialog box.
Personal Miles. To create this global Calculation field, follow the steps you used to create Annual Miles, but use this formula in Step 2:
If (not (IsEmpty (Annual Miles)); Annual Miles - MilesSum; “")
If Annual Miles (total miles for the year) is not blank, business miles (MilesSum) are subtracted from Annual Miles. This yields the personal miles driven for the year. Otherwise, the field is left blank (represented by the pair of double quotation marks).
Now you’ve defined the essential fields for the Mileage Master database. One more will be added in a later chapter, but these are all we’ll need for now.
Now that the fields have been defined, click OK to close the Define Database dialog box. FileMaker generates a default layout for the database, placing all the defined fields in a single vertical column. The field names are used as labels for the fields. If all you wanted was a quick-and-dirty database, you could start entering data immediately. Or you could clean up the layout slightly by rearranging fields, removing unnecessary ones, and editing labels to make them more descriptive.
The default layout is only a starting place for most databases. Since all the fields you just defined are used, many (such as the Summary fields) are better removed and placed on other layouts, for example.

Mileage Master, however, is meant to be an example of an attractive, easy to use, highly functional database. Rather than use the default layout (either as-is or after some editing), we can create custom layouts that better serve our needs. As explained in Chapter 1, you can make as many layouts as you like, each for a different purpose. We’ll create these custom layouts in the chapters that follow.
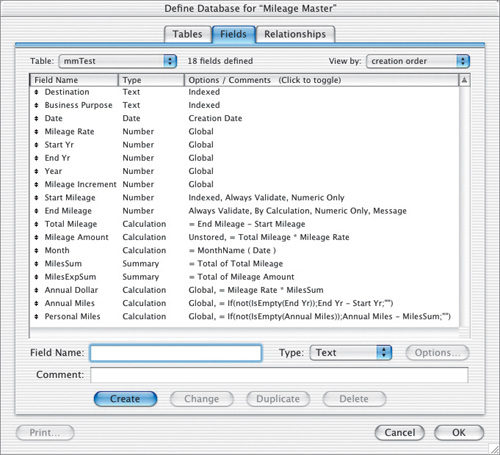
Compare your field list to the one shown below. (If there are errors in the field names, types, or options, it will affect the way the database works.) Don’t worry about the order of the fields, but be sure to check the type and options for each field. You may also want to recheck the result type for the Calculation fields. To do so, double-click each Calculation field in the field list.
When naming and saving a new database, the Windows and Mac file dialog boxes are different. Other dialog boxes may also be slightly different, although they will normally contain the same options.
It’s only critical to include the .fp7 file extension if you’re a Windows user. (Note that if you’re using FileMaker Pro 5.0-6.0, the correct extension is .fp5.)
Don’t worry if you make mistakes while defining fields. To change a field’s name or type, select it in the Define Database’s field list, make the change, and then click the Change button.
Similarly, it isn’t a problem if you exit the dialog box before you’ve created all the fields. To return to the Define Database dialog box, choose File > Define Database.
Since data in Number fields can be entered using any combination of digits, a decimal, and a sign (+ or -), you’re probably wondering why we didn’t set a format for any of the fields. It’s because formatting is specified as part of a layout— not as part of a field definition. Field formatting is discussed in Chapter 3 and later chapters.
Because the Personal Miles formula is virtually identical to the one for Annual Miles, you may find it simpler to copy the Annual Miles formula in the Specify Calculation dialog box, paste it into the formula box for Personal Miles, and then replace the fields with the correct ones.
To replace one field with another, select it in the formula and then double-click the replacement field in the field list.
My version of the Define Database dialog box is probably larger than the one on your screen. You can enlarge the dialog box by clicking its bottom-right corner and then dragging down and to the right.