No one wants to run into trouble, but unfortunately it does happen. The suggestions in this appendix can help if iMovie or iDVD is crashing, or if the program’s performance is choppy.
For more specific queries, turn to the Web and the large community of iMovie and iDVD users who share their experiences. The first place I look is Dan Slagel’s “Unofficial” iMovie FAQ (frequently asked questions). Apple’s discussion forums are also filled with information. See Appendix B for those URLs, or go to my own iMovie/iDVD Web site at www.necoffee.com/imovievqs/.
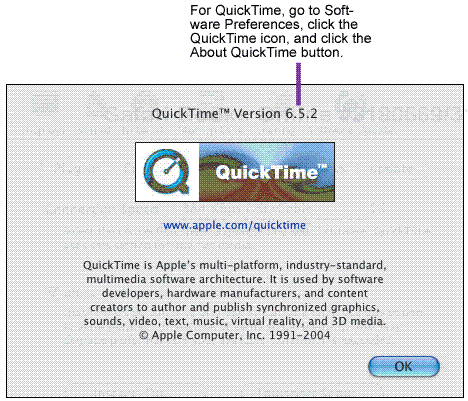
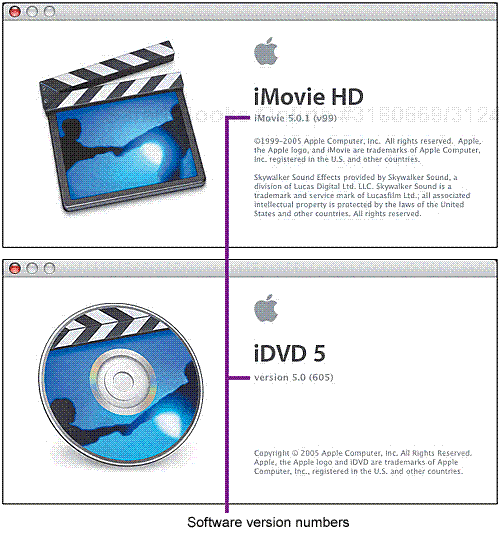
Also, make sure you’re running the latest versions of iMovie, iDVD, and QuickTime (especially the latter). Apple’s iLife Web page (www.apple.com/ilife/) includes links to the latest updates. To check your versions, go to the iMovie or iDVD menu in each program, and choose About iMovie or About iDVD.
Make the iMovie window smaller. Drag the resize handle in the lower-right corner of the screen to make the window smaller.
Quit other running applications. iMovie and iDVD will gladly use as much memory and processor power as you can throw at them. If playback is sluggish, try running only iMovie or iDVD.
Delete the program’s preferences. If iMovie or iDVD crashes, its preferences can become corrupted, causing more problems later. Here’s how to delete preferences:
![]() Quit the application.
Quit the application.
![]() In the Finder, choose Home from the Go menu.
In the Finder, choose Home from the Go menu.
![]() Open the Library folder.
Open the Library folder.
![]() Open the Preferences folder.
Open the Preferences folder.
![]() Delete the following files (you may not have them all):
Delete the following files (you may not have them all):
iMovie Preferences
com.apple.imovie.plist
com.apple.iMovie3.plist
com.apple.iDVD.plist
Turn off FileVault (Mac OS X 10.3 and later). FileVault is a technology introduced in Mac OS X 10.3 Panther that creates an encrypted version of your Home directory to secure its contents from snooping eyes. The problem is that iMovie and iDVD store their project files in the Home directory by default. So, when FileVault is active, the computer is constantly encrypting and decrypting massive quantities of data on the fly. Turn FileVault off in Mac OS X’s Security preference pane.
Make sure you have plenty of available hard disk space. I can’t say it enough. Digital video requires huge amounts of disk space. Consider buying an external hard drive and storing your projects there; if your Mac includes a FireWire 800 port (a faster version of FireWire), get a drive with FireWire 800 support.
Check your DVD media. Sometimes a failed burn operation is the fault of the disc. This can happen with generic discs bought in bulk, but also occurs with more reputable vendors’ discs. Try a new brand of disc, starting with the ones Apple sells (since presumably they’ve been vetted by the company).
Clean your SuperDrive. Accumulated dust can disrupt the laser used to burn data to a disc. Spray a little compressed air into the SuperDrive’s slot to blow the dust away.
Set Energy Saver settings. Since it can take hours to burn a disc, your computer may think you’ve left it and go into a power-saving mode. In Mac OS X’s System Preferences, set the processor performance to Highest and the hard drive to never spin down. Also turn off the option to put the computer to sleep automatically after a period of inactivity.
Burn during the day. Many people do their disc burning at night while they sleep (computers are meant to do work while we rest, aren’t they?). If you’re waking up to burn failures, try burning during the day—Mac OS X performs some nightly maintenance operations around 3 a.m., which could be interfering with the burning operation.
Change audio quality. iMovie and iDVD use audio set to 48.000 kHz (16-bit). However, some audio sources may record at 44.100 kHz, which has been known to cause burning problems. Take these steps to change a movie’s audio quality:
![]() Export your movie from iMovie to a QuickTime file using Expert Settings.
Export your movie from iMovie to a QuickTime file using Expert Settings.
![]() In the Movie Settings dialog, under Sound options, click the Settings button.
In the Movie Settings dialog, under Sound options, click the Settings button.
![]() Click the Rate popup menu and choose 48.000.
Click the Rate popup menu and choose 48.000.
![]() Export the clip, then import it into iDVD.
Export the clip, then import it into iDVD.
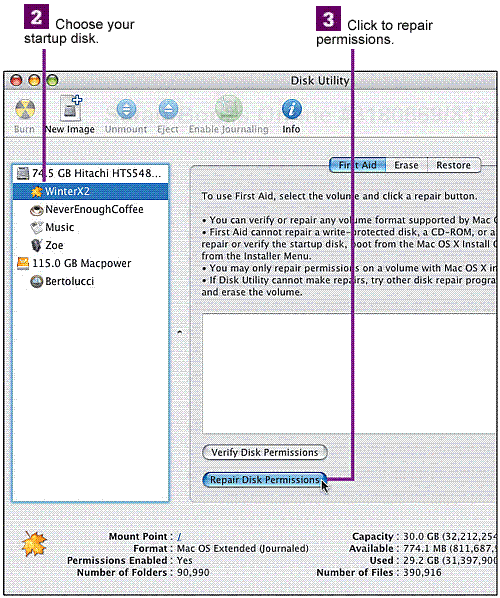
Repair Mac OS X permissions. When things start going haywire under Mac OS X, I take this step first. Each file on your computer has permissions assigned to it, which dictate, for example, how the file can be changed or moved. For whatever reason, sometimes the wrong permissions get applied.
![]() Open Disk Utility, which is located in the Utilities folder within your Applications folder.
Open Disk Utility, which is located in the Utilities folder within your Applications folder.