
Although the video footage captured by your digital camcorder is recorded as long series of ones and zeros, it’s written on magnetic tape (which is still the best way to store the vast amount of information that digital video occupies). To turn that footage into a malleable form you can edit, you need to bring it from the camera’s tape to your hard disk. iMovie calls this process importing.
Before you start, make sure you have plenty of free space on your hard disk: importing a typical 60-minute MiniDV tape takes up roughly 13 gigabytes (GB) of hard disk space (1 second of DV video equals 3.6 MB). If you’re importing HD footage, plan on using about four times that amount of disk space.

![]() Connect the FireWire cable to the camcorder and your Mac.
Connect the FireWire cable to the camcorder and your Mac.

![]() Switch the camcorder to Play/VCR mode (the name can vary among camera manufacturers).
Switch the camcorder to Play/VCR mode (the name can vary among camera manufacturers).

![]() Launch iMovie. It should go into Camera mode automatically; if not, click the mode switch to change from Edit mode to Camera mode.
Launch iMovie. It should go into Camera mode automatically; if not, click the mode switch to change from Edit mode to Camera mode.

When the camera is connected, you can use iMovie’s controls to rewind, fast-forward, and play through the footage on tape. This lets you locate footage without fiddling with the camera’s miniscule buttons. If nothing else, I find it easier to rewind the tape using iMovie.

Press Rewind or Fast-forward while the video is playing to review the footage sped up.


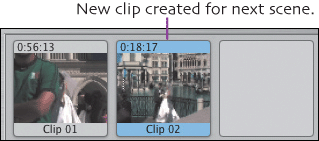
As you import, iMovie identifies the moments in your footage when you stopped recording one scene and started recording the next. When such a break is encountered, iMovie creates a new clip for each scene.

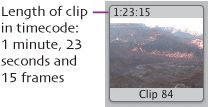
Now that your footage is in iMovie, you need to become familiar with the way video is measured: timecode. A movie is made up of thousands of frames, so clips are measured in terms of minutes, seconds, and frames.
In NTSC video (the standard for television in North America), 30 frames equals 1 second; so, for example, a timecode value of 1:23:15 is equal to one minute, twenty-three and a half seconds.
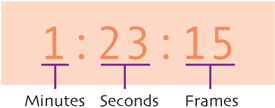
Timecode notation
Many European countries use the PAL standard, which is 25 frames per second. In PAL format, our example of ten and a half seconds would be a timecode of 1:23:12.
iMovie automatically determines which type of camcorder you’re using (NTSC or PAL) and creates a project matching that rate.
Quit other applications before importing to make sure that their actions in the background (such as checking email, playing music, etc.) don’t interfere with the import process. Otherwise, you could encounter dropped frames or stuttery playback.
If you have an iSight camera that’s connected at the same time as your camcorder, and you want to capture live video with it, click the camera icon next to the mode switch and choose iSight from the popup menu that appears.
If you’re importing sections of your tape (instead of the entire tape), rewind to a few seconds before the start of what you want to capture. This gives you some buffer while editing.
Press the spacebar in Camera mode to start importing footage. Press it again to stop.
The free space indicator in the lower-right corner of iMovie’s window keeps tabs on how much room is left on your hard disk. As the disk fills up, the indicator text changes from black to yellow to red. When no more space is free, iMovie stops the import process.
You can also import QuickTime movies (or other formats that are compatible with QuickTime, such as AVI movies) from your hard disk. Simply drag the QuickTime file from the Finder onto the Shelf or the Timeline. However, since most QuickTime movies are smaller in size, the resolution may not be as good as your camcorder’s footage.
You can buy analog-to-digital converter boxes, which enable you to connect an analog cam-corder or VCR to your Mac and import that footage into iMovie. I used one recently to digitize and edit the video from my wedding, since VHS tapes noticeably deteriorate.
If, as you import, you hear an echo, check your camera’s volume level. If it’s audible, you’ll hear the footage’s audio first from the camcorder’s speakers, and then from your Mac’s speakers a fraction of a second after.
iMovie HD’s Magic iMovie feature imports video and adds transitions automatically. However, since we’re editing manually, we don’t need to use Magic iMovie.