
Let’s recap our progress so far.
By this point, you’ve imported your footage from the camera, added any songs and still photos, and assembled the clips in the Timeline. You’ve also edited the clips and incorporated transitions, titles, and effects.
Before you proceed, make sure any final polishing work has been done on your movie (such as adding other music, trimming clips to tighten the movie’s timing, etc.).
In this chapter, you’ll share the movie with the rest of the world by emailing it to someone, building a .Mac HomePage (if you’re a .Mac subscriber; if not, see the extra bits section on page 69), creating a QuickTime file, and finally creating an iDVD project in preparation for burning the movie to a DVD.

If you want to share only a section of your movie, select the clips in the Timeline before choosing the Share command.

![]() In the Share dialog, click the Email button.
In the Share dialog, click the Email button.
![]() Choose your email program from the popup menu.
Choose your email program from the popup menu.
![]() iMovie launches your email program and creates a new outgoing message with the movie attached (Apple Mail shown here). Enter a recipient, write a brief note, and hit Send to zing it on its way.
iMovie launches your email program and creates a new outgoing message with the movie attached (Apple Mail shown here). Enter a recipient, write a brief note, and hit Send to zing it on its way.
![]() In the Share dialog, click the HomePage button.
In the Share dialog, click the HomePage button.

![]() After signing into your account, choose a section of your HomePage site, and click an iMovie theme.
After signing into your account, choose a section of your HomePage site, and click an iMovie theme.
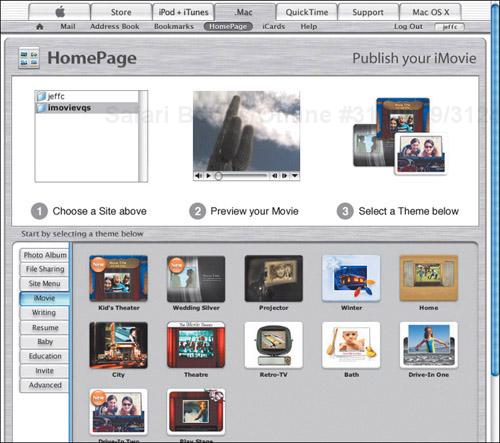
Type a page title, movie title, and description into the fields, then click Publish to make the page live.

![]() In the Share dialog, click the QuickTime button.
In the Share dialog, click the QuickTime button.
![]() Choose a compression setting from the popup menu (see the next page).
Choose a compression setting from the popup menu (see the next page).

![]() In the Save dialog that appears, choose a location on your hard disk.
In the Save dialog that appears, choose a location on your hard disk.
You can burn that file to a CD-ROM, upload it to a Web site, or use it for whatever you see fit for a self-contained movie file.
The preset QuickTime settings are scaled and compressed for their intended medium, so, for example, the Email version is smaller in dimension and is more compressed to reduce the file size significantly.
Full Quality DV is not compressed at all, leading to huge file sizes, but the best image quality.


One advantage of DVDs in general is the capability to jump to specific scenes within a movie, instead of fast-forwarding through the entire movie. You set up these scenes, called chapters, in iMovie before creating the iDVD project.
![]() Click the iDVD button.
Click the iDVD button.

![]() position the Playhead where you want a chapter to begin.
position the Playhead where you want a chapter to begin.

![]() Click the Add Chapter button.
Click the Add Chapter button.

A new chapter is added in the iDVD pane.

![]() Type a name for the chapter as it will appear in iDVD.
Type a name for the chapter as it will appear in iDVD.


![]() iDVD launches automatically, with your movie already set up in iDVD's main menu screen. You're now done with iMovie, and ready to tackle iDVD in Chapter 11!
iDVD launches automatically, with your movie already set up in iDVD's main menu screen. You're now done with iMovie, and ready to tackle iDVD in Chapter 11!
When sharing just a range of clips, the selection must be contiguous—they all need to connect to each other. Otherwise, the “Share selected clips only” option is disabled.
You can share video clips that are on the Shelf, too. If you select more than one, iMovie assembles them in the order they were originally imported, not their order on the Shelf.
iMovie warns you if the movie’s expected file size is too large to send via email. Look in the summary below the file name field.
Be a responsible Internet citizen: refrain from sending large files (2 MB or larger) via email. A copy of the movie must be stored on every email server between you and your recipient’s computer; combined with spam and malicious email attachments floating around out there, this puts a strain on Internet service providers, who may in turn restrict your capability to successfully send large attachments.
If you’re not a .Mac member, go to www.mac.com to sign up. A one-year membership costs $100, but you can try the service free for 60 days. (Even if you don’t choose to pay, you get to keep your .Mac screen name, which is used by iChat AV.)
At this writing, the .Mac service includes 125 MB of hard disk space. If you find yourself filling that up with movies (or photos or other files), Apple is happy to sell you more space—up to 1 GB of storage (at $50 per year).
iMovie reads your .Mac membership information when it launches. If you want to publish to another person’s account, you need to quit iMovie, make the change in the .Mac pane of the Mac OS X System Preferences, and then relaunch iMovie.
You can also publish movies to a .Mac HomePage without doing it directly from iMovie (if you’ve created a QuickTime movie using custom settings). Copy the movie file to your iDisk, log on to .Mac, click the HomePage icon, and follow the instructions.
iMovie’s default QuickTime settings offer decent image quality and file sizes, but you can do better. Choose Expert Settings from the popup menu, then specify another type of video compression, such as Sorenson Video 3. Apple has more information on its support Web site: http://docs.info.apple.com/article.html?artnum=165371.
You’ll notice that the frame size for Full Quality DV is 720 × 480 pixels, which is a wider screen size than the Monitor’s size of 640 × 480. What’s going on?
Although each frame is made up of pixels, the pixels in video are rectangular, not square (taller than they are wide). When you view it in iMovie or iDVD, the size is converted to prevent video from looking squished.
Clicking a chapter marker in the iDVD pane moves the Playhead to that point in the Timeline.
You can’t move chapter markers. Instead, select a marker in the iDVD pane, click the Remove Chapter button, and then create a new marker in the new location.
Instead of going to the iDVD pane, use the Add Chapter Marker (or press
 ) or Delete Chapter Marker (
 ) items in the Advanced menu.
Another way to share is to record your movie back to a MiniDV tape in your camcorder, using the Videocamera option in the Share dialog. If you aren’t able to burn DVDs, you can connect your camcorder to your television to view the movie.
If your Mac supports Bluetooth (a short-range wireless network protocol) and you own a Blue-tooth-enabled cellular phone, you can share your movie via Bluetooth in the Share dialog.