
The current trend of the software industry is moving towards Open Data Protocols. One of the most interesting and popular data protocols that have sprung into existence recently is Open Data Protocol or OData. OData is a web-based protocol used to query and/or update data. OData uses standard web technologies, such as HTTP, Atom Publishing Protocol, XML, and JSON to communicate and provide access to the information present on the server to the external world.
Even though OData is not the only way to enable representational-relational data from the server, it brings a standardization on how the data should be represented using a unique URI, which allows the data to be filtered, queried, manipulated, and so on. OData can be thought of as a tap from the ecosystem that exposes the dataset or a tap into the ecosystem of developers who can build applications very easily, as the way in which OData API works is easily understood by them.
In the Microsoft .NET platform, the ODATA services are encapsulated in WCF Data Services (which was formerly known as ADO.NET data services). These services are easy to use and come in handy for developers in the Microsoft world. .NET also provides a superior client library that makes it very easy to create tools that can consume the OData services.
Before we try to expose an OData service, it is important to create a database with some tables that might be useful to expose. Let's create three tables inside our SQL Server database:
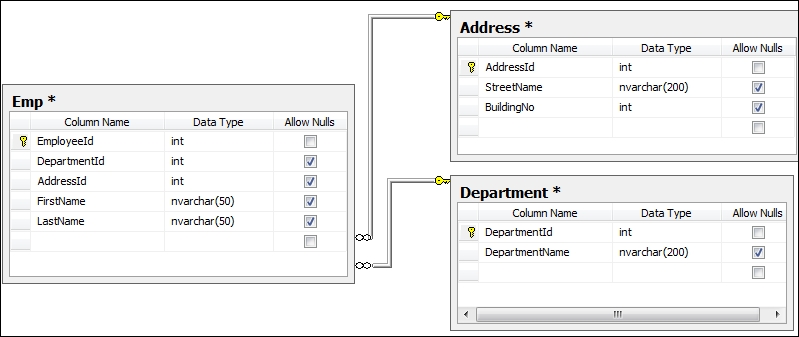
In the preceding screenshot, we created three tables. We created the relationships between the three tables so that we can generate the relationship inside our mode.
Now, let's create an OData service from Visual Studio:
- Launch Visual Studio and create an ASP.NET web application. Create the web application to host the WCF data service.
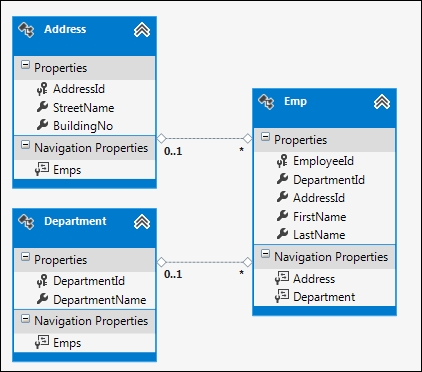
- Add an ADO.NET data model to the project and point it to the database that is created. We are going to use the Entity Framework to communicate with the database. Once it is successfully created, the entity data model will look like the following screenshot:
- Now add a new WCF Data Service to the web application; we will call it
EmployeeDataService. - After the WCF Data Service is added to the solution, replace the
/*Todo: put your data source class name here */path withODataDbEntities, which is the database context created from the Entity Framework. - Generally, OData services are restrictive in nature. If you do not set a proper permission to objects, either read or write, the objects are not exposed to the external world. Let's now configure the service with a set of rules as follows:
public static void InitializeService(DataServiceConfiguration config)
{
    config.SetEntitySetAccessRule("*", EntitySetRights.AllRead);

    //Set paging
    config.SetEntitySetPageSize("*", 25);

    config.DataServiceBehavior.MaxProtocolVersion = DataServiceProtocolVersion.V3;
}
The preceding specification defines that the service exposes all the entities for
Readwith a custom pagination of 25 items per page. - The OData framework doesn't mean exposing everything from the database out on the Web. It means exposing specific entities with as much or as little granularity as you like. The OData framework provides you with support on intercepting queries, making custom behaviors, making custom service operations, and so on. For every request, the OData framework calls
OnStartProcessingRequest, which you can intercept to add various cache headers:protected override void OnStartProcessingRequest(ProcessRequestArgs args) { base.OnStartProcessingRequest(args); HttpContext context = HttpContext.Current; HttpCachePolicy c = HttpContext.Current.Response.Cache; c.SetCacheability(HttpCacheability.ServerAndPrivate); c.SetExpires(HttpContext.Current.Timestamp.AddSeconds(60)); c.VaryByHeaders["Accept"] = true; c.VaryByHeaders["Accept-Charset"] = true; c.VaryByHeaders["Accept-Encoding"] = true; c.VaryByParams["*"] = true; }In the preceding code, we have added the
HttpCacheheader on every request that passes through the OData handler. - You can also use built-in interceptors such as
QueryInterceptororChangeInterceptorto ensure that the OData service hooks itself to the custom logic specified on those methods before the object is returned:[QueryInterceptor("Emp")] public Expression<Func<Emp, bool>> OnQueryEmployee() { //ToDo : Write your custom logic here. return e => true; } [ChangeInterceptor("Emp")] public void OnChangeEmployee(Emp emp, UpdateOperations operation) { if (operation == UpdateOperations.Add) { throw new DataServiceException(401, "We do not allow to add new employees"); } } - In the preceding code, you can see that the
OnQueryEmployeefunction is called whenEmpis called from the client. You can write your own custom logic to filter data. TheOnChangeEmployeefunction is called whenever any client tries to make changes to the data on the server. WCF Data Service will automatically hook itself onto the method and pass theEmpobject with the operation. - Finally, the service can be hosted on IIS and the service URL can be called to get a reference for the service.
WCF Data Service is a new implementation of Microsoft to support Open Data Protocol standards. It provides an easy way to expose objects based on the REST-based design principle. It uses its runtime serializers to convert data objects into standard formats of data such that they can be consumed by applications that support Open Data Protocol standards. The support for standard AtomPub APIs included in the services makes it even better.
From the programming perspective, there is not much to write to expose items. The API is made simple enough and a large set of APIs is used automatically to generate the standard API formats and sent as a response.
As we have already seen how to create OData services, let's consider some things that we haven't covered yet.
Consuming OData services is easy. Let's take an example of an online OData service to show how we can consume it. We take the reference of the NuGet public API, which lists the packages that are supported by NuGet. NuGet is a free, open source public developer package management system. It helps a developer integrate a number of online .NET projects inside it by using its library hosted on the cloud. Now, let's connect to the OData service hosted by NuGet and take a reference to find the packages available on it. To connect to the NuGet package service, we add a reference of the following link to our project using the service reference at http://packages.nuget.org/v1/FeedService.svc/, as shown in the following screenshot:
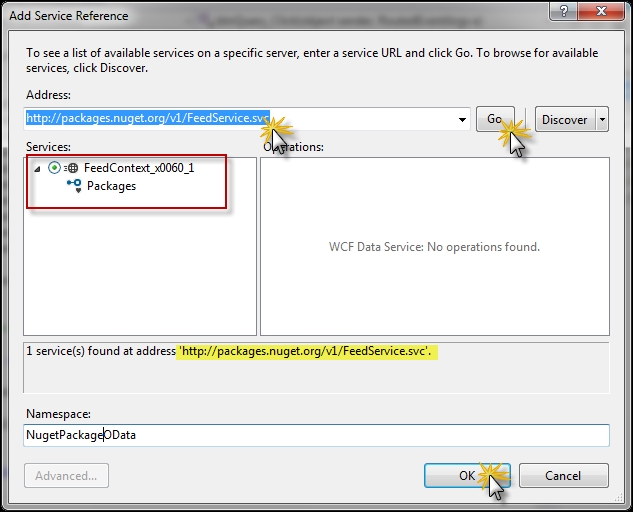
Here, when you add a reference to the NuGet PackageOData service, it will show you a public service that has a public interface called packages. The public API is freely available to everyone to keep a track of all the packages that are available with NuGet. We call the Namespace service NugetPackageOData.
After taking a reference from the public NuGet package API, let's create a new WPF application and a UI. The UI has a TextBox class, a ListBox class, and a Button class such that when the button is clicked, the query text from the Textbox class is searched on the NugetPackage service and the list is shown in the List section on the screen.
<DockPanel LastChildFill="True">
        <Grid DockPanel.Dock="Top">
            <Grid.ColumnDefinitions>
                <ColumnDefinition Width="80" />
                <ColumnDefinition Width="*" />
                <ColumnDefinition Width="100" />
            </Grid.ColumnDefinitions>
            <TextBlock Grid.Column="0" Text="Query:"
                   Margin="5" />
            <TextBox Name="txtQuery" Grid.Column="1"
                   Margin="5" />
            <Button Name="btnQuery" Grid.Column="2"
                Content="Query"
                Margin="5"
                Click="btnQuery_Click" />
        </Grid>
        <Separator Margin="5" />
        <ListBox Name="lstPackages" ItemsSource="{Binding}">
            <ListBox.ItemTemplate>
                <DataTemplate>
                    <Grid>
                        <Grid.ColumnDefinitions>
                            <ColumnDefinition Width="3*" />
                            <ColumnDefinition Width="0.5*" />
                            <ColumnDefinition Width="1.5*" />
                            <ColumnDefinition Width="2*" />
                            <ColumnDefinition Width="1*" />
                        </Grid.ColumnDefinitions>
                        <TextBlock Text="{Binding Id}" Grid.Column="0" />
                        <TextBlock Text="{Binding Version}" Grid.Column="1" />
                        <TextBlock Text="{Binding Authors}" Grid.Column="2" />
                        <TextBlock Text="{Binding Dependencies}" Grid.Column="3" />
                        <TextBlock Text="{Binding Created}" Grid.Column="4" />
                    </Grid>
                </DataTemplate>
            </ListBox.ItemTemplate>
        </ListBox>
    </DockPanel>
In the preceding XAML, we create DockPanel, which hosts one grid and one list. The grid shows the top-panel to query the package and the list shows a list of packages returned by the service. We create an appropriate DataTemplate binding to ensure that the service package contract is maintained.
In the preceding code, we create an object of the NugetOData packager client and call its package API to get all the public APIs. We use the query sent from the textbox to load only the items that contain the key in their title:
IEnumerable<V1FeedPackage> QueryNuGetPackage(string query)
{
    var client = new FeedContext_x0060_1(this.clientUri);
    var returnedPackages = client.Packages.Where(e => e.Title.ToUpper().Contains(query.ToUpper()));

    return returnedPackages;
}

private void btnQuery_Click(object sender, RoutedEventArgs e)
{
    if (string.IsNullOrWhiteSpace(txtQuery.Text))
        return;

    this.lstPackages.DataContext = this.QueryNuGetPackage(txtQuery.Text);
}
The preceding code gets all the packages that are returned from the package OData public API and filters the returned data by the query text.
Authentication is an important consideration when dealing with OData services. The OData services exposes data using REST-based URLs and is available to the external world. In some cases, these data blocks need to be secured behind valid credentials. If we need to map using a Windows account, the IIS manager provides an ASP.NET Windows authentication automatically just by configuring the website, as shown in the following screenshot:
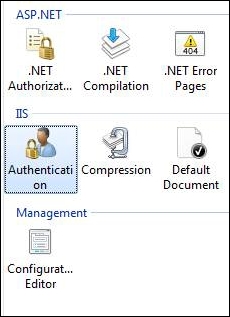
Double-click on the authentication icon of IIS to load the authentication, disable Anonymous Authentication for the website, and enable the Basic Authentication option. After the application is configured, the Authentication tab will look like the following screenshot:
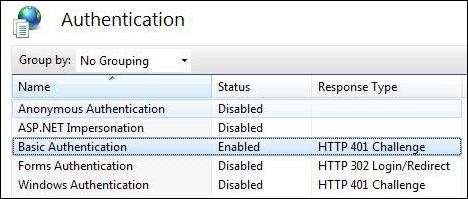
Once the Basic Authentication option is set for the site, the site will require the user to specify the Windows authentication credentials to log in.
On the other hand, if the service requires authenticating using custom credentials, you need to disable the Basic Authentication option and re-enable Anonymous Authentication. The web application can specify a custom HTTP module to pull the username and password from the request headers and perform the validation. Let's add an IHttpModule to the web application to initiate an authentication for the service.
Let's define
BasicAuthenticationModule, which will ensure the following aspects:
- The service is called in the SSL for authentication
- The service has an
Authorizationheader block on its request header - The
AuthorizationHeaderprovides abase64representation of a valid user's credentials as follows:public class BasicAuthModule : IHttpModule { public void Init(HttpApplication app) { app.AuthenticateRequest += new EventHandler(app_AuthenticateRequest); } void app_AuthenticateRequest(object sender, EventArgs e) { HttpApplication app = (HttpApplication)sender; if (!app.Request.IsSecureConnection) { BasicAuthModule.GenerateAutenticationFailedResponse(app, 403, 4, "Please connect the service using HTTPS"); app.CompleteRequest(); } else if (!app.Request.Headers.AllKeys.Contains("Authorization")) { BasicAuthModule.GenerateAutenticationFailedResponse(app, 401, 1, "Please provide Authorization headers with your request."); app.CompleteRequest(); } else if (!BasicAuthProvider.Authenticate(app.Context)) { BasicAuthModule.GenerateAutenticationFailedResponse(app, 401, 1, "Logon failed."); app.CompleteRequest(); } } private static void GenerateAutenticationFailedResponse(HttpApplication app, int code, int subCode, string description) { HttpResponse response = app.Context.Response; response.StatusCode = code; response.SubStatusCode = subCode; response.StatusDescription = description; response.AppendHeader("WWW-Authenticate", "Basic"); } public void Dispose() { } }
The preceding code defines HttpModule, which will be called automatically when a request needs authentication. The module checks whether the service is called using SSL and it also checks for the authorization header component. If everything is correct, it validates the user ID and password sent through the authorization header parsing the values using the BasicAuthProvider class.
The BasicAuthProvider class is like an AuthenticationProvider class, whose job is to validate the user ID and password that is sent in the authorization header block and return the credentials whether they are valid or not, as shown in the following code:
public class BasicAuthProvider
{
    public static bool Authenticate(HttpContext context)
    {
        string authHeader = context.Request.Headers["Authorization"];
        IPrincipal principal;
        if (TryGetPrincipal(authHeader, out principal))
        {
            HttpContext.Current.User = principal;
            return true;
        }
        return false;
    }
}
The idea of authenticating the BasicAuthProvider class is to acquire the value of the authorization header and generate an IPrincipal object when authorization succeeds. The authentication calls the TryGetPrincipal object to authenticate the user and generate the Principal object, as shown in the following code:
    private static bool TryGetPrincipal(string authHeader, out IPrincipal principal)
    {
        string user;
        string password;
        if (TryParseAuthorizationHeader(authHeader, out user, out password))
        {
            return TryAuthenticate(user, password, out principal);
        }
        principal = null;
        return false;
    }
In the preceding code, we try to parse the authorization header string that is passed by the client, and get the user ID and password from the Base64 encoded string in the authorization header block. The logic of parsing can be anything and depending on that, the client needs to send it.
private static bool TryParseAuthorizationHeader(string authHeader, out string user, out string password)
    {
        user = "";
        password = "";
        if (string.IsNullOrEmpty(authHeader) || !authHeader.StartsWith("Basic"))
        {
            return false;
        }
        string base64EncodedCreds = authHeader.Substring(6);
        string[] creds = Encoding.ASCII.GetString(Convert.FromBase64String(base64EncodedCreds)).Split(new char[] { ':' });
        if (creds.Length != 2 || string.IsNullOrEmpty(creds[0]) || string.IsNullOrEmpty(creds[1]))
        {
            return false;
        }
        user = creds[0];
        password = creds[1];
        return true;
    }
In the preceding code, we parsed the string inside the authorization header. Note that, in our case, the authorization header starts with the basic, and the username and password are split using :. The entire string is also Base64 encoded to ensure that we do not pass illegal characters.
private static bool TryAuthenticate(string user, string password, out IPrincipal principal)
    {

        //Todo : Authenticate from database and generate the User Identity here.
        if (user.ToLower().Equals("admin") && password.Equals("myadminaccount"))
        {
            principal = new GenericPrincipal(
                new GenericIdentity(user), new string[] { "Users" });
            return true;
        }
        else
        {
            principal = null;
            return false;
        }
    }
The TryAuthenticate function gets the user ID and password and returns a genericPrincipal object. The principal object is transferred into the context, which can be used later on when generating the output. Using this block, you can use any authentication technique to validate the user ID and password and specify respective permissions to the user. If you are using the ASP.NET membership and roles, the GenericPrincipal function constructor will allow you to specify roles for the identity.
principal = new GenericPrincipal(new GenericIdentity(user), Roles.GetRolesForUser(user));
The preceding code generates the principle for the membership API.
Now, to configure the application to use the authentication module, we add the module to Web.config of the site as follows:
<system.webServer>
    <modules runAllManagedModulesForAllRequests="true">
      <add name="BasicAuthModule" type="WCFDataServiceApplication.BasicAuthModule"/>
    </modules>
  </system.webServer>
The OData service itself supports query interceptors that let you allow/disallow an object to be sent to the client. Based on the interceptor, you can also filter your data.
The QueryInterceptor attribute intercepts any requests made by the client and you can set your logic to ensure whether the query is successful or not, as shown in the following code:
[QueryInterceptor("Emp")]
public Expression<Func<Emp, bool>> OnQueryEmployee()
{
    var user = HttpContext.Current.User;
    if (user.IsInRole("Administrators"))
        return e => true;
    else
        return e => false;
}
[ChangeInterceptor("Emp")]
public void OnChangeEmployee(Emp emp, UpdateOperations operation)
{
    if (operation == UpdateOperations.Add || operation == UpdateOperations.Change)
    {
        var user = HttpContext.Current.User;
        if (!user.IsInRole("Administrators"))
            throw new DataServiceException(401, "User do not have permission to change employee credentials");
    }
}
In the preceding code, the QueryInterceptor attribute is used to ensure that CurrentUser is validated when the emp table is fetched. The OData environment will automatically call the OnQueryEmployee method and check whether the administrator role is set for the current user before letting it retrieve the employee information.
The ChangeInterceptor attribute is called when any DML operation is performed on the data. When the client requests to add or change or even delete this method, OnChangeEmployee gets called and it checks whether the user is in the administrator role; otherwise, it throws an exception down the pipeline.
We have seen how to consume the OData service. If the service needs to pass request headers to be authenticated, you can pass it inside the SendingRequest event handler, as shown in the following code:
Uri serviceRootUri = new Uri(
                "https://localhost:8000/WCFDataServiceApplication/");
WCFDataServiceClient client =
    new WCFDataServiceClient(serviceRootUri);
client.SendingRequest += (o, requestEventArgs) =>
{
    var creds = username + ":" + password;
    var encodedCreds =
                Convert.ToBase64String(Encoding.ASCII.GetBytes(creds));
    requestEventArgs.RequestHeaders.Add(
                "Authorization", "Basic " + encodedCreds);
};
var res = client.Emp.FirstOrDefault();
In the preceding code, the WCFDataServiceClient service is called. The SendingRequest event is handled to intercept the user ID and password for every call to the service to get the employee's information or any other objects. Please note the specific format of the authorization header.
- Refer to WCF OData with ASP.NET at http://bit.ly/wcfodata