
CHAPTER 4
Managing Projects and Collaboration
Managing source code within the context of a project requires being able to navigate and maintain files, work within the appropriate Python environment, and maintain changes with source control. Each of these tasks is available in Visual Studio Code as either standard functionality or with the installation of an extension. In this chapter, the core features for managing projects are explored in a chatbot application created with the ChatBotAI library. (To learn more about the ChatBotAI library, visit pypi.org/project/chatbotAI.) The application uses the Wikipedia library to search for information from Wikipedia articles. (To learn more about the Wikipedia library, visit pypi.org/project/wikipedia/.) The exercises within this chapter are completed within the Wikipeida_Chatbot folder.
Files and Folders
In Visual Studio Code, working with files and folders goes beyond simply accessing a file. You can open a complete project in the editor and manage multiple files across subfolders simultaneously. Once a project is opened in the editor, Visual Studio Code provides helpful features for navigating and searching across folders. The Explorer view displays the contents of an opened project, thus providing easy access to manage and open files in the editor.
Open a Project
To manage a project in Visual Studio Code, first open its folder in the editor using one of these methods:
- External terminal: Navigate to the location of the folder and enter
code .to open in Visual Studio Code. - Menu: Select File ➪ Open Folder or File ➪ Open Recent.
- Keyboard shortcut: Press Cmd+K, O/Ctrl+K, O.
- Welcome page: Select Open Folder or an item under Recent. See Figure 4.1.
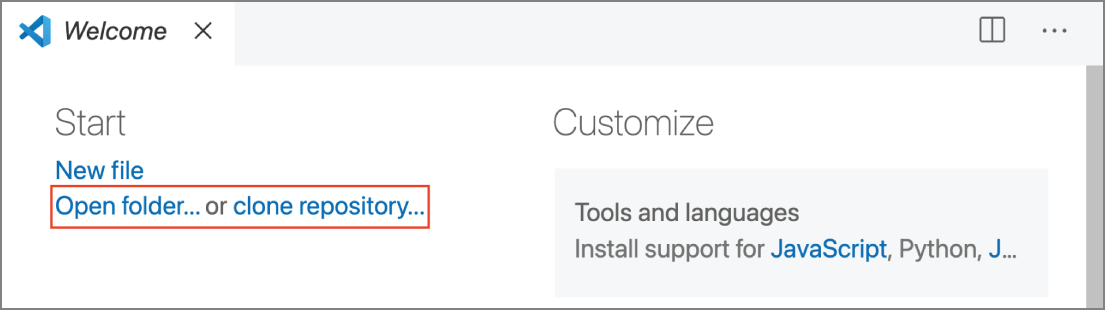
Figure 4.1: The Open Folder link displays on the Visual Studio Code Welcome page.
- Explorer View: If no folder is opened, click Open Folder (see Figure 4.2).
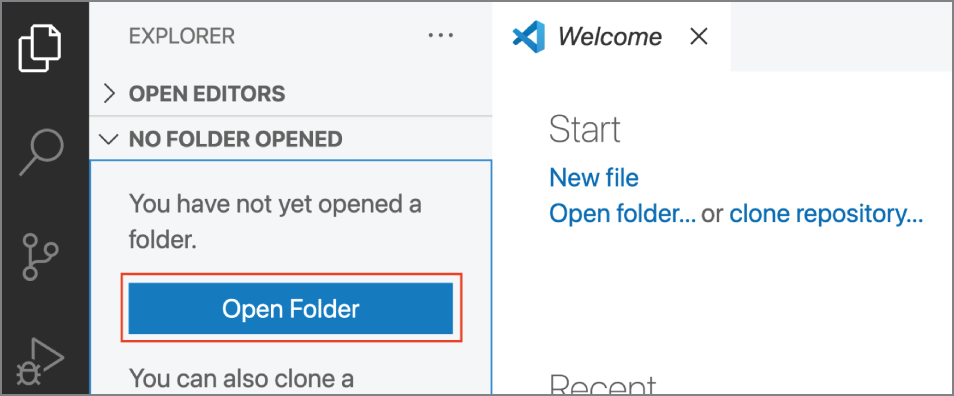
Figure 4.2: The Open Folder button is available on the Explorer view when no folder is opened.
Try It Out: Use your preferred method to open the Wikipedia_Chatbot folder.
When a folder is opened, the Explorer view displays the folder contents. Files can be opened with either a single-click or a double-click; however, the outcome differs for each action. A single-click opens a file in a tab within the editor. If you happen to single-click another file, the initial file tab is replaced with the subsequent file. If edits are made to a file in an editor tab, single-clicking a file in the Explorer view opens the file in a new tab.
A double-click opens the file in an editor tab. A subsequent single-click on another file in the editor opens the file in a new tab in the editor. The benefit of a double-click is that you are able to open multiple files within a project in new editor tabs without the need to edit any files within the editor.
Try It Out: In the Explorer view, open the README.md file. Next, navigate to the examples folder and open the Example.py file to display in the editor (see Figure 4.3).
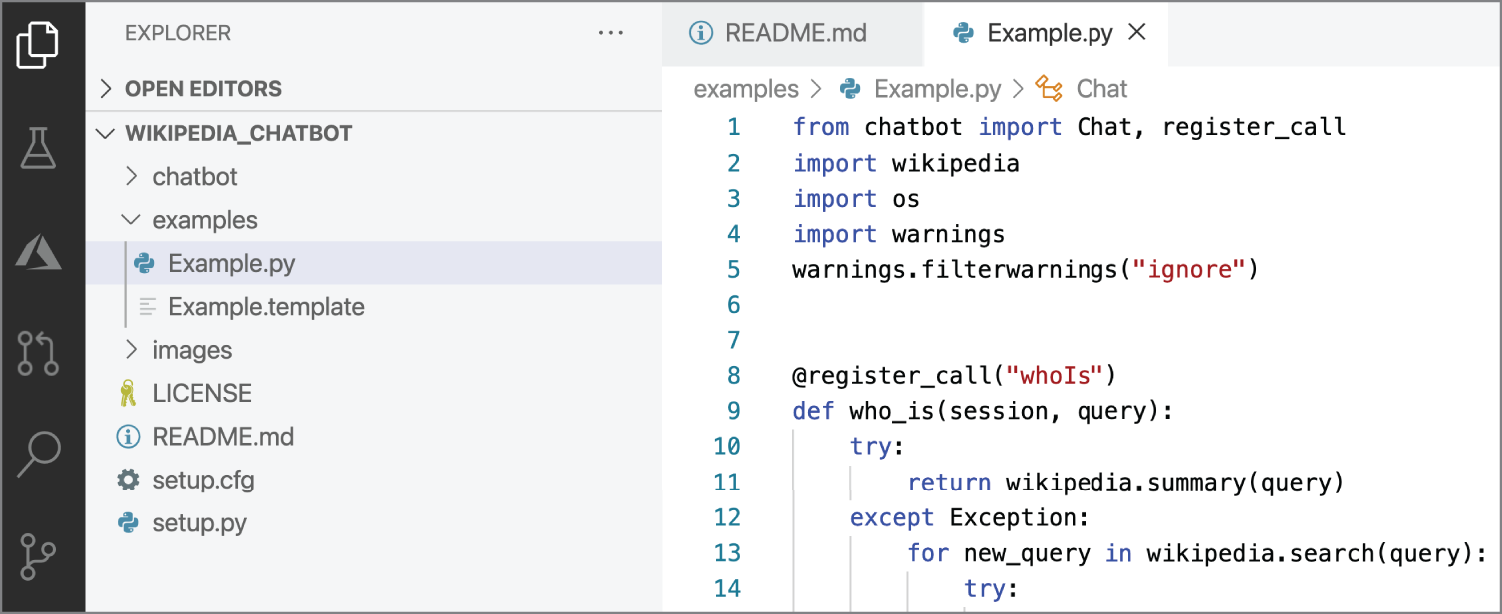
Figure 4.3: The README.md and Example.py files are opened in the editor.
If there are files or folders that you'd like Visual Studio Code to hide in the Explorer and search feature, you can define the pattern with the File: Exclude setting (see Figure 4.4).

Figure 4.4: The Files: Exclude setting is available in Settings. Click Add Pattern to include a new entry for the setting.
Navigate Files
Navigation history is saved each time you navigate between files in the editor. If there are multiple files opened in the editor, you can view all files in an editor group with the keyboard shortcut Ctrl+Tab. A list of opened files displays at the top of the editor. You can change the active file by holding Ctrl while pressing Tab to select the file and then release Ctrl to apply the selection. The keyboard shortcut Ctrl+Shift+Tab navigates the list in reverse order when there are many files open.
Try It Out: Press Ctrl+Tab to change the active file (see Figure 4.5).
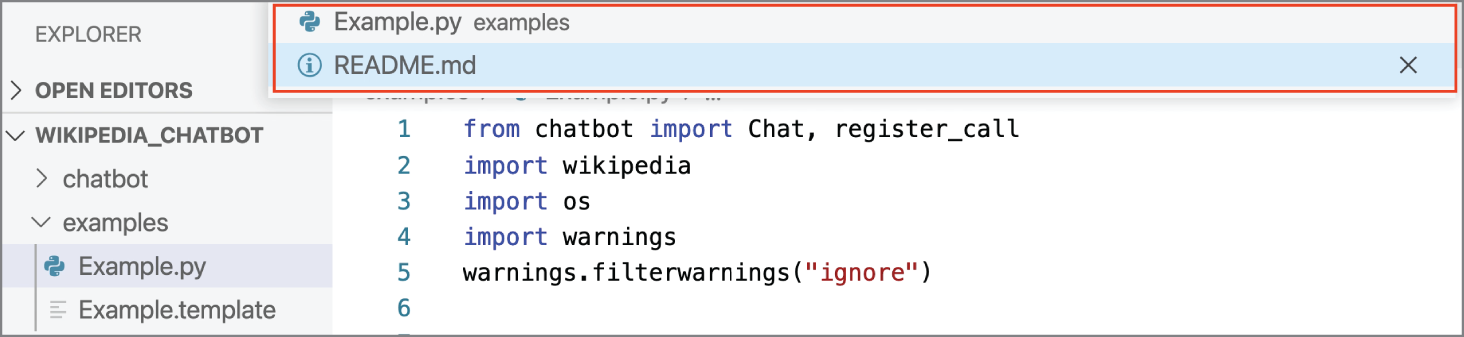
Figure 4.5: Each opened file appears in the list of available files to switch.
You can also navigate files in a folder using the Breadcrumbs. The Breadcrumbs display can be found at the top of the editor and shows the file path. Selecting a breadcrumb in the path displays a drop-down with the level's siblings. You can then select a sibling to navigate to other folders and files (see Figure 4.6).
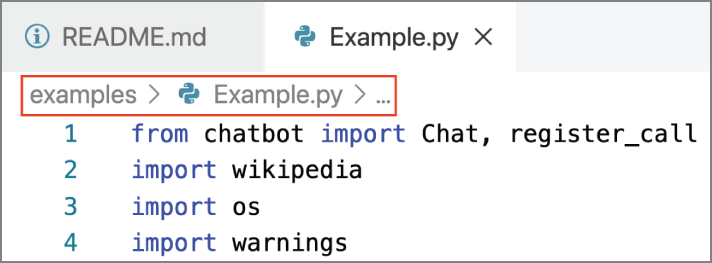
Figure 4.6: The breadcrumbs display the path to the Example.py file.
The Command Palette command Focus Breadcrumbs is used to interact with breadcrumbs. When used, the last element in the breadcrumb trail is selected, and a drop-down opens that enables you to navigate to a sibling file or folder. Use the up and down arrow keys to select a sibling element. To navigate to the children elements of a sibling, use the left and right arrow keys (see Figure 4.7).

Figure 4.7: The child element of the examples folder displays.
Search across Files
Searching across files in an opened folder can be done quickly with the Search view (Cmd+Shift+F/Ctrl+Shift+F). Search results display below the search bar as you type in the search term. Search results are grouped into files containing the search term. The search term results (see Figure 4.8) include the term's total number of occurrences in each file and the respective location(s). You can expand a file to see a preview of all occurrences within the file and single-click an occurrence to view in the editor.
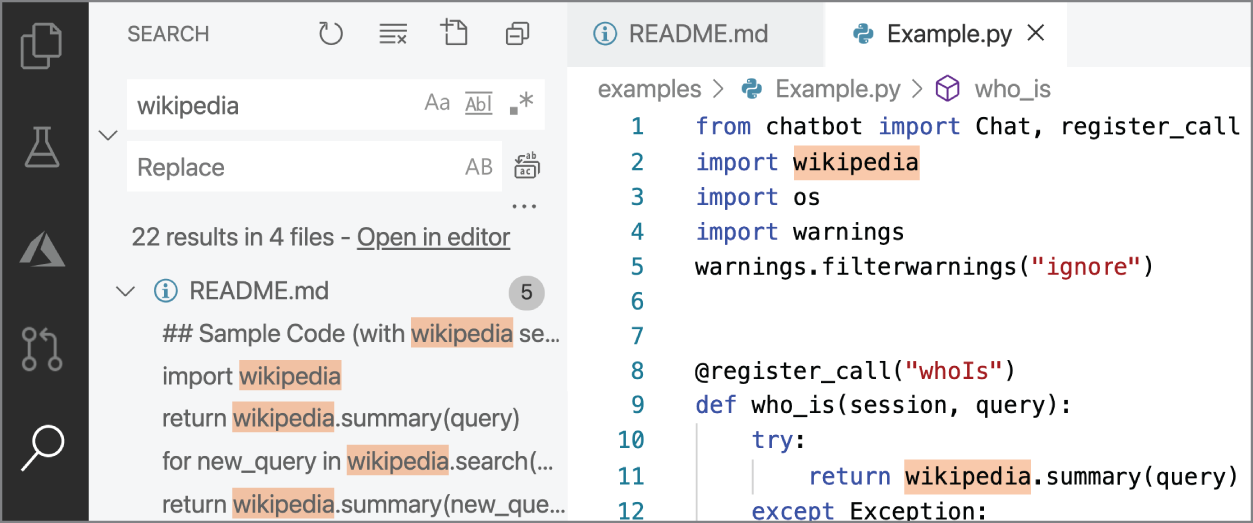
Figure 4.8: The search results show that there are 22 results in 4 files with the term wikipedia.
Try It Out: Search for the term wikipedia across all files in the Wikipedia_Chatbot folder. Once found, click an occurrence in the Example.py file to view in the editor.
- In the Search view, enter the search term wikipedia. The results show that there are 22 results in 4 files with the term wikipedia (see Figure 4.9).
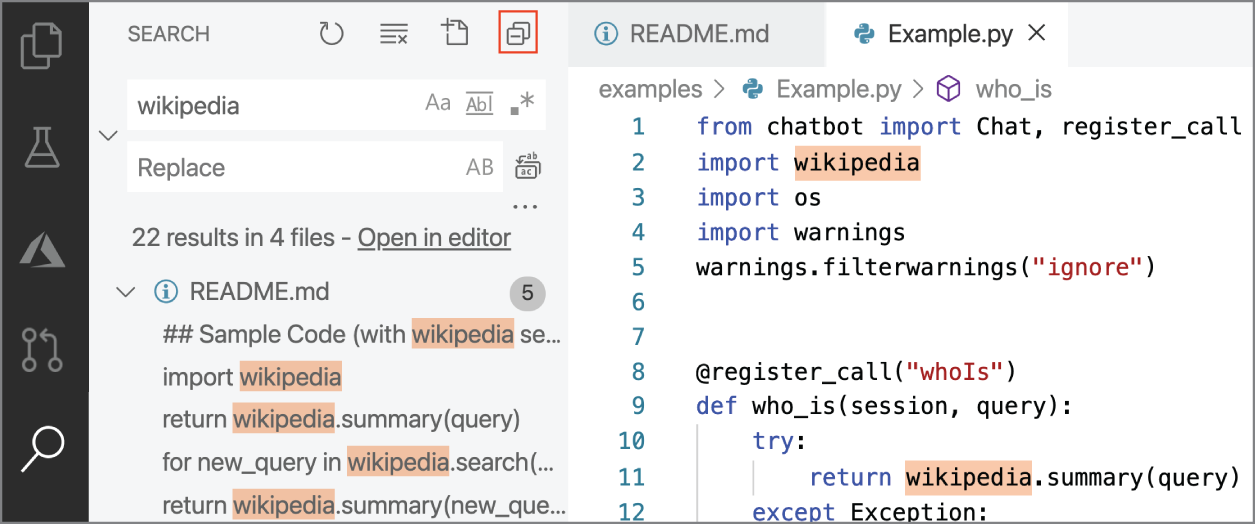
Figure 4.9: Search for wikipedia in the search bar.
- Select the first occurrence in the
Example.pyfile to view the file and term location in the editor (see Figure 4.10)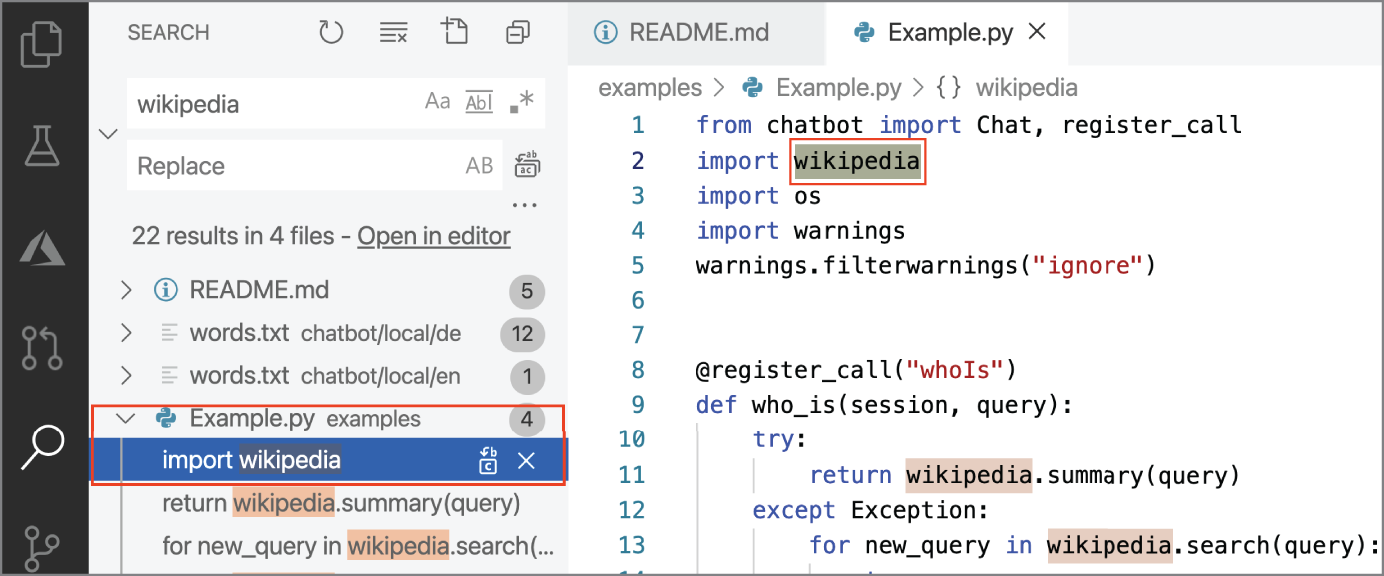
Figure 4.10: Selecting the first occurrence of wikipedia in the
Example.pyfile opens the file in the editor and highlights the term in the file.
You can filter your search by selecting whether you want the results to match the case (Option+Cmd+C/Alt+C) or match the whole word (Option+Cmd+W/Alt+W). In addition to the keyboard shortcuts, each filter can be accessed using the icons in the search bar (see Figure 4.11).
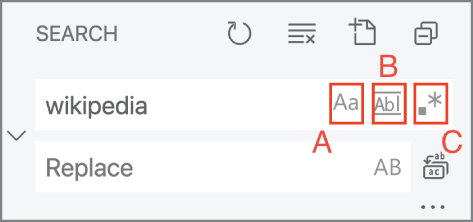
Figure 4.11: In the Search view, the Match Case (A), Match Whole Word (B), and Use Regular Expression (C) icons display next to the search bar.
The search feature supports regular expression searching as well. To toggle regular expression searching, click the Use Regular Expression icon in the search bar (see Figure 4.11, C) or use the keyboard shortcut Option+Cmd+R/Alt+R.
Search results could also be replaced by another term. Click the arrow next to the search field, which opens the Replace field (see Figure 4.12, A). This feature enables you to preserve the case (see Figure 4.12, B) and replace all (see Figure 4.12, C) instances of the term in the project.
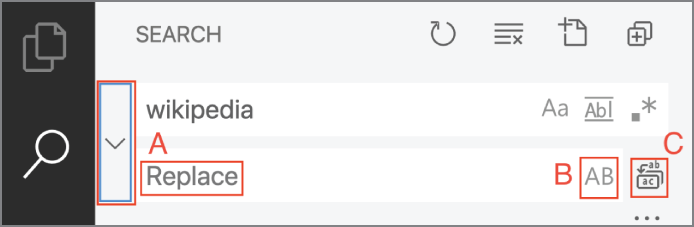
Figure 4.12: The Replace (A) field displays when the arrow next to the Search field is selected. The icons to the right of the Replace field enables you to select Preserve Case (B) or Replace All (C).
To specify which files to include or exclude from search results, click the Toggle Search Details (see Figure 4.13) icon below the search field. Enter the name of the files in the appropriate field.
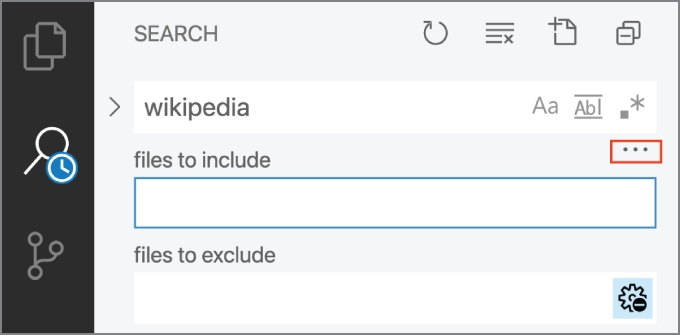
Figure 4.13: The Toggle Search Details icon opens the Files To Include and Files To Exclude fields.
Search results could also display in the editor by clicking Open In Editor (see Figure 4.14). When selected, search results display in a new tab, which lists every instance of the search term and the respective location by line in a scrollable format.
There's also the ability to search for a term directly from the editor. The keyboard shortcut Cmd+F/Ctrl+F opens a search bar inside the active tab (see Figure 4.15). Enter the search term into the tab to search the file. The editor search bar includes some similar commands from the Search view. In addition, there is a Find In Selection as indicated by the triple line icon.
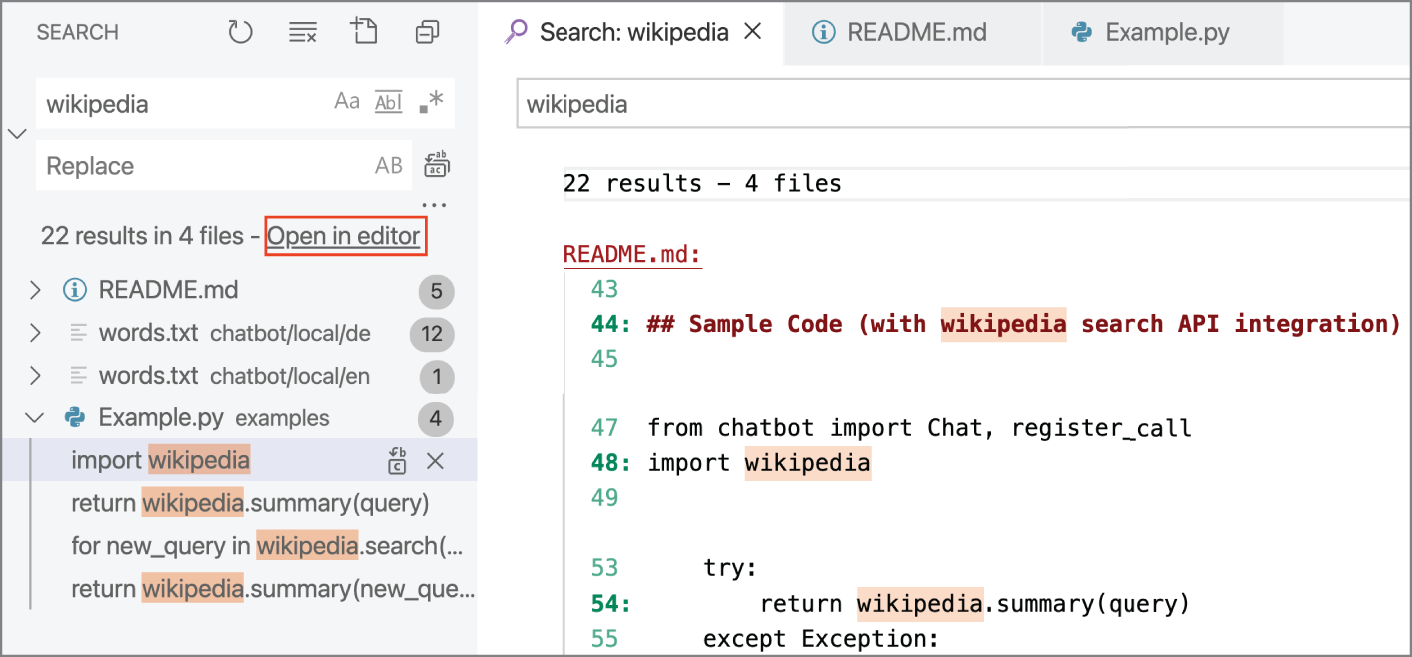
Figure 4.14: When search results are opened in the editor, each instance of the term is listed alongside the respective line in the file.
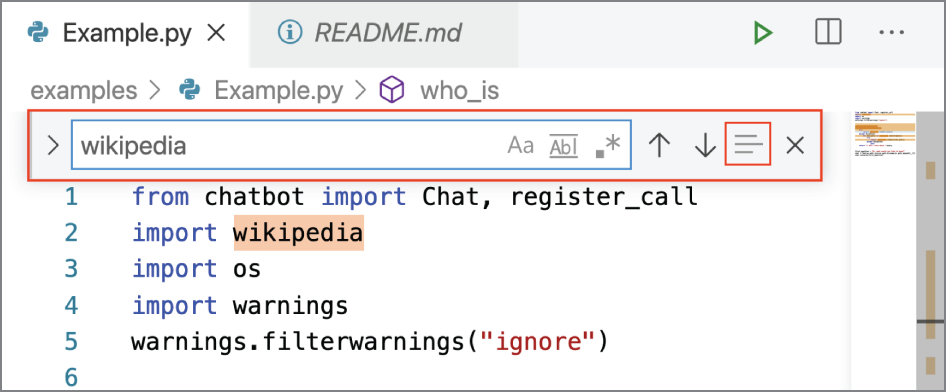
Figure 4.15: The keyboard shortcut Cmd+F/Ctrl+F opens a search bar within the active tab. Although most functionality from the Search view is available for this feature, there is an additional feature to find a term in a selection.
Close a File or Folder
Visual Studio Code refreshes when a folder is closed. You can close a file or folder in the editor in various ways.
- Menu: Select File ➪ Close Window or Close Folder.
- Editor (close file): Click the X on the File tab.
- Keyboard shortcut (close window): Press Cmd+W/Ctrl+W.
- Keyboard shortcut (close folder): Press Cmd+K, F/Ctrl+K, F.
Environments
The Python extension for Visual Studio Code provides integration features for working with global, virtual, and conda environments. Although a global environment provides the fastest way to get started with writing a Python program, it is recommended to manage projects in their own isolated virtual or conda environments to avoid library version conflicts across different projects. Using isolated environments also helps you clearly understand what libraries are used with each specific project.
To select an environment, run the Python: Select Interpreter command in the Command Palette. The Command Palette provides a list of Python interpreters. In the interpreter list, virtual and conda environments are indicated by either env or conda in parentheses. Global environments are presented without the parentheses. See Figure 4.16.
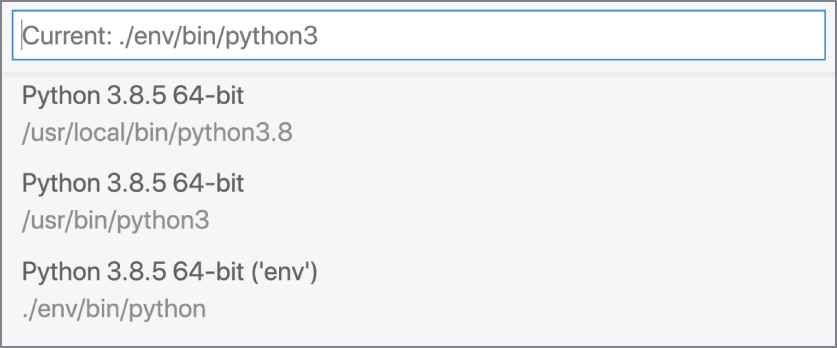
Figure 4.16: A list of environments available displays in the environment list. There are two global environments and one virtual environment.
Virtual Environments
Visual Studio Code automatically detects when you create a new virtual environment and prompts you to select whether the new virtual environment should be selected for the workspace (see Figure 4.17). If selected, Visual Studio Code saves the path to the Python interpreter in the virtual environment to the Workspace settings.

Figure 4.17: After a virtual environment is created, Visual Studio Code provides a notification requesting whether to select the environment for the workspace folder. Clicking Yes activates the virtual environment and selects the virtual environment as the interpreter.
Conda Environments
Before you can create a conda environment, conda must be set as the default integrated terminal shell to use conda commands in Visual Studio Code. The shell can be set in the User settings.
- Run the command Preferences: Open User Settings.
- In the left navigation, select Features ➪ Terminal. Scroll down to the settings for Integrated ➪ Shell.
- Select the applicable Edit in settings.json link for your operating system (see Figure 4.18).
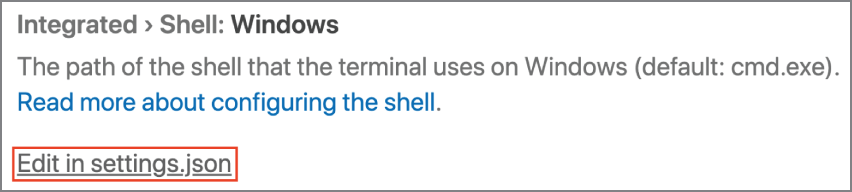
Figure 4.18: Edit in settings.json is selected for the Windows operating system.
- In the
settings.jsonfile, setterminal.integrated.shell.<platform>, in addition toterminal.integrated.shellArgs.<platform>. For example, for Windows, the entry would be as follows:"terminal.integrated.shell.windows": "C:\Windows\System32\cmd.exe","terminal.integrated.shellArgs.windows": ["/K", "C:\<path to conda installation>\Scripts\activate.bat C:\<path to conda installation>"],
When selecting an interpreter, Visual Studio Code automatically detects existing conda environments that contain a Python interpreter. If you create a conda environment while Visual Studio Code is running, you must first reload the window to refresh the environment list that is available when selecting a Python interpreter. To refresh the window, run the command Developer: Reload Window.
It may take a moment for the conda environment to appear in the list. If the conda environment doesn't at first appear, try the command again in 15 seconds.
Try It Out: Create either a virtual or conda environment for the Wikipedia_Chatbot project. After the isolated environment is activated, install ChatBotAI and Wikipedia.
- Virtual environment:
pip install chatbotAI, pip install wikipedia - Conda environment:
conda install -c anaconda chatbotAI, conda install -c anaconda wikiedpia
Run Examples.py to try the application; see Figure 4.19. When the application starts, the chatbot greets and continues to ask a series of questions related to your response. To make a Wikipedia inquiry, ask the chatbot Who/What is <query> (e.g., What is Visual Studio Code). Assuming that there is a Wikipedia page for the topic, the chatbot returns the introductory paragraph for the topic. If there is no relevant Wikipedia article, the chatbot returns with the string I don't know about <query>.
To stop the program, enter quit.
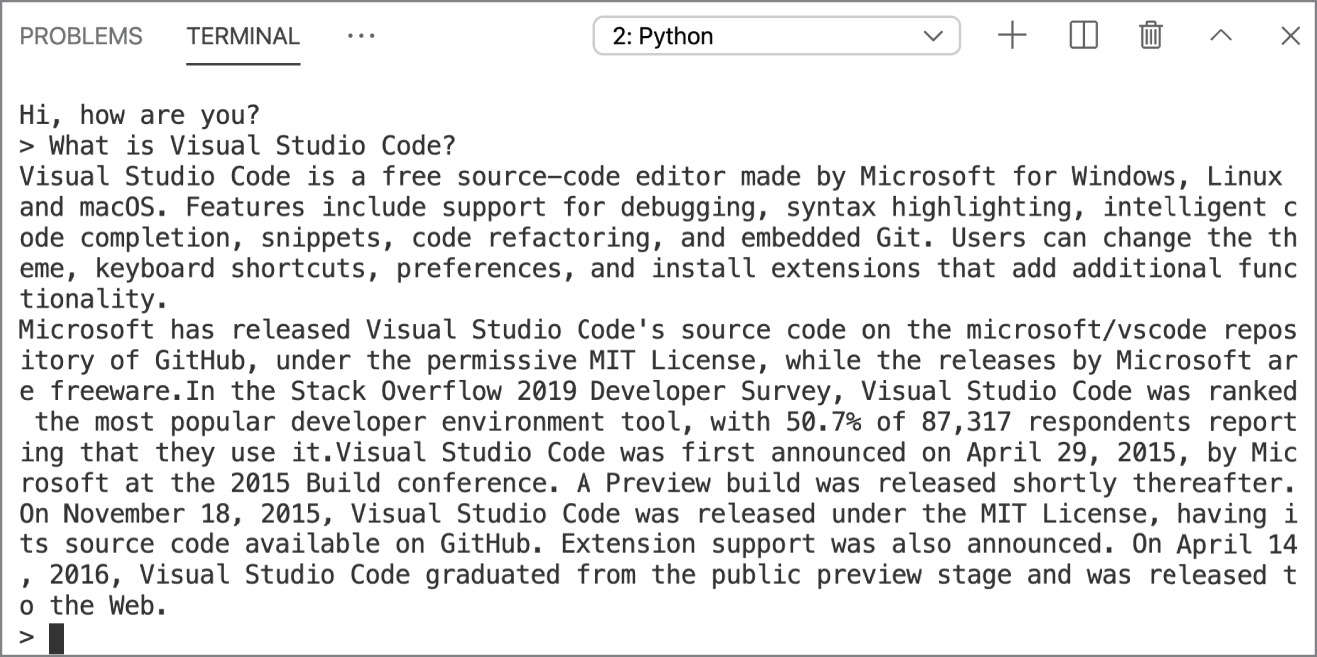
Figure 4.19: An inquiry is made to the chatbot about Visual Studio Code. The response provided by the chatbot is the introductory paragraph for the Visual Studio Code Wikipedia page.
Source Control
Visual Studio Code is equipped with integrated source control that enables you to track and manage changes to code. Source control also provides a way to collaborate with others across a project by connecting to a remote repository, such as a repository on GitHub. Although the editor comes with the Git source control manager (SCM) built in, you can install an additional SCM from the Extension Marketplace. Git version 2.0.0 or newer must be installed to use Git features. To install or update Git, visit git-scm.com/download.
The Source Control view provides version control information for your project, such as Changes, Staged Changes, and Merge Changes. The Source Control icon always indicates an overview of how many files have been changed in your repository (see Figure 4.20).
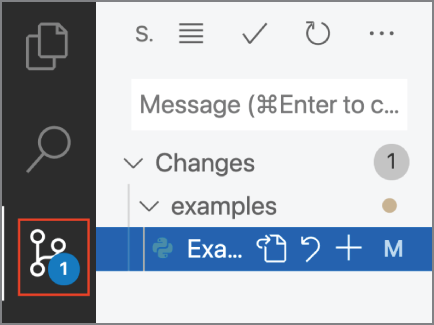
Figure 4.20: The Source Control icon in the Activity Bar indicates that there is one pending change.
If you do not have a folder opened, the Source Control view instructs you to either open a folder that contains a Git repository or clone a repository. See Figure 4.21.
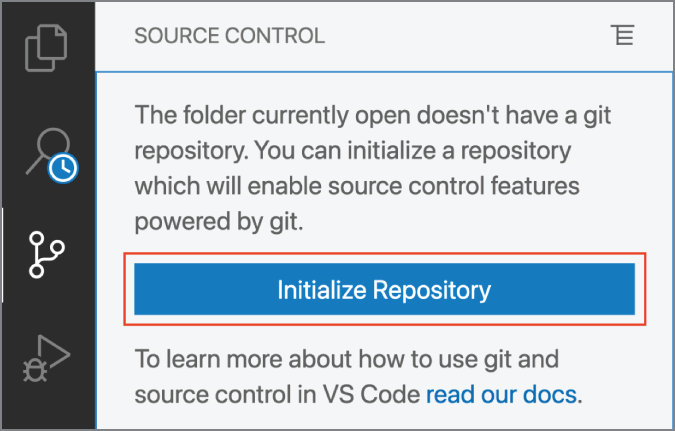
Figure 4.21: In the Source Control view, you can initialize a Git repository by clicking the Initialize Repository button.
The Status Bar contains a Git status bar that displays the checked-out branch (see Figure 4.22, A) and either a Synchronize Changes or Publish action (see Figure 4.22, B). Additional information regarding each action is explained in the later section titled “Remotes.”

Figure 4.22: The Git status bar indicates the checked-out branch (A) and displays an icon to publish to GitHub (B).
Visual Studio Code detects changes made within the Visual Studio Code UI in addition to changes made through the command-line interface (CLI). Therefore, you can run CLI commands in another shell or in the Visual Studio Code integrated terminal given that Visual Studio Code syncs with the current state. If you're entering commands within the Visual Studio Code UI, you can open the Git output window to view the commands. To access the Git output window, navigate to View ➪ Output (Ctrl+Cmd+U/Ctrl+Shift+U) and select Git from the Output window drop-down menu (see Figure 4.23).
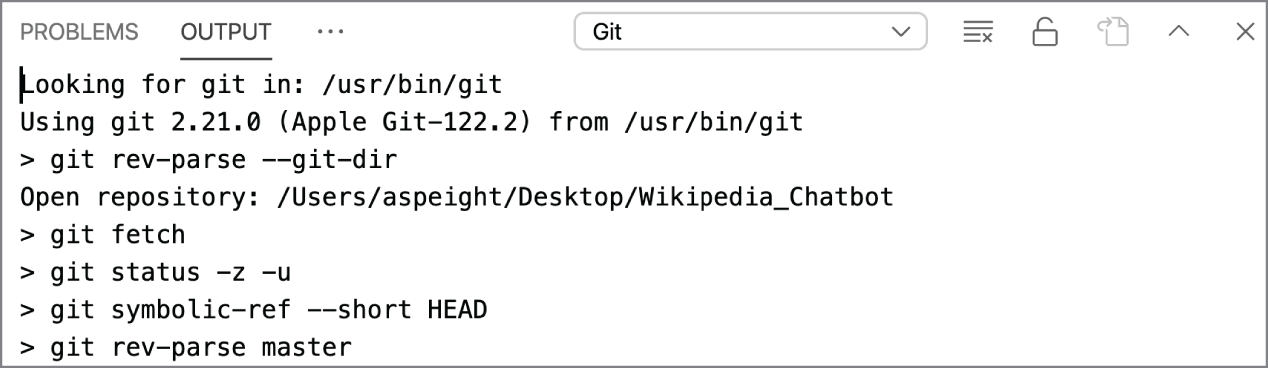
Figure 4.23: The Output window displays the Git output for the repository.
Initialize a Repository
The Source Code view displays a “No source control providers registered” message if Visual Studio Code doesn't detect an existing Git repository. To initialize a repository, click the Initialize Repository command that appears in the view. Alternatively, run the Git: Initialize Repository command from the Command Palette.
When you initialize a repository, Visual Studio Code creates the necessary Git repository metadata files and shows your files as files that have not yet been committed for the first time. Such files are referred to as untracked changes (indicated by a U icon) ready to be staged.
Try It Out: Initialize a repository for chatbot.
- Run the command Git: Initialize Repository and select the Wikipedia_Chatbot folder. Notice that the files within Wikipedia_Chatbot now have a U icon (indicative of untracked changes) next to the filename. The Source Control view also displays the total of number of pending changes (see Figure 4.24).
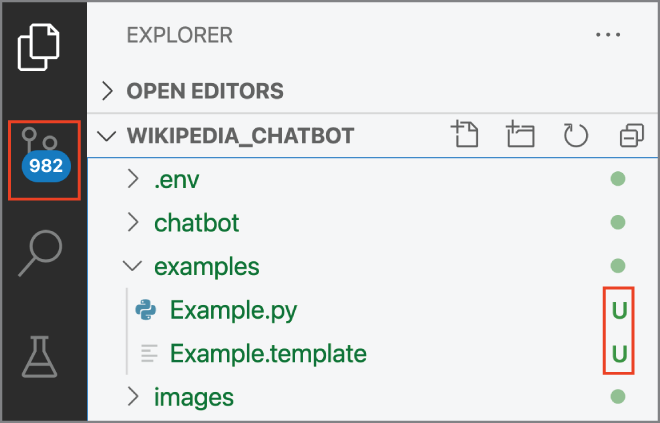
Figure 4.24: The Source Control view icon indicates that there are 982 pending changes. In addition, an untracked icon displays next to each file in the Explorer view.
The Views And More Actions (see Figure 4.25) icon within the Source Control view provides a list of options for changing how the files within the Changes section are viewed and sorted. The View and Sort menu option provides the option to view changes as either a list or a tree. The default setting is to view as a list. If the Changes section is set to view as a list, you could sort the list by name, path, or status.
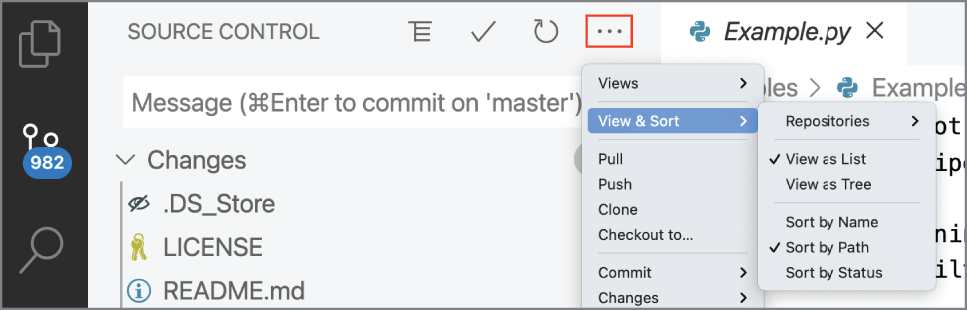
Figure 4.25: Clicking the Views And More Actions icon provides options for changing how the list of changes is sorted.
Try it Out: Change the view of changes to view them as a tree (see Figure 4.26).
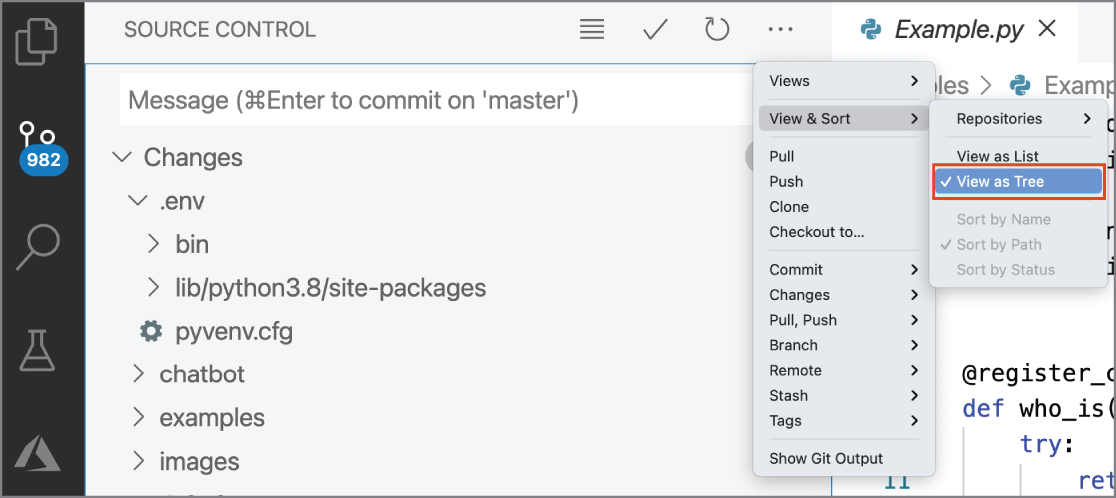
Figure 4.26: Changing the view to a tree displays the project files within their respective folders.
Commit Changes
You can conveniently commit changes for your project from the Source Control view. The Changes section within the view displays all changes made within the project. Next to each file is the Git status indicated by a letter.
- U—Untracked
- M—Modified
- A—Added
You can discard all changes (see Figure 4.27) or stage all changes using the icons in the Changes header. To view the icons, hover over the header.
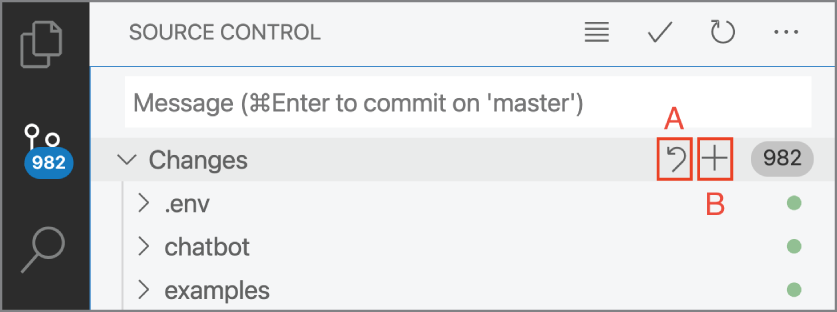
Figure 4.27: The first icon (A), Discard All Changes, is used to discard all staged changes. The second icon (B), Stage All Changes (B), is used to stage all pending changes for the repository.
If you hover over a file within the Changes section, you're given the option to either open the file (A), discard the changes (B) or stage the changes (C). See Figure 4.28.
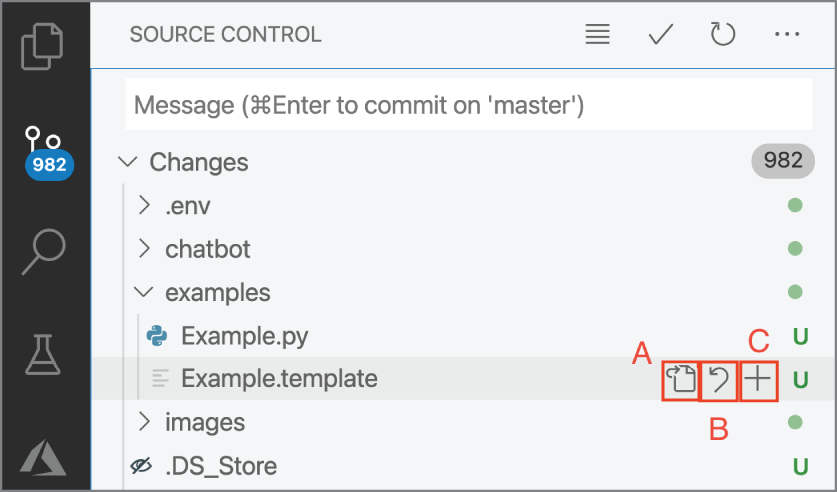
Figure 4.28: The icons that display next to the file enable you to manage changes for the singular file. The first icon (A), Open File, opens the file in the editor window. The second icon (B), Discard Changes, is used to discard the change. The third icon (C), Stage Changes, is used to stage the pending change.
Once a change is staged, the file is moved to the Staged Changes section. If you hover over a file within the Staged Changes section, you're given the option to either open the file (A) or unstage the changes (B). See Figure 4.29.
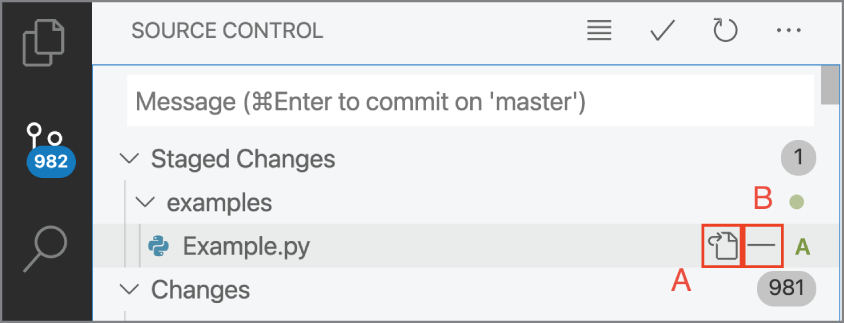
Figure 4.29: The first icon (A), Open File, opens the file in the editor window. The second icon (B), Unstage Changes, unstages the change.
Commit messages are entered in the Message bar (see Figure 4.30). To commit the changes, either press Cmd+Enter/Ctrl+Enter or select the Commit icon.
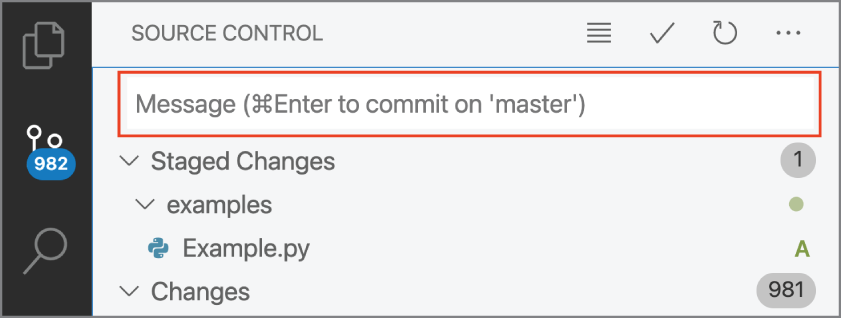
Figure 4.30: Commit messages are entered in the Message bar.
Before committing project files to the repository, it's likely that you'd want to ignore some files such as the virtual environment folder or any file which contains environment variables. Visual Studio Code provides two quick ways to add files to a .gitignore file. After the .gitignore file is created, you can add files directly from either the Source Control view or the Command Palette. When a file is added to .gitignore, Visual Studio Code opens the .gitignore file in a new tab.
Before adding a file to .gitignore, the file must be unstaged. To add a file to .gitignore from the Source Control view, right-click the file and select Add To .gitignore (see Figure 4.31).
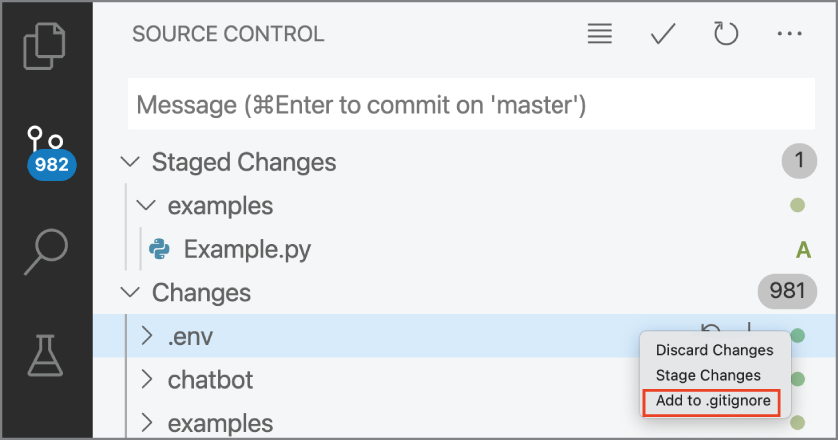
Figure 4.31: In the Source Control view, select the Add To .gitignore menu option to add the .env files to .gitignore.
Alternatively, you could add a file from the Command Palette with the command Git: Add To .gitignore. Before you run the command, ensure that the file is active in the editor.
Try It Out: Stage and commit the files in the Wikipedia_Chatbot project to the master branch.
- In Source Control view, select the appropriate folders/files to add to
.gitignore(e.g. the virtual environment folder). - Click the + icon to stage all the files within Changes (see Figure 4.32).
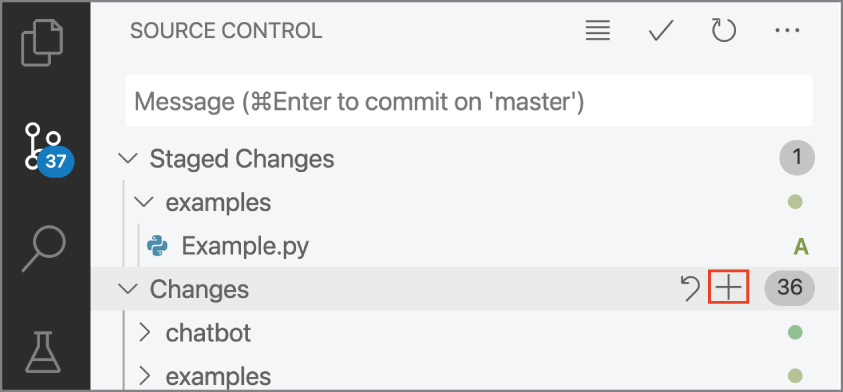
Figure 4.32: The + icon is selected to stage all changes.
- Enter a commit message in the Message bar (e.g., “add project files to repo”; see Figure 4.33).
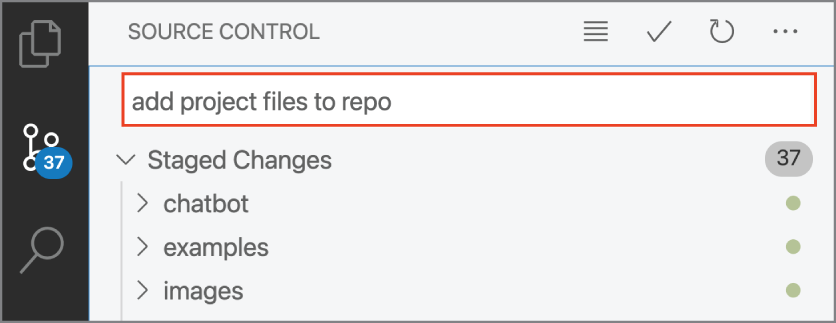
Figure 4.33: The commit message “add project files to repo” is entered into the Message bar.
- Commit the changes (see Figure 4.34).
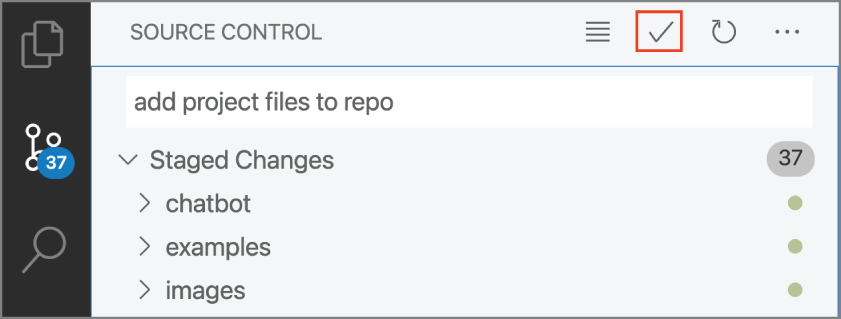
Figure 4.34: The Commit Changes icon is used to commit the staged changes.
Branches
When collaborating with others, code changes, such as new features or bug fixes, are often created on a branch. Branches enable collaborators to branch from the codebase and complete their work in an isolated environment independent of others. With Git, changes made on a branch can be merged with the codebase or master branch. In Visual Studio Code, there are two ways to create a new branch:
- Command Palette: Run the command Git: Create Branch. When prompted, enter a name for the branch.
- Status Bar: Click the branch indicator and select + Create New Branch (see Figure 4.35).

Figure 4.35: In the window that appears, click + Create New Branch to create a new branch for the repository.
When you create a new branch, the branch is automatically checked out. Checking out a branch updates the files in the working directory to match the version stored in that branch. When a branch is checked out, Git records all new commits on the branch. There are two ways to manually check out a branch:
- Command Palette: Run the command Git: Checkout To. When prompted, select a branch from the list.
- Status Bar: Click the branch indicator and select a branch from the list.
Try It Out: Create a new branch for the Wikipedia_Chatbot project. In Example.py, change the string assigned to the first_question variable to Hi, what would you like to know?.
- Run the command Git: Create Branch.
- When prompted, name the branch
vscode-chatbot-exercises. See Figure 4.36.
Figure 4.36: The name of the branch is entered to create a new branch.
- Confirm the
vscode-chatbot-exercisesbranch is checked out in the Status Bar (see Figure 4.37).
Figure 4.37: The branch indicator in the Status Bar shows that the
vscode-chatbot-exercisesbranch is checked out. - Change the string assigned to the
first_questionvariable toHi, what would you like to know?
Remotes
Visual Studio Code also supports repositories connected to a remote, such as GitHub. You can push, pull, and sync a branch to its origin all within the editor. The aforementioned Git commands are available in the Source Control view within the More Actions menu. See Figure 4.38.
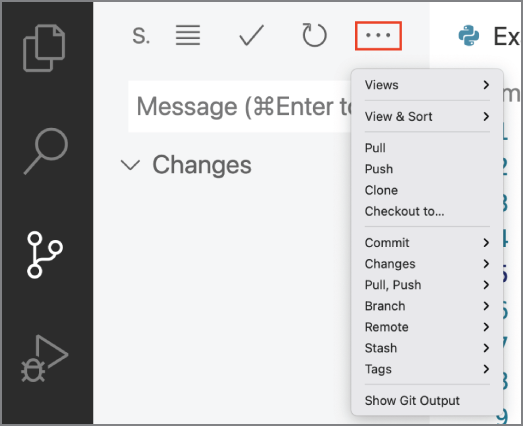
Figure 4.38: The More Actions menu can be accessed from the top of the Source Control view.
The Synchronize Changes action in the Git status bar pulls remote changes down to your local repository and then pushes local commits to the remote repository. If there is no remote repository configured, the Publish action is enabled, which lets you publish the current branch to a remote.
Visual Studio Code can also fetch changes from a remote. The benefit of this feature is that the editor can show you how many changes your local repository is ahead or behind the remote. Although this feature is disabled by default, you can modify the setting git.autofetch to true to enable it.
Gutter Indicators
If you're making changes to a file within a folder that is a Git repository, Visual Studio code adds annotations to the left of the editor window—referred to as the gutter (see Figure 4.39). There are three visual indicators:
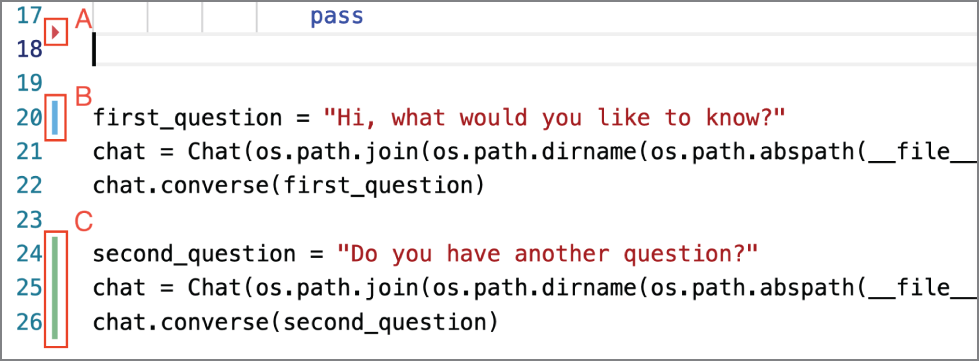
Figure 4.39: For the Example.py file, the gutter indicates that a line has been deleted (A), a line has been modified (B), and a new line has been added (C).
- Label A—Lines have been deleted
- Label B—Modified lines
- Label C—New added lines
View Diffs
Changes are compared in the Diff editor. To view diffs for a file, select the file in the Source Control view. The Diff editor opens in a new tab with a side-by-side view of the diffs (see Figure 4.40).
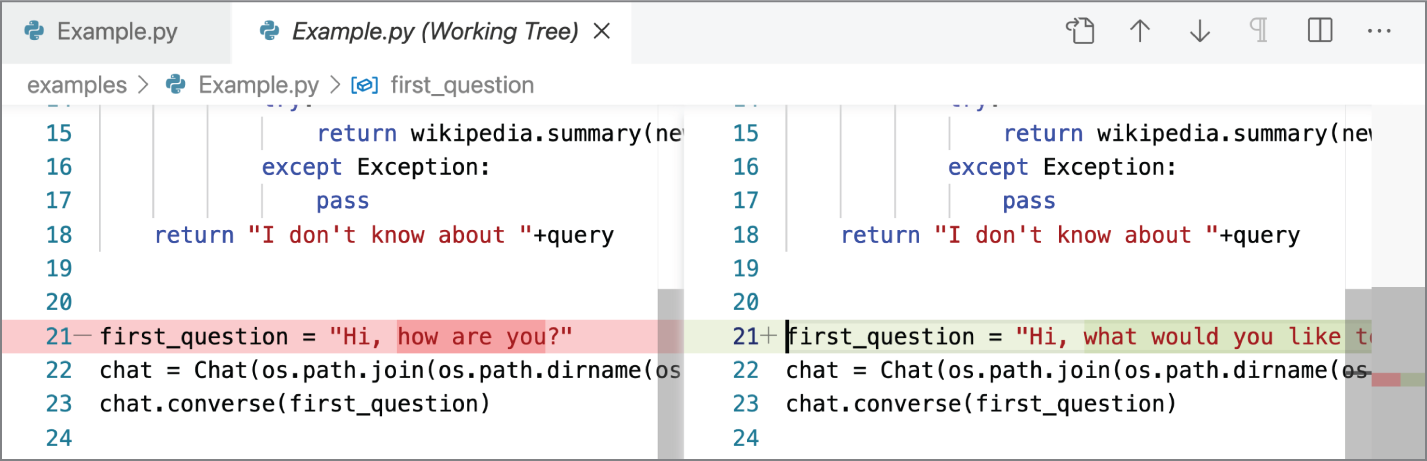
Figure 4.40: Diffs are displayed in the Diff editor for the original Example.py file and the newly modified version.
You can toggle to the inline view by opening the More Actions menu at the top of the Diff editor and selecting Toggle Inline View (see Figure 4.41).
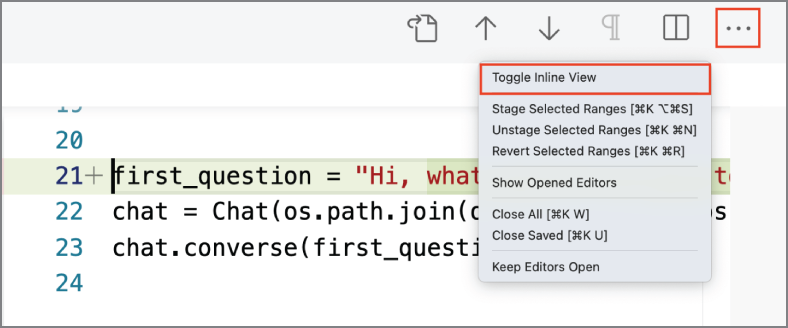
Figure 4.41: The Toggle Inline View menu item can be accessed from the More Actions menu at the top of the Diff editor.
The Previous Change (Ctrl+Option+F5/Shift+Alt+F3) and Next Change (Option+F5/Alt+F3) icons are used to navigate the diffs. See Figure 4.42.
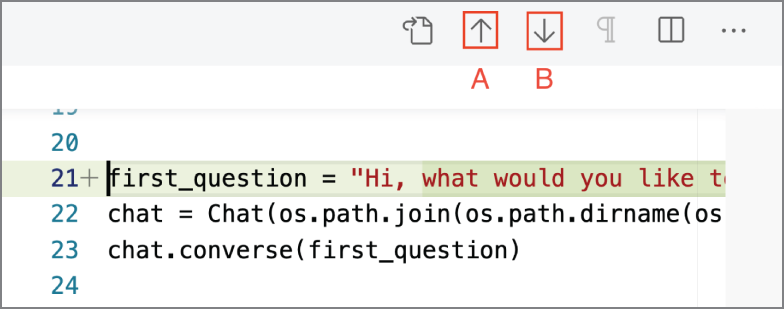
Figure 4.42: The Previous Change (A) icon is an up arrow. The Next Change (B) icon is a down arrow.
Try It Out: In the Example.py file, change the string assigned to the first_question variable to Hi, what would you like to know?. Save the file.
from chatbot import Chat, register_callimport wikipediaimport osimport warningswarnings.filterwarnings("ignore")@register_call("whoIs")def who_is(session, query):try:return wikipedia.summary(query)except Exception:for new_query in wikipedia.search(query):try:return wikipedia.summary(new_query)except Exception:passreturn "I don't know about "+queryfirst_question = "Hi, what would you like to know?"chat = Chat(os.path.join(os.path.dirname(os.path.abspath(__file__)), "Example.template"))chat.converse(first_question)
Select the Example.py file in the Source Control view to view the diffs in the Diffs editor (see Figure 4.43) and then commit the changes.
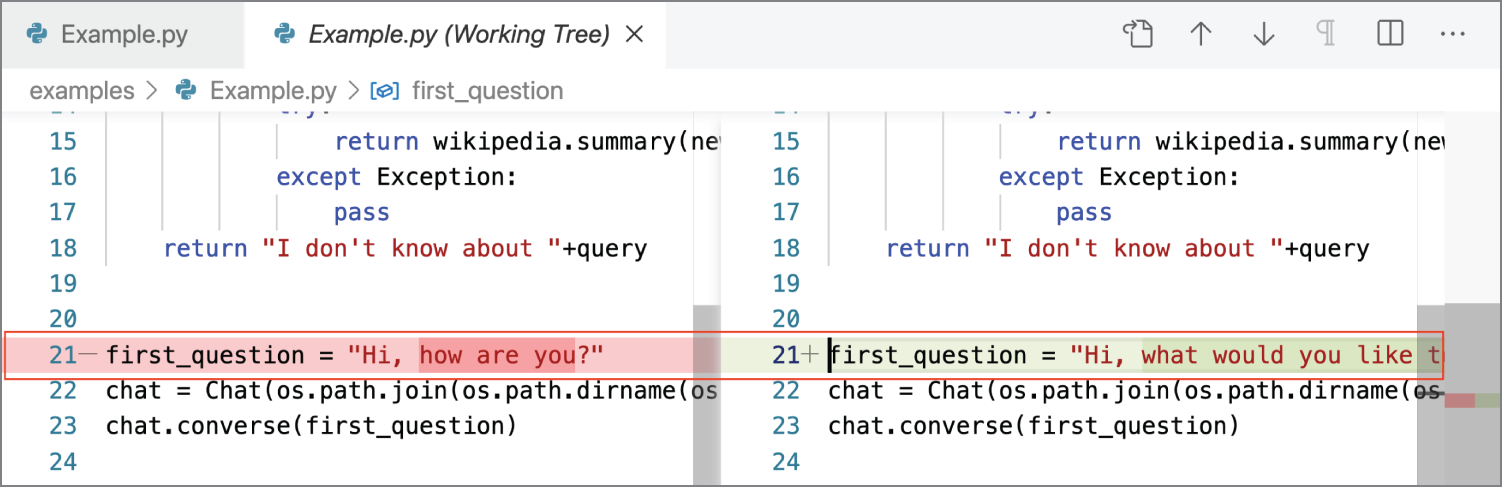
Figure 4.43: The Diff editor displays the original Example.py file and the newly modified version.
You can also manually select any two files to view diffs:
- Explorer View: Right-click the file in the Explorer or Open Editors list and select Select For Compare. Next, right-click the second file to compare with and select Compare With <filename_you_chose>.
- Keyboard shortcut: Select a file in the editor window to make it the active file. Enter the keyboard shortcut Cmd+Shift+P/Ctrl+Shift+P and select File: Compare Active File With. Select the file for comparison from the list of recent files.
Push and Merge Commits
As changes are committed, the Status Bar lists the total number of commits to push to the origin. Selecting the status bar item executes the task to push and pull to origin. See Figure 4.44.

Figure 4.44: The number of commits to be pushed to the remote server displays in the Status Bar next to the checked-out branch.
After the commits are pushed, the status bar item changes to display only the Synchronize Changes icon (see Figure 4.45).

Figure 4.45: The Synchronize Changes icon displays next to the checked-out branch.
Pull Requests
The pull request workflow is supported in Visual Studio Code with pull request extensions. One such extension is the GitHub Pull Requests and Issues extension. Pull request extensions enable you to review, comment, and merge pull requests all within the editor for a remote (see Figure 4.46).
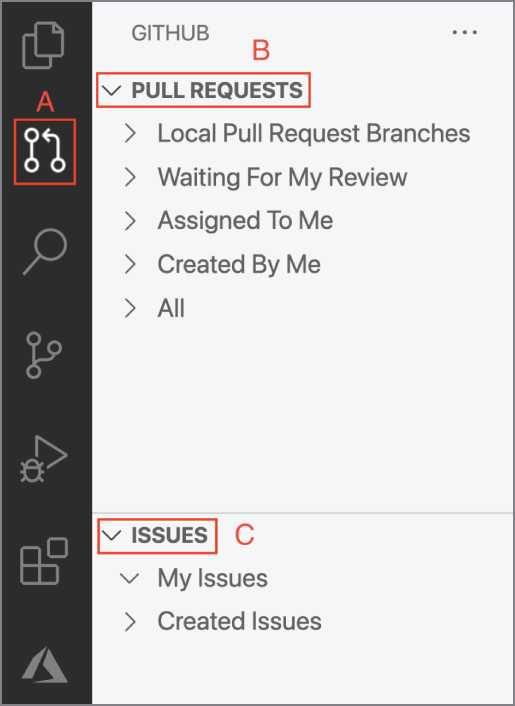
Figure 4.46: The GitHub Pull Requests and Issues extension provides a view in the Explorer (A), which is used to manage pull request. The view displays Pull Requests (B) and Issues (C).
Live Share
The Live Share extension enables sharing and collaboration across multiple users but within Visual Studio Code. A host shares a project in Visual Studio Code with guests who can remotely view or edit the project. Collaborators are able to work together simultaneously across a project, thus eliminating the back-and-forth tasks for commits, pushes, pull requests, and merge conflicts. Live Share provides full-feature functionality for all participants regardless of whether they join a session in the Visual Studio Code desktop client (on any operating system) or a web browser. In the end, a collaborative session results in a single commit. Either a Microsoft or GitHub account is required to participate in a Live Share session. Sharing or joining the session itself occurs within seconds and maintains access to your preferred environment configurations and settings.
Install Live Share
Download the Live Share extension from the Extension Marketplace. The extension page includes requirements that are necessary to use the extension.
Once it's installed, reload and wait for dependencies to download and install. You can check the status of the installation within the Status Bar. After installation is complete, a few additional UI elements and features are added to the editor.
- Status Bar: Live Share—The Live Share status bar item is used to sign in to Live Share and also provides session states that update throughout an active collaboration. See Figure 4.47. You can also view a list of participants by selecting the people icon.

Figure 4.47: The Live Share status bar item displays in the Status Bar. Selecting the bar signs you into Live Share. If signed in and currently hosting or attending an active session, you can view session states and session participants.
- Activity Bar: Live Share Explorer view—The Live Share Explorer view within the Activity Bar displays the active shared project in addition to session participants (see Figure 4.48). You can also access all Live Share functions within this view.
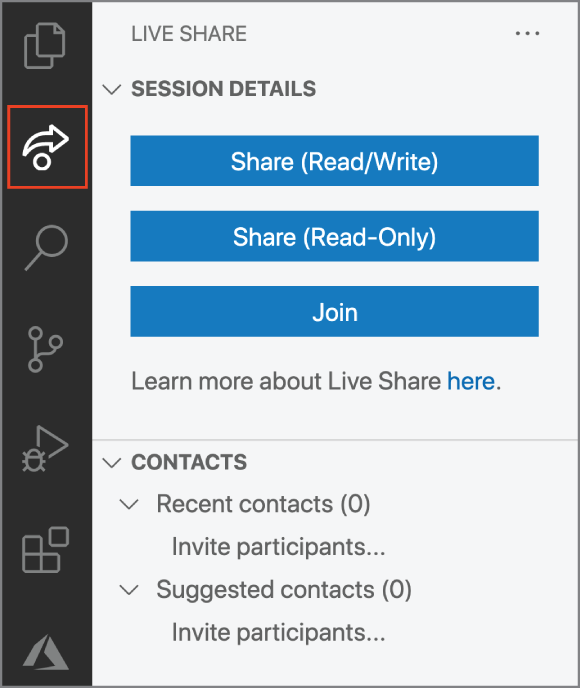
Figure 4.48: The Live Share Explorer icon is used to open the Live Share Explorer view. This view displays session details and contacts.
- Command Palette—All Live Share functions are available within the Command Palette. To view a complete list of commands, type Live Share into the Command Palette. A contextualized list of commands is available by selecting the Live Share status bar item.
Sign In to Live Share
For security purposes, sign-in is required to use Live Share. The following account types are required:
- Microsoft personal account (e.g.,
@outlook.com) - Microsoft-backed work or school account (Azure Active Directory—AAD)
- GitHub account
To sign in, click the Live Share status bar item. A notification appears that requests you to log in via the browser. Click Launch Sign In to open the browser to a sign-in page. Alternatively, you can run the command Live Share: Sign In With Browser to access the sign-in page. Once signed in, close the browser and return to Visual Studio Code.
If you signed in without joining a session, the Status Bar reflects that you are signed in (see Figure 4.49) and displays an icon for you to share a project.

Figure 4.49: After signing into Live Share, the Status Bar displays the name provided for the logged in account.
If you signed in after accessing a link to join a session, the Status Bar initially reflects that you are joining a session followed by a change in state to indicate that you've joined the session.
Share a Project
A host provides access to a Live Share session by sharing an invite link with guests. Before you can generate an invite link, the project must first be opened in Visual Studio Code. Hosts have complete flexibility in regard to which files/folders are visible for guests. In addition, hosts can select whether the session enables edits or is read-only.
The steps to share a project are as follows:
- Open a folder you'd like to share with guests.
- In the Status Bar, click the Live Share status bar item or run the command Live Share: Start a Collaboration Session (Share).
After sharing, a notification appears to let you know that the invite link has been copied to your clipboard (see Figure 4.50). The link is always available for access by clicking on the status bar item and selecting Invite Others (Copy Link). The notification also enables you to set the session to read-only. A read-only session prevents others from editing the project. This setting may be useful for a session with external guests you may not trust or when pair programming.
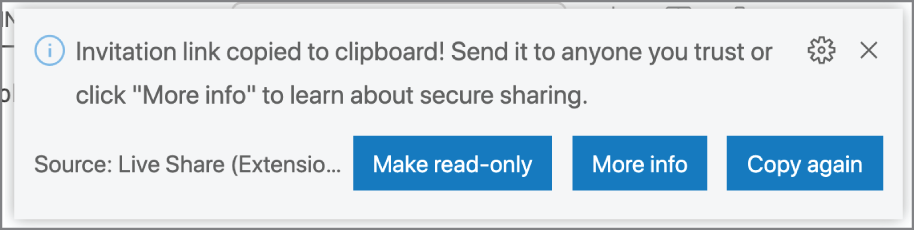
Figure 4.50: A notification appears in the editor to inform you that the invite link has been copied to the clipboard. The notification also provides the option to make the session read-only.
- Share the link with a guest. When a guest clicks the link, they are prompted to log in to join the session. If the guest chooses to sign in as anonymous, Visual Studio provides a notification to the host requesting approval to allow the anonymous guest to join the session (see Figure 4.51).
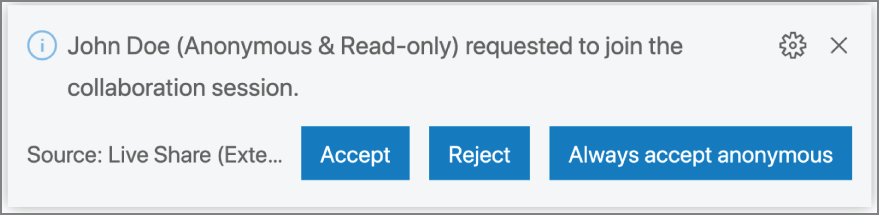
Figure 4.51: Visual Studio Code displays a notification requesting whether the anonymous guest John Doe should be allowed to join the session. The host could also select the option to always allow anonymous guests to join. Selecting the latter option lets anonymous guests automatically join future sessions without host approval.
Once the session is active, the Status Bar reflects that a collaboration session is active (see Figure 4.52) and provides a total count of guests. Guests are automatically taken to the file you're editing once they join the session.

Figure 4.52: The Status Bar shows that one guest is currently in the session.
When you are done sharing the project, stop sharing by clicking the Stop Collaboration Session icon in the Live Share view (see Figure 4.53). Once sharing has stopped, all guests are notified that the session has ended. At that point, guests no longer have access to the project, and any temp files are automatically cleaned up.
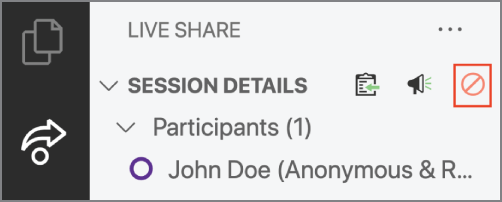
Figure 4.53: The Stop Collaboration Session icon displays in the Session Details section of the Live Share view. Click the icon to stop the session.
Join a Session
Guests receive access to a Live Share session by navigating to the invite link shared by the host. Guests can join a session either via a web browser or via the Visual Studio Code desktop client (see Figure 4.54). Joining via the browser is ideal for guests who may not have the necessary tools installed and provides quicker access to the session. Browser access is optimal for short-term guests who wouldn't need to install Visual Studio Code locally. The browser is also an alternative for collaborators working on a tablet, smartphone, or any other device that cannot run Visual Studio Code, whereas joining with Visual Studio Code is ideal for guests who may already have the editor running or who are experiencing issues joining with the invite link.
To join a session via the web browser, click the invite link provided by the host. The link takes you to a web page that provides the option to continue to the browser. Once you join the session, you have full access to all Visual Studio Code editing features. To leave the session, close the browser window.
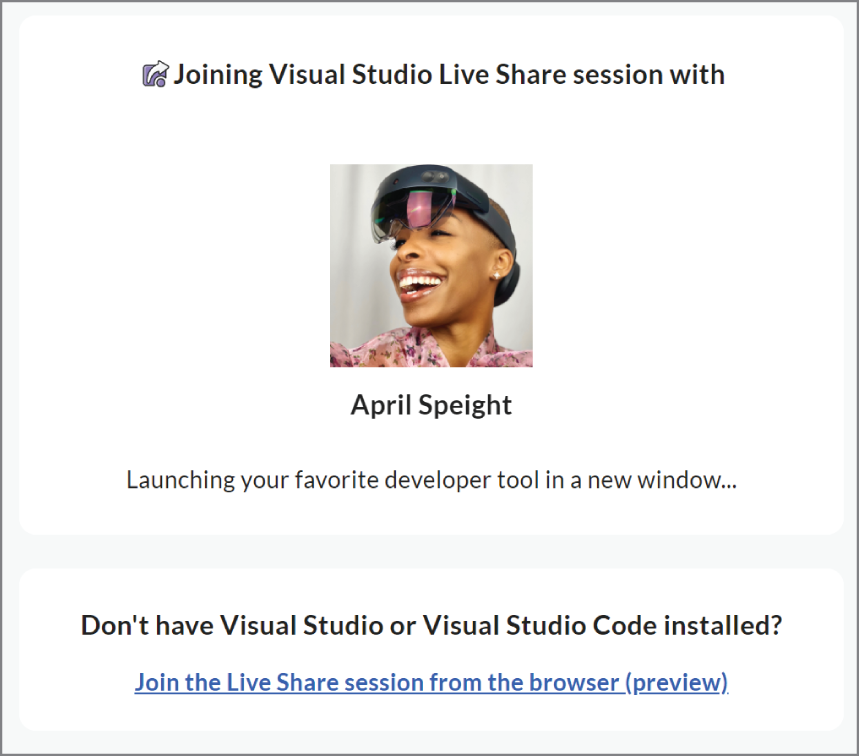
Figure 4.54: When a guest clicks the invite link to join the session, they're given the option to either join via Visual Studio Code or continue in the browser.
Joining a session through the desktop client requires that the Live Share extension is already installed in the editor. After signing into Live Share, navigate to the Live Share view in the Activity Bar and click the Join Collaboration Session icon (see Figure 4.55).
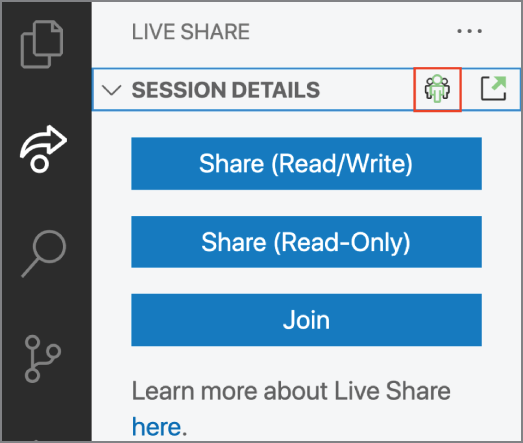
Figure 4.55: The Join Collaboration Session icon displays in the Session Details section of the Live Share view.
You can paste the invite link URL and press Enter to confirm (see Figure 4.56). Once confirmed, you are connected to the session, and the Status Bar is updated to reflect both that you've joined and the total count of guests.

Figure 4.56: The invite URL is entered when prompted to join the session.
To leave the session, close the Visual Studio Code window (see Figure 4.57). Alternatively, if you'd prefer to keep the window open, click the Leave Collaboration Session icon in the Live Share view.
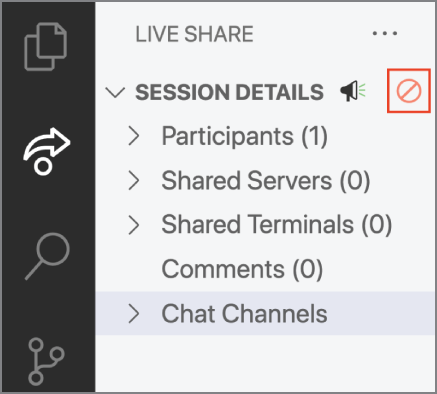
Figure 4.57: To leave a session, select the Leave Collaboration Session icon in the Live Share view.
Editing and Collaboration
During the session, everyone has the ability to simultaneously edit code (if the session is not read-only) and to navigate the project's files and folders. Both the host and guests can see each other's edits and selections in real time. Visual Studio Code displays a flag next to a guest's cursor on hover or when they edit, highlight, or move their cursor (see Figure 4.58).

Figure 4.58: Visual Studio Code indicates where session participants have their cursor in the editor.
Follow a Participant
Following enables you to follow everything the host or another guest does in the editor. You can follow a person by selecting their name in the participant's list. If you are following someone, the circle next to their name is filled in, and the line number in their active file displays as well (see Figure 4.59).
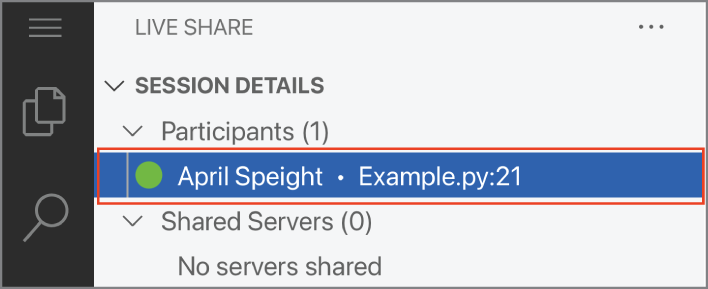
Figure 4.59: When a person is followed, a filled-in circle displays next to their name.
You could also follow someone by clicking the pin icon in the right corner of the editor group (see Figure 4.60). If more than one other person is in the session, you will be asked to select the participant you want to follow.
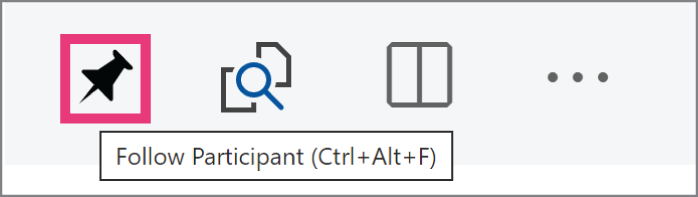
Figure 4.60: The pin icon in the editor window can be used to follow a session participant.
You can stop following someone by selecting the pin icon again or with the keyboard shortcut Cmd+Alt+F/Ctrl+Alt+F. Furthermore, following automatically stops if you do any of the following:
- Start editing the currently active file
- Open a different file
- Close the currently active file
Share a Terminal
Hosts can also share terminals with guests (see Figure 4.61). Sharing a terminal enables guests to run commands on their own without the need to rely on the host. This may be helpful in cases where it may be more efficient for a guest to run a series of commands rather than walk the host through the commands to run within the terminal. Although terminals are not shared by default, the host can share a terminal by clicking the Share Terminal icon or entry in the Live Share view. Before the terminal is shared, Visual Studio Code provides the option to select one of the following two access modes:
- Read-only access: Guests can only view the host's terminal input and output.
- Read/write access: Guests can view the host's terminal, type in the terminal, and run commands.
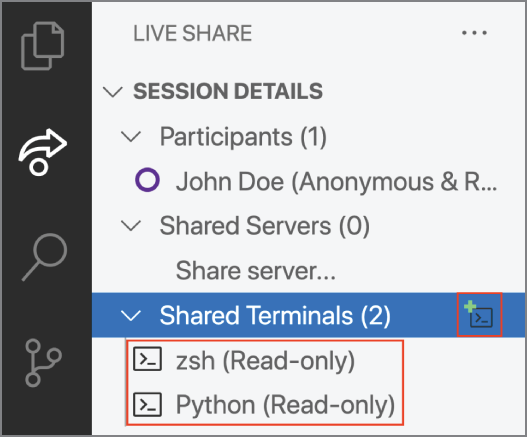
Figure 4.61: The host can select a terminal in the workspace to share with guests.
Visual Studio Code provides a new shared terminal once the access mode is selected. When a shared terminal session ends, all guests are disconnected. Hosts can stop a shared terminal session one of three ways:
- Type
exitinto the terminal - Close the terminal window
- Click the Unshare Terminal icon in the Live Share view
Summary
In this chapter, you learned how to do the following:
- Navigate project files in the Explorer view or with breadcrumbs
- Search across project files in the Search view
- Activate a virtual or conda environment for a project
- Manage version control with Git
- Collaborate with others remotely using Live Share
You're now prepared to manage a Python project and collaborate with others in Visual Studio Code.