
CHAPTER 6
Unit Testing
Visual Studio Code and the Python extension provide a great interface for testing within the Test Explorer view. You can use Visual Studio Code to work with unit tests written in unittest, pytest, and nose. This chapter walks through unit testing for unittest and pytest with a simple example from the Python Koans repository.
The exercises within this chapter are completed within the Triangles folder. The Triangles folder contains two subfolders: unittest and pytest. Each subfolder contains code and a test file for the respective framework. Before proceeding with the exercises, open the subfolder for the preferred framework in Visual Studio Code and activate a virtual or conda environment for the workspace.
Enable and Discover Tests
Unit testing in the Python extension is disabled by default. You must enable a test framework to run unit tests, and only a single test framework can be enabled at a time. (To switch frameworks, disable the current framework and enable the new one.)
To enable a test framework, complete the following:
- Run the command Python: Configure Tests.
- Select the framework.
- Select the directory that contains the test.
- Select the pattern to identify test files.
Upon opening a project, if Visual Studio Code discovers potential tests, the editor prompts by default to configure a test framework. This is useful for a collaborator that has cloned the project and opens for the first time in Visual Studio Code. You could change this behavior in settings by setting python.testing.promptToConfigure to false.
Given that unittest is built into the standard Python framework, there is no further installation that needs to occur before using the framework. However, should you select to use pytest, Visual Studio Code prompts you to install the framework if the framework is not already installed. The prompt displays after the framework is enabled. If pytest is located outside the current environment, within the settings set python.testing.pytestPath to the path to pytest. The default value is pytest.
The structure of the project has a significant impact on how tests are discovered. For example, if your project structure organizes all tests into a singular folder and the code in a separate folder, specifying an optional working directory for tests would be optimal. The python.testing.cwd setting enables you to specify such an optional working directory for tests. The default for the python.testing.cwd setting is null. To specify a directory, set python.testing.cwd in the settings to the folder that contains the code files (e.g., if all code files are within a src folder, cwd would be set to src
).
Discovery patterns are dependent on the selected framework. The default behavior for unittest and pytest follow:
- unittest—Looks for any Python file with
testin the name in the top-level project folder. All test files must be importable modules or packages. To specify a discovery pattern for a specific naming convention (e.g., appending_testto every test filename), change the pattern within settings forpython.testing.unitTestArgs. The default argument is-p *test*.py. - pytest—Looks for any Python (
.py) file whose name begins withtest_or ends with_test, located anywhere within the current folder and all subfolders.
When a test is enabled, the python.testing.unittestEnabled or python.testing.pyttestEnabled setting is set to true. The advantage of enabling a framework using the command Python: Configure Tests is that when a framework is enabled, the command automatically disables any other framework.
Once a framework is enabled, Visual Studio Code begins test discovery. Test discovery could also be triggered manually with the command Python: Discover Tests. If tests are found, the Status Bar shows “Run Tests” (see Figure 6.1). If discovery fails, the Status Bar shows “Test discovery failed.”

Figure 6.1: When a test is discovered, the Status Bar displays a lightning icon and the phrase “Run Tests.”
Try It Out: Enable either unittest or pytest and execute a test discovery for either test_unittest.py or test_pytest.
unittest:
- Run the command Python: Configure Tests.
- Select the unittest framework (see Figure 6.2).
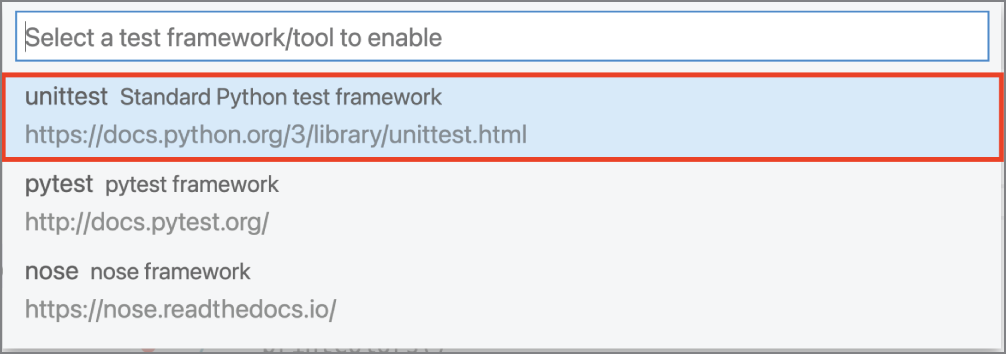
Figure 6.2: The unittest framework is selected as the framework.
- Select the option . Root Directory for the directory that contains the test (see Figure 6.3).

Figure 6.3: The . Root Directory option is selected as the directory that contains the test.
- Select the
test_*.pypattern to identify test files (see Figure 6.4).
Figure 6.4: The pattern
test_*.pyis selected to identify test files. - Verify whether the Status Bar says “Run Tests.”
pytest:
- Run the command Python: Configure Tests.
- Select the pytest framework (see Figure 6.5).
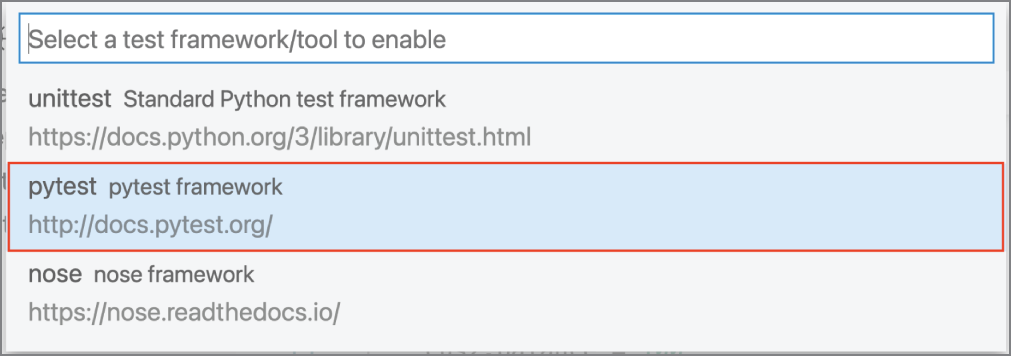
Figure 6.5: The pytest framework is selected as the framework.
- Select . Root Directory for the directory that contains the test (see Figure 6.6).

Figure 6.6: The option . Root Directory is selected as the directory that contains the test.
- Select the
test_*.pypattern to identify test files (see Figure 6.7).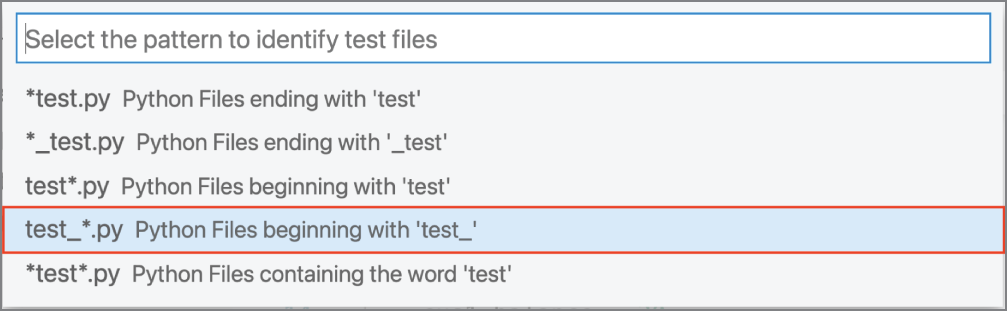
Figure 6.7: The pattern
test_*.pyis selected to identify test files. - Verify whether the Status Bar say “Run Tests.”
Run Tests
The Test Explorer view (see Figure 6.8) provides a convenient way for you to visualize, navigate, and run tests. The view becomes activated only after a test is discovered as a result of test discovery. Once activated, a Test Explorer icon is added to the Activity Bar.
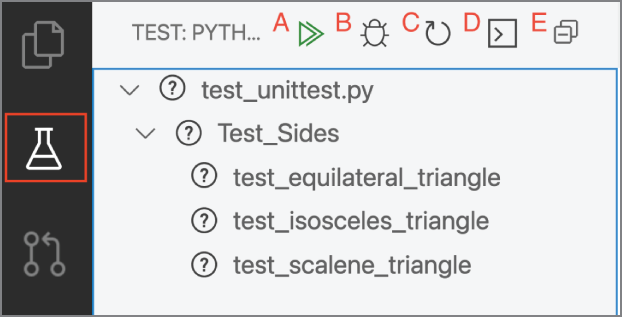
Figure 6.8: The Test Explorer view.
The Test Explorer contains the following tasks at the top of the view:
- Run All Tests (A)—Runs all discovered tests
- Debug All Tests (B)—Debugs all discovered tests
- Discover Tests (C)—Triggers test discovery
- Show Test Output (D)—Opens the Output panel to view test output
- Collapse All (E)—Collapses all discovered tests within the Test Explorer
The Run Test and Debug tasks also appear inline with each file, class, and test.
You can run a test in Visual Studio Code in various ways:
- Status Bar—Click Run Tests (see Figure 6.9) and select one of the commands (e.g., Run All Tests or Run Test Method).
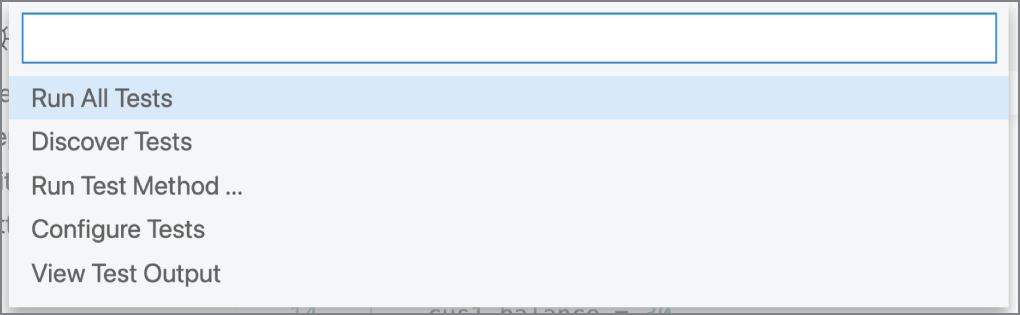
Figure 6.9: The list of commands that appear after clicking Run Tests in the Status Bar.
- Explorer view—Right-click a test file and select Run All Tests.
- Editor—Click Run Test above the test case (see Figure 6.10).
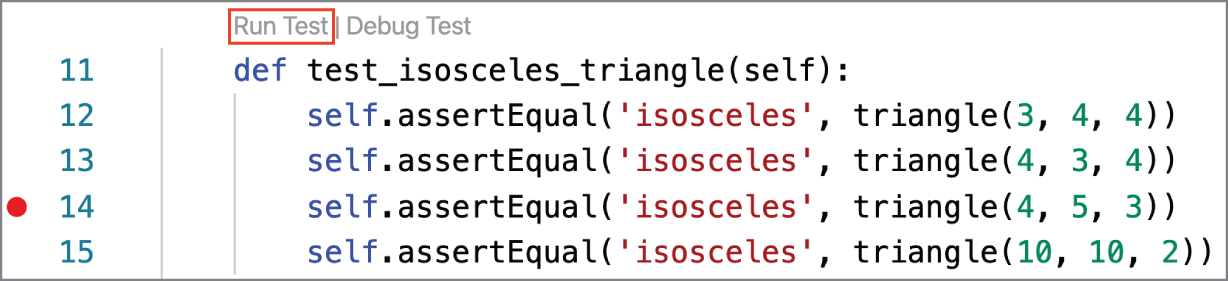
Figure 6.10: “Run Test” displays above the test case in the editor.
- Test Explorer View
- Run all tests—Click the Play button at the top of the Test Explorer view.
- Run a specific group of tests or a single test—Select the file, class, or test, and then click the Play button to the right of the item.
- Command Palette—Select any of the run test commands.
| COMMAND | DESCRIPTION |
| Run All Tests | Runs all tests in the workspace and its subfolders. |
| Run Current Test File | Runs the test in the file that's currently active in the editor. |
| Run Failed Tests | Reruns any tests that failed in a previous test run. Runs all tests if no tests have yet been run. |
| Run Test File | Prompts for a specific test filename; then runs the test in that file. |
| Run Test Method | Prompts for the name of a test to run, providing auto-completion for test names. |
Try It Out: Run all tests for the framework you enabled in the prior exercise. An intentional fail is included in the example to demonstrate a failed test.
Visual Studio Code displays test results in the following locations:
- Test Explorer view—Results display as either pass (green circle with a checkmark) or fail (red circle with an X; see Figure 6.11) next to the file, class, or test.
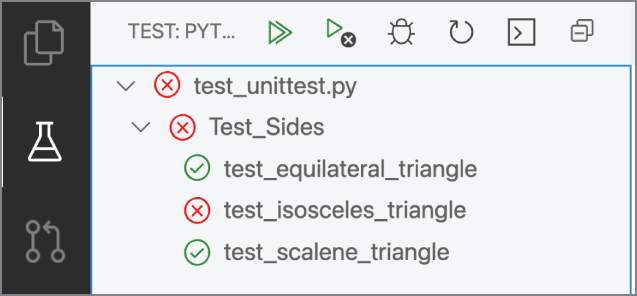
Figure 6.11: The Test Explorer view shows that the test failed. The first and third test cases passed, and the second test case failed.
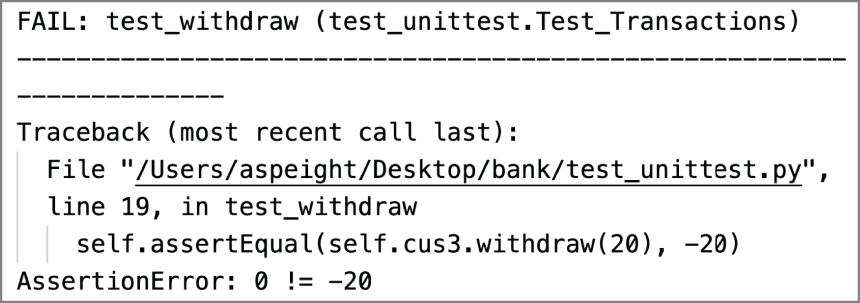
- Output panel—The Python Test Log provides a complete log of the test results (including any exceptions thrown anywhere in the unit code or the test code). To access the panel, select View ➪ Output to show the Output panel (see Figure 6.12); then click Python Test Log from the drop-down menu on the right. Alternatively, click Show Test Output in the Test Explorer view.
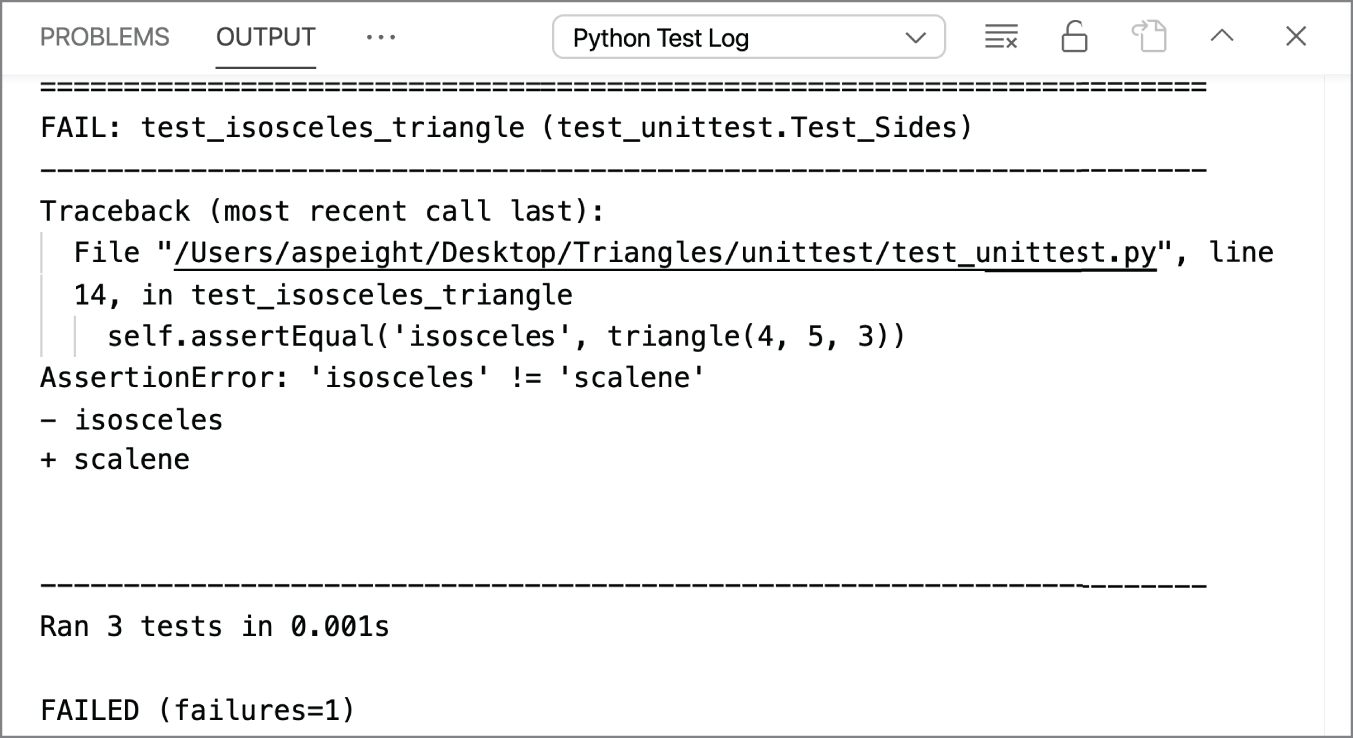
Figure 6.12: The Output panel shows which test failed.
- Editor—Above each test case, either a check mark (pass) or triangle with an exclamation mark (fail) displays. See Figure 6.13.
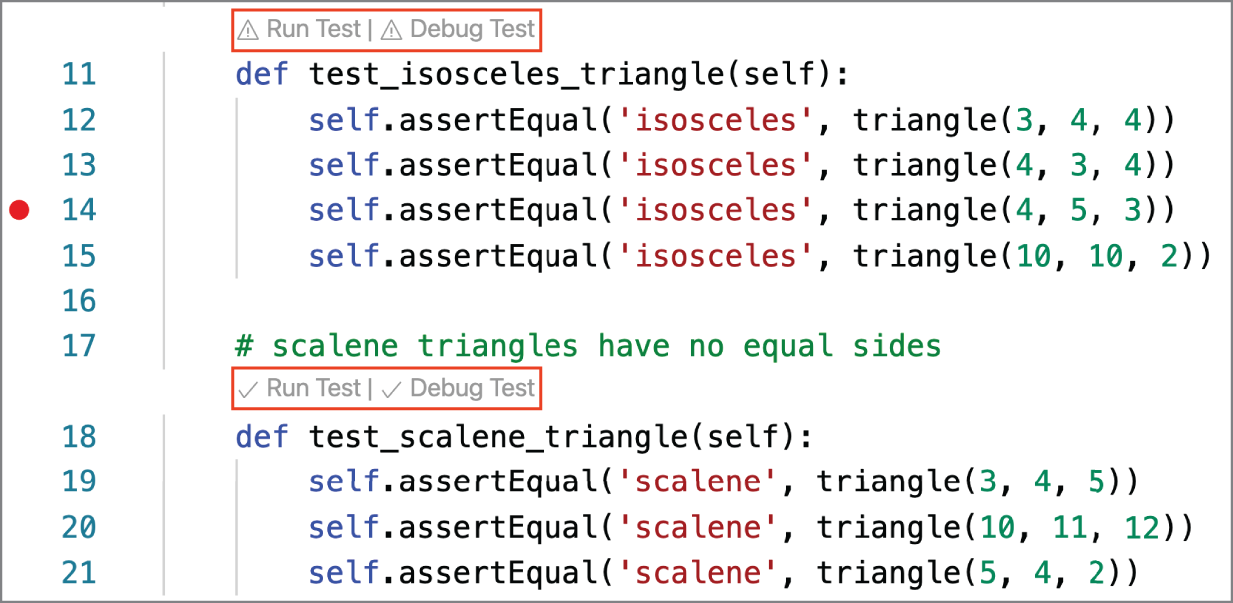
Figure 6.13: The first test case displays a triangle with an exclamation mark indicating that the test failed. The second test case displays a check mark indicating that the test passed.
- Problems panel—If using pytest, failed tests display in the Problems panel (see Figure 6.14). Double-click an issue to navigate directly to the test.
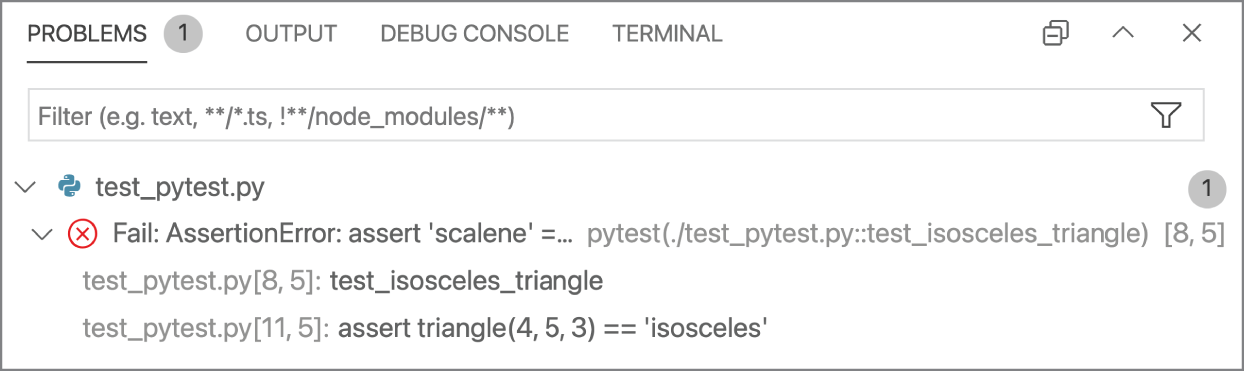
Figure 6.14: The Problems panel shows the failed test for a test that uses the pytest framework.
Try It Out: View the test results from the previous exercise. Although you might spot the error right away, you'll debug the assertion in the next section.
unittest:
Notice that a test failed within the def test_isosceles_triangle (self) case for self.assertEqual('isosceles', triangle(4, 5, 3)).
pytest:
Notice that a test failed within the def test_isosceles_triangle case for assert triangle(4, 5, 3) == 'isosceles'.

Figure 6.16: A test failed for the test_isosceles_triangle case.
Debug Tests
Debugging tests include the same functionality and commands used to debug Python files for test files. Debugging is often necessary if you suspect that your test has a bug. A breakpoint can be placed in the test file wherever desired prior to running the debugger. In addition to the Command Palette and Status Bar, you can start the debugger either within the editor or within the Test Explorer view.
- Debugger—Click Debug Test above the test case (see Figure 6.17).
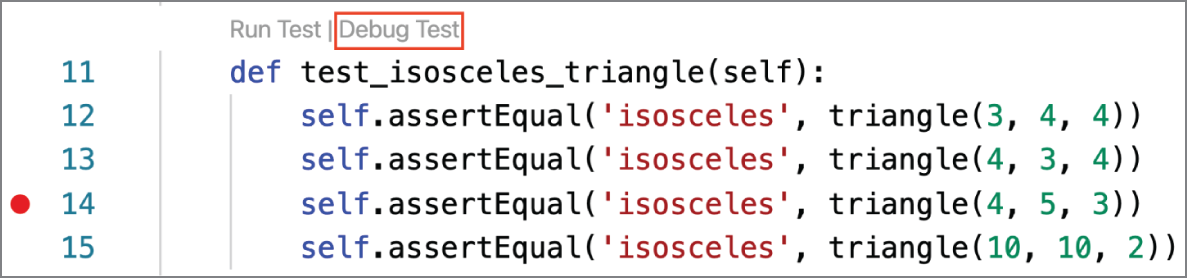
Figure 6.17: “Debug Test” displays above the test case in the editor.
- Test Explorer View—Click the bug icon for the test.
Try It Out: Set a breakpoint in the test file for the test that is failing and run the debugger for the test. Though the bug may be obvious, the purpose is to use the debugger to illustrate the debugging process.
unittest:
- Set a breakpoint for
self.assertEqual('isosceles', triangle(4, 5, 3)). - Click Debug Test in the editor to debug the test.
- After the debugger pauses at the breakpoint, click Continue.
- In the Debug Console, view the
AssertionError(see Figure 6.18).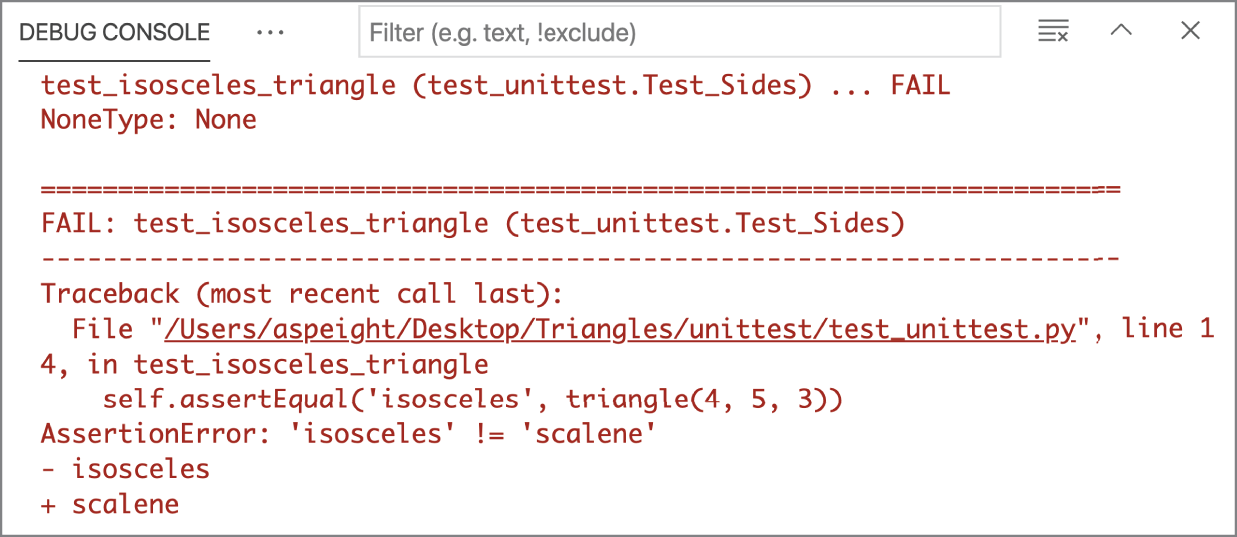
Figure 6.18: The Debug Console displays
AssertionError: ' isosceles ' != ' scalene '. - In
test_unittest.py, changeself.assertEqual('isosceles', triangle(4, 5, 3)) toself.assertEqual('isosceles', triangle(4, 4, 3)and save the file. - Run all tests. Each test within
test_unittest.pyshould pass.
pytest:
- Set a breakpoint for
assert triangle(4, 5, 3) =='isosceles'. - Click the inline Debug icon in the Test Explorer to debug the test.
- After the debugger pauses at the breakpoint, click Continue.
- In the Debug Console, view the “short test summary info” message (see Figure 6.19).
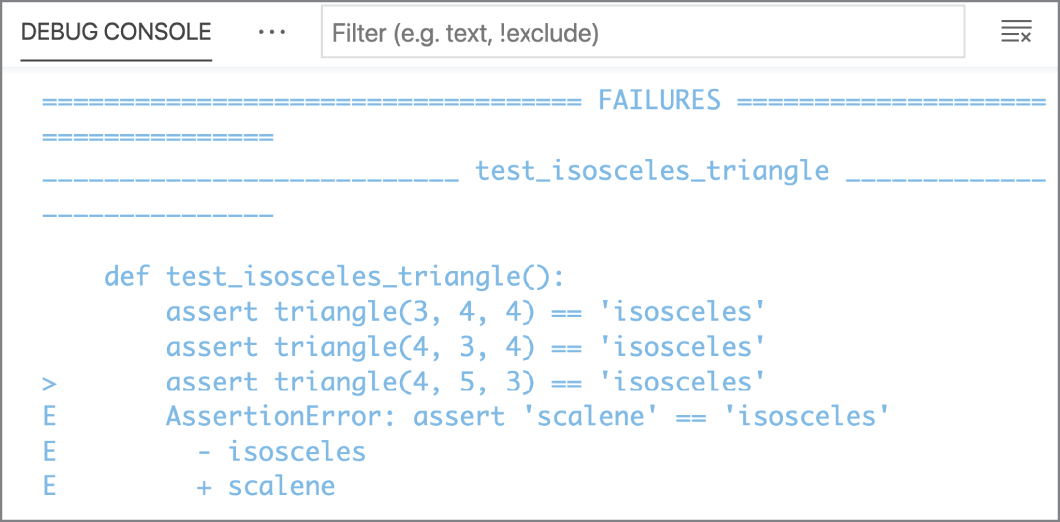
Figure 6.19: The Debug Console displays
AssertionError: ' isosceles ' != ' scalene '. - In
test_unittest.py, modifyassert triangle(4, 5, 3) =='isosceles' toassert triangle(4, 4, 3) =='isosceles' - Run all tests. Each test within
test_unittest.pyshould pass.
Summary
In this chapter, you learned about the following:
- The Python extension supports three frameworks: unittest, pytest, and nose.
- Each test framework has its own unique structure and naming conventions.
- A test framework must first be configured with either the command Python: Configure Tests or within
settings.jsonbefore running a test. - Only one test framework can be enabled at a time. Using the Python: Configure Tests command automatically disables a framework when another is enabled.
- Test discovery occurs either after a framework is configured or by manually executing discovery with either the command Python: Discover Tests or the Discover Tests icon in the Test Explorer view.
- The Test Explorer helps visualize, navigate, and run tests.
- Test results display in the Test Explorer, the editor, the Output panel, and in the Problems panel (for pytest).
- All debugger functionality and commands are available to aid in debugging a test.
- Test configuration settings are available for both general settings and by framework.
At this stage, you are able to conduct unit testing for Python in Visual Studio Code.