
CHAPTER 8
Using Git and GitHub with Visual Studio Code
GitHub is a platform that provides hosting for software development and version control using Git. Ranked as the number-one collaboration tool in the Stack Overflow Developer Survey 2020, GitHub is used by many developers for maintaining repositories and collaborating with others. The platform provides an interface that mirrors Git commands that are used within the terminal. Although you could maintain repositories within the GitHub interface, the built-in source control features and GitHub Pull Requests and Issues extension brings the same GitHub features and functionality inside Visual Studio Code.
This chapter explores how to use the extension in the editor. To complete the exercises in this chapter, either create a GitHub account at github.com or use an existing one. If you're unfamiliar with GitHub, consider reviewing the “Hello World” tutorial provided by GitHub at guides.github.com/activities/hello-world/.
Getting Started
The project example used in this chapter is a currency converter created by Data Flair that uses ExchangeRate-API to provide currency conversion rates for 160 currencies. The interface for the converter is created using Tkinter, Python's standard GUI package (see Figure 8.1).
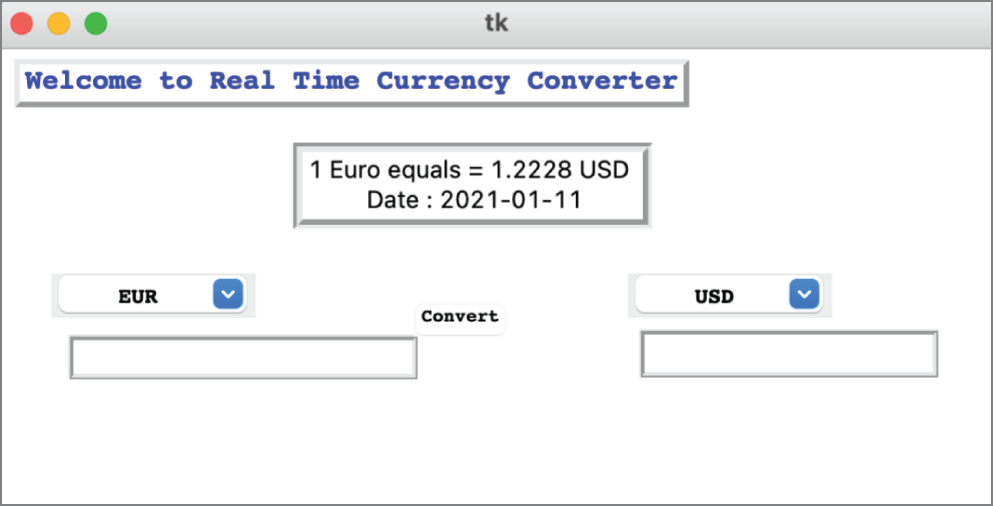
Figure 8.1: The currency converter interface
The complete Python script is available in the Currency_Converter_Completed folder. The currency_converter_completed.py and pull_request_template.md files are referenced to complete the exercises in this project.
To get started, create a new folder called currency_converter and open it in Visual Studio Code. After the folder is opened, create and activate a virtual environment.
Next, install the requests package within the integrated terminal. This installation is necessary to make a call to ExchangeRate-API for the conversion.
# install the Requests packagepip install requests
GitHub Pull Requests and Issues Extension
The GitHub Pull Requests and Issues extension enables you to work with GitHub inside Visual Studio Code. With the extension, you can perform most GitHub tasks within Visual Studio Code such as creating and cloning repositories, pushing changes to the remote, and managing pull requests and issues. Access to your GitHub account is provided by signing into GitHub via the extension. Together, GitHub and Visual Studio Code sets up authentication, thus eliminating the need for you to manually do so.
To sign into GitHub, click the Accounts icon at the bottom of the Activity Bar (see Figure 8.2) and click Sign In To Use GitHub Pull Requests And Issues.
A new browser window opens for you to enter your GitHub credentials. Upon successful sign-in, you're prompted to authorize Visual Studio Code to access GitHub. Click Continue to continue the sign-in process (see Figure 8.3).
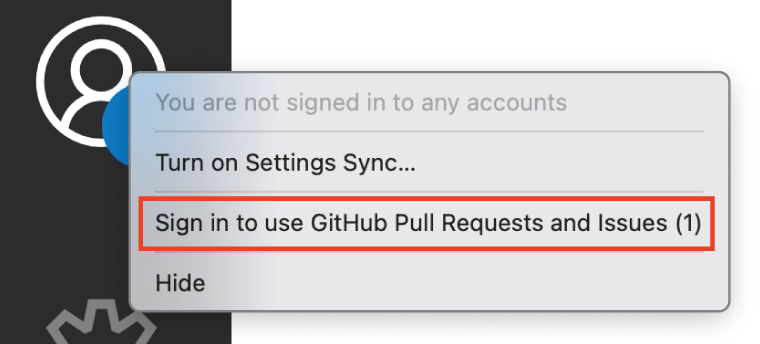
Figure 8.2: The Accounts icon provides an option to sign into GitHub to use the GitHub Pull Requests and Issues extension.
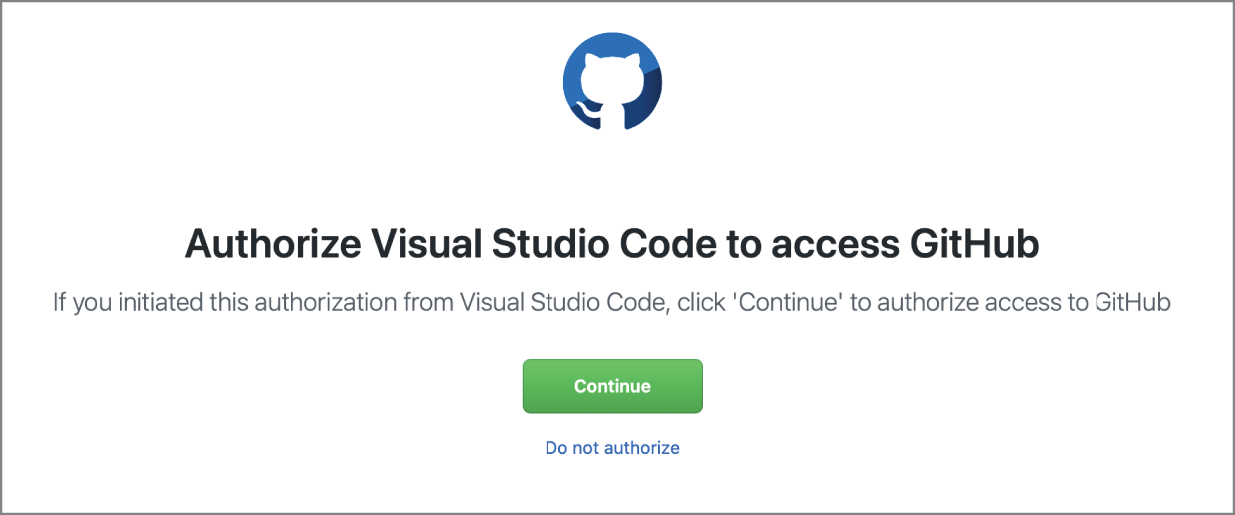
Figure 8.3: You are prompted to authorize Visual Studio Code to access GitHub within the browser window.
After providing authorization, the Visual Studio Code window prompts whether to allow the extension to open the URI (see Figure 8.4). Click Open to complete the sign-in process.
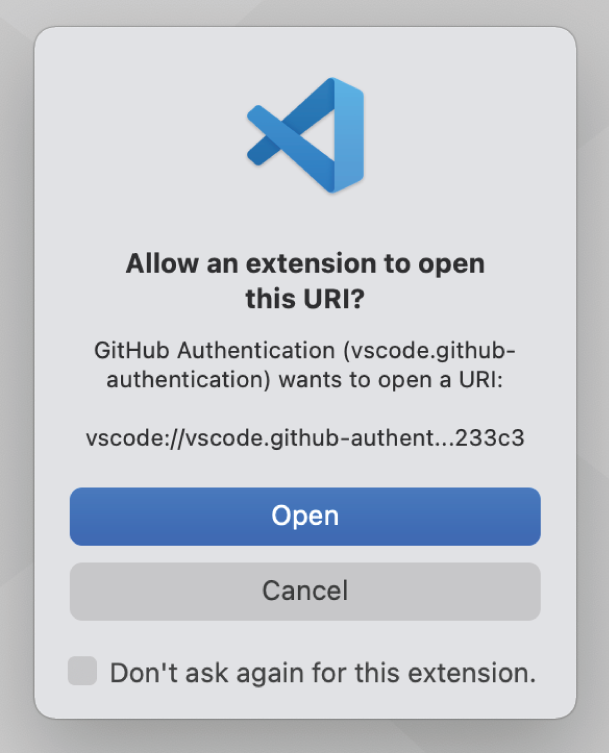
Figure 8.4: Visual Studio Code asks whether it should allow the GitHub Pull Requests and Issues extension to open the URI.
After completing the sign-in process, click the Accounts icon to view the signed-in account (see Figure 8.5).
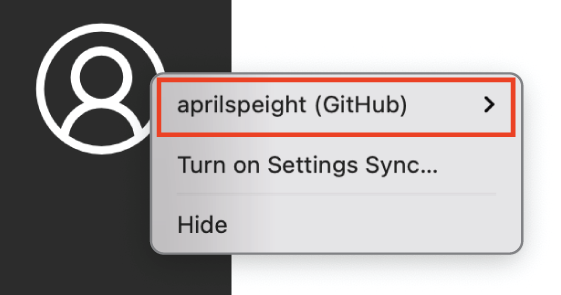
Figure 8.5: Clicking the Accounts icon shows which GitHub account is signed in to the GitHub Pull Requests and Issues extension.
Try It Out: Install the GitHub Pull Requests and Issues extension and sign in to your GitHub account.
Once you are signed into the GitHub Pull Requests and Issues extension, certain installed Visual Studio Code extensions can access your GitHub account information. Within the Accounts menu, select the signed-in user followed by Manage Trusted Extensions to select which extensions should be allowed to use your GitHub authentication.
The Manage Trusted Extensions menu lists all extensions that currently have access to your GitHub authentication. In addition, the menu displays the last time the extension used the GitHub account. See Figure 8.6.
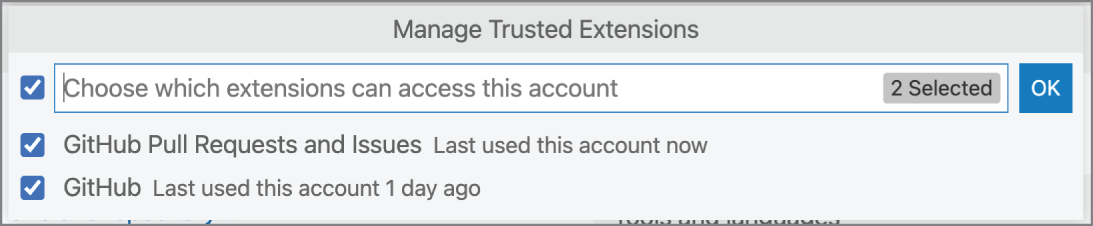
Figure 8.6: The Manage Trusted Extensions menu lists all extensions that have access to the GitHub authentication in addition to the last time the extension used the GitHub account.
To remove access for an extension, unselect the box next to the extension.
Try It Out: View the list of extensions allowed to access your GitHub authentication. If necessary, uncheck the extensions in which you do not want to have access to your GitHub authentication.
To sign out of the GitHub Pull Requests and Issues extension, click the Accounts icon followed by the signed-in user and the menu option Sign Out.
Publish a Project to GitHub
Although you could create and publish a repository to GitHub via the command line with the GitHub CLI, the GitHub Pull Requests and Issues extension provides a way for you to do so through the Visual Studio Code interface. The extension automates the process without the need to enter a series of commands into the terminal. This is convenient given that Git commands can get rather complicated. The extension hides a lot of that complexity similar to the editor's built-in source control commands.
A folder must be open to create and publish a repository to GitHub. If there's no code yet in the repository, use the Initialize Repository command first. Otherwise, if there is code, publish a repository to GitHub in either of the following manners:
- Source Control view: Click Publish To GitHub (see Figure 8.7).
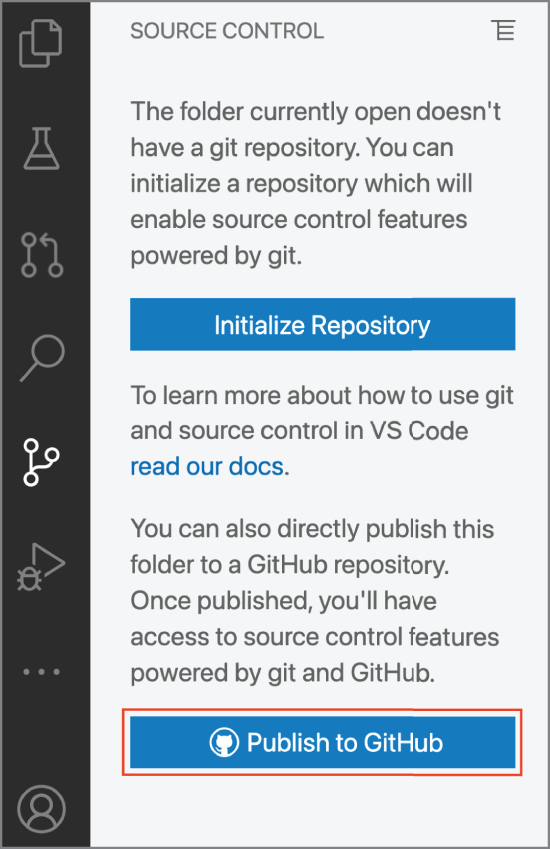
Figure 8.7: Clicking the Publish To GitHub button publishes the project to GitHub.
- Command Palette: Run the command Publish to GitHub.
Whether you start the publishing process from the Source Control View or Command Palette, the workflow to publish the project to GitHub is the same. First, enter a name for the repository and select whether to create a private or public repository for the project (see Figure 8.8).

Figure 8.8: Select whether the new repository should be private or public.
Next, Visual Studio Code lets you select which files should be included in the repository (see Figure 8.9). You can select from the files that appear in the list.
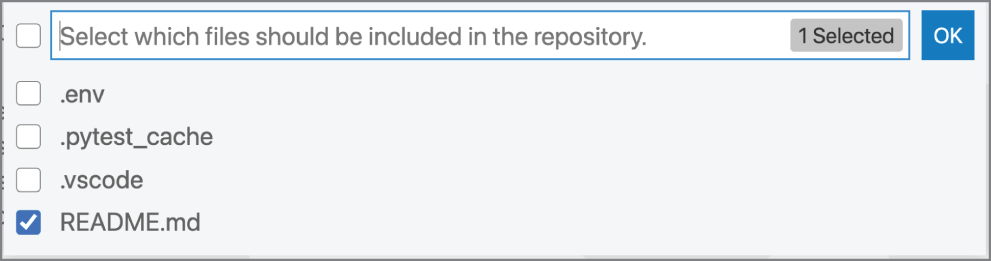
Figure 8.9: The README.md file is selected to be included in the repository.
After the files are selected, Visual Studio Code begins to publish the project to GitHub. You can follow the publishing progress in the lower right side of the editor (see Figure 8.10).

Figure 8.10: Publishing progress is provided at the bottom right of the editor. The notification updates to let you know which step is currently being done in the process.
Once the upload is complete, a notification appears to inform you that the publish was successful and provides a button to open the repository in GitHub (see Figure 8.11). Clicking the button opens the repository in the browser.
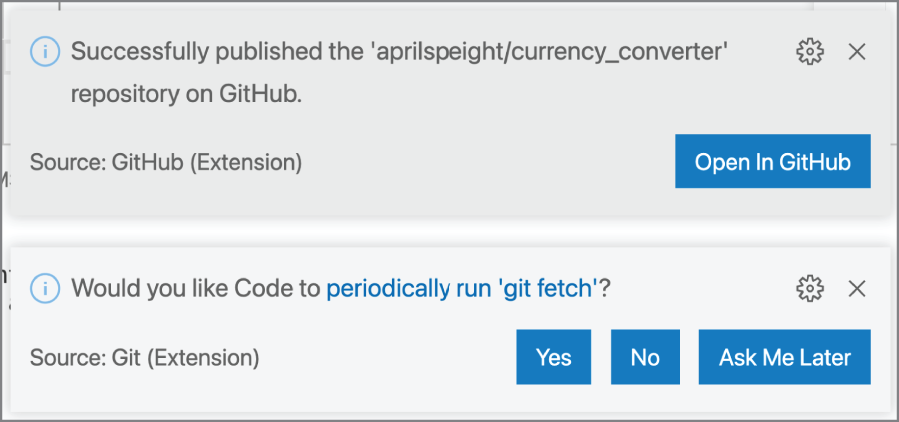
Figure 8.11: A notification appears in the lower right of the editor to inform you that the repository was successfully published to GitHub. You have the option to open the repository in GitHub.
When you publish a project to GitHub, the extension automatically creates a .gitignore file that lists all the files you didn't select to publish (see Figure 8.12).
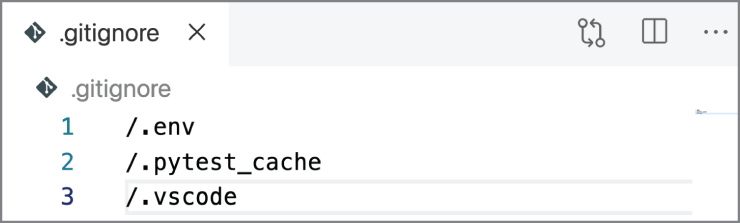
Figure 8.12: The files that were not selected to add to the new repository are listed in the .gitignore file.
If you create a .gitignore file prior to publishing the project to GitHub, the extension uses that existing file and doesn't ask which files to include during the publishing workflow.
Try It Out: Add a README.md file for the currency_converter project and publish the project to GitHub. When prompted, select Publish To GitHub Private Repository and only select the README.md file for upload. After the project is published to GitHub, view the newly created repository in GitHub. In addition, view the .gitignore file to view the list of files added to the newly created .gitignore file.
Push Changes to GitHub
In Visual Studio Code, once a project is connected to the GitHub remote, you're given access to both Git and GitHub features. Rather than manually enter Git commands in a terminal to stage, commit, and push changes, you can do so through the editor interface. As you make changes to your project, use the source control features introduced in Chapter 4, “Managing Projects and Collaboration.”
Once you're ready to push your changes to GitHub, you can do so in one of three ways:
- Source Control view: Select Push in the More Actions menu (indicated by three dots, as shown in Figure 8.13).
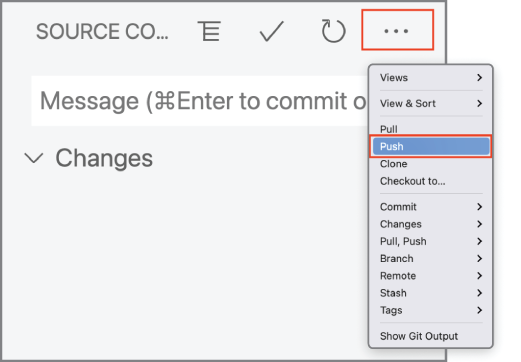
Figure 8.13: The More Actions menu is accessed by clicking the three dots.
- Command Palette: Select Git: Push.
- Status Bar: Click the Synchronize Changes action. After selecting the action, Visual Studio Code provides a prompt to confirm whether you want to push/pull commits to and from origin/master (see Figure 8.14).

Figure 8.14: In the Status Bar, the Synchronize Changes action indicates that there is one change to push to the remote.
Once changes are pushed, they're reflected in the remote (see Figure 8.15).

Figure 8.15: The changes pushed for the currency_converter.py script is reflected in the GitHub repository.
Try It Out: Create two new files, currency_converter.py and pull_request_template.md. After creating the file, stage, commit, and push changes to GitHub.
- Create a new file called
currency_converter.pyand add the code from thecurrency_converter_completed.pyfile. - Save and run the script to try the currency converter. When run, the
currency_converter.pyscript opens a window, which displays the currency converter interface. Enter a numerical value to be converted and click Convert for the default EUR > USD conversion. - Stage the changes, enter the commit message
add conversion script, and commit the change. - Create a new file called
pull_request_template.mdand add the copy from thepull_request_template.mdfile. - Stage the changes, enter the commit message
add pull request template, and commit the change. - In the Status Bar, click Synchronize Changes to push the changes to GitHub. After the changes are pushed, you can view the recent push on GitHub within the browser.
Most often, changes to repository files are made on a branch. You can create new branches and switch between branches within the editor. Selecting the branch within the Status Bar provides a prompt to either check out an existing branch or create a new branch (see Figure 8.16).

Figure 8.16: To create or switch to another branch, click the branch in the Status Bar.
Alternatively, you could create or check out a branch with the More Actions menu in the Source Control view.
Try It Out: Create a new branch called readme-update and add descriptive text in the README.md file for the currency converter project. Save, stage, and commit the changes. See Figure 8.17.

Figure 8.17: The new branch name is readme-update.
Manage Pull Requests and Issues
Whether you're contributing to an external repository or maintaining an open-source project, the process of managing pull requests and issues requires careful review, conversation among collaborators, and the necessity of Git metadata to track changes that have been made. Though the aforementioned tasks and information are available within the browser on GitHub, the GitHub Pull Requests and Issues extension brings the same features directly inside Visual Studio Code.
Each section of the GitHub view consists of subsections that group the pull requests and issues into organized categories. As you carry out the process of managing pull requests and issues (e.g., creating pull requests in the editor), additional sections are added to the view to help further manage the task at hand.
Pull Requests
The + icon in the Pull Requests section enables you to create a pull request directly in the editor (see Figure 8.18). Alternatively, you could run the command GitHub Pull Requests: Create Pull Request in the Command Palette.
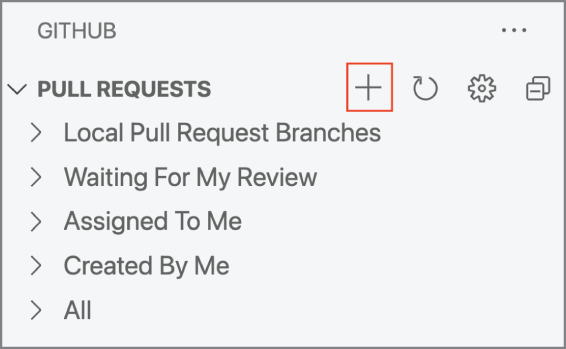
Figure 8.18: Click the + icon to create a new pull request.
When Create Pull Request is clicked, you're first prompted to select a target branch for the repository (see Figure 8.19).

Figure 8.19: The master branch is selected as the target branch.
After a target branch is selected, the editor begins to create the pull request. While the pull request is being created, the editor prompts you to select a title for the pull request using one of these three options:
- Commit—use the latest commit message
- Branch—use the branch name
- Custom—specify a custom title
If a pull request template is available in the project files, the extension locates the template for the repository. Once located, the pull request is created and is opened in a new tab in Review Mode (see Figure 8.20).
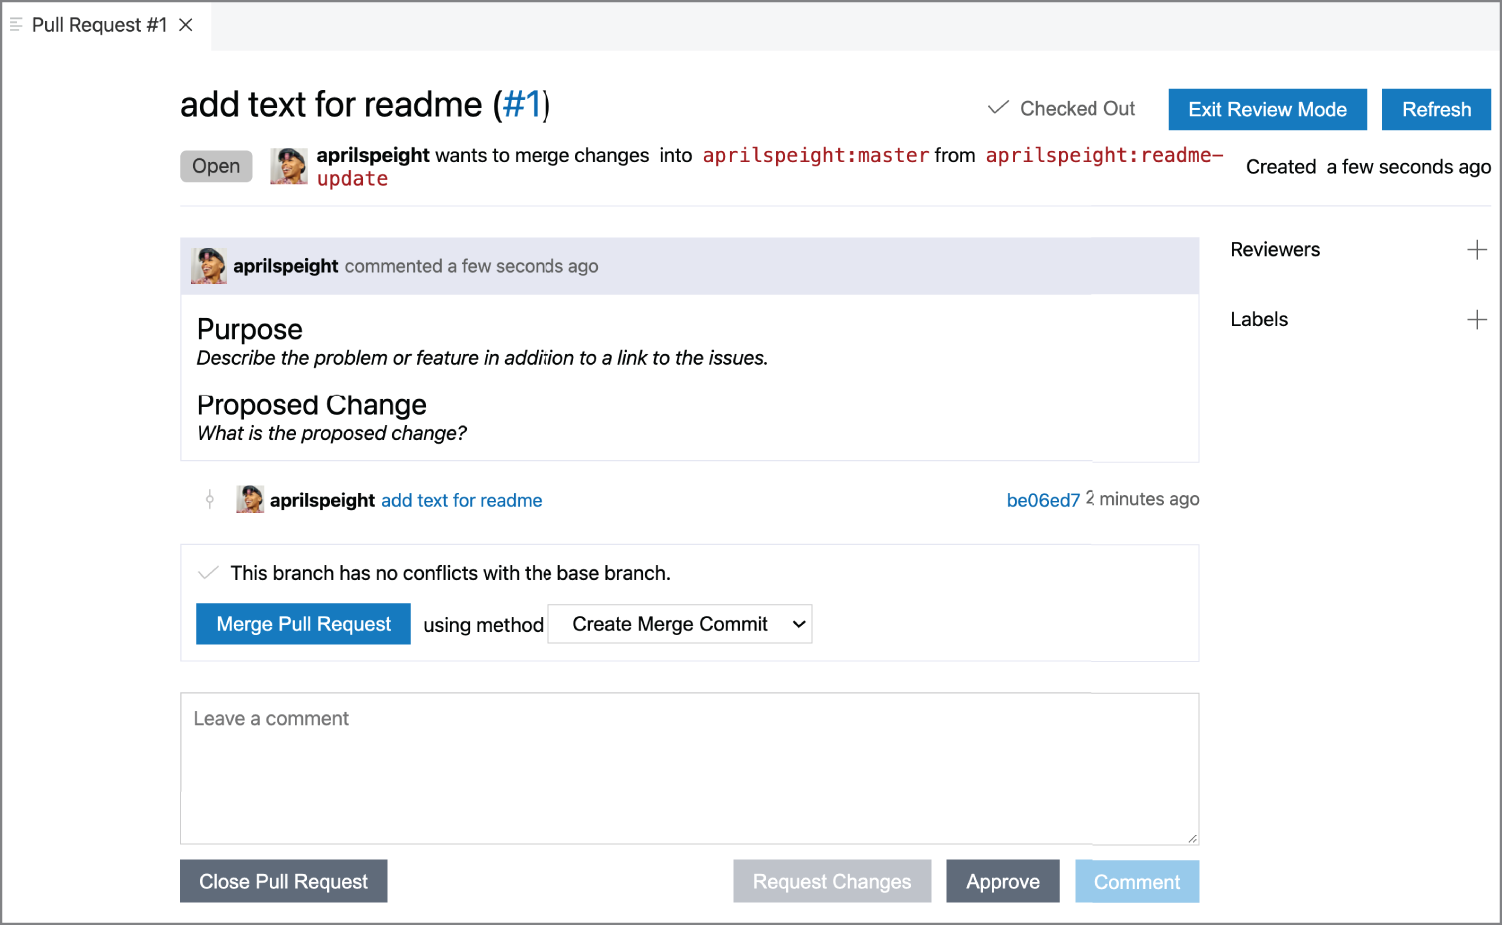
Figure 8.20: The pull request opens in a new Pull Request tab in the editor. You can manage the pull request in Visual Studio Code using the same features available on GitHub.
Try It Out: Create a pull request for the readme-update branch. Edit the comment created by the pull request template, and save the pull request.
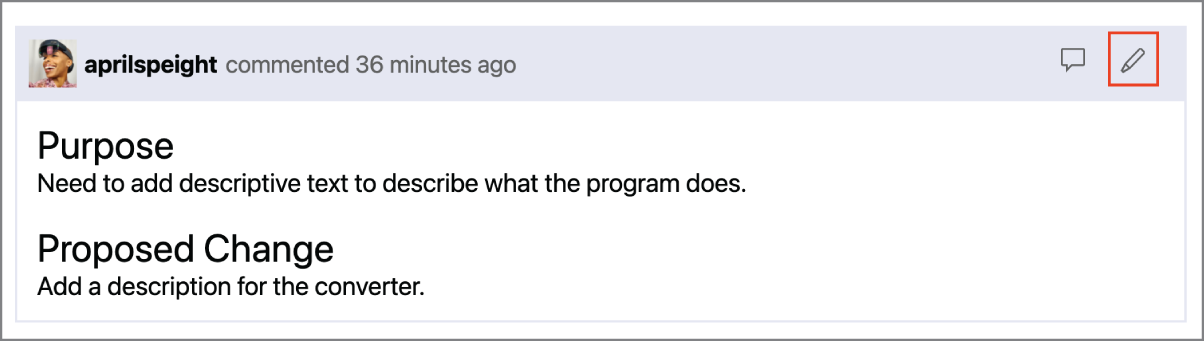
Figure 8.21: Edit the comment by hovering over the command and clicking the pencil icon.
Within Review Mode, you can manage the pull request as you would in the browser on GitHub. In the GitHub view, a new Changes In Pull Request section appears (see Figure 8.22).
The Changes In Pull Request section provides the following:
- The author's GitHub avatar
- Description for the pull request
- Files changed within the pull request
- Commits within the pull request
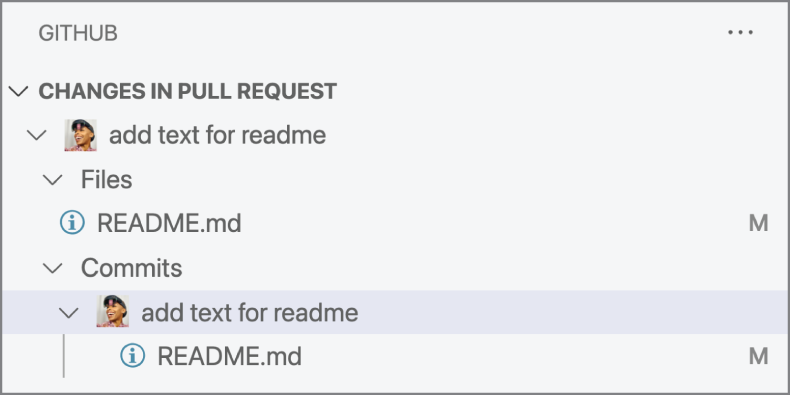
Figure 8.22: The Changes In Request section appears after a new pull request is created in the editor.
Selecting any file within the Pull Requests section opens the diff editor for the file.
In addition to the ability to create pull requests, the Pull Requests section organizes all pull requests for the repository into the follow subsections (see Figure 8.23):
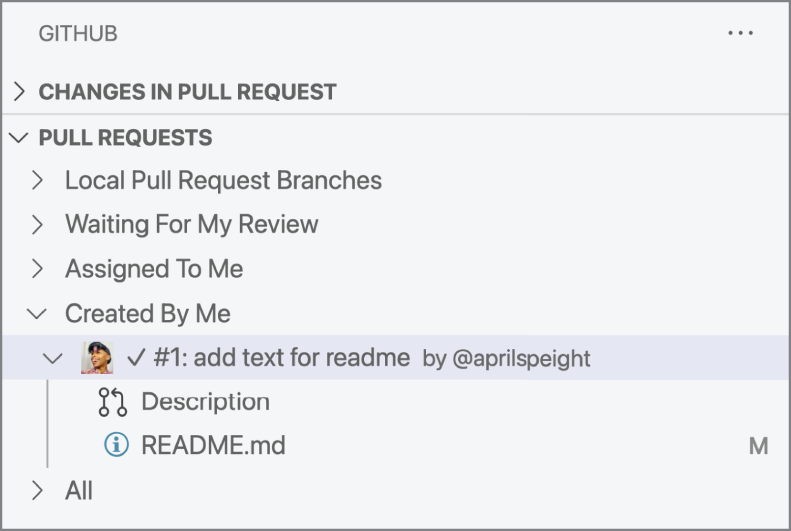
Figure 8.23: Pull requests are organized into subsections within the Pull Request view.
- Local Pull Request Branches—Lists all pull request branches that are local
- Waiting For My Review—Lists all pull requests that are waiting for your review prior to sign-off
- Assigned To Me—Lists all pull requests that are assigned to you
- Created By Me—Lists all pull requests that you've created for the repository
- All—Lists all pull requests for the repository
Once you're ready to merge the pull request, within the Pull Requests tab select the appropriate method and click Merge Pull Request (see Figure 8.24).
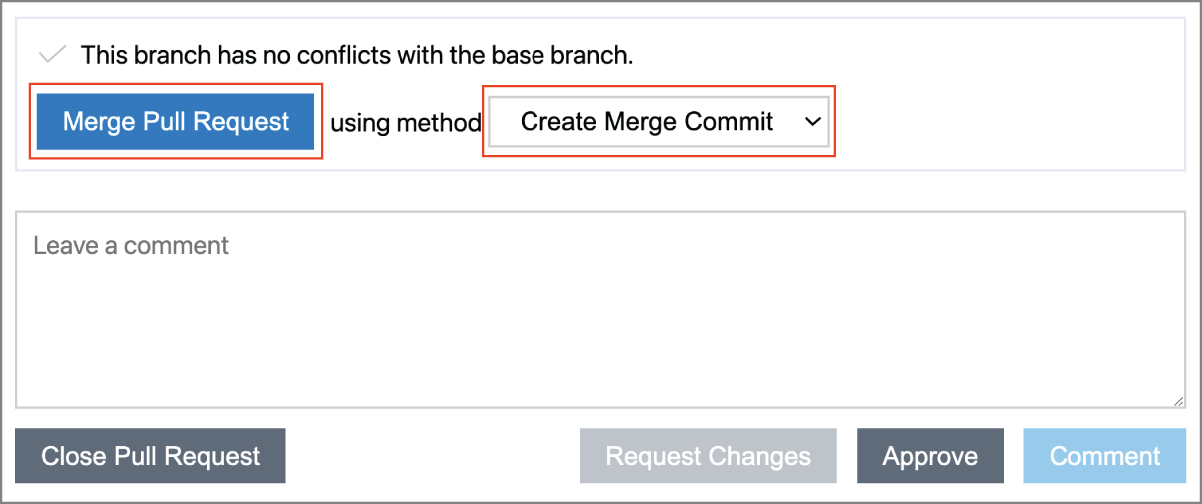
Figure 8.24: Select the merge method followed by Merge Pull Request.
Next, add a title and comment (if applicable) for the merge commit. Once complete, click Merge Commit (see Figure 8.25).
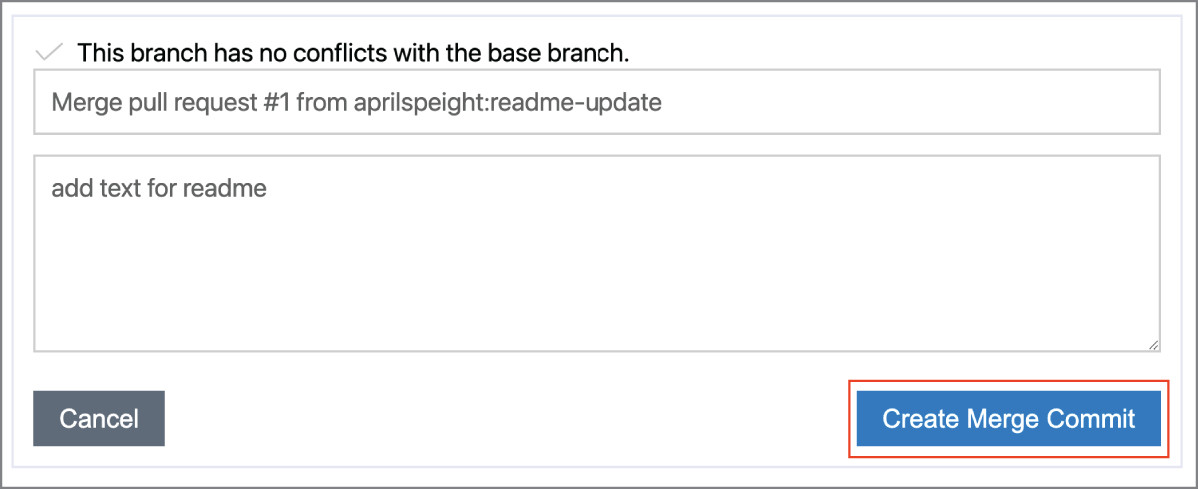
Figure 8.25: Click Merge Commit to commit the merge.
Try It Out: Merge the readme-update pull request into the master branch. Once complete, switch to the master branch to view the merged changes in the README.md file.
Issues
The + icon in the Issues section enables you to create an issue directly in the editor. When an issue is created, a NewIssue.md file is opened as a new tab in the editor (see Figure 8.26).
The issue template includes the following:
- Issue title
- Assignees
- Labels
- A space to provide the issue
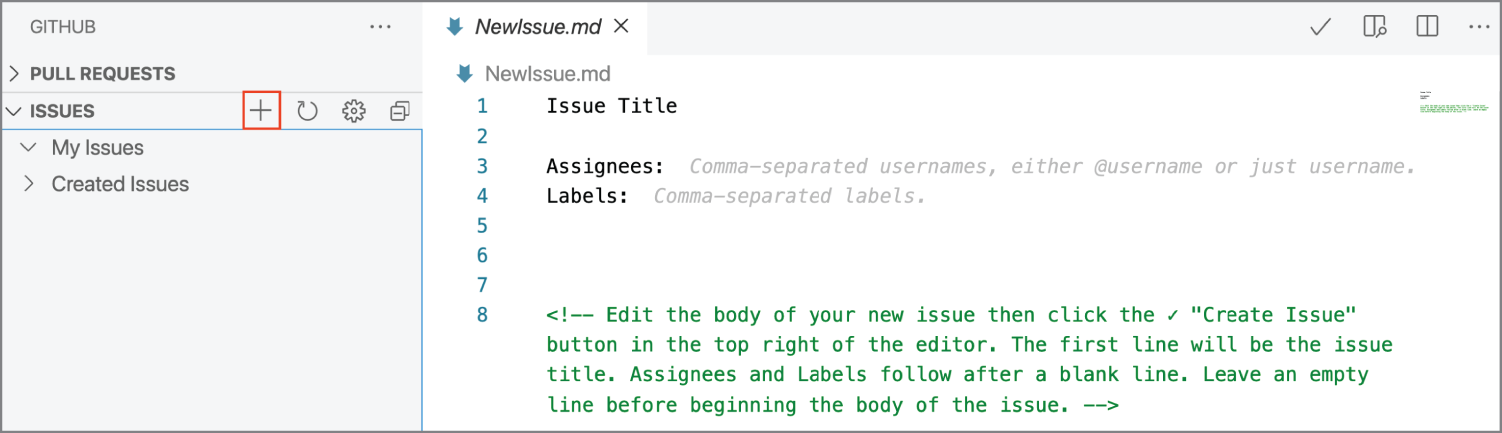
Figure 8.26: A NewIssue.md tab opens in the editor when a new issue is created.
After completing the template, click Create Issue (Shift+S) at the top of the editor tab (see Figure 8.27).
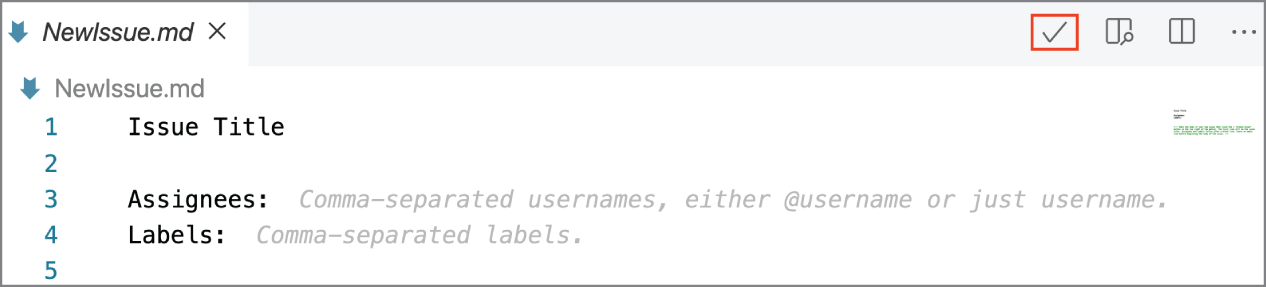
Figure 8.27: The Create Issue command is indicated by a check mark.
Alternatively, you could run one of these commands in the Command Palette:
- GitHub Issues: Create An Issue
- GitHub Issues: Create Issue From Clipboard
- GitHub Issues: Create Issue From Selection
The Command Palette command GitHub Issues: Create Issue From Clipboard pastes the clipboard item in the NewIssue.md file (see Figure 8.28). Ensure you have first copied the line (or lines) to the clipboard.
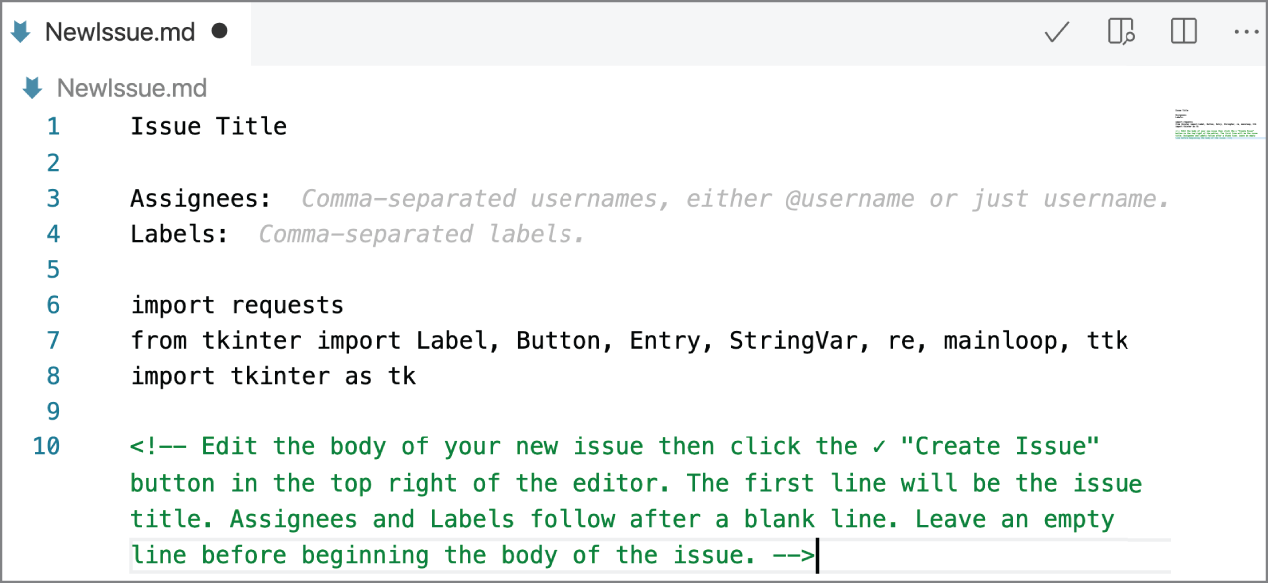
Figure 8.28: Clicking Create Issue From Clipboard pastes the lines of code into the NewIssue.md file.
The command GitHub Issues: Create Issue From Selection adds the path to the file in which the issue exists into the NewIssue.md file (see Figure 8.29).
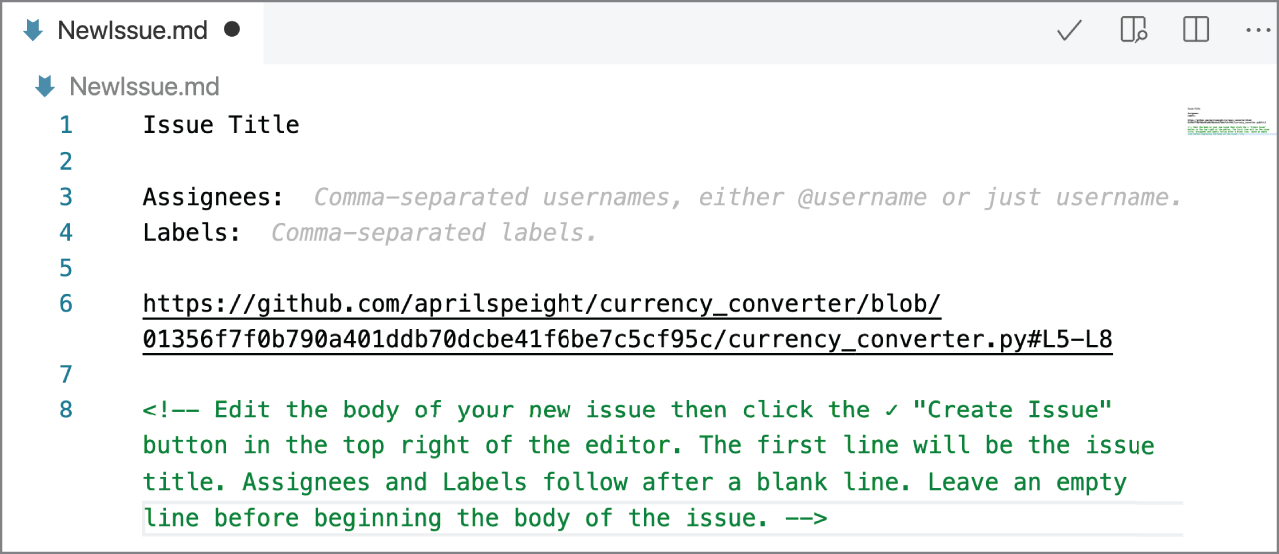
Figure 8.29: Clicking Create Issue From Selection adds the link to the issue in the NewIssue.md file.
Try It Out: In currency_converter.py, select lines 5–8. Using the Create Issue From Selection command, create an issue (see Figure 8.30). For title, enter Issue Exercise.
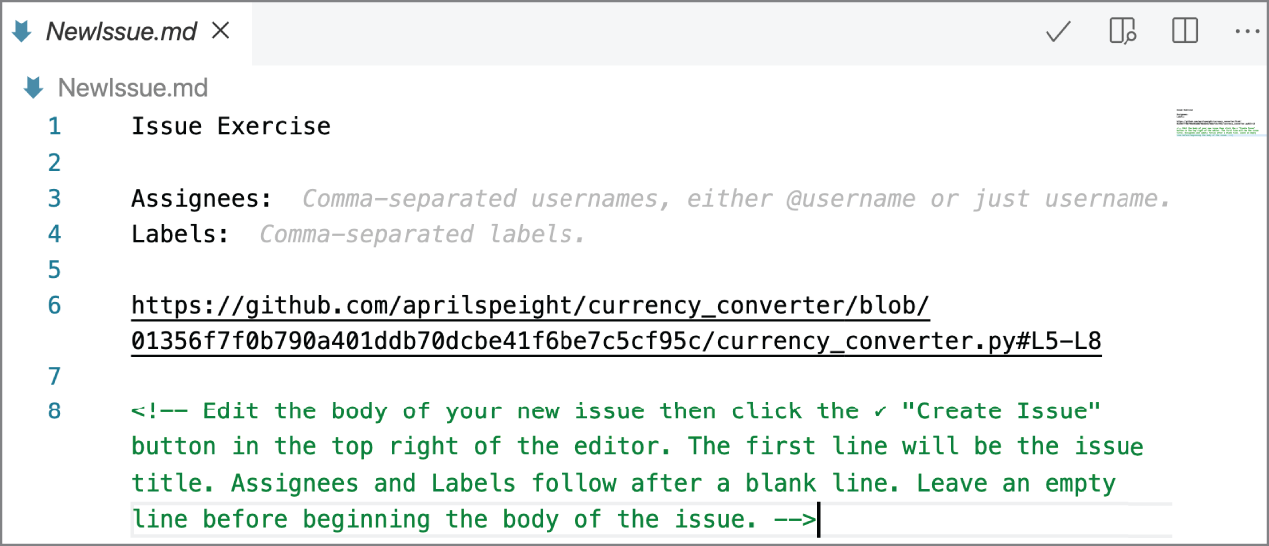
Figure 8.30: A new issue is created for lines 5–8 of the currency_converter.py file. A link to the lines of code is added to the NewIssue.md file.
After an issue is created in the editor, click Refresh (the circle arrow icon) in the Issues section of the GitHub view to view the issue in the list (see Figure 8.31).
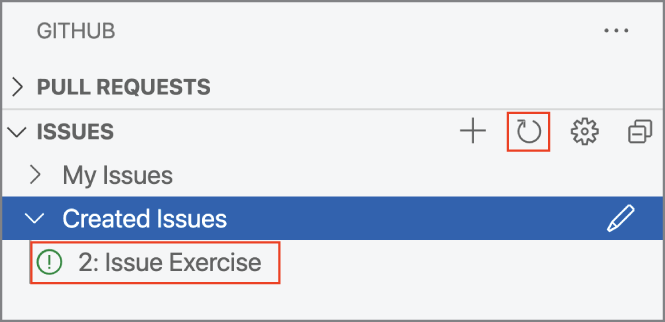
Figure 8.31: After the Refresh icon is clicked, the list of issues updates to include the newly created issue.
In the Issues section of the GitHub view, hovering over an issue displays the issue details (see Figure 8.32).
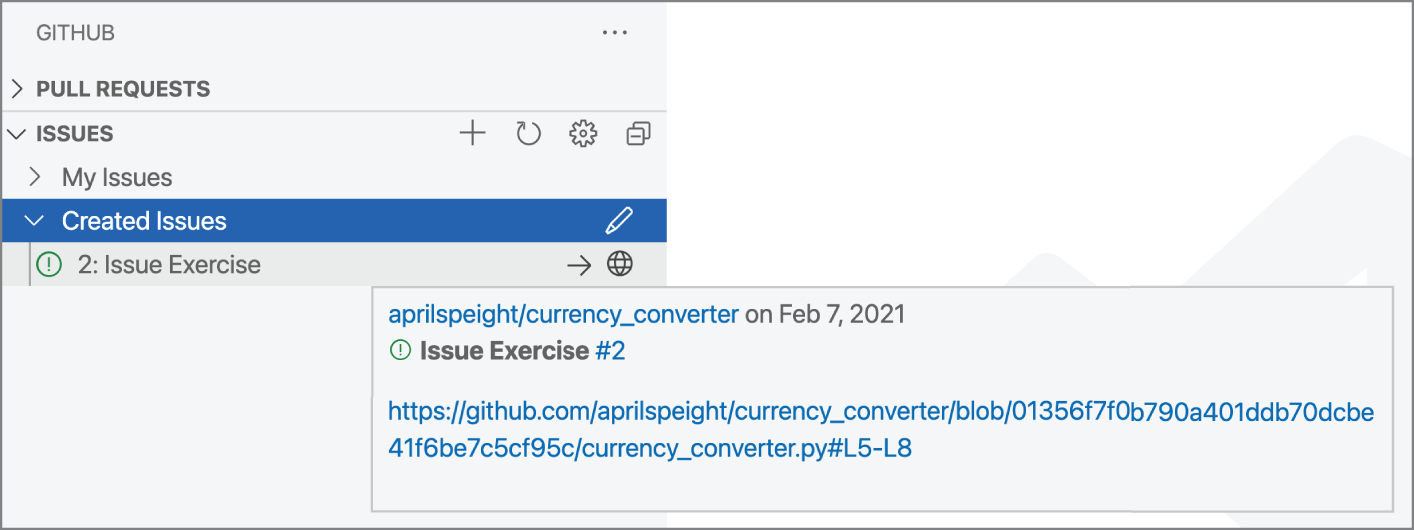
Figure 8.32: The issue details display when hovering over the issue in the Issues view.
To the right of the issue title are the actions Start Working on Issue and Checkout Issue Branch (see Figure 8.33, A) and Open Issue (see Figure 8.33, B), which open the issue in the browser.
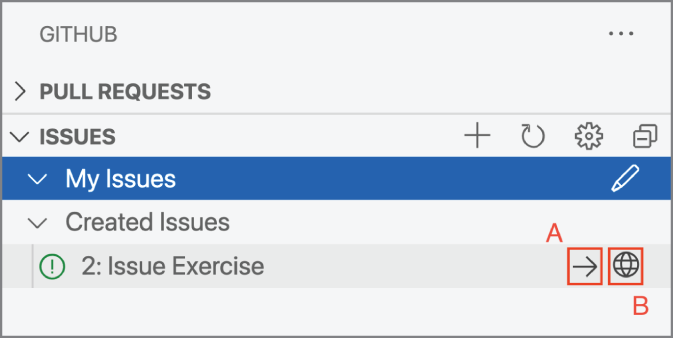
Figure 8.33: The issue has two commands: Start Working On Issue and Checkout Issue Branch And Open Issue.
Clicking the former action checks out the issue branch and replaces the action with Stop Working In Issue And Close Topic Branch. To stop working on the issue, select the action to close the branch. Closing the topic branch checks out the Master branch (see Figure 8.34).

Figure 8.34: The topic branch is checked out while working on the issue.
When ready, stage and commit the changes made for the issue. In the Source Control view, the commit message is populated as a fix for the issue (see Figure 8.35).
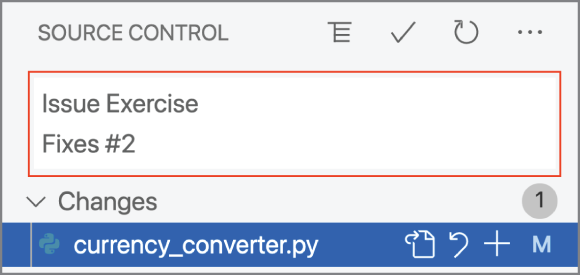
Figure 8.35: A commit message is autopopulated for the issue.
After the commit is complete, a check mark displays next to the issue in the GitHub view (see Figure 8.36).
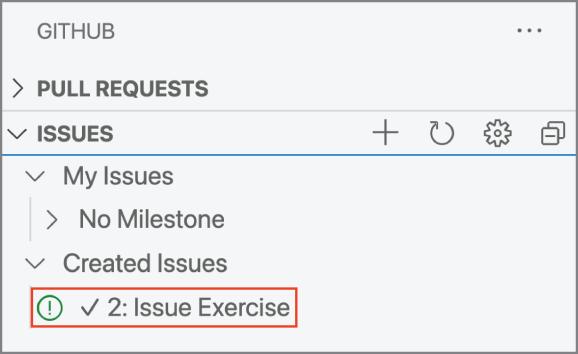
Figure 8.36: A check mark displays next to the issue once the commit is complete.
Before you can merge changes, you first need to create a pull request. Right-click the issue in the GitHub view and click Create A Pull Request. The option to create a pull request is available only when working on the issue. Therefore, ensure that you are on the topic branch.
Try It Out: Select the Issue Exercise issue to work on the issue. Make a change in the currency_converter.py file and save it. Next, stage and commit the change. Afterward, create a pull request and then merge the changes.
Permalinks provide another means for providing direct navigation to a line or lines of code within a file. When a permalink is selected, the browser opens the specific file on GitHub to the line numbers. The lines highlighted in the browser on GitHub reflect the cursor placement or lines selected in Visual Studio Code from when the permalink was created. The permalink is useful for sharing with others in issues, pull requests, email, etc.
To generate a permalink, in the Command Palette run the command GitHub Issues: Copy GitHub Permalink or GitHub Issues: Open Permalink In GitHub. The first command copies the permalink, whereas the second command opens a new browser window for the permalink.
Clone Repository
With Visual Studio Code's built-in repository clone features, you're not limited to working with repositories created locally. You can clone repositories that exist within your personal GitHub account or clone an existing public repository on GitHub. The clone features enable you to do the following:
- Clone a repository from your GitHub account
- Provide a link to a repository to clone
- Search for a repository on GitHub to clone
You can clone a repository in one of two places within the editor:
- Command Palette: Run the command Git: Clone
- Explorer view: Click Clone Repository. The Clone Repository button displays in the Explorer view only if no folder is opened.
- Welcome tab: Click Clone Repository under the Start section.
Regardless of how you invoke cloning, the workflow to clone is consistent. The editor first prompts you to provide the repository URL or pick a repository source. In this case, the repository source is GitHub. If you'd rather select a repository within your GitHub account or search GitHub for a repository, select Clone From GitHub (see Figure 8.37).

Figure 8.37: To clone a repository from GitHub, click Clone From GitHub when prompted.
Clicking Clone From GitHub first provides a list of the repositories that you own (see Figure 8.38).
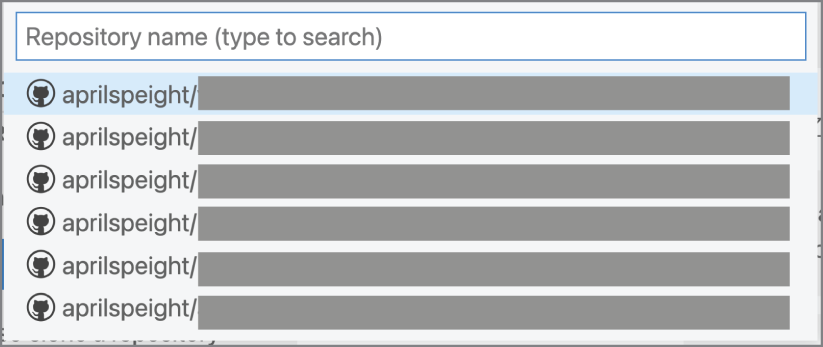
Figure 8.38: A list of repositories within the signed-in GitHub account
To search across all public repositories on GitHub, enter a search term into the prompt (see Figure 8.39).
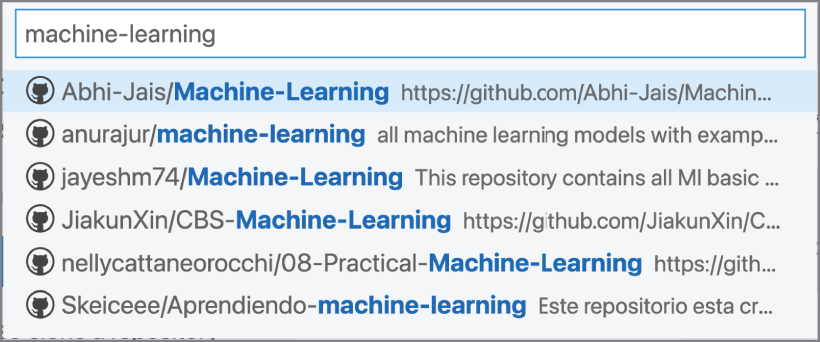
Figure 8.39: The search term machine-learning is used to find all public repositories that include the term machine-learning.
Once you've selected a repository to clone, the editor prompts you to select a location on your computer to save the cloned repository. After selecting a location, Visual Studio Code begins to clone the GitHub repository. When cloning is complete, Visual Studio Code sets up a remote URL to the repository. The editor also prompts you to open the cloned repository either in the current window or in a new window.
Try It Out: Clone the scikit-learn repository into Visual Studio Code.
- Open a new Visual Studio Code window.
- In the Explorer view, click Clone Repository.
- At the prompt, enter
github.com/scikit-learn/scikit-learnand click Clone From URL (see Figure 8.40).
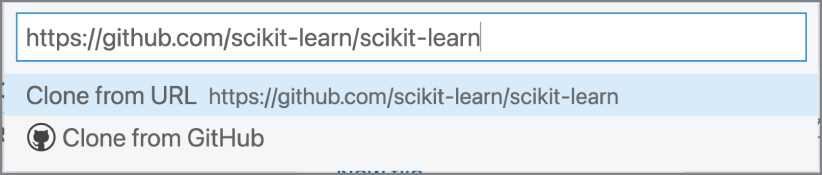
Figure 8.40: The URL for the Scikit-Learn repository is entered as the repository to clone.
- Select a location on your computer in which to create the cloned repository. A subfolder is created with the repository name within the selected folder.
- After cloning is complete, open the repository in the editor (see Figure 8.41).

Figure 8.41: Open the repository in the current window.
Timeline View
In the Explorer view is a Timeline view that lists all changes for any given file (see Figure 8.42). To view a list of changes, select a file in the explorer and expand the Timeline section. Each change is listed with the name of the respective pull request, the GitHub user who created the pull request, and how long ago the pull request was merged.
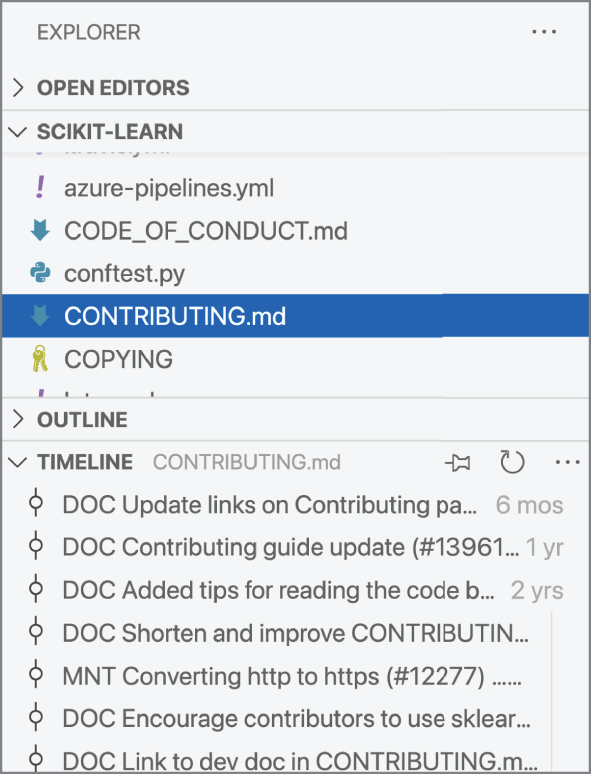
Figure 8.42: A list of changes for the CONTRIBUTING.md file displays in the Timeline view.
Hovering over the change in the list displays the following additional information:
- GitHub user and their email address
- Commit hash
- Date and time of the merge
- Pull request title and number
- Pull request description
Selecting a change from the list opens the change in the diff editor (see Figure 8.43).
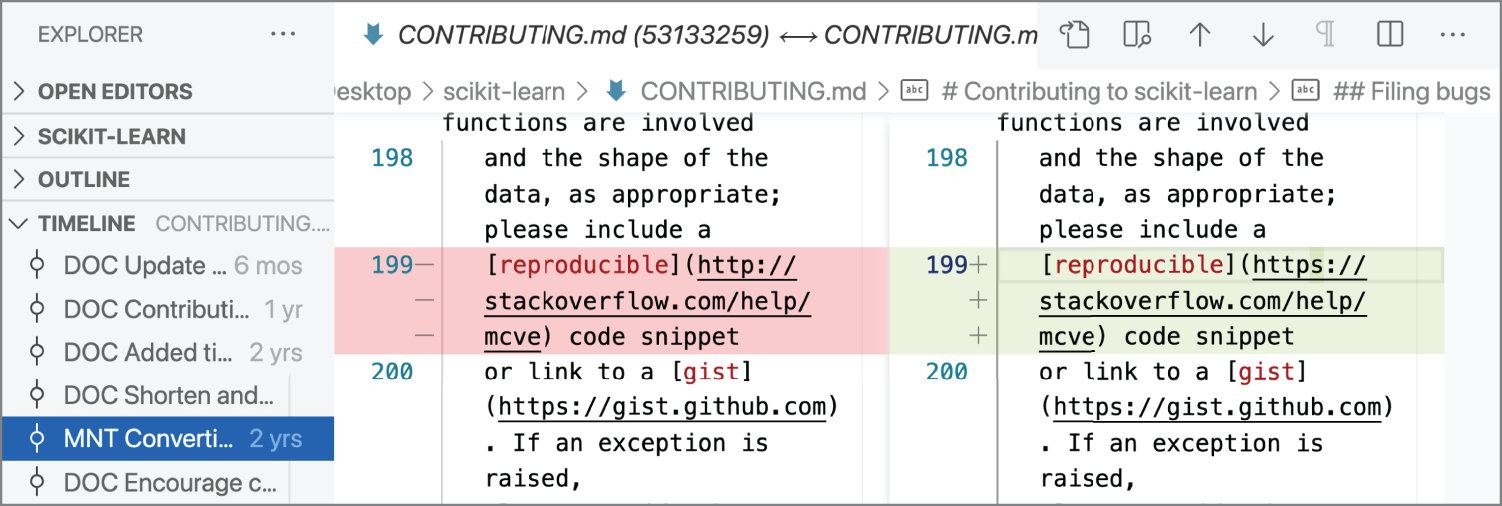
Figure 8.43: The changes for the selected change display in the diff editor.
Try It Out: In the Explorer view, select the CONTRIBUTING.md file and expand the Timeline section. Select the most recent change from the list to open the diff editor to view the changes.
Summary
In this chapter, you learned how to do the following:
- Sign in to GitHub to authorize Visual Studio Code to access your GitHub account and organizations.
- Create a public and private repository in Visual Studio Code and publish to GitHub.
- Push and synchronize changes to/from GitHub.
- Create and manage pull requests and issues within Visual Studio Code.
- Clone a repository on GitHub within Visual Studio Code.
- Use the Timeline view to view all changes for a given file.
You are now prepared to manage projects in Visual Studio Code with Git and GitHub.