
CHAPTER 9
Deploy a Django App to Azure App Service with the Azure App Service Extension
Django is a free open-source Python web framework for developing web apps. The framework encourages rapid development by providing the architecture to create database-connected web apps and thus enabling developers to focus more on writing the app. The framework's primary strength is how it manages data models and database connectivity. Each model maps to a single database table that can be leveraged to store data for your app. By default, the database configuration uses SQLite. However, Django also supports the following relational databases: PostgreSQL, MariaDB, MySQL, and Oracle.
In this project, you’ll learn how to create a Django project in Visual Studio Code and deploy to production with Azure App Service. To get started with Azure, refer to the appendix, “Getting Started with Azure.”
This project provides a high-level overview of how to set up a Django project in preparation for deploying the app to Azure. Sample code is provided in the Django-website folder to help expediate the app creation. For a detailed review of how to create and manage a Django project, visit djangoproject.com.
Getting Started
The project example in this chapter uses the Django framework to create a website that is deployed to Azure App Service (see Figure 9.1). The website template is provided by Start Bootstrap, a resource for free, open-source, MIT-licensed Bootstrap themes, templates, and code snippets. To learn more about Start Bootstrap, visit startbootstrap.com.
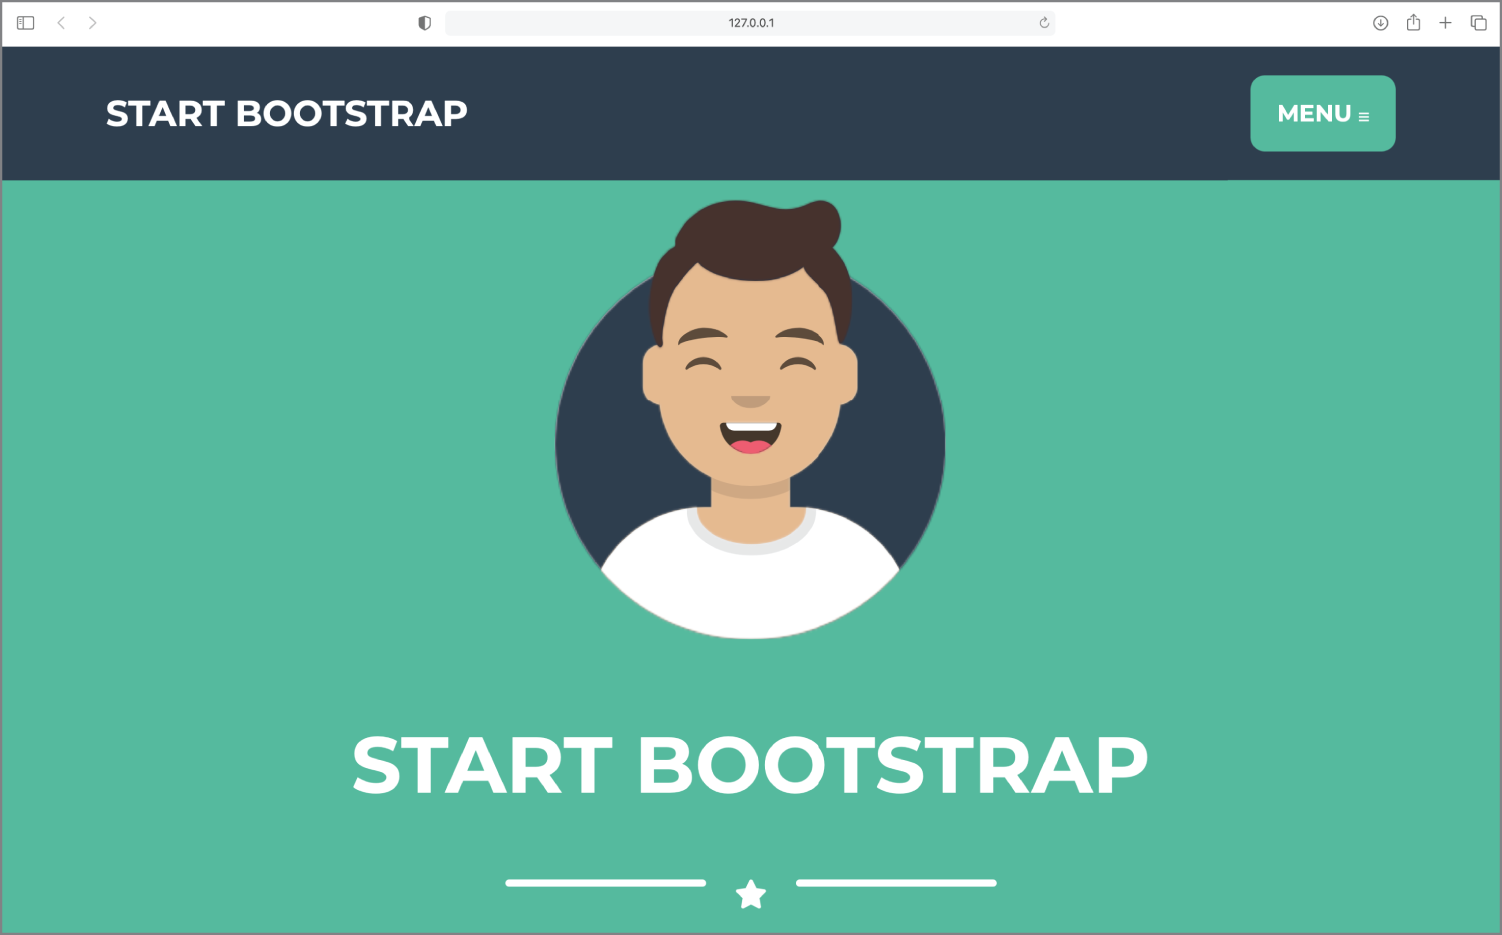
Figure 9.1: The website created in this project.
The files within the Django-website-complete folder are necessary for completing the exercises in this project. The files within the folder are used to create a multipage website that will be deployed to Azure from Visual Studio Code.
To get started, create a new folder called Django-website and open it in Visual Studio Code. After the folder is opened, create and activate a virtual environment.
Next, create a requirements.txt file in your project root that lists the following dependencies:
Django==3.1.5Whitenoise==5.2.0
Finally, run the command pip install -r requirements.txt to install the dependencies.
Creating a Django Project
A Django project is technically a Python package that contains all the settings for an instance of Django. This includes database configuration, Django-specific options, and application-specific settings. The code that establishes a Django project is generated by running the following command:
django-admin startproject mysite
After startproject is run, the following files are created:
mysite/manage.pymysite/__init__.pysettings.pyurls.pyasgi.pywsgi.py
A description of each file is provided here:
mysite/—The parentmysite/root directory is a container for your project.manage.py—This is a command-line utility that lets you interact with the project in various ways. You run commands by usingpython manage.py <command>.mysite/—The childmysite/directory is the actual Python package for your Django project. Its directory name is the Python package name you'll need to use to import anything inside it.__init__.py—This is an empty file that tells Python that this directory contains a Python package.settings.py—This contains the settings/configuration for the project.urls.py—This contains the URL declarations for the project; it's a “table of contents” of the site.asgi.py—This is an entry point for ASGI-compatible web servers to serve your project.wsgi.py—This is an entry point for WSGI-compatible web servers to serve your project.
Try It Out: Create a new Django project. Run the following command in the integrated terminal:
django-admin startproject mysite
You can view the site created within the project by running the Django development server. The Django development server is a lightweight web server included with Django so that you can develop things rapidly, without having to deal with configuring a production server. To view the site, first use cd to navigate into the mysite folder and run the runserver command.
cd mysitepython manage.py runserver
Once run, the following output appears in the terminal:
Performing system checks…System check identified no issues (0 silenced).You have unapplied migrations; your app may not work properly until they are applied.Run 'python manage.py migrate' to apply them.January 07, 2021 - 15:50:53Django version 3.1, using settings 'mysite.settings'Starting development server at http://127.0.0.1:8000/Quit the server with CONTROL-C.
The output includes an HTTP address, which you can visit in the browser to view your site. In the integrated terminal, Cmd+click/Ctrl+click the address to open the browser and navigate to the site. A successful Django installation and valid project reflects a “Congratulations!” page with a rocket taking off (see Figure 9.2).
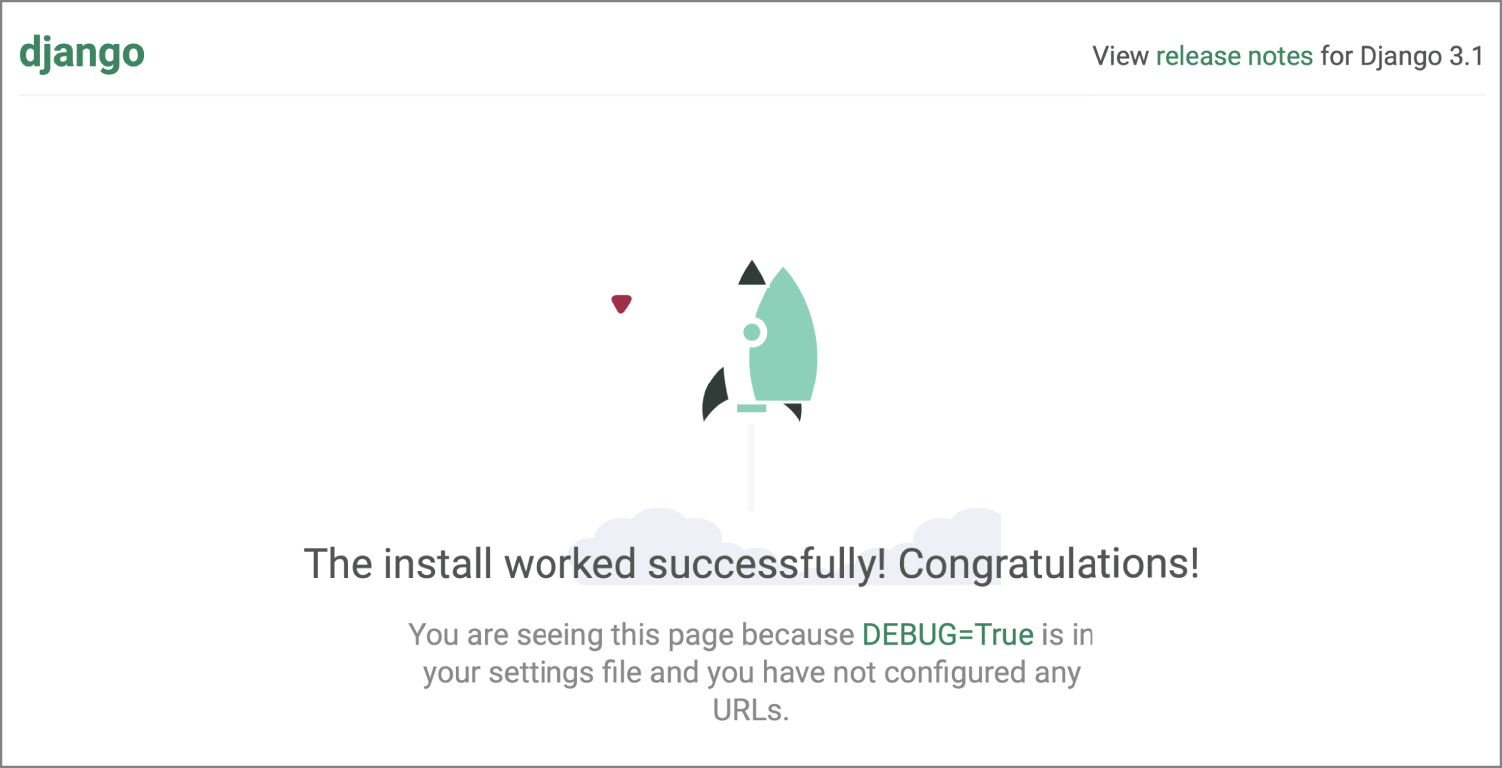
Figure 9.2: The “Congratulations!” page displays in the browser, which indicates the Django installation was successful and the project is valid.
The integrated terminal also shows the server log.
After viewing the site, close the browser and press Ctrl+C in the editor to quit the server.
Try It Out: Start the Django development server to view the site in the browser.
- In the integrated terminal, use the command
cdto change into the innermysite/directory. - Run the following command to start the development server:
python manage.py runserver - Click the HTTP address that appears in the output to view the site in the browser.
- After viewing the site, close the browser. In Visual Studio Code, press Ctrl+C to quit the server.
Creating an App
The Django project itself is a collection of configurations. In addition, the project contains apps created within the project. An app is a web application that does something (e.g., a website or a database of records). A Django project can consist of multiple apps. The benefit in creating multiple apps is that you can better organize your code and also reuse apps in multiple projects. To create an app, run the following command within the preferred directory:
python manage.py startapp <app-name>
When an app is created, Django automatically generates a directory structure of an app. An example of the directory structure is provided here:
<app-name>/migrations/__init__.pyadmin.pyapps.pymodels.pytests.pyviews.py
A description of each file is provided here:
<app-name>/—The root directory for the appmigrations/—Where Django stores migrations, which describe changes to your database__init__.py—An empty file that tells Python that this directory contains a Python packageadmin.py—Where you register your app's models with the Django admin applicationapps.py—A configuration file common to all Django apps__init__.py—Tells Python that the app is a packagemodels.py—The module containing the models for your apptests.py—Contains test procedures that run when testing the appviews.py—The module containing the views for your app
Try It Out: Create an app demosite within the same directory as the manage.py file.
After an app is created, it must be added to the project's settings.py file. The settings.py file is in the mysite/mysite folder. Within settings.py, add the app to the list of INSTALLED_APPS. The INSTALLED_APPS list consists of all apps that are enabled in the Django project. Each string within the list should be a dotted Python path to one of the following:
- An application configuration class (preferred)
- A package containing an application
The string itself consists of an application name and label. The application name is the dotted Python path to the application package. The label is the final part of the name. Both the application name and label must be unique.
Try It Out: In the editor, navigate to mysite/mysite and open the project's settings.py file. Add 'demosite' to the INSTALLED_APPS list.
INSTALLED_APPS = []'django.contrib.admin','django.contrib.auth','django.contrib.contenttypes','django.contrib.sessions','django.contrib.messages','django.contrib.staticfiles','demosite',]
The next step is to configure a database. As mentioned, by default the configuration uses SQLite. Given its lightweight nature, opting to use SQLite in production is dependent on the app. With regard to concurrency, only one thread or process can make changes to a SQLite database at a time. Thus, all other concurrent processes are forced to wait until the currently running process has finished. This is not ideal if there are multiple users sending data to a database. Furthermore, the db.sqlite3 file becomes a source file in your repository. The database deploys as a source file and overwrites the production db.sqlite3 file. Thus, information stored through the live web app is erased. In most cases, the general rule of thumb is to only use SQLite for development and testing. However, for the purpose of completing the project in this chapter, the SQLite configuration will suffice.
The final step is to create a migration. A migration is helpful for working with databases. The Django Project documentation refers to migrations as a version control system for your database schema. To create a migration, run the following command:
python manage.py migrate
Try It Out: Create a migration for the project.
Creating a Home Page
Django uses templates to dynamically generate the HTML needed for your web app's user interface. HTML templates separate the HTML from code. Django has a built-in back end for its template system referred to as the Django template language. The template itself is a text document or a Python string marked up using the Django template language. The template contains the static parts of the HTML output as well as syntax describing how dynamic content is inserted.
Django looks for templates inside a templates subdirectory within each item of the INSTALLED_APPS list. To create a template for your app, add a new templates directory into the app directory followed by a directory for the app. Inside the app directory, create an HTML file named index.html. The index.html file is where you'll place the HTML.
Try It Out: Create a templates directory that stores the index.html file.
- Inside the
demositedirectory, create atemplatessubdirectory followed by a nesteddemositedirectory.demosite/migrations/templates/demosite/__init__.pyadmin.pyapps.pymodels.pytests.pyviews.py - Create a new file
index.htmlinside the nesteddemositedirectory. The file structure should reflect the following:demosite/migrations/templates/demosite/index.html__init__.pyadmin.pyapps.pymodels.pytests.pyviews.py - Inside the
index.htmldirectory, add the basic structure for an HTML document and include a title and body for the web page. If you create the structure manually, IntelliSense is available to autocomplete as you type.<!DOCTYPE html><html><head><title>Hello World</title></head><body>Welcome to my website.</body></html>
In Django, web pages and other content are delivered by views. A view is a web page in your Django application. Views for a website may include a home page, about page, and a contact page. Each view is represented by a Python function that Django chooses by examining the URL that's requested. The function returns a response for the HTML file passed into the function call.
The function itself is stored in the views.py file within the demosite folder. To create a function, add the following to views.py
:
from django.shortcuts import renderdef <function name>(request):return render(request, '<app-name>/<file-name>.html')
Try It Out: Add a function for index.html into the views.py file.
from django.shortcuts import renderdef index(request):return render(request, 'demosite/index.html')
There are no limitations for URL naming conventions for your app. The URL for each web page is listed in the urls.py file within the mysite/mysite folder. The urlpatterns list within urls.py contains the list of URLs. The syntax for a listing is as such:
path('<url-path>/', views.home)
Ensure that you import views from the app's directory so that you can access the function for the respective view.
Try It Out: Navigate to mysite/mysite and open the urls.py file. Add an import statement for views followed by an item to urlpatterns for the index view.
from django.contrib import adminfrom django.urls import pathfrom demosite import viewsurlpatterns = [path('admin/', admin.site.urls),path('', views.index),]
Run the command python manage.py runserver to view the home page in the browser.
Creating Website Pages
It's likely that when you create a website, your website needs to serve additional static files such as images, JavaScript, or CSS. Static files are stored in a static folder within the root directory of the Django project, which is in turn referred to in the project's settings.py file in the variables STATIC_URL and STATICFILE_DIRS. When in development, static files are served when you run the command python manage.py runserver.
However, Django does not serve static files automatically when in a production environment. For simplicity, this project uses WhiteNoise to serve static files in production. WhiteNoise allows your Python web app to serve its own static files, making it a self-contained unit that can be deployed anywhere. To learn more about WhiteNoise, visit whitenoise.evans.io/en/stable/. An alternative for serving static files in production is Azure Blob Storage. Azure Blob Storage provides storage and delivers your static files to users over HTTP. To learn more about Azure Blob Storage, visit azure.microsoft.com/services/storage/blobs
/.
There are a few additional modifications that need to be done in the project files before you can render a web page that includes the static files. For convenience, the static files and the completed version of each Django project file are included in the Django-website-complete folder. To learn more about configuring static files for a Django app, visit docs.djangoproject.com/en/3.1/howto/static-files
/.
Try It Out: Add static files to the subdirectory mysite and run the server to view the website.
- Create a new static folder within
mysite.mysite/demosite/mysite/static/db.sqlite3manage.py - Copy the
assets,css, andjsfolders withinDjango-website-completeinto the static folder. - Inside the
demositefolder, navigate totemplates/demositeand openindex.html. Replace the code withinindex.htmlwith the code that's in the corresponding file inDjango-website-complete. - Run the server to view the website. Once you are done, close the browser and stop the server. See Figure 9.3.

Figure 9.3: The browser reflects the website that includes the static files to render the CSS and JavaScript files.
Azure App Service requires additional configuration to serve static files. The following modifications must be made to the settings.py file:
Add an import statement for os.
import os
Add the following to the ALLOWED_HOSTS list:
ALLOWED_HOSTS = [os.environ['WEBSITE_HOSTNAME']] if 'WEBSITE_HOSTNAME' in os.environ else []
Add the following to the INSTALLED_APPS list:
'whitenoise.runserver_nostatic'
Add the following to the MIDDLEWARE list:
'whitenoise.middleware.WhiteNoiseMiddleware'
Add the following at the end of the file:
STATIC_ROOT = os.environ.get("mysite", "./static/")STATICFILES_DIRS = [os.path.join(BASE_DIR, 'static')]STATICFILES_STORAGE = ('whitenoise.storage.CompressedManifestStaticFilesStorage')
Try It Out: Navigate to mysite/mysite and open the settings.py file. Make the modifications for serving static files with Azure App Service.
Azure App Service uses the Gunicorn web server by default. During startup, the app service on Linux container looks for your app object or a wsgi.py folder. Azure App Service then runs Gunicorn using the following command:
# <module> is the name of the folder that contains wsgi.pygunicorn --bind=0.0.0.0 --timeout 600 <module>.wsgi
If your app does not contain a wsgi.py file, you must create a custom startup file in the root directory of the project. The startup file can use whatever name you choose, such as startup.sh, startup.cmd, startup.txt, etc. The file itself contains the Django startup commands.
For more information on configuring a Linux Python app for Azure App Service, refer to docs.microsoft.com/azure/app-service/configure-language-python.
Deploying to Azure
Now that the website renders locally in the browser, the next step is to deploy the Python app to Azure. Deployment functionality is available within Visual Studio Code using the Azure App Service extension. For this project, the Django website project is deployed to Azure App Service on Linux.
Azure App Service is an HTTP-based service for hosting web applications, REST APIs, and mobile back ends. A web app in Azure App Service parlance is the process that hosts your web app code and various languages including Python. With Azure App Service, you're able to use DevOps capabilities, package management, staging environments, custom domain, and TLS/SSL certificates. To learn more about Azure App Service, visit docs.microsoft.com/azure/app-service/overview.
Once installed, the Azure App Service extension is accessed via the Azure logo in the Activity Bar. All Azure extensions installed appear in the Azure view and are separated by sections. Thus, you can find all installed Azure extensions in a single view.
The extension itself syncs with your Azure account by signing into Azure. To sign in to Azure, select the Azure view and select Sign In To Azure (see Figure 9.4). The browser opens and prompts you to enter the credentials for your Azure account. Upon successful sign-in, you can close the browser and return to Visual Studio Code. The signed-in account displays in the Status Bar.
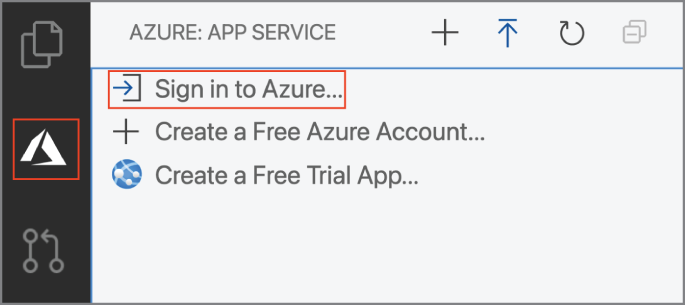
Figure 9.4: The Azure view is accessed by clicking the Azure logo in the Status Bar. To sign in to Azure, click Sign In To Azure.
Try It Out: Sign in to Azure.
- In the Extension Marketplace, search for and install the Azure App Service extension.
- In the Azure view, click Sign In To Azure.
- In the browser, enter your Azure credentials.
- Close the browser and return to Visual Studio Code.
- Check the Status Bar to confirm that you are signed in to Azure.
There are four commands available within the Azure view for Azure: App Service.
- Create New Web App (see Figure 9.5, A)—Creates a new web app resource
- Deploy To Web App (see Figure 9.5, B)—Deploys the web app to Azure
- Refresh (see Figure 9.5, C)—Refreshes the web app resource in Visual Studio Code to sync with changes made in the Azure portal
- Collapse All (see Figure 9.5, D)—Collapses all folders within Azure: App Service
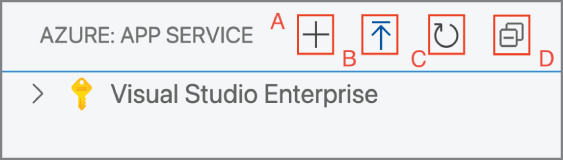
Figure 9.5: The commands in the Azure: App Service view
Additional commands are available within the Command Palette and are prepended with Azure App Service. Below the commands in the Azure view are headings for each of your Azure subscriptions. Within each subscription heading are your existing Web App resources.
The Web App service requires a requirements.txt file in your project root that lists your dependencies for your service. Azure App Service installs the dependencies automatically.
Before you begin the deployment workflow, an Azure App Service web app must be created for the project. Either select the Create New Web App command in the Azure view or run the command Azure App Service: Create New Web App in the Command Palette.
For the first prompt, enter a globally unique name for your app (see Figure 9.6). The name must be unique across all Azure customers. Consider using a combination of company/personal name + app name + any other identifier.
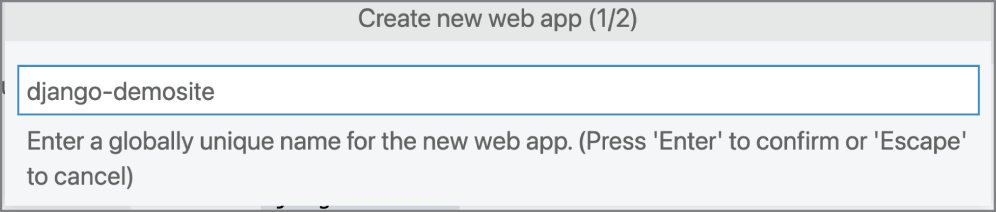
Figure 9.6: Enter a globally unique name for your app.
For the second prompt, select Python 3.7 as the runtime (see Figure 9.7).
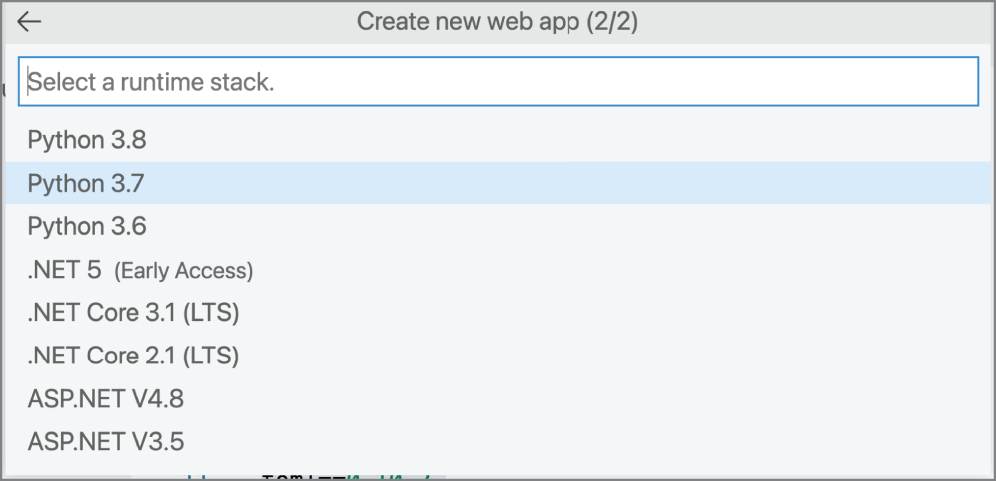
Figure 9.7: Select Python 3.7 as the runtime.
You can follow the status of creating the web app in the bottom of the editor (the process takes a few minutes). After the new web app is created, the extension prompts you to either deploy to Azure or view the output. Before deploying to Azure, confirm that app service is running properly. You can view the website for the app by clicking the link to the site in the Output panel (see Figure 9.8).
Alternatively, you can access the website by expanding your subscription in the Azure view within Azure: App Service, right-clicking the app service name, and clicking Browse Website or Cmd+clicking/Ctrl+clicking the URL in the output.
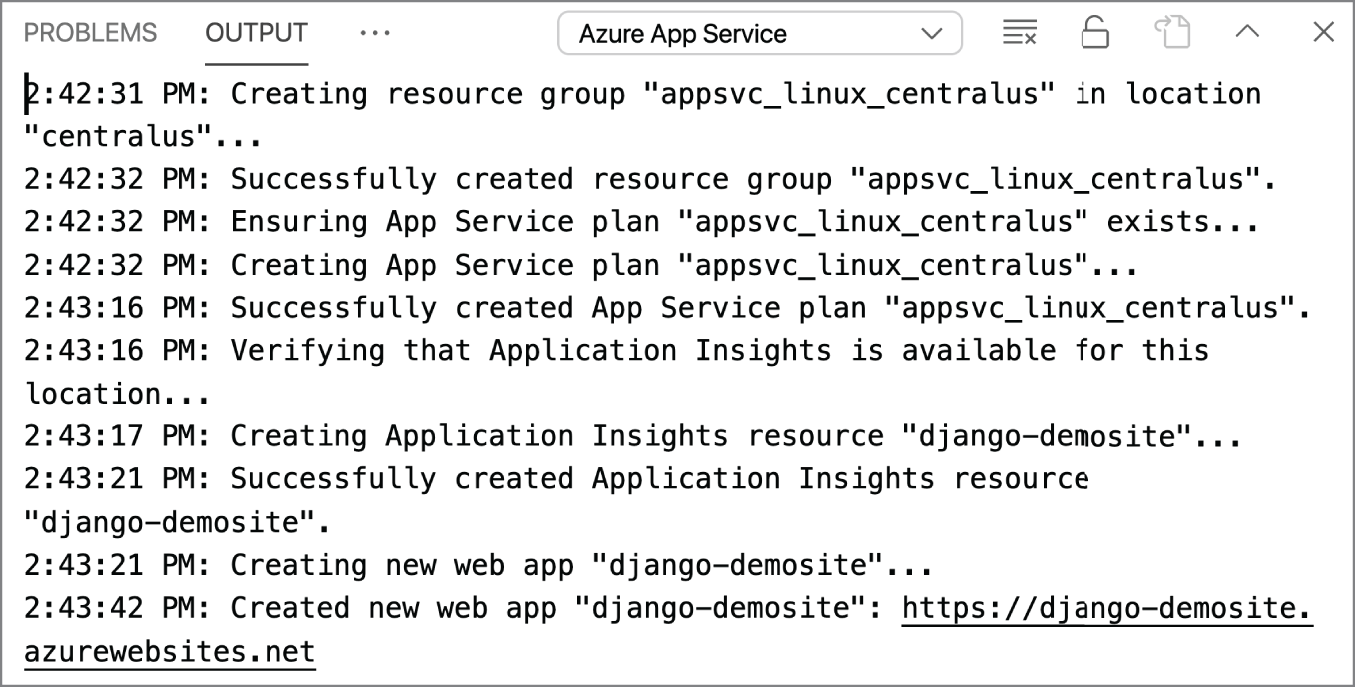
Figure 9.8: The output for creating the new web app
If creation is successful, the default app appears in the browser (it might take a few moments for the web app to start the first time). The default app appears since your project code has not yet been deployed to Azure App Service (see Figure 9.9).
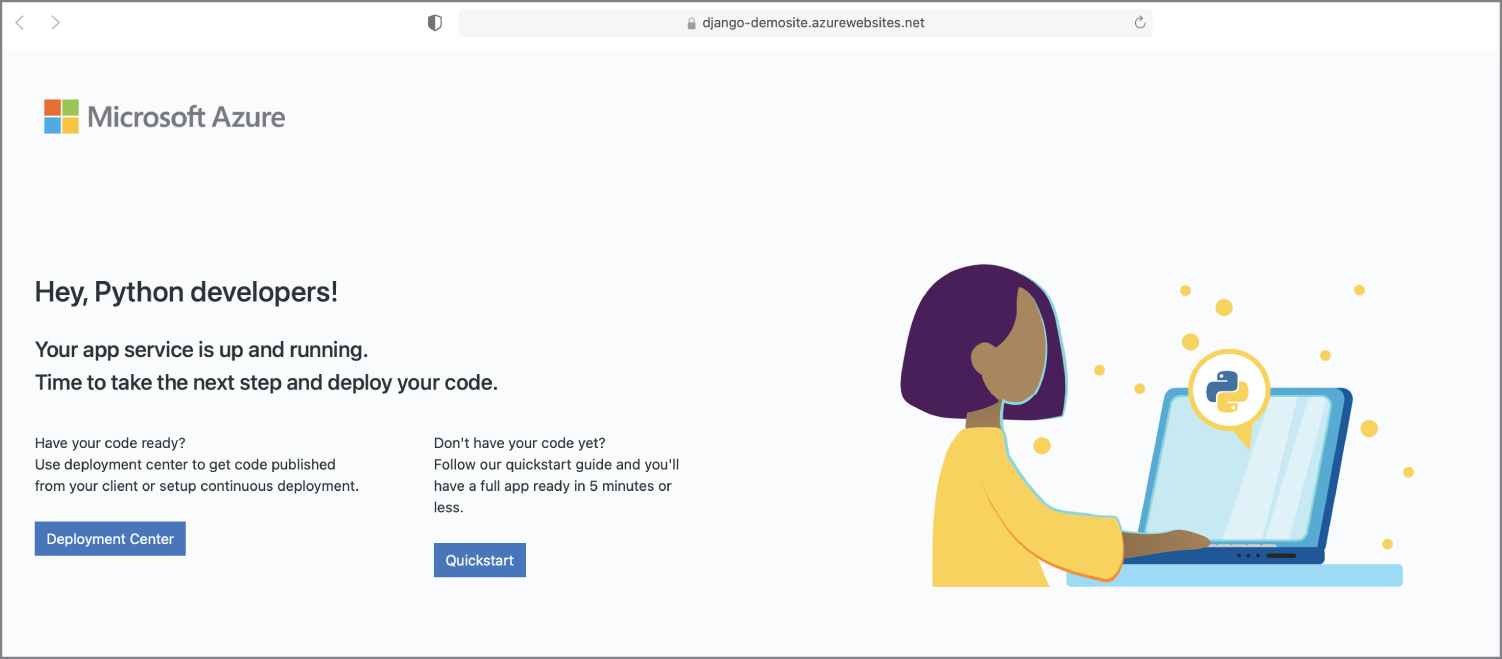
Figure 9.9: The default app appears in the browser after the successful creation of a web app.
Try It Out: Create a new web app and confirm that creation was successful by viewing the default app in the browser.
After a web app is created, you are ready to deploy your app to an Azure App service. There are three ways to start the deployment workflow:
- Command Palette: Run the command Azure App Service: Deploy to Web App.
- Azure view: Click the Deploy To Web App command.
- Azure view: Right-click the app service name and select Deploy To Web App.
For prompts in the deployment workflow, provide the following details:
- Select the folder to deploy: Select your current app folder (see Figure 9.10).

Figure 9.10: Select the current app folder to deploy.
- Select Web App: Select the app service (see Figure 9.11).
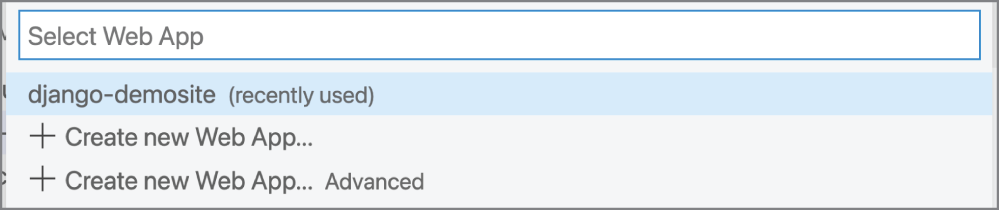
Figure 9.11: Select the app service previously created.
- Update your build configuration: Yes.
- Overwrite the existing deployment: Deploy (see Figure 9.12).
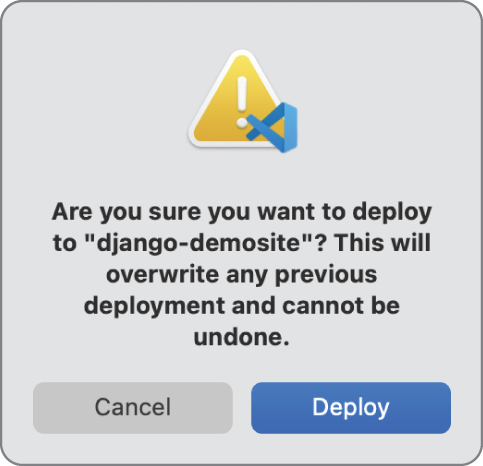
Figure 9.12: Select Deploy to overwrite any previous deployment.
- Always deploy the workspace: Yes (see Figure 9.13).
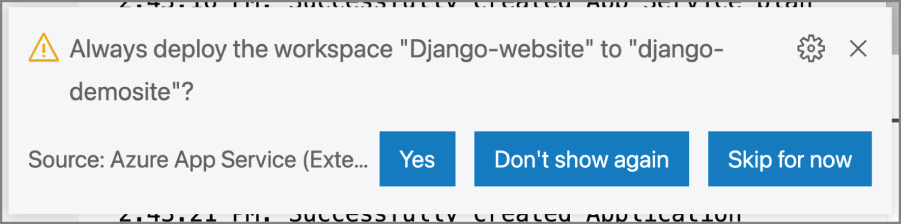
Figure 9.13: Select Yes to always deploy the workspace Django-website to django-demosite.
Once the deployment process starts, you can view the progress in the Output panel. Deployment may take a few minutes to complete and is dependent on the number of dependencies that need to be installed. After deployment is complete, Visual Studio Code provides a notification to confirm. Before you navigate to the site, the startup command must be configured in the app service within the Azure Portal.
In the Azure view, right-click the app and click Open In Portal. In the App Service resource, navigate to Settings ➪ Configuration ➪ General Settings. Enter the following in the Startup Command field and save:
# <module> is the name of the folder that contains wsgi.pygunicorn --bind=0.0.0.0 --timeout 600 <module>.wsgi
If the wsgi.py file is within a subfolder, use the --chdir command to specify the parent folder.
# examplegunicorn --bind=0.0.0.0 --timeout 600 --chdir mysite mysite.wsgi
On the Overview tab of the App Service resource, select the URL to view the website. See Figure 9.14.
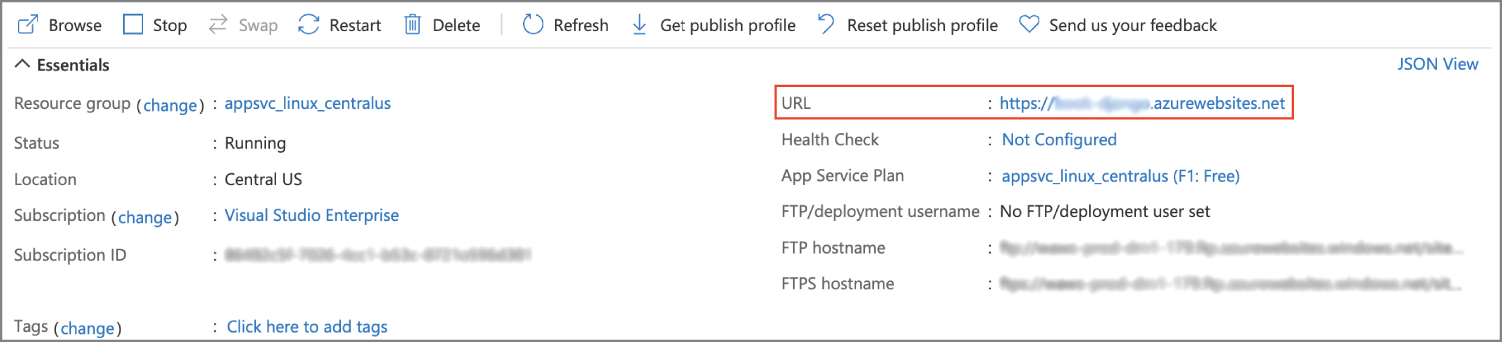
Figure 9.14: Select the URL link to view the website.
You can verify that your files have deployed by first expanding the app service in the Azure view for Azure: App Service and then expanding Files (see Figure 9.15).
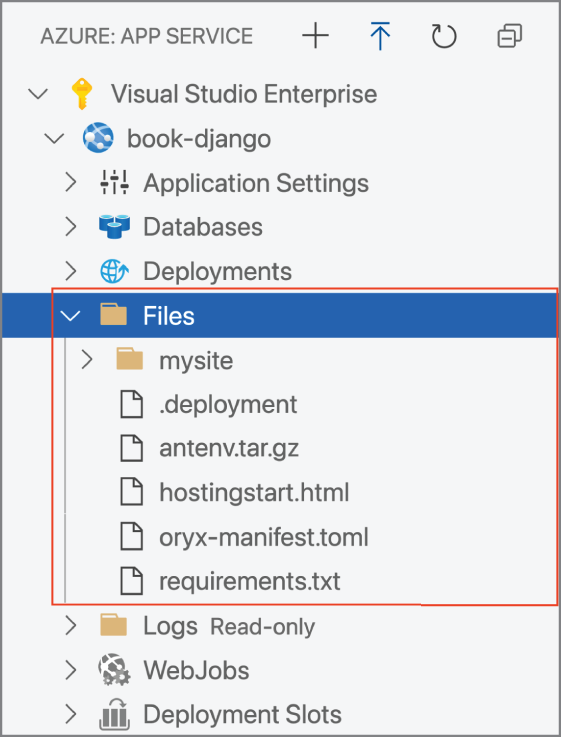
Figure 9.15: The Files directory includes the deployment files.
Try It Out: Deploy the web app to Azure.
If you need to update the website content, make your updates in the editor and then repeat the deploy workflow.
Now that the web app is deployed, you can stream logs directly in Visual Studio Code. To do so, right-click the app service in the Azure view within Azure: App Service and click Start Streaming Logs (see Figure 9.16).
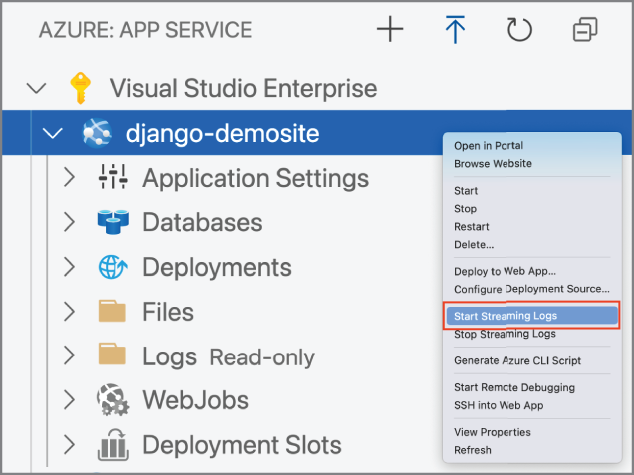
Figure 9.16: Right-click the app service and click Start Streaming Logs to stream logs to the Output panel in the editor.
Logging must be enabled before you can stream logs. If the editor prompts to enable file logging and restart the web app, click Yes. After the app restarts, click the Start Streaming Logs command again.
The Output panel first displays Start Live Log Stream followed by the log output. You can refresh the web app in the browser to generate more log information. To stop streaming logs, right-click the app in Azure: App Service and select Start Streaming Logs.
Try It Out: Stream logs for the web app in Visual Studio Code.
Summary
In this chapter, you learned how to do the following:
- Create a Django project.
- Create an app with a Django project.
- Dynamically generate HTML with templates.
- Create web pages (e.g., views) in a Django project.
- Serve static files with WhiteNoise.
- Configure a Django project for Azure App Service to serve static files.
- Create a web app and deploy a Django project to Azure App Service.
- Stream logs for the web app in Visual Studio Code.
You are now prepared to create and deploy Django projects in Visual Studio Code.