Chapter 4. Finding Subdomains
In order to scope out and test API endpoints, we should first be familiar with the domain structure a web application uses.
Infrequently in today’s world will a single domain be used to serve a web application in it’s entirety.
More often than not, web applications will be split into at minimum client and server domains—plus the well known “https://www” versus just “https://”.
Being able to iteratively find and record subdomains powering a web application is a useful first recon technique against that web application.
Multiple Applications Per Domain
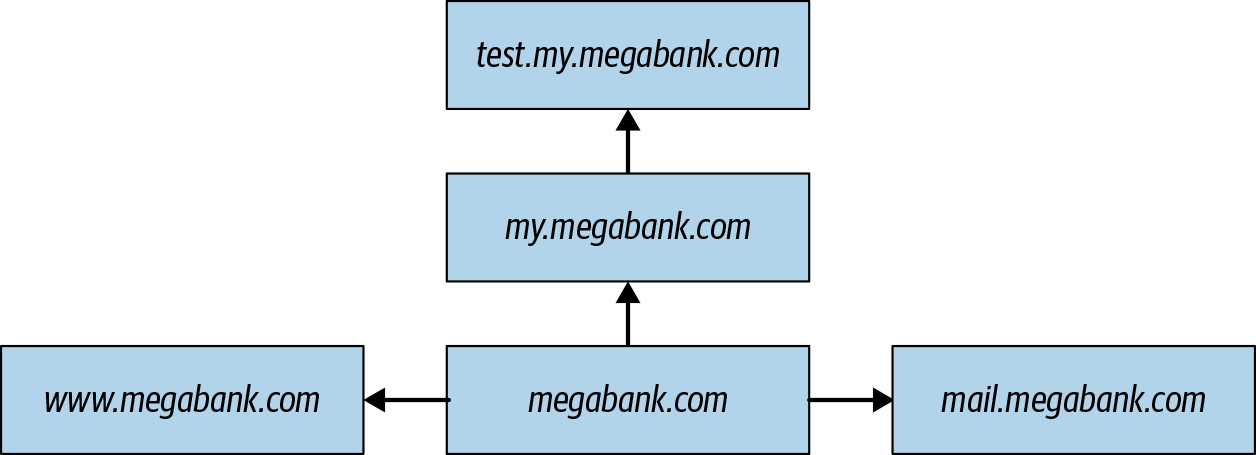
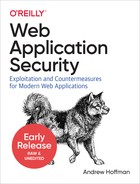
Figure 4-1. A simple subdomain web—often these webs are significantly more complex, and may contain servers not accessible from an external network.
Let’s assume we are trying to map MegaBank’s web applications, in order to better perform a black-box penetration test that was sponsored by said bank.
We know that MegaBank has an app that users can log into and access their bank accounts. This app is located at https://www.mega-bank.com.
We are particularly curious if MegaBank has any other internet-accessible servers linked to the mega-bank.com domain name. We know MegaBank has a bug bounty program, and the scope of that program covers the main mega-bank.com domain quite comprehensively. As a result of this, any easy to find vulnerabilities in mega-bank.com have already been fixed or reported. If new ones pop-up, we will be competing against the clock to find them before the bug bounty hunters do.
Because of this, we would like to look for some easier targets that still allow us to hit MegaBank where it hurts. This is a purely ethical corporate-sponsored test, but that doesn’t mean we can’t have any fun.
The first thing we should do, is perform some recon and fill our web application map up with a list of subdomains attached to megabank.com. Because www points to the publicly facing web application itself, we probably don’t have any interest in that. But most large consumer companies actually host a variety of subdomains attached to their primary domain. These subdomains are used for hosting a variety of services from email, to admin applications, file servers, and more.
There are many ways to find this data, and often you will have to try several to get the results you are looking for. We will start with the most simple methods and work our way up.
The Browser’s Built-In Network Analysis Tools

Figure 4-2. Wikipedia.org—Browser Developer tools network tab showing a async HTTP request made to Wikipedia’s API. The developer tools can be used to view, modify, resend and record network requests like this. These freely available network analysis tools are much more powerful than many paid network tools ten years ago.
Initially, we can gather some useful data simply by walking through the visible functionality in MegaBank and seeing what API requests are made in the background. This will often grant us a few low-hanging fruit endpoints.
In order to view these requests as they are being made, we can use our own web browser’s network tools or a more powerful tool like Burp, PortSwigger or ZAP.
Because this book is written excluding specialized tools, we will rely solely on the browser for now.
As long as you are using one of the three major browsers (Chrome, FireFox, Edge) you should find that the tools included with them for developers are extremely powerful.
In fact, browser developer tools have come so far you can easily become a proficient hacker without having to purchase any third party tools. Modern browsers provide tooling for network analysis, code analysis, run-time analysis of JavaScript with breakpoints and file references, accurate performance measurement (which can also be used as a hacking tool in side-channel attacks), as well as tools for performing minor security and compatibility audits.
In order to analyze the network traffic going through your browser, do the following (Chrome):
-
Click the triple dots on the top right of the navigation bar to open the settings menu
-
Under “more tools” click “developer tools”
-
At the top of this menu, click the tab “Network”. If it is not visible, expand the developer tools horizontally until it is.
Now try navigating across pages in any given website while the network tab of the developer tools is open. You should note that new HTTP requests pop up, alongside a number of other requests.
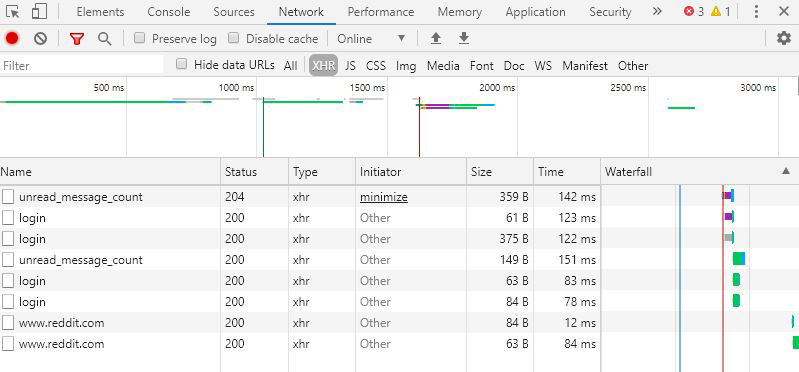
Figure 4-3. Network Tab—Used for analyzing network traffic that flows to and from your web browser.
You can use this tab in the browser to see all of the network traffic the browser is handling. As a result, with a larger site it can become quite intimidating to filter through.
Often the most interesting results come from the “XHR” tab which will show you any HTTP POST/GET/PUT/DELETE etc. requests made against a server and filter out fonts, images, videos, and dependency files.
From the network tab with the “XHR” filter selected, you can click any individual request in the left-hand pane to view more details.
Clicking one of these requests will bring up the raw and formatted versions of the request, including any request headers and body. In the “preview” tab that appears when a request is selected you will be able to see a pretty-formatted version of the result of any API request.
The response tab will show you a raw response payload, and the timing tab will show you very particular metrics on the queuing, downloading and waiting times associated with a request. These performance metrics are actually very important as they can be used to find side-channel attacks (an attack that relies on a secondary metric other than response to gauge what code is running on a server. for example load time between two scripts on a server that are both called via the same endpoint).
By now you should have enough familiarity with the browser network tab to start poking around and making use of it for recon. The tooling is intimidating, but they aren’t actually that hard to learn.
As you navigate through any website, you can check the request → headers → general → request URL to see what domain a request was sent to or a response was sent from. Often times this is all you need to find affiliated servers to a primary website.
Taking Advantage of Public Records
Today the amount of publicly available information stored on the web is so huge that an accidental data leak can slip through the cracks without notice for years.
A good hacker can take advantage of this fact, and find many interesting tidbits of information that could lead to an easy attack down the line.
Some data that I’ve found on the web while performing penetration tests in the past includes:
-
Cached copies of GitHub repos that where accidentally turned public before being turned private again
-
SSH Keys
-
Various keys for services like Amazon AWS or Stripe that were exposed periodically and then removed from a public-facing web application
-
DNS listings and URLs that had not been intended for a public audience
-
Pages detailing unreleased products that where not intended to be live
-
Financial records hosted on the web but not intended to be crawled by a search engine
-
Email Addresses, Phone Numbers, and Usernames
This information can be found in many places, for example:
-
Search Engines
-
Social Media Posts
-
Archiving applications like archive.org
-
Image searches and reverse image searches
When attempting to find subdomains, public records can also be a good source of information because subdomains may not be easily found via a dictionary, but could have been indexed in one of the services listed above.
Search Engine Caches
Figure 4-4. Google.com—a search that combines the Google search operators site: and --inurl:<pattern>. By combining these two operators we can ask Google to return us only wikipedia.org webpages which are about puppies while leaving out any that contain the word “dog” in their URL. This technique can be used to reduce the number of search results returned, and to search specific subdomains while ignoring specific keywords. Mastery of Google’s search operators and operators in other search engines will allow you to find information not easily discovered otherwise.
Google is the most used search engine in the world, and is often thought to have indexed more data than any other search engine.
By itself, a Google search would not be useful for manual recon due to the huge amount of data you would have to sift through in order to find anything useful. This is furthered by the fact the Google has cracked down on automated requests and rejects requests that do not closely mimic that of a true web browser.
Fortunately, Google offers special search operators for power searchers that allow you to increase the specificity of your search query.
We can use the operator site:<my-site to ask Google to only query against a specific domain.
site:mega-bank.com log in
Doing this against a popular site will usually return pages upon pages of content from the main domain, and very little content from the interesting subdomains. You will need to improve the focus of your search further to start uncovering any interesting stuff.
The minus operator can be used to add specific negative conditions to any query string. For example: -inurl:<pattern> will reject any URLs that match the pattern supplied.
We can use this operator to remove results for the subdomains we are already familiar with, like www. Do note it will also filter out instances of www from other parts of a URL, as it does not specify the subdomain but the whole url string instead. This means https://admin.mega-bank.com/www would be filtered as well which means there could be false positive removals.
site:mega-bank.com -inurl:www
You can try this against many sites, and you will find subdomains you didn’t even think existed. For example, let’s try it against the popular news site Reddit:
site:reddit.com -inurl:www
The first result from this query will be code.reddit.com—an archive of code used in the early versions of Reddit that the staff decided to make available to the public.
Websites like Reddit purposefully expose these domains to the public.
For our pen test against MegaBank, if we find additional domains that are purposefully exposed and not of interest to us we will simply filter them out as well. If MegaBank had a mobile version hosted under the subdomain mobile.mega-bank.com we could easily filter that out as well:
site:mega-bank.com -inurl:www -inurl:mobile
When attempting to find subdomains for a given site, you can repeat this process until you find no more relevant results. It may also be beneficial to try these techniques against other search engines like Bing—the large search engines all support similar operators.
At that time, record anything interesting you have been able to find via this technique and than move on to other subdomain recon methods.
Accidental Archives
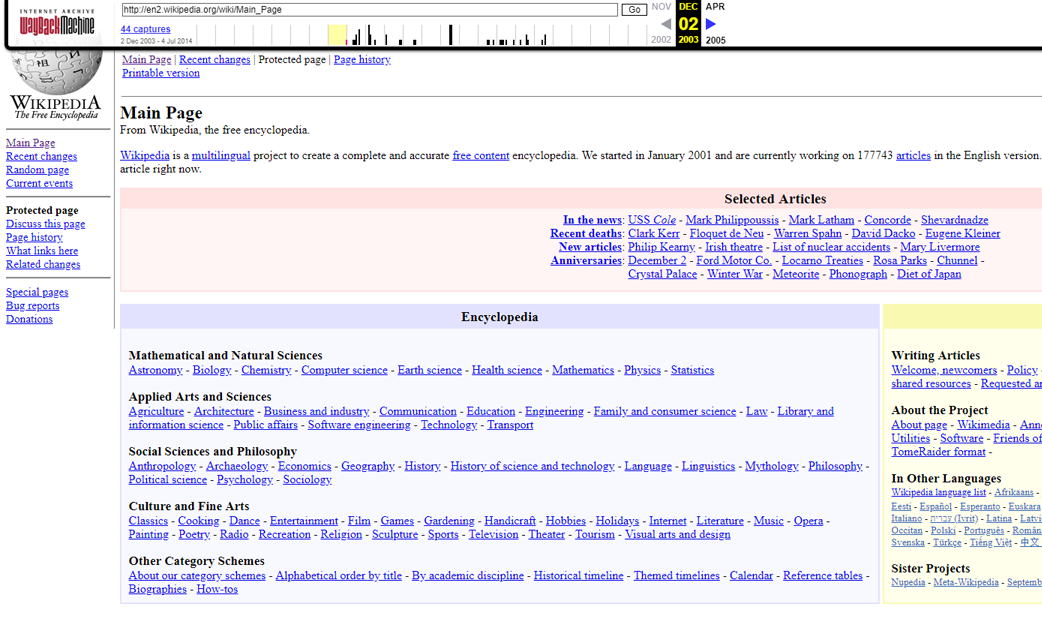
Figure 4-5. archive.org—a San Francisco based non-profit that has been around since 1996. Archive.org strives to preserve the history of the internet, as many sites die and new sites take their domains. Because Archive.org stores historical snapshots of websites, sometimes dating back 20 years—the website is a goldmine for finding information that was once disclosed (purposefully or accidentally) but was than removed. This particular screenshot is the home page of Wikipedia.org, indexed in 2003—nearly two decades ago!
Public archiving utilities like archive.org are useful because they build snapshots of websites periodically and allow you to visit a copy of a website in the past.
Generally speaking, search engines will index more data regarding a website but will try to crawl said website periodically to keep their cache up to date.
This means that for relevant current data you should look in a search engine, but for relevant historical data you might be better off looking at a website archive.
The New York times is one of the most popular web-based media companies by traffic. If we look up their main website in archive.org (https://www.nytimes.com/) we will find that archive.org has saved over 200,000 snapshots of the front-page between 1996 and today.
Historical snapshots are particularly valuable if we know or can guess a point in time when a web application shipped a major release, or had a serious security vulnerability disclosed.
When looking for subdomains, historical archives often disclose these via hyperlinks that where once exposed through the HTML or JS but no longer are visible in the live app.
If we right click on an archive.org snapshot in our browser, and “inspect source” we can do a quick search for common url patterns. A search for file:// might pull up a previously live download, while a search for https:// or http:// should bring up all of the HTTP hyperlinks.
We can automate the discovery of subdomains from an archive with a simple steps.
-
Open 10 archives from 10 seperate dates with significant time inbetween
-
Right click → view source → ctrl + a to highlight all HTML
-
Press ctrl + c to copy the HTML to your clip board
-
Create a file on your desktop “legacy-source.html”
-
Press ctrl + v to paste the source code from an archive into the file
-
Repeat this for each of the 9 other archives you opened
-
Open this file in your favorite text-editor (VIM, Atom, VSCode, etc.)
-
Perform searches for the most common URL schemes:
-
http://
-
https://
-
file://
-
ftp://
-
ftps://
-
Depending on your usecase, you can find a full list of browser supported URL schemes in the official specification document: https://www.iana.org/assignments/uri-schemes/uri-schemes.xhtml
Social Snapshots
Every major social media website today makes their money off of the sale of user data—which depending on the platform can include public posts, private posts, and even direct messages in some cases.
Unfortunately today’s major social media companies go to great efforts to convince their users that a user’s most private data is secure. This is often done through marketing messages which entail the great lengths the customer’s data has undertaken in order to remain out of reach. However, this is often only in order to assist in onboarding and maintaining active users. Very few countries have laws and lawmakers modernized enough to enforce the legitimacy of any of these claims.
It is likely that many users of these sites do not fully understand what data regarding them is being shared, by what methods it is being shared and for what goals this data is being consumed.
Finding subdomains for a company sponsored pen test via social media data would not be found unethical by most. However, I implore you to consider the end user when you use these API’s in the future for more targeted recon.
For the sake of simplicity, we will take a look at the Twitter API as recon example. Keep in mind however that every major social media company offers a similar suite of API’s typically following a similar API structure. The concepts required to query and search through tweet data from the Twitter API can be applied to any other major social media network.
Twitter API
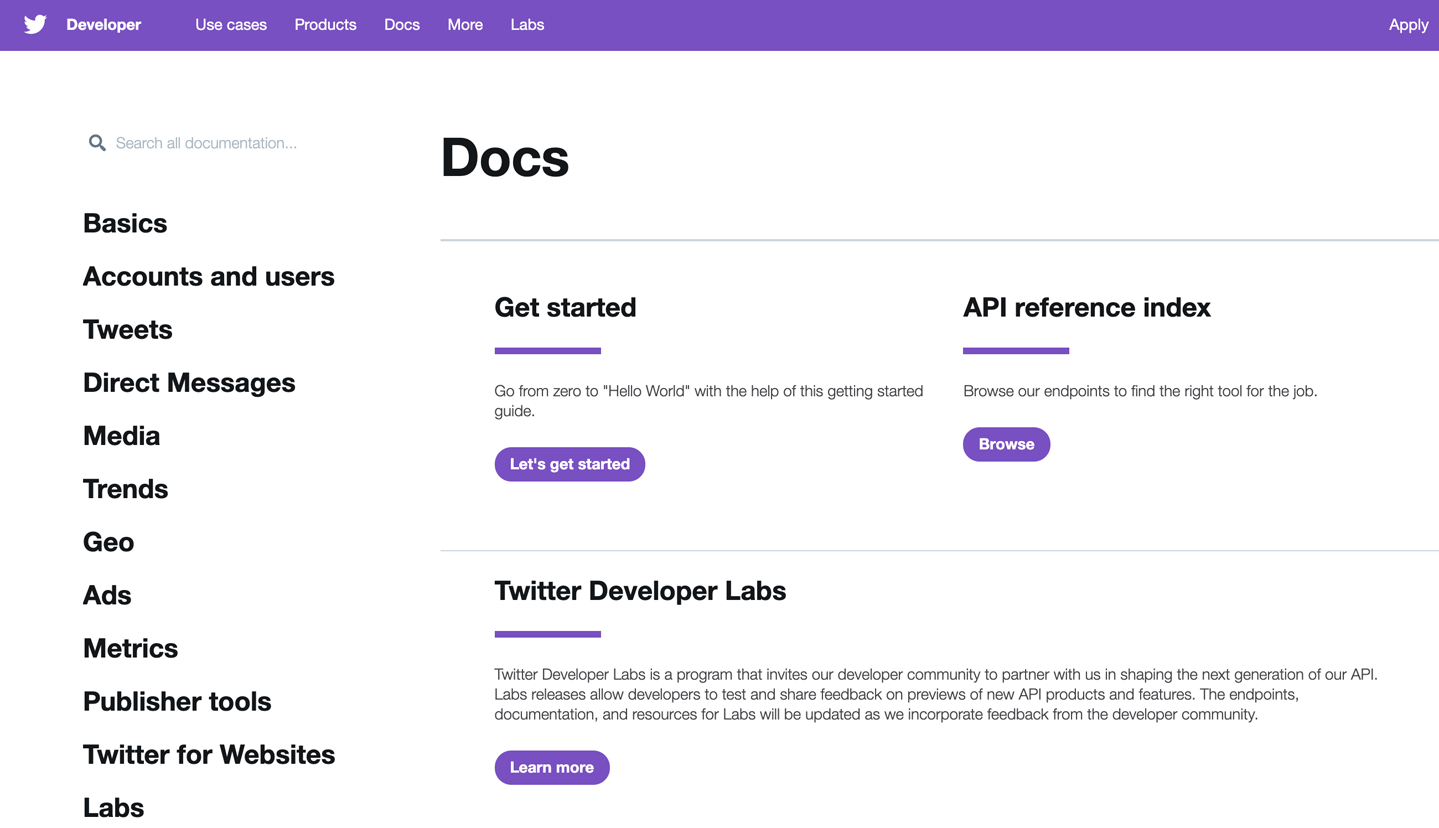
Figure 4-6. Twitter API—Twitter’s developer docs will quickstart your ability to search and filter through user data. In some cases, searches can even be performed against Twitter’s servers instead of locally. Do keep in mind that doing this for malicious purposes is probably against Twitter’s ToS, so this useage should be restricted to white-hat only.
Twitter has a number of offerings for searching and filtering through their data. These offerings differ in scope, feature set, and data set. This means the more data you want access to, and the more ways you wish to request and filter that data the more you will have to pay.
At the very bottom tier, Twitter offers a trial “search API” which allows you to sift through 30 days worth of tweets provided you request no more than 100 tweets per query and query no more than 30 times per minute. With the free tier API, your total monthly queries are also capped at 250. It will take about 10 minutes worth of queries to acquire the maximum monthly dataset offered at this tier. This means you can only analyze 25,000 tweets without paying for a more advanced membership tier.
These limitations can make coding tools to analyze the API a bit difficult, and if you require Twitter for recon in a work sponsored project you may want to consider upgrading or looking at other data sources.
We can use this API to build a JSON that contains links to *.mega-bank.com in order to further our subdomain recon.
In order to begin querying against the Twitter search API you will need the following:
-
A registered developer account
-
A registered app
-
A bearer token to include in your requests in order to authenticate yourself
Querying this API is quite simple, although the documentation is scattered and at times hard to understand due to lack of examples.
curl --request POST--url https://api.twitter.com/1.1/tweets/search/30day/Prod.json--header'authorization: Bearer <MY_TOKEN>'--header'content-type: application/json'--data'{"maxResults": "100","keyword": "mega-bank.com"}'
By default this API performs fuzzy searching against keywords. For exact matches, you must ensure the transmitted string itself is enclosed in double quotes. Double quotes can be sent over valid JSON in the form: `"keyword": ""mega-bank.com"".
Recording the results of this API and searching for links may lead to the discovery of previously unknown subdomains. These typically come from marketing campaigns, ad trackers, and even hiring events that are tied to a different server than the main app.
For a real life example, try to construct a query that would request tweets regarding Microsoft. After sifting through enough tweets, you will note that Microsoft has a number of subdomains they actively promote on Twitter including:
-
careers.microsoft.com (a job posting site)
-
office.microsoft.com (the home of Microsoft Office)
-
powerbi.microsoft.com (the home of the PowerBI product)
-
support.microsoft.com (Microsoft customer support)
Do note that if a tweet becomes popular enough, major search engines will begin indexing it. That means, analyzing the Twitter API will be more relevant if you are looking for less popular tweets. Highly popular viral tweets will be indexed by search engines due to the amount of inbound links. This means sometimes it would be more effective to simply query against a search engine using the correct operators as discussed previously in this chapter.
Should the results of this API not be sufficient for your recon project, Twitter also offers two other API’s: “streaming” and “firehose.”
Twitter’s “streaming API” provides a live stream of current tweets to analyze in real time, however this API only offers a very small percentage of the actual live tweets as volume is too large to process and send to a developer in real time. This means at any given time you could be missing more than 99% of the tweets. If an app you are researching is trending, or massively popular this API could be beneficial. If you are doing recon for a startup, this API won’t be of much use to you.
Twitter’s “firehose” operates similarly to the streaming API, but guarantees deliver of 100% of the tweets matching a criteria you provide. This is typically much more valuable than the streaming API for recon as we prefer relevancy over quantity in most situations.
To conclude, when using Twitter as a recon tool—follow these rules:
-
For most web applications, querying the “search API” will give you the most relevant data for recon.
-
Large scale apps, or apps that are trending may have useful information to be found in the firehose or streaming API’s.
-
If historical information is acceptable for your situation, considering downloading a large historical data dump of tweets and querying locally against those instead.
Remember, almost all major social media sites offer data API’s which can be used for recon or other forms of analysis. If one doesn’t give you the results you are looking for, another may.
Zone Transfer Attacks
Walking through a public facing web app and analyzing network requests will only get you so far. We also want to find the subdomains attached to MegaBank that are not linked to the public web app in anyway.
A “Zone Transfer Attack” is a kind of recon trick that works against improperly configured domain name system (DNS) servers. It’s not really a “hack” although though it’s name would imply it is. Instead it’s just a information gathering technique that takes little effort to use, and can give us some valuable information if it is successful.
DNS servers are responsible for translating human-readable domain names (e.g. https://mega-bank.com) to machine-readable IP addresses (e.g. 195.250.100.195) which are hierarchical and stored using a common pattern so that they can be easily requested and traversed.
DNS servers are valuable because they allow the IP address of a server to change, without having to update the users of an application on that server. In other words, a user can continually visit https://www.mega-bank.com without worrying about which server the request will resolve to.
The DNS system is very dependent on it’s ability to synchronize DNS record updates with other DNS servers. DNS zone transfers are a standardized way that DNS servers can share DNS records. Records are shared in a text based format known as a “zone file”.
Zone files often contain DNS configuration data that is not intended to be easily accessible. As a result, a properly configured DNS “master” server should only be able to resolve zone transfer requests that are requested by another authorized DNS “slave” server.
If a DNS server is not properly configured to only resolve requests for other specifically defined DNS servers, it will be vulnerable to bad actors.
At it’s core, a DNS zone transfer attack is a specially formatted request on behalf of an individual that is designed to look like a valid DNS zone transfer request from a valid DNS server.
To summarize, if we wish to attempt a zone transfer attack against a MegaBank we need to pretend we ourselves are a DNS server and request a DNS zone file as if we needed it in order to update our own records.
In order to perform a zone transfer attack against MegaBank, we need to first find the DNS servers associated with https://www.mega-bank.com. We can do this very easily in any unix-based system from the terminal.
host -t mega-bank.com
The command “host” refers to a DNS lookup utility that you can find in most Linux distros as well as in recent versions of Mac OS. The -t flag specifies we want to request the nameservers that are responsible for resolving mega-bank.com.
The output from this command would look something like this:
mega-bank.com name server ns1.bankhost.com
mega-bank.com name server ns2.bankhost.com
The strings we are interested in from this result are ns1.bankhost.com and ns2.bankhost.com. These refer to the two nameservers that resolve for mega-bank.com.
Attempting to make a zone transfer request with host is very simple, and only should take one line:
host -l mega-bank.com ns1.bankhost.com
Here the -l flag suggested we wish to get a zone transfer file for mega-bank.com from ns1.bankhost.com in order to update our records.
If the request is successful, indicating a improperly secured DNS server you would see a result like this:
Using domain server:
Name: ns1.bankhost.com
Address: 195.11.100.25
Aliases:

mega-bank.com has address 195.250.100.195
mega-bank.com name server ns1.bankhost.com
mega-bank.com name server ns2.bankhost.com
mail.mega-bank.com has address 82.31.105.140
admin.mega-bank.com has address 32.45.105.144
internal.mega-bank.com has address 25.44.105.144
From these results, you now have a list of other web applications hosted under the mega-bank.com domain, as well as their public IP addresses!
You could even try navigating to those subdomains or IP addresses to see what resolves. With a little bit of luck you have greatly broadened your attack surface!
Unfortunately, DNS zone transfer attacks don’t always go as planned like in the example above. A properly configured server will give a different output when you request a zone transfer:
Using domain server:
Name: ns1.secure-bank.com
Address: 141.122.34.45
Aliases:

: Transfer Failed.
The zone transfer attack is easy to stop, and you will find that many applications are properly configured to reject these attempts. However, because attempting a zone transfer attack only takes a few lines of bash it is almost always worth trying. If it succeeds, you get to write down a number of interesting subdomains to look at that you may not have found otherwise.
Brute Forcing Subdomains
As a final measure in discovering subdomains, brute force tactics can be used. These can be effective against web applications with few security mechanisms in place, but against more established and secure web applications we will find that our brute force must be structured very intelligently.
Brute forcing subdomains should be our last resort as brute force attempts as they are easily logged and often extremely time consuming due to rate limitations, regex and other simple security mechanisms developed to prevent against such types of snooping.
Warning
Brute force attacks are very easy to detect and could result in your IP addresses being logged or banned by the server or it’s admin.
Brute forcing implies testing every possible combination until we find a match. With subdomains, there can be many possible matches so stopping at the first match may not be sufficient.
First, let’s stop to consider that unlike a local brute force—a brute force of subdomains against a target domain required network connectivity. Because we must perform this brute force remotely, our attempts will be further slowed due to network latency. Generally speaking, you can expect anywhere between 50 and 250ms latency per network request.
This means we should make our requests asynchronous, and fire them all off as rapidly as possible rather than waiting for the prior response. Doing this will dramatically reduce the time required for our brute force to complete.
The feedback loop required for detecting a live subdomain is quite simple. Our brute force algorithm generates a subdomain, and we fire off a request to <subdomain-guess>.mega-bank.com. If we receive a response, we mark it as a live subdomain. Otherwise, we mark it as a un-used subdomain.
Because the book you are reading is titled “Web Application Security”, the most important language for us to be familiar with for this context is JavaScript. JavaScript is the sole programming language currently availible for client side scripting in the web browser, but also an extremely powerful back-end server side language thanks to NodeJS and the open-source community.
Let’s build up a brute force algorithm in two steps using JavaScript. Our script should do the following:
-
Generate a list of potential subdomains
-
Run through that list of subdomains, pinging each time to detect if a subdomain is live
-
Record the live subdomains and do nothing with the un-used subdomains
We can generate subdomains using
/** A simple function for brute forcing a list of subdomains* given a maximum length of each subdomain.*/constgenerateSubdomains=function(length){/** A list of characters from which to generate subdomains.** This can be altered to include less common characters* like '-'.** Chinese, Arabic and Latin characters are also* supported by some browsers.*/constcharset='abcdefghijklmnopqrstuvwxyz'.split('');letsubdomains=charset;letsubdomain;letletter;lettemp;/** Time Complexity: o(n*m)* n = length of string* m = number of valid characters*/for(leti=1;i<length;i++){temp=[];for(letk=0;k<subdomains.length;k++){subdomain=subdomains[k];for(letm=0;m<charset.length;m++){letter=charset[m];temp.push(subdomain+letter);}}subdomains=temp}returnsubdomains;}constsubdomains=generateSubdomains(4);
This script will generate you every possible combination of characters length n where the list of characters to assemble subdomains from is charset.
The algorithm works by splitting the charset string into an array of characters, than assigning the initial set of characters to that array of characters.
Next, we iterate for duration length creating a temporary storage array at each iteration. After this, we iterate for each subdomain, and each character in the charset array that specifies our available character set. Finally we build up the temp array using combinations of existing subdomains and letters.
Now using this list of subdomains, we can begin querying against a top level domain (TLD—aka .com, .org., .net, etc.) like mega-bank.com.
In order to do so, we will write a short script that take’s advantage of the DNS library provided within NodeJS—a popular JavaScript runtime.
In order to run this script, you will just need a modern version of node installed on your environment (provided it is a Unix-based environment like Linux or Ubuntu).
constdns=require('dns');constpromises=[];/** This list can be filled with the previous bruteforce* script, or use a dictionary of common subdomains.*/constsubdomains=[];/** Iterate through each subdomain, and perform an asynchronous* DNS query against each subdomain.** This is much more performant than the more common `dns.lookup()`* because `dns.lookup()` appears asynchronous from the JavaScript,* but relies on the operating system's getaddrinfo(3) which is* implemented synchronously.*/subdomains.forEach((subdomain)=>{promises.push(newPromise((resolve,reject)=>{dns.resolve(`${subdomain}.mega-bank.com`,function(err,ip){returnresolve({subdomain:subdomain,ip:ip});});}));});// after all of the DNS queries have completed, log the resultsPromise.all(promises).then(function(results){results.forEach((result)=>{if(!!result.ip){console.log(result);}});});
In this script, we do several things to improve the clarity and performance of the brute forcing code.
First important the Node DNS library, and than we create an array “promises” which will store a a list of promise objects. Promises are a much more simple way of dealing with asynchronous requests in JavaScript, and are supported natively in every major web browser and NodeJS.
After this, we create another array “subdomains” which should be populated with the subdomains we generated from our first script (we will combine the two scripts together at the end of this section).
Next, we use the forEach() operator to easily iterate through each subdomain in the subdomains array. This is equivalent to a for iteration, but syntactically more elegant.
At each level in the subdomain iteration we push a new promise object to the promises array. In this promise object, we make a call to “dns.resolve” which is a function in Node’s DNS library that attempts to resolve a domain name to an IP address.
These promises we push to the promise array only resolve once the DNS library has finished it’s network request.
Finally, the Promise.all block takes an array of Promise objects and results (calls .then()) only when every promise in the array has been resolved (completed it’s network request).
The double !! operator in the result specifies we only want results that come back defined, so we should ignore attempts that return no IP address.
If we included a condition that called reject() we would also need a catch() block at the end to handle errors. The DNS library throws a number of errors, some of whom may not be worth interrupting our brute-force for. As a result, this was left out for simplicitie’s sake but would be a good exercise if you intend to take this example further.
Additionally, we are using dns.resolve versus dns.lookup because although the JavaScript implementation of both resolve asynchronously (regardless of the order they where fired), the native implementation that dns.lookup relies on is built on libuv which performs the operations synchronously.
We can combine the two scripts into one program very easily, first we generate our list of potential subdomains and than we perform our asynchronous brute force attempt at resolving subdomains:
constdns=require('dns');/** A simple function for brute forcing a list of subdomains* given a maximum length of each subdomain.*/constgenerateSubdomains=function(length){/** A list of characters from which to generate subdomains.** This can be altered to include less common characters* like '-'.** Chinese, Arabic and Latin characters are also* supported by some browsers.*/constcharset='abcdefghijklmnopqrstuvwxyz'.split('');letsubdomains=charset;letsubdomain;letletter;lettemp;/** Time Complexity: o(n*m)* n = length of string* m = number of valid characters*/for(leti=1;i<length;i++){temp=[];for(letk=0;k<subdomains.length;k++){subdomain=subdomains[k];for(letm=0;m<charset.length;m++){letter=charset[m];temp.push(subdomain+letter);}}subdomains=temp}returnsubdomains;}constsubdomains=generateSubdomains(4);constpromises=[];/** Iterate through each subdomain, and perform an asynchronous* DNS query against each subdomain.** This is much more performant than the more common `dns.lookup()`* because `dns.lookup()` appears asynchronous from the JavaScript,* but relies on the operating system's getaddrinfo(3) which is* implemented synchronously.*/subdomains.forEach((subdomain)=>{promises.push(newPromise((resolve,reject)=>{dns.resolve(`${subdomain}.mega-bank.com`,function(err,ip){returnresolve({subdomain:subdomain,ip:ip});});}));});// after all of the DNS queries have completed, log the resultsPromise.all(promises).then(function(results){results.forEach((result)=>{if(!!result.ip){console.log(result);}});});
After a short period of waiting, we will see list of valid subdomains in the terminal to view:
{subdomain:'mail',ip:'12.32.244.156'},{subdomain:'admin',ip:'123.42.12.222'},{subdomain:'dev',ip:'12.21.240.117'},{subdomain:'test',ip:'14.34.27.119'},{subdomain:'www',ip:'12.14.220.224'},{subdomain:'shop',ip:'128.127.244.11'},{subdomain:'ftp',ip:'12.31.222.212'},{subdomain:'forum',ip:'14.15.78.136'}
Dictionary Attacks
Rather than attempting every possible subdomain, we can speed up the process further by utilizing a “dictionary attack” instead of a “brute force attack”.
Much like a brute force attack, a dictionary attack iterates through a wide array of potential subdomains but instead of randomly generating them they are pulled from a list of the most common subdomains.
Dictionary attacks are much faster, and will usually find you something of interest. Only the most peculiar and non-standard subdomains will be hidden from a dictionary attack.
A popular open source DNS scanner called dnscan ships with a list of the most popular subdomains on the internet, based off of millions of subdomains from over 86,000 DNS zone records.
According to the subdomain scan data from dnscan, the top 25 most common subdomains are as follows:
www
mail
ftp
localhost
webmail
smtp
pop
ns1
webdisk
ns2
cpanel
whm
autodiscover
autoconfig
m
imap
test
ns
blog
pop3
dev
www2
admin
forum
news
The dnscan repository on GitHub hosts files containing the top 10,000 subdomains which can be integrated into your recon process thanks to it’s very open GNU v3 license.
You can find dnscan’s subdomain lists, and source code here: https://github.com/rbsec/dnscan
We can easily plug a dictionary like dnscan’s into our script.
For smaller lists, you could simply copy/paste/hardcode the strings into the script.
For the large lists, like dnscan’s 10,000 subdomain list—we should keep the data separate from the script and pull it in at runtime.
This will make it much easier to modify the subdomain list, or make use of other subdomain lists. Most of these lists you will find will be in .csv format, making integration into your subdomain recon script very simple:
constdns=require('dns');constcsv=require('csv-parser');constfs=require('fs');constpromises=[];/** Begin streaming the subdomain data from disk (versus* pulling it all into memory at once, in case it is a large file).** On each line, call `dns.resolve` to query the subdomain and* check if it exists. Store these promises in the `promises` array.** When all lines have been read, and all promises have been resolved* than log the subdomains found to the console.** Performance Upgrade: if the subdomains list is exceptionally large,* than a second file should be opened and the results should be* streamed to that file whenever a promise resolves.*/fs.createReadStream('subdomains-10000.txt').pipe(csv()).on('data',(subdomain)=>{promises.push(newPromise((resolve,reject)=>{dns.resolve(`${subdomain}.mega-bank.com`,function(err,ip){returnresolve({subdomain:subdomain,ip:ip});});}));}).on('end',()=>{// after all of the DNS queries have completed, log the resultsPromise.all(promises).then(function(results){results.forEach((result)=>{if(!!result.ip){console.log(result);}});});});
Yes, it is that simple! If you can find a solid dictionary of subdomains (it’s just one search away) you can just paste it into the brute force script and now you have a dictionary attack script to use as well.
Because the dictionary approach is much more efficient than the brute force approach, it may be wise to begin with a dictionary and than use a brute force subdomain generation only if the dictionary does not return the results you are seeking.
Summary
When performing recon against a web application, the main goal should be to build a map of the application that can be used later when prioritizing and deploying attacks payloads.
An initial component of this search is understanding what servers are responsible for keeping an application functioning—hence our search for subdomains attached to the main domain of an application.
Consumer facing domains, for example the client of a banking website usually get the most scrutiny. Bugs will be fixed rapidly, as visitors are exposed to them on a daily basis.
Servers that run behind the scenes—like a mail server or admin backdoor as another example, are often riddled with bugs as they have much less use and exposure.
Often, finding one of these “behind-the-scenes” API’s can be a beneficial jumpstart when searching for vulnerabilities to exploit in an application.
A number of techniques should be used when trying to find subdomains, as one technique may not provide comprehensive results.
Once you believe you have performed sufficient reconnaissance and have collected a few subdomains for the domain you are testing against, you can move on to other recon techniques—but you are always welcome to come back and look for more if you are not having luck with more obvious attack vectors.