Chapter 19 Learning Advanced CSS Selectors
HTML elements enable web page designers to mark up a document's structure, but beyond trust and hope, you don't have any control over your text's appearance. CSS changes that. CSS puts the designer in the driver's seat. — Håkon Wium Lie
- Learning the powerful ID and universal selectors
- Leveling your style game with the descendant, child, and sibling selectors
- Targeting your styles by combining two or more selectors
- Becoming a style master by understanding CSS inheritance, cascading, and specificity
On the surface, CSS seems like a simple topic: You apply values to some properties, combine them into a rule, and then apply that rule to a page element. Repeat a few more times, and voilà: your page is beautiful. But the apparent simplicity of CSS is only skin-deep. Underneath the straightforward implementation of declarations and rules are obscure caves of complexity and unfathomed depths of dynamism. This chapter serves as an introduction to this hidden world, which is home to some of the most powerful and practical CSS concepts.
Working with ID Selectors
In Chapter 7, I introduced you to CSS selectors, which enable you to specify the page object you want to style:
selector{property1:value1;property2:value2; ... }
So far, you've learned that the selector part of this CSS rule can be the name of an HTML tag (a type selector) or the name of a CSS class (a class selector). A rather large collection of CSS selectors exists, however. Many of these selectors are rather obscure, but the more common ones are powerful tools indeed. The lessons in this chapter introduce five of these selectors, beginning with the ID selector.
Learn
My WebDev Workshop includes a complete rundown of all the CSS selectors, with examples. Check it out: https://webdev.mcfedries.com/code/selector-reference/.
Lesson 19.1: Using ID Selectors
Covers: The #id selector
Online: wdpg.io/19-1-0
Back in Chapter 16, you learned that you can link to a specific element in a web page by adding the id attribute to that element and then including the id value in your link address. You can also use an element's id value to apply CSS styling to that element. To do this in an internal or external style sheet, you type the id value preceded by a hash symbol (#) to create the selector:
#id-value {
property1: value1;
property2: value2;
    ...
}
Remember
As with class names, your id value must begin with a letter and can include any combination of letters, numbers, hyphens (-), underscores (_).
Beware
Again, like class names, id values are case-sensitive.
The following example shows ID selectors in action.
Example
Online:wdpg.io/19-1-1
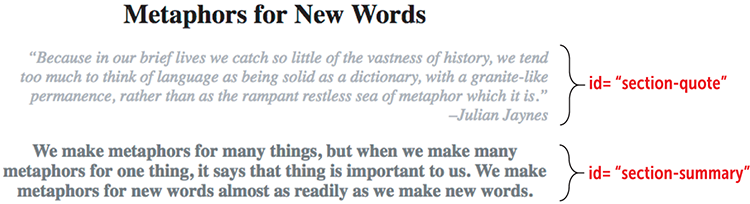
This example adds an ID to each of two <div> tags—section-quote and section-summary—and then uses the corresponding ID selectors to apply rules to each div element.
Web Page
CSS
#section-quote {    ①
    color: darkgray;    ①
    font-size: 1.25em;    ①
    font-style: italic;    ①
    text-align: right;    ①
}    ①
#section-summary {    ②
    color: dimgray;    ②
    font-size: 1.5em;    ②
    font-weight: bold;    ②
    text-align: center;    ②
}    ②
① Rule for the section-quote id
② Rule for the section-summary id
HTML
<h1>
    Metaphors for New Words
</h1>
<div id="section-quote">    ③
“Because in our brief lives we catch so little of the vastness of history, we tend too much to think of language as being solid as a dictionary, with a granite-like permanence, rather than as the rampant restless sea of metaphor which it is.”<br>–Julian Jaynes
</div>
<div id="section-summary">    ④
We make metaphors for many things, but when we make many metaphors for one thing, it says that thing is important to us. We make metaphors for new words almost as readily as we make new words.
</div>
③ The section-quote id assigned to a div element
④ The section-summary id assigned to a div element
Best Practices: Classes Versus IDs
When should you use an ID selector versus a class selector? Ask yourself the following questions:
- Will the styles I want to use be applied to one and only one element?
If so, use an ID selector on that element.
- Will the styles I want to use be applied to multiple elements?
If so, use a class selector on each of those elements.
- Will the styles I want to use be applied to only one element now but could be applied to other elements in the future?
If so, use a class selector on that one element now. You can always apply the class selector to other elements as needed down the road.
Beware
ID selectors, because they apply to a single element, make your CSS code harder to maintain and troubleshoot. You’ll understand why when I talk about specificity later in this chapter. Therefore, the true best practice when it comes to ID selectors is to never use them.
Web Page Genealogy: Parents, Descendants, and Siblings
Before continuing with the selectors, you need to take a mercifully brief detour into the hierarchical structure of a web page so that you can learn a few key concepts. Figure 19.1 shows the hierarchy of a typical web page.
Now traverse this (upside-down) tree structure:
- The
htmlelement is the root of the structure. - The
htmlelement has two main branches:headandbody. - The
headelement has two branches:titleandstyle. - The
bodyelement has three branches: anh1element and twopelements. - The first of the
pelements has adivbranch. - That
divbranch has twopbranches. - The second of those
pbranches has asectionbranch. - The
sectionbranch has twopbranches.
Given this hierarchy, I can define a few useful terms that you'll need to understand the CSS selectors that follow:
- Parent —An element that contains one or more other elements. In Figure 19.1,
htmlis the parent of theheadandbodyelements, and thedivelement is the parent of the twopelements. - Grandparent —An element that contains a second level of elements. In Figure 19.1,
htmlis the grandparent of (among others) thetitleandh1elements, and thedivelement is the grandparent of thesectionelement.
Figure 19.1 The tree structure of a typical web page
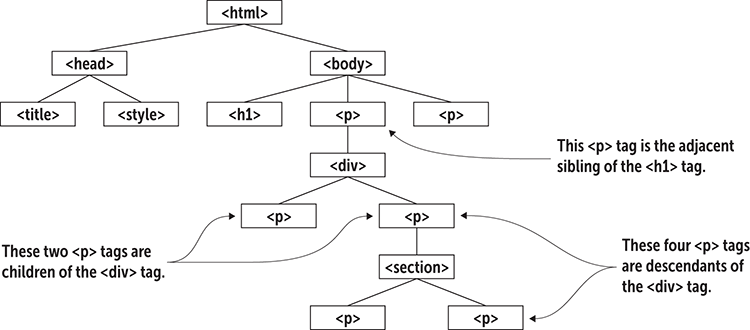
- Ancestor —An element that contains one or more levels of elements. In Figure 19.1,
htmlis an ancestor of every other element, and thebodyelement is an ancestor of thedivelement and every element contained within thedivelement. - Child —An element that’s contained within an element that lies one level above it in the hierarchy. That is, the element has a parent in the structure. In Figure 19.1,
titleis a child ofhead, and thedivis a child of its containingpelement. - Descendant —An element that’s contained within an element that lies one or more levels above it in the hierarchy. That is, the element has an ancestor in the structure. In Figure 19.1,
titleis a descendant ofhtml, and the fourpelements are all descendants of their containingdivelement. - Sibling —An element that lies on the same level as another element. In Figure 19.1, the three child elements of the
bodyelement—that is, theh1and the twopelements—are all siblings. Note in particular that a sibling that comes right after another sibling is called an adjacent sibling.
Working with Contextual Selectors
With the terms from the preceding section in mind, I want now to talk about how you use the web page hierarchy to construct some powerful CSS rules by using three contextual selectors (so-named because they define an element's context within the web page).
Lesson 19.2: The Descendant Selector
Online: wdpg.io/19-2-0
One common CSS scenario is applying a style rule to all the elements contained within (that is, are descendants of) some other element (the ancestor). To do that, use the descendant selector, which separates the ancestor and descendant elements with a space, as shown in the following syntax:
ancestor descendant { ① ②property1:value1; ③property2:value2; ③ ... }
① The element's parent element
② The element you want to style
③ The styles you want to apply
Remember
In CSS lingo, the character that you place between two elements to form a selector (such as the space used in the descendant selector) is called a combinator.
Master
Yep, a space is a head-scratching character choice to define a CSS selector, but the latest CSS specs introduce an explicit descendant combinator: the double greater-than sign (div >> p instead of div p). No browsers support this yet, but all will in the future.
Your page may have a couple of p elements at the beginning that serve as a summary of the page and quite a few more p elements that hold the body text. Assuming you want to style the summary text differently from the body text, a generic p selector won't work. If, instead, you enclose all the body text p elements in a div element, you can target all the p elements with the following selector:
div p
Beware
The descendant selector is powerful because it targets every descendant of an ancestor, no matter how far down the hierarchy those descendants reside. To avoid unexpected results, if you want to target a descendant one level below an ancestor, you should use the child selector (discussed in Lesson 19.3).
The following example uses the descendant selector to style a page's body text.
Example
Online:wdpg.io/19-2-1
This example uses the descendant selector div p to target only those p elements that are contained within the div element.
Web Page

CSS
body {    ①
    color: blue;    ①
    font-family: Verdana, sans-serif;    ①
    font-size: 1.2em;    ①
}    ①
div p {    ②
    color: #444;    ②
    font-family: Georgia, serif;    ②
    font-size: 0.75em;    ②
}    ②
① Styles applied to all text
② Styles applied only to p elements that are descendants of a div element
HTML
<h2>Weird Word Origins</h2>
<p>Welcome to the always wonderful, sometimes weird, and often downright wacky world of word histories</p>
<div>
    <p>Never thought you’d hear adjectives such as <i>wacky</i> and <i>weird</i> associated with the history of words? Think again, oh soon-to-be-even-wiser-than-you-are-now reader! The study of word origins isn't about memorizing technical terms or resurrecting dead languages or puzzling over parts of speech. Instead, it's all about telling stories.</p>
    <p>The history of a word is a narrative, plain and simple: where the word began, how it changed over time, and how it got where it is today. Delightfully, these narratives are often full of plot twists, turning points, heroes and villains, and surprise endings.</p>
</div>
Lesson 19.3: The Child Selector
Play
Create a rule that applies a green color and a font size of 1.2em to any <code> tag that is a descendant of a <div> tag. Online:wdpg.io/19-2-2
Online: wdpg.io/19-3-0
Rather than select every descendant of a specified element, you often need to target only its children. To do that, use the child selector, which separates the parent and child elements with a greater-than sign (>), as shown in the following syntax:
parent > child { ① ②property1:value1; ③property2:value2; ③ ... ③ }
① The element's parent element
② The element you want to style
③ The styles you want to apply
Referring to Figure 19.1, you can style the div element's two p children with the following selector:
div > p
Master
To select an element that’s the first child of its parent, use the element:first-child pseudo-class. Similarly, to select an element that’s the last child of its parent, use the element:last-child pseudo-class. Online:wdpg.io/19-3-4
Master
Another powerful child pseudo-class is :nth-child(n), where n specifies which children you want to select. Use :nth-child(odd) to select the odd (first, third, and so on) children, or :nth-child(even) to select the even (second, fourth, and so on) elements. Online:wdpg.io/19-3-5
The following example uses the child selector to style those p elements that are children of a div element.
Example
Online:wdpg.io/19-3-1
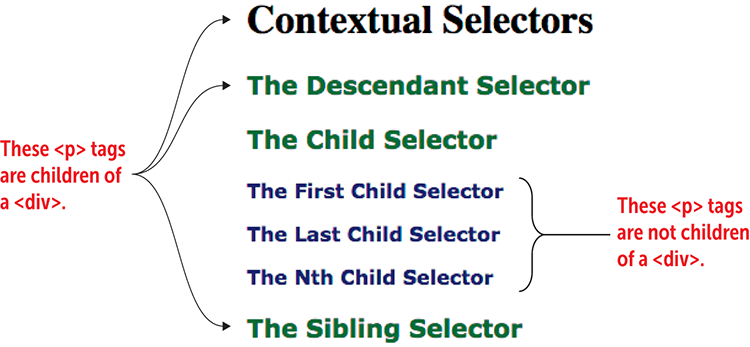
This example uses the div > p child selector to set a font size of 1.25em and a color of dark green to only those p elements that are direct children of a div element.
Web Page
CSS
p {    ①
    color: darkblue;    ①
    font-size: 1em;    ①
    font-weight: bold;    ①
}    ①
div > p {    ②
    font-size: 1.25em;    ②
    color: darkgreen;    ②
}    ②
① Styles for all p text
② Styles for p elements that are children of div elements
HTML
<h1>Contextual Selectors</h1>
<div>
    <p>The Descendant Selector</p>    ③
    <p>The Child Selector</p>    ③
        <section>
            <p>The First Child Selector</p>
            <p>The Last Child Selector</p>
            <p>The Nth Child Selector</p>
        </section>
    <p>The Sibling Selector</p>    ③
</div>
③ The child p elements
Lesson 19.4: The Sibling Selector
Play
Given a numbered list that's nested within another numbered list, use the child selector to create a rule that styles the nested list to use lowercase letters instead of numbers. Online:wdpg.io/19-3-2
Online: wdpg.io/19-4-0
Instead of selecting an element's children or descendants, you might need to target its siblings. To do that, use the sibling selector, which separates the reference element and the sibling element with a tilde (~), as shown in the following syntax:
element ~ sibling { ① ②property1:value1; ③property2:value2; ③ ... ③ }
① The reference element
② The element you want to style
③ The styles you want to apply
In Figure 19.1, you can style the two p elements that are the siblings of the h1 element with the following selector:
h1 ~ p
The following example shows the sibling selector in action.
Example
Online:wdpg.io/19-4-1
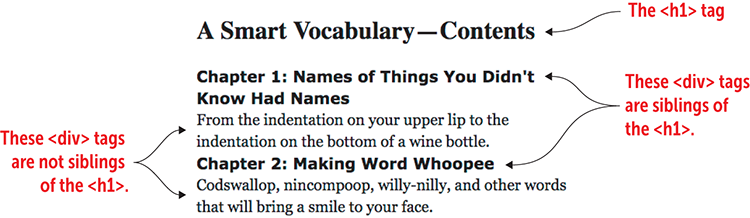
This example uses the h1 ~ div sibling selector to set a sans-serif font stack and a bold font weight to only those div elements that are siblings of the h1 element.
Web Page
CSS
div {    ①
    font-family: Georgia, serif;    ①
    font-weight: normal;    ①
}    ①
h1 ~ div {    ②
    font-family: Verdana, sans-serif;    ②
    font-weight: bold;    ②
}    ②
① Styles for all div text
② Styles for div elements that are siblings of h1
HTML
<h1>
    A Smart Vocabulary—Contents
</h1>
<div>    ③
    Chapter 1: Names of Things You Didn't Know Had Names
    <div>From the indentation on your upper lip to the indentation on the bottom of a wine bottle.</div>
</div>
<div>    ③
    Chapter 2:  Making Word Whoopee
    <div>Codswallop, nincompoop, willy-nilly, and other words that will bring a smile to your face.</div>
</div>
③ The sibling div elements
Master
To select only the adjacent sibling of an element, change the tilde to a plus sign: element + sibling (as in h1 + p). Online:wdpg.io/19-4-4
Taking Things up a Notch by Combining Selectors
CSS selectors are useful tools because they enable you to target areas of your web page that you want styled. By specifying a particular class or an element's descendants, you gain much more control of your page presentation. But what if instead of needing to use either the class selector or the descendant selector, you need to use both? That is, what if you want to target not the element that has been assigned a particular class, but its descendants? Table 19.1 demonstrates a few ways to combine CSS selectors.
Table 19.1 Some Ways to Combine Selectors
| Example | Description |
<div class="sidebar alert"> |
Applies both the class named sidebar and the class named alert to the div element |
p.footnote {styles} |
Applies a rule to those p elements that have been assigned the class named footnote |
p.footnote > a {styles} |
Applies a rule to a elements that are the children of those p elements that have been assigned the class named footnote |
p.footnote a.external {styles} |
Applies a rule to a elements that have been assigned the class named external and that are the descendants of those p elements that have been assigned the class named footnote |
#payables-table li:nth-child(even) {styles} |
Applies a rule to the even numbered li elements in the list that has been assigned the ID payables-table |
While I’m on the topic of combining things, I should mention that it's perfectly valid CSS to apply a single style rule to two or more selectors. You do that by separating the selectors with commas, like so:
selectorA,selectorB{property1:value1;property2:value2; ... }
Suppose that you have a class named pullquote that you use to style the pull quotes in your website's news articles and a class named sidebar that you use for the sidebars in your website's tutorial pages. If these two classes use the same rule, you can combine them:
.pullquote,
.sidebar {
    color: #444;
    background-color: #ccc;
}
Lesson 19.5: The ::before and ::after Pseudo-elements
Online: wdpg.io/19-5-0
In CSS, you can create web page objects that aren’t officially part of the page hierarchy, and these objects are known as pseudo-elements. Two common examples are ::before and ::after, which you use to insert content before and after, respectively, the content of whatever element you specify. In CSS, this content is called generated content because you don’t type the content yourself; it's created by the browser automatically. Here's the syntax:
element::before|after {    ①    ②

    content: value;    ③
    content_styles;    ④
}
① The web page element
② Where you want the content added
③ The content you want to insert
④ Optional styles applied to the inserted content
Remember
To insert a special character as the custom content, use the character's hexadecimal code, preceded by a backslash (). The declaration content: '�266f';, for example, specifies the musical sharp sign (♯) as the custom content. Use the HTML5 Entity Browser (wdpg.io/charent) to look up a character's hex code.
You'll occasionally see the single-colon variants :before and :after. Sites use this older syntax to provide support for Internet Explorer 8. Because that browser now stands at around one-tenth of 1 percent global use (and shrinking), the world has moved on to the double-colon standard that you see in this book.
You can use the following rule to automatically add a pilcrow (¶), also called a paragraph mark, after each paragraph:
p::after {
    content: '¶';
}
One of the most common uses for the ::before pseudo-element is to replace the default bullets in an unordered list with custom bullets. The following example shows how.
Example
Online:wdpg.io/19-5-1
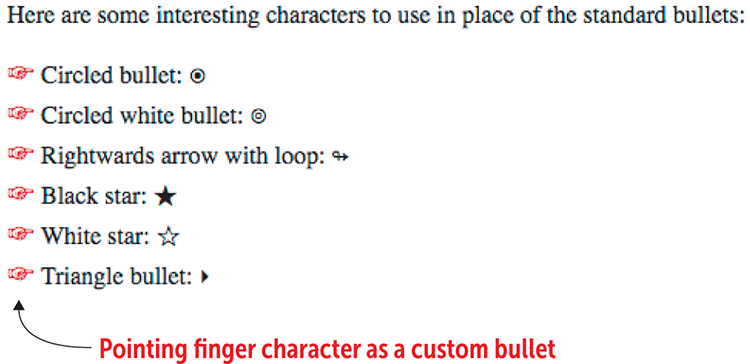
This example uses list-style-type to remove the bullets from the ul element and then uses li::before to add a custom bullet character—a pointing finger (hex code 261e)—and a nonbreaking space (hex 00a0).
Web Page
CSS
ul {
list-style-type: none; ①
margin-left: 0; ②
padding-left: 1em; ②
text-indent: -1em; ②
}
li::before {
content:'261e�0a0'; ③
color: red; ④
font-size: 1.1em; ④
}
① Removes the default bullet
② Ensures that bullet text wraps correctly
③ Adds a pointing finger and space
④ Styles the custom bullet
HTML
<div>
Here are some interesting characters to use in place of the standard bullets:
</div>
<ul>
<li>Circled bullet: ⦿</li>
<li>Circled white bullet: ⦾</li>
<li>Rightwards arrow with loop: ↬</li>
<li>Black star: ★</li>
<li>White star: ☆</li>
<li>Triangle bullet: ‣</li>
</ul>
Play
CSS offers the counter-increment property that lets you set up a counter for a numbered list. If you set the ol element's list-style-type property to none, you can use ol::before to create custom numbers for a list. Online:wdpg.io/19-5-2
Play
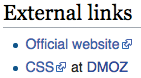
An external link is one that points to a resource on a different site. Create a CSS rule that automatically adds an icon to denote external links, the way that Wikipedia does (see Figure 19.2). Online:wdpg.io/19-5-3
Figure 19.2 Wikipedia marks external links with an icon.
While I’m talking about pseudo-elements, it's worth mentioning that you can use the ::first-letter pseudo-element to apply one or more styles to the first letter of a text block. div::first-letter {font-size: 1.5em; color: red;}, for example, styles the first letter of each div element to have size 1em and color red. To style the entire first line of a text block, use the ::first-line pseudo-element.
Resetting CSS with the Universal Selector
The universal selector (*) applies to every element on the web page, which may seem to be an odd way of approaching styles. After all, how often would a particular set of styles apply to every element on a page? Almost never. The universal selector is useful, however, when it comes to a CSS reset —a way of removing the web browser's default styles so that you can apply your own without having to worry about conflicts with the browser. Here's a basic CSS reset:
* {
    font-size: 100%;
    margin: 0;
    padding: 0;
}
This reset defines the default font size and removes the browser's default margins and padding (both of which you learned about in Chapter 9).
Master
Here are some other common CSS reset declarations:border: 0;font-family: inherit;font-style: inherit;font-weight: inherit;vertical-align: baseline;
Styles: What a Tangled Web Page They Weave
Most of the style declarations and rules you've worked with so far have operated in splendid isolation. You style an h1 element with a font size and a p element with an alignment, and the web browser applies these two rules independently of each other. However, in the real world of web design, such simplicity is rare. I'm talking hen's-teeth rare. For all but the most basic web pages, it's a certainty that your styles are fraternizing and sometimes even fighting with one another. It’s mayhem, but you can restore some semblance of order by understanding three key CSS mechanisms: inheritance, the cascade, and specificity.
Lesson 19.6: Understanding Inheritance
Online: wdpg.io/19-6-0
With all that talk earlier in the chapter about ancestors, parents, children, and descendants, you won't be surprised to learn that CSS comes with a method for passing traits along from one "generation" to the next. This method is called, appropriately enough, inheritance, and it means that for certain CSS properties, if a parent element is styled with that property, its child and descendant elements are automatically styled the same way.
In the following example, a div element is assigned the class intro, which styles the element with 1.1em brown text. Notice that the div element's children—the em, sup, and code elements, as well as the nested div element—are styled the same way because in each case, they’ve inherited those styles from the parent div.
Play
The a element inherits style properties such as color, but you don’t see this inheritance; the browser overrides the inheritance so that your links stand out from the regular page text. Can you think of a way to force the text of child a elements to use the same color as their parent? Online:wdpg.io/19-6-2
What did I mean when I said that only certain properties are inherited? Although many CSS properties are inherited by descendant elements, not all of them are. If you were to apply a border around the parent div element in the preceding example, that same border style wouldn't be applied to any of its descendants, because it would look odd to have, say, a border around an em or a sup element.
Example
Online:wdpg.io/19-6-1
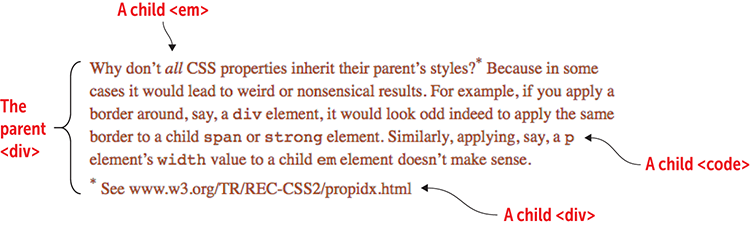
This example demonstrates inheritance by showing how the styles of the parent div element get passed down to child elements such as em, code, and the nested div.
Web Page
CSS
.intro {    ①
    color: saddlebrown;    ①
    font-size: 1.1em;    ①
    line-height: 1.4;    ①
}    ①
① Styles for the intro class
HTML
<div class="intro">    ①
Why don’t <em>all</em> CSS properties inherit their parent’s styles?<sup>*</sup> Because in some cases it would lead to weird or nonsensical results. For example, if you apply a border around, say, a <code>div</code> element, it would look odd indeed to apply the same border to a child <code>span</code> or <code>strong</code> element. Similarly, applying, say, a <code>p</code> element’s <code>width</code> value to a child <code>em</code> element doesn’t make sense.    ②    ③
    <div>    ④
        <sup>*</sup> See www.w3.org/TR/REC-CSS2/propidx.html    ④
    </div>    ④
</div>
① The parent div element
② A child em element
③ A child code element
④ A child div element
Lesson 19.7: Learning About the Cascade
Online: wdpg.io/19-7-0
Learn
The World Wide Web Consortium (W3C) maintains a complete list of CSS properties. Among other tidbits, that list helpfully specifies whether each property is inherited. See https://www.w3.org/TR/REC-CSS2/propidx.html.
Besides the fact that styles get passed down from parent elements to descendant elements though inheritance, CSS also defines the way that the styles get propagated. This definition is called the cascade, and if inheritance is the "what" of style propagation, the cascade is the "how." (Before continuing, let me answer the question that's no doubt on your mind: Yes, the cascade is the reason why collections of styles are called cascading style sheets.) To see how the cascade works, consider the following code:
<style>    ①
    div {    ①
        color: red;    ①
    }    ①
</style>    ①
<div style="color: blue;">    ②
    What is the color of this text?
</div>
① Internal style sheet
② Inline style
Here, an internal style sheet tells the div element to use red text, and an inline style colors the <div> tag's text blue. What color is the text between the <div> and </div> tags? That is, how will the browser resolve the conflict between the internal style sheet and the inline style?
To answer both questions, you need to know how the cascade does its job. First, you already know that there are three main ways to specify CSS: inline styles, internal style sheets, and external style sheets. Together, these methods constitute what the W3C calls author style sheets (because they’re created by the person who wrote the web page; that's you). But two other style sheets get applied when a web page loads: the browser's default styles (called the user agent style sheet), and the browser user's custom styles (called the user style sheet).
The cascade organizes these five sources of style data into the following hierarchy:
- User agent style sheet
- User style sheet
- External style sheets
- Internal style sheets
- Inline styles
Remember
Speaking generally, the closer a style declaration is to the actual element that it's styling, the greater its weight.
These sources are listed in ascending order of importance (weight, in CSS lingo). If the browser sees that a particular style rule is defined in two or more of these sources, it resolves the conflict by applying the style from the source that has the greatest weight. For the code example I showed earlier, you can see that an inline style trumps an internal style sheet, so the text between the <div> and </div> tags will display as blue, as shown in the following example.
Example
Online:wdpg.io/19-7-1
This example demonstrates the CSS cascade, where the div element's inline style gets rendered because it carries more weight than the div type selector from the internal style sheet.
Web Page

HTML
<style>    ①
    div {    ①
        color: red;    ①
    }    ①
</style>    ①
<div style="color: blue;">    ②
    What is the color of this text?
</div>
① Internal style sheet
② Inline style
Lesson 19.8: Introducing Specificity
Online: wdpg.io/19-8-0
Master
There’s a sixth style source you need to know: adding the !important keyword to the end of any style declaration. This keyword carries the greatest possible CSS weight, so it overrides any other source. Online:wdpg.io/19-7-2
You may be wondering what happens to the CSS cascade when two styles that target the same element come from the same source. Consider the following code:
<style>
    p.colored-text {
        color: purple;
    }
    .colored-text {
        color: blue;
    }
    div p {    ①
        color: green;
    }
    p {    ②
        color: red;
    }
</style>

<div>
    <p class="colored-text">What is the color of this text?</p>
</div>
① Descendant selector
② Type selector
The style sheet contains four rules, all of which target the p element. The first rule selects all p elements that use the colored-text class; the second rule selects all elements that use the colored-text class; the third rule selects p elements that are descendants of a div element; and the fourth rule selects all p elements. What color will the browser render the text between the <p> and </p> tags? The cascade alone doesn't answer this question because all the rules come from an internal style sheet and therefore are given equal weight.
To figure out the winner in this CSS fight, you need to know a bit about a concept called specificity. Specificity is one of the most complex ideas in all of CSS, but for purposes of this chapter, I can say this about it: The more specifically a particular selector targets something on a web page, the greater weight it’s given when the browser is calculating which rules to apply. You can judge how specifically a selector targets something by applying the following recipe to the selector:
- Count the number of elements (such as
pordiv) and pseudo-elements (such as::before), and assign 1 point to each. - Count the number of classes and pseudo-classes (such as
:hover), and assign 10 points to each. - Count the number of IDs, and assign 100 points to each.
- If the selector is part of an inline style sheet, assign 1,000 points.
Remember
The universal selector (*) doesn’t contribute to the specificity score (it’s worth 0 points). If you add the !important keyword to a declaration, add 10,000 points to the specificity score.
Beware
Earlier in the chapter, I cautioned you against overusing the ID selector, and here, you see the main reason to approach it with caution. This selector greatly outweighs elements, pseudo-elements, classes, and pseudo-classes.
The points assigned are indicative of the weight each selector carries. Returning to the example, count the points:
p.colored-text—This selector contains one element and one class, for a total of 11 points..colored-text—This selector contains one class, for a total of 10 points.div p—This selector contains two elements, for a total of 2 points.p—This selector contains one element, for a total of 1 point.
You can see that the p.colored-text selector has the most points, so the text between the <p> and </p> tags gets rendered as purple, as shown in the following example.
Example
Online:wdpg.io/19-8-1
This example demonstrates CSS specificity, where the selector p.colored-text is more specific that the other selectors, so the browser renders the text as purple.
Web Page

HTML
<style>
    p.colored-text {    ①
        color: purple;
    }
    .colored-text {    ②
        color: blue;
    }
    div p {    ③
        color: green;
    }
    p {    ④
        color: red;
    }
</style>
<div>
    <p class="colored-text">What is the color of this text?</p>
</div>
① Specificity = 11 points
② Specificity = 10 points
③ Specificity = 2 points
④ Specificity = 1 point
The different weight of selectors is usually the reason why your CSS rules don't apply to some elements, although you think they should. To minimize the time you spend bug hunting, you need to understand how browsers interpret your code. And to understand that, you need to have a firm understanding of how specificity works. —Vitaly Friedman
Summary
- An ID selector applies CSS rules to any element that uses the specified ID value.
- To target all the elements contained within a parent element, use the descendant selector, which is the parent and descendant element names separated by a space.
- To target all the child elements contained within a parent element, use the child selector, which is the parent and child element names separated by a greater-than sign (>).
- To target all the elements that are siblings of some other element, use the sibling selector, which is the names of the two elements separated by a tilde (~).
- Append
::beforeor::afterto a selector to insert generated content before or after the element’s content. - Many CSS properties are inherited from the element's parent.
- Inheritance occurs via the cascade, which assigns greater importance to declarations whose sources are closer to the element. In ascending order, these sources are browser default styles, user custom styles, external style sheets, internal style sheets, and inline styles.
- For declarations from the same source, specificity tells the browser to render the styles from the more specific of the selectors. In ascending order, these selectors are elements and pseudo-elements, classes and pseudo-classes, IDs, inline styles, and the
!importantkeyword.