

Combining media forms is nothing new. Silent films, for example, interspersed still type frames throughout the movie to deliver dialogue and establish context, as theater organists provided dramatic musical accompaniments.
Today’s multimedia may combine type, image, audio, video and infographics, not to mention interactivity. Think searchable databases and archives, user-generated content and social networking. All this must be available to active “users” on their desktop PCs, laptops, smartphones, tablets and TVs.
But don’t drop out because you fear the technical. Even simple digital multimedia adds a lot of capability to the visual communicator’s toolbox. Here we begin with basics for novice visual communicators.
First, multimedia design is implemented in degrees. A simple digital slideshow may enhance an otherwise static website, while elsewhere gamers enter online virtual worlds to participate in massively multiuser online role playing games (MMORPG).
Second, whether deployed a little or a lot, digital multimedia means multisensory. It allows for communication via sound and touch in addition to sight. (No such thing as smell-o-vision yet, but anything is possible...)
Third, multimedia makes interactivity possible. Users participate in providing input and feedback. Multimedia also gives users control as far as when to access content, quantity of information, direction of exploration and pacing of the digital experience.

Multimedia: The early years. In the days before “talkies,” live musicians played scores to accompany silent films. Note the Tampa Theater’s orchestra pit at the bottom of the photo.
Tampa Theater, 1930. Burgert Brothers collection. Courtesy, Tampa-Hillsborough County Public Library System.
Enabling user-control, however, reminds us that not all users have the same abilities. From the outset, you should design not only multiple ways for your users to interact with your content but also alternative ways your users are able to access content. How will you accommodate, for example, the deaf community? Or folks with limited hand dexterity or the visually impaired? These are front-end planning issues.
It’s true that some kinds of multimedia components remain better off in the hands of professionals. However, there are simple multimedia production tools available for the nonprofessional. Many are available for free online or come preinstalled on your computer. Just be aware that not all mobile and tablet devices support all Web-based applications and proceed accordingly.
Thumbnails, Storyboards & Site Maps
Hold up. Before you log on, remember to step away from the computer for planning. By definition, multimedia is complex, whether it’s a clickable interactive commercial or a big investigative story with text, photos, footage and interactive infographics. So brainstorm concept, design and organization with paper and pencil. Or perhaps tablet and stylus.
Rough sketch some thumbnail layouts that imagine how all your content might go together. For slideshows, video and animation, use storyboarding techniques to nail beginnings, middles and ends, along with transitions, pacing and timing. And for multi-page Web projects, site map content relationships along with user flow via intuitive links and navigation.
Better yet, to maximize creative synergy, do the preliminary noodling with the whole team sitting in the same room—in which case you’ll need the big whiteboard and some colored markers.
Working with Images
In the attention-grabbing department, images win hands-down. But still images are—you know—still. Turned into slideshows or placed in interactive image galleries, however, even still images become engaging multimedia components. Newsrooms tend to prefer interactive image galleries over automated slideshows because they seem to generate more viewing traffic. Yet an image gallery may offer viewing options that include a slideshow format.
Sorting, cropping and editing photos needs to happen before you begin assembling your slideshow or image gallery. We already covered the rules for dealing with photos in “Chapter 9: Adding Visual Appeal.” Those best practices apply here. Plus, always work on a copy of the original photo; save and protect the original to be available for another day. Don’t forget to optimize resolution; 72 dpi remains the standard for photos destined for screen viewing.

Pick just one. Don’t let your slide transitions outshine your actual slides. pick one simple transition style and stick with it. We recommend cutting and fading as opposed to exploding and twirling out of control.
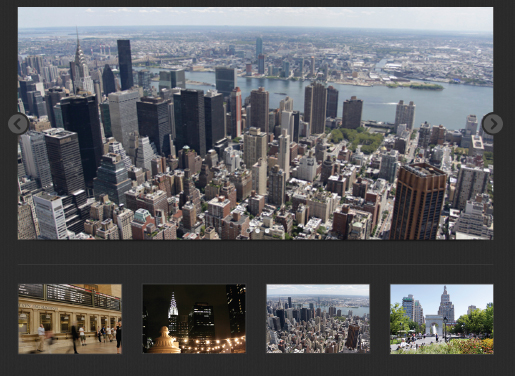
Image galleries. There are many inexpensive and free image gallery plug-ins available for displaying your photos on websites and blogs. The gallery at right includes an interactive feature slideshow and thumbnail gallery.
Slideshows.
When creating slideshows from multiple images, consider image content, transitions and user controls. For a simple set of images intended to add interest to a Web banner or content area, choose quality images united by a theme (color, subject, etc.) with similar orientation.
If your slideshow is intended to tell a story, apply a video-like approach to selecting images. A storyboard of sequential sketches helps organize the storyline and assist with image selection. A storyboard also helps if the slideshow includes a narrative. Select photos with tight, medium and wide angles for variety. Use the best quality images you can, but keep in mind that an image that conveys narrative continuity may be a better choice than a technically superior one.
Slideshow transitions. Slide programs offer many transition styles. Avoid the kid-in-a-candy-store impulse to use one of each. Simple tends to be best so choose one transition style and stay with it. Traditional cuts always work. In the end, you want your slideshow to be about the images or the story, not the funky transitions you used.
Audio may seem off-topic in a discussion about visual communication. But audio plays a role in multimedia. Audio is the narration or natural (nat) or ambient (ambi) sound on captured video. It’s the background track or bed in Web and DVD projects. Short audio clips as sound effects or SFX signal action, such as the sound of a button being pressed or email being sent. Audio can highlight what’s important. It also reinforces tone and mood.

Can you hear it? audio is a powerful multimedia component. Try to imagine the sounds that would accompany the image above.
Back in the heyday of radio, great audio was “theater of the mind.” That continues to be the way you should think about audio production. But if you find yourself unable to enlist an audio pro, stick to the basics. In general:
1. Use ambient audio sparingly, especially for trigger sounds like button clicks. A little goes a long way.
2. Background music should enhance the overall tone and message of the project. It should not be expected to set the tone by itself.
3. Give your user controls, preferably start, stop, pause and volume. We’ve all been blown out of our desk chairs by a Web soundtrack that was a big surprise, too loud or both.
4. When the audio is narration, an interview or some other situation where clarity is crucial, capture the highest quality audio possible. Use the best microphone you can—which may not be the one on your digital recorder or video camera. Your audience is more likely to forgive a poor quality image than an inaudible soundtrack.
Where to Get Audio.
Ambient sounds and music as well as trigger sounds like button clicks are available for purchase from digital stock sites. There are also websites that offer free sounds and music. Be aware, however, that free downloads may come with restrictions or attribution requirements. Make sure you respect both.
Pacing. Whether slow and measured or fast and frenetic, the duration of your images and the speed of transitions set an overall tone for your slideshow. If you expect viewers to absorb and appreciate your slideshow content, give them enough time to do so.
The “Ken Burns Effect.” The Ken Burns effect is a gradual simultaneous zoom in or out and panning across still images in a slideshow. Burns used the technique when featuring historical photographs, letters and maps in his documentaries. The effect is readily available on consumer-grade video software, but apply it with caution. Use it if the technique will enhance the slideshow’s communication function, not because you think it looks cool.
Captions/cutlines. Not all slideshows require captioning. But news contexts probably do. In addition to having a narrative beginning, middle and end, three rules apply here: One, make the caption/cutline “go with” the image. Oh, yes, we have seen it go the other way. Two, don’t state the obvious. A photo of a black dog doesn’t need a cutline that reads, “This is a black dog.” Instead, supplement the obvious, such as “Duke, a 6-year-old rescue lab/shepherd mix with exemplary manners, loves children.” Three, do cover what’s not obvious but relevant, such as a photo’s W’s. Clearly identify who, what, when and where. And don’t forget to fact-check and proof. Also be kind and credit the photographers.
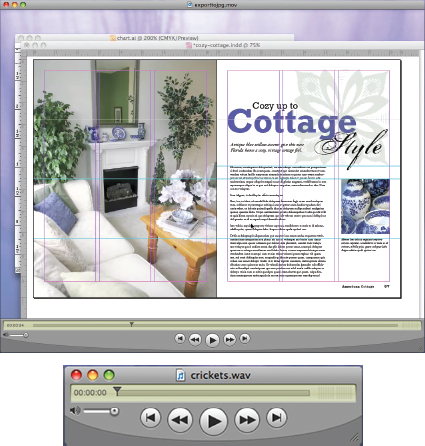
In control. If your website includes video and audio clips, give your audience access to the controls. at the very least, provide volume control, start and stop buttons.
To loop or not to loop. You can set a slideshow to loop continuously or a particular number of times before stopping. Your choice here depends on where your slideshow will be displayed. If it is to be the backdrop of a Web banner, then a subtle continuous loop might be appropriate. If your slideshow is intended to tell a story, letting it play through once is sufficient. As a rule, it’s a good idea to provide user controls on video clips such as story slideshows. Viewers appreciate access to buttons that start, stop, rewind, pause and adjust volume.
Interactive image galleries. Interactive image galleries do provide your audience with a more controlled method of viewing your images. Some photo-editing programs have the ability to generate Web-ready image galleries from your selected images. All you have to do is upload the files to your Web server.
Photo-sharing websites offer similar options. Sign-up is typically free, and once you have an account you upload your images. You can organize your images into galleries for viewing and provide a link to your shared gallery from your main website. If you prefer to display those images within your own website, some photo-sharing sites offer plug-ins or widgets you can incorporate into your Web page. Plug-ins and widgets allow photos stored on the photo-sharing site to display how and where you want them.
Slideshows with Audio.
Now think about combining everything you’ve learned about photo slideshows with our tips for working with audio. Hey, you’re ready to produce audio slideshows. Don’t be intimidated. The software is cheap (or free) and user-friendly, so much so that it’s mostly the same software pros use. As they say, producing audio slideshows has become “ridiculously simple.” Try it. It’s fun.
Begin by assessing whether you have a story that supports audio and visuals. Audio and photos should supplement and complement each other, the same as captions/cutlines. Time audio and visuals to “go with” each other. Remember storyboarding and maintaining narrative continuity.
Before putting the audio slideshow together, finish editing and saving your photos in one folder. Likewise, edit and save your audio track. Convention suggests you’ll need a couple dozen photos for every minute of audio—more or less—depending on the subject matter’s tone and pacing. After the audio and photos files are completed, open your audio slideshow software, import your photos and audio, and finally tweak as needed. Remember that a 2-minute audio slideshow begins to stretch the limit of user tolerance.
Audio slideshows offer a simple and easy tool for disciplining ourselves to tell effective stories in a short period of time with audio and visuals. Sound and pictures working together in time segues handily to video.
Video Clips
Video runs the gamut from carefully orchestrated multiple-camera commercials to homegrown cell-phone-recorded clips posted on video-sharing websites. In between the complex and the amateur, there are video interviews and monologues, short clips of events and activities, and how-to tutorials, among others.
Simple video-editing software is as commonplace as slideshow-making tools, and nonprofessionals can create good quality clips. Video isn’t designed so much as it is composed, shot and edited, although in some cases it may be art directed. Like shooting photography, if the stakes are high, shooting video and film is best left to professionals. Nevertheless, if it’s you or nada, follow these shooting and editing tips for beginners:
» Steady your camera with a tripod or other solid surface. Camera shake gets very old very quickly.
» Shoot in a location with bright, even lighting. Avoid harsh, high-contrast and backlighting, along with what you may believe are special lighting effects.
» When possible, shoot some test footage to check blocking, sound and light.
» Shoot more video than you think you’ll need, at least 10–15 seconds for each shot you want to capture. You can always cut extra material, but you can’t magically insert file footage no one ever shot. (B roll is file, secondary or archival footage used as visual fill or for creating transitions between clips.)
» Capture a variety of angles for each scene: tight close-up, medium, full, wide and long. Think about establishing shots versus detail/beauty shots.
» Avoid zooming and panning. Cutting from scene to scene is actually more natural.
» Compose your shots. Use the rule of thirds as your guide and place your focal point accordingly.
» Don’t talk while shooting. The microphone may pick up your voice. Heavy breathers off-screen can be a problem, too.
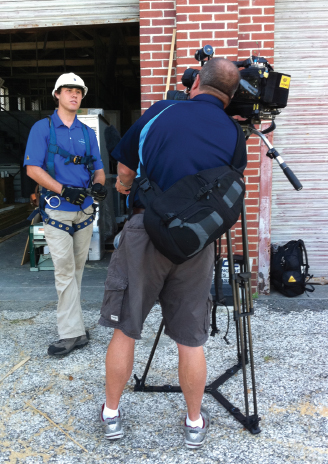
Not as easy as it looks.
Capturing good video requires planning. Consider lighting, location and subject matter. and always shoot more footage than you think you’ll need.
When Shooting Interviews & Monologues (Talking Heads):
» Shoot in a quiet location.
» Select your talking head wisely. Not everyone appears interesting and engaging (or articulate) on-camera.
» Test footage… Better safe than sorry.
When Editing Video:
» Begin with the best quality video possible, i.e. uncompressed raw footage.
» Make sure you have good usable audio, too. “Audio is half the picture,” as they say.
» Select simple transitions—cuts and fades. Pick one transition style and stick to it. Attention should be on the video, not on the transitions.
» Try to keep overall video duration short. In multimedia contexts, viewers can drop out in seconds, and most casual online video viewers only hang around for 2–3 minutes.

Doing an end-run around format incompatibilities. Finding video formats that run on all browsers is no easy task. A good workaround is to upload your video to a video-sharing site, then use the code provided to embed the video back into your website. The sharing site manages the tricky browser issue for you. The tradeoff is that your video will contain branding from the sharing site.
Video Encoding.
After editing, encoding is the next step in making a video. There are many file formats out there, and choosing the right one takes a little research. Video-sharing sites, for example, often post file size and format requirements. Meanwhile, different software and hardware brands peddle their unique file formats.
When choosing a file format, try to avoid those that are exclusive to particular devices, platforms or software applications. You want your video to be viewable by the greatest number of people. MPEG-4 (Motion Pictures Expert Group), or MP4 for short, is the most popular video file format for the Web (at the time of this printing, anyway). MP4 is friendly across platforms and supported by the most popular Web browsers.
In addition to file format, you’ll also need to pay attention to aspect ratio, which refers to screen frame proportions, and final file size, which also includes modes of compression. Video files are huge and must be compressed before packed into files for transport. So compression and file size matter not only for uploading and downloading but also for storage space. Wherever your video is being housed or hosted, once again, a few minutes’ research on the specs can save your—ahem— “project” at deadline time. Stay within uploading parameters. Quick downloading is critical, too, if you want your viewer to stay tuned around long enough to see your clip.
Speaking of viewers, don’t forget they need access to a video player of some sort for viewing. Fortunately, most modern browsers support common video formats. And if you come across a format your browser does not support, plug-ins are generally free and easy to find and install.
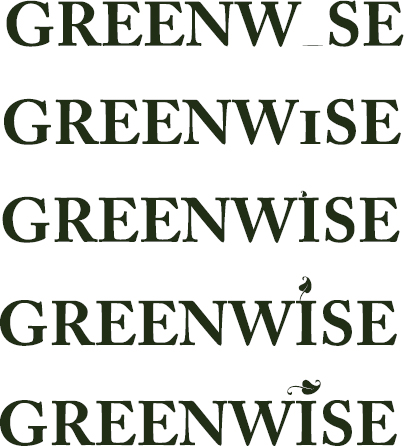
Simple is good. animation need not be complicated. This logo grows a letter “I” and sprouts a leaf over the course of a few seconds.
An excellent way to bypass many browser and video format incompatibilities would be to post your video on a video-sharing site. Most video-sharing sites will provide a bit of code allowing you to embed the clip on your own website. A minor drawback of this method is that the video-sharing site may require you to include their branding on your video clip.
Once viewers find your video, waiting for the whole clip to download, as in “progressive” video delivery, can be a real drag unless the clip is short and sweet. “Streaming” video is advisable for longer videos. But you would hire professionals for those longer videos anyway.
Shooting & Editing Video Not Your Bag?
The same sites that offer stock images also offer stock video clips. Stock may not work for your situation. But if using stock saves time and money, it might be worth checking out.
Generations of children have grown up watching animation as a Saturday morning cat-and-mouse anvil-dropping form of entertainment. Now animation has grown up, too. It’s everywhere from the startup sequence on your cell phone to spectacular CGI effects in blockbuster movies.
Like other multimedia components, animation can be classified by complexity. Animation found in full-length feature films and complex interactive websites remains the bailiwick of highly skilled pros. More accessible animation, such as transitioning in presentation slides, is generated by the presentation program itself.
If you’re inclined to try your hand at animation, affordable animation programs are out there. The learning curve for animation software is steeper than most but not insurmountable. It’s absolutely possible for the average person to create simple animated logos, video title sequences, banner ads and animated website components without an advanced degree in motion design.

Motion tweens.
Computer-generated tweened animation works on the same principle as traditional hand-drawn animation. a series of images is flashed in rapid succession, creating the illusion of movement.
Adobe Photoshop CS4 screen shot(s) reprinted with permission from Adobe Systems Incorporated.
Motion Tweens.
The simplest digital animations work on the same principle as original hand-drawn animation. A series of images, each one slightly different from the last, is flashed in rapid succession giving the illusion of movement. The digital animation rate is approximately 30 frames per second so 30 images are needed to create one second of animation. This is a lot of drawing.
Fortunately, if you’re using tweened animation, the computer will do the “drawing” for you. In tweened animation, only key changes in motion or shape are illustrated. For example, imagine the starting key frame has a red circle in the upper left corner, and the final key frame has the same red circle in the lower right corner. Based on the frame rate you specify, the computer will generate all the in-between frames necessary for an animation that moves the red circle from upper left to lower right.
Tweened animation is great for simple movement but also can be used for changes in color or opacity—tweening can be used to fade an object in or out.

Space and time. In animation, objects move through space over time. animation programs include a timeline, seen here in the lower right of each graphic. “events” happen at points along the timeline. In these screen grabs, the red bar represents the duration of the animation. The yellow triangle is effectively the “you are here” on the timeline. The preview window shows what the animation looks like at a given point in the animated sequence.
Adobe AfterEffects CS5 screen shot(s) reprinted with permission from Adobe Systems Incorporated.

Storyboards are an excellent tool for planning tweened animation. Arrows and other directional devices can signal the movements along with the relationships of shapes and type. Each sketch on the storyboard can describe the contents of a key frame, as well as—uh-huh—audio.
It’s about Time.
Actually, motion is not so much what makes animation different from other graphics. The element of time is. Animated elements appear, disappear and change shape at different points along a timeline. Pacing and transitions aren’t issues when designing for print or even when designing static websites. But in animation and video, pacing and transitioning impact the overall feel, thus message, of the piece. A quick pace and sharp transitions give intensity and edge. Subtle, gradual changes are more soothing.
Duration is Another Important Consideration.
How long does your animation need to last? Each situation is different depending on the job the animation is meant to do. However, the longer the animation, the greater the file size. So be aware of file size limitations—server, application or project-imposed. And, as a general rule, don’t let your animations loop indefinitely. Have them cycle one or more times then stop. Don’t loop animations that are particularly sharp and choppy. You don’t want to give anyone a headache.
Again, choosing a file format requires a bit of research to determine what is acceptable for your particular project. Animated banner ads, for example, may have physical size, file size and looping requirements in addition to format requirements.
In general, use formats that are compatible across the greatest number of devices. Also look for those with good compression (file size) and good quality output.
Use Restraint.
Adding a little animation to a layout can help break through all the visual clutter viewers suffer every day. But don’t let your animation add to visual clutter. Use animation with a purpose. Make sure it’s the right medium for your message. Don’t use animation just for the sake of using it.
Motion is not so much what makes animation different from other graphics. The element of time is.
Apps and Plug-Ins and Widgets, Oh My!
Perhaps the most exciting thing about multimedia is the opportunity it provides to engage the audience fully. For advertisers, interactivity is a luxury only dreamed of just a generation ago. Each element we’ve discussed thus far allows for some interactivity, be it the pause, play and volume controls on a video clip or the ability to browse photos in an online photo gallery. And don’t forget the banner ad’s click-through (cha-ching).
The good news is that you no longer need to be a credentialed computer programmer to include interactive multimedia components in your screen layouts. Plug-ins, widgets and apps make it possible for non-developers to add a wide range of interactive components with ease.
Applications (Apps).
Applications, commonly referred to as “apps,” are programs designed to run on a computer, tablet, smartphone, website or social media site. Large complex applications such as word-processing programs have been available on computers for years. Since the introduction of smartphones and tablets, professional and amateur programmers have been adding to the slate of apps for those devices, too. Some common examples of apps include calendars, mileage trackers, restaurant finders and, of course, games.
Some companies and organizations build custom apps to supplement websites. This makes sense as interaction with the smaller touchscreens of handheld devices is different from that of websites. A specifically designed app can provide the smartphone or tablet owner with a much better user experience.
For the moment, application building is still squarely in the realm of professional Web designers and developers.
Plug-Ins.
A plug-in is code that gives a browser or website additional functionality. For example, when a website automatically displays the most recent posts from a separate blog, a plug-in is at work.
There are plug-ins available that can do everything from filtering SPAM or viruses to allowing game playing or viewing different media types. They are easily added to sites or browsers via an installation program or by copying and pasting code in the right location.
Plug-ins are commonly installed behind the scenes, and there may or may not be visible front-end evidence of their presence on a site or browser. If a plug-in requires input from a user, or needs to physically display some sort of content on a page, then a widget is needed.
Most plug-in or widget code can be had for free or for minimal cost. Often all that is required is a code cut-and-paste.
Widgets.
Widgets are the visible expression of the existence of a plug-in. For example, imagine you want to measure social media activity on a specific page and display the results in a sidebar. An installed plug-in will track the activity, but the widget is what displays the results. All widgets require a plug-in, but not all plug-ins have a widget.
Any time a plug-in requires user input, a widget is needed. You may have a plug-in to distribute an e-newsletter, but a widget is needed to provide an interface, in this case a form, so users can subscribe.
There are widgets to display local weather, create tag clouds, play video and slideshows and even map the nearest pizza places.
With literally thousands of plug-ins and widgets available, the potential for adding interactivity to your projects is huge.
Where do I Get Plug-Ins, Widgets and Apps?
The short answer: Search online. Most plug-in or widget code can be had for free or for minimal cost. Often all that is required is a code cut-and-paste. Oh, and sometimes a credit to the developer is needed, too. Don’t forget to check and provide credit where credit is due.
When searching for and installing plug-ins and widgets, pay attention to online reviews. Since these mini programs can be created by anyone, quality is all over the board. Some are not regularly updated. And many are not “supported,” meaning if something goes wonky, you’re on your own to fix it.
Multimedia Websites

This webpage has three multimedia components generated by plug-ins and widgets:
1. Home page rotating feature image
2. A sidebar populated with the most recent updates from a social media site
3. An electronic newsletter with a front-end widget for user subscriptions
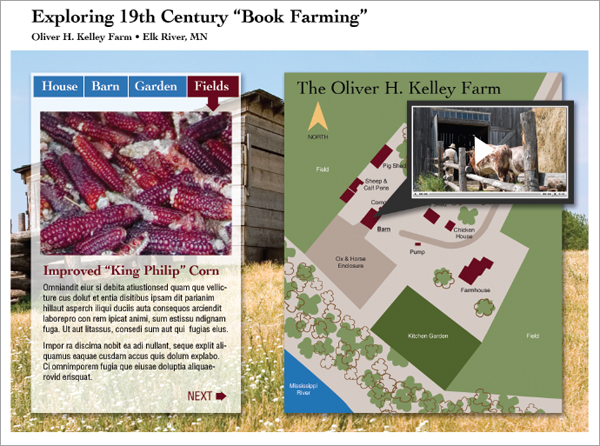
Multimedia storytelling. The interactive page above incorporates photos, text, slideshows, infographics and video clips. The result is a multisensory self-paced learning experience.
Another thing to look for is whether or not a plug-in or widget comes with an editable Cascading Style Sheet (CSS). Style sheets are used to dictate the way design features like fonts and colors display onscreen. If you can access a style sheet, you can tweak the appearance of a plug-in to better match your overall layout.
As mentioned, apps tend to be more complex, and building them requires the skills of a developer. However, if your organization needs a strong unique presence on tablets or smartphones, hiring a developer to create a custom app might be worth the investment.
Multimedia Storytelling
Back in our infographics chapter, we talked about the enhanced communication capabilities inherent in infographics packages. Multimedia components enhance your communicating abilities exponentially.
Imagine an interactive multimedia website devoted to the human heart. The centerpiece might be a high-end 3D animation of the inner workings of the heart providing something like a virtual ride through the pulmonary system. We could enhance the online experience with sound effects and narration.
Other interactive features and links would layer additional information. Users might click to learn more about platelets, heart chambers, red blood cells, etc., or even how to read an electrocardiogram (EKG) or become a cardiologist. Users might take a quiz to test their knowledge of or calculate their risks for heart disease. Maybe users entertain themselves competing in a heart health game that pits exercise and eating habits against genetics. How about chatting in real time with a medical expert? Anyone want to upload personal stories, share medical resources or add data to a map? You get the idea.
This type of multimedia design not only requires professionals, it requires teams of professionals. It also requires research, planning and a battery of thumbnail sketches, storyboards, site maps and wireframes.
Should you find yourself part of a team creating an interactive multimedia experience, here are some things to consider:
» Not every story or subject lends itself to full multimedia treatment. Make sure you have a deep, interesting and multifaceted topic to work with.
» Choose the best multimedia elements for your particular content. If you don’t have a good candidate for a talking-head expert or spokesperson, don’t plan to include a video interview. Do consider all your media options, including infographics.
Multimedia Content Toolbox
Multimedia muse Vidisha Priyanka recommends the following for the digital editor/producer’s toolbox:
Text
» headlines
» summaries
» external links
» audio transcripts
» photo captions/cutlines
» blogs/microblogs
Images
» still photos
» illustrations
» infographics
» photo slideshows
» photo galleries
Video
» recorded clips
» live feeds
» historical footage
» animation
» video logs
» tutorials
Audio
» narration (anncr, VO)
» dramatizations
» music
» sound effects (SFX)
» natural (nat) or ambient (ambi) sounds
» actualities (acts or ax)
Interactivity
» live chat
» discussion forums
» feedback
» timelines
» polls
» games
» mashups
» searchable databases
» calculators
» guest books
» augmented reality
» widgets
Data
» numbers
» statistics
» spreadsheets
» lottery results
» archives
User-Contributed Content
» anecdotes
» comments
» photos
» cell phone/mobile content
» videos
» social networks
» user reviews
» wikis
Mobile Content
» really simple syndication (RSS) feeds
» music
» videos
» podcasts
» social networks
» quick response (QR) codes and other mobile scanning
» global positioning system (GPS) applications such as navigation and geo-caching
Site Exposure (Going Viral)
» content- and media-sharing sites for video, photos, news, information, networking

» Elect one medium to tell the main story, and let the other media play supporting roles. Think in terms of creating a content focal point.
» Decide on an overall look and feel. Then choose design elements that support that look and feel.
» Make the interface intuitive. Make buttons look like buttons, and make them easy to find and use. Same goes for links.
» Don’t let the technology get in the way of the information or the story. The technology should be “invisible” to the user.
New technologies can and do inspire designers and visual communicators. But there’s an old aphorism about the shortsightedness of designing the whole living room around the coffee table.

Multimedia storyboarding. When multimedia news pioneers Tim Price and Vidisha Priyanka worked at TBO.com, they collaborated on stories that required all manner of rough storyboarding and site mapping. The storyboarded investigation shown here reported the tragic murder of a lottery winner.
http://www2.tbo.com/static/special_reports_news/shakespear-case/
Source: The Tampa Tribune, HCSO and PCSO
Multimedia designer: Tim Price/TBO.com
Multimedia producer: Vidisha Priyanka/TBO.com
Images courtesy Tim Price, Vidisha Priyanka and TBO.com/ Media General.
► Try This
1. Visit the website of a large news organization. Look for examples of multimedia storytelling. Which multimedia elements are employed? Write a brief critique.
2. Locate some simple logos. Storyboard three options for animating each of said logos.
3. Find a website or online magazine that accepts animated banner ads. What are the specs and requirements for file size, format, duration, etc.? Spend some time exploring the animated banner ads on this site. What animation techniques are being used?
4. Visit a site that sells video and audio clips. What formats do they come in? What styles and genres are available? Find a video clip and some audio clips you like. Brainstorm ways of using them in a website.
5. Storyboard an animated banner ad advertising the site you found in No. 4. Don’t forget the click-through.
6. Produce a 1- to 2-minute photo slideshow or, better yet, an audio slideshow that documents reality. Story ideas to consider include a visual oral history of your oldest living family member, the status of adoptions at your local animal shelter or the hidden story of a nearby nature preserve. Maybe attending and documenting a public event, such as a quilt show, or a political rally is more your speed.
7. After you produce the slideshow above in No. 6, lay out a Web page for that same story that includes: a big type header, a media player for the slideshow, a complementary type story, associated still photography, at least one infographic, and user feedback/comments. Don’t forget to label everything with subheads, captions/cutlines and/or chatter, etc., as seems appropriate.