
Chapter 7
Using and managing built-in Windows apps
Performing screen captures with Snip & Sketch
In this chapter, we discuss many of the programs that are included with a default installation of Microsoft Windows 10. Our goal is to cover the major productivity apps, as well as the apps you can use to manage and edit media files. We omit detailed coverage of such long-in-the-tooth legacy items as Notepad and Paint (worthy programs though they may be), as well as programs that are essentially self-explanatory, such as Alarms & Clock. And we reserve the bigger topic of Microsoft Edge, the default browser in Windows 10, for a separate chapter, the one that follows this one.
In addition to the many legacy applications, Windows 10 offers a whole set of modern productivity and communication apps, all designed for touch and pen as well as more traditional input methods. In addition, not installed by default but available as part of a Microsoft 365 subscription, are the full collection of desktop apps and matching web apps for Word, Excel, PowerPoint, and other familiar productivity tools.
Note
Because Microsoft regularly delivers feature-enhancing cumulative updates to Windows 10, several apps described in this chapter might have undergone changes—some minor, others significant—by the time you read this. We describe the programs as they appeared as of late 2020.
We begin with an overview of apps included with a default installation of Windows 10.
Apps included with Windows 10
Every installation of Windows 10 includes a collection of modern apps that enable the core features of the operating system and add productivity functions. Crucially, they can also be updated through the Store, as needed, rather than requiring a separate update mechanism. These apps fall into three categories: system apps, provisioned apps, and installed apps. In this section, we describe the differences between these categories and inventory the apps that are a part of current Windows 10 versions.
Note that the listing in this section does not include the legacy apps that are included in the Windows Accessories and Windows Administrative Tools folders on Start. Most of those apps were originally designed for use with earlier Windows versions and are included with Windows 10 for compatibility reasons.
Windows system apps
System apps are installed as part of Windows and are considered integral to the operating system. Many of them are essentially invisible, even though you use their features constantly as you work with Windows 10. For example, every time you click Start, you’re launching the Microsoft Windows Shell Experience Host. Likewise, the Search system app goes to work whenever you type in the search box on the taskbar. You regularly interact with the Accounts Control Host and Credential Dialog Host apps without ever seeing their names.
You’re likely to encounter a small group of named apps in this category; that list includes the Settings app (also known as the Immersive Control Panel) and the legacy version of Microsoft Edge.
Most system apps are located in the WindowsSystemApps folder. The two exceptions are the Settings app, whose files are located in C:WindowsImmersiveControlPanel, and the Windows Print Dialog app, which is stored in C:WindowsPrintDialog.
With rare exceptions, system apps cannot be uninstalled through the Windows user interface. In version 1709 and earlier, for example, the Contact Support app could be removed using the options in Settings > Apps; in later versions, these functions are assumed by the Get Help app, which is installed as a provisioned app and not as a system app (see the next section for details about what this means).
To list all system apps, use this PowerShell command:
Get-AppxPackage -PackageTypeFilter Main | ? { $_.SignatureKind -eq “System” } | Sort Name | Format-Table Name, InstallLocation
Provisioned Windows apps
Provisioned Windows apps are installed in a user account the first time you sign in with that account.
You can list all provisioned Windows apps with this PowerShell command:
Get-AppxProvisionedPackage -Online | Format-Table DisplayName, PackageName
In Windows 10 version 2004, the list of provisioned apps includes a small number of core apps that are essential to the operation of Windows but aren’t installed as system apps:
Microsoft Store (which still goes by its old moniker of Windows Store when you use PowerShell to list provisioned apps) is the place to acquire and update modern apps of all kinds; for details, see “Using and managing Store apps” in Chapter 6. Also on the list of provisioned apps is one called the Store Purchase App, which assists with the process of paying for Store apps.
Desktop App Installer provides the capability to install packaged desktop apps by double-clicking an app package, without having to go through the Microsoft Store or use esoteric PowerShell commands. Desktop App Installer can also install a packaged app directly from the web. (A companion provisioned app, the C++ Runtime framework, is also available for packaged desktops that require it.)
The new Microsoft Edge is included as a provisioned app beginning with Windows 10 version 20H2 and replaces the existing legacy Edge installation. For more details, see Chapter 8, “Using the new Microsoft Edge.”
The collection of provisioned apps also includes a healthy assortment of extensions that allow Windows apps to process some relatively new media file formats: HEIF Image Extensions, VP9 Video Extensions, Web Media Extensions, and Webp Image Extension.
In addition, OEMs might include some provisioned apps, such as utilities for managing hardware, as part of their default image for Windows 10 PCs.
In the remainder of this section, we break down the lengthy list of provisioned apps by category.
Information
Cortana is installed as an app beginning with Windows 10 version 2004. Curiously, its name in the list of provisioned apps doesn’t include any hint of its true identity but only a number: Microsoft.549981C3F5F10.
Feedback Hub allows anyone to create, search, share, and upvote bug reports and offer suggestions for the Windows development team.
Get Help puts you in touch with Microsoft’s Virtual Agent. You can tell your troubles to the agent, who provides automated assistance; if that doesn’t solve your problem, you can ask to speak to a live human.
Tips offers videos and other instructional material about Windows 10. (This app was previously known as Get Started.)
Maps displays maps and aerial photos along with directions between points. It also offers a supported way to provide a default location for your PC, as detailed later in this chapter.
Weather displays current conditions and detailed forecasts for locations around the world.
Communications and productivity
The Windows Communications App package includes two apps that can be opened separately but use the same infrastructure: Mail allows you to send, receive, and manage email messages using a variety of industry-standard protocols. Calendar keeps track of appointments and other events. A separate People app manages contact information. (We cover all three apps later in this chapter.)
Skype enables communication via text message and audio/video conferencing.
Your Phone connects your Windows 10 device to your mobile device. On Android devices, it allows you to send and receive text messages and view or copy the most recent 2000 photos on your phone’s camera roll.
Office, which has also been known as My Office, Get Office, and the Office Hub in its short Windows 10 career, provides details about your Microsoft 365 subscription and lists Office files that you have recently worked with.
OneNote for Windows 10 allows you to create, store, and manage notes of all kinds, including documents scanned with a smartphone camera. It works with the same data files as the full-featured OneNote desktop app included with Microsoft 365 subscriptions.
Sticky Notes provides a place to jot small notes that are reminiscent of the ubiquitous yellow Post-it Notes from 3M. These notes can sync with OneNote and with the Microsoft Launcher on Android devices.
Entertainment
Groove Music is the Windows 10 default player app for files in supported audio formats. (For details, see “Music, photos, and movies,” later in this chapter.)
Movies & TV plays personal videos and allows you to purchase or rent movies and TV shows that can also be played on Xbox consoles. (For details, see “Music, photos, and movies,” later in this chapter.)
Microsoft Solitaire Collection includes an updated version of the classic Klondike time-waster, along with four other solo card games, with access to online challenges and tournaments and a paid, ad-free version.
Xbox connects you to the world of computer gaming in genres ranging from card games to shoot-em-ups. (The list of provisioned apps also includes a handful of Xbox-related tools intended to perform under-the-hood tasks, including Xbox Game Bar, Xbox Game Overlay, Xbox Gaming Overlay, Xbox Identity Provider, Xbox Speech to Text Overlay, and Xbox Title-callable UI.)
Creative tools
Microsoft Photos allows you to store, organize, and edit a collection of digital images. We cover this app later in this chapter.
Paint 3D was introduced in Windows 10 version 1703. It was intended as a replacement for the venerable Microsoft Paint, but fans of that ancient program protested so loud that Microsoft canceled its plans to deprecate the older Paint, which still works well and which we recommend over the newer alternative.
3D Viewer is intended for working with 3D models and animations, while Print 3D allows you to print a model on a local printer or send it to an online print service.
Voice Recorder, previously called Sound Recorder, uses your PC’s microphone to record audio files. You can add markers to identify key moments and use the app’s rudimentary editing tools to trim saved audio files.
Mixed Reality Portal helps to configure a 3D headset for use with apps and games that allow the person wearing the headset to interact with an experience that mixes the physical world with digital content. For an overview of the technology, see https://docs.microsoft.com/windows/mixed-reality/.
Utilities
Alarms & Clock shows world time and acts as an alarm, stopwatch, and timer.
Calculator includes a programmer mode (specialized for bitwise operations on binary, octal, and hexadecimal values) along with the more common standard and scientific modes, and it can serve as a handy converter for measurements of volume, length, angles, time, and so on. Beginning with Version 1709, Calculator also performs currency conversions.
Camera captures still images and video from a webcam.
Snip & Sketch is a tool for capturing and editing screen images. This app, introduced in version 1809, is a more versatile program than the legacy Snipping Tool app.
Windows 10 also includes the full complement of small programs that have been part of Windows for decades: Notepad, Paint, Character Map, WordPad, and the like. You can find these programs under Windows Accessories in the list of apps on Start.
Some provisioned apps can be uninstalled using the tools in Settings > Apps. If the Uninstall command is grayed out and unavailable, it may be possible to remove a provisioned app using PowerShell commands; we recommend hiding, rather than uninstalling, any of these apps that you’d prefer not to use.
Installed apps
This last category consists of apps that are installed as part of signing in to a new account, delivered through the Windows Content Delivery Manager. These apps include some third-party products that may include a trial period followed by the requirement to pay for the full product. It also includes some apps from Microsoft.
The list of installed apps changes periodically, based on Microsoft’s partnerships with third-party developers.
For PCs running Windows 10 Home or Pro where the new profile belongs to a local account or a Microsoft account, the list typically includes games such as Candy Crush and Farmville, along with some entertainment software.
You’ll see a different set of installed apps, focused primarily on productivity, if you install Windows 10 Enterprise and sign in using any account type, or if you install Windows 10 Pro and sign in using either Active Directory credentials on a Windows domain or Azure Active Directory credentials, such as those associated with a Microsoft 365 Business or Enterprise subscription.
All apps in this category can be uninstalled using the tools in Settings > Apps. Some of the apps in this category are added to Start as suggestions, rather than being installed. You can remove them from Start, leaving no trace of the app behind.
Mail, Calendar, and People
Although they are tightly linked, Mail, Calendar, and People have separate entries in Start and display their contents in separate windows. (A fourth app, Microsoft To Do, is also a member of this family; for now, it’s available through the Store, but it will be a provisioned app beginning in 2021.) You can switch between them by tapping or clicking icons in the lower-left corner of the window. The People app, whose contents include contacts saved with the accounts you set up in Mail or Calendar, provides a directory of potential addressees when you create Mail messages or invite associates to a meeting. Type the beginning of a contact’s name or email address on the To or Cc line of a message, and Mail will search your contacts in People and display suggestions that match the character you entered; click a suggestion to add it to your draft message.
Setting up and using Mail
The first time you open the Mail app, you’ll be asked to set up accounts, as shown next. If you sign on to Windows using a Microsoft account, the email address associated with that account appears at the top of this setup page. If that’s the only email account you use, you can move on by clicking Ready To Go. If you log on locally or if you’d like to set up other accounts, click Add Account. Mail supports Outlook.com, Office 365 Exchange, Google accounts (Gmail and G Suite), Yahoo! Mail, and Apple’s iCloud, as well as generic accounts based on the POP and IMAP standards. The setup process is straightforward, prompting you for your email address and password:

If your account requires you to enter additional settings, such as the names of your incoming and outgoing servers, scroll to the bottom of the Add An Account list and then click Advanced Setup.
Adding and deleting accounts
To add email accounts after completing this initial configuration, open Settings by clicking the gear icon in the lower-left corner of the Mail window. Click Manage Accounts > Add Account. To delete an existing account, select it in Manage Accounts. Note that if you sign in with a Microsoft account, you cannot delete the Mail and Calendar account associated with that address. You can, however, turn off email sync options for that account, as described later in this section, which removes its entry from the Accounts list.
Linking inboxes
If you have two or more email accounts, Mail will create a separate inbox for each. Thus, you’ll see all your messages from the first account, followed by all your messages from the second, and so on. You might find it more convenient to link the accounts, thereby creating a unified inbox. To do this, open Settings > Manage Accounts > Link Inboxes. Mail presents a dialog box listing accounts available to be linked:
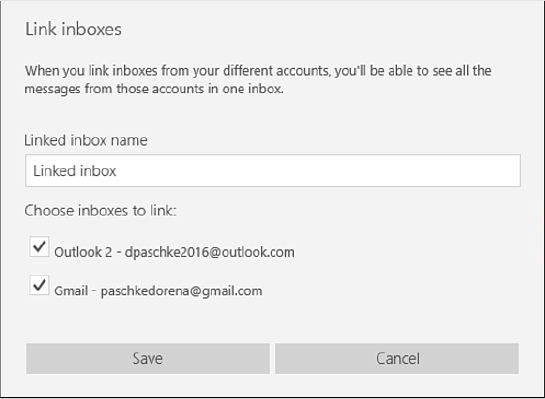
Supply a name for the combined inbox if you don’t like the generic name that Mail proposes. Then select each account you want to be part of the combine. If you change your mind, you can unlink the accounts by returning to this dialog box and removing check marks.
Setting sync options
To configure sync options for an account, go to Settings > Manage Accounts, select the account you want to configure, and then click Change Mailbox Sync Settings. Note that with a combined inbox, you still configure the component accounts individually. For example, if you have one email account for personal messages and another for business, you can opt to have the one synced every 15 minutes and the other only once every two hours. If you have an account you use primarily as a repository for commercial messages, you might want to set that account up so that only the most recent week’s worth of messages appear in Mail.
The default sync settings are shown in Figure 7-1. On Outlook.com and Office 365 Exchange accounts, synchronization is automatic and continuous. On accounts that use POP and IMAP to send and receive messages, Mail bases its sync frequency on your usage patterns. If you use the app with any significant frequency, it will fetch messages at shorter time intervals. In any case, you can override the app’s decision-making and configure a predetermined sync interval by opening the drop-down menu at the top of the dialog box. (This menu also includes the power-saving option to sync manually rather than at predetermined intervals.) Note that sync settings for an Outlook.com or Office 365 Exchange account do not include the option to base downloads on usage patterns.

Figure 7-1 Sync settings for Microsoft email accounts, left, do not include the option to download content based on your usage patterns, as shown in the Gmail account settings, right.
Because sync settings apply to the device on which they’re configured and do not transfer to other devices, you can easily set up different devices for different usage scenarios. Let’s say, for example, that you have a desktop computer for use in the office and a Surface Pro tablet for use on the go. You might configure the office PC to download all mail from your server (by opening the Download Email From drop-down menu and clicking Any Time) but save disk space on the Surface Pro by collecting only messages from the last two weeks.
Setting notification options
By default, Mail announces the arrival of new mail by posting a notification to Action Center. You have the option of adding banner and audible notifications. Or you can dispense with notifications altogether. To make your wishes known, in Mail go to Settings > Notifications.
Reducing mailbox clutter with Focused Inbox
Focused Inbox is a feature that uses machine learning to sort your incoming messages into two groups: those that Mail thinks you will want to read immediately and those that are less important. With Focused Inbox, two tabs appear above the list of messages in the message header pane—Focused and Other—as shown in Figure 7-2. Incoming messages that Mail deems important appear on the Focused tab, whereas all others fall under Other.
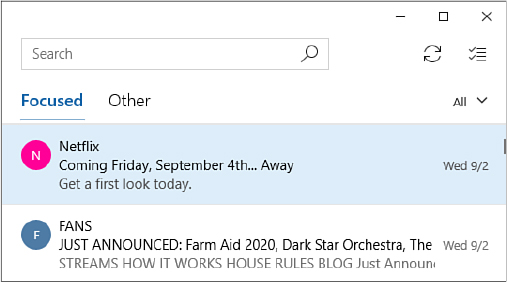
Figure 7-2 Focused Inbox divides messages into two sets, called Focused and Other.
Mail makes its determination based on the message content and on whom you exchange mail with most frequently. You can train the Focused Inbox feature to work more accurately by right-clicking a message in the message list and choosing Always Move To Other or Always Move To Focused, as shown in the next image. Use the Move To Focused or Move To Other command to move a single message from one category to the other without changing future actions for messages from that sender.
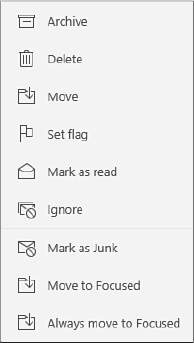
Note the Ignore option on that menu, which allows you to tell Mail to stop showing you messages in a specific conversation. This option is extremely handy if you’re part of a mailing list whose members can’t stop adding to a long, ongoing thread.
To turn the Focused Inbox feature on or off, in Mail go to Settings > Focused Inbox. Note that Focused Inbox might not be available for all types of mail accounts.
Creating a new message
To create a new message, click the New Mail icon. Above the To and Subject lines, you’ll find a ribbon that provides an elaborate set of editing tools, derived from Microsoft Word. For example, a wealth of styling options is available via the Format tab on the ribbon. Use the arrows on the ribbon to see the full set of options at your disposal:

To attach a file to your message, click the Insert tab. You can use that part of the ribbon to insert tables, pictures, and hyperlinks as well. Alternatively, you can create an attachment by dragging a file into your new message document. Mail also provides a proofreader; click Options and then click Spelling to check the spelling of your messages.
On devices that support a pen, a Draw menu option allows you to add drawings or annotations to a message using familiar drawing tools.
In a new Mail message or a reply, you can insert @mentions into an email message. An @mention of somebody’s name highlights their name in the message and adds it to the To line of the message header, helping to ensure that they see your message.
To use this feature, in the body of your message, type an @ sign and then begin typing a name or email address. Mail displays a list of suggestions that match your characters; click to add the name to your message.
After you select a contact, the name is highlighted in the message body and the name is added to the To line if it’s not already there. You can then edit the name in the message body if you like; for example, you might want to keep things informal by trimming off the last name.
When people receive a message with an @mention, it remains highlighted for good visibility. In addition, the highlighted name is a mailto: link, so when recipients click the name, it opens a new message window with the name already in the To box.
You can filter your inbox to show only messages that include an @mention with your name. Click the arrow at the top of the message header pane and choose Mentions.
Using folders
The pane to the left of the message headers provides a list of system folders—Inbox, Drafts, Sent Items, and Archive—plus any folders you designated as favorites. (If the Mail window is too narrow, you’ll need to click the hamburger icon to see the folder list.) Other folders you have created on your mail server or within Mail are listed in an additional pane that appears if you click More. To create a folder in Mail, click More, and then click Create New Folder (the plus icon), to the right of All Folders or, in a combined inbox, to the right of the account name.
You can add any of your own folders to the Favorites list by right-clicking the folder and then clicking Add To Favorites. Once ensconced in the Favorites list, a folder name makes a convenient drag-and-drop target for received messages. You can also move a message from the headers pane to any folder by right-clicking the header and then clicking Move.
Setting up and using Calendar
In Mail, Calendar, and People, you can use the icons at the lower-left corner to switch from one app to another. If you’re already running Mail or People, a quick tap opens Calendar in a new window, or switches to Calendar if it’s already open. Alternatively, you can launch Calendar from Start.
Accounts set up in Mail are used in Calendar and vice versa. You can add or modify accounts in Calendar as you would in Mail; click Settings > Manage Accounts. If you’re using multiple accounts, your Calendar events will be distinguished by color; you can also set the color by right-clicking an event in the calendar, choosing Categorize, and selecting a color. If the display gets noisy, you can use the check boxes in the left pane, below the thumbnail calendar, to filter particular components of your composite calendar.
If you don’t see this pane at the left of your screen, click or tap the hamburger icon in the upper-left corner. Doing this removes or redisplays the left pane. (You’ll find it useful particularly on a small display.)
Here you can specify which color is used to display each calendar: Point at a calendar, click the arrow that appears to its right, and then select a color.
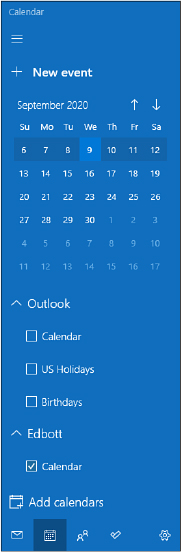
You can also add specialty calendars that show schedules for sports teams, your favorite television shows, and so on. To do that, click Add Calendars. (If you have multiple accounts set up in Calendar, you specify which one displays the calendars you add by going to Settings > Calendar Settings > Interesting Calendars.)
Adding an event
To add an event to your calendar, either click or tap New Event, or click the calendar itself. If you click New Event, you get the full Details window for the event. If you click a day or an hour on the calendar, you get a smaller version of this window, and you can move to the full view by clicking More Details. In either case, if you have Calendar configured to use more than one account, you’ll want to specify which account the new event should belong to.
In the Details view, you can use the Reminder list to specify your preferences regarding alerts. Calendar defaults to a 15-minute heads-up, but you have lots of alternatives, including None. Note that Calendar’s live tile (if you have the app pinned to Start) will also alert you to upcoming events. Set the size to wide if you want to see multiple events on the live tile. Depending on your settings, Cortana can offer reminders as well.
Figure 7-3 shows the details of a recurring event. To create such an item, click the circular Repeat icon and specify your parameters. Calendar offers daily, weekly, monthly, and yearly options.

Figure 7-3 Clicking Repeat opens a new set of options, where you can specify yearly, monthly, weekly, or daily parameters for a recurring event.
Inviting others to a meeting
To create a meeting event and invite others to join, add the email addresses of your invitees to the People section of your Details view. Then click Send. Each of the invitees will get an email message allowing him or her to send back a yes/no/maybe response. The Accept, Tentative, and Decline links, with associated drop-down options, make it easy for the invitee to respond to the invitation.
Setting options
To specify the days of your work week and the hours of your work day, click Settings > Calendar Settings. You can do a few other things as well on the Calendar Settings page, such as opting for week numbers and switching to alternative languages and calendars. If you stick with English, the calendar choices include Hijiri, Umm al-Qura, Hebrew Lunar, and Saka Era, in addition to the default Gregorian. Many other options are available for languages other than English.
Printing from Calendar
To print, click Show (the ellipsis icon in the upper-right corner of the Calendar window) and then click Print. There you can specify the starting date for your output as well as whether to print the day, week, work week, or month. A preview button gives you the opportunity to check before you commit.
Adding or editing contacts with People
People acts as a repository for contacts derived from the accounts you set up in Mail or Calendar. You can launch People from the icon at the bottom-left corner of those apps as well as from Start. People lists your contacts, summarizing recent communications and calendar entries for the selected contact in a Timeline pane. In the Timeline pane, you can click an entry to open a message in Mail or Calendar.
When you first run People, the app prompts you to add accounts. Contacts will then be imported from the accounts you name. You can select a variety of accounts, including Outlook, Gmail, Exchange, and iCloud. If you use the People tab in the Photos app (see “Photos and videos,” later in this chapter) to identify people in your pictures, those people also become available as contacts to the People app.
You can also add contacts directly in People. Click the Plus button along the top of the People window to open an editing form.
People contacts can be pinned either to Start or to the taskbar for easy access and use. Click the Pin Menu button near the upper-right corner of People to pin the current contact to either location. (For more about pinning contacts to the taskbar, see “Pinning people to the taskbar” in Chapter 3, “Using Windows 10.”)
Using Skype
Skype for Windows 10, Microsoft’s internet video telephony and messaging tool, has been installed as part of Windows 10 since version 1703. You can also run Skype in a web browser by going to https://web.skype.com.
The modern Skype for Windows 10 app, which is available through the Microsoft Store, and Skype for Desktop, which you can find at skype.com, are functionally similar and use the same accounts and contact lists. You can log in and use whichever seems most convenient and comfortable on the device you’re using.
Microsoft continues to invest significant development effort in Skype. You can peruse a log of feature changes dating from the present back a few years by visiting https://bit.ly/skype-windows10-new.
Microsoft also offers a more richly featured communications product called Microsoft Teams (which is the successor of Skype for Business), as part of Microsoft 365 Business and Enterprise subscriptions. A free version is also available for small businesses and schools. For details, see http://bit.ly/teams-freemium.
Getting started
When you first run Skype, the program prompts you to create an account or sign in to an existing one. You can use your Microsoft account if you don’t already have a Skype account.
Before you start making calls, you might want to check your video, microphone, and speaker settings. Click More (the ellipsis icon above the pane on the left), click Settings, and run the tests under Audio & Video.
To find a contact, in the Search box, type your contact’s Skype account name, if you know it, or an email address. You can also type the contact’s name, but this approach might produce a long list of Skype users with identical first and last names. When you find the person you want to add, click the name to see relevant options, which depend on whether the person has a Skype account, whether you’ve chatted before, and other factors. You can right-click a name and choose Add To Favorites so that it appears prominently in your list of contacts.
Note that if you receive an unwanted contact solicitation and choose to decline, the Decline button provides additional options to block the request or report it as spam.
With your equipment checked out and your contacts list populated, you might then want to flesh out your own profile—the information your contacts will see about you. The profile screen appears when you click your own picture or name in the upper-left corner of the window, and here you can add phone information and other details. If you shot your profile photo with the rear-facing camera by mistake or simply want to transmit a different image, click Change Picture.
Placing or answering an audio or video call
To initiate an internet call, click your contact’s name and then choose one of the options that appear above the pane on the right:

Click Create Group (the rightmost icon) to add one or more people to the call. The phone icon in the center makes the call audio only. Choose the camera icon on the left to send video as well. You can also switch in and out of video during the call if the need arises—for example, if your internet connection is not strong enough to support video transmission.
Similar buttons appear if someone places a call to you. Before you answer, you’ll also get an audio signal to alert you to the call.
Calling people who don’t have Skype or aren’t online
With Skype, you can also place Voice-over-Internet-Protocol (VoIP) calls to people who don’t have Skype accounts or are not online. The calls are charged at per-minute rates that vary by country or region. Before placing a call, you can buy credit by clicking your profile icon and choosing Skype To Phone.
When you’re ready to call, press Ctrl+D. On the dialer that appears, type or click the numbers to dial, and then click the phone icon. Note that you can also enter letters, which is handy for phone numbers—usually for a business—that are presented as letters or a word.
While you’re on a call, notice that when you switch to another app, Skype switches to mini view—a small window that includes the video (if it’s a video call) and controls for muting your microphone and hanging up the call. The window stays in front of other windows, leaving you a small, but unobstructed, view of the action.
Sending text or video messages, pictures, or files
To send a text message, select a contact name and then type in the text box that appears at the bottom of the window. (You can also send text while you’re in an audio or video call.) To send a video message to someone, click the video-camera icon to the right of the text box. Your camera will come to life, your shining visage will appear on the screen, and you can click the red Record button when you’re ready to start. Click the Send button when you’re satisfied and ready to transmit.
To send a photo or a file, click the nearby Add Files icon.
Using OneNote
OneNote is Microsoft’s extraordinarily versatile note-taking machine. You can use it as a personal organizer, recording outlined and free-form notes, drawings, embedded video and audio, attached files, and so on. You can also use it as a collaborative tool, sharing notebooks with other members of a project team.
Like Skype, OneNote comes in desktop and modern variants. The Store app, officially known as OneNote for Windows 10, is included in all Windows 10 installations; the desktop version is part of the Microsoft Office family and is included with Microsoft 365 business subscriptions. Versions for Android devices and iPhone are also available through their respective app stores.
OneNote for Windows 10 uses OneDrive to store and sync notebooks, which means you can add or edit pages from any device in any location and access that content on every other device where you’re signed in with the same account. The desktop OneNote app allows you to open, save, and edit notebooks stored locally or on OneDrive or OneDrive for Business.
Over time, the capabilities of the modern OneNote app have expanded dramatically. Unless you have a specific reason to prefer the desktop app, we recommend using this version.
If you’re new to OneNote, these core principles will get you started:
Notes are stored in notebooks, which are subdivided into sections. Each section consists of one or more pages. OneNote creates a default notebook that contains a single section (called Quick Notes) with no pages. Sections are identified by tabs arranged vertically beneath the notebook name, and pages appear in a vertical pane to the right of the selected section. You can create an unlimited number of new notebooks and add as many sections and pages to existing notebooks as you want.
OneNote saves everything you enter immediately and instantly. If your notebook is stored on OneDrive, you have access to it from anywhere, including mobile devices.
OneNote is a free-form editor. You can type or jot anywhere on the page. With drawing tools, you can create sketches or annotate your notes.
From OneNote for Windows 10, you can share any notebook.
Using Maps
Mapping applications have long been one of the indispensable tools of modern life. Microsoft’s modern Maps app should serve you well, whether you want to explore a new city, plot a road trip, find a restaurant or a bank, print a set of turn-by-turn directions to take with you on the road, or just enjoy aerial views of the world or your neighborhood.
On first run, Maps asks for permission to track your location information. If you consent, Maps will plant a marker at your current location. Tapping Show My Location (the target-shaped button in the toolbar on the right side of the screen) at any time displays your current location, assuming the program knows where that is. (The keyboard shortcut Ctrl+Home performs the same function.)
Searching for places and services
To find a location, click the Search tool on the left or press Ctrl+F. You can type an address, the name of a person or business in your contacts list, or the name of a place known to Maps—an institution or a restaurant, for example. As shown in Figure 7-4, Maps displays the location on the map, one or more street-side pictures, and other interesting information. If you search for a restaurant known to Maps, you’ll also be rewarded with reviews, hours, and website information. The panel of icons in the What’s Nearby section of this information pane offers single-click searches for nearby restaurants, attractions, malls, hotels, banks, hospitals, and parking facilities.
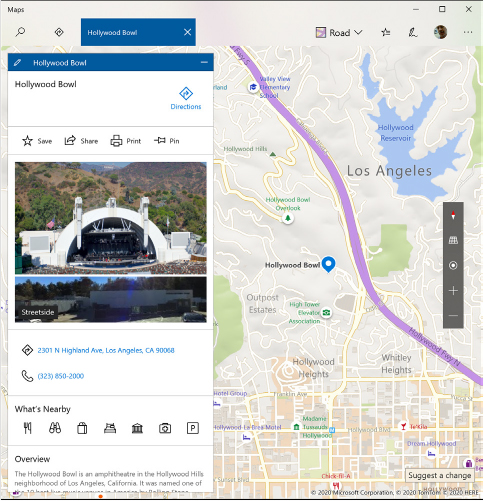
Figure 7-4 In addition to displaying your search item on the map, Maps displays a street-side picture and a considerable amount of related information. Clicking Tilt Up displays a 3-D map so you can better visualize the topography.
Getting directions
To get directions, click the Directions icon (to the right of the Search icon) and then type your starting and ending points. (One of them might already be in place if you just searched for it.) Maps responds with a set of route alternatives.

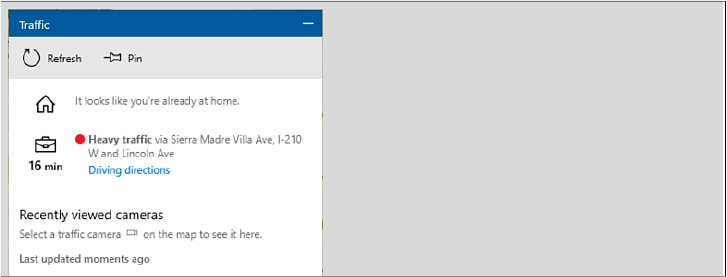
Click or tap the left side of one of these alternatives to see particular steps in the route. Click or tap Go to see and hear turn-by-turn instructions. If you want a more detailed look at traffic conditions than the “Light traffic” indication with the directions, tap Map Views (the first icon in the bar along the top side) and turn on Traffic. Optionally, Maps can display the location of traffic-jamming incidents and traffic cameras. Click one of those to get a preview of your upcoming drive.
Maps defaults to showing driving directions. To see public transportation information instead, click the bus icon near the upper-left corner of the directions pane. Maps shows you the best route and includes helpful information about how to watch for your stop on the transit system. For a trip from Columbia University to Carnegie Hall, for example, the resulting instructions include this tip about getting off the train: “Previous stop is 66 St – Lincoln Center. If you reach 50 St., you’ve gone too far.” You can also tap on a bus stop on the map to see when the next bus will arrive at that stop.
If you’d rather walk than ride, click the humanoid icon next to the bus icon. Maps calculates its walking time at a rate of about 2.3 miles per hour. If you usually walk or ride public transit, you can change the default by clicking See More > Settings, and opening the Preferred Directions list.
On the right side of a map’s display, Maps offers a panel of additional options, allowing you to change the compass heading, switch between plane and elevation views, display your current location, and zoom in and out.
Sharing maps and creating reminders
To send someone a map, display the map and then click See More > Share. Maps opens a panel of sharing options.

Downloading maps for offline use
If you’re out and about without a data connection for your portable device, you can still use maps that you previously downloaded. To take advantage of this feature, go to Settings > Apps > Offline Maps. To download a map, click the plus sign. On subsequent screens, you can choose the particular map you want.
Maps are updated frequently. To ensure that you have the most recent data, set the Automatically Update Maps switch at Settings > Apps > Offline Maps to On.
Performing screen captures with Snip & Sketch
Pictures speak louder than words, and sometimes an image capture of the current window or screen can be the ideal way to enhance a PowerPoint presentation, explain a procedure, or remind yourself at some future time of what you were doing and how. All Windows versions, from the very first to the present, have offered two keyboard shortcuts for capturing screens:
PrtScn captures an image of the entire screen. If you have multiple monitors, the image includes all screens.
Alt+PrtScn captures an image of the current window.
Both capture methods post bitmaps to the Clipboard, and you can paste the results into any program that accepts graphics.
Note
These two screen-capture methods can also save an image file (in PNG format) to OneDrive automatically. To turn this feature on or off, right-click the OneDrive icon in the notification area and choose Settings. You’ll find the setting on the Backup tab under Screenshots.
Recent Windows versions offer two additional built-in shortcuts:
Windows key + PrtScn captures an image of all current screens (including secondary screens) and saves that image as a PNG file in the Screenshots subfolder of your Pictures folder.
Windows key + Shift + S dims the screen and displays a toolbar at the top border of the screen, with four options that you can use to capture all or part of the current display, as shown here:

From left to right, these options allow you to specify any of the following types of snips:
Rectangular Snip Click to define one corner of the area you want to capture and then drag diagonally, releasing the mouse when you reach the opposite corner of the rectangular area.
Freeform Snip Click and drag in any direction to define an irregular shape.
Window Snip After selecting this option, move the mouse pointer over the window you want to capture until it appears undimmed and then click.
Fullscreen Snip Click anywhere to capture the entire display.
When you finish your capture, your selection is copied to the Clipboard and a notification appears in the lower-right corner of the screen and in Action Center. Click that notification to open your saved capture in the Snip & Sketch app.
Note that Snip & Sketch made its formal debut with version 1809. Earlier versions included a similar but slightly less versatile app called Snipping Tool.
Music, photos, and movies
A decade ago, your PC was the indispensable hub of digital media. Music and movies were delivered on shiny discs, and you needed a desktop or laptop PC to rip CDs, watch a movie while traveling, transfer photos from your digital camera, and share your photos on social media.
Today, the increasing sophistication of smartphones and tablets, coupled with cloud-based entertainment services, means the PC is no longer a hub, and shiny discs are now an endangered species. The PC is still uniquely qualified for tasks that involve editing and managing a personal media collection and syncing it with cloud services, but for playing those files, you’re more likely to use a smaller mobile device.
The three core media apps included with Microsoft Windows 10—Groove Music, Photos, and Movies & TV—are tightly connected to the cloud, although the demise of the Groove Music Pass at the end of 2017 removes at least one of our favorite cloud connections. Like other apps built for Windows 10, they’re touch-friendly but also work well in a window on a conventional PC. And because it’s possible to update these apps through the Store, they have evolved significantly since Windows 10 debuted in 2015. In the following sections, we cover the most recent releases of these apps.
If you’re worried that the digital media landscape in Windows 10 will be completely alien, we can reassure you that a couple of familiar touchstones remain: Windows Media Player is still available for playing music and movies on a desktop or portable PC and, yes, Paint is still around for basic photo-editing tasks. Both programs are essentially unchanged from their Windows 7 incarnations.
In the living room, it’s still possible to connect a PC to a home entertainment system directly, although the experience is less enjoyable than it used to be now that Windows Media Center is no longer available with any edition of Windows 10. (In fact, Media Center is removed from your system when you upgrade from a prior edition.) More modern alternatives include streaming content from a Windows tablet or PC to a large display (like your big-screen TV) by using built-in support for the Miracast standard. And if your living room or rec room includes an Xbox One game console, it’s easy to connect to a Windows 10 PC.
Music
No, you’re not seeing double. Windows 10 includes two programs whose primary purpose is to play digital music files:
Groove Music is a modern Windows app and the default app for playing music files in Windows 10. It’s the direct successor to the Xbox Music app from Windows 8.1, and it traces its ancestry (at least indirectly) to the late, lamented Zune Music app. Using Groove Music, you can play music and audio files in various formats.
Note
On January 1, 2018, Microsoft shuttered the Groove Music Pass subscription service and also ended sales of albums and tracks in the Microsoft Store. The Music tab is no longer available in the Microsoft Store app, and tracks that were added to a music collection as part of a Groove Music Pass subscription no longer play. In addition, you can no longer use Groove to stream a personal music collection from OneDrive.
Windows Media Player in Windows 10 is virtually identical to the version shipped with Windows 7. (The single, very large, exception is support for files saved using formats based on lossless compression.) The most distinctive feature of Windows Media Player compared with Groove Music is its ability to play CDs and rip their contents to digital formats. It can also sync content with some older models of portable music players.
Both programs create indexed libraries from the contents of folders in your Music library. The indexes are stored separately.
Both programs support the same selection of audio formats, most of them compressed. For practical purposes, audio files must be compressed; using the uncompressed WAV format, a typical 60-minute CD will consume more than half a gigabyte of disk space. Compressing the files means you can store more music on your hard disk, and it makes the process of backing up and streaming music files easier and more efficient.
When it comes to compression, Windows 10 supports both lossy and lossless formats. Most popular algorithms used to compress audio (and video) files are lossy, which means that they achieve compression by eliminating data. In the case of audio files in the popular MP3 and AAC formats, the data that’s tossed out during the compression process consists mostly of frequencies that are outside the normal range of human hearing. The level of compression is determined by the bit rate. Higher bit rates preserve more of the original sound quality of audio tracks but result in larger files on your hard disk or portable player. Lower bit rates pack more music into limited space at a cost in fidelity.
The more compressed a music file is (that is, the lower its bit rate), the more likely you are to notice degradations in audio quality.
Windows 10 supports three different lossless compressed formats: Windows Media Audio Lossless, Apple Lossless Audio Codec (ALAC), and Free Lossless Audio Codec (FLAC). When you have a choice of formats, we recommend FLAC, which is widely supported and stores music files efficiently without sacrificing any information. In theory, at least, a track saved in any of these lossless formats should be indistinguishable from the original.
Using Groove Music
Every installation of Windows 10 sets Groove Music as the default music player, unless you choose a different app when you first set up a user profile. If you used this app in its previous incarnations, the basic look and feel should be familiar. One area that has changed repeatedly over the short life of Windows 10 is the primary navigation list at the top of the pane on the left. With the demise of the Groove Music Pass service, this section now contains only three links: My Music, which displays the contents of albums and songs in your music library; Recent Plays, which shows the names of tracks and albums you’ve been listening to lately; and Now Playing, which shows the currently selected album or playlist.
Below those core navigation links is the Playlists option, which opens a pane where you can create custom playlists from tracks in your library and manage previously created playlists.
The navigation pane—that thin column of icons on the left—follows the same interface conventions as other modern apps. If the app’s window is wide enough, the labels for the navigation pane appear automatically; to make those labels visible, or to hide them if you want more room for the current view, click the Maximize/Minimize Navigation Pane (aka “hamburger”) button at the top of the pane. Figure 7-5 offers an overview of the Groove interface with the navigation pane expanded to show all its labels.
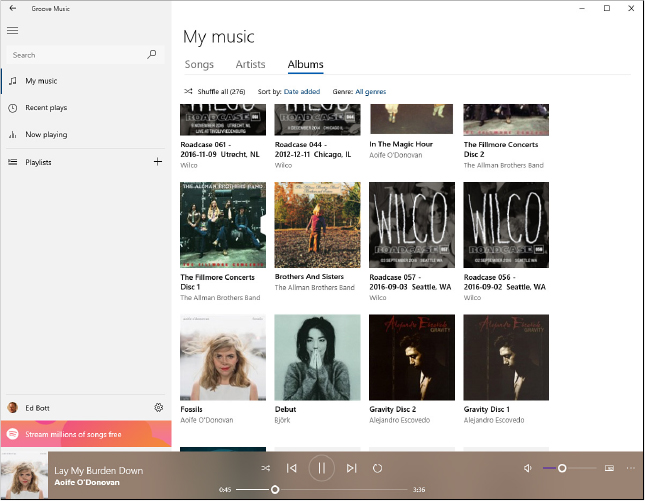
Figure 7-5 The Groove Music app’s contents pane offers multiple views of your collection, available via icons in the navigation pane on the left. Sort or filter the current view using controls at the top.
The design of the Groove Music app isn’t difficult to figure out. A menu pane on the left provides a way for you to choose what you want to play from your local music collection. To change the way your collection is displayed, click the My Music tab and then choose Albums, Artists, or Songs. To display the current album or playlist, click Now Playing. Your custom playlists appear at the bottom of the left pane.
Figure 7-6 shows the options that appear when you click to display the contents of an individual album. (A menu of additional options for the album appears when you click the ellipsis to the right of the Add To command.)

Figure 7-6 The options at the bottom apply only to the current selection. Use the Add To option to send tracks or an entire album to a custom playlist.
The option to select individual songs from an album or playlist (or from the Songs view) isn’t immediately obvious. When you select an album, for example, track numbers appear to the left of each song. Move the mouse pointer over the track to reveal a check box where the track number had been, along with Play and Add To buttons. (With songs in a playlist or in the Songs view, the check box appears to the left of the track name.) After you click to select one song, check boxes appear to the left of all other tracks in the current album or playlist.
As we noted earlier, Groove Music no longer integrates with OneDrive. Any compatible files you save to the Music folder in OneDrive must be synced to the local device to be available for playback.
As Figure 7-7 shows, search terms you enter in the box at the top of the navigation pane return results showing artists, albums, songs, and playlists from your collection.

Figure 7-7 Use the search box in the upper left to display results that match artists, albums, and songs from your collection.
Troubleshooting
You can’t hear any sound from your speakers
Modern PCs often have multiple playback channels, in both digital and analog formats. Audio playback hardware can be found in various locations: on your motherboard; as an optional feature on an add-in video card, with multichannel sound typically delivered over an HDMI cable; on an add-in sound card; or through headphones connected physically or wirelessly using a Bluetooth connection. It’s not unusual to find multiple audio playback options in a single PC, especially one that has been upgraded extensively.
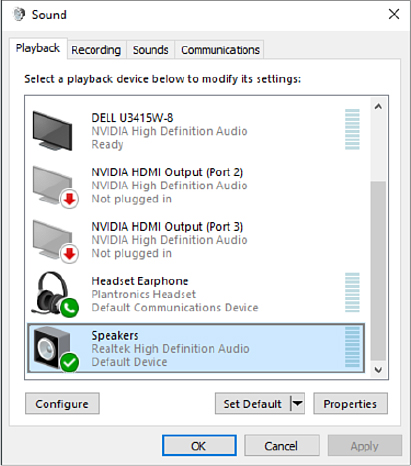
If your hardware and drivers appear to be installed correctly, but you’re unable to hear any sound, click the speaker icon in the notification area and look at the playback device listed above the volume slider. Click the arrow to its right to choose from a list of alternate playback devices.
To change the default device, right-click the speaker icon in the notification area at the right side of the taskbar and click Sounds. This opens the Sound dialog box from Control Panel; select the Playback tab. Look for a green check mark next to the device currently designated as the default playback device. In the following example, the built-in speakers are disabled, and headphones connected via Bluetooth are used for communications programs and for playback. To change the default playback device, click the Speakers/Headphones option that corresponds to the device you want to use (the exact wording varies depending on how the driver developer chose to implement it) and then click Set Default:
 For details on how to configure hardware and install drivers to unlock the functionality of those devices, see Chapter 14, “Hardware and devices.”
One new and noteworthy feature that arrived in Groove Music after the release of Windows 10 version 1803 is the playback equalizer. From the Settings page, click Equalizer to open the control shown in Figure 7-8, and then drag the sliders for each of the five frequency ranges up or down. You can choose from several preset arrangements or create a single Custom setting. Choose the Flat option to play back with no adjustments.
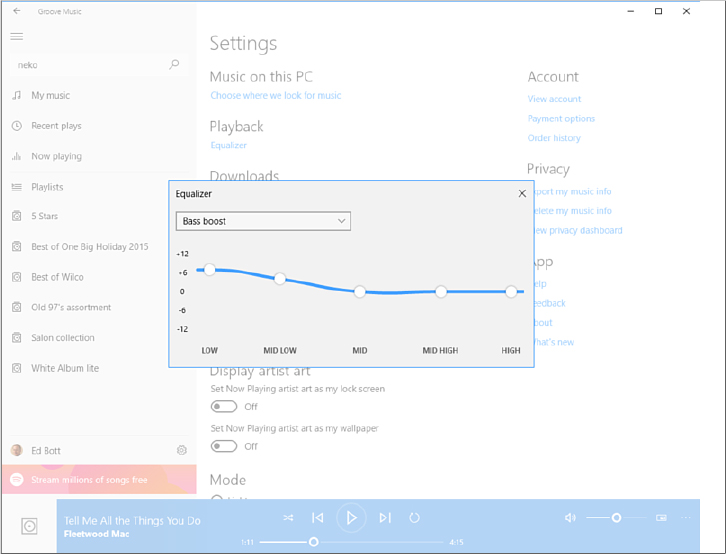
Figure 7-8 The Playback equalizer feature, introduced in mid-2018, allows you to emphasize or soften audio frequencies to compensate for room acoustics or playback equipment.
Using Windows Media Player to rip CDs
If you prefer the familiar Windows Media Player interface to the more modern Groove Music app, relief is a search away. We don’t recommend Windows Media Player for new Windows 10 users, but if you’re already comfortable with its quirks, it’s a thoroughly appropriate choice.
We don’t include exhaustive instructions for Windows Media Player in this edition. (If you’re interested in that, pick up a copy of Windows 7 Inside Out from Microsoft Press, 2011.) The single most important task Windows Media Player can perform that Groove Music can’t is to convert (“rip”) tracks from an audio CD and save them in digital formats on your local hard drive, as shown in Figure 7-9.
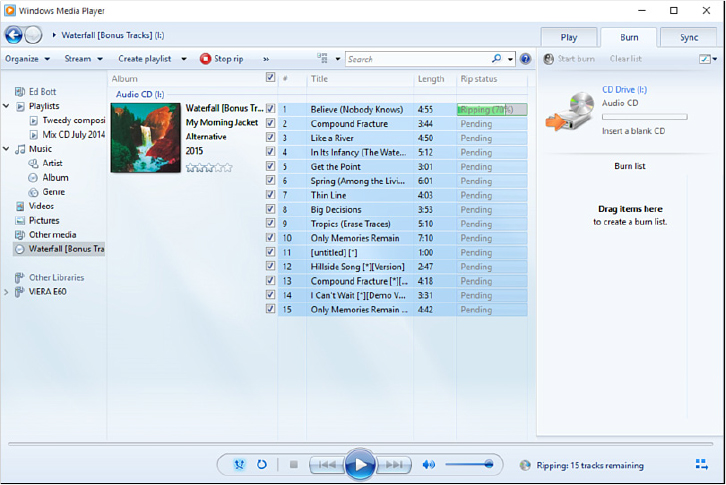
Figure 7-9 The best reason to use Windows Media Player is to rip an audio CD to digital format, a task that Groove Music can’t perform.
When you’re connected to the internet, Windows Media Player consults its online data sources to determine the name of your disc, as well as the names of the artist or artists and tracks and the genre of music the disc contains. This information is used to automatically tag and name tracks. You can use Windows Media Player, File Explorer, or a third-party tag editor to change those tags if necessary.
Windows Media Player copies each CD track to a separate file and stores it, by default, in the Music folder in the user profile of the currently signed-in user (%UserProfile%Music). Using the album metadata, Windows Media Player creates a folder for each artist and a subfolder for each album by that artist.
The digital files you create by ripping a CD are completely free of technical restrictions on your ability to play them back or make identical copies: you can listen to the saved tracks on your PC or on a mobile device, burn a collection of tracks to a custom CD, or copy those tracks to another PC or to OneDrive. Before you use Windows Media Player to rip a CD, however, it’s wise to check the program’s settings.
For compatibility with the maximum number of devices, the widely used MP3 format is best.
To set your preferences after inserting a CD, click the Rip Settings button on the Player toolbar. (You can also reach this dialog box by clicking Organize > Options, and then clicking the Rip Music tab.) Click Format, and then choose one of the eight available formats, as shown in Figure 7-10. If you choose a format that allows lossy compression, use the slider at the bottom of the dialog box to choose a quality level.
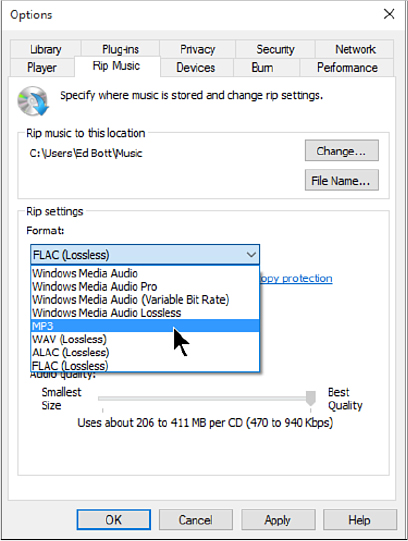
Figure 7-10 Before ripping a CD, be sure to choose a format and quality level here.
As long as you have that dialog box open, use the options at the top to specify the location where you want your ripped files saved and to define the default naming convention for individual tracks.
Photos and videos
Windows 10 includes two built-in apps suitable for viewing, managing, and editing photos in digital image formats. In this section, we concentrate on the Photos app, with a nod to the grizzled elder of image editors, Paint, which remains primarily for compatibility’s sake. Another legacy tool from bygone days, Windows Photo Viewer, isn’t included with a clean Windows 10 installation, but it might still be available if you upgraded from Windows 7 or Windows 8.1. We can’t think of a good reason to use this outdated program.
The Photos app has undergone significant changes since the original edition of this book. These updates, which occur much more frequently than the twice-a-year Windows 10 feature updates, have smoothed the rough edges in its interface and added some notable features. Figure 7-11 shows the user interface of the Photos app as of September 2020, with the entire collection available for browsing and editing.

Figure 7-11 In Collection view, the Photos app displays your collection of digital pictures by date, with newest photos first. Use the timeline on the right to jump to a different date.
As with its music and movie counterparts, the Photos app displays the contents of all files it finds in your Pictures library. It also includes the option to show photos and videos from OneDrive, even if those files are not synchronized with your PC or tablet.
The navigation links above the contents pane include two alternative views you can use to organize photos into albums or browse the contents of your collection by folder rather than by date. A People tab uses facial recognition and manual tagging to help you find pictures containing friends and family members. We discuss Albums and Video Projects later in this chapter.
Several options in the Photos app’s Settings page are worth checking before you invest a lot of time and energy learning its inner workings. Figure 7-12 shows some of these options.

Figure 7-12 To view settings for the Photo app, click the See More menu on the opening page (identified by three dots in the upper-right corner) and then click Settings.
At the top of the page, not shown here, is a Sources list, which allows you to specify which local folders include photos you want to see in your collection. Beneath that entry, shown earlier in Figure 7-12, is a switch you can use to include photos and videos from OneDrive. Beneath that switch is an option to select which photos and videos to include from your cloud collection. If you don’t want album art from the Music folder and random images from your Documents folder visible in the Photos app, select Pictures Folder Only. If you prefer to see only files in selected folders that are synced to your local PC or device, turn this option off and add the local synced OneDrive folders to your Pictures library.
The Linked Duplicates setting under the Viewing And Editing menu is intended to eliminate the frustration of seeing multiple copies of the same image. This can occur if your camera captures images in RAW format but also saves a lower-resolution copy for easier downloading on space-sensitive mobile devices. You can see the full selection of image files by using File Explorer.
Two options beneath that offer control of people tagging and control of how your mouse wheel behaves when you’re viewing a single photo.
Clicking an individual photo from your collection or from a folder or an album opens it for viewing, sharing, and editing, with an array of tools appearing in a bar above the image, as shown in Figure 7-13. (If the menu bar is hidden, click the image to make it reappear.) Note that we clicked the Edit & Create command to display a menu of additional choices; clicking the ellipsis at the end of the menu bar shows a separate drop-down menu with still more options.

Figure 7-13 Double-clicking a photo from the collection displays options for sharing and editing this photo on the menu bar at the top.
If you opened this picture from a folder or album, allow the mouse pointer to hover over either side of the picture to display an arrow you can use to quickly shuffle back and forth through the pictures in a folder. The buttons on the menu bar above the picture allow you to add a photo to an album or other creation, zoom in or out, delete the photo, or rotate it, with options to edit, share, or print the selection on the far right.
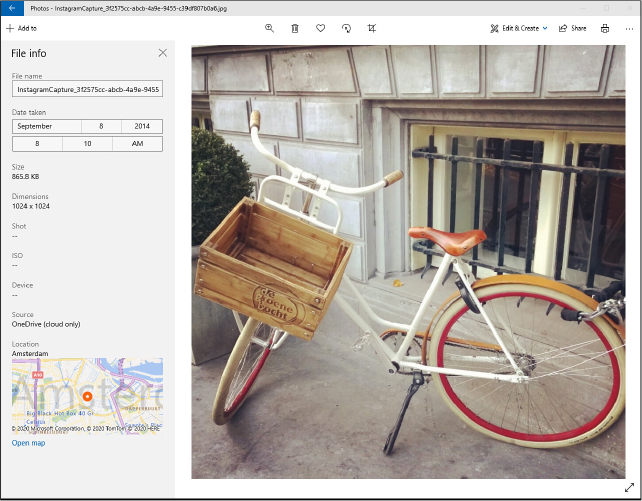
Click the ellipsis at the right of the menu bar and then click File Info to see selected details about the image, as shown next. Note that the metadata displayed in the File Info pane is read-only and only the Date Taken info can be edited in the Photos app. In the case of photos stored in a local or network folder, you can work with the file and its metadata directly; click Open Folder under the Folder Path heading to open the folder containing the image in File Explorer.
Using the Photos app to crop and edit pictures
The greatest strength of the Photos app is its collection of lightweight editing tools. After opening an image, click or tap Edit & Create > Edit on the menu bar to reveal the lean and efficient layout shown in Figure 7-14. This user experience has evolved substantially over the past few years, from a frankly clunky set of categorized editing tools to the simple but powerful assortment shown here.
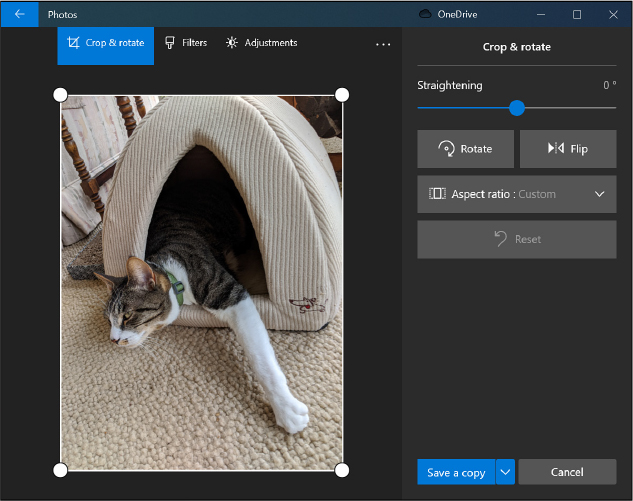
Figure 7-14 The clean layout of editing tools shown here puts you one click away from most useful functions.
To quickly turn a casual shot into something worth keeping and sharing, start with the cropping, flipping, rotating, and straightening tools shown in Figure 7-14. (If they’re not visible, click the Crop & Rotate button, at the top of the pane.)
To select the portion of the image you want to keep, cutting out extraneous parts of the picture, grab any of the four corners and drag. Use the controls on the right for more focused tasks:
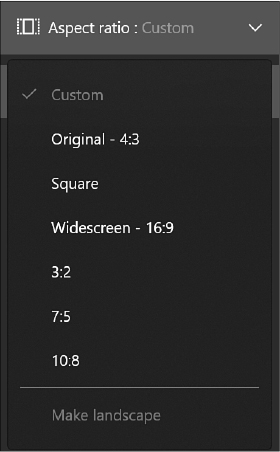
Aspect Ratio Click this button to lock a specific aspect ratio into place. The Custom option allows free-form cropping, whereas all other options adjust width and height simultaneously to preserve the ratio you choose from the drop-down list, as shown in the detail that follows Figure 7-14.
Flip Use this option to change a picture to its mirror image, flipping the left-right orientation. This can be useful to make a picture fit a layout. It’s generally not a good idea to use this tool with images that contain text.
Rotate Click or tap this control to shift the angle of the picture 90 degrees at a time, to fix images that are sideways or upside down.
The vertical slider to the right of the image allows you to straighten a picture by moving the horizon of the image in either direction, one degree at a time, for those occasions when you were holding the camera at a slight angle when the picture was snapped.
Click Reset to undo any changes and start over.
All other editing controls are arranged into two groups, which appear along the right side of the selected photo when you click a button at the top of the pane. Click Filters to see the editing options, including 15 predefined filters, shown in Figure 7-15.

Figure 7-15 Select one of the filters on the right to apply that set of effects to the current image. Drag the slider to control the intensity of the filter.
The slider at the top of the editing pane applies algorithmic fixes to lighting, contrast, color, and the like. Move the slider to the left for a darker image, or to the right for more light.
Each of the 15 filters beneath the Enhance slider applies a set of effects that collectively give the image a distinctive look and feel. Use the Filter Intensity slider to adjust the filter’s effects. There’s no penalty in trying different filters to see whether you like the result; you can always choose Original (the first item in the list of filters) to remove all effects.
Click Adjustments to switch to a different set of editing tools, as shown in Figure 7-16.

Figure 7-16 It’s possible to improve a photo with judicious application of these light and color editing tools, which can compensate for poor lighting or exposure.
The two sliders at the top of this pane work in straightforward fashion. Slide the Light bar to the left to make an overexposed photo darker, or to the right to brighten an image that seems a little too dark.
Use the Color slider to change the temperature, tint, or saturation of the image—for example, to compensate for a blue tint from indoor lighting. Move the bar all the way to the left to remove all color, converting the image to monochrome, and to the right to punch up the saturation of the image. Either effect is best used in moderation.
Click the arrow to the left of either slider to expose more fine-grained controls, as shown earlier in Figure 7-16.
If you don’t like the results after tinkering with these effects, click the Reset option just above either slider to return it to the neutral setting and start over.
The remaining editing controls in this pane have the following effects:
Clarity Use this slider to emphasize or deemphasize highlights and shadows, making the image sharper by sliding the bar to the right, or softening its focus by moving that slider to the left.
Vignette Blurs and defocuses the outside edges of the image, leaving the center portion in focus. This effect, reminiscent of an old-time cameo, is useful when you want to deemphasize a potentially distracting background.
Red Eye Removes the red-eye effect caused by using a flash when snapping photos of people. (Note that this tool has no effect on pictures of dogs and cats and other nonhuman species.)
Spot Fix Click this option to change the mouse pointer to a tool that blurs anything you click with it. Use it to remove distractions and clutter from an image, such as blemishes from a close-up portrait.
The options at the bottom of the editing pane remain fixed regardless of which set of tools is in use. Click Cancel to revert the image to its last saved state. Click Save to apply all edits, using the same file name and replacing the current image. Click Save A Copy to leave the original image undisturbed and save the edited image in the same location, with a numeric suffix appended to the file name.
Creating albums and video projects
Previously, we discussed tools for managing an entire collection, which can be organized by date or by folder. Using the second option in the Photos app navigation bar, Albums, you can create albums made up of photos and videos you select, which in turn can be viewed as a slide show, uploaded to the cloud, or shared using any app that supports the Windows 10 Share pane. Using the Video Projects option, you can turn a selection of photos and videos into a moving picture, complete with narration, music, and transitional effects. Every album and video project has a title and a selection of pictures and videos.
The albums and video project views show creations in OneDrive as well as those stored locally. The Photos app creates some of these projects for you, based on dates, locations, and its own pattern recognition skills. The app can pick out photos containing smiling people, for example, and find pictures that contain animals or bodies of water. You can also create albums and video projects manually, adding photos from any folder as well as from OneDrive.
Switching to Albums view in the Photos app produces a scrolling list of all albums, as shown in Figure 7-17. Those you have created yourself appear at the top; albums created by Photos are shown below. Items stored in OneDrive are denoted by a cloud in the upper-left corner.

Figure 7-17 The Albums view includes albums you create manually as well as those created for you by the Photos app.
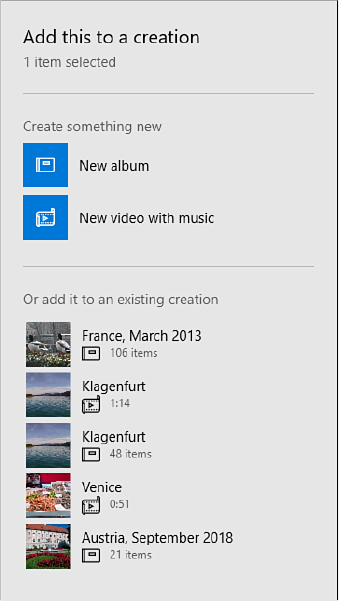
To begin creating a new album, click the big New Album rectangle. That takes you back to Collection view, where you can select items to populate your new album. Alternatively, you can start your creation in Collection view. Right-clicking a photo or video there and clicking Add To produces a menu comparable to the following figure:
To play or edit an album, click its entry in Albums view. Note that, in addition to expanding an album, you can remove items from it. Albums are made up of pointers to files only, so deletions from an album do not remove the photos within it.
Creating a new video project is similar to creating an album. Start by clicking the Video Projects item on the main menu bar. Photos responds with tiles for the projects you have already started or finished, along with a selection of items it creates for you. A New Video Project tile, similar to the New Album tile shown in Figure 7-17, gets you started with your new project. Alternatively, you can right-click an item in Collection view and choose New Video With Music from the menu shown in the previous illustration.
After you do either of the foregoing, a tile for your new creation appears in Video Projects view. When you click that tile, Photos responds by creating a video from your selection, as shown in Figure 7-18.
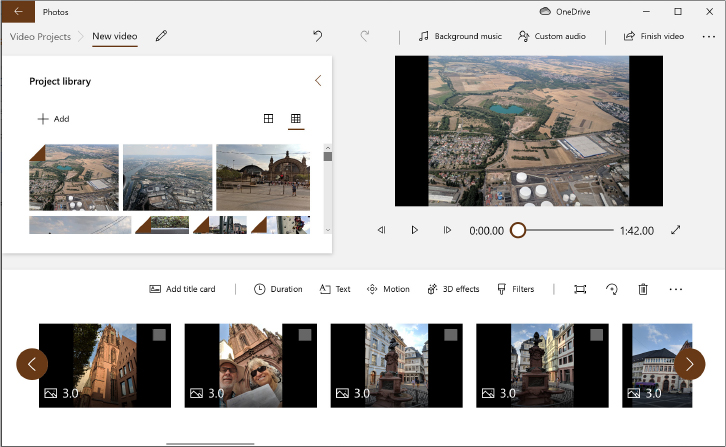
Figure 7-18 Photos begins the process of creating a new video project by putting all items on the storyboard and making its own decisions about duration, sequence, transitional effects, and on so on. You can overrule those decisions.
Note that this initial presentation represents the app’s choices about sequence, durations, and everything else. You can select individual items on the storyboard and click the headings above the storyboard to edit what Photos has given you. Alternatively, you can start over from scratch by clicking Remove All and then dragging items from the project library to the storyboard.
Editing photos with Paint
Paint (Mspaint.exe) has been a part of Windows since version 1.0. Despite its age, Paint still has a few tricks up its sleeve. Its most useful feature is the capability to save an image in an alternative format. If you saved an image in the space-hogging Windows Bitmap format, for example, you can quickly convert it to a much more efficient, compressed format, such as PNG or JPEG, by using the Save As option on the File menu, as shown in Figure 7-19.

Figure 7-19 Use Paint’s File menu to convert an image to a different format.
(Paint 3D, which debuted in version 1703, is designed for a completely different set of tasks. Although it has the capability to crop two-dimensional images and export them to alternative formats, the older Paint program is much more suited for the tasks we describe in this section.)
You also can use Paint to resize an image, a capability that’s useful if your original image was captured at a high resolution (with a correspondingly large file size) and you plan to post it on a webpage or share it via email, where the large file size might be unwelcome.
To shrink an image using Paint, click Resize on the Home tab. That opens the dialog box shown in Figure 7-20, which you use to specify a percentage or an actual height or width, measured in pixels. The decrease in file size can be substantial.
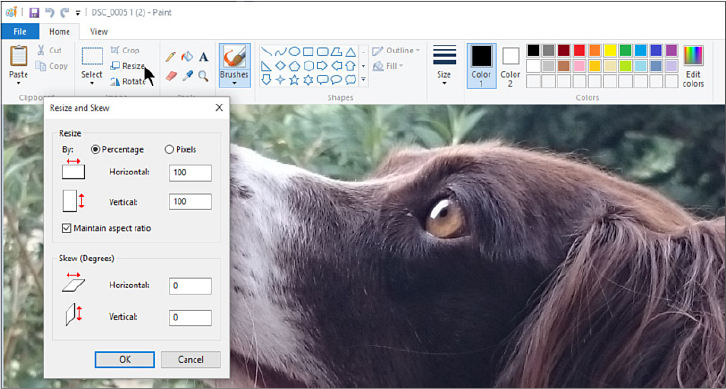
Figure 7-20 Use Paint to change the size of an image file; this option is useful when you plan to post an image online and file size is a concern.
Watching movies, recorded TV shows, and video clips
The Movies & TV app is similar in design to Groove Music and Photos. Of the three, it’s probably the simplest to use, doing its handful of required tasks very well.
The design of the Movies & TV app follows the same principles as the Photos app, with the navigation bar along the top. The Purchased tab allows you to see content you purchased from the Microsoft Store. (Previous purchases from the Xbox store are also included and can be played back.) Figure 7-21 shows a typical TV library.

Figure 7-21 Movies and TV programs you purchased through an Xbox or from the Microsoft Store are available for playback here.
Click Personal on the menu bar to see your collection of personal video files captured in compatible formats, such as those in MP4 formats recorded on a modern smartphone. The player window, shown in Figure 7-22, includes the typical controls for playback, with a slider bar you can use to move to a specific point in the file.

Figure 7-22 Click the double-headed diagonal arrow to zoom a video to full screen, hiding elements such as the title bar and playback controls.
The Show More Options button (indicated by an ellipsis in the lower-right corner of the app) reveals menu options you can use to cast the video to a device such as a large-screen TV—a topic we cover next.
Projecting to another screen
You have a high-definition video on your Windows 10 laptop or tablet. That’s fine for watching a rented movie or TV show as you fly cross-country, but that laptop screen isn’t big enough for the entire family to share. For that, you need the large, high-definition TV connected to a surround-sound system in your living room.
If you have a long enough HDMI cable, you can connect your laptop’s video output to a spare HDMI input on the big-screen TV. That option works, but it’s an awkward solution at best. So how do you bring that video to the big screen without tripping over a 15-foot cord?
One answer, if you have the right hardware, is to stream your laptop display (with multichannel surround sound) to the larger, louder living-room system. For this task, you can choose from a variety of wireless standards, each one backed by a large hardware or software company. Windows 10 natively supports a standard called Miracast, which is designed for wirelessly mirroring a mobile display and streaming high-quality sound between mobile devices and large displays, with (in theory) perfect fidelity.
In homes, Miracast is mostly an entertainment option, good for projecting YouTube videos and the occasional webcast to a larger screen. This setup is also effective for a conference room or a classroom, where a large display might support Miracast natively; if it doesn’t, a Miracast adapter can be permanently attached to the display and available for connection from any Windows 10 device. Windows 10 PCs can also play the role of Miracast receiver, allowing you to cast a video from a smaller screen to a larger one.
To project your laptop or tablet display to a TV using Miracast, you need a compatible receiver, such as a TV or Blu-ray player that also supports the standard, or an external adapter that connects to your TV’s HDMI port. Although the Miracast standard is relatively new, the technology behind it is well tested, and there are an increasing number of compatible devices on the market. The most versatile option is a thumb drive–sized adapter like the Microsoft Wireless Display adapter shown in Figure 7-23, which plugs into an HDMI input on a TV or monitor and draws power from a USB port on the TV.

Figure 7-23 The Microsoft Wireless Display adapter plugs into an HDMI port and draws power via a USB connection, turning a TV into a Miracast receiver.
A Miracast receiver uses your existing network infrastructure. Connecting a Miracast-compatible device allows the device to mirror or extend its display to the larger screen.
After preparing the Miracast receiver to accept incoming connections (usually a simple matter of turning it on and selecting the matching input on the TV), open Windows 10’s Action Center and click or tap the Connect button. That opens up a panel that lists available devices, where you can click or tap the entry for your Miracast receiver, with the goal of making a connection like the one shown in Figure 7-24.
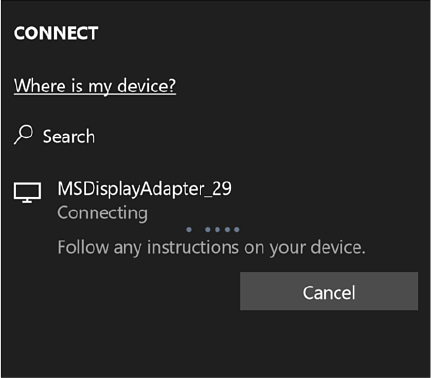
Figure 7-24 Clicking or tapping Connect at the bottom of the Windows 10 Action Center displays this dialog box, from which you can connect to a Miracast device and mirror your laptop or tablet display to a larger device such as a TV.
After successfully connecting to the Miracast receiver, you can duplicate the display on your laptop or tablet to the larger screen, allowing you to wirelessly project a Microsoft PowerPoint presentation to a conference room TV, watch a livestream in your living room, or cue up a music playlist for a party.
All three built-in Windows 10 media apps include a Cast option you can use to send the current video and audio output to a previously configured device.
After you make a Miracast connection, you can change the projection mode just as you would with a second display connected directly to your PC. You use the options in the Connect pane to extend the display so that you can watch a webcast or a video conference call on the large screen while you work on your laptop; use the second screen only; or use the PC screen only, severing the Miracast connection.