
Chapter 9
Storage and file management
Organizing personal data with user profile folders and libraries
Using OneDrive to store, sync, and share files
Sorting, filtering, and grouping in File Explorer
Recovering lost, damaged, and deleted files and folders
Managing existing disks and volumes
Working with virtual hard disks
Unless you use your computer exclusively as a game machine, learning to manage your “stuff”—your documents, programs, and communications—is probably the single most critical computing skill you need to acquire. The addition of cloud services adds extra flexibility as well as new organizational challenges, especially as you juggle multiple devices with different storage capacities.
In this chapter, we cover the best way to manage files on local volumes and in the cloud.
Microsoft’s cloud storage service, OneDrive, offers 5 GB of free storage with every free Microsoft account. Its sync engine, built into Windows 10, is now shared by OneDrive and OneDrive for Business. A relatively new OneDrive feature, Files On-Demand, allows you to browse through your cloud storage without having to fill up all of your local storage. In this chapter, we explain how to configure OneDrive so that your most important files are available when you need them, even if you’re not connected to the internet.
The primary tool for managing files in Microsoft Windows 10, regardless of where they are located, is File Explorer (the direct descendant of what was known as Windows Explorer in Windows 7 and earlier versions). File Explorer is an amazingly powerful tool, filled with features that can streamline your work processes and make it easier to find digital music files and photos. Most Windows users barely scratch the surface of File Explorer, which is why we devote a significant section of this chapter to a master class in its rich feature set.
Finally, this chapter also covers the tools and techniques for working with existing local drives—internal, external, and removable—including managing volumes and monitoring disk usage.
 File Explorer also includes a search box, which we cover in Chapter 10, “Cortana and Windows search,” along with additional details about Windows 10’s powerful indexing and search tools.
Organizing personal data with user profile folders and libraries
Windows uses a logical organizational structure that helps keep data together in known system folders. As we explain in this section, you can change the location of some of these folders to make best use of your available storage. You can also create virtual storage locations called libraries to make searching easier.
What’s what (and where) in your user profile
Your personal files and settings are stored by default in your user profile, which is created by copying the contents of the Default profile to a new folder when you sign in to a user account for the first time on a device. In addition to predefined folders for personal documents and digital media files, this new profile also includes the details that define the desktop environment: the user’s own registry settings (HKEY_CURRENT_USER), as well as user data and settings for installed apps and desktop programs.
Note
Although you can customize the Default profile, doing so requires the use of enterprise deployment tools and is impractical for home and small business installations.
In addition to individual user profiles, Windows 10 creates a Public profile containing a group of folders for common document types that mirror those in your user profile. You can see the Public Documents, Public Music, Public Pictures, and Public Videos folders in their matching libraries. The advantage of these folders is that other users can save files to these locations from different user accounts on the same computer or from across the network.
Local user profiles are stored in %SystemDrive%Users. Each user’s profile is stored in a subfolder whose name is based on the user account name (for example, C:UsersKaty). The entire path for the current user’s profile is accessible via another commonly used environment variable, %UserProfile%. If you have File Explorer’s navigation pane set to show all folders, you can see the subfolders of your profile by clicking your user name in the navigation pane. (If you don’t see your name in the navigation pane, right-click a blank space in the pane and choose Show All Folders.)
Troubleshooting
Your user account name and user profile folder name don’t match
As we mentioned earlier, Windows creates the user profile folder when you first sign in to a device. If you do so with a local or domain account, the name of the profile folder matches the user name (unless there’s already a folder with that name from a previous installation, in which case Windows appends a dot and the name of the PC to the folder name). Signing in with an Azure AD account creates a profile name consisting of your username with the extension .AzureAD.
This naming convention breaks down if you sign in for the first time using a Microsoft account. In that case, Windows creates a folder name using the first five characters of the user name associated with the Microsoft account. If your user name is six characters or longer, the folder name (which is also shown in File Explorer as the profile name) is truncated. So the profile folder for [email protected] becomes C:Usersedbot.
If that folder name bothers you, we have some bad news: There’s no supported way to change the user profile folder name after that first sign-in. But you can make sure it doesn’t happen again. The trick is to create a local user account with the same name as what you want to use for your user profile folder. (Follow the instructions in “Creating and managing user accounts,” in Chapter 11, “Managing user accounts, passwords, and credentials.”) Then, after signing in for the first time using that local account, you can connect your Microsoft account.
To see the folders included in your user profile, open its folder directly from C:Users or from the drop-down menu at the left of the address bar. As you can see from Figure 9-1, the list includes some familiar destinations. (Because third-party apps can add their own data folders to the user profile, your system might include some additional folders.)
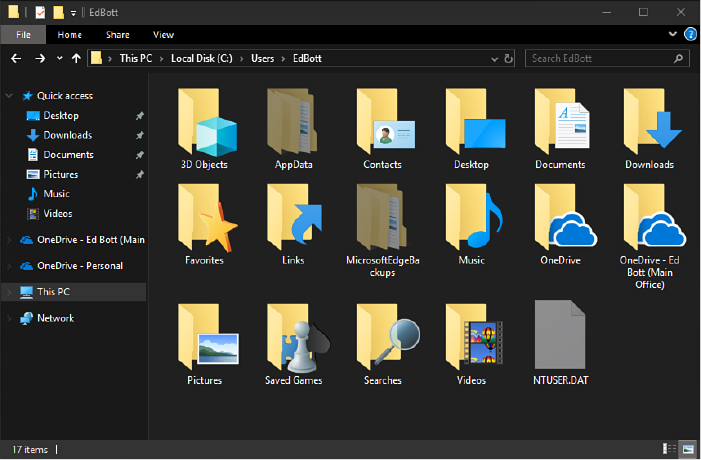
Figure 9-1 Your user profile contains folders intended for specific types of data as well as a hidden AppData folder for data that should be accessed only from within an app.
The personal data folders (Documents, Downloads, Music, Pictures, and Videos) serve as the default location for applications that use those file types. You’ll also find folders containing the contents of synced OneDrive and SharePoint data stores. Here’s everything you need to know about the remaining folders:
3D Objects Apps like Paint 3D store their data files here by default. This system folder made its first appearance in Windows 10 version 1709.
Contacts This folder first appeared in Windows Vista and was designed to store contact information used by Windows Mail. It is not used by any programs included in Windows 10 and is maintained for compatibility purposes with third-party personal information management programs.
Desktop This folder contains items that appear on the user’s desktop, including files and shortcuts. (A Public counterpart also contributes items to the desktop.) A link to this location appears in the Quick Access section of the navigation pane.
Favorites Internet Explorer saves shortcuts to websites here. (Microsoft Edge, as we note in Chapter 8, “Using the new Microsoft Edge,” handles its favorites collection differently.) To manage Internet Explorer favorites in File Explorer, type the shortcut shell:favorites in the address bar.
Links In Windows 7, this folder contains shortcuts that appear in the Favorites list at the top of the navigation pane. Its contents are not used in Windows 10.
Saved Games This folder is the default storage location for apps that can save a game in progress.
Searches This folder stores saved search specifications, allowing you to reuse previous searches. (We explain how to use this feature later in this chapter.)
Relocating personal data folders
The organizational scheme that Windows uses for personal data folders—keeping documents, music, pictures, and so on in visible subfolders of %UserProfile%—is perfectly appropriate for most configurations. In fact, for portable devices and all-in-one PCs that have only a single storage device, it’s the only option.
On desktop PCs that include options for multiple storage devices, some users prefer to store documents and other personal data on a volume other than the system drive. With this configuration, it’s easier to organize large collections of data, in particular, digital media files, which have a way of overwhelming available space on system volumes. (It’s a good idea to keep a portion of your system drive free for maintenance, such as updates, and for performance, which reduces available data storage even further.)
This option is especially attractive on desktop PCs where Windows is installed on a solid-state drive (SSD) to maximize performance. Adding a second, much larger conventional hard disk—at a cost per gigabyte that’s typically a fraction of an SSD—makes it possible to store large amounts of data without compromising system performance.
The easiest, safest way to accomplish this goal is to store personal data in folders on a separate drive, and then include those folders in your libraries and set them as the default save location, a topic we cover in the next section. This approach leaves you with a default set of profile folders, which you can still use when it’s convenient to do so, but it keeps the bulk of your data files on a separate drive.
Not everyone loves libraries, however, and there’s no requirement to love them. You can still move some or all of your profile subfolders in Windows 10, just as you could in earlier versions. To relocate a user profile folder by editing its properties, follow these steps:
Open your user profile folder by starting at This PC, navigating to C:Users, and then double-clicking your profile name. Alternatively, enter %UserProfile% in the address bar.
Right-click a folder you want to relocate and choose Properties. (Or select the folder, and then click Properties on the Home tab.)
On the Location tab, enter the address you want to relocate the folder to. For example, to move the Documents folder from C:UsersEdbottDocuments to X:Documents, type or paste the path as shown here:

Click OK. Windows asks permission to create the target folder if it doesn’t already exist. Click Yes. A Move Folder dialog box similar to this one appears:

Unless you have some good reason not to move the existing files from the original location to the new one, click Yes.
It’s really not a good idea to click No in this dialog box. First, it’s difficult to imagine why you would want to divide your personal documents into two identically named folders on different volumes. (If you want to keep your existing files separate from those you save in the future, move the old files to a subfolder in the new location instead of leaving them in the old location.) Second, because %UserProfile% is a system-generated folder, not an ordinary data folder that corresponds to a fixed disk location, leaving some files behind will give you two subfolders with the same name in %UserProfile%.
A relatively new option in Windows 10 allows you to relocate specific folders from your personal profile to OneDrive. We cover this option in more detail later in this chapter.
Using libraries
A library is a virtual folder that aggregates the contents of multiple folders stored on your computer, on your network, or in the cloud. You can sort, filter, group, search, arrange, and share the data in a library as if it were in a single location. Windows 10 gives you several by default: Documents, Music, Pictures, Saved Pictures, and Videos. You can create additional libraries to suit your storage needs, and you can customize any library by changing or adding to the physical folders that make up that library.
The important things to understand about libraries are the following:
A library can encompass multiple folders on multiple disks on multiple networked devices.
All folders in a library must be capable of being indexed, which in turn means you can perform fast searches covering the full contents of a library by entering a search term in the search box while viewing the contents of a library in File Explorer. That action quickly pulls up all matching documents, even if they’re located on a networked PC or server or on an external drive. (It also means that you cannot add a shared folder to a library if it’s located on a network-attached storage device that doesn’t support Windows indexing.)
Library files are automatically backed up by the Windows 10 File History feature.
Libraries are useful for large collections of digital media files, where archived files are stored in a shared network folder or on an external drive, with current projects on a local drive. They’re also invaluable for keeping team projects organized—create a library that includes your local project folder and the shared folders where your coworkers store graphics and final submissions.
Figure 9-2 illustrates a library search. Here we created a custom library called Research, made up of a synced OneDrive folder, a local folder containing scanned documents, and a shared network folder. Searching for the term population returns a single results list containing eight matching items—four Word documents, three Excel worksheets, and a PDF file—stored in three different locations.
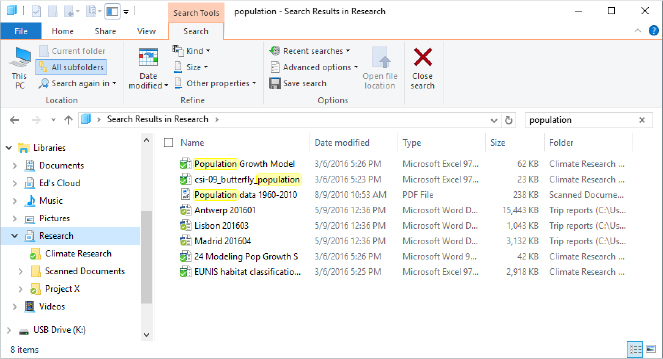
Figure 9-2 The custom library shown here includes folders on two separate local drives and one on a network server. Search results cover all three locations.
To create a new library, right-click the Libraries heading in the navigation pane, and then click New > Library. (If you don’t see the Libraries heading, right-click in an empty space in the navigation pane, and then click Show Libraries.) Give the new library a descriptive name and then press Enter. Your newly created library appears in the navigation pane. Open it and then click the Include A Folder button to populate the library.
Using the Include Folder In dialog box, select the folder you want to use as the default location for saving files in this library, and then click Include Folder. That opens the library and lists the contents of the folder you just selected.
To add more folders to the library, click the Manage tab under the Library Tools heading. Then click Manage Library to get to the Library Locations dialog box, shown in Figure 9-3.
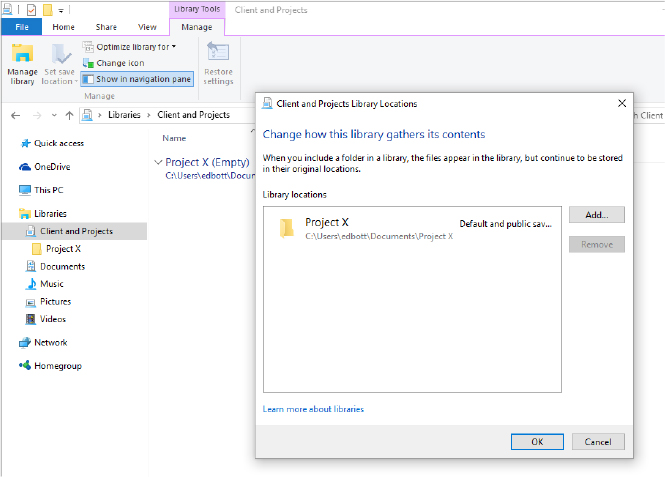
Figure 9-3 The first folder you add to a library becomes the default location for saving files within that library. Use the Manage Library button to add more folders and change settings.
In this dialog box, you can delete folders as well as add them, of course, and you can change the library’s default save folder. The default save folder is important for applications that expect to save their documents in particular places—a music service, for example, that expects to save downloaded songs in a certain folder within the Music library. It’s also the folder that File Explorer will use if you drag a file to the library’s heading in the navigation pane.
What locations can you add to a library? The most important consideration is that the folder must be indexed so that it can be included in searches. Folders and network shares in any of the following locations are eligible for inclusion:
The system drive.
An additional volume on an internal local drive formatted using NTFS or FAT32.
An external USB or IEEE 1394 (FireWire) hard drive, formatted using NTFS or FAT32.
A USB flash drive, if the device appears in the navigation pane, under the This PC heading. (Most removable drives do not satisfy this condition.)
A shared network folder that’s indexed using Windows Search; this includes any shared folder from another computer in your workgroup as well as shared folders on Windows-based servers.
A shared network folder that has been made available offline and is therefore available in your local index.
- For more details on how to manage the search index, see “Configuring the Windows search index” in Chapter 10.
To delete a library, right-click its entry in the navigation pane and click Delete. The library is gone, but its component folders and their contents remain.
Using OneDrive to store, sync, and share files
OneDrive, Microsoft’s cloud-based file-storage service, is a crucial part of the Windows 10 experience. When you sign in with a Microsoft account, Windows 10 synchronizes settings and stores recovery keys for encrypted storage using OneDrive. Every newly created free Microsoft account includes 5 gigabytes (GB) of OneDrive storage. (Some older accounts include larger allotments that are grandfathered in.) You can expand that storage capacity with paid upgrades to OneDrive or get a massively increased cloud storage allotment (1024 GB per user) with a Microsoft 365 Personal or Family subscription.
OneDrive for Business, which shares a sync client with the consumer OneDrive service, offers enterprise-class management capabilities and at least 1024 GB of file storage for each Microsoft 365 Business and Enterprise subscription. We explore the differences between the two OneDrive services more fully later in this section.
OneDrive offers a sync client for every major desktop and mobile operating system. In Windows 10, this sync client is built in and is updated automatically. Before we get to that sync client, though, let’s start with an overview of OneDrive and OneDrive for Business.
How OneDrive and OneDrive for Business work
Despite the shared brand name, Microsoft’s two cloud-based file-storage services have different origins. A common sync client, introduced in 2017, has helped bring the management tools together, but there are some big differences in how the two services work.
Because these are web-based services, Microsoft regularly updates the back-end services and can change the web-based interface independently of the local sync client. As a result of this steady evolution, some screenshots in this section might appear different from those you see when you sign in to your online account.
OneDrive, the consumer service, is designed for personal use, with special views that showcase photo libraries and albums. OneDrive is the default storage option for Microsoft 365 Family and Personal editions.
Files stored in OneDrive are organized into folders and subfolders just as they would be on a local drive. Figure 9-4 shows the top-level folders in a OneDrive account, as viewed in a web browser. Note the range of options available in the command bar for the selected folder, as well as the additional menu choices available from the More (ellipsis) menu.
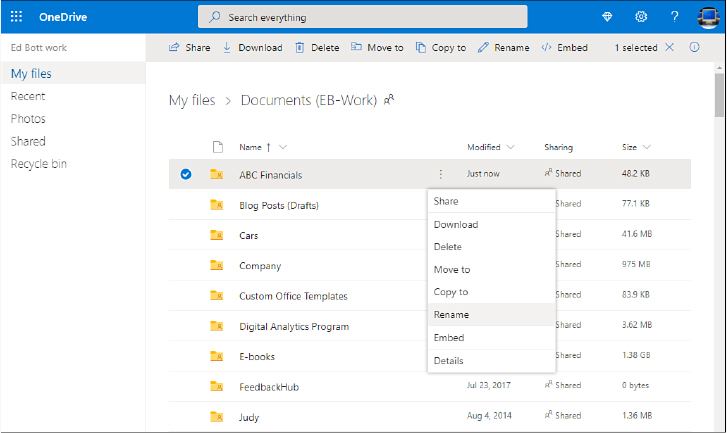
Figure 9-4 When using OneDrive in a web browser, you can perform most file-management tasks and have the ability to create, edit, and collaborate on Office documents.
Clicking the usage graph in the lower-left corner opens a page with details about storage for that subscription.
OneDrive for Business offers a similar web-based view, with one crucial difference: Subscription settings aren’t accessible from the navigation pane on the left. That’s because a OneDrive for Business subscription is managed by a company administrator, with additional security and collaboration options appropriate for use in an organization.
Both services allow subscribers to share files and folders with other people. The consumer edition of OneDrive allows complete control of sharing: You can choose to make a file, a photo, or an entire folder public. You can also share access by using a link that doesn’t require signing in with a Microsoft account.
Sharing options for OneDrive for Business are managed by a company administrator, who might apply restrictions on sharing files with other people, especially in folders that contain confidential company information.
Both OneDrive and OneDrive for Business include built-in versioning, so you can see the history of a document and download an earlier version if you want to recover a portion of an earlier draft. The Recycle Bin for both services makes it possible to retrieve deleted documents for up to 30 days.
Setting up and using OneDrive
On a new installation of Windows 10, OneDrive is available but is not configured by default. Setting up OneDrive is simple, but you’re under no obligation to use it. (For information about removing all visible traces of OneDrive, see “Disable OneDrive in Windows 10” later in this section.)
To get started, run the OneDrive app in Start, click the OneDrive entry in File Explorer’s navigation pane, or click the gray cloud icon in your notification area. Any of these actions opens the Set Up OneDrive wizard.
After you enter your email address, the setup wizard determines whether that address is associated with a OneDrive personal account or a OneDrive for Business account and prompts you to sign in. After entering your credentials, you see the dialog box shown in Figure 9-5, which recommends a local folder to hold your synced files. Your inclination might be to just click Next and move on quickly; we recommend you stop and consider your options here.

Figure 9-5 The default location for storing your synced files is a folder in your user profile. Click Change Location to specify that you want the folder on a separate data drive.
The default location is a folder in your user profile, with the name OneDrive followed by a hyphen and either the word “Personal” or, in the case of OneDrive for Business accounts, the name of your organization. (Allow the mouse pointer to hover over the file name if it’s truncated.) You can’t change the folder name, but we can think of two good reasons to click Change Location and select a different drive. First, if your business name is long, consider choosing a folder with a shorter path to avoid running into problems with lengthy path names. Second, if your system drive is a relatively small SSD and you have a separate data drive with multiple terabytes of storage, you definitely want to choose that data drive for synced files.
Beginning with Windows 10 version 1709, the space-saving Files On-Demand feature is automatically enabled when you connect a new account. A full listing of files and folders in your OneDrive account appears in File Explorer, and you can open any file by double-clicking it; if the file is currently available only online, the OneDrive sync client downloads it automatically and keeps the local copy in sync with the cloud.
You can disable the Files On-Demand feature if you prefer; in that configuration, only files and folders you choose to sync from the cloud to the local device are visible in File Explorer. To find this setting, right-click the OneDrive or OneDrive for Business shortcut in File Explorer or in the notification area, and then click Settings; on the Settings tab, clear the Save Space And Download Files As You Use Them box under the Files On-Demand heading.
With Files On-Demand enabled, you can selectively show or hide files and folders in File Explorer. Open the OneDrive Settings dialog box for the account you want to adjust, click the Account tab, and then click Choose Folders. By default, all folders and all files are selected. From the list of folders, as shown in Figure 9-6, clear the check box for any you want to keep online without displaying in File Explorer.

Figure 9-6 Clear the Make All Files Available check box if you prefer not to see the contents of some OneDrive folders in File Explorer.
On a device with sufficient storage, you can sync your entire cloud file collection; just make sure there’s enough disk space to handle all the photos, music files, video clips, and documents stored there. On devices that have limited local storage, you can selectively sync folders in the cloud to the local device so that those files are available even when you’re offline. To designate any file or folder for offline access, right-click its icon in File Explorer and choose Always Keep On This Device.
Repeat this process if you want to set up one or more OneDrive for Business accounts. (You can link only a single OneDrive personal account.) Note that the Microsoft account you link in OneDrive does not have to be the same one you use to sign in to Windows 10, although that’s the most common (and logical) configuration.
At any time, you can change your OneDrive configuration: right-click the OneDrive icon associated with that account in File Explorer’s navigation pane or in the taskbar (the OneDrive account icon is white; OneDrive for Business icons are blue) and then click Settings. From the resulting dialog box, you can add a new account, unlink an existing account, change the selection of folders that are visible, and limit the amount of bandwidth your system uses when syncing files.
Syncing files and folders
Any file or folder you save in your local OneDrive or OneDrive for Business folder is automatically copied to a corresponding location in the cloud. If you have multiple devices (including PCs, Macs, tablets, and mobile phones) using the same OneDrive or OneDrive for Business account, changes, additions, and deletions you make to files and subfolders on one device are synchronized with all those other devices. So, for example, if you routinely work on the same documents on separate computers at the office and at home, saving to the OneDrive folder on each system ensures that you can retrieve the latest version from anywhere.
If for any reason you need to interrupt this normal syncing activity, right-click the OneDrive or OneDrive for Business icon in your notification area and choose Pause Syncing. You can pause for two hours, eight hours, or a complete day.
When Files On-Demand is enabled, items in your local OneDrive folder that are available only online are marked in File Explorer with a cloud icon; those that have been downloaded manually are tagged with a green check mark in a white circle; files and folders that have been set to be always available on the current device are marked with a white check mark on a solid green background. Items that are currently being synced are denoted by rotating arrows. You can get detailed information about a sync operation in progress by clicking the OneDrive icon in your notification area, as shown in Figure 9-7.

Figure 9-7 Click the cloud icon in the notification area (white for personal, blue for a OneDrive for Business account) to display this sync status window.
The three icons in the navigation bar along the bottom of this status display are live. Click Open Folder to open the corresponding OneDrive or OneDrive for Business folder in File Explorer. Click View Online to open the OneDrive account in a browser window. Click Help & Settings to open a menu that leads to OneDrive Settings and other options.
Sharing OneDrive files and folders
To share a file or folder in your personal OneDrive, right-click the item in File Explorer and then click Share. A Share dialog box appears:

As this figure shows, the share is initially set to offer full editing privileges to any recipient. Click the right-pointing arrow to reveal additional settings, including an Allow Editing check box that you can clear to make a shared file read-only. You can also assign a password and an expiration date to the share.
You can enter an email address to share the link with a specific person, or click the Copy Link button, which copies the sharing link to the Clipboard so that you can paste it into a message yourself. Sharing options and procedures are similar in OneDrive for Business. Right-click a OneDrive for Business item in File Explorer and click Share. This opens the same Send Link dialog box as in OneDrive Personal; click the arrow to the right of the link to see additional settings, such as an option to allow sharing only by members of your organization. Note that options to share outside your organization might be restricted by your administrator. You can also assign read-only or edit permissions, and choose various other options.
To share a resource from your Microsoft 365 groups or other SharePoint repositories, select the resource in the OneDrive for Business website and click Share on the command bar. Depending on how your site is set up, you might see a message restricting the share to members of your organization.
Using Personal Vault
Beginning in the fall of 2019, OneDrive (but not OneDrive for Business) has offered Personal Vault, a BitLocker-encrypted virtual folder that requires two-step authentication to access and that locks automatically after a period of inactivity (20 minutes, by default). You can use Personal Vault to store sensitive documents or images—such things as financial or insurance records, scans of licenses, trust documents, and so on. Any time you want to enter the vault or upload material to it, you’ll be prompted for a second form of authentication, such as a fingerprint, PIN, or code transmitted to you via text or email. You’ll find a shortcut for Personal Vault in the top-level folder tree for your personal OneDrive account—either in File Explorer or in the corresponding location in the online view of OneDrive.
When Personal Vault has been idle for 20 minutes, the system closes it automatically. A notification appears under the OneDrive heading in your notification area 5 minutes before the scheduled close (this notification includes a button you can use to keep the vault open), and you’ll see another notification when the vault has actually been closed.
If the 20-minute inactivity parameter doesn’t suit you, you can extend it to 1, 2, or 4 hours. Right-click the OneDrive icon on your taskbar, choose Settings, and then, on the Account tab, make a selection from the drop-down menu under Personal Vault:

Mastering File Explorer
You can’t become a Windows expert without learning how to move quickly and confidently through File Explorer. This general-purpose tool is used throughout Windows for all sorts of file-management tasks, for opening and saving files in Windows programs, and even in parts of the Windows shell. The more you understand about how File Explorer works, the more effective you’ll be at speeding through tasks without unnecessary delays. Because it’s vital to know your way around, we begin this section with a short tour.
Figure 9-8 shows the default File Explorer layout.
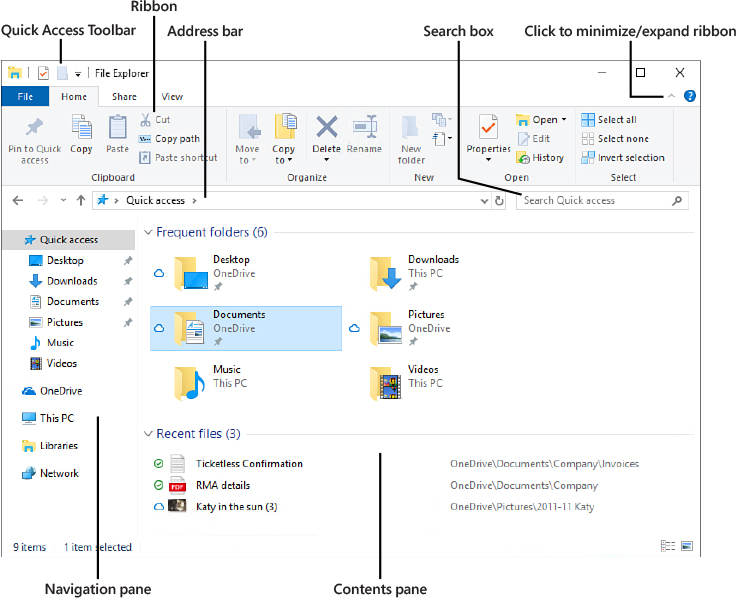
Figure 9-8 File Explorer includes the navigation and display elements shown here, some of which can be customized.
After File Explorer is open, you have a wide assortment of keyboard shortcuts to choose from. Pressing Ctrl+N opens a new window on the same folder. Ctrl+W closes the current window. The following additional keyboard shortcuts work in File Explorer:
Alt+Up Arrow Go up one level.
Alt+Left Arrow Go to previous folder in history.
Alt+Right Arrow Go to next folder in history.
Alt+D Move the focus to the address bar and select the current path.
F4 Move the insertion point to the address bar and display the contents of the drop-down menu of previous addresses.
Alt+Enter Show properties of the selected file.
Tab Cycle through the following elements: navigation pane, file list, column headings, address bar, search box.
F11 Switch in and out of full-screen mode.
Ctrl+Shift+N Create a new subfolder in the current folder.
Ctrl+Shift+E Expand the navigation pane to the current folder.
If you’ve used any of the recent versions of Microsoft Office, or if you’re coming to Windows 10 by way of Windows 8, you won’t be startled to see the ribbon atop File Explorer. If, by any chance, this aspect of the user interface is new to you, the only thing you need to know is that it replaces the old system of drop-down and cascading menus with a set of top-level tabs—Home, Share, and View in the example shown in Figure 9-8. Click a tab heading to display available commands for that tab, which are organized into groups—Clipboard, Organize, New, Open, and Select on the Home tab, for example.
More important points to note are the following:
The command bar from Windows 7 days is gone. The ribbon itself provides the context-specific commands that used to appear on the command bar.
Unlike its Office counterpart, the commands and groups on the File Explorer ribbon cannot be customized. What you see is what you get.
The ribbon can be minimized or not, according to your preference. If the ribbon is minimized, it looks very much like a menu, with the commands for a tab appearing only when you click the tab heading. To switch between the full ribbon and this minimized version, use the Expand/Minimize arrow to the right of the tab headings, or just double-click any tab heading.
When you select one or more files that File Explorer recognizes as pictures, music, or videos, an additional tab appears at the right side of the ribbon, under a color-coded heading. Likewise, selecting a library from the navigation pane or clicking in the search box displays additional tabs with commands relevant to those contexts. These extra tabs can appear side by side. If you display the contents of the Pictures folder, for example, and then click in the search box, new tabs appear under the Search Tools and Picture Tools headings, as shown in the next figure.

Most of what’s on the ribbon is also available on the menus that appear when you right-click files or folders. If you ever become impatient when trying to find a command on the ribbon, right-click in the contents pane and look there. Microsoft adopted the ribbon to reduce the number of cascading submenus that we all used to have to traverse. But sometimes the old ways seem simpler; it’s your choice.
To the left of the ribbon tabs, displayed in blue, is the File menu. There you’ll find commands for opening a new File Explorer window and for adjusting folder and search options, as well as a list of recently used folders for quick navigation. If you’re proficient with managing files at the command line, the most interesting options on this menu are the ones that allow you to open a Windows PowerShell session, using the current folder as the path, with or without administrative privileges.

Troubleshooting
The Open Windows PowerShell command is grayed out
The PowerShell command that appears on the File tab in Windows Explorer opens Windows PowerShell in the current folder. If you’ve selected a virtual folder, such as Quick Access, the command is unavailable. Select a different folder—the one in which you want PowerShell to run—and the command reappears in full glory.
The design goal of the ribbon is to put the commands you use most often front and center, easy to find. A secondary benefit is that it makes less frequently used commands easier to discover. Here are a few gems that merit your attention:
The Copy Path command, on the Home tab, puts the path of the current folder or file on the Clipboard. This is handy for sending someone a link to a network share via email. (As an alternative, you can click in the address bar and press Ctrl+C, or you can press Shift as you right-click a file or folder, and then click Copy As Path on the shortcut menu.)
The Move To and Copy To commands, also on the Home tab, drop down a list of likely targets (recently used folders) for your move and copy operations. If none of those recent folders are appropriate, click Choose Location.
The Zip command, on the Share tab, instantly creates a Zip (compressed) file from the current selection, thereby providing an alternative to the time-honored approach of right-clicking and choosing Send To, Compressed (Zipped) Folder. (See “Using compressed (zipped) folders” later in this chapter.)
On the View tab, you’ll find handy commands for showing or not showing files and folders with the Hidden attribute. Another command nearby lets you assign the Hidden attribute to the current selection.
Using the navigation pane
In its default arrangement, the navigation pane on the left is arranged into nodes that expand and collapse on demand. Each top-level node offers a starting point for navigating through files on your computer, on your network, on local removable drives, and in the cloud. (A OneDrive node is visible by default; third-party cloud service providers can add their own top-level nodes to the navigation pane.)
If you prefer the older, tree-style view with a single hierarchy, click View > Navigation Pane > Show All Folders.
With the Show All Folders option selected, the navigation pane looks like the example shown in Figure 9-9. (Note that the Quick Access menu shown here is collapsed, making the listing even more compact.) The top level of the folder hierarchy, under the Desktop heading, includes your profile folders (which you can expand by clicking your user name in the navigation pane), removable drives (which also appear directly under This PC), OneDrive accounts, SharePoint sites, Control Panel, Recycle Bin, and any folders you’ve created directly on the desktop.

Figure 9-9 Selecting the Show All Folders option changes the navigation pane to one that more closely resembles the file-management tool in older Windows versions.
From the Navigation Pane menu on the View tab, you can clear the Navigation Pane entry to make this element completely disappear. Unless you’re working on a tiny tablet with extreme space constraints, we can’t imagine why you would want to choose this option. This same menu does, however, contain two additional selections you might find useful:
Expand To Open Folder By default, opening any folder in the contents pane displays its contents there and doesn’t affect the navigation pane. If you select Expand To Open Folder, File Explorer expands the navigation pane to show the parent folder of the folder you select in the contents pane, making it easier to see where the selected item fits in the File Explorer hierarchy and move or copy files between folders in that hierarchy.
Show Libraries If you choose to directly manage files stored in libraries (as discussed in “Using libraries” earlier in this chapter), you might want to include them in your navigation pane. When the Show Libraries option is selected, all your libraries—those that Windows provides and any you create yourself—appear in a node in the navigation pane. If you want to see only particular libraries, click the Libraries node heading, and then right-click each library you want to remove and click Don’t Show In Navigation Pane. To restore a library to this node, use the Show In Navigation Pane command. Both commands are also in the Manage group on the Libraries Tools tab.
Navigating faster with Quick Access shortcuts
The Quick Access node, which appears at the top of the navigation pane in all configurations, is new in Windows 10. When it’s selected, the contents pane displays two groups of shortcuts: frequently used folders at the top, recently used files beneath it. Windows makes some intelligent choices about what to display under Quick Access, but you can customize this to suit your needs.
In the Frequent Folders section, you’ll find some folders marked with pins and others without. The pinned folders always appear under Quick Access (unless you unpin them). The unpinned folders are ones you recently worked with, and these folders are replaced by others if you begin to use them less frequently. You can unpin a pinned folder by right-clicking it and then clicking Unpin From Quick Access. And you can make any folder anywhere a permanent resident of Quick Access by right-clicking it and then clicking Pin To Quick Access.
The Recent Files section of Quick Access contains files you recently worked with, sorted with the most recently used one at the top. By right-clicking a file name and clicking Open File Location, you can go directly to the folder in which the file resides. If you find that you don’t need to see a particular file (and want to make room for another), you can right-click that file and then click Remove From Quick Access.
Quick Access is an extremely handy navigational tool because it gathers together the stuff you’re most likely to be concerned with, regardless of where that stuff is actually stored. But if you don’t need it, or you’re not keen on having passersby see what you’ve been working on, you can suppress the Frequent Folders section or the Recent Files section, or both. To do this, click View > Options. On the General tab of the Folder Options dialog box, you’ll find the check boxes you need in the Privacy section, as shown in Figure 9-10.

Figure 9-10 Use these settings to control whether files and folders you’ve recently opened or edited are visible in the Quick Access pane.
(If you just want to cover your immediate tracks without changing the overall behavior of File Explorer, it’s probably simpler to click Clear in the Privacy section.)
Inside OUT
Customize the Quick Access Toolbar
As its name implies, the Quick Access Toolbar—that set of icons in the upper-left corner of File Explorer, above the ribbon—puts commonly used functions close at hand (or close to your mouse pointer). If you’d like those items a few centimeters closer, you can move the Quick Access Toolbar by clicking the arrow at the end and then clicking Show Below The Ribbon.
This menu also includes a short list of six commonly used items you can add to the Quick Access Toolbar, including Undo, Redo, and New Folder. But don’t be fooled by that paltry selection. You can add any command or even entire groups of commands to the Quick Access Toolbar. To add a command, right-click it and then click Add To Quick Access Toolbar.
To add an entire group of commands to the Quick Access Toolbar, right-click the name at the bottom of the group and then click Add To Quick Access Toolbar. In this example, we added the Panes group from the View tab, making it easier to add the Preview or Details pane even if the View tab isn’t visible:

To remove any command or group of commands, right-click the item on the Quick Access Toolbar and then click Remove From Quick Access Toolbar.
Layouts, previews, and other ways to arrange files
You can adjust the display of any individual folder’s contents in File Explorer by means of options in the Layout group on the View tab. As Figure 9-11 shows, your choices are numerous: icons in your choice of four sizes, List, Details, Tiles, and Content. Display options are folder-specific and persistent.

Figure 9-11 The View tab provides a large set of options for displaying content in File Explorer.
You can get a look at each layout option by hovering the mouse pointer over it on the View tab. File Explorer gives you a preview of each choice, making it easier for you to decide.
The range of options for the various icon views is larger than it looks. Although there are four discrete choices available on the View tab—small, medium, large, and extra-large—the actual number of sizes is 76. You can cycle smoothly through all 76 sizes by choosing one of them, holding down the Ctrl key, and turning the wheel on your mouse. With each step, you’ll see the icons grow or shrink (although at some of the smaller sizes, the change is barely perceptible).
Content view arranges listings in multiline bands that take up the full width of the window, while List view displays file names only, arranged in columns.
Details view is one of the most important alternatives, offering a multicolumn tabulation of your files that unlocks a wide range of sorting, filtering, and grouping options, as we discuss later in this chapter, “Sorting, filtering, and grouping in File Explorer.”
The default arrangement of column headings is determined by the folder type, but you can tailor this arrangement in any folder. To add or remove a column heading while in Details view, right-click anywhere in the row of column headings. (Alternatively, click the View tab and then click Add Columns in the Current View group.) If the list of column headings that appears doesn’t include the one you want, click the More option at the bottom of the list. As Figure 9-12 shows, the Choose Details dialog box that appears next provides you with a wealth of choices. In fact, Figure 9-12 shows only the first 15 choices in a vast array of possibilities.

Figure 9-12 Use this dialog box to select which headings are displayed in Details view.
In the Choose Details dialog box, you can use the Move Up and Move Down buttons to change the order in which column headings appear. (You can also change the column order in File Explorer by dragging headings with the mouse.)
Initially, all folders intended for the storage of user data (including those you create) are assigned one of five folder templates that define the default headings File Explorer considers appropriate for the content type. The logic is straightforward: You’ll probably want to sort a folder full of MP3 tracks by track number, and the Date Taken column is extremely useful for filtering digital photos, but neither column would be particularly useful in a folder full of Microsoft Word documents.
The View tab also contains commands to show an optional pane on the right side of the contents pane. This pane can either show a preview of the currently selected file—supported file formats include most image files, Microsoft Office documents, and PDF files—or details about the current file (a topic we discuss in the next section). Either command is a toggle. Click once to make the pane visible; click again to hide the pane. If you use either capability regularly, it’s worth memorizing the keyboard shortcuts: Alt+P for Preview, Alt+Shift+P for Details.
Using compressed (zipped) folders
Depending on the file type, you can dramatically reduce the amount of disk space used by one or more files by compressing those files into a zipped folder. You can also combine multiple files into a single Zip file while preserving the folder hierarchy of that group of files.
Don’t be fooled by the name: A zipped folder (also known as a Zip file or archive) is actually a single file, compressed using the industry-standard Zip format and saved with the .zip file name extension. Any version of Windows can open a file saved in this format, as can other modern operating systems. The format is also accessible with the help of many third-party utilities.
To create a new archive using zipped folders, follow these steps:
In File Explorer, display the folder in which you want the new archive to reside.
Right-click any empty space in the folder, and then click New > Compressed (Zipped) Folder.
Name the folder.
To add files and folders to your archive, drag and drop them onto the zipped folder icon in File Explorer (or double-click to open the zipped folder in its own window and then drag items into it). You can also use the Clipboard to copy and paste items. To remove an item from the zipped folder, double-click the folder to display its contents, right-click the item, and then click Delete.
You can also create a compressed folder from the current selection by clicking Zip on the Share tab in File Explorer. Windows creates an archive file with the same name as the selected object. Use the Rename command (or press F2) to replace the default name with a more descriptive one.
To extract individual files or folders from a zipped folder, open it in File Explorer and then drag the items you want to extract to a new location, or use the Clipboard to copy and paste. To extract all items from a zipped folder to a specific location, right-click the zipped folder icon and then click Extract All, or open the zipped folder in File Explorer and click Extract All on the Extract tab on the ribbon.
Sorting, filtering, and grouping in File Explorer
Regardless of the view settings you’ve chosen for a folder, you can adjust the way its contents are displayed at any time by changing the sort order, filtering the contents by one or more properties to include only selected items, and grouping and arranging the contents by a particular heading. In any view, the sort and group options are available by right-clicking anywhere in the contents pane and choosing a Sort By or Group By option. In most cases, however, these actions are easier to accomplish by switching to Details view and using the column headings, which is also the preferred way to filter.
Note that all these techniques also work with virtual folders, such as search results and libraries.
Sorting a folder’s contents
To sort a folder in Details view, click the heading you want to use as a sort key. For example, to sort by Date Modified, click the Date Modified heading. Click again on the same heading to reverse the sort order. An up arrow or down arrow above the heading indicates whether the folder is sorted in ascending or descending order by that current field.
In all other views, right-click any empty space in the contents pane and select a value from the Sort By menu. A bullet next to Ascending or Descending indicates the current sort order; choose the other option to reverse the sort order.
Filtering folder contents
In Details view only, you can use headings to filter the contents of a folder. If you rest your pointer on a heading, a drop-down arrow appears at the right. Clicking the arrow reveals a set of filter check boxes appropriate for that heading. In most cases, the filter list is built on the fly from the contents of the current file list. If you’re looking for a particular type of file—a Word or PDF document, for example, or an executable file—you can filter by type to show only those files. Figure 9-13 shows the filter list for the Type field in the Downloads folder, with the contents filtered to show only files whose type matches Application.
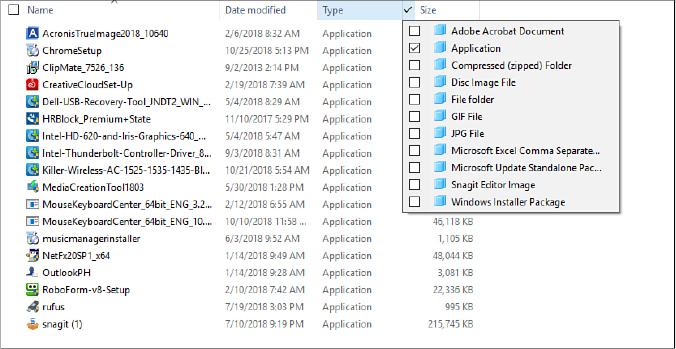
Figure 9-13 When you click the drop-down arrow to the right of a column heading, a set of filtering options appropriate for that heading appears.
Select the check box next to any item to add it to the filter list; clear the check box to remove a previously selected item from the filter. After you filter the list in Details view, you can switch to any other view and the filter will persist. Look in the address bar to see the specific filter applied, and then click the folder name to the left of the search term in the address bar (also known as a breadcrumb) to remove all filtering without switching back to Details view.
If you filter by Size or Name, you get a much more limited set of choices that includes ranges rather than discrete values.
A single filter can include multiple items from each heading’s filter list, which are treated as a logical OR—in other words, File Explorer displays items that match any of the selected check boxes. A filter can also include multiple headings, which together function as a logical AND, with File Explorer displaying only items that satisfy the criteria applied to each heading. So, for example, you can filter a picture folder to show only photos where the value in the Rating column is four or five stars and the value in the Date Taken field is in this year, resulting in a list of your favorite photos of the year, suitable for a year-end newsletter or family photo album.
When a folder is filtered, check marks appear to the right of headings used for filtering. The values on which you have filtered appear in the address bar. You can perform most common file-management tasks on the items in the results list, including renaming individual files or using the Clipboard to copy or move files from their current location to a new folder.
Inside OUT
Use the date navigator to zoom through time
If you click a date heading, the filter options display a date navigator like the one shown next, with common date groupings available at the bottom of the list. You can also click Select A Date Or Date Range and use the calendar to filter the file list that way.
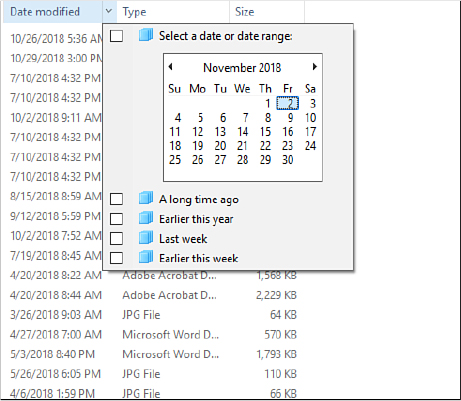
The date navigator is much more powerful than it looks at first glance. Use the calendar to zoom in or out and narrow or expand your view of the contents of a folder or a search. Initially, the calendar shows the current month, with today’s date highlighted. Click the month heading to zoom out to a display showing the current year as a heading with the current month highlighted. You can then drag or hold down Ctrl and click to select multiple months.
Click the year to zoom out again to show the current decade. Click once more to show the current century. In any calendar view, you can use the arrows to the left and right of the column heading to move through the calendar a month, year, decade, or century at a time. To zoom back in, click any month, year, decade, or century on the calendar control. This technique is especially valuable with folders or search results containing hundreds or thousands of files and folders.
Grouping folder contents
If sorting and filtering don’t give you enough ways to organize or locate files, try grouping. When you group items, File Explorer collects all the items that have some common property, displaying each group under a heading that can be expanded or collapsed in most views.
List view offers a particularly interesting perspective, with each group of results appearing under a column heading. The grouped arrangement is saved as part of the custom view settings for that folder; the next time you open the folder, it will still be grouped.
To group items in a File Explorer window, open the View tab, click Group By, and then click the property you want to use. File Explorer displays a bullet before the selected property. You can remove the grouping by returning to Group By and choosing None.
Managing disk space
At the dawn of the Windows 10 era, several long-term trends converged to make data storage more of a performance issue than it has been in years.
For many years, the trend with conventional hard disks was simple: more storage space at a lower cost per gigabyte. Each new Windows version required more space than its predecessor, but the accompanying new generation of hardware meant there was plenty of room for system files and data.
The advent of solid-state drives (SSDs) and flash memory changed all that. SSDs are dramatically faster than conventional hard disks. They’re also more reliable than hard disks because they have no moving parts. However, although the gap is narrowing, SSDs are still far more expensive per gigabyte than conventional hard disks, causing PC makers to choose smaller default disks for new PCs.
On a desktop PC, you have the option to expand storage by replacing the primary drive with one that’s faster, larger, or both; on most full-size desktop PCs, you can also install additional drives to make room for extra data files. Many portable devices, on the other hand, provide built-in primary storage that is soldered to the system board and can’t be replaced easily. For some portable devices, the option to expand storage using inexpensive removable media is available. Microsoft’s Surface Pro PCs, for example, include a slot that accepts removable storage in the form of a MicroSD card, which can be treated as dedicated storage and used for File History.
- For a full discussion of the ins and outs of setting up new hard drives and SSDs in Windows 10, see “Managing hard disks and other storage devices,” in Chapter 14, “Hardware and devices.” For a discussion of how to use removable storage for backup, see “Using File History to protect files and folders” in Chapter 15, “Troubleshooting, backup, and recovery.”
Managing storage on a Windows 10 device involves two separate challenges:
Setting default file locations to make the best use of available storage
Performing occasional maintenance to ensure that useful space (especially on the system drive) isn’t being wasted with unnecessary files
For an overview of how much total storage is available and what’s in use on a Windows 10 device, open Settings > System > Storage to see a page like the one shown in Figure 9-14. This example shows a desktop PC with a C drive on which 304 GB of a total capacity of 953 GB is currently in use.

Figure 9-14 The Storage page in Settings shows how much storage is in use on the current drive.
For more details about space consumption in a particular category, click it. Figure 9-15, for example, shows the breakdown of the System & Reserved category.

Figure 9-15 This screenshot shows details for the System & Reserved category.
Here are some examples of what you’ll find in various top-level categories:
System & Reserved This category is typically large and includes files that are essential to the operation of the system. The actual amounts of storage in use depend on the type of device and how much memory it contains. More memory means a bigger paging file, for example.
Apps & Features This category includes default apps as well as legacy desktop apps and those you downloaded from the Microsoft Store.
Documents, Pictures, Music, Videos These separate categories show how much space is in use in the default save locations for the respective file types. Note that this value is not the total found in the libraries of the same names.
Mail This value measures the space used by local copies of messages saved using the default mail app. Clicking or tapping the Manage Mail button takes you to the default email app: Mail or Microsoft Outlook, for example.
OneDrive The total amount of space used by local copies of files synced from OneDrive.
Desktop This total should be small unless you use the desktop as a dumping ground for downloads and other potentially large files.
Maps If you have a large collection of offline maps, this category can get fairly large.
Other People This category displays the total amount of space in use for data files from other user accounts, not broken down by file types.
Temporary Files This category includes files that are managed by Windows but are not typically necessary for the operation of a Windows 10 device. On the system shown in Figure 9-16, with just a few clicks, you can recover almost 6 GB of storage space from the Recycle Bin.

Figure 9-16 With several options in this category, you can free up large amounts of disk space.
Other If you have large collections of files that don’t slot into the standard categories, you might see a very large Other category. The types of large files that might show up in this category include Hyper-V virtual machines and associated VHD files as well as ISO files.
The initial display at Settings > System > Storage, as shown, for example, in Figure 9-14, shows nonremovable storage devices only. To see other storage elements in your system, click View Storage On Other Drives. As Figure 9-17 shows, the resulting display includes USB disks, flash disks, and other media.
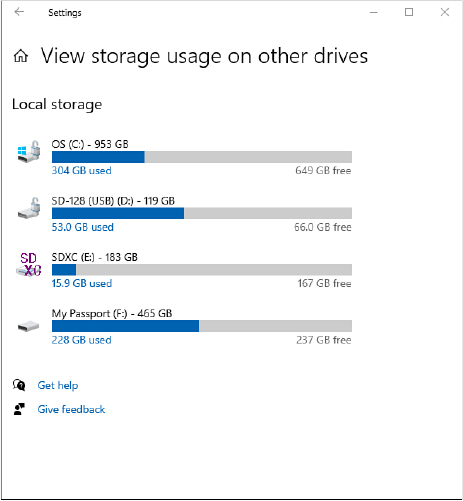
Figure 9-17 Clicking View Storage On Other Drives expands the initial list to include removable media.
As you click to navigate deeper into the categories in the Storage section of Settings, you’ll find buttons and links for managing files contained in that category by using File Explorer.
Changing default save locations
On systems with multiple drives (including removable media), you can change the default location for specific file types. If you have a large music collection, for example, you might prefer to store MP3 files on a disk you dedicate for that purpose. To make that possible, open the Storage page in Settings and click Change Where New Content Is Saved, as shown in Figure 9-18.

Figure 9-18 You can change the default location for new files you save in default categories. Existing files remain in their current locations.
Note
Changing the default location for a file type affects the storage of new items. It does not move current items.
When you set the default save location for these categories to a secondary drive, Windows 10 creates folders on the secondary drive, with subfolders that correspond to the category name for each file type within a folder named after your user account name.
Note that if you are redirecting an item type that is currently stored in a library, Windows expands the library definition to include the new location.
- For information about libraries, see “Using libraries” earlier in this chapter.
Cleaning up unneeded files
A feature called Storage Sense is designed to free up disk space automatically by deleting files you don’t need. Because this feature has the potential to guess wrong and remove files you really do need, it is turned off by default. To turn Storage Sense on and fine-tune its capabilities, go to Settings > System > Storage and click Configure Storage Sense Or Run It Now. That opens a page like the one shown in Figure 9-19.
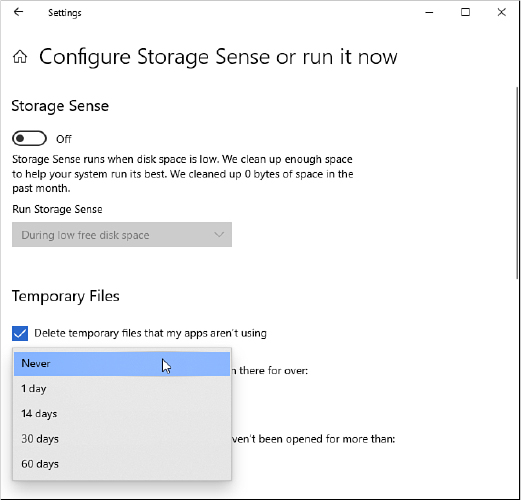
Figure 9-19 Storage Sense provides options for deleting unnecessary files.
In addition to the option to automatically purge unused temporary files, Storage Sense includes the option to automatically clear the contents of the Recycle Bin, the Downloads folder, and locally available copies of files from OneDrive, OneDrive for Business, and SharePoint accounts. For each such category, you can specify an age for files: from 1 day to 60 days, or Never.
With the Storage Sense switch off, as it is in Figure 9-19, you can perform ad-hoc deletions of temporary or download files. Scroll to the bottom of the Settings page and click Clean Now to carry out the specified deletions. By setting the Storage Sense switch on, you can let Windows automatically perform surveillance and deletion according to your specifications.
More options for tidying up are available via the legacy Disk Cleanup utility (Cleanmgr.exe). You can use the search box to locate this tool; as an alternative, open File Explorer, right-click the disk you want to tidy up, choose Properties, and then click Disk Cleanup. Note that this utility initially opens in standard user mode, allowing you to manage files available to your user account but blocking access to system files. To enable the full range of Disk Cleanup options, click Clean Up System Files, entering the credentials for an administrator account if necessary. That restarts the utility and unlocks access to the full range of cleanup options, as shown in Figure 9-20.

Figure 9-20 When you start Disk Cleanup using administrative credentials, you have the option to remove Windows installation files and previous Windows versions.
Caution
You might be tempted to obsess over disk space usage and use every trick to create as much free space as possible. That strategy might come back to haunt you, however. If you remove previous Windows installations, for example, you lose the ability to roll back to a previous version to recover from compatibility problems. As a general rule, we recommend keeping at least 20 percent of total disk capacity free. That allows enough room to process temporary files properly without affecting performance dramatically. Beyond that baseline, think long and hard before deleting what might be important files.
Recovering lost, damaged, and deleted files and folders
It takes only a fraction of a second to wipe out a week’s worth of work. You might accidentally delete a folder full of files or, worse, overwrite an entire group of files with changes that can’t be undone. Whatever the cause of your misfortune, Windows includes tools that offer hope for recovery. If a file is simply lost, try searching for it. (See “Using Windows Search” in Chapter 10.) For accidental deletions, your first stop should be the Recycle Bin, a Windows institution since 1995.
- Windows 10 includes a considerably more powerful recovery tool called File History—but it’s available only if you set it up in advance. See “Using File History to protect files and folders” in Chapter 15, “Troubleshooting, backup, and recovery.”
The Recycle Bin provides protection against accidental erasure of files. In most cases, when you delete one or more files or folders, the deleted items go to the Recycle Bin, not into the ether. If you change your mind, you can go to the bin and recover the thrown-out items. Eventually, when the bin fills up, Windows begins emptying it, permanently deleting the files that have been there the longest.
The following kinds of deletions do not go to the Recycle Bin:
Files stored on removable disks such as USB flash drives
Files stored on network drives, even when that volume is on a computer that has its own Recycle Bin
Files deleted from a command prompt
Files deleted from compressed (zipped) folders
You can bypass the Recycle Bin yourself, permanently deleting an item, by holding down the Shift key while you delete the item. You might choose to do this if you’re trying to reclaim disk space by permanently getting rid of large files and folder subtrees.
To see and adjust the amount of space currently used by the Recycle Bin for each drive that it protects, right-click the Recycle Bin icon on your desktop and then click Properties. In the Recycle Bin Properties dialog box (shown in Figure 9-21), you can select a drive and enter a different value in the Custom Size box. Windows ordinarily allocates up to 10 percent of a disk’s space for recycling. (When the bin is full, the oldest items give way to the newest.) If you think that amount of space is excessive, enter a lower value. If you’re certain you don’t need to recover files from a particular drive, select the Don’t Move Files To The Recycle Bin setting for that drive.
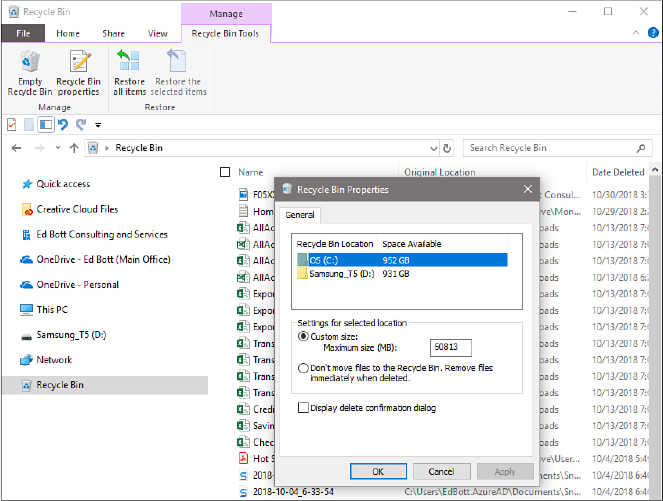
Figure 9-21 You can use the Recycle Bin Properties dialog box to alter the amount of space devoted to the bin—or to turn the feature off for selected drives.
Note that the Recycle Bin for OneDrive folders shows only deleted copies of locally synced files. A separate OneDrive Recycle Bin is available from the browser-based interface and includes all deleted files.
Whether the Recycle Bin is enabled or disabled, Windows normally displays a confirmation prompt when you delete something. If that prompt annoys you, clear the Display Delete Confirmation Dialog check box.
Restoring files and folders
When you open the Recycle Bin, Windows displays the names of recently deleted items in an ordinary File Explorer window. In Details view, you can see when each item was deleted and which folder it was deleted from. Use the column headings to sort the folder—for example, to display items that have been deleted most recently at the top, with earlier deletions below. Alternatively, you can organize the bin by disk and folder by clicking the Original Location heading. If these methods don’t help you find what you’re hoping to restore, use the search box.
Note that deleted folders are shown only as folders; you don’t see the names of items contained within the folders. If you restore a deleted folder, however, Windows re-creates the folder and its contents.
The Restore commands on the Manage tab (Restore All Items and Restore The Selected Items) put items back in the folders from which they were deleted. If a folder doesn’t currently exist, Windows asks your permission to re-create it. Note that if your Recycle Bin contains hundreds or thousands of deleted files dating back weeks or months, Restore All Items can create chaos. That command is most useful if you recently emptied the Recycle Bin and all of its current contents are visible.
If you want, you can restore a file or folder to a different location. Select the item, click the Home tab, click Move To, and then choose a new location. Or, simplest of all, you can drag the item out of the Recycle Bin and drop it in the folder where you want to save it.
Purging the Recycle Bin
A deleted file sitting in your Recycle Bin takes up as much space as it did before it was deleted. If you’re deleting files to free up space for new programs and documents, transferring them to the Recycle Bin won’t help. You need to remove them permanently. The safest way to do this is to move the items to another storage medium—a different hard disk or a removable disk, for example.
If you’re sure you’ll never need a particular file again, however, you can delete it in the normal way, and then purge it from the Recycle Bin. Display the Recycle Bin, select the item, and then press Delete.
To empty the Recycle Bin entirely, click Empty Recycle Bin on the Manage tab.
Managing existing disks and volumes
No matter how well you plan, your approach to deploying storage resources is likely to change over time. The Disk Management tool (Diskmgmt.msc) can help you adjust to changing requirements. You can expand volumes (assuming space is available), shrink volumes, reformat, relabel, assign new drive letters, and more. We’ll consider these options next.
- This section assumes you are working with physical disks that have already been prepared for use with Windows and volumes that already contain data. For details on how to use Disk Management with new physical disks, see “Managing hard disks and other storage devices” in Chapter 14.
Extending a volume
What do you do when a disk begins to fill up? The most common solution is to prune away unneeded files to recover disk space, as we discussed earlier in this chapter. But Disk Management will be happy to make an NTFS volume larger for you, provided unallocated space is available on the same hard disk. This configuration is unusual and only likely to occur when the disk you’re working with was originally partitioned into multiple volumes and you have deleted one or more volumes. To accomplish the expansion, right-click the volume you want to expand and then click Extend Volume. Click Next to move past the Extend Volume Wizard’s welcome page. The Select Disks page, shown in Figure 9-22, appears.
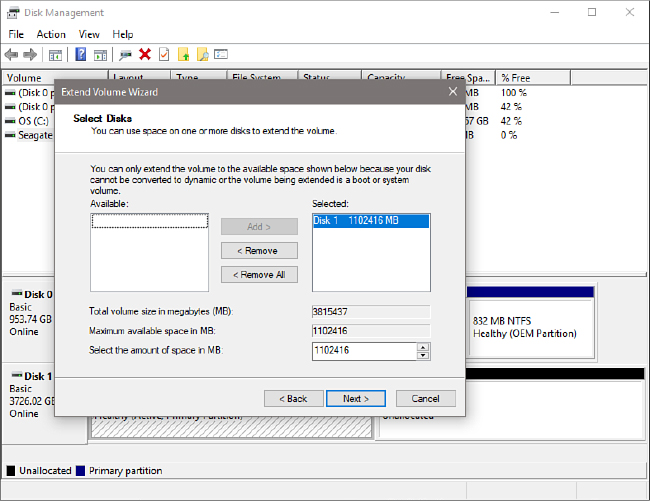
Figure 9-22 Use the Extend Volume Wizard to extend a volume into unallocated space on the same disk or another hard disk with free space.
The Selected list, on the right side of this dialog box, initially shows the disk whose volume you intend to extend. The Maximum Available Space In MB box shows you how much larger you can make the volume, assuming you want to confine your expansion to the current disk. The Select The Amount Of Space In MB box, initially set to equal the maximum available space, is where you declare the number of megabytes you want to add to the volume, and the Total Volume Size In Megabytes (MB) box shows you how big your volume is about to become.
When you’re ready to continue, click Next, review your orders on the ensuing page, and then click Finish. If your volume resided on a basic disk to begin with, it remains basic after the expansion—provided that the space into which you expanded was contiguous with the original volume. Note that no separate formatting step is required; the new territory acquires the same formatting as the original.
Volume extension is subject to the following limitations:
Only NTFS-formatted volumes can be extended.
A logical drive can be extended only within the extended partition that contains it.
The system and boot partitions can be extended only into contiguous unallocated space.
Shrinking a volume
Provided space is available, you can shrink an NTFS-formatted volume to make more space available for other volumes. (This option is most common on very large physical disks where you want to segregate different types of data.) To do this, right-click the volume in either the volume list or graphical view pane and then click Shrink Volume. Disk Management responds by analyzing the disk, and then it reports the amount of shrinkage possible, as shown here:
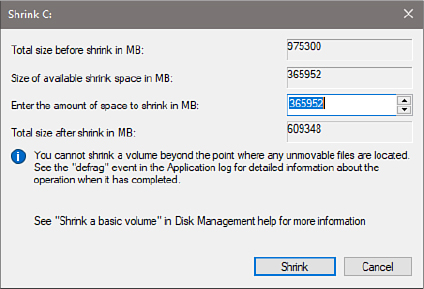
Enter the number of megabytes by which you want to reduce your volume, and then click Shrink. Disk Management defragments the disk, moving all its data to a contiguous block, and then performs the shrink.
Be aware that two types of system-managed files—paging files and volume shadow copy files—cannot be moved during the defragmentation process. This means you might not have as much room to shrink as you would like. Microsoft also advises that the amount by which you can shrink a volume is “transient” and depends on what is happening on the volume at the time. In other words, if you’re trying to eliminate, say, 10 GB from the volume and Disk Management can manage only 7, take the 7 and then try for more later.
Deleting a volume
Deleting a volume is easy—and irreversible. All data is lost in the process, so be sure you have backed up or no longer need whatever the volume currently contains. Then right-click the volume and click Delete Volume. The volume reverts to unallocated space, and if it happens to have been the last volume on a dynamic disk, the disk itself is converted to basic.
Converting a FAT32 disk to NTFS
To convert a FAT or FAT32 disk to NTFS, use the command-line Convert utility. The essential syntax is
convert d: /fs:ntfs
where d is the drive letter you want to convert. For information about optional parameters, type convert /? at the command prompt.
The Convert utility can do its work within Windows if the drive to be converted is not in use. However, if you want to convert the system volume or a volume that holds a paging file, you might see an error message when you run Convert. In that case, you must schedule the conversion to occur the next time you start Windows. After you restart the computer, you see a prompt that warns you that the conversion is about to begin. You have 10 seconds to cancel the conversion. If you allow it to proceed, Windows runs the Chkdsk utility and performs the conversion automatically. During this process, your computer will restart twice.
Assigning or changing a volume label
In Windows 10, as in previous versions of Windows, you can assign a descriptive text label to any volume. Assigning a label is purely optional, but it’s a good practice, especially if you have a multi-boot system or if you set up separate volumes to keep your data organized. You can use Data as the label for your data drive, Music for the drive that holds your collection of digital tunes, and so on.
You can enter a volume label when you format a new volume, or you can do it at any time afterward by right-clicking a volume (in Disk Management or in File Explorer), clicking Properties, and entering text in the edit field near the top of the General tab.
Assigning and changing drive letters
You can assign one and only one letter to a volume. For all but the following volumes, you can change or remove the drive letter at any time:
The boot volume
The system volume
Any volume on which the paging (swap) file is stored
To change a drive-letter assignment, right-click the volume in Disk Management and then click Change Drive Letter And Paths. (You can do this in either the upper or lower pane.) To replace an existing drive letter, select it and click Change. To assign a drive letter to a volume that currently has none, click Add. Select an available drive letter from the Assign The Following Drive Letter list, and then click OK twice.
Troubleshooting
The drive letter for your card reader has disappeared
Windows 10 does not display empty drives by default. If your computer has a set of drives for memory cards, you might be accustomed to seeing those drives listed in File Explorer whether the drives are empty or not. If you want to make the empty drives visible, open File Explorer, click the View tab, and then select Hidden Items.
Mapping a volume to an NTFS folder
In addition to (or in place of) a drive letter, you can assign one or more paths to NTFS folders to a volume. Assigning a drive path creates a mounted volume (also known as a mounted drive, mounted folder, or volume mount point). A mounted volume appears as a folder within an NTFS-formatted volume that has a drive letter assigned to it. Besides allowing you to sidestep the limitation of 26 drive letters, mounted volumes offer these advantages:
You can extend storage space on an existing volume that’s running low on free space. For instance, if your digital music collection has outgrown your drive C, you can create a subfolder of your Music folder and call it, say, More Music. Then you can assign a drive path from a new volume to the More Music folder—in effect increasing the size of your original Music folder. The More Music folder in this example appears to be part of the original Music folder but actually resides on the new volume.
You can make commonly used files available in multiple locations. Say you have an enormous collection of clip art that you store on drive X, and each user has a subfolder in his or her Documents folder where desktop publishing files are stored. In each of those personal folders, you can create a subfolder called Clip Art and assign that folder’s path to volume X. That way, the entire clip art collection is always available from any user’s desktop publishing folder, and no one has to worry about creating shortcuts to X or changing drive letters while they work.
To create a mounted volume, follow these steps:
In Disk Management, right-click the volume you want to change (in either the graphical view pane or the volume list pane), and then click Change Drive Letter And Paths.
Click Add to open the Add Drive Letter Or Path dialog box.
Select Mount In The Following Empty NTFS Folder. (This is the only option available if the volume already has a drive letter assigned.)
Click Browse. The Browse For Drive Path dialog box that appears shows only NTFS volumes, and the OK button is enabled only if you select an empty folder or click New Folder to create one.
Click OK to add the selected location in the Add Drive Letter Or Path dialog box, and then click OK to create the drive path.
You can manage files and subfolders within a mounted volume just as though they were stored in a regular folder. In File Explorer, the mounted volume appears within the list of folders, identified by a drive icon with a shortcut arrow. And as Figure 9-23 shows, when you right-click the folder icon and then click Properties, the General tab reveals that the folder is actually a mounted volume and provides more details about the drive to which the folder is mapped.
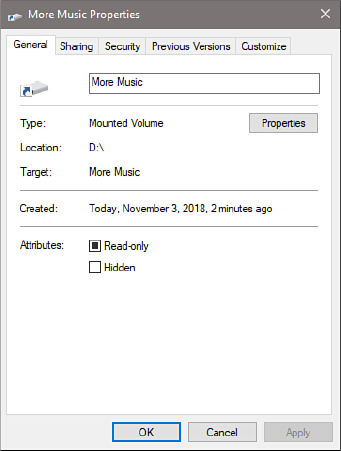
Figure 9-23 The properties dialog box for a mounted drive identifies the volume that actually holds its files.
Click the Properties button on the General tab to see more details about the drive to which the folder is mapped.
If you use the Dir command in a Command Prompt window to display a folder directory, a mounted volume is identified as <JUNCTION> (for junction point, yet another name for a mounted volume), whereas ordinary folders are identified as <DIR> (for directory, the MS-DOS term for a folder).
Caution
When creating mounted volumes, avoid establishing loops in the structure of a drive—for example, by creating a drive path from drive X that points to a folder on drive D and then creating a drive path on drive D that points to a folder on drive X. Windows allows you to do this, but it’s invariably a bad idea because an application that opens subfolders (such as a search) can go into an endless loop.
To see a list of all the mounted drives on your system, click View > Drive Paths in Disk Management. A dialog box like the one shown in Figure 9-24 appears. Note that you can remove a drive path from this dialog box; if you do so, the folder remains in the same spot it was previously located, but it reverts to being a regular, empty folder. The files and folders remain in that volume, accessible if you assign a drive letter or a different empty folder to it.
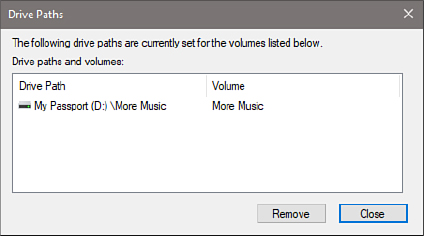
Figure 9-24 This dialog box lists all the mounted drives on a system and shows the volume label, if any, of each mounted drive.
Permanently wiping all data from a disk
Formatting a volume results in a root folder that appears to be empty. Because of the way formatting works, however, someone with data-recovery tools might be able to restore deleted files even after you format the volume. If you’re discarding or recycling an old computer or hard disk, you don’t want to risk the possibility of it landing in the hands of someone who might search it for recoverable data that can be used for identity theft or other nefarious purposes.
If your old disk is headed for the dumpster, you can ensure that the data can’t be recovered by removing the disk drive from the computer and physically destroying the disk. Using tools as varied as a power saw, drill, torch, or sledgehammer, you can render the disk inoperable. (Be sure you’re wearing safety goggles.) Although this method is effective, it has several disadvantages: It takes time and considerable physical effort, and it has all the usual risks associated with tools. In the case of an otherwise functional piece of hardware, you’re left with a disk that can’t be sold or donated to someone who can use it.
As we discuss in Chapter 14, the Format command (with the /P switch) and the Cipher command (with the /W switch) can be used to overwrite everything on a disk, but these tools are impractical for cleaning the system partition.
Another simple solution is to use a third-party disk-wiping tool. A free one that we like is Darik’s Boot And Nuke (DBAN), which you can download from https://dban.org. DBAN is a bootable disk that securely wipes a computer’s hard disks. If you’re worried that DBAN or another purported disk-wiping utility might surreptitiously steal your data before destroying it, remove your concerns by disconnecting your computer from your network before using the program.
If your disk contains highly sensitive material and you want to be absolutely sure its data can’t be recovered, search for a utility that conforms to the United States Department of Defense DoD 5220.22-M standard for clearing and sanitizing media. This standard requires each sector to be overwritten with different characters several times, thus defeating even the most sensitive data-recovery tools. Programs that meet the standard include BCWipe (https://www.jetico.com).
Working with virtual hard disks
Using Disk Management, you can create a virtual hard disk (VHD) in the same formats used by the Windows 10 Hyper-V Manager program. A VHD file encapsulates all the characteristics of a simple disk volume in a single file. Once you’ve created, initialized, and formatted a VHD file, you can mount the file so that it appears as a disk drive in File Explorer and Disk Management; unlike a physical disk, however, you can back up or move the entire disk by copying the VHD file. This type of file can be a useful alternative to Zip files for archiving and sharing large amounts of information with a detailed folder hierarchy.
- For more information about Hyper-V Manager, see Chapter 16, “Hyper-V.”
To create a virtual hard disk, open Disk Management and click Action, Create VHD. Disk Management responds with the Create And Attach Virtual Hard Disk dialog box, as shown in Figure 9-25.

Figure 9-25 You can create a virtual hard disk using either of two formats. The Dynamically Expanding option makes the best use of existing disk space.
Specify a file name with a fully qualified path. It’s easiest to do this with the help of the Browse button, but note that the file cannot be stored in your %SystemRoot% (usually C:Windows) folder.
New in Windows 10 is the option to create a virtual hard disk in either of two formats. The VHD format supports disks up to 2 TB; these can be used on systems running Windows 7, Windows 8 or 8.1, or Windows 10. The VHDX format supports much larger disks, up to 64 TB, but it’s not supported by earlier versions of Windows. The VHDX format was introduced with Windows Server 2012, and the option to create gigantic virtual disks is perhaps primarily of interest to server administrators. VHD is still the default format in Windows 10. However, because metadata in VHDX disks continuously tracks changes (a service not provided in VHD), they are, as the dialog box indicates, more resilient to power failures. For that reason, you might prefer the newer format even if your size requirements are well under 2 TB. Provided that you don’t require interoperability with Windows 7 or Windows 8.1, we don’t know of a good reason not to prefer VHDX.
If you want the disk to expand in size as you add files to it, select Dynamically Expanding. Otherwise, select Fixed Size. (The Recommended option changes depending on which VHD format you chose.) Either way, you must also specify a size (that’s a maximum size if you select Dynamically Expanding). The minimum size is 3 MB; the maximum is the amount of free space available on your (real) disk. After you finish with the Create And Attach Virtual Hard Disk dialog box, Disk Management adds the new virtual disk to its graphical view pane as an unknown, uninitialized disk with unallocated space.
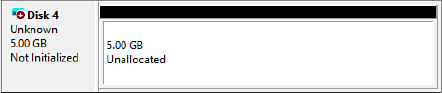
Right-click the area at the left side of this display (with the disk number), and then click Initialize Disk. The Initialize Disk dialog box that appears gives you the option of setting up a disk with a Master Boot Record or a GUID Partition Table:
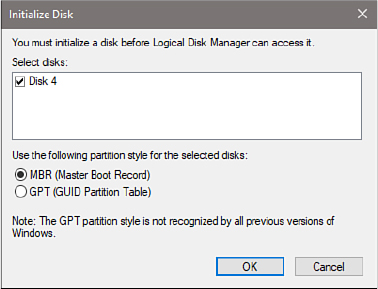
Select MBR (Master Boot Record) if you want the VHD to be usable in older versions of Windows; choose GPT (GUID Partition Table) if you’re working with a disk larger than 2 TB. After completing these steps, you can follow the procedures described earlier in this chapter to create one or more volumes on the new disk. After you have created a volume, formatted it, and assigned it a drive letter, the disk appears like any other in Disk Management and File Explorer.
To remove a virtual hard disk, right-click the disk-number box at the left side of Disk Management’s graphical view pane, and then click Detach VHD. Disk Management informs you that deleting the disk will make it unavailable until you reattach it. The dialog box also reminds you of the location of the file that encapsulated your virtual hard disk.
To reattach a virtual disk, click Action > Attach VHD in Disk Management. Then type or browse to the location of the VHD or VHDX file. (It will be identified in File Explorer as Hard Disk Image File.)