
Chapter 19
PowerShell and other advanced management tools
An introduction to Windows PowerShell
Working in a Command Prompt session
Using Microsoft Management Console
The simplest way to accomplish most tasks in Windows 10 is with the help of the graphical user interface—the dialog boxes and Settings pages where you can define preferences and change settings.
But just because that’s usually the easiest way doesn’t mean it’s the only way. Most such tasks have an alternative that you can exercise via the command line or by making changes to the Windows registry. If you’re a system administrator or help desk technician, using command-line tools can save time, especially when you incorporate them into scripts. And for some tasks, using a command-line tool is the only way to get a specific job done.
Beginning in 2006, Windows users have had the option of performing command-line tasks in Windows PowerShell, rather than Command Prompt (Cmd.exe). PowerShell, a .NET-based command-line shell and scripting language tailored to work with every facet of Windows, is now the default shell in Windows 10 and all currently supported Windows Server releases. (If you right-click Start or press Windows key+X, you will probably find that the Quick Link menu includes commands for Windows PowerShell rather than Command Prompt; you can change that default, of course, as we explain later in this chapter.) Microsoft has continued to develop PowerShell and has recently made the code open-source (along with the rest of the Windows command-line infrastructure).
New in Windows 10 version 2004 is Windows Terminal, a modern customizable terminal application that can serve as a front end to PowerShell and Command Prompt, as well as to Azure Cloud Shell and Linux. We begin this chapter with a brief look at Windows Terminal. We follow that with a more extensive introduction to the PowerShell language, with pointers to additional learning resources.
Because of the ongoing importance of Command Prompt (Cmd.exe), this chapter also includes an overview of its most salient features. We also cover the powerful Registry Editor utility (Regedit.exe), starting with an explanation of how the Windows registry works, and we finish with a quick overview of the many advanced management tools based on the Microsoft Management Console.
But first, a question to consider.
Command Prompt or PowerShell?
PowerShell’s language is formal, verbose, and perhaps intimidating. If you are not a system administrator, you don’t need to automate your work with scripts, and you’re comfortable with the venerable Command Prompt, you do not need to change your ways. To reestablish Command Prompt as the default shell, open Settings > Personalization > Taskbar, and look for the switch labeled Replace Command Prompt With Windows PowerShell In The Menu When I Right-Click The Start Button Or Press Windows Key+X. Slide that switch to the Off position, and you’ll see Command Prompt and Command Prompt (Admin) on the Quick Link menu, in place of the corresponding PowerShell commands. (To display the Quick Link menu, right-click Start or press Windows key+X.)
If you’re not sure which shell you prefer, leave the defaults alone and use Windows Terminal. In Terminal, you can devote one tab to PowerShell and another to Command Prompt, and then switch easily from one to the other.
Using Windows Terminal
If you make extensive use of command-line tools, such as PowerShell, Command Prompt, or WSL, you should definitely check out the Windows Terminal application. Windows Terminal is a free, open-source, optional component that you can install from the Microsoft Store. (Windows Terminal builds are also published on the releases page at Microsoft’s GitHub repository: https://github.com/microsoft/terminal/releases. If you install from GitHub, note that the app will not update automatically; you’ll need to fetch updates on your own.)
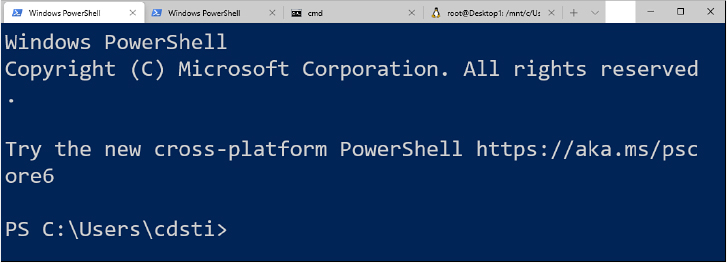
Figure 19-1 shows Terminal in action, with four tabs—two PowerShell profiles, an instance of Command Prompt, and another of Ubuntu.

Figure 19-1 With tabs in Windows Terminal, you can keep multiple command-line environments running simultaneously.
Opening and working with tabs
One of the most appealing features about Windows Terminal is its support for multiple tabs. To open a new tab, click the downward-pointing arrow at the right edge of your current tabs:
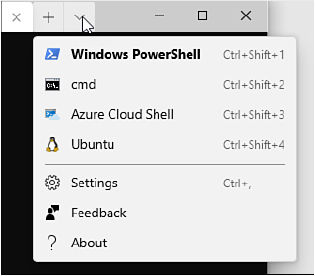
Terminal displays an option for each command shell installed on your system. Note the keyboard shortcuts at the right side of each new-tab option. You can use these to switch between tabs. You can also move forward and backward through your current tab setup by pressing Ctrl+Tab or Ctrl+Shift+Tab.
Configuring Windows Terminal
Settings for Terminal are stored in a .json file for handy portability. To display the file, click the arrow at the right of your tab setup and then choose Settings. (You might need to select an app to handle .json files. Lacking a more powerful text editor, Notepad is a good choice.) Figure 19-2 shows the default settings for Terminal 0.9, the preview version that was available in early 2020. (To display the default settings, hold down the Alt key while clicking the arrow.) Each profile in Terminal can be configured independently of the others.

Figure 19-2 Settings for Windows Terminal are stored in an editable, transportable .json file.
Using the mouse to change text size
You can certainly use the Settings file to configure text characteristics for a profile in Terminal. If you just want to magnify text temporarily to get a closer look without having to squint or move your monitor, a simple mouse maneuver does the trick. Hold down the Ctrl key and roll the mouse wheel. Compare the following image to Figure 19-1, for example.
This simple text manipulation comes courtesy of Terminal’s new GDI-based rendering engine. Other welcome text improvements include the ability to display glyphs, symbols, ideograms, emojis, and programming ligatures.
We’ve only skimmed the surface here, working from a preview version of Terminal. For much more information, start by clicking the arrow at the right of your tabs, and then choosing About. You’ll find a link to Documentation there.
An introduction to Windows PowerShell
Microsoft describes Windows PowerShell as a “task-based command-line shell and scripting language designed especially for system administrators.” That means you can use PowerShell for the same kinds of tasks you’re accustomed to performing with Command Prompt, and you can use its scripting power to automate routine work. If you’re a Windows user who occasionally likes to take advantage of the power of text-based command-line tools such as Ipconfig or Netsh, you’ll find that PowerShell enables you to interact with the operating system in all the old familiar ways—and a good many new ones as well. If you’re accustomed to using batch programs, VBScript, or JScript to automate administrative tasks, you can retain your current scripting investment but take advantage of the additional capabilities afforded by PowerShell’s object orientation and .NET Framework foundation as your scripting needs grow.
Among the advantages PowerShell offers over previous shells and scripting platforms are the following:
Integration with the Microsoft .NET Framework Like more traditional development languages, such as C#, PowerShell commands and scripts have access to the vast resources of the .NET Framework.
Object orientation and an object-based pipeline All PowerShell commands that generate output return .NET Framework objects rather than plain text, eliminating the need for text parsing when the output of one command provides input to a second.
A consistent, discoverable command model All of PowerShell’s commands (or “cmdlets,” as they are called) use a verb-noun syntax, with a hyphen separating the two components. All cmdlets that read information from the system begin with Get; all those that write information begin with Set. These and other similar consistencies make the language easy to learn and understand. Each cmdlet has a help topic that can be retrieved by typing get-help cmdletname (where cmdletname is the name of a cmdlet). You can use a -Whatif parameter to test the effect of a cmdlet before you execute it.
Universal scripting capability A PowerShell script is a text file, with the extension .ps1, containing PowerShell commands. Any commands that can be used interactively can be incorporated into a script. Scripting structures, such as looping, branching, and variables, can also be used interactively—that is, outside the context of a script.
A focus on administrators PowerShell includes features of particular interest to system administrators, such as the ability to work with remote computers; access to system resources such as files, folders, registry keys, events, and logs; and the ability to start and stop services.
Extensibility Developers can extend the PowerShell language by importing modules—packages of PowerShell commands and other items. Microsoft 365 administrators, for example, can download Microsoft 365 PowerShell modules and connect to a Microsoft 365 tenant to manage the entire family of Microsoft 365 apps and services. For details, see https://bit.ly/office365-powershell.
The following pages introduce PowerShell. Our discussion focuses primarily on the use of PowerShell as an interactive command shell because PowerShell scripting is itself a book-length subject. For sources of additional information, see “Finding additional PowerShell resources” later in this chapter.
Starting PowerShell
To launch Windows PowerShell, right-click Start (or press Windows key+X) and choose Windows PowerShell or Windows PowerShell (Admin) from the Quick Link menu. Alternatively, type powershell into the search box; the Windows PowerShell application should appear at or near the top of the results list. Nearby you’ll also find the 64-bit and 32-bit versions of the Windows PowerShell Integrated Scripting Environment (ISE). The ISE is a multi-tabbed graphical environment of particular use for developing and debugging scripts.
As Figure 19-3 shows, PowerShell’s default appearance offers a minimal command-line interface similar to that of Command Prompt. The Windows PowerShell label in the title bar and above the copyright notice, along with the letters PS at the beginning of the command prompt, are the only distinguishing details.
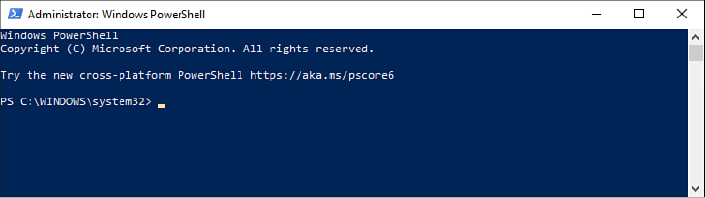
Figure 19-3 An uncustomized (default) PowerShell window looks a lot like a Command Prompt window.
Interacting with PowerShell
If you’re an old hand at the command prompt but new to PowerShell, the first thing you might want to try is using some of Command Prompt’s familiar internal commands. You’ll discover that most such items—for example, dir, cd, md, rd, pushd, and popd—still work in PowerShell. Redirection symbols, such as > to send output to a file and >> to append output to a file, work as well, and you can pipe lengthy output to More, just as you’re accustomed to doing in Command Prompt. PowerShell uses aliases to map Command Prompt commands to its own cmdlets. Thus, dir is an alias for the PowerShell cmdlet Get-Childitem; cd is an alias for PowerShell’s Set-Location. You can create your own aliases to simplify the typing of PowerShell commands that you use often; for details, see “Using and creating aliases” later in this chapter.
Like any other command prompt, PowerShell can be used to launch executables. Typing regedit, for example, launches Registry Editor; typing taskschd launches Task Scheduler. (Note that with PowerShell, you also can work directly with the registry without the use of Registry Editor; for details, see “Editing the Windows registry” later in this chapter.)
Using cmdlets
The core of PowerShell’s native vocabulary is a set of cmdlets, each consisting of a verb, followed by a hyphen, followed by a noun—for example, Start-Service. A cmdlet can be followed by one or more parameters; each parameter is preceded by a space and consists of a hyphen connected to the parameter’s name followed by a space and the parameter’s value. So, for example,
Get-Process -Name iexplore
returns information about any currently running processes named iexplore.
With parameters that accept multiple values, you can use a comma to separate the values. For example,
Get-Process -Name iexplore, winword, excel
generates information about Microsoft Word and Excel as well as Internet Explorer.
Many cmdlets use positional parameters. For example, the -Name parameter for Get-Process is positional. PowerShell expects it to come first, so you can omit -Name and simply specify the names of the processes in which you’re interested.
If you omit both the first positional parameter and its value, PowerShell typically assumes a value of *. So, for example,
Get-Process
returns information about all running processes, as shown in Figure 19-4.
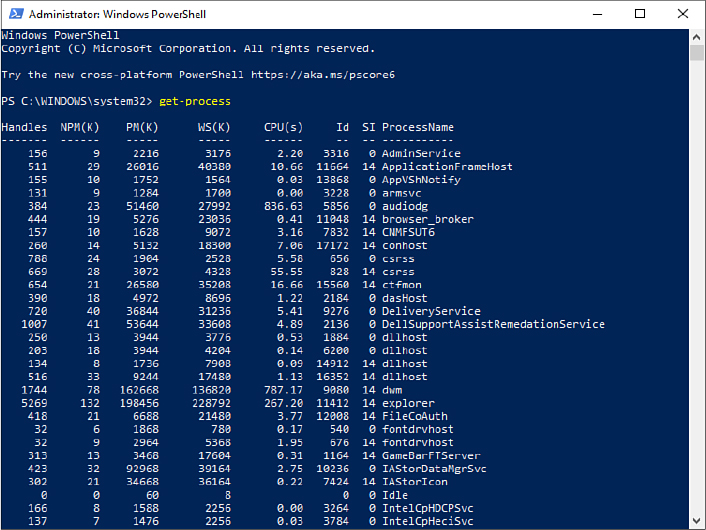
Figure 19-4 Typing Get-Process without parameters produces information about all running processes.
In some cases, if you omit values for an initial positional parameter, PowerShell prompts you to supply the parameter. For example, in response to
Get-Eventlog
PowerShell will do you the courtesy of prompting for the name of an event log. (Event logs are large; it wouldn’t be reasonable to ask for all of them at once.)
For information about any particular cmdlet, type get-help followed by the cmdlet name.
Using the pipeline
You can use the pipe operator ( | ) to supply the output of one cmdlet as input to another. You can connect as many cmdlets as you please using the PowerShell pipeline, as long as each cmdlet to the right of a pipe operator understands the output of the cmdlet to its left. Because PowerShell cmdlets return full-fidelity .NET objects rather than text, a cmdlet to the right of a pipe operator can operate directly on properties or methods of the preceding cmdlet’s output.
The following paragraphs provide examples of the use of piping to format, filter, and sort the output from various Get- cmdlets.
Formatting output as a list
The default output from many Get- cmdlets is a table that presents only some of the resultant object’s properties (about as many as the width of your display is likely to accommodate). For example, the cmdlet
Get-Service
generates a three-column display that includes only the Status, Name, and DisplayName properties.
If you pipe the same output to Format-List,
Get-Service | Format-List
PowerShell, no longer constrained by display width, can display more of the object’s properties (as shown in Figure 19-5), including in this case such useful items as the dependencies of each service and whether the service can be paused or stopped.
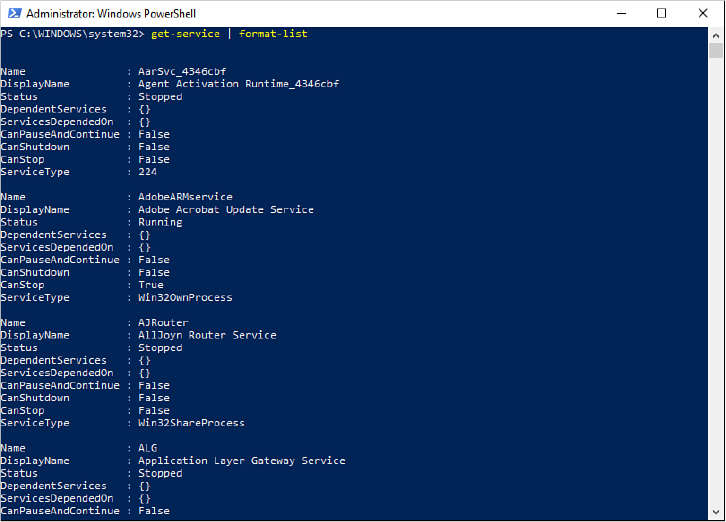
Figure 19-5 By piping a cmdlet to Format-List, you can see more of a resultant object’s properties.
In some cases, you’ll find the Format-List cmdlet, with no parameters, is equivalent to Format-List -Property *. But this is by no means always the case. For example,
Get-Process | Format-List
returns four properties for each process: ID, Handles, CPU, and Name. Asking for all properties produces a wealth of additional information.
To generate a list of particular properties, add the -Property parameter to Format-List and supply a comma-separated list of the properties you want to see. To see what properties are available for the object returned by a cmdlet, pipe that cmdlet to Get-Member:
Get-Process | Get-Member -Membertype property
Formatting output as a table
Perhaps you want tabular output but with different properties from those that your cmdlet gives you by default. Format-Table does the trick. For example,
Get-Service | Format-Table -Property name, dependentservices, servicesdependedon
generates a table consisting of these three enumerated properties. Note that PowerShell’s console output is constrained by your console width, no matter how many properties you ask to see. For results that are too wide to display, redirect output to a file (using the > operator) or try the Out-Gridview cmdlet, described next.
Generating an interactive graphical table
Piping the output to Out-Gridview generates a graphical tabular display you can filter, sort, and copy easily into other programs, such as Excel, that accommodate tabular data. For example,
Get-Process | Select-Object * | Out-Gridview
produces output comparable to that shown in Figure 19-6. Note that in this example, Get-Process is piped first to Select-Object * because Out-Gridview, unlike Format-Table, does not include a -Property parameter. Select-Object * passes all properties of the object returned by Get-Process along the pipeline to Out-Gridview.
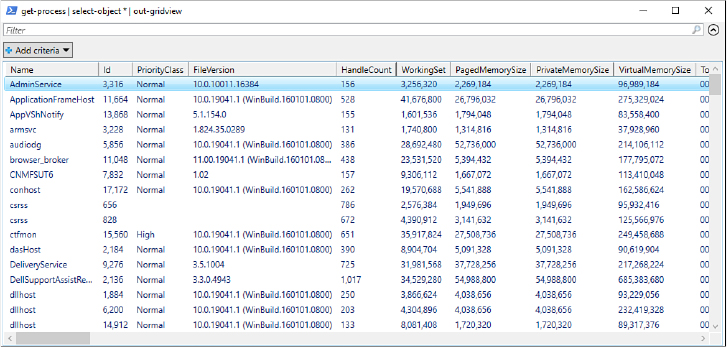
Figure 19-6 The Out-Gridview cmdlet produces a graphical tabular display you can sort, filter, and copy into a spreadsheet.
You can manipulate the Out-Gridview display with techniques comparable to those used by many other programs:
To sort the display, click a column heading; click a second time to reverse the sort.
To change the position of a column, drag its heading. You can also rearrange columns by right-clicking any column head, choosing Select Columns, and then using the Move Down and Move Up buttons in the Select Columns dialog box.
To remove columns from the display, right-click any column heading, click Select Columns, and then use the << button in the Select Columns dialog box.
To perform a quick filter, enter text in the line labeled Filter. For example, to limit the display in Figure 19-6 to processes with properties containing the word Microsoft, type Microsoft on the Filter line.
To filter on one or more specific columns, click the Add Criteria button. In the drop-down list that appears, select check boxes for the columns on which you want to filter and then click Add.
Filtering output
To filter output from a cmdlet, pipe it to the Where-Object cmdlet. With Where-Object, you encapsulate filtering criteria in a script block, between curly braces. The following example filters output from Get-Service so that only services whose status is Stopped are displayed:
Get-Service | Where-Object {$_.Status -eq “Stopped”}
Sorting output
You can use the Sort-Object cmdlet to sort the output from a cmdlet on one or more of the resultant object’s properties in a variety of useful ways. If you omit the -Property parameter, Sort-Object sorts on the default property. For example,
Get-Childitem | Sort-Object
sorts the contents of the current directory by Name, the default property in this case. To sort on multiple properties, follow -Property with a comma-separated list. Sort-Object sorts on the first named property first, sorting items with identical values for the first property by the second property, and so on. Sorts are ascending by default; to sort in descending order, add the parameter -Descending.
By piping Sort-Object to Select-Object, you can do such things as return the largest or smallest n items in a resultant object. For example,
Get-Process | Sort-Object -Property WS | Select-Object -Last 10
returns the processes with the 10 largest values of the working set (WS) property. Using -First 10 instead of -Last 10 gives you the items with the smallest values.
Piping output to the printer
To redirect output to the default printer, pipe it to Out-Printer. To use a nondefault printer, specify its name, in quotation marks, after Out-Printer. For example,
Get-Content C:UsersCraigDocumentsMusicSonata.sib | Out-Printer “Microsoft Print To PDF”
sends the content of C:UsersCraigDocumentsMusicSonata.sib to the device named Microsoft Print To PDF.
Using PowerShell features to simplify keyboard entry
PowerShell is a wordy language and doesn’t take kindly to misspellings. Fortunately, it includes many features to streamline and simplify the task of formulating acceptable commands.
Using and creating aliases
An alias is an alternative formulation for a cmdlet. As mentioned earlier, PowerShell uses aliases to translate Command Prompt commands to its own native tongue—for example, cd to Set-Location. But it includes a great many more simply for your typing convenience; gsv, for example, is an alias for Get-Service. And you can create aliases of your own.
To see what aliases are currently available (including any you created yourself during the current session), type get-alias. To see whether an alias is available for a particular cmdlet, pipe Get-Alias to Where-Object, like this:
Get-Alias | Where-Object { $_.definition -eq “Set-Variable” }
This particular command string inquires whether an alias is available for the Set-Variable cmdlet. If you type this, you’ll discover that PowerShell offers two: sv and set.
To create a new alias, type set-alias name value, where name is the alias and value is a cmdlet, function, executable program, or script. If name already exists as an alias, Set-Alias redefines it. If value is not valid, PowerShell won’t bother you with an error message—until you try to use the alias.
Aliases you create are valid for the current session only. To make them available permanently, include them in your profile. See “Using your profile to customize PowerShell” later in this chapter.
Abbreviating parameter names
Aliases are dandy for cmdlets, but they’re no help for parameter names. Fortunately, with PowerShell you can abbreviate such names. The commands Get-Process -name iexplore and Get-Process -n iexplore are equivalent. As soon as you’ve typed enough of a parameter name to let PowerShell recognize it unambiguously, you can give your fingers a rest. And, of course, you can combine aliases with parameter abbreviations to further lighten your load.
Using Tab expansion
As a further convenience, with PowerShell you can complete the names of files, cmdlets, or parameters by pressing Tab. Type part of a name, press Tab, and PowerShell presents the first potential completion. Continue pressing Tab to cycle through all the possibilities. Note, however, that Tab expansion works only with the noun portion of a cmdlet; type the verb and the hyphen, and then you can use Tab expansion for the noun.
Using wildcards and regular expressions
Like all its Windows-shell predecessors, PowerShell supports the * and ? wildcards—the former standing in for any combination of zero or more characters, the latter for any single character. PowerShell also provides a vast panoply of “regular expressions” for matching character strings. For details about regular expressions in PowerShell, go to https://docs.microsoft.com/en-us/search/?scope=PowerShell. Then search for regular_expressions. In general, you can use this method to get additional information about and documentation for any PowerShell topic.
Recalling commands from the command history
PowerShell maintains a history of your recent commands, which makes it easy to reuse (or edit and reuse) a command you already entered. To see the history, type get-history. Each item in the history is identified by an ID number. Type invoke-history ID to bring an item to the command line. On the command line, you can edit an item before executing it. With the exception of Alt+F7, the editing keys available in Command Prompt (which are listed in Table 19-3) work the same way in PowerShell.
The number of history items retained in a PowerShell session is defined by the automatic variable $MaximumHistoryCount. By default, that variable is set to 64. If you find you need more, you can assign a larger number to the variable. For example, to double the default for the current session, type $MaximumHistoryCount = 128. To change the history size for all sessions, add a variable assignment to your profile. For more information, see “Using your profile to customize PowerShell” later in this chapter.
Using PowerShell providers for access to file-system and registry data
PowerShell includes a set of built-in providers that give you access to various kinds of data stores. Providers are .NET Framework–based programs, and their data is exposed in the form of drives, comparable to familiar file-system drives. Thus, you can access a key in the HKLM registry hive with a path structure similar to that of a file-system folder; for example, the path HKLM:HardwareACPI specifies the ACPI key of the Hardware key of the HKEY_LOCAL_MACHINE hive. Or, to use a quite different example, you can use the command Get-Childitem env: to get a list of current environment variables and their values.
Table 19-1 lists PowerShell’s built-in providers.
Table 19-1 Built-in providers
Provider |
Drive |
Data store |
Alias |
Alias: |
Currently defined aliases |
Certificate |
Cert: |
X509 certificates for digital signatures |
Environment |
Env: |
Windows environment variables |
FileSystem |
(varies) |
File-system drives, directories, and files |
Function |
Function: |
PowerShell functions |
Registry |
HKLM:, HKCU: |
HKLM and HKCU registry hives |
Variable |
Variable: |
PowerShell variables |
WSMan |
WSMan: |
WS-Management configuration information |
The following paragraphs provide some basic information about working with the file system and registry.
Working with the file system
For very simple file-system operations, you might find that familiar Command Prompt commands are adequate and easier to use than PowerShell cmdlets. The built-in aliases listed in Table 19-2 let you stick with time-honored methods. PowerShell supports the familiar single period (.) and double period (..) symbols for the current and parent directories, and it includes a built-in variable, $Home, that represents your home directory (by default, equivalent to the %UserProfile% environment variable).
Table 19-2 File-system aliases
Alias |
PowerShell cmdlet |
cd, chdir |
Set-Location |
copy |
Copy-Item |
del |
Remove-Item |
dir |
Get-Childitem |
move |
Move-Item |
md, mkdir |
New-Item |
rd, rmdir |
Remove-Item |
type |
Get-Content |
The PowerShell cmdlets, however, include valuable optional parameters:
-Confirm and -Whatif The -Confirm parameter, used with Copy-Item, Move-Item, Remove-Item, or Clear-Content, causes PowerShell to display a confirmation prompt before executing the command. (Clear-Content can be used to erase the contents of a file.) If you use the -Whatif parameter, PowerShell shows you the result of a command without executing it.
-Credential Use the -Credential parameter to supply security credentials for a command that requires them. Follow -Credential with the name of a user, within double quotation marks. PowerShell will prompt for a password.
-Exclude You can use the -Exclude parameter to make exceptions. For example, Copy-Item directory1*.* directory2 -Exclude *.log copies everything, excluding all .log files, from Directory1 to Directory2.
-Recurse The -Recurse parameter causes a command to operate on subfolders of a specified path. For example, Remove-Item x:garbagefolder*.* -Recurse deletes everything from X:Garbagefolder, including files contained within that folder’s subfolders.
-Include By using the -Include parameter in conjunction with -Recurse, you can restrict the scope of a command. For example, Get-Childitem c:userscraigdocuments * -Recurse -Include *.xlsx restricts a recursive listing of C:UsersCraigDocuments to files with the extension .xlsx.
-Force The -Force parameter causes a command to operate on items that are not ordinarily accessible, such as hidden and system files.
For detailed information about using these parameters with Set-Location, Get-Childitem, Move-Item, Copy-Item, Get-Content, New-Item, Remove-Item, or Get-Acl, type get-help cmdletname.
Working with the registry
The built-in registry provider provides drives for two registry hives: HKEY_LOCAL_MACHINE and HKEY_CURRENT_USER. To change the working location to either of these, type set-location hklm: or set-location hkcu:, respectively. Use standard path notation to navigate to particular subkeys but enclose paths that include spaces in quotation marks—for example, set-location “hkcu:control panelaccessibility”.
To display information about all subkeys of a key, use Get-Childitem. For example,
Get-Childitem -Path hkcu:softwaremicrosoft
returns information about all the subkeys of HKCU:SoftwareMicrosoft.
To add a key to the registry, use New-Item. For example,
New-Item -Path hkcu:softwaremynewkey
adds the key mynewkey to HKCU:Software. To remove this key, type remove-item -path hkcu:softwaremynewkey.
To copy a key, use Copy-Item and specify the source and destination paths; like this, for example,
Copy-Item -Path hkcu:softwaremykey hkcu:softwarecopyofmykey
To move a key, use Move-Item. The command
Move-Item -Path hkcu:softwaremykey -Destination hkcu:softwaremyrelocatedkey
copies all properties and subkeys associated with HKCU:SoftwareMykey to HKCU:SoftwareMyrelocatedkey and deletes HKCU:SoftwareMykey.
To display the security descriptor associated with a key, use Get-Acl. To see all the properties of the security descriptor, pipe this to Format-List -Property *. For example,
Get-Acl -Path hkcu:softwaremicrosoft | Format-List -Property *
generates a display comparable to this:

Go to https://docs.microsoft.com/search/?scope=PowerShell and type get-help registry for more information about working with the registry.
Discovering PowerShell
PowerShell provides plenty of resources to help you learn as you go. You can display help information about any cmdlet by typing get-help cmdletname. For example, to read help about Get-Help, type get-help. If you omit the first get, PowerShell helpfully pipes the help text to More. So, for example, if you type help get-help, PowerShell pauses the output after each screenful.
Among the useful parameters for Get-Help are the following:
-Examples To display only the name, synopsis, and examples associated with a particular help text, add the -Examples parameter.
-Parameter To get help for a particular parameter associated with a cmdlet, include -Parameter. Specify the parameter name in quotation marks.
-Detailed To get the description, syntax, and parameter details for a cmdlet, as well as a set of examples, use the -Detailed parameter. (Without this parameter, the examples are omitted; with -Examples, the syntax information is omitted.)
-Full For the works, including information about input and output object types and additional notes, specify -Full.
-Online For the latest information that Microsoft has, including additions or corrections to the native output of Get-Help, specify -Online. The relevant information from Microsoft Docs will appear in your browser.
The information made available via the -Online parameter is more current and more accurate than what’s provided in the Windows help file for PowerShell. For the most recent updates, visit the PowerShell Scripting page in Microsoft Docs, https://bit.ly/scripting-with-powershell.
Finding the right cmdlet to use
The Get-Command cmdlet can help you figure out which cmdlet is the right one to use for a given task. Type get-command with no arguments to get the names and definitions of all available cmdlets, functions, and aliases. Get-Command can also give you information about non-PowerShell executables. If you type get-command *, for example, you’ll get a huge list including all program files in all folders included in your current %Path% environment variable.
Either global list (with or without the non-PowerShell executables) is likely to be less than useful when you just want to know which cmdlets are available for use with a particular object. To get such a focused list, add the -Noun parameter. For example, type get-command -noun eventlog to get a list of the cmdlets that use that noun; you’ll be rewarded with the names and definitions of Clear-Eventlog, Get-Eventlog, Limit-Eventlog, New-Eventlog, Remove-Eventlog, Show-Eventlog, and Write-Eventlog. You can get a list focused similarly on a particular verb by using the -Verb parameter.
Scripting with PowerShell
A PowerShell script is a text file with the extension .ps1. You can create a script in any plain text editor (Notepad will do fine), or you can use the Integrated Scripting Environment (ISE).
Anything you do interactively with PowerShell you can also do in a script. The reverse is true as well; you can take lines from a script, including those that involve looping or branching structures, and execute them individually outside the context of a script. For example, if you type
For ($i=1; $i -le 5; $i++) { “Hello, World” }
at the PowerShell command prompt, PowerShell performs the familiar greeting five times.
Using PowerShell’s history feature, you can transfer commands you have used interactively into a script. That way you can test to see what works and how it works before committing text to a .ps1 file.
For example, the command
Get-History | Foreach-Object { $_.commandline } >> c:scriptsmynewscript.ps1
appends the CommandLine property from each item in your current history to the file C:ScriptsMynewscript.ps1. (If the path doesn’t exist, the command returns an error.) Once you have transferred your history to Mynewscript.ps1 in this manner, you can edit it in Notepad by typing notepad c:scriptsmynewscript.ps1.
Running PowerShell scripts
Although files with the extension .ps1 are executable PowerShell scripts, running one is not quite as straightforward as double-clicking a .bat file. In the first place, if you double-click a .ps1 file in File Explorer, you’ll get an Open File–Security Warning dialog box, from which the only forward step leads to Notepad. In effect, the default action for a PowerShell script in File Explorer is Edit.
Second, the first time you try to run a script by typing its name at the PowerShell command prompt, you might see a distressing message displayed in red letters and with possibly unwelcome detail. This means that PowerShell has declined to run your script “because the execution of scripts is disabled on this system.” You need to change PowerShell’s execution policy, as described next.
Third, even after you’ve cleared the execution-policy hurdle, you might still be rebuffed if you try to run a script stored in the current directory. That’s because PowerShell requires a full path specification, even when the item you’re running is stored in the current directory. For example, to run Displayprocessor.ps1, which resides in the current directory, you must type .displayprocessor.
Getting and setting the execution policy
PowerShell’s power can be used for evil ends. The majority of Windows users will never run PowerShell, but many will have .ps1 files lying about on their system or will download them inadvertently. To protect you from malice, PowerShell disables script execution until you explicitly enable it. Enabling execution requires a change to the execution policy.
Note that your profile script (if you have one) is subject to the same execution policy as any other script. (See “Using your profile to customize PowerShell” later in this chapter.) Therefore, it’s pointless to set an execution policy by means of a profile script; that script itself will not run until you’ve enabled script execution elsewhere.
The following execution policies, listed here from least permissive to most, are available:
Restricted The default policy. No scripts are allowed to run.
AllSigned Any script signed by a trusted publisher is allowed to run. PowerShell presents a confirmation prompt before running a script signed by a publisher that you have not designated as “trusted.”
RemoteSigned Scripts from local sources can run. Scripts downloaded from the internet (including scripts that originated as email or instant-messaging attachments) can run if signed by a trusted publisher.
Unrestricted All scripts can run, but PowerShell presents a confirmation prompt before running a script from a remote source.
Bypass All scripts are allowed to run.
Execution policies can be set separately for the following scopes:
Process Affects the current PowerShell session only. The execution policy is stored in memory and expires at the end of the session.
CurrentUser The execution policy is stored in a subkey of HKCU and applies to the current user only. The setting is retained between PowerShell sessions.
LocalMachine The execution policy is stored in a subkey of HKLM and applies to all users at this computer. The setting is retained between PowerShell sessions.
If policies are set at two or more of these scopes, the Process policy takes precedence over the CurrentUser policy, which takes precedence over the LocalMachine policy. Execution policy can also be set via Group Policy, however, and settings made in that manner trump any of the foregoing scopes. (Group Policy settings can be made in either the Computer Configuration or User Configuration node; a Computer Configuration setting trumps any other.)
To see the execution policies in effect at all scopes, type get-executionpolicy -list.
To set an execution policy, use Set-ExecutionPolicy. To set a policy at the LocalMachine scope, you need to be running PowerShell with administrative privileges.
The default scope for Set-ExecutionPolicy is LocalMachine, so if you’re planning to apply a policy to all users at your computer, you can omit the -Scope parameter. For example, if you’re comfortable disabling all of PowerShell’s script-execution security measures, including warning prompts, you can type set-executionpolicy bypass. For a slightly more protective environment, type set-executionpolicy unrestricted.
To set a policy at the CurrentUser or Process scope, add -Scope followed by CurrentUser or Process. Note that you can also set an execution policy at the Process scope by adding an -Executionpolicy argument to a command that launches PowerShell. For example, from a command prompt in Command Prompt, in PowerShell, or on the Start menu, you can type powershell -executionpolicy unrestricted to launch PowerShell with the Unrestricted execution policy at the Process scope.
To remove an execution policy from a particular scope, set that scope’s policy to Undefined. For example, if you set a Process policy to, say, Bypass, and you would like PowerShell to revert to the policy at the next level of precedence (CurrentUser, if a policy is set there, or LocalMachine, if not), type set-executionpolicy undefined -scope process.
Using your profile to customize PowerShell
Your profile is a script that PowerShell executes at the beginning of each session. You can use it to tailor your PowerShell environment to your preferences. Your profile must have the following path and file name:
$HomeDocumentsWindowsPowerShellMicrosoft.PowerShell_profile.ps1
where $Home is a system-generated PowerShell variable corresponding to the environment variable %UserProfile%. You can see where this is on your system by typing $profile, and you can edit an existing profile by typing notepad $profile. If you have not yet created a profile, you can type the following:
if (!(test-path $profile)){New-Item -Type file -Path $profile -Force}
PowerShell will create the file for you in the appropriate folder. Then you can type notepad $profile to edit the blank file.
You can use your profile to customize PowerShell in a variety of ways. Possibilities to consider include changing the default prompt and creating new aliases.
PowerShell’s prompt is derived from a built-in function called Prompt. You can overwrite that function with your own. For example, the function
Function prompt {“PS [$env:computername] $(Get-Date) > “}
replaces the built-in PowerShell prompt with the letters PS, followed by your computer name, followed by the current date and time.
To add new aliases to the ones PowerShell already offers, include Set-Alias statements in your profile. (See “Using and creating aliases” earlier in this chapter.)
Using the PowerShell ISE
A feature introduced with PowerShell 2.0 allows you to issue commands and work with scripts in a graphical environment. This ISE includes a command pane, a script pane, and an output pane. The output pane displays the results of any commands you issue in the command pane or any scripts you run in the script pane.
Windows PowerShell ISE is a desktop app that you can launch from Start. Alternatively, at a PowerShell prompt or in a Command Prompt window, type powershell_ise.
The ISE supports multiple tabs, so you can open several scripts at once. Click File > New to open a new blank tab (for example, to write a new script) or File > Open to open an existing script in a new tab. To run the current script, click Debug > Run/Continue, press F5, or click the green arrow in the middle of the toolbar. You can use other commands on the Debug menu to set and remove breakpoints and step through execution.
The ISE offers all the usual amenities of a graphical environment. You can resize and rearrange the panes, for example. You can use the View menu’s Zoom commands (or adjust the slider in the lower-right corner of the window) to make the text display larger or smaller. And you can easily select and copy text from one pane to another or from the ISE to another application.
The ISE uses its own profile, separate from the one you use to customize PowerShell itself. The path and file name are as follows:
$HomeDocumentsWindowsPowerShellMicrosoft.PowerShellISE_profile.ps1
and you create the file by typing:
if(!(Test-Path $profile)){New-Item -Type file -Path $profile -Force}
Finding additional PowerShell resources
This chapter’s discussion of PowerShell has barely nicked the surface. You’ll find complete documentation for PowerShell at https://docs.microsoft.com/powershell/. For more about getting started In PowerShell, visit https://docs.microsoft.com/powershell/scripting/.
Working in a Command Prompt session
To open a Command Prompt window, run Cmd.exe. You can do this by double-clicking any shortcut for Cmd.exe, but because you like to type, you might find it easiest to tap the Windows key to position the insertion point in the search box, type cmd, and then press Enter. To open a second or subsequent Command Prompt window when one is already open, you can type start in the window that’s already running.
Running with elevated privileges
Your activities in a Command Prompt session are subject to the same User Account Control (UAC) restrictions as anything else you do in Windows. If you use Command Prompt to launch a program (for example, Registry Editor) that requires an administrative token, you’ll be asked to confirm a UAC prompt before moving on. If you plan to run several such tasks from Command Prompt, you might prefer to run Command Prompt itself with elevated privileges. To do this, use any of the following techniques:
Type cmd in the search box and press Ctrl+Shift+Enter.
Right-click any shortcut for Command Prompt and then click Run As Administrator, or press Ctrl+Shift as you click the shortcut or press Enter.
Use the appropriate command on the Quick Link menu: click Command Prompt (Admin), or click Windows PowerShell (Admin) and then enter cmd.
Windows displays the word Administrator in the title bar of any Command Prompt window running with elevated privileges.
Starting Command Prompt at a particular folder
If you run Cmd.exe from its location in %SystemRoot%System32, the session begins with that folder as the current directory. If you run Command Prompt from the Start menu, Windows uses the location specified in the Start In field for the Start > Windows System > Command Prompt shortcut: %HOMEDRIVE%%HOMEPATH%. To run a Command Prompt session at a different folder, hold down the Shift key while you right-click the folder in File Explorer. On the shortcut menu, click Open PowerShell Window Here, and then enter cmd.
Starting Command Prompt and running a command
By using the /C and /K command-line arguments, you can start a Command Prompt session and immediately run a command or program, which we refer to as commandstring in this section. The difference between the two is that cmd /C commandstring terminates the Command Prompt session as soon as commandstring has finished, whereas cmd /K commandstring keeps the Command Prompt session open after commandstring has finished. Note the following:
You must include either /C or /K if you want to specify a command string as an argument to Cmd. If you type cmd commandstring, the command processor simply ignores commandstring.
While commandstring is executing, you can’t interact with the command processor. To run a command or program and keep the Command Prompt window interface, use the Start command. For example, to run Mybatch.bat and continue issuing commands while the batch program is running, type
cmd /k start mybatch.bat
If you include other command-line arguments along with /C or /K, /C or /K must be the last argument before commandstring.
Using AutoRun to execute commands when Command Prompt starts
By default, Command Prompt executes on startup whatever it finds in the following two registry values:
The AutoRun value in HKLMSoftwareMicrosoftCommand Processor
The AutoRun value in HKCUSoftwareMicrosoftCommand Processor
The AutoRun value in HKLM affects all user accounts on the current machine. The AutoRun value in HKCU affects only the current user account. If both values are present, both are executed—HKLM before HKCU. Both AutoRun values are of data type REG_SZ, which means they can contain a single string. To execute a sequence of separate Command Prompt statements, therefore, you must use command symbols or store the sequence as a batch program and then use AutoRun to call the batch program.
You can also use Group Policy objects to specify startup tasks for Command Prompt.
Editing the command line
When working at a command prompt, you often enter the same command multiple times or enter several similar commands. To assist you with repetitive or corrective tasks, Windows includes a feature that recalls previous commands and allows you to edit them on the current command line. Table 19-3 lists these editing keys and what they do.
Table 19-3 Command-line editing keys
Key |
Function |
Up Arrow or F3 |
Recalls the previous command in the command history |
Down Arrow |
Recalls the next command in the command history |
Page Up |
Recalls the earliest command used in the session |
Page Down |
Recalls the most recently used command |
Left Arrow |
Moves left one character |
Right Arrow |
Moves right one character |
Ctrl+Left Arrow |
Moves left one word |
Ctrl+Right Arrow |
Moves right one word |
Home |
Moves to the beginning of the line |
End |
Moves to the end of the line |
Esc |
Clears the current command |
F7 |
Displays the command history in a scrollable pop-up box |
F8 |
Displays commands that start with the characters currently on the command line |
Alt+F7 |
Clears the command history |
Using command symbols
Old-fashioned programs that take all their input from a command line and then run unaided can be useful in a multitasking environment. You can turn them loose to perform complicated processing in the background while you continue to work with other programs in the foreground.
To work better with other programs, many command-line programs follow a set of conventions that control their interaction:
By default, programs take all their input as lines of text typed at the keyboard. But input in the same format also can be redirected from a file or any device capable of sending lines of text.
By default, programs send all their output to the screen as lines of text. But output in the same format also can be redirected to a file or another line-oriented device, such as a printer.
Programs set a number (called a return value) when they terminate to indicate the results of the program.
When programs are written according to these rules, you can use the symbols listed in Table 19-4 to control a program’s input and output or chain programs together.
Table 19-4 Command symbols
Symbol |
Function |
< |
Redirects input |
> |
Redirects output |
>> |
Appends redirected output to existing data |
| |
Pipes output |
& |
Separates multiple commands in a command line |
&& |
Runs the command after && only if the command before && is successful |
|| |
Runs the command after || only if the command before || fails |
^ |
Treats the next symbol as a character |
( and ) |
Groups commands |
The redirection symbols
Command Prompt sessions in Windows allow you to override the default source for input (the keyboard) or the default destination for output (the screen).
Redirecting output
To redirect output to a file, type the command followed by a greater-than sign (>) and the name of the file.
Using two greater-than signs (>>) redirects output and appends it to an existing file.
Redirecting input
To redirect input from a file, type the command followed by a less-than sign (<) and the name of the file.
Redirecting input and output
You can redirect both input and output in a command line. For example, to use Batch.lst as input to the Sort command and send its output to a file named Sorted.lst, type the following:
Sort < batch.lst > sorted.lst
Standard output and standard error
Programs can be written to send their output either to the standard output device or to the standard error device. Sometimes programs are written to send different types of output to each device. You can’t always tell which is which because, by default, both devices are the screen.
The Type command illustrates the difference. When used with wildcards, the Type command sends the name of each matching file to the standard error device and sends the contents of the file to the standard output device. Because they both go to the screen, you see a nice display with each file name followed by its contents.
However, if you try to redirect output to a file by typing something like this:
type *.bat > std.out
the file names still appear on your screen because standard error is still directed to the screen. Only the file contents are redirected to Std.out.
With Windows, you can qualify the redirection symbol by preceding it with a number. Use 1> (or simply >) for standard output and 2> for standard error. For example:
type *.bat 2> err.out
This time, the file contents go to the screen and the names are redirected to Err.out.
The pipe symbol
The pipe symbol (|) is used to send, or pipe, the output of one program to a second program as the second program’s input. Piping is commonly used with the More command, which displays multiple screenfuls of output one screenful at a time. For example:
help dir | more
This command line uses the output of Help as the input for More. The More command filters out the first screenful of Help output, sends it to the screen as its own output, and then waits for a keystroke before sending more filtered output.
Editing the Windows registry
The Windows registry is the central storage location that contains configuration details for hardware, system settings, services, user customizations, applications, and every detail—large and small—that makes Windows work.
Note
The registry is the work of many hands, over many years, and capitalization and word spacing are not consistent. With readability as our goal, we made our own capitalization decisions for this book, and our treatment of names frequently differs from what you see in Registry Editor. No matter. Capitalization is irrelevant. Spelling and spacing must be correct, however.
Although it’s convenient to think of the registry as a monolithic database, its contents are actually stored in multiple locations as separate hive files, alongside logs and other support files. Some of those hive files are read into memory when the operating system starts; hive files that contain user-specific settings are stored in the user profile and are loaded when a new user signs in.
The Boot Configuration Data (BCD) store has its own file on the boot drive. The core hives for Windows—the Security Account Manager (SAM), Security, Software, and System—are securely stored in %SystemRoot%System32Config. Two hives that contain settings for local and network services are located in %SystemRoot%ServiceProfilesLocalService and %SystemRoot%ServiceProfilesNetworkService, respectively. User-specific hives are stored as part of the user profile folder.
The Hardware hive is unique in that it has no associated disk file. This hive, which contains details about your hardware configuration, is completely volatile; that is, Windows 10 creates it anew each time you turn your system on.
Note
You can see where the hives of your system physically live by examining the values associated with HKLMSystemCurrentControlSetControlHiveList. Windows assigns drive letters after assembling the registry, so these paths do not specify drive letters.
You can’t work with hive files directly. Windows 10 is designed in such a way that direct registry edits by end users are generally unnecessary. When you change your configuration by using the Settings app or Control Panel, for example, Windows writes the necessary updates to the registry for you. Likewise, when you install a new piece of hardware or a new program, the setup program makes the required registry changes; you don’t need to know the details.
On the other hand, because the designers of Windows couldn’t provide a user interface for every conceivable customization you might want to make, sometimes working directly with the registry is the only way to make a change. Even when it’s not the only way, it might be the fastest way. Removing or modifying registry entries is occasionally a crucial part of troubleshooting and repair as well. Windows includes a registry editor you should know how to use—safely. This section tells you how.
Caution
Most Microsoft support articles contain a dire warning about the risks associated with editing the registry. We echo those warnings here. An incorrect registry modification can render your system unbootable and, in some cases, might require a complete reinstall of the operating system. Use Registry Editor at your own risk.
Understanding the Registry Editor hierarchy
Registry Editor (Regedit.exe) offers a unified view of the registry’s contents as well as tools for modifying those contents. You’ll find this important utility on the All Apps list, under the Windows Administrative Tools category. It also shows up when you use the search box. Alternatively, you can type regedit at a command prompt or in the Run dialog box. Registry Editor has been virtually unchanged since the last century. However, beginning in version 1703, you might have noticed some small but long-needed improvements: an address bar, new keyboard shortcuts for traversing the registry, and the addition of a View-menu command with which you can select the font for displaying the registry.
Figure 19-5 shows a (mostly) collapsed view of the Windows 10 registry, as seen through Registry Editor.
The Computer node appears at the top of the Registry Editor tree listing. Beneath it, as shown here, are five root keys: HKEY_CLASSES_ROOT, HKEY_CURRENT_USER, HKEY_LOCAL_MACHINE, HKEY_USERS, and HKEY_CURRENT_CONFIG. For simplicity’s sake and typographical convenience, this book, like many others, abbreviates the root key names as HKCR, HKCU, HKLM, HKU, and HKCC, respectively.
Root keys, sometimes called predefined keys, contain subkeys. Registry Editor displays this structure in a hierarchical tree in the left pane. In Figure 19-7, for example, HKLM is open, showing its top-level subkeys.

Figure 19-7 The registry consists of five root keys, each of which contains many subkeys.
Subkeys, which we call keys for short, can contain subkeys of their own, which in turn can be expanded as necessary to display additional subkeys. The address bar near the top of the Registry Editor window shows the full path of the currently selected key: ComputerHKLMHARDWAREDESCRIPTIONSystemBIOS, in the previous figure.
Note
One of the Registry Editor changes introduced in version 1703 is the address bar. In it, you can type a registry path and press Enter to jump directly to that key, much as you can for jumping to a folder in File Explorer. For the root keys, you can type the full name or the commonly used abbreviations described earlier.
To go to the address bar and select its current content, press Alt+D or Ctrl+L, the same keyboard shortcuts that work in File Explorer as well as most web browsers. Previous versions of Registry Editor displayed the path in a status bar at the bottom of the screen, but you couldn’t edit it or select it for copying.
The contents of HKEY_LOCAL_MACHINE define the workings of Windows itself, and its subkeys map neatly to several hives we mentioned at the start of this section. HKEY_USERS contains an entry for every existing user account (including system accounts), each of which uses the security identifier, or SID, for that account.
 For a detailed discussion of the relationship between user accounts and SIDs, see “What are security identifiers?” in Chapter 11, “Managing user accounts, passwords, and credentials.”
The remaining three predefined keys don’t exist, technically. Like the file system in Windows—which uses junctions, symlinks, and other trickery to display a virtual namespace—the registry uses a bit of misdirection (implemented with the REG_LINK data type) to create these convenient representations of keys that are actually stored within HKEY_LOCAL_MACHINE and HKEY_USERS:
HKEY_CLASSES_ROOT is merged from keys within HKLMSoftwareClasses and HKEY_USERSsid_Classes (where sid is the security identifier of the currently signed-in user).
HKEY_CURRENT_USER is a view into the settings for the currently signed-in user account, as stored in HKEY_USERSsid (where sid is the security identifier of the currently signed-in user).
HKEY_CURRENT_CONFIG displays the contents of the Hardware ProfilesCurrent subkey in HKLMSYSTEMCurrentControlSetHardware Profiles.
Any changes you make to keys and values in these virtual keys have the same effect as if you had edited the actual locations. The HKCR and HKCU keys are generally more convenient to use.
Registry values and data types
Every key contains at least one value. In Registry Editor, that obligatory value is known as the default value. Many keys have additional values. The names, data types, and data associated with values appear in the right pane.
The default value for many keys is not defined. You can think of an empty default value as a placeholder—a slot that could hold data but currently does not.
All values other than the default always include the following three components: name, data type, and data. Figure 19-8, for example, shows customized settings for the current user’s lock screen. (Note the full path to this key in the address bar at the top of the Registry Editor window.)
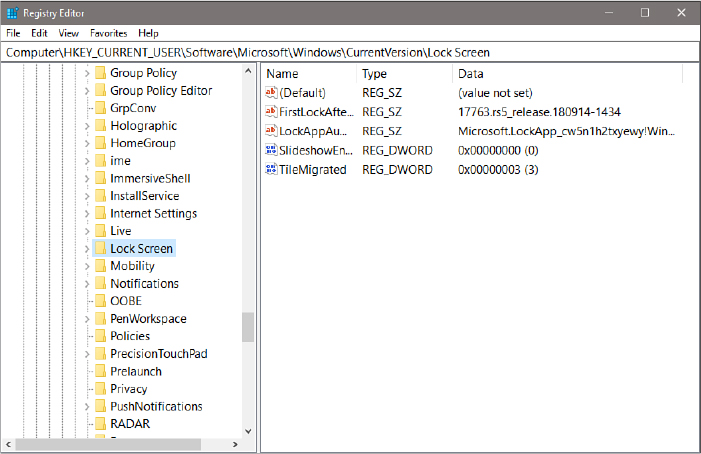
Figure 19-8 Selecting a key on the left displays all its values on the right.
The SlideshowEnabled value (near the bottom of the list) is of data type REG_DWORD. The data associated with this value (on the system used for this figure) is 0x00000000. The prefix 0x denotes a hexadecimal value. Registry Editor displays the decimal equivalent of hexadecimal values in parentheses after the value.
The registry uses the following data types:
REG_SZ The SZ indicates a zero-terminated string. This variable-length string can contain Unicode as well as ANSI characters. When you enter or edit a REG_SZ value, Registry Editor terminates the value with a 00 byte for you.
REG_BINARY The REG_BINARY type contains binary data—0s and 1s.
REG_DWORD This data type is a “double word”—that is, a 32-bit numeric value. Although it can hold any integer from 0 to 232, the registry often uses it for simple Boolean values (0 or 1) because the registry lacks a Boolean data type.
REG_QWORD This data type is a “quadruple word”—a 64-bit numeric value.
REG_MULTI_SZ This data type contains a group of zero-terminated strings assigned to a single value.
REG_EXPAND_SZ This data type is a zero-terminated string containing an unexpanded reference to an environment variable, such as %SystemRoot%. (For information about environment variables, see “Interacting with PowerShell” earlier in this chapter.) If you need to create a key containing a variable name, use this data type, not REG_SZ.
Internally, the registry also uses REG_LINK, REG_FULL_RESOURCE_DESCRIPTOR, REG_RESOURCE_LIST, REG_RESOURCE_REQUIREMENTS_LIST, and REG_NONE data types. Although you might occasionally see references in technical documentation to these data types, they’re not visible or accessible in Registry Editor.
Browsing and editing with Registry Editor
Because of the registry’s size, looking for a particular key, value, or data item can be daunting. In Registry Editor, the Find command (on the Edit menu and also available by pressing Ctrl+F) works in the forward direction only and does not wrap around when it gets to the end of the registry. If you’re not sure where the item you need is located, select the highest level in the left pane before issuing the command. If you have an approximate idea where the item you want is located, you can save time by starting at a node closer to (but still above) the target.
After you locate an item of interest, you can put it on the Favorites list to simplify a return visit. Open the Favorites menu, click Add To Favorites, and supply a friendly name (or accept the default). If you’re about to close Registry Editor and know you’ll be returning to the same key the next time you open the editor, you can skip the Favorites step because Registry Editor always remembers your last position and returns to that position in the next session.
Registry Editor includes a number of time-saving keyboard shortcuts for navigating the registry:
To move to the next subkey that starts with a particular letter, simply type that letter when the focus is in the left pane; in the right pane, use the same trick to jump to the next value that begins with that letter.
To open a key (revealing its subkeys), press Right Arrow or Alt+Right Arrow.
To collapse the subkeys of the current key, press Left Arrow or Alt+Left Arrow. With all subkeys collapsed, either action moves up one level in the subkey hierarchy. To move up a level without closing the subkeys as you move up, press Alt+Up Arrow.
To move to the top of the hierarchy, press Home.
To quickly move between the left and right panes, use the Tab key.
In the right pane, press F2 to rename a value, and press Enter to open that value and edit its data.
Some of these shortcuts, added in version 1703, match the behavior of File Explorer shortcuts, allowing you to apply your knowledge of that program to Registry Editor.
Once you are comfortable using these keyboard shortcuts, you’ll find it’s usually easier to zip through the subkey hierarchy with a combination of arrow keys and letter keys than it is to open outline controls with the mouse.
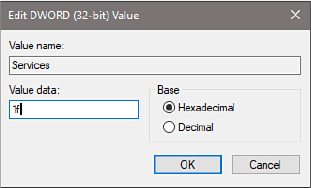
Changing data
You can change the data associated with a value by selecting a value in the right pane and pressing Enter or by double-clicking the value. Registry Editor pops up an edit window appropriate for the value’s data type:
Adding or deleting keys and values
To add a key, select the new key’s parent in the left pane, open the Edit menu, point to New, and click Key. The new key arrives as a generically named outline entry, exactly the way a new folder does in File Explorer. Type a new name.
To add a value, select the parent key, open the Edit menu, and point to New. On the submenu that appears, click the type of value you want to add. A value of the type you select appears in the right pane with a generic name. Type over the generic name, press Enter twice, enter your data, and press Enter once more.
To delete a key or value, select it and then press Delete. Note that deleting a key also deletes every value and subkey associated with it.
Using the Reg command
One expert-level option is to use the Reg command in a Command Prompt window or in a batch file or script. Type reg /? to see the full list of eligible arguments for the reg command (query, add, export, import, and so on). Each of those variants has its own syntax help. Try reg add /? to see the correct syntax for adding a value.
Backing up and restoring parts of the registry
Before you make any changes to the registry, consider using System Restore to set a restore point, which includes a snapshot of the registry as it currently exists. Taking this precaution allows you to roll back any ill-advised changes.
- For information about using System Restore, see “Rolling back to a previous restore point” in Chapter 15, “Troubleshooting, backup, and recovery.”
In addition, or as an alternative, you can use the Export command in Registry Editor to back up the portion of the registry where you plan to work. Registry Editor can save all or portions of your registry in any of four different formats, but only one is relevant in the modern era.
The Registration Files option creates a .reg file, which is a text file that can be read and edited in Notepad or a similar program. A .reg file can be merged into the registry of a system running any version of Windows. When you merge a .reg file, its keys and values replace the corresponding keys and values in the registry. By using .reg files, you can edit your registry “offline” and add your changes to the registry without even opening Registry Editor. You can also use .reg files as an easy way to share registry settings and copy them to other computers.
To export a portion of the registry before you work on it, select a key in the left pane, and then click File > Export. (Easier still, right-click a key and click Export.) In the Save As Type list in the Export Registry File dialog box, select Registration Files (*.reg). Under Export Range, choose Selected Branch and then click Save. The resulting file includes the selected key and all its subkeys and values.
Caution
Exporting a registry hive file using the Registry Hive Files format saves the entire hive; importing the saved file replaces the entire contents of the selected key with the contents of the file—regardless of its original source. That is, it wipes out everything in the selected key and then adds the keys and values from the file. The potential for chaos is obvious, and the benefits are not worth the risk, in our estimation.
If you saved your backup as a .reg file, you use the same process to import it. (As an alternative, you can double-click the .reg file in File Explorer without opening Registry Editor.) The complete path to each key and value is stored as part of the file, and it always restores to the same location. This approach for recovering from registry editing mishaps is fine if you did not add new values or subkeys to the section of the registry you’re working with; it returns existing data to its former state but doesn’t alter the data you added.
Troubleshooting
You used a registry cleaner and your system is no longer working properly
The registry is often inscrutable and can appear messy. Misguided attempts at cleanup can cause unexpected problems that are nearly impossible to troubleshoot, which explains why Microsoft is so insistent with its warnings that improper changes to the registry can prevent your computer from operating properly or even booting. We’ve never found a so-called registry cleaner that justifies the risk it inevitably entails. If you find yourself with a misbehaving system after using a registry cleaner, use the Reset option to recover your system and start over. And this time, don’t bother to install that unnecessary utility.
Automating registry changes with .reg files
The .reg files created by the Export command in Registry Editor are plain text, suitable for reading and editing in Notepad or any similar editor. Therefore, they provide an alternative method for editing your registry. You can export a section of the registry, change it offline, and then merge it back into the registry. Or you can add new keys, values, and data to the registry by creating a .reg file from scratch and merging it. A .reg file is particularly useful if you need to make the same changes to the registry of several computers. You can make and test your changes on one machine, save the relevant part of the registry as a .reg file, and then import the saved file to the registry on other machines that require it.
Figure 19-9 shows a .reg file. In this case, the file was exported from the HKCUSoftwareMicrosoftWindowsCurrentVersionExplorerAdvanced key, shown in Figure 19-10.
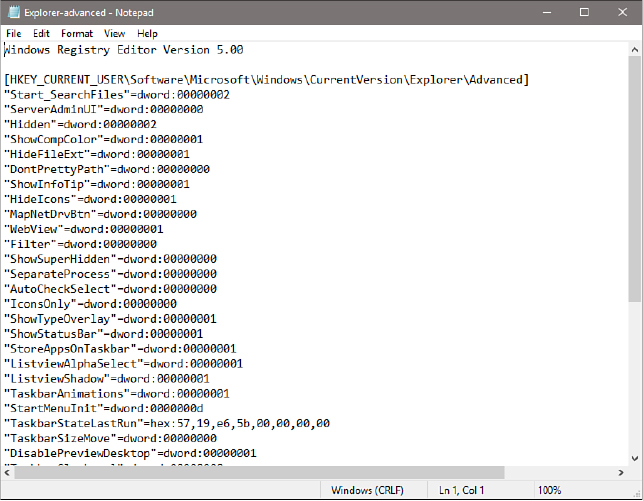
Figure 19-9 A .reg file is a plain-text file suitable for offline editing. This .reg file was exported from the key shown in Figure 19-10.

Figure 19-10 This key’s name, values, and data are recorded in the .reg file shown in Figure 19-9.
Identifying the elements of a .reg file
As you review the examples shown in the two figures, note the following characteristics of .reg files:
Header line The file begins with the line “Windows Registry Editor Version 5.00.” When you merge a .reg file into the registry, Registry Editor uses this line to verify that the file contains registry data. Version 5 (the version used with Windows 7 and later versions, including Windows 10) generates Unicode text files, which can be used with all supported versions of Windows as well as the now-unsupported Windows XP and Windows 2000.
Key names Key names are delimited by brackets and must include the full path from the root key to the current subkey. The root key name must not be abbreviated. (Don’t use HKCU, for example.) Figure 19-9 shows only one key name, but you can have as many as you want.
The default value Undefined default values do not appear in .reg files. Defined default values are identified by the special character @. Thus, a key whose default REG_SZ value was defined as MyApp would appear in a .reg file this way:
“@”=”MyApp”
Value names Value names must be enclosed in quotation marks, whether or not they include space characters. Follow the value name with an equal sign.
Data types REG_SZ values don’t get a data type identifier or a colon. The data directly follows the equal sign. Other data types are identified as shown in Table 19-5.
Table 19-5 Data types identified in .reg files
Data type
Identifier
REG_BINARY
hex
REG_DWORD
dword
REG_QWORD
hex(b)
REG_MULTI_SZ
hex(7)
REG_EXPAND_SZ
hex(2)
A colon separates the identifier from the data. Thus, for example, a REG_DWORD value named “Keyname” with value data of 00000000 looks like this:
“Keyname”=dword:00000000
REG_SZ values Ordinary string values must be enclosed in quotation marks. A backslash character within a string must be written as two backslashes. Thus, for example, the path C:Program FilesMicrosoft Office is written like this:
“C:\Program Files\Microsoft Office\”
REG_DWORD values DWORD values are written as eight hexadecimal digits, without spaces or commas. Do not use the 0x prefix.
All other data types Other data types—including REG_EXPAND_SZ, REG_MULTI_SZ, and REG_QWORD—appear as comma-delimited lists of hexadecimal bytes (two hex digits, a comma, two more hex digits, and so on). The following is an example of a REG_MULTI_SZ value:
“Addins”=hex(7):64,00,3a,00,5c,00,6c,00,6f,00,74,00,00,75,00,73,00,5c,00,
31,00,32,00,33,00,5c,00,61,00,64,00,64,00,64,00,69,00,6e,00,73,00,5c,00,
64,00,71,00,61,00,75,00,69,00,2e,00,31,00,32,00,61,00,00,00,00,00,00,00
Line-continuation characters You can use the backslash as a line-continuation character. The REG_MULTI_SZ value just shown, for example, is all one stream of bytes. We added backslashes and broke the lines for readability, and you can do the same in your .reg files.
Line spacing You can add blank lines for readability. Registry Editor ignores them.
Comments To add a comment line to a .reg file, begin the line with a semicolon.
Using a .reg file to delete registry data
.Reg files are most commonly used to modify existing registry data or add new data. But you can also use them to delete existing values and keys.
To delete an existing value, specify a hyphen character (minus sign) as the value’s data. For example, to use a .reg file to remove the value ShellState from the key HKCUSoftwareMicrosoftWindowsCurrentVersionExplorer, add the following lines to the .reg file:
[HKEY_CURRENT_USERSoftwareMicrosoftWindowsCurrentVersionExplorer]”ShellState”=-
To delete an existing key with all its values and data, insert a hyphen in front of the key name (inside the left bracket). For example, to use a .reg file to remove the key HKCR.xyzshell and all its values, add the following to the .reg file:
[-HKEY_CLASSES_ROOT.xyzshell]
Merging a .reg file into the registry
To merge a .reg file into the registry from within Registry Editor, open the File menu and click Import. Registry Editor adds the imported data under the appropriate key names, overwriting existing values where necessary.
The default action for a .reg file is Merge—meaning merge with the registry. Therefore, you can merge a file into the registry by simply double-clicking it in File Explorer and answering the confirmation prompt.
Registry virtualization
One of the longstanding fundamental principles of security in Windows is that it prevents applications running under a standard user’s token from writing to system folders in the file system and to machine-wide keys in the registry, while at the same time enabling users with a standard account to run applications without running into “access denied” roadblocks.
Some older applications that require administrator-level access are still in use in Windows 10, but standard users can run them without hassle. That’s because User Account Control uses registry virtualization to redirect attempts to write to subkeys of HKLMSoftware. (Settings in HKLM apply to all users of the computer; therefore, only administrators have write permission.) When an application attempts to write to this hive, Windows writes instead to a per-user location, HKCRVirtualStoreMachineSoftware. Like file virtualization, this is done transparently; the application (and all but the most curious users) never know this is going on behind the scenes.
Note
When an application requests information from HKLMSoftware, Windows looks first in the virtualized key if it exists. Therefore, if a value exists in both the VirtualStore hive and in HKLM, the application sees only the one in VirtualStore.
Note that because the virtualized data is stored in a per-user section of the registry, settings made by one user do not affect other users.
Note
Registry virtualization is an interim solution to application compatibility problems. It was introduced with Windows Vista; at that time, nearly 15 years ago, Microsoft announced its intention to remove the feature from a future version of the operating system. It is still a feature in Windows 10 but is increasingly less important as software developers adapt their apps to modern security requirements. For more information about registry virtualization, see https://bit.ly/registry-virtualization.
Automating tasks
Windows 10 provides several ways to automate tasks. The built-in Task Scheduler tool allows you to create tasks using a point-and-click interface; batch commands and scripts, especially those using Windows PowerShell, represent the most common automation alternative.
Task Scheduler
Task Scheduler is a Microsoft Management Console (MMC) snap-in that supports an extensive set of triggering and scheduling options. Scheduled tasks can run programs or scripts at specified times, launch actions when a computer has been idle for a specified period of time, run tasks when particular users sign in or out, and so on. Task Scheduler is also tightly integrated with the Event Viewer snap-in, making it possible to use events (an application crash or a disk-full error, for example) as triggers for tasks.
Windows and third-party apps make extensive use of Task Scheduler to set up maintenance activities that run on various schedules. You can also create custom tasks. For full documentation on this tool, see https://docs.microsoft.com/windows/desktop/TaskSchd.
Automating command sequences with batch programs
A batch program (also commonly called a batch file) is a text file with a .bat filename extension that contains a sequence of commands to be executed. You execute the commands by entering the file name at a command prompt. Any action you can take by typing a command at a command prompt can be encapsulated in a batch program.
When you type the name of your batch program at the command prompt (or when you specify it as a task to be executed by Task Scheduler and the appropriate trigger occurs), the command interpreter opens the file and starts reading the statements. It reads the first line, executes the command, and then goes on to the next line. On the surface, this seems to operate just as though you were typing each line yourself at the command prompt. In fact, however, the batch program can be more complicated because the language includes replaceable parameters, conditional and branching statements, the ability to call subroutines, and so on. Batch programs can also respond to values returned by programs and to the values of environment variables.
Automating tasks with Windows Script Host
Microsoft Windows Script Host (WSH) provides a way to perform more sophisticated tasks than the simple jobs that batch programs are able to handle. You can control virtually any component of Windows and of many Windows-based programs with WSH scripts.
To run a script, you can type a script name at a command prompt or double-click the script’s icon in File Explorer. WSH has two nearly equivalent programs—Wscript.exe and Cscript.exe—that, with the help of a language interpreter dynamic-link library such as Vbscript.dll, execute scripts written in VBScript or another scripting language. (Cscript.exe is a command-line program; Wscript.exe is its graphical counterpart.)
With WSH, the files can be written in several languages, including VBScript (a scripting language similar to Microsoft Visual Basic) and JScript (a form of JavaScript). All the objects are available to any language, and in most situations, you can choose the language with which you are most comfortable. WSH doesn’t care what language you use, provided the appropriate interpreter dynamic-link library is available. VBScript and JScript interpreters come with Windows 10; interpreters for Perl, KiXtart (KixKIXE), Python, RexxHex, and other languages are available elsewhere.
Using Microsoft Management Console
Microsoft Management Console (MMC) is an application that hosts tools for administering computers, networks, and other system components. By itself, MMC performs no administrative services. Rather, it acts as the host for one or more modules, called snap-ins, which do the useful work. MMC provides user-interface consistency so that you or the users you support see more or less the same style of application each time you need to carry out some kind of computer management task. A combination of one or more snap-ins can be saved in a file called a Microsoft Common Console Document or, more commonly, an MMC console.
Creating snap-ins requires expertise in programming. You don’t have to be a programmer, however, to make your own custom MMC consoles. All you need to do is run MMC, start with a blank console, and add one or more of the snap-ins available on your system. Alternatively, you can customize some of the MMC consoles supplied by Microsoft or other vendors simply by adding or removing snap-ins. You might, for example, want to combine the Services console with the Event Viewer console, the latter filtered to show only events generated by services. You might also want to include a link to a website that offers details about services and service-related errors. Or perhaps you would like to simplify some of the existing consoles by removing snap-ins you seldom use.
MMC consoles use, by default, the file name extension .msc, and .msc files are associated by default with MMC. Thus, you can run any MMC console by double-clicking its file name in a File Explorer window or by entering the file name at a command prompt. Windows 10 includes several predefined consoles; the most commonly used ones, described in Table 19-6, can be easily found by typing their name in the search box.
Table 19-6 Useful predefined consoles
Console name (file name) |
Description |
Certificate Manager (Certmgr.msc) |
Uses the Certificates snap-in to view and manage security certificates for the current user. A similar console, Certlm.msc, manages certificates on the local machine. |
Computer Management (Compmgmt.msc) |
Includes the functionality of the Task Scheduler, Event Viewer, Shared Folders, Local Users And Groups, Performance Monitor, Device Manager, Disk Management, Services, and WMI Control snap-ins, providing control over a wide range of computer tasks. |
Device Manager (Devmgmt.msc) |
Uses the Device Manager snap-in to enable administration of all attached hardware devices and their drivers. See Chapter 14 for more information on configuring hardware. |
Disk Management (Diskmgmt.msc) |
Uses the Disk Management snap-in for configuring disk volumes and partitions. For details, see “Managing hard disks and other storage devices,” in Chapter 14. |
Event Viewer (Eventvwr.msc) |
Uses the Event Viewer snap-in to display all types of logged information. See “Event Viewer” in Chapter 15. |
Hyper-V Manager (Virtmgmt.msc) |
Uses the Hyper-V Manager snap-in to provide an environment for creating, modifying, and running virtual machines. See Chapter 16, “Hyper-V,” for details. |
Local Users and Groups (Lusrmgr.msc) |
Uses the Local Users and Groups snap-in to manage local user accounts and security groups. For more information, see “User accounts and security groups” in Chapter 11. |
Performance Monitor (Perfmon.msc) |
Uses the Performance Monitor snap-in to provide a set of monitoring tools. See Chapter 12, “Performance and power management,” for details. |
Print Management (Printmanagement.msc) |
Uses the Print Management snap-in for managing printers and print jobs. |
Services (Services.msc) |
Uses the Services snap-in to manage services in Windows. For details, see “Managing services” in Chapter 12. |
Task Scheduler (Taskschd.msc) |
Uses the Task Scheduler snap-in for managing tasks that run automatically. |
Trusted Platform Module (TPM) Management (Tpm.msc) |
Displays information about and enables configuration of a computer’s TPM chip. |
Windows Firewall With Advanced Security (Wf.msc) |
Uses the Windows Firewall With Advanced Security snap-in to configure rules and make other firewall settings. For details, see “Advanced tools for managing Windows Defender Firewall” in Chapter 18, “Windows security and privacy.” |