
Chapter 14
Hardware and devices
Adding, configuring, and removing hardware devices
Updating and uninstalling drivers
Managing hard disks and other storage devices
Configuring displays and graphics adapters
Speakers, microphones, and headsets
It’s probably only a slight exaggeration to say that no two computers are alike. Motherboards, storage devices and controllers, video and network adapters, and peripherals of all shapes and sizes combine to create a nearly infinite number of possible computer configurations.
The good news for anyone using Windows 10 is that most of these devices should just work. For most common hardware upgrades, Windows detects the device automatically and installs a driver so that you can use the device and its full array of features. This chapter covers those installations as well as devices that need to be added manually and those that have optional configuration steps.
Over the past few years, feature updates to Windows 10 have added native support for some new types of hardware, including devices built using the USB Audio 2.0 and Bluetooth LE standards as well as High Dynamic Range (HDR) video. For the most part, new devices using these standards should just work if you’re using the most recent version of Windows 10. This chapter covers a relatively new feature (added in version 1803) called Swift Pair, which simplifies the experience of setting up some Bluetooth devices. It also offers display-related improvements such as support for high-DPI hardware configurations, typically found in high-end, business-class notebooks, and the Night Light feature that makes portable computing easier on the eyes.
In this chapter, we cover the traditional nerve center of hardware, Device Manager, as well as the newer hardware configuration options in Settings. We explain how drivers work (and how to work with drivers). We also offer hints on the best ways to set up specific device configurations, including hard disks, multiple monitors, Bluetooth adapters, and printers.
Adding, configuring, and removing hardware devices
Since its introduction in Windows 95, Plug and Play technology has evolved tremendously. Early incarnations of this technology were notoriously unreliable, leading some users to dismiss the feature as “plug and pray.” As this now-mature technology passes the quarter-century mark, however, hardware and software standards have converged to make most device configuration tasks completely automatic.
Any computer that was certified as compatible with Windows 7 or later supports the Plug and Play device standard, which handles virtually all the work of configuring computer hardware and attached devices. A Plug and Play device identifies itself to Windows by using unique identifiers in a well-organized hierarchy, listing its required resources (including drivers), and allowing software to configure it.
Plug and Play devices can interact with the operating system, with both sides of the conversation responding to device notification and power management events. A Plug and Play driver can load automatically when Windows detects that a device has been plugged in, and it can suspend its operations when the system sleeps and resume without issue when the system wakes.
Note
Although you still can find older devices that require non–Plug and Play inputs—such as scanners, plotters, and similar peripherals that connect to serial and parallel ports—these legacy devices are becoming increasingly rare. If you own this type of device, we recommend retiring it if possible and replacing it with a supported modern alternative. If you have no choice but to keep it around, look for a community of fellow owners of that device; they’re the most likely to be able to help you with configuration issues.
Installing a new Plug and Play device
When you install a Plug and Play device for the first time, the Plug and Play manager queries the device to determine its hardware ID and any compatible IDs. It then compares the hardware ID with a master list of corresponding tags drawn from all the Setup Information files in the %SystemRoot%Inf folder. If it finds a signed driver with a matching tag, it installs that driver package and makes other necessary system modifications with no intervention required from you. If everything goes as expected, the only subtle indication you might see is a progress dialog box (typically minimized) that displays a green bar over its taskbar icon and then vanishes when its work is complete.
Note
Any user can plug in a new device and begin using it if a driver for that device is included with Windows 10 or is available via Windows Update. Installing a new driver that is downloaded from a third-party site and is digitally signed by a third party rather than by Microsoft requires an administrator’s credentials.
If Windows detects a Plug and Play device (after you’ve plugged it into a USB port, for instance) but cannot locate a digitally signed driver that matches the device ID, it looks for generic driver packages that match any compatible IDs reported by the device. If that search still doesn’t turn up a suitable driver, the Plug and Play manager installs a stub for the device and awaits the arrival of a proper driver. These partially installed devices appear in Device Manager, under the Other Devices heading, with a yellow exclamation point over the device name, as in Figure 14-1.

Figure 14-1 If Windows 10 can’t find drivers for a new Plug and Play device, it adds a yellow exclamation point to the Device Manager listing and files the device under the Other Devices heading.
Troubleshooting
Drivers for built-in devices are missing
Device Manager might show some devices in the Other Devices category, with a yellow exclamation point indicating that the correct drivers are missing, after a clean installation of Windows 10. This usually occurs on a PC where some low-level devices built into the motherboard aren’t recognized during Windows 10 setup. Try checking Windows Update manually to see if the correct drivers turn up; if that search doesn’t retrieve the desired drivers, check with the device manufacturer to see whether drivers are available for download. Pay special attention to chipset drivers, which add the necessary entries to the Windows Plug and Play database to allow the correct built-in drivers to be installed.
When Windows Update can’t find a signed driver (and, thankfully, those occasions are becoming rarer as the Windows ecosystem matures), you need to manually install a device driver, a topic we cover in more detail later in this chapter.
The built-in Windows drivers are perfectly adequate for many device classes. Some devices, especially complex ones like scanners and all-in-one printers, might require utility software and additional drivers to enable the full range of features for that device.
How device drivers and hardware work together
Before Windows can work with any piece of hardware, it requires a compatible, properly configured device driver. Drivers are compact control programs that hook directly into Windows and handle the essential tasks of communicating your instructions to a hardware device and then relaying data back to you. After you set up a hardware device, its driver loads automatically and runs as part of the operating system, without requiring any further intervention on your part.
Many individual technologies used in Windows 10 devices use minidriver models, where the device driver is made up of two parts. Typically, Microsoft writes a general class driver that handles tasks that are common to devices in that category. The device manufacturer can then write device-specific code to enable custom features.
Windows 10, even more than its recent predecessors, includes a surprisingly comprehensive library of class drivers that allow most devices to function properly without requiring any additional software. There are class drivers for pieces of hardware that are, these days, typically integrated into a larger system: audio devices, network adapters, webcams, and display adapters, for example. Windows 10 also includes drivers for external add-ons (wired and wireless) including printers, monitors, keyboards, scanners, mice and other pointing devices, smartphones, and removable storage devices.
This core library is copied during Windows setup to a protected system folder, %SystemRoot%System32DriverStore. (Driver files and associated elements are stored in the FileRepository subfolder.) Anyone who signs in to the computer has Read & Execute permissions for files that are saved in that location, but only an installation program working with authorization from a member of the Administrators group can create or modify files and folders there.
You can add new drivers to the driver store in a variety of ways, including the following:
Windows Update offers drivers when it detects that you’re running a device that’s compatible with that driver but is currently using an older version. (You can also search for the most recent driver via Windows Update when installing a new device.)
A Windows quality or feature update can refresh the driver store with new and updated drivers.
As an administrator, you can add signed third-party drivers to the driver store by running an installer program. All drivers added to the driver store in this fashion are saved in their own subfolder (with a cryptic folder name that ends in a 16-character unique identification string) within the FileRepository folder, along with some supporting files created by Windows 10 that allow the drivers to be reinstalled if necessary.
Any driver that has been added to this store is considered to be trusted and can be installed without prompts or administrator credentials. All drivers, new or updated, that are downloaded from the Windows Update service are certified to be fully compatible with Windows 10 and are digitally signed by Microsoft.
A Windows hardware driver package must include a Setup Information file (with the extension .inf). This is a text file that contains detailed information about the device to be installed, including the names of its driver files, the locations where they are to be installed, any required registry settings, and version information. All devices with drivers in the DriverStore folder include Setup Information files in the %SystemRoot%Inf folder.
Although the Setup Information file is a crucial part of the driver installation process, you don’t work with it directly. Instead, this file supplies instructions that the operating system uses during Plug and Play detection, when you use a setup program to install a device or when you manually install a driver update.
Caution
The syntax of Setup Information files is complex, and the intricacies of .inf files can trip up even experienced software developers. If you find that a driver setup routine isn’t working properly, you might be tempted to try editing the Setup Information file to work around the hang-up. Trust us: That approach is almost certain to fail. In fact, by tinkering with .inf files to install a driver that’s not certified to be compatible with your hardware, you run the risk of corrupting registry settings and making your system unstable.
When Windows completes the installation of a driver package, it performs all the tasks specified by the Setup Information file and copies the driver files themselves to %SystemRoot%System32Drivers.
Getting useful information from Device Manager
The more you know about individual hardware devices and their associated driver software, the more likely you are to make short work of troubleshooting problems or configuring advanced features for a device. In every case, your starting point is Device Manager, a graphical utility that provides detailed information about all installed hardware, along with controls you can use to configure devices, assign resources, and set advanced options.
Note
In Windows 10, Device Manager also includes categories that don’t represent actual hardware—print queues, for example, or anything under the Software Devices heading. In this section, we focus only on physical hardware devices and their associated drivers.
The easiest way to open Device Manager (Devmgmt.msc) is to right-click the Start button (or press Windows key+X) and then click the Device Manager shortcut on the Quick Link menu. Alternatively, type device in the search box and then click the Device Manager entry from the top of the results list. (Device Manager is also available as a snap-in under the System Tools heading in the fully stocked Computer Management console.)
As Figure 14-2 shows, Device Manager is organized as a hierarchical list that inventories every piece of hardware within or connected to your computer. The default view shows devices by type.

Figure 14-2 Click the arrow to the left of any category in Device Manager to expand or collapse the list of individual devices within that category.
To view information about a specific device, double-click its entry in Device Manager’s list of installed devices. Each device has its own multitabbed properties dialog box. Most hardware devices include a selection of tabs, including General and Driver. The General tab lists basic facts about the device, including the device name and type, the name of its manufacturer, and its current status, as in the example in Figure 14-3.
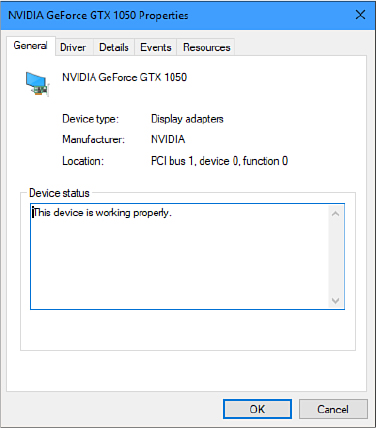
Figure 14-3 The General tab supplies basic information about a device and indicates whether it’s currently functioning properly.
The Driver tab, shown in Figure 14-4, lists version information about the currently installed driver for the selected device. Although the information shown here is sparse, it covers the essentials. You can tell at a glance who supplied the driver, and you can see who digitally signed it; you can also determine the date and version number of the driver, which is important when considering whether you should download and install an available update.

Figure 14-4 The Driver tab, which is available for every installed device, offers valuable information and tools for managing installed drivers.
Clicking the Driver Details button on the Driver tab leads to another dialog box that lists the names and locations of all files associated with that device and its drivers. Selecting any file name from this list displays details for that file in the lower portion of the dialog box. (We’ll get to the other buttons in the next section.)
Click the Details tab for a potentially overwhelming amount of additional information, arranged in a dialog box in which you can see one property and its associated values at a time. To see the full list of properties available for inspection, click the arrow to the right of the current entry in the Property box; Figure 14-5 shows the typically dense result.

Figure 14-5 Most device properties you can select from this list return obscure details, but a few are useful for troubleshooting purposes.
Choosing a property tucks the list away and displays the value or values associated with that property, as in the example shown here, which lists the Plug and Play Hardware IDs associated with the selected device.

Troubleshooting
Device Manager shows an unknown device
Most modern hardware built for Windows 7 or later just works with Windows 10. But occasionally you might find mysterious entries under the Other Devices heading in Device Manager, with few or no details, no associated drivers, and no clue about what to do next. This problem is most likely to appear after you perform a clean install of Windows 10 on a device originally designed for another operating system, but the issue can also occur with older external hardware.
You can often get important clues by opening the properties dialog box for the device and looking on the Details tab. The Hardware IDs property, in particular, can be invaluable. The first three characters, followed by a backslash, identify the bus to which the device is connected: USB or PCI, for example. The string VID_ followed by a number is a Vendor ID code; PID_ is a Product ID code; REV_ is the revision code. Use your favorite search engine to look on the web for the first value to identify the vendor that made the device, which might help to narrow your search; look for a combination of the first two values to identify a specific device.
In addition to this basic information, the properties dialog box for a given device can include any number of custom tabs. The wireless network adapter in the laptop PC shown in Figure 14-6, for example, adds a custom tab (Advanced) that you can use to configure the device at the hardware level—setting allowed wireless modes, for example.

Figure 14-6 You can configure advanced properties for some devices, such as the allowed wireless modes for this network adapter, using Device Manager.
By design, the information displayed in Device Manager is dynamic. When you add, remove, or reconfigure a device, the information shown here changes as well.
Enabling and disabling devices
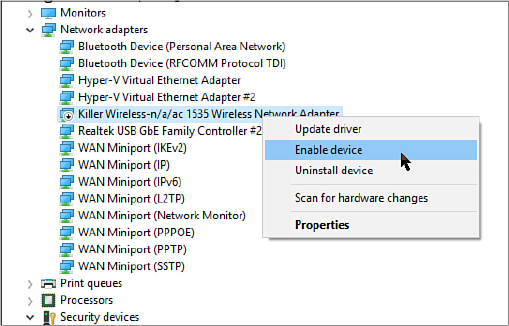
Any device listed in Device Manager can be disabled temporarily. You might choose this option if you’re certain you won’t need an installed device under normal conditions, but you want to keep it available just in case. On a desktop PC with a permanent wired Ethernet connection, for example, you can keep a Wi-Fi adapter installed but disabled. That configuration gives you the option to enable the device and use the wireless adapter to connect to a hotspot on a mobile device if the wired network is temporarily unavailable.
Right-click any active entry in Device Manager to see a shortcut menu with a Disable command. To identify any device that’s currently disabled, look for the black, downward-pointing arrow over its icon in Device Manager, as shown here. To turn a disabled device back on, right-click its entry in Device Manager and then click Enable Device.
Adjusting advanced device settings
As we mentioned earlier, some devices include specialized tabs in the properties dialog box available from Device Manager. You use the controls on these additional tabs to change advanced settings and properties for devices. For example:
Network cards, modems, input devices, and USB hubs often include a Power Management tab you can use to control whether the device can force the computer to wake up from Sleep mode. This option is useful if you have fax capabilities enabled for a modem (yes, some businesses still use faxes and modems) or if you use the Remote Desktop feature over the internet on a machine that isn’t always running at full power. On both portable and desktop computers, you can also use this option to allow Windows to turn off a device to save power.
The Volumes tab for a disk drive contains no information when you first display the properties dialog box for that device. Click the Populate button to read the volume information for the selected disk, as shown in Figure 14-7, and click the Properties button to check the disk for errors, run the Defrag utility, or perform other maintenance tasks. Although you can perform these same tasks by right-clicking a drive icon in File Explorer, this option might be useful in situations where you have multiple hard disks installed and you suspect that one of those disks is having mechanical problems. Using this option, you can quickly see which physical disk a given volume is stored on.

Figure 14-7 After you click the Populate button, the Volumes tab lists volumes on the selected drive. Select any volume and click Properties for full access to troubleshooting and maintenance tools.
Caution
DVD drives offer an option to change the DVD region, which controls which discs can be played on that drive. The DVD Region setting actually increments a counter on the physical drive itself, and that counter can be changed only a limited number of times. Be extremely careful with this setting, or you might end up losing the capability to play any regionally encoded DVDs in your collection on that device.
 When working with network cards, you can often choose from a plethora of performance-related settings on an Advanced tab. Randomly tinkering with these settings is almost always counterproductive; however, you might be able to solve specific performance or connectivity problems by adjusting settings as directed by the device manufacturer or a Microsoft Support article.
Setting up Bluetooth devices
Bluetooth is one of those rare standards that passes the “it just works” test consistently. These days, virtually every portable device supports Bluetooth for wirelessly connecting headsets and pairing fitness devices. Many desktop PCs include Bluetooth support as well, making it possible to connect wireless keyboards and mice. Bluetooth technology also enables the Your Phone app on Windows 10, which allows you to make and receive calls through an Android smartphone using your PC’s audio hardware.
Recent feature updates have added a bevy of new features designed to make Windows 10 devices work better with Bluetooth LE devices such as fitness monitors. In Settings, the Bluetooth & Other Devices page combines the previously separate Bluetooth and Connected Devices pages. From this location, you can manage Bluetooth accessories, wireless docks, Xbox wireless controllers, and media devices by using a single interface.
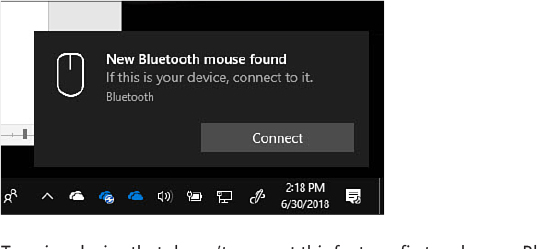
Before you can use one Bluetooth device with another, you have to pair them, a process that generally involves making the external device discoverable (typically, by pressing and holding a pairing button for a few seconds or going into the settings menu on the device) and switching to the Bluetooth & Other Devices page in Settings > Devices. In version 1803, Windows 10 added support for a new feature called Swift Pair for Bluetooth that makes this process nearly effortless. If the device supports Swift Pair, making that device discoverable prompts Windows to display a notification like the one shown here. Click Connect to complete the pairing process:
To pair a device that doesn’t support this feature, first make sure Bluetooth is turned on; then click Add Bluetooth Or Other Device and choose Bluetooth from the Add A Device dialog box. Figure 14-8 shows a Surface Pen, successfully discovered in Windows 10. (Making the pen discoverable requires holding down the top button for several seconds until a light flashes.) Tap the device name to complete the connection and make the device usable with Windows 10, running in this example on a Surface Pro.

Figure 14-8 Before using a Bluetooth device with a Windows 10 PC, you have to make the device discoverable and then pair it with the PC.
Bluetooth connections represent a security risk—a low one, to be sure, but a risk nonetheless. That’s why pairing a keyboard, for example, requires that you use the keyboard to enter a code from the PC’s screen. Without that precaution, an attacker might be able to connect a wireless keyboard to your computer without your knowledge and then use it to steal data or run unauthorized and potentially dangerous software.
The Bluetooth & Other Devices page in Settings contains an on-off switch for the Bluetooth adapter. On mobile PCs, this is a power-saving feature. On a desktop PC without a touchscreen, be careful before disabling Bluetooth, because doing so could render your wireless keyboard and mouse—and thus the entire PC—unusable. The only cure, in that case, is to plug in a wired keyboard or mouse and turn the setting back on.
Managing USB devices
Universal serial bus, more commonly known as USB, is one of the oldest and most reliable Plug and Play standards in the world. Through the years, the USB standard has progressed from version 1.1 to 2.0 to 3.2, with the jump to USB 3.1 and beyond making a monumental difference in the speed of data transfer between USB-connected devices (up to 20 Gb/sec for USB 3.2 Gen 2x2 devices).
In an unfortunate bit of timing that has inspired some confusion, a new USB Type-C connector arrived at the same time as USB 3.1 began to appear in high-end computing machinery, including Microsoft’s Surface Book 2, Surface Pro (2017), and Surface Go. With the help of so-called alternate modes (and appropriate adapters), you can use a USB Type-C port to connect to devices using HDMI, DisplayPort, Thunderbolt, and Mobile High-Definition Link (MHL) connections. One popular USB Type-C category is the multi-port hub, which accepts HDMI and DisplayPort cables, RJ-45 plugs from wired networks, traditional USB Type-A cables, and even laptop-grade power supplies, transforming a portable PC into a fully connected desktop PC through a single USB Type-C input. The USB Type-C connector is reversible (no more flipping the USB plug three times until you find the right orientation). These new connectors are compatible with older USB devices but require an adapter.
Note
USB Type-C connectors typically support USB 3.1 and can connect to older USB devices using adapters. However, because the USB Type-C specification mandates support only for the older, slower USB 2.0 standard, you have no guarantee of USB 3.1 compatibility. This is most likely to be a problem with off-brand devices that were released as part of the first wave of USB Type-C support.
All USB devices are Plug and Play compatible. Knowing the types of connectors and the highest standard supported on your device can help ensure that you avoid compatibility hassles and carry the right cables.
Updating and uninstalling drivers
If you’re having a hardware problem that you suspect is caused by a device driver, your first stop should be Device Manager. Open the properties dialog box for the device, and use the following buttons on the Driver tab to perform maintenance tasks:
Update Driver This choice opens the Update Drivers dialog box, which we describe in the next section.
Roll Back Driver This option uninstalls the most recent manually updated driver and rolls back your system configuration to the previously installed driver. This option is available from Safe Mode if you need to remove a driver that’s causing blue-screen (Stop) errors. Unlike System Restore, this option affects only the selected device. If you have never updated the selected driver or if you updated it through Windows Update, this option is unavailable.
Uninstall Device This button completely removes driver files and registry settings for the selected device. For driver packages you downloaded and installed separately, it also offers the option to completely remove the associated driver files. Use this capability to remove a driver that you suspect was incorrectly installed, and then reinstall the original driver or install an updated driver.
Disabling automatic driver updates
Microsoft uses the Windows Update mechanism to deliver drivers for many devices. Using this feature, you can plug in a new device with relative confidence it will work without extra effort on your part. You also can use it to automatically receive updated drivers, which typically fix reliability, stability, and compatibility problems.
The dark side of driver updates is that they can occasionally cause a previously functional device to act up or even shut down. For that reason, some cautious Windows users prefer to disable automatic driver updates. In previous Windows versions and in the initial release of Windows 10, an advanced setting in Control Panel > System allowed you to specify that you never want to automatically install drivers from Windows Update. In version 1607, this option was replaced by a Group Policy setting.
If you’re willing to accept the burden of manually checking for driver updates in exchange for the assurance of not being inconvenienced by a defective driver update, you can turn on this setting by opening the Local Group Policy Editor (Gpedit.msc) and going to Computer Configuration > Administrative Templates > Windows Components > Windows Update. Double-click the Do Not Include Drivers With Windows Updates policy, and set it to Enabled.
If you want to script this change, or if you’re working with Windows 10 Home, where Group Policy is not supported, open Registry Editor using an administrator’s credentials, and go to the key HKLMSoftwarePoliciesMicrosoftWindowsWindowsUpdate. Then add a new DWORD value, ExcludeWUDriversInQualityUpdate, and set it to 1.
Updating a device driver manually
Microsoft and third-party device manufacturers frequently issue upgrades to device drivers. In some cases, the updates enable new features; in other cases, the newer version swats a bug that might or might not affect you. New Microsoft-signed drivers are often (but not always) delivered through Windows Update. Other drivers are available only by downloading them from the device manufacturer’s website. Kernel-mode drivers must still be digitally signed before they can be installed.
If the new driver includes a setup program, run that program to copy the necessary files to your system’s driver repository. Then start the update process by opening Device Manager, selecting the entry for the device you want to upgrade, and clicking the Update Driver button on the toolbar or the Update Driver option on the right-click shortcut menu. (You can also click Update Driver on the Driver tab of the properties dialog box for the device.)
That action opens the dialog box shown in Figure 14-9.
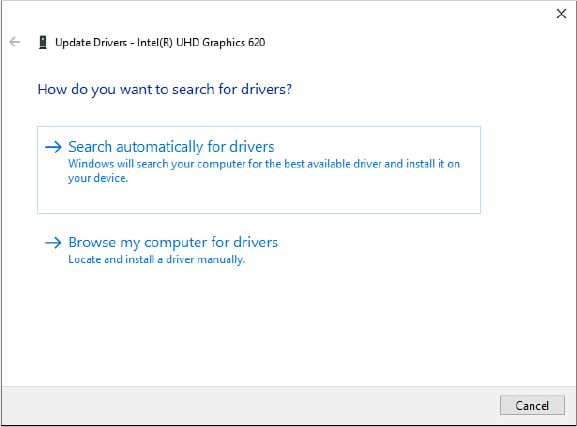
Figure 14-9 When manually updating a driver, try the automatic option first unless you want to select a specific driver you previously downloaded.
Click Search Automatically For Drivers if you know that the driver file is available on a removable media device. Click Browse My Computer For Drivers to enter the location of a downloaded driver package or choose from a list of available drivers in the driver store folder. Clicking the Browse My Computer For Drivers option opens a dialog box like the one shown in Figure 14-10, with two options for manually selecting a driver.

Figure 14-10 If you’ve downloaded a driver package that doesn’t include an installer, select its location here to allow the update to proceed.
If you’ve downloaded the driver files to a known location or copied them to removable storage, click Browse to select that location, and then click Next to continue. (If you have a copy of the FileRepository folder from a previous Windows installation on the same hardware, you can choose that location.) With the Include Subfolders option selected, as it is by default, the driver update software will do a thorough search of the specified location, looking for a Setup Information file that matches the hardware ID for the selected device; if it finds a match, it installs the specified driver software automatically.
Use the second option, Let Me Pick From A List Of Available Drivers On My Computer, if you know that the driver software you need is already in the local driver store. In general, choosing this option presents a single driver for you to choose. In some cases, as in the example in Figure 14-11, you can see previous versions of a driver, with the option to replace a new driver with an older one for troubleshooting purposes. If you need to install an alternative driver version that isn’t listed, clear the Show Compatible Hardware check box and then choose a driver from an expanded list of all matching devices in the device category.
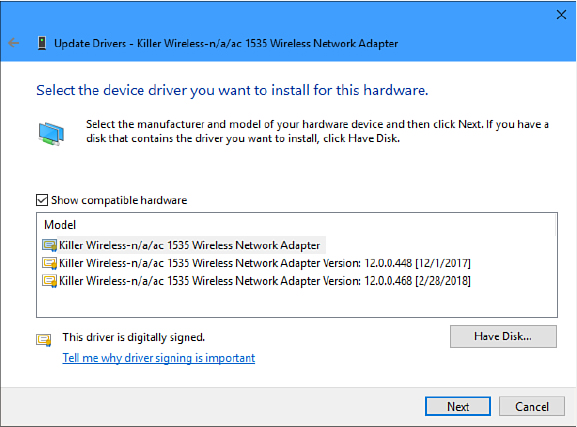
Figure 14-11 Clear the Show Compatible Hardware check box only if you’re absolutely certain that Plug and Play has selected the wrong driver and you want to manually install a different driver.
Rolling back to a previous driver version
Unfortunately, manually updated drivers can sometimes cause new problems that are worse than the woes they were intended to fix. This is especially true if you’re experimenting with prerelease versions of new drivers. If your troubleshooting leads you to suspect that a newly installed driver is the cause of recent crashes or system instability, consider removing that driver and rolling your system configuration back to the previously installed driver.
To do this, open Device Manager and double-click the entry for the device you want to roll back. Then go to the Driver tab and click Roll Back Driver. The procedure that follows is straightforward and self-explanatory.
Uninstalling a driver
There are at least three circumstances under which you might want to completely remove a device driver from your system:
You’re no longer using the device, and you want to prevent the previously installed drivers from loading or using any resources.
You’ve determined that the drivers available for the device are not stable enough to use on your system.
The currently installed driver is not working correctly, and you want to reinstall it from scratch.
To remove a driver permanently, open Device Manager, right-click the entry for the device in question, and click Uninstall Device. (If the entry for the device in question is already open, click the Driver tab and click Uninstall Device.) Click OK when prompted to confirm that you want to remove the driver, and Windows removes the files and registry settings completely. You can now unplug the device.
If you installed the driver files from a downloaded file, the Uninstall Device dialog box includes a check box (shown in Figure 14-12) that you can select to remove the files from the driver store as well. This prevents a troublesome driver from being inadvertently reinstalled when you reinsert the device or restart the computer.

Figure 14-12 Be sure to select this check box so that a troublesome driver doesn’t reinstall itself automatically.
Note that you can’t delete driver software that’s included with Windows 10.
If the problematic device driver was delivered through Windows Update, removing it is only a temporary fix. The next time Windows checks for new updates, it will download and install that same driver, unless you take steps to exclude that driver. To do that, use the troubleshooting package Microsoft created expressly for this problem. You can read more about this tool at https://bit.ly/show-hide-update; download it directly from https://bit.ly/wushowhide (look in your browser’s Downloads folder for the file).
After downloading the package, run it and follow the prompts, choosing the Hide Updates option. After checking for available updates, the troubleshooter displays a list of driver and other updates that apply to the current system. Select the check box to the left of the unwanted driver and finish the wizard. If you find that a later update has resolved the problem, rerun the troubleshooter and choose the Show Updates option to make the driver available again via Windows Update.
Troubleshooting
Sporadic hardware errors
When your computer acts unpredictably, chances are good that defective hardware or a buggy device driver is at fault.
In those circumstances, using a powerful troubleshooting tool called Driver Verifier (Verifier.exe) is a terrific way to identify flawed device drivers. Instead of your computer locking up at a most inopportune time with a misleading Blue Screen of Death (BSOD), Driver Verifier stops your computer predictably at startup with a BSOD that accurately explains the true problem. Although this doesn’t sound like a huge improvement (your system still won’t work, after all), Driver Verifier performs a critical troubleshooting step: identifying the problem. You can then correct the problem by removing or replacing the offending driver. (If you’re satisfied that the driver really is okay despite Driver Verifier Manager’s warning, you can turn off Driver Verifier for all drivers or for a specific driver. Any driver that Driver Verifier chokes on should be regarded with suspicion, but some legitimate drivers bend the rules without causing problems.)
Driver Verifier works at startup to thoroughly exercise each driver. It performs many of the same tests that are run as part of the Windows certification and signing process, such as checking for the way the driver accesses memory.
Beware: If Driver Verifier finds a nonconforming driver—even one that doesn’t seem to be causing any problems—it will prevent your system from starting. Use Driver Verifier only if you’re having problems. In other words, if it ain’t broke…
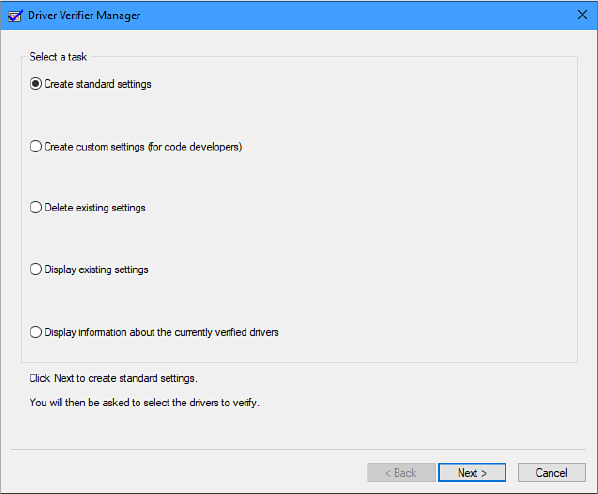
To begin working with Driver Verifier, open an elevated Command Prompt window and type verifier. In the Driver Verifier Manager dialog box, shown next, select Create Standard Settings. (If you want to assess current conditions before proceeding, select the last option: Display Information About The Currently Verified Drivers.)
When you click Next, the Driver Verifier Manager displays a list of all currently installed drivers that match the conditions you specified. Note that the list might contain a mix of hardware drivers and some file-system filter drivers, such as those used by antivirus programs, backup utilities, CD- and DVD-burning apps, and other low-level system software.
At this point, you have two choices:
Go through the list and make a note of all drivers identified, and then click Cancel. No changes are made to your system configuration; all you’ve done is gather a list of suspicious drivers, which you can then try to remove or disable manually.
Click Finish to complete the wizard and restart your computer. Don’t choose this option unless you’re prepared to deal with the consequences, as explained in the remainder of this sidebar.
If you choose the second option and your computer stops with a blue screen when you next sign in, you’ve identified a problem driver. The error message includes the name of the offending driver and an error code.
To resolve the problem, boot into Safe Mode using Windows 10’s Recovery Environment and disable or uninstall the problem driver. You’ll then want to check with the device vendor to get a working driver that you can install.
To disable Driver Verifier so that it no longer performs verification checks at startup, run Driver Verifier Manager again and select Delete Existing Settings in the initial dialog box. Alternatively, at a command prompt, type verifier /reset. (If you haven’t yet solved the driver problem, of course, you’ll be stopped at a BSOD, unable to disable Driver Verifier. In that case, boot into Safe Mode and then disable Driver Verifier.)
You can configure Driver Verifier so that it checks only certain drivers. To do that, open Driver Verifier Manager, select Create Standard Settings, click Next, and select the last option: Select Driver Names From A List. With this option, you can exempt a particular driver from Driver Verifier’s scrutiny—such as one that Driver Verifier flags but you’re certain is not the cause of your problem.
Note
Driver Verifier has been included with every version of Windows since Windows 2000 and is included with Windows 10. For information about using Driver Verifier, see the Microsoft Support article 244617, “Using Driver Verifier to identify issues with Windows drivers for advanced users,” at https://support.microsoft.com/kb/244617.
Printers and print queues
To install a modern printer that plugs into a USB port on the PC where you plan to use it, just connect the device. Plug and Play does the rest of the work. (See “Installing a new Plug and Play device” earlier in this chapter.)
Note
Although it’s nearly certain there are still some non–Plug and Play printers out there, connecting to creaky parallel ports on PCs from the late Cretaceous period, we are happy to bid those devices adieu, and we urge you to do the same. We don’t cover manual connection options for legacy devices in this book.
Wireless printers that connect over Wi-Fi or by using Bluetooth also support Plug and Play. Follow the manufacturer’s instructions to complete the wireless connection, or skip ahead a few pages to our explanation of the Add A Printer option.
- You can share a printer for use by other users on the same local network. Follow the instructions in “Sharing files, printers, and other resources over a local network“ in Chapter 13, “Windows networking.”
To configure a printer or work with documents in a print queue, go to Settings > Devices > Printers & Scanners. Click any installed printer to show buttons like those visible in Figure 14-13.
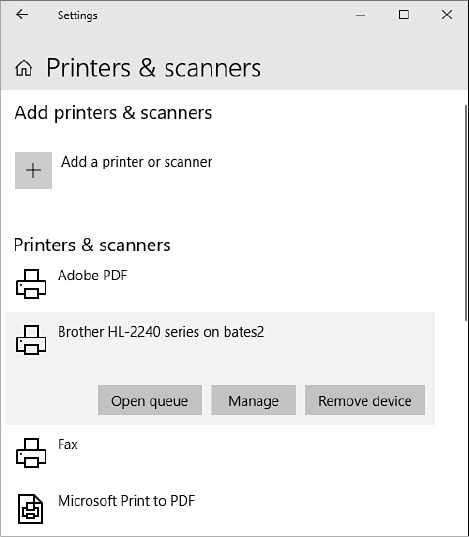
Figure 14-13 This Settings page shows installed printers and scanners. Click any item in the list to reveal the three buttons shown here.
The Open Queue button, naturally, takes you to a list of pages waiting to print. Click Manage to see options that include the familiar printer-queue dialog box as well as links to printer settings and the extremely useful Print A Test Page command. Click Manage > Printer Properties to see status information and other configuration options.
Printers aren’t exactly like snowflakes, but there are far too many variations in hardware and software design for us to offer more than the most general advice: Get to know your printer by inspecting these settings, and don’t be afraid to read the manual.
To make a wireless or networked printer available locally, go to Settings > Devices > Printers & Scanners and click Add A Printer Or Scanner. If the planets are properly aligned, the autodiscovery software might locate your printer and walk you through setting it up. If you’re not so lucky, click The Printer I Want Isn’t Listed to open the manual options shown in Figure 14-14. In this example, we chose the Select A Shared Printer By Name option, clicked Browse, and located the shared printer on a network server.

Figure 14-14 The Add Printer Wizard offers numerous paths to connect to a printer, especially those that are available over a network.
Among the “other options” available on this page in the Add Printer Wizard is one that you can use to connect to a network printer using its Universal Naming Convention (UNC) name. The device shown in Figure 14-13 earlier, for example, is connected to a printer on a server named Bates2, making its UNC address \BATES2Brother HL-2240 Series. You can also use an IP address for a device that has a permanently assigned address, and you can enlist the help of a wizard to connect a wireless or Bluetooth printer.
One of the simplest ways to connect to a shared network printer doesn’t involve any wizards at all. Just use File Explorer to browse to the network computer (entering and saving credentials for the share, if necessary), where you should see an entry for any shared printer available to you. Double-click that icon to begin the process of connecting to that printer. Because Windows requires a local copy of the network printer’s driver, you may need an administrator’s credentials.
Managing hard disks and other storage devices
When you connect a new storage device to a PC running Windows 10, a new entry, complete with driver, appears in Device Manager. But unlike with most other hardware, that’s not where you perform initial setup and configuration tasks. Instead, you’ll probably use the Disk Management console (Diskmgmt.msc), which offers a graphical interface for initializing, partitioning, and formatting storage devices.
For those who need to incorporate disk-management tasks in scripts (as well as for those who simply prefer carrying out administrative tasks at the command prompt), Windows also provides a powerful command-line program called DiskPart. Everything you can do with Disk Management you can also do by using DiskPart; you just have to work harder and more carefully.
Knowing when to use which tool is the secret of disk wizardry in Windows 10. Disk Management, for example, is ideal for shrinking and expanding volumes, while the Clean command in DiskPart makes short work of preparing a disk to be formatted for a new role. That command has no counterpart in Disk Management.
Note
Accessing Windows Management Instrumentation (WMI) through Windows PowerShell provides another method for managing disks. This method has the additional advantage of custom programmability, which can be useful for hardware manufacturers and other high-volume operations. Windows also includes a second command-line tool for file-system and disk management, called Fsutil. You can use this utility to find files by security identifier (SID), change the short name of a file, and perform other esoteric tasks. These specialized tools and techniques are beyond the scope of this book.
In this chapter, we cover the tasks required to prepare a new drive for use on a Windows 10 PC. For instructions on the tasks required to maintain and reconfigure an existing disk drive, see Chapter 9, “Storage and file management.”
Running Disk Management
To run Disk Management, type diskmgmt.msc at a command prompt, or press Windows key+X (or right-click the Start button) and then click Disk Management, supplying administrative credentials if necessary. Figure 14-15 illustrates the Disk Management console.

Figure 14-15 Use the Disk Management console to gather information about and manage hard disks and removable disks.
Disk Management provides a wealth of information about physical disks and the volumes, partitions, and logical drives in place on those disks. You can use this utility to perform the following disk-related tasks:
Check the size, file system, status, and other properties of disks and volumes
Create, format, and delete partitions, logical drives, and dynamic volumes
Assign drive letters to hard disk volumes, removable disk drives, and optical drives
Create mounted drives
Convert basic disks to dynamic disks and vice versa
Create spanned and striped volumes
Extend or shrink partitions
Disk Management displays information in two panes. In its default arrangement, the upper pane lists each volume on your system and provides information about the volume’s type, status, capacity, available free space, and so on. You can carry out commands on a volume by right-clicking any entry in the first column of this pane (the column labeled Volume) and choosing a command.
In the lower pane, each row represents one physical device. The heading at the left of each row shows the name by which that device is known to the operating system (Disk 0, Disk 1, and so on), along with its type, size, and status. To the right are areas that display information about the volumes of each device. Note that these areas are not by default drawn to scale. To change the scaling used by Disk Management, click View and then Settings. You’ll find various options on the Scaling tab of the Settings dialog box.
Right-clicking a heading at the left in the lower pane displays commands pertinent to an entire storage device. Right-clicking an area representing a volume provides a menu of actions applicable to that volume.
Managing disks from the command prompt
To use DiskPart, start by running Windows PowerShell or Command Prompt (Cmd.exe) with elevated privileges.
- For more information about PowerShell and Cmd.exe, see Chapter 19, “PowerShell and other advanced management tools.”
When you run DiskPart, it switches to a command interpreter, identified by the DISKPART> prompt. If you type help and press Enter, you see a screen that lists all available commands.
Even if you prefer to avoid the command line and don’t intend to write disk-management scripts, you should know about DiskPart, because if you ever find yourself needing to manage hard disks from the Windows Recovery Environment (Windows RE), you will have access to DiskPart, but you won’t have access to the Disk Management console. (Windows RE is a special environment you can use for system-recovery purposes if a major hardware or software problem prevents you from starting Windows.)
Caution
DiskPart is not for casual experimentation. Its primary purpose is for scripting rather than for interactive use. The DiskPart command-line interpreter is dense and cryptic, with a complex structure that requires you to list and select objects before you act on them. For more details about DiskPart, see “DiskPart Commands” (https://bit.ly/diskpart-commands). This article has been freshly updated for Windows 10, and its details about the syntax and usage of DiskPart are invaluable.
Setting up a new hard disk
Whether you’re installing Windows on a brand-new disk or simply adding a new disk (internal or external) to an existing system, you should consider how you want to use the new storage space before you begin creating volumes. If your goal is to set up a large space for backup or media storage, for example, you might want to devote the entire disk to a single volume. On the other hand, if your plan is to establish two or more separate volumes—perhaps one for each family member on a shared home computer—decide how many gigabytes you want to assign to each partition. You can change your mind later, but it’s easiest to adjust the number of volumes on a disk and their relative sizes before you fill a volume with a large amount of data.
Installing Windows on a new disk
When you run the Windows 10 setup program on a computer with a single, raw hard disk (such as a desktop computer you built yourself from new parts or any PC in which you’ve replaced the system drive with a new physical drive), you’re presented with a screen identifying the disk and its size. If you want to create a single volume encompassing the entire disk, you can click Next to proceed, and Setup will take care of initializing the disk, creating a new volume, and formatting it. Otherwise, you can click New, and then in the same screen, you can choose the size of the volume you want to create for your Windows installation.
If you decide not to use the entire disk for Windows, you can create additional volumes from within the Setup program. But there’s no particular need to do this. After you install Windows, you can use Disk Management to create one or more additional volumes in the unallocated space remaining on the disk.
- For more information about setting up Windows, see Chapter 2, “Installing, configuring, and deploying Windows 10.”
Adding a new disk to an existing Windows installation
When you open Disk Management for the first time after installing a new hard disk, Windows offers to initialize the disk, as shown in Figure 14-16. This action defines the partition style for the disk and is an essential first step before you can use Disk Management to perform any further actions.

Figure 14-16 You must initialize a disk using one of these two partition styles before you can create a new volume and format it for data storage.
MBR (Master Boot Record) and GPT (GUID Partition Table) are terms describing alternative methods for maintaining that information that defines a disk’s subdivisions. Which partition style should you choose? GPT is required on drives that contain the Windows partition on UEFI-based systems—a description that applies to every Windows PC sold in the past five years or more. Choose MBR only when compatibility with older operating systems on legacy hardware is required. GPT disks support larger volumes (up to 18 exabytes) and more partitions (as many as 128 on a basic disk).
After this task is complete, you need to create one or more volumes in the unallocated space, assign a drive letter to each volume, label the volumes (if you don’t want them to be identified in File Explorer as simply “New Volume”), and format them. You can carry out all these steps with the help of a wizard. To begin, right-click anywhere in the area marked Unallocated and then click New Simple Volume. The New Simple Volume Wizard appears.
Specify Volume Size. This page displays the maximum and minimum amounts of space you can devote to the new volume. The wizard doesn’t give you the option of designating volume space as a percentage of unallocated space, so if your goal is to create two or more volumes of equal size, you need to do a bit of arithmetic before going on.
Assign Drive Letter Or Path. You can assign any available drive letter to the new volume. Note that the letters A and B, which used to be reserved for floppy disks, are no longer reserved. You also have the option to assign no drive letter.
Format Partition. You don’t have to format the new volume immediately, but there is rarely a good reason to wait. Your choices, as shown in Figure 14-17, are as follows:
File System A file system is a method for organizing folders (directories) and files on a storage medium. For hard disk volumes larger than 4 GB (4,096 MB), your only options are NTFS (the default) and exFAT. If you’re formatting removable media such as USB flash drives or a writable optical disc, other file systems are available. For more information, see “Choosing a file system” later in this chapter.
Allocation Unit Size The allocation unit size (also known as the cluster size) is the smallest space that can be allocated to a file. The Default option, in which Windows selects the appropriate cluster size based on volume size, is the best choice here.
Volume Label The volume label identifies the drive in File Explorer. The default label is “New Volume.” It’s a good idea to give your new volume a name that describes its purpose.

Figure 14-17 You use the Format Partition page to specify your new volume’s file system, allocation unit size, and volume label.
Select the Perform A Quick Format check box if you want Disk Management to skip the sometimes lengthy process of checking the disk media. Select Enable File And Folder Compression if you want all data on the new volume to use NTFS compression.
The wizard’s final page gives you one more chance to review your specifications. You should take a moment to read this display before you click Finish.
After Disk Management has done its work and disk formatting is complete, a dark blue bar appears over the new volume in the console’s graphical view pane:

If your disk still has unallocated space (as the disk in this example does), you can add another volume by right-clicking that part of the display and then clicking New Simple Volume again.
Choosing a file system
Formatting a disk prepares it for data storage; the first step in formatting is choosing a file system. Windows 10 supports the following file systems: FAT (File Allocation Table), NTFS, exFAT (Extended File Allocation Table, optimized for use with flash drives), CDFS (Compact Disc File System, also sometimes identified as ISO-9660), and UDF (Universal Disk Format). Windows 10 provides read/write ability for the Resilient File System (ReFS), but creation capability is limited to Windows 10 Pro for Workstations.
The formatting choices available for a specific volume depend on the type of media you’re formatting. With hard disks, the only options made available by Disk Management are NTFS and exFAT. If you want to format a hard disk in FAT32, you need to use the Format command with the /FS switch at the command prompt. (Type format /? at the command prompt for details.) The only good reason to do this, however, is for the sake of compatibility with devices running non-Microsoft operating systems that don’t natively support NTFS.
If you’re formatting a USB flash drive or a MicroSD card, on the other hand, either FAT32 or exFAT is a reasonable choice. Because NTFS is a journaling file system, reading and writing files on NTFS disks involves more disk input/output than similar operations on FAT32 and exFAT disks. Flash drives can perform a finite number of reads and writes before they need to be replaced—hence, they might have a longer life expectancy under FAT32 or exFAT than under NTFS. On UEFI systems, FAT32 is required for bootable installation media. (For more information about exFAT, see the “exFAT vs. FAT32” sidebar later in this chapter.) For a tabular comparison of file systems, see https://bit.ly/file-systemcomparison.
In general, for any fixed drive, NTFS is your best choice. It offers a number of important advantages over the earlier FAT and FAT32 file systems:
Security On an NTFS volume, you can restrict access to files and folders by using permissions. (For information about using NTFS permissions, see “What are ACLs?” in Chapter 11, “Managing user accounts, passwords, and credentials.”) You can add an extra layer of protection by encrypting files if your edition of Windows 10 supports it. (Windows 10 Home does not support file encryption using EFS; all other editions do.) On a FAT or FAT32 drive, anyone with physical access to your computer can access any files stored on that drive.
Reliability Because NTFS is a journaling file system, an NTFS volume can recover from disk errors more readily than a FAT32 volume. NTFS uses log files to keep track of all disk activity. In the event of a system crash, Windows 10 can use this journal to repair file-system errors automatically when the system is restarted. In addition, NTFS can dynamically remap clusters that contain bad sectors and mark those clusters as bad so that the operating system no longer uses them. FAT and FAT32 drives are more vulnerable to disk errors.
Expandability Using NTFS-formatted volumes, you can expand storage on existing volumes without having to back up, repartition, reformat, and restore.
Efficiency On partitions greater than 8 GB, NTFS volumes manage space more efficiently than FAT32. The maximum partition size for a FAT32 drive created by Windows 10 is 32 GB; by contrast, you can create a single NTFS volume of up to 16 terabytes (16,384 GB) using default settings, and by tweaking cluster sizes, you can ratchet the maximum volume size up to 256 terabytes.
Optimized storage of small files Files on the order of 100 bytes or less can be stored entirely within the Master File Table (MFT) record, rather than requiring a minimum allocation unit outside the MFT. This results in greater storage efficiency for small files.
Working with solid-state drives
Most newer computers are equipped with a solid-state drive (SSD), which stores data in a chunk of flash memory instead of on a spinning magnetic disk; SSDs include an onboard disk controller and the requisite power and data connectors and can be installed using the same cables as you’d use for a conventional hard disk or in a dedicated slot on the PC’s motherboard. Such drives can provide improved performance, increased battery life, better durability, reduced likelihood of damage caused by drops and shocks, faster startup times, and reductions in noise, heat, and vibration. These benefits come at a price: SSDs typically cost more and have less storage capacity than current hard disk drive (HDD) models, although the gap has closed dramatically in recent years, especially for the sizes typically used for Windows 10 system drives.
Conventional hard disk drives are typically the biggest performance bottleneck in any computing environment. If you can speed up disk activity, especially reads, the effects on system startup and application launch times can be breathtaking. On our test platform, which has a conventional hard disk and an older solid-state drive configured for dual booting, the total boot time when using the SSD is roughly one-fourth the time required to boot from the HDD. On very recent hardware, with the latest generation of SSDs, we routinely see boot times of less than 15 seconds. Close examination of log files created by the Windows System Assessment Tool (WinSAT), which are stored in %SystemRoot%PerformanceWinSATDataStore, shows radically higher throughput and faster times in the DiskMetrics section of the SSD-based system.
Although the underlying technology in SSDs and HDDs is completely different, for the most part, the devices are treated identically by Windows, and you don’t need to concern yourself with the differences. Behind the scenes, Windows does several things differently on SSDs, including the following:
SuperFetch, ReadyBoost, ReadyBoot, and ReadyDrive, features designed to overcome hard disk bottlenecks, are unnecessary and are disabled by default on most SSDs. (Windows analyzes disk performance and disables these features only on SSDs that are fast enough to make these features superfluous.)
When creating a partition on an SSD, Windows properly aligns the partition for best performance.
Windows 10 supports the TRIM command. SSDs have to erase blocks of data before those blocks can be reused; they can’t write directly over deleted data as rotating disks can. The TRIM command makes this process more efficient by reclaiming deleted space in the background. You can find more details in this Wikipedia article:
Using Storage Spaces
Storage Spaces is a technology introduced with the server editions of Windows in 2012 and with Windows 8 and Windows 8.1. With this technology, you can aggregate collections of disks into “storage pools” and then create virtualized disks (“storage spaces”) within those pools. For example, you could take two 3-TB disks (Serial-Attached SCSI, Serial ATA, or USB) and use Storage Spaces to combine them into a single 6-TB virtualized disk.
You can also use Storage Spaces to establish resiliency for critical data. For example, using your two 3-TB disks, you could create a mirrored storage space in which each file saved on one of the physical disks is mirrored on the other; if one of the physical disks fails, your data is preserved.
Three types of resiliency are available:
Two-way mirror The system writes two copies of your data. You can lose one physical disk without data loss. A minimum of two physical disks is required. The amount of storage available is half of the total storage pool or the capacity of the smaller disk, whichever is less.
Three-way mirror The system writes three copies of your data. You can lose two physical disks without data loss. A minimum of three physical disks is required, and the amount of storage available is approximately one-third of the storage pool.
Parity The system stripes data across physical disks while also maintaining parity information that allows it to protect and recover your data more efficiently in the event of drive failure. A minimum of three drives is required.
Simple (nonresilient) storage spaces are recommended if you prefer a large virtual disk to separate physical disks. You might make this choice, for example, if you have a large media collection and several older (hence smaller) disks that are not currently in service. Simple storage spaces are also a good choice for space-intensive operations (video editing, for example) that do not require resiliency. Files in a simple storage space are striped across physical disks, resulting in better performance.
Use parity for maximum resiliency, but note that write performance is degraded by the requirement for the system to calculate and store parity information. This choice might be appropriate for archival storage.
Note the following:
You can create a storage space only on freshly formatted blank disks. If you begin with formatted disks, Storage Spaces will erase all data on the physical components of a pool (with due warning to you, of course) before setting up the storage space, and such erased data cannot be recovered via the Recycle Bin or other data-recovery tools.
Storage spaces should not be used as a substitute for backups. They do not protect you against theft, fire, or other catastrophic events that affect the entire collection of physical disks.
To set up a storage space, go to Settings > System > Storage and click Manage Storage Spaces, under the More Storage Settings heading. (Or begin typing storage spaces in the search box and click the shortcut when it appears in the search results.) Click Create A New Pool And Storage Space, and respond to the UAC prompt. A display comparable to the one shown next appears.

After noting the warning about the erasure of existing data on the available drives, select the drives you want to use, and then click Create Pool. The Create A Storage Space window appears. The example shown below represents a Storage Space configured as a two-way mirror with two disks of identical size:
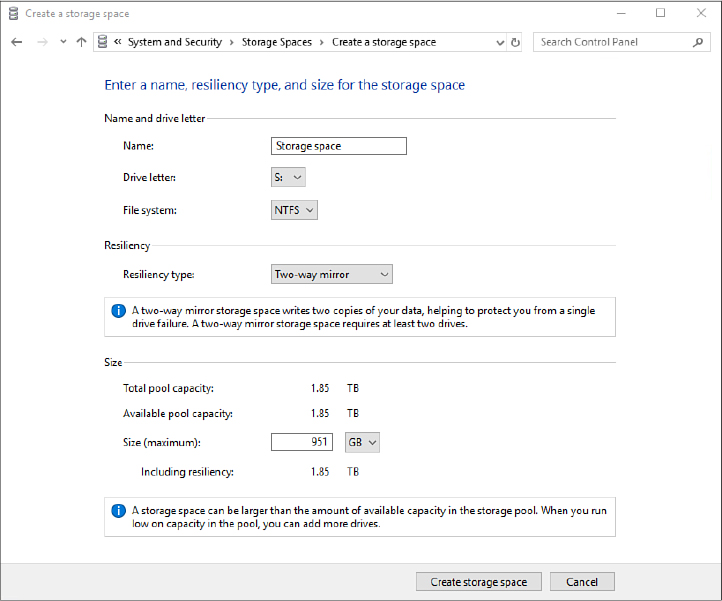
Choose a drive letter, file system, and resiliency type, adjust the capacity if needed, and then click Create Storage Space.
For much more information about Storage Spaces, see https://bit.ly/storage-spaces and https:/bit.ly/storage-spaces-faq.
Configuring displays and graphics adapters
On a desktop or portable PC with a single screen (and, when connecting to an external monitor, the proper cable), you shouldn’t need to do anything to configure your display. All modern display adapters deliver up-to-date drivers via Windows Update, and the display is capable of configuring itself as soon as it’s connected.
In this chapter, we cover a handful of scenarios when you might need to review and adjust these settings manually. We also explain how to use a new feature, introduced in version 1803, that provides per-app control over graphics settings on PCs that contain two graphics processing units (GPUs).
Changing display settings
As we noted earlier, Windows typically does a good job of configuring display settings. To review them, go to Settings > System > Display. This group of settings has been greatly expanded over the course of multiple feature updates, removing all related settings from the old-style Control Panel and making many tasks simpler than in previous releases. Figure 14-18 shows this new Settings page, with display options for a Surface Laptop.
The Brightness settings at the top of this dialog box are typically available only on a laptop PC. We discuss the Night Light settings a bit later in this section. Pay particular attention to the settings under the Scale And Layout heading:
Change The Size Of Text, Apps, And Other Items On high-resolution monitors, you can increase the apparent size of apps and text, a process known technically as scaling. Here, too, Windows recommends a scaling factor based on the size of the display and the resolution. You might choose a larger or smaller scaling factor for your own personal comfort. On a system with a single display, you can adjust the scaling by using a slider below the thumbnail of the current monitor on the Display page in Settings.
- We cover scaling in “Making text easier to read” in Chapter 3, “Using Windows 10.”
Resolution Every display has a native resolution, one where the number of physical pixels matches the number of pixels Windows wants to show. Configuring the display at a nonnative resolution generally results in a subpar viewing experience, often with a blurry, stretched display. Figure 14-18 shows a Surface Pro running at its native resolution of 2256 by 1504 pixels, as indicated by the word “Recommended” in the label. Click that value to open a full list of other supported resolutions. Why would you choose a non-native resolution? One common scenario is projecting to a large display—in a conference room, for example, or to a Miracast adapter connected to the HDMI input on a TV. If you choose the option to duplicate displays on both monitors, you need to set the resolution to match the large monitor or TV, even if it looks distorted on your laptop screen.

Figure 14-18 If you see “Recommended” after the first two options under the Scale And Layout heading, that means Windows has correctly configured your display resolution and scaling.
Troubleshooting
Display options stop at 1920 by 1080 even though your monitor supports higher resolutions
The most likely cause of this problem is an HDMI connection that’s incapable of handling the desired resolution. If either the display adapter or the monitor supports only the HDMI 1.3 standard, you’re limited to Full HD (1920 by 1080) resolution. If both ends of the connection support HDMI 1.4 or later, you need to use a High Speed HDMI cable (a standard HDMI cable is limited to Full HD resolution). In most cases, the best workaround is to switch to a different connection, if one is available. The DisplayPort 1.2a standard, which uses mini and full-sized connectors and also works with USB-C adapters using alternate modes, supports 4K (3840 by 2160 or 4096 by 2160) resolutions, and the HDMI 1.4 standard supports 5K displays (5120 by 2880).
- Orientation This setting is available on portable devices that can be used as tablets and on external displays that can be rotated 90 degrees for use in portrait mode. For a laptop or desktop computer where the orientation of the display is fixed, changing orientation would result in an odd, mostly unreadable display; thus, this setting is typically unavailable.
An increasingly popular configuration for high-powered portable PCs is the inclusion of two GPUs. Some models in Microsoft’s Surface Book line, for example, can switch between the power-saving but still capable built-in Intel graphics and a more powerful discrete GPU based on an Nvidia chipset. If you own a PC that includes two GPUs, a feature that first appeared in Windows 10 version 1803 allows you to associate a GPU with a specific app. This feature is scheduled to get further refinements in the 20H2 release.
To configure custom per-GPU options, go to Settings > System > Display and click Graphics Settings. On a Surface Book, that opens the Graphics Settings page shown in Figure 14-19. As you can see, we’ve already customized this device to give an extra GPU boost to Microsoft Edge and to the built-in Virtual Machine Connection app.
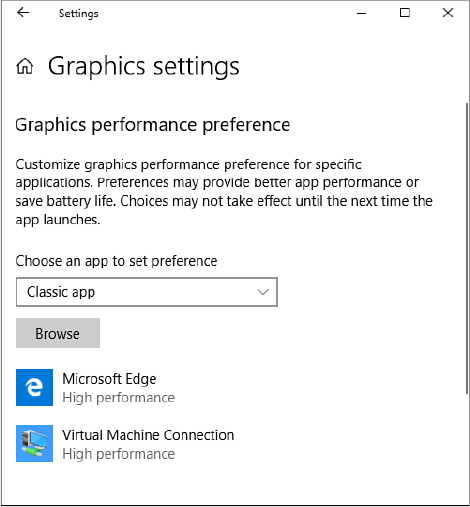
Figure 14-19 On high-end devices with switchable GPUs, you can assign a GPU to specific apps for better performance or to maximize power saving.
The technique to add an app to this list varies. For a Windows desktop program, choose Classic App, and then click Browse and locate the executable file for that program. For a UWP app, choose Universal App and then select the app from the resulting drop-down list. Click Add to create a new entry on the list for your selected program, and then click Options to open the Graphics Specifications dialog box shown in Figure 14-20. The top portion identifies which GPU is for power saving and which is for high performance, and the options below allow you to tell Windows which GPU to use for that app.
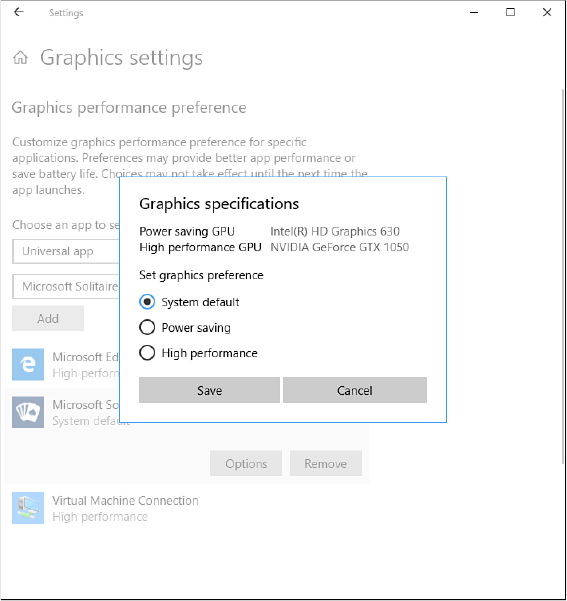
Figure 14-20 With System Default selected, Windows will automatically choose the appropriate GPU. To override that choice, choose Power Saving or High Performance from this dialog box.
At any time, you can see which GPU is in use for a given app by opening Task Manager and looking at the GPU Engine column on the Performance tab. Click the GPU Engine column heading to sort the list so that all apps currently using either GPU appear at the top of the list.
Version 1803 also adds support for High Dynamic Range (HDR) displays. If your system includes hardware compatible with this feature, you can adjust its performance by going to Settings > Apps > Video Playback.
Controlling scaling on high-DPI displays
So-called high-DPI displays are typically found today on high-end portable PCs. Some models in Microsoft’s Surface Book series, for example, have a screen size of 13.5 inches (measured diagonally) and a native resolution of 3000 by 2000 pixels. That translates to 267 pixels per inch (a measure sometimes referred to in casual usage as dots per inch, or DPI).
That density is far greater than (typically more than double) the density of a high-resolution desktop display or a budget-priced laptop PC with a similar display size running at a lower native resolution. If you use a high-DPI system at normal (100 percent) scaling, the icons and text will be so small as to be unreadable. That’s why, by default, the Surface Book is configured to run Windows 10 at 200 percent scaling. The result is an impressively sharp display. Everything in the Windows interface and in modern Windows apps is magnified at twice its normal size, using multiple physical pixels to create each effective pixel (at 200 percent scaling, each effective pixel is made from four physical pixels). The most popular classic desktop apps look great on primary high-DPI displays, as does any desktop app that was built using Windows Presentation Foundation (WPF).
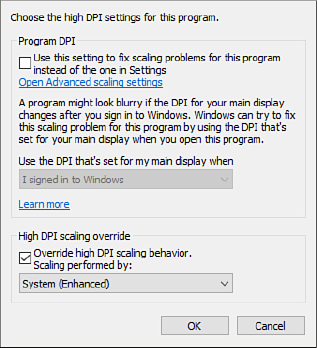
Beginning with version 1703, Windows 10 includes new display code that improves rendering for some older desktop apps that previously looked a little blurry on high-DPI displays. If you notice that a desktop program isn’t scaling properly, you can use another new option that debuted in version 1703 to change its behavior. Find the program’s executable file, right-click to open its properties dialog box, click Change High DPI Settings on the Compatibility tab, select the Override High DPI Scaling Behavior setting, and change it to System (Enhanced). This setting overrides the way the selected program handles DPI scaling, eliminating the use of bitmap stretching and forcing the application to be scaled by Windows:
Windows 10 supports scaling factors from 100 percent all the way to 450 percent, with most elements of the user interface looking crystal-clear even at the highest scaling levels. That includes Start, File Explorer, and the Windows taskbar.
In general, scaling produces a display that looks perfectly natural. In some scenarios, however, scaling issues can cause problems, including blurry text, desktop programs that appear too large or too small, or interface elements such as menus and toolbars that are clipped or overlap.
These types of scaling problems are most likely to occur when you try to change the display scaling dynamically. This can happen in a variety of scenarios: connecting a portable PC with a high-DPI internal display to a larger external monitor, for example, using a video output or a laptop dock; projecting that high-DPI display to a large TV screen; or making a Remote Desktop connection. Any of those scenarios can result in some unfortunate scaling combinations, especially when using desktop apps that weren’t written to handle scaling changes gracefully.
When that happens, the only sure cure is to close all running apps, sign out of Windows, and then sign back in. Ironically, the same problem occurs in reverse when you disconnect from the docking station. Microsoft has dedicated some serious engineering resources to solving this annoyance in recent Windows 10 releases, thankfully.
Using multiple displays
When you attach a second (or third or fourth) display to your computer, the Display page in Settings changes. Thumbnails, one for each attached display, appear in a preview pane like the one shown in Figure 14-21. You can drag the displays to either side of one another (or even move one above the other), adjusting the alignment of displays to match their actual physical alignment, with the goal of having your mouse pointer move naturally between displays without a jarring shift when crossing the bezels.

Figure 14-21 With multiple monitors, you can arrange each so that it matches the physical layout. Drag the monitor thumbnail up, down, or to either side of another display’s thumbnail.
It’s worth noting that the thumbnails have only a casual relationship to the size of the physical displays they represent. In Figure 14-21, for example, display 1 is a Dell laptop with a 15-inch screen, with a display resolution of 3840 × 2160 and scaling set to 250 percent. Display 2 is a 34-inch external display, which is dramatically larger (in terms of physical size) than the laptop’s built-in display but actually has a significantly lower resolution of 3440 × 1440 and a scaling factor of 100 percent.
If you’re working with two or more displays and you’re not sure which is which, click the Identify button, which temporarily positions a large number on each display that corresponds to the number on its thumbnail. Note that you can drag the thumbnail for display 1 to the right of display 2 if that’s the way they’re physically arranged on your desktop. Doing so allows your mouse to cross borders gracefully when you move the pointer.
To manage how multiple displays work together, use the controls under the Multiple Displays heading near the bottom of Settings > System > Display. You can duplicate the display on multiple desktops, extend the display, or disconnect a particular display so that it’s not in use. An even easier shortcut is to press Windows key + P, which opens the Project pane on the right side of the main display. This option is especially useful when connecting a laptop to an external display. Choose Second Screen Only to temporarily stop using the laptop’s built-in display and use only the (presumably larger) external monitor.
Night Light
The Night Light feature is based on a relatively recent scientific discovery: Blue light suppresses the secretion of melatonin, disrupting circadian rhythms and disrupting your sleep. To adjust for this effect, you can turn on the Night Light feature, which favors warm colors and reduces the amount of blue light on a display.
To enable this feature, go to Settings > System > Display and slide the Night Light switch to On. To make fine-grained adjustments in how this feature works, click Night Light Settings, which opens the dialog box shown in Figure 14-22.
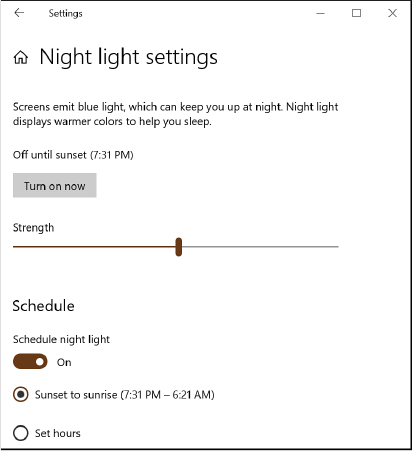
Figure 14-22 If you regularly check your email and perform work-related tasks right before bedtime, consider scheduling Windows 10 to reduce the amount of blue light in the display at night.
The Color Temperature At Night slider allows you to fine-tune how the display looks by adjusting the values of red and yellow. Use the Schedule settings to automatically turn on Night Light at sunset and turn it off after sunrise, based on the current location; as an alternative, you can assign specific hours based on your sleep schedule or use the button at the top of the dialog box to turn the feature on or off manually. (You might choose to ignore the schedule if you’re on a transcontinental flight in a darkened airplane cabin, for example.)
And one major caveat: Obviously, turning on the Night Light feature severely distorts the color of your display; if you’re editing photos or videos or doing any other kind of work that depends on accurate color fidelity, don’t use this feature.
Speakers, microphones, and headsets
Windows 10 supports a broad array of high-quality audio outputs, capable of delivering multichannel surround sound to sophisticated home theater setups or just driving the tiny speakers on a laptop. As with other hardware subsystems, most of this capability is built into the Windows core drivers and doesn’t require custom drivers from hardware manufacturers. (That, of course, doesn’t prevent OEMs from including custom drivers and audio control software with their Windows 10 PCs.)
Over the past few years, the most common audio settings have migrated to the modern user experience. After you open Settings > System > Sound, you can choose the correct output or input device, adjust the master volume level, and test your microphone’s sensitivity. To make additional adjustments to an output or input device, including renaming or disabling a device, click Device Properties. Click App Volume And Device Preferences to assign inputs and outputs and adjust volume on a per-app basis.
A few useful built-in capabilities are buried deep in the configuration dialog boxes of the old audio subsystem, as found in Control Panel. The first allows you to test your surround-sound (or stereo) audio configuration to confirm that every speaker is working properly. From the bottom of the Sound page in Settings, click Sound Control Panel; in the Sound dialog box, select the correct playback device (the default device is identified by a green check mark) on the Playback tab. Click Configure to open the test app. Pick your speaker layout and then click Test to cycle through all the speakers, with a visual display showing which one should be playing. To end the test, click Stop, as shown in Figure 14-23.

Figure 14-23 You can use this speaker setup test to confirm you haven’t accidentally wired the right speakers to left and vice versa.
Windows 10 also allows you to designate a device, typically a headset, for use as the default communications device, as shown in Figure 14-24. (This configuration is designed for ease of use with communication apps such as Skype. For all other applications, such as playing music and videos, you can use a different playback device—external speakers, usually. This device is designated as the default device.) After making that designation, you can change playback behavior so that other sounds automatically reduce their volume when your communication device is in use, and the sound of, say, a New Mail Message notification would interfere with your communication.

Figure 14-24 Using this well-hidden option, you can reduce other sounds (music and notifications, for example) when Windows detects that you’re trying to communicate.