
Appendix B
The Windows Insider Program
How the Windows Insider Program works
Joining the Windows Insider Program
Keeping track of what’s in each preview build
Submitting and tracking feedback
If you have a hankering for new Windows features, all you have to do is wait. Microsoft typically releases new feature updates for Windows twice a year, targeting completion dates in March and September. These full upgrades are delivered at no charge through Windows Update to properly activated devices running Windows 10.
This accelerated release schedule is a key part of the “Windows as a Service” model for Windows 10, where upgrades arrive far more frequently than before.
Still not fast enough for you? Then feel free to sign up for the Windows Insider Program, which is free of charge and open to anyone who wants to receive preview releases of Windows as they work their way through the development process. This open approach makes it significantly easier than in previous Windows versions to track the development process and see what’s coming next.
By running preview builds, you can try out new features as they develop. More importantly, the program gives you the opportunity to report bugs and provide feedback and suggestions that can influence the direction of those features.
The Insider program is, of course, ideal for Windows enthusiasts, but it’s also of value to IT professionals who want to avoid unpleasant surprises when new versions are rolled out to the public. In this appendix, we explain how to manage your participation in the Windows Insider Program.
How the Windows Insider Program works
Microsoft introduced the Windows Insider Program in 2014 when it announced Windows 10, delivering the first preview release days later. The program has continued nonstop since then, expanding in 2017 to include business users as well as personal accounts.
You don’t need to pay a fee or pass a test to join the Windows Insider Program. All you have to do is complete two steps. First, go to https://insider.windows.com, read the terms and conditions, and sign up using a Microsoft account or an Azure Active Directory address. After completing that prerequisite, you can take the second step by configuring any device running Windows 10 to install Insider Preview builds.
Unless you’re an experienced software tester, you should approach these preview builds with caution. By definition, they are unfinished, with known and unknown issues that can potentially expose you to system crashes and data loss. The best test platforms are secondary PCs that are properly backed up; for testing software compatibility and previewing new Windows features, a virtual machine is an excellent choice, although it isn’t as useful at providing compatibility information for Microsoft engineers.
Another significant issue associated with setting up access to Insider Preview builds is the need to install feature updates far more frequently than the normal twice-yearly schedule. The most aggressive Insider option involves installing a new feature update weekly during normal development cycles, and the pace of updates sometimes increases to multiple builds per week as developers reach the end of the cycle and prepare for the public release.
Joining a device to the Windows Insider Program is not a decision to be made lightly. If you decide you want to stop receiving preview builds and go back to the current release channel, you can safely do so during the brief interval after a new Windows version is released to the Semi-Annual Channel. At that time, you can safely disconnect a device from receiving Insider builds without having to reinstall Windows. At all other times, however, you’ll almost certainly have to back up your data and perform a clean reinstall of Windows.
If you’re cognizant of the risks and willing to accept the trade-offs, keep reading to learn how to set up a Windows 10 PC to receive Insider builds.
Joining the Windows Insider Program
After registering at https://insider.windows.com, you’re ready to configure a Windows 10 device to receive Insider Preview builds. Go to Settings > Update & Security > Windows Insider Program and click Get Started.
The first step is to link your PC to the registered Insider account. In most cases, the Microsoft account you use to sign in to Windows 10 is the best choice here. Then walk through the wizard’s steps to configure your Insider settings, as shown in Figure B-1.

Figure B-1 If you’re willing to accept the risks of installing preview builds in exchange for the opportunity to influence the direction of Windows, click Get Started and link an account that you’ve registered with the Windows Insider Program.
After that step is complete, you need to choose one of three Insider Preview channels. Over time, these channels have evolved, with Fast and Slow rings as well as an occasional (but limited) option for Insiders in the Fast ring to “skip ahead” a full version. As of mid-2020, those options are replaced by three channels whose names and general contours match those used for other Microsoft software and services, including Microsoft Edge, Microsoft 365, and Microsoft Teams test releases.
Dev Channel Preview builds go to this group of Insiders first. The benefit of being first to see a new feature is balanced by the risk of being the first to experience a new bug. You can report those bugs using the Feedback Hub. Microsoft recommends this channel for “highly technical users.”
Beta Channel Devices configured for this “early adopter” channel receive preview builds after they’ve had a chance to be thoroughly tested by the Dev channel. These builds are aligned to a specific upcoming release and are likely to be more stable and reliable because they incorporate fixes based on feedback from testers in the Dev channel.
Release Preview Channel This is the most conservative channel of all, offering new builds near the end of the development cycle for a feature update. Insiders who choose this channel also receive advanced quality updates and have early access to certain key features. These builds are fully supported. Microsoft recommends this channel for IT pros who want to preview and validate upcoming releases without a major risk of instability.
Before you can complete the configuration process, you must click through two bold and very stern warnings, which list the risks we discussed earlier. After a restart, you’re ready to begin receiving new builds. The current Insider Preview release that matches your preferences will download and install automatically, just like any feature update.
After configuring a device to receive Insider Preview builds, you should see some new options in the Windows Insider Program section in Settings > Update & Security, as shown in Figure B-2. There, you can change your Insider settings by changing the channel, which indirectly changes the pace at which you receive new builds. To use a different account with a specific device, register that account with the Windows Insider Program. Then click the account card at the bottom of that Settings page and use the Change or Unlink buttons.
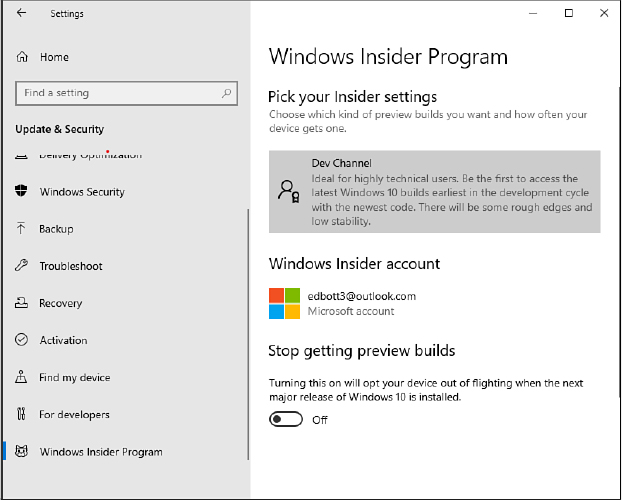
Figure B-2 Click the current channel or the Windows Insider Account to change Insider settings.
Insider Preview builds arrive via Windows Update, as normal. After installing an Insider Preview build, you can see a few changes. For starters, a watermark appears in the lower-right corner of the screen, above the clock in the notification area, with the words “Evaluation copy” and the Insider Preview build number. (This watermark disappears for some builds that are released near the end of a development cycle, as Microsoft prepares the final preview builds for the official release.)
In addition, on a PC configured to receive Insider Preview builds, some privacy settings can’t be adjusted. If you go to Settings > Privacy > Diagnostics & Feedback, for example, you’ll find that the Feedback Frequency options are set to the default levels, and a message on that page discloses that the Windows Insider Program has taken control of those options.
Those options return to normal when you change the configuration of a device so that it no longer receives Insider Preview builds and is back on the Semi-Annual Channel.
Note
At the time we wrote this book, Microsoft was actively testing the version of Windows scheduled for release in the second half of 2020. Instead of a code name, this release is identified as 20H2 in its Insider flight details. To identify the current status of Insider Preview releases for Windows 10 PC, Server, and IoT, go to the Flight Hub at https://docs.microsoft.com/windows-insider/flight-hub/.
When running an Insider Preview build, you can suspend delivery of new builds for up to seven days. Go to Settings > Update & Security > Windows Update, click Advanced Options, and then click Pause Updates For 7 Days. You might choose to make this change if you’re in the midst of a big project and don’t want your work to be interrupted by a large download that could take an hour or more to install. You might also choose to stop updates temporarily if you’re traveling. As a member of the Windows Insider Program, however, that delay is limited to a week. (For a device in the public Semi-Annual Channel, you can use the same option to pause updates for up to 35 days.)
As long as your PC is enrolled in the Windows Insider Program, you will continue to receive new builds. When the development cycle for one release ends, the next one begins without interruption. To configure your PC so that you stop receiving Insider builds when the next public release of Windows 10 is installed, go back to Settings > Update & Security > Windows Insider Program and turn on the Stop Getting Preview Builds switch at the bottom of the page.
Of course, setting that option has no effect on your current installation. As we noted earlier, the only way to leave the Windows Insider Program in the middle of a development cycle is to install a clean copy of a released version of Windows 10.
Keeping track of what’s in each preview build
Every new Insider Preview release is accompanied by copious documentation. Visit the Insider Flight Hub at https://docs.microsoft.com/windows-insider/flight-hub/ to catch up on just the highlights. That page lists each build in the active development cycle, in reverse chronological order, with a link to the corresponding set of release notes on the Windows Insider Blog, which discusses those features in more detail and includes detailed lists of general fixes as well as known issues. Visit https://blogs.windows.com/windowsexperience/tag/windows-insider-program to browse through all the release notes.
Links to those same release notes are also available in the Feedback Hub app, on the Announcements tab; click the megaphone icon in the navigation pane to see the full list, as shown in Figure B-3.

Figure B-3 Open the Feedback Hub and click the megaphone app in the navigation pane to see a full list of Windows 10 announcements, including details about each new Insider Preview build.
That’s not the only purpose of the Feedback Hub app, of course, as we consider in the next section.
Submitting and tracking feedback
The Windows Insider Program is, by design, a feedback loop. The primary means for offering bug reports and suggestions to Microsoft is via the aptly named Feedback Hub app.
That loop is a crucial step in ensuring that serious bugs are caught and fixed before they reach the general public. A prime example of just how important that task is occurred when Microsoft released the October 2018 Update, version 1809. Only days later, the rollout of that feature update was paused for more than a month after early adopters reported two serious bugs with the new update.
Ironically, Windows Insiders had done the job they were supposed to do, with multiple Insiders reporting both bugs during the course of testing preview builds. Microsoft’s engineers had missed those reports in the flood of data from the Feedback Hub. To help ensure that those reports are taken more seriously, the Windows team added a new Severity field to the feedback form and instituted new review processes to avoid a recurrence of that embarrassing release cycle.
The Feedback tab, shown in Figure B-4, allows you to view and search all items submitted by the Insider community, adding your own comments and upvoting items to make a suggestion more visible to the Microsoft employees designing and coding upcoming Windows releases.
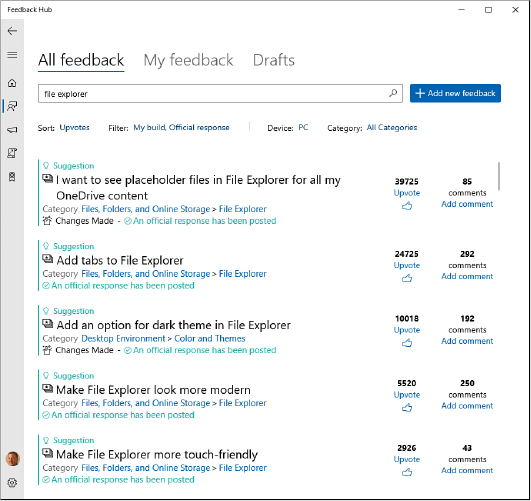
Figure B-4 Before creating a new feedback item, use the search box to find previous reports.
Before you click the Add New Feedback button, we recommend using the search box to find previous reports on the same issue. If you find one that already covers the issue you were planning to report, consider clicking the Upvote button (to the left of a summary item and below the heading when you open the full feedback item) rather than creating a duplicate feedback item. If you have additional details that are relevant, open the item and add a comment. (You can also comment on comments.)
A few suggestions for getting the most out of the Feedback Hub app:
Use the Sort options to change the display of search results. Choose Trending to see items that are getting the most current activity; click Upvotes to show feedback items that have already proven popular and might benefit most from your support.
Choosing My Build from the Filter list can help you avoid seeing outdated feedback and confirm that an issue you’re experiencing is also being reported by others using the same build. Clearing that option can help you report a longstanding issue that was reported in previous builds and is still occurring in a current build.
Take advantage of Filter options to identify issues that have been addressed by the Windows development team. Select the Changes Made and Official Response categories to see items that contain these details.
If you can’t find an existing feedback item, click Add New Feedback and fill in the four-part form. Provide clear details in the subject line so that others can find your issue, and choose the correct category in step 2. Pay special attention to the Add More Details section, shown in Figure B-5, which includes a check box for prioritizing an issue as “high severity.” For issues that you can reliably reproduce, we recommend using the options to attach screenshots and files or even record a series of steps to help an engineer understand exactly what you’re seeing.

Figure B-5 The Recreate My Problem option allows you to record a sequence of events that an engineer can reproduce, making a bug report or suggestion far more effective.