
Chapter 9
Relaxing with Windows 8’s Photo and Entertainment Apps
In This Chapter
- Viewing photos from your PC and multiple online services with the Photos app
- Using the Camera app
- Understanding your options for more sophisticated photo needs
- Enjoying your music collection and accessing Microsoft’s Music Marketplace with the touch-friendly Xbox Music app
- Understanding your options for more sophisticated music needs
- Buying and renting movies and TV shows online and watching them with the Xbox Video app
- Understanding your options for more sophisticated video needs
In the old days, users would manage their media collections on their PCs and then sync a subset of their photo, music, and video content with devices and share a further subset via discs, USB devices, and online services. While these activities are still possible in Windows 8, and will no doubt be quite popular for some people, Microsoft is embracing a new way of doing things that more closely mirrors related changes in the tech industry.
The new way of doing things was triggered by a technological advance called cloud computing. In this new model, your data isn’t stored on a single hard disk on a single PC, where it’s inaccessible from other PCs and devices and could potentially suffer from data loss because of a catastrophic hardware failure. Instead, the data is stored in the cloud—in
powerful, geographically redundant data centers run by major corporations we actually trust—and is always accessible from any PC or device.
In this new cloud computing model, all of your data is always available on your PC, just like before. But now you can pick up almost any other PC or device and still access your data seamlessly, because it’s automatically synced for you. Microsoft pioneered this new approach with Windows Phone back in 2010, and it’s finally going mainstream with Windows 8.
You can see cloud computing’s impact on Windows 8 in many places, from the new Microsoft account sign-in to the synced settings and the mobile device–like productivity apps discussed in the previous chapter. But the system’s photos and entertainment capabilities, related to digital photos, music, and video, are an interesting case. This is because Microsoft had previously spent over a decade delivering an increasingly powerful but complex series of applications and services through its Windows Media and Zune product lines, to which hundreds of millions of Windows users have grown accustomed.
Today, those services are being reorganized under the Xbox entertainment brand. Previously, Xbox meant one thing and one thing only, video games. But Xbox is evolving into a more general purpose entertainment platform, adding digital music and video to its stable of capabilities. (Photos remain separate because users’ photos are their own and are not acquired from a central location.)
If you’re not ready to move forward and utilize online services like SkyDrive to store your music collection, or rent and buy movies and TV shows from Microsoft’s Xbox-based marketplaces, no need to worry; all of the local-based digital media capabilities in Windows 7 are still present in Windows 8. But as with the rest of this book, this chapter focuses solely on the new capabilities. And in this specific case, that means enjoying digital photo, music, and video content in new ways through new Metro experiences.
It’s Going to Change
Thanks to the dynamic nature of its new apps platform, the Metro-style apps that Microsoft includes with Windows 8/RT will change over time, so it’s highly likely that the apps described in this chapter will appear somewhat differently over time and will include additional features. This is normal, and as a general statement, it’s probably fair to say that the versions of the Photos, Camera, Xbox Music, and Xbox Video apps you use will provide a superset of the functionality we describe in this chapter.
A Note About the Windows 8 Entertainment Apps and Your Microsoft Account
In Chapter 8, we discussed how many of Windows 8’s productivity apps are simple clients for online services provided by Microsoft and other companies. As such, you must sign in to your Microsoft account to access many of these apps, even if you’ve elected—against our advice—to not automatically do so by signing in to the PC with a Microsoft account.
These apps rely heavily on online services, are less full-featured when you’re offline; you’ll only be able to use content stored on the machine, your own PC-based photos, music, and videos, and any rented movies or purchased TV shows or movies.
Photos and Camera actually work fine without a Microsoft account, go figure, but as you’ll see, you will need to sign into various online services to use Photos to its fullest. But Microsoft’s new Metro-style entertainment apps, Xbox Music and Xbox Video (and the related Xbox Companion) do require you to sign-in with a Microsoft account to be used effectively.
If you have signed in with a Microsoft account, these apps will automatically sign into that account as well, tying your PC or device to the Xbox entertainment services in the cloud. But if you’ve configured a non-Microsoft account and attempt to run one of these apps, you’ll be asked to sign-in with a Microsoft account. You can retain your current domain or local account if you’d like, and just sign in to app and app groups with a Microsoft account. Or, you could follow our advice from Chapter 12 and do the right thing: Sign in with a Microsoft account. Or, if you have a domain account, connect it to a Microsoft account. Signed in with a local account? Convert it.
Both Xbox Music and Xbox Video provide a similar experience for non-Microsoft account users. You’ll just see a non-threatening Sign In prompt in the upper-right corner of the screen, as shown in Figure 9-1.
Figure 9-1: Xbox Music and Video both require a Microsoft account to be used fully.

If you don’t sign-in, you’ll only see a tiny subset of the functionality described in this chapter. But you’re not going to go through any of that, right? Right.
Windows 8 includes tools for enjoying digital photos on your PC or device, no matter the source. That means basic photo-viewing experiences for both Metro and the desktop, and ways to acquire (or download) photos from a digital camera, smartphone, memory card, or other device. But most Windows 8 PCs and devices will also include more advanced tools for editing photos, uploading them to your favorite online service, and more. Don’t worry: If you don’t have these tools, we’ll tell you how to get them.
NOTE As with elsewhere in the book, we focus only on new features in Windows 8, and not on functionality that remains unchanged from previous Windows versions. Again, the assumption is that you know how to use Windows and want to get up to speed on the new stuff.
Here we look at the photo features in Windows 8, starting with the new Metro-style Photos app.
Using the Photos App
The new Photos app is a great way to view your photos, whether they are on the PC, in SkyDrive, on your other PCs, or on various third-party online photo sharing services. It also provides photo acquisition features, so you can acquire, or “download” photos from a digital camera, memory card, or other device.
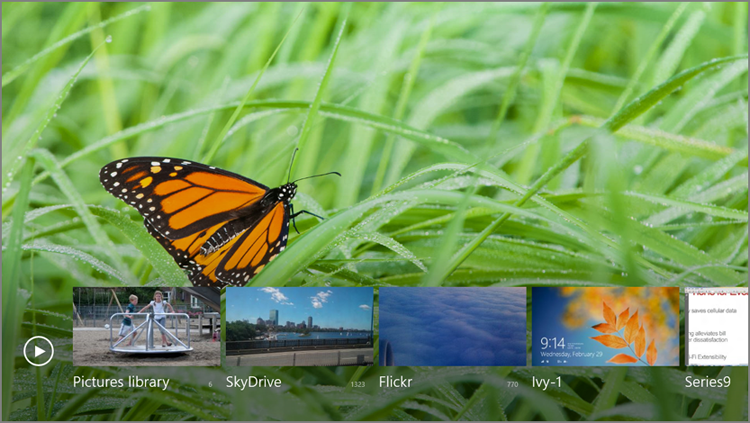
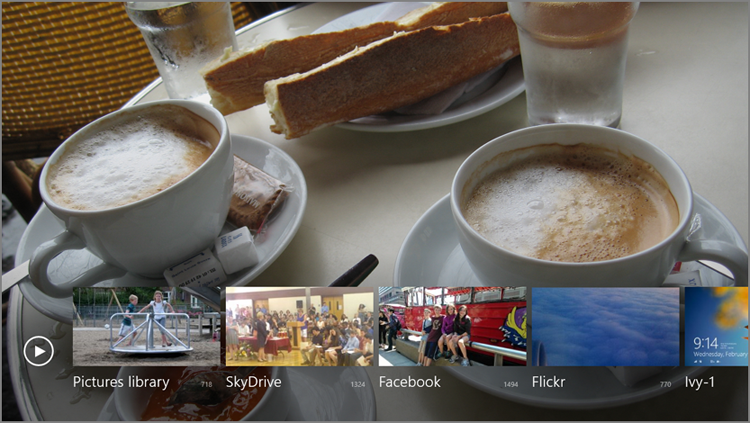
The Photos app, shown in Figure 9-2, is a typical, full-screen, Metro-style experience, with large tiles representing the photos on your PC, in various online services, and on your other connected PCs.
These sources can include some combination of the following:
- Pictures library: Here, you’ll find all of the photos stored in the Pictures library on your PC.
- SkyDrive: Microsoft’s cloud storage service, SkyDrive, provides 25 GB of free storage plus paid annual tiers for those who need even more.
- Facebook: The most popular social network on earth is also an increasingly common way for people to share photos with friends, family, co-workers, and other contacts.
- Flickr: Yahoo!’s popular Flickr remains the number one photo-sharing service on earth.
- Connected PCs: If you’ve downloaded and installed the SkyDrive desktop application from www.skydrive.com on each of your PCs, you will see the photo collections from those PCs listed here as well. In Figure 9-2, for example, Ivy-1 and Series9 represent other connected PCs.
Figure 9-2: Photos app
About Libraries
Microsoft introduced libraries in Windows 7, providing a new way to collect related content—documents, music, photos, and videos by default—in virtual folders that are really views to two or more physical folder locations on the PC. Libraries continue in Windows 8 largely unchanged, and Microsoft provides the same four default libraries—Documents, Music, Pictures, and Videos—as it did in the previous OS version. Likewise, each library aggregates the same two physical folders as in Windows 7, in default. So in the case of the Pictures library, that means the My Pictures folder that’s part of your user account and the Public Pictures folder.
This is all a long way of saying that Windows 8’s basic photo management features haven’t changed since Windows 7.
Depending on how you’ve configured your Microsoft account, some of these sources will and will not be immediately available. The Pictures library is always available, online or off, and will include whatever photos and other pictures you store in your Pictures library. And your SkyDrive source should be automatically configured since your Microsoft account comes with access to SkyDrive storage.
But the other sources, Facebook, Flickr, and your connected PCs, may or may not be configured and available. If you took the time to associate your Facebook account with your Microsoft account, this source will be set up and ready to go. But if not, you can do so now from within Photos. And the process for configuring this account to work with Photos is similar to that for Flickr, which has to be performed manually regardless of how you’ve configured your Microsoft account. So let’s examine that first.
Configuring Facebook or Flickr Photos
To manually configure Facebook—remember, the process is also very similar for Flickr—to work with the Photos app, you will need to visit the app’s Settings pane. To do so, tap Winkey + I. (Or, with a touch or mouse interface, display the Charms bar and then select Settings.) The Settings pane should resemble Figure 9-3.
Figure 9-3: Photos Settings
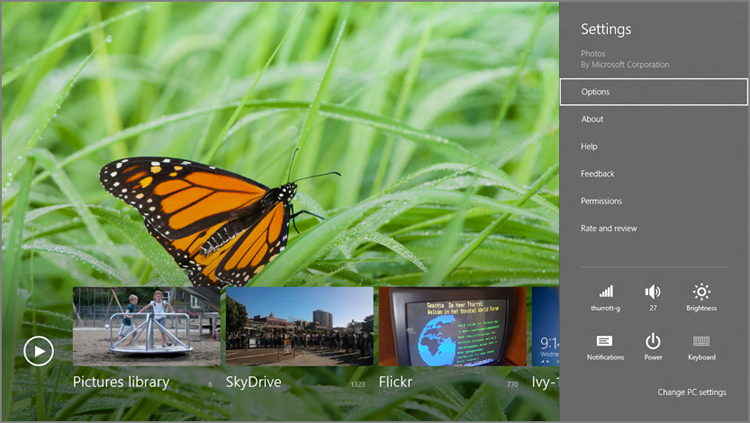
Select Options to display various options related to Photos. Next to both Flickr and Facebook, you will see a link titled Options. Click the link for the service you wish to configure. (We’re using Facebook in this example, but the process is very similar for Flickr.)
Photos will pass you through to the web-based Facebook authentication site using Internet Explorer. Here, as shown in Figure 9-4, you will authorize Photos to use your Facebook account.
Figure 9-4: Configuring Photos to work with Facebook
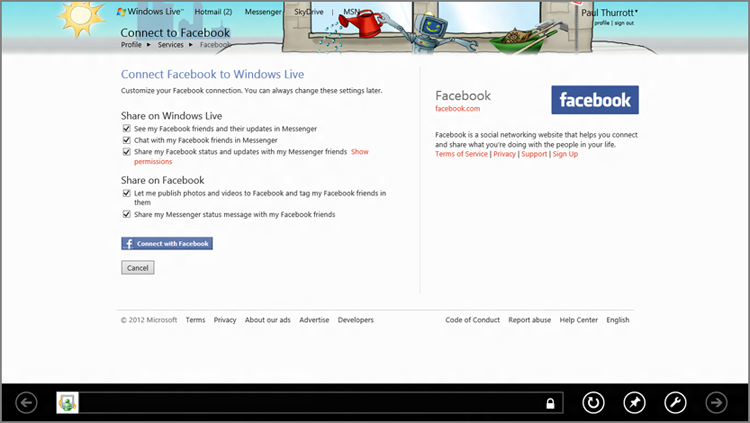
Click Connect with Facebook to connect the Facebook service to the Photos app. Once you’ve provided your Facebook credentials, Microsoft will link the two accounts and you can return to the Photos app. When you do, you’ll see that a new Facebook tile has been added to the app, providing you with access to the photos from that service (see Figure 9-5).
Figure 9-5: Facebook is now available in Photos.
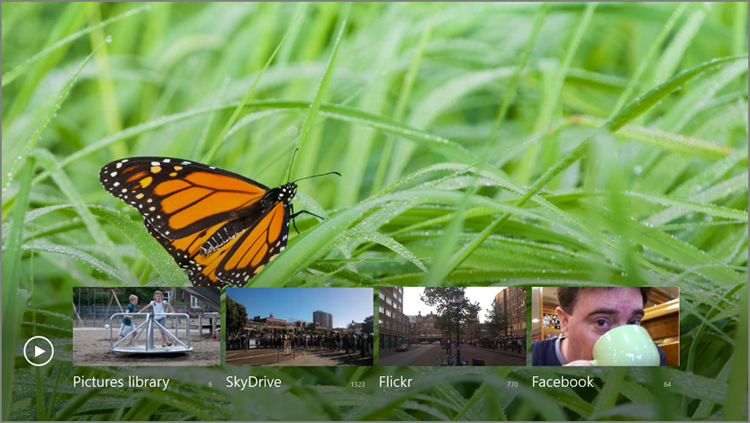
If you don’t use Facebook or Flickr, you can actually remove these tiles from the Photos home screen. We describe this process a bit later in the chapter.
Again, the way you configure Photos to work with Flickr is identical to what we just discussed. So if that’s required, you can connect to your Flickr account in the same fashion.
Using SkyDrive to Connect to Other PC Photo Libraries
By this point, you should have Photos configured to work with some combination of your local photos, SkyDrive-based photos, and possibly your Facebook and Flickr-based photos as well. That’s a lot of photos. But most people have two or more PCs, and if you configure these PCs a certain way, you can actually access the photo collections on your other PCs—or what we call your connected PC—from any of your PCs.
This assumes that the PCs in question are online, of course. If a connected PC is off or asleep, you won’t be able to access its pictures from the Photos app. On the good news front, these other PCs don’t have to be on your home network to work: One could be in Singapore, for example, and one in Boston, Massachusetts, and you’d still be able to make the connection as long as they’re both online.
So how do you connect PCs? There are two requirements:
- Microsoft account: You must configure each PC to sign in with the same Microsoft account.
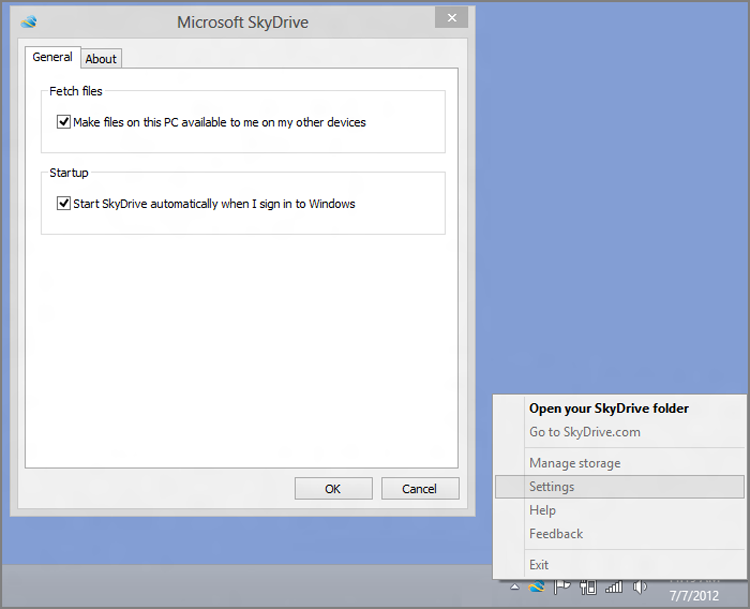
- SkyDrive application for Windows: You must install the SkyDrive application for Windows (not to be confused with the Metro-style SkyDrive app for Windows 8) on each PC and configure that application to use a feature called Remote Fetch. This feature makes that PC’s files available to you on your other PCs and devices. You do this through the SkyDrive application’s Settings window, which can be seen in Figure 9-6, and accessed through the app’s system tray icon.
Figure 9-6: Make sure the SkyDrive application is configured to share its files with other connected PCs.
When you do configure your PCs to use SkyDrive’s Remote Fetch feature, the photo libraries from those PCs will appear in the Photos app on your other PCs. It’s like magic!
Navigating Through Your Pictures Library, SkyDrive, Facebook, and Flickr
Once all of your photo sources are configured, you can use the Photos app as it is intended: to view your photos, regardless of their location. Well, assuming you’re online, that is: When you’re offline, only the Pictures library tile will respond.
Navigation in each source is similar: You’re presented with a horizontally arranged list of tiles, each of which represents a folder, file, depending on the source. These tiles are in alphabetical order, from left to right, with folders appearing before actual files. Consider the view shown in Figure 9-7, which displays the contents of the Pictures library.
Figure 9-7: Viewing folders in the Pictures library
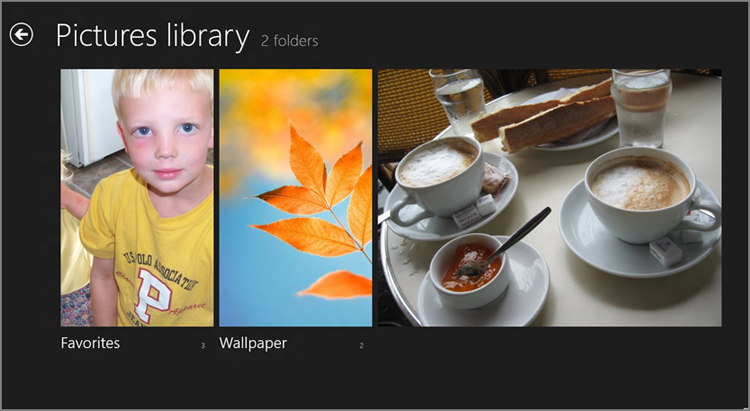
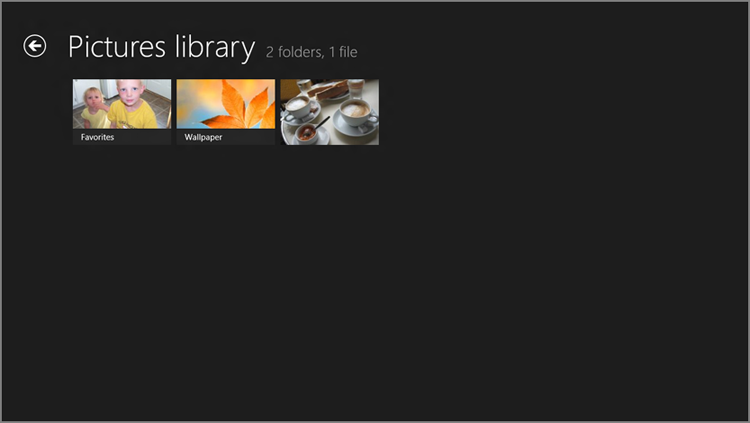
In this view, you can see two folders, which are represented as tall, rectangular tiles and a single photo, which appears in its native aspect ratio. If you find this view constrictive, you can view more folders (and files) simultaneously by using semantic zoom to pan back the view, resulting in the grid-like layout shown in Figure 9-8. Obviously, this option—which is available in virtually all Photos views—is more effective (and even necessary) when you have a lot of pictures.
Figure 9-8: You can zoom out to view more photos on-screen at once.
You can enable semantic zoom in a variety of ways. With a touch-based system, you use the suddenly common pinching gesture, with two fingers, directly on the screen. With a mouse and keyboard, you can hold the Ctrl key and use your mouse’s scroll wheel. Or, with just the mouse, click the small minus (“-”) symbol in the bottom right of the screen.
And if you zoom enough in the correct direction, you can even use this feature to zoom into a photo! (If you do, you can use the small plus (“+”) symbol that appears in the lower right to zoom back out as well.
These basic views are true of all the photo sources, but of course each is a bit different in its own way. So here’s some information to consider about each:
- Pictures library: By default, the Pictures library consists of the contents of two locations, My Pictures and Public Pictures, but you can add and remove locations as well. Files and folders in a library are mixed together and arranged as one. So if you have folders named Alpha and Gamma in your My Pictures folder and then one folder named Beta in Public Pictures, they will be arranged alphabetically as Alpha, Beta, and then Gamma in the Pictures library in both File Explorer (on the Windows desktop) and in the Pictures library view in the Photos app.
- SkyDrive: When you access SkyDrive from its normal web interface at skydrive.com, you’re given the opportunity to configure the “type” of each folder. One of those types is Photos. And only folders that are configured as type Photos will appear in the Photos app in Windows 8. So if you’re not seeing certain SkyDrive photos appear, make sure they’re in a properly configured folder.
- Facebook: Everyone’s favorite social networking service organizes photos into albums, and what you’ll see in the Facebook view in Photos will correspond to that. You’ll see common Facebook locations like Cover Photos, Mobile Uploads, Wall Photos, and so on, as well as whatever albums you’ve manually created. The order here, however, is not alphabetical. Instead, they’re arranged by which most recently were accessed.
- Flickr: Yahoo’s popular photo-sharing service provides users with a Photostream, which is basically just every photo you’ve ever uploaded. But it also provides folder-like containers, including sets, which can be further grouped into collections. So you might consider these folders and sub-folders, respectively. Looking at the Flickr view in Photos, you’ll see a tile for your Photostream and then tiles for each collection and set.
- Connected PCs: As with your own Picture library, your connected PCs will present an aggregated list of folders, sorted alphabetically.
Viewing Photos and Photo Slideshows
Each of the supported photo sources provides nearly identical features related to viewing photos and photo slideshows. So you can browse into any source, and eventually you’ll be presented with one or more actual photos, in a folder. At this point, you can perform some basic activities related to individual photos or groups of photos.
To view a photo full-screen, simply select it. This works exactly as expected, but if you open the app bar (Winkey + Z) while viewing an individual photo, you’ll see some interesting options, as shown in Figure 9-9.
These options include the following:
- Set as … Lock screen: While you can always use the PC Settings interface to select a favorite photo for your lock screen image, oftentimes you’ll think to do this while actually viewing photos. This menu item, found by tapping the Set as button, lets you do so.
- Set as … App tile: By default, the Photos app tile will shuffle through photos, presenting an animated view. But you can configure a single picture to be the permanent tile image if you’d like.
- Set as … App background: As you’ve seen, the Photos app provides a nice photographic background image in its main view. But you’ll probably want to change that to a favorite photo of your own. When you do, this view will change to resemble Figure 9-10.
NOTE that this delete button is not available when viewing photos on connected online services or PCs.
- Delete: This button deletes the file from your PC, after a quick confirmation.
- Slide show: This button triggers a slideshow of the photos contained in the folder that contains the picture you’re currently viewing.
Figure 9-9: A single photo viewed full-screen
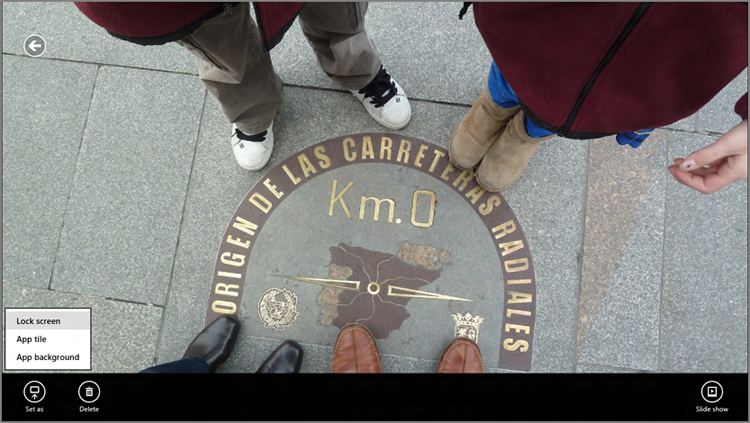
Figure 9-10: Customizing the Photos app with your own picture.
Of course, you can also trigger slideshows from a folder view, and when you access the app bar from this view, you get a different set of buttons, and thus capabilities. A few are notable.
In this Browse by Date view, you can also reverse pinch to zoom out and see more on-screen at once.
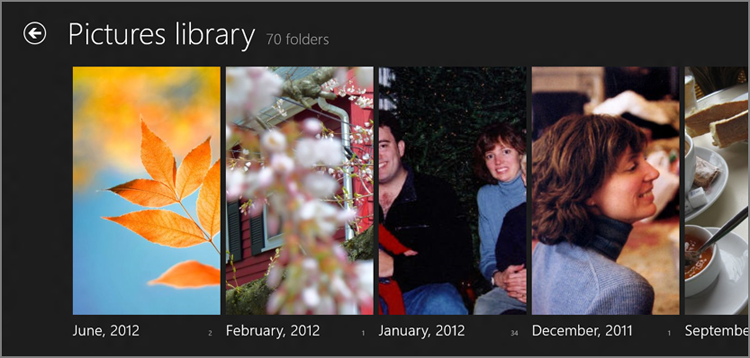
The first is a Browse by date button, though it only appears in the Pictures library view. When you activate this button, the view switches so that each “folder” tile now represents a month, as in Figure 9-11. (And there’s now a new Browse by album button in the app bar so you can switch back.)
Figure 9-11: The Pictures library, viewed by date
This is a neat feature, but it works only within a single source. You can’t mix photos from, say, Facebook and Flickr into a single slideshow. You’ll be prompted to that effect if you try.
There’s also a power-user feature of sorts that lets you collect photos from different folders (within a single photo source) into a basket, like that in the Metro-style File Picker, so that you can run a slideshow of photos from different locations.
To use this feature, enter a folder or view that contains photos. Then, select individual photos, as you would when selecting Start screen tiles: by right-clicking them, tapping and dragging down a bit, or by pressing the Spacebar; as you select a photo, a selection rectangle will indicate success. Or you can select every photo in a folder by opening the app bar and pressing Select All.
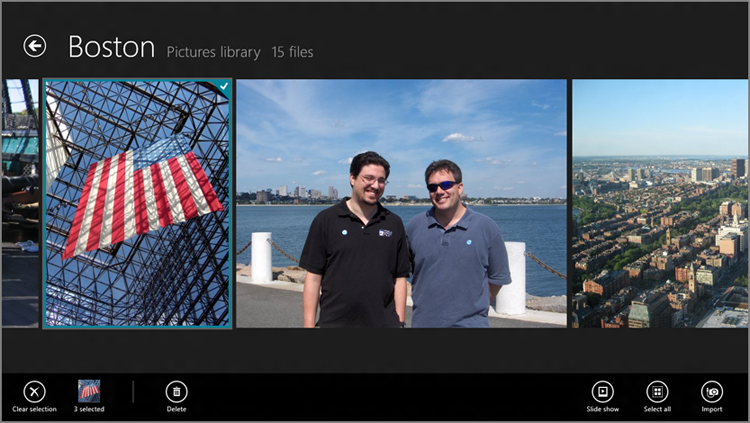
Either way, as you select photos, you’ll see two new buttons in the app bar as you go: a Clear Selection button for clearing the selection and a selection thumbnail that indicates how many photos you’ve selected; these can both be seen in Figure 9-12. Once you’ve selected all the photos you want—again, from multiple folders—you can tap the Slide show button to start this more advanced slideshow type.
Sharing, Printing, and Searching
Many common photo-related activities work consistently with similar features in other Metro apps, thanks to the new system-wide capabilities in Windows 8. For example, when viewing a photo, you can print it by accessing the Devices interface (Winkey + K) or, more directly, the Print interface (Ctrl + P). Or you can use the Share interface (Winkey + H) to share the photo with others using a compatible Metro-style app, such as Mail.
Figure 9-12: Multi-selecting photos from different folders.
There’s no way to search all sources simultaneously, though that would be very useful.
Likewise, the excellent Search functionality in Windows 8 can be used in Photos to find particular pictures. If you access the Search charm (Winkey + Q) while viewing a photo or from within a particular folder, the Search pane that appears will search only that folder. Search at the source level and it will search just that source.
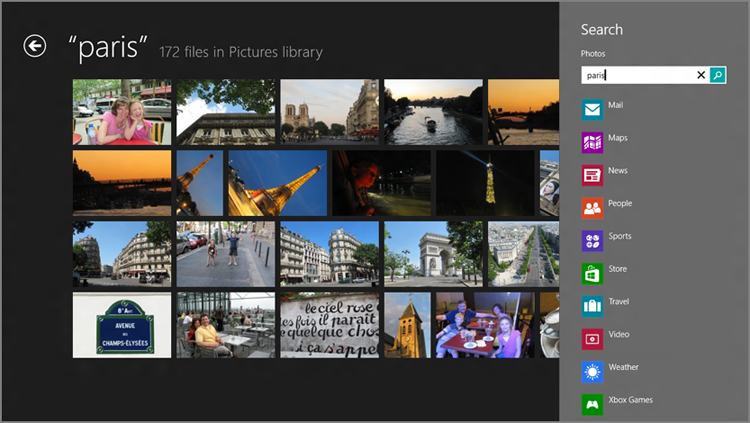
If you open the Search charm from outside the Photos app and then select Photos from the list of apps in the Search pane, you get a grid-based view of your Pictures library, filtered to the search term, as shown in Figure 9-13.
Figure 9-13: A Photos search results list
Acquiring Photos from a Camera, Memory Card, or Other Device
If you’ve ever connected a digital camera, a camera’s memory card, or another device (like a smartphone) that contains pictures to Windows in the past, you know that Microsoft’s desktop OS has long supported basic photo acquisition (or what some people think of “downloading”) capabilities through desktop apps like Photo Gallery. You can still do this, if you’d like. Or, you can use the new Metro-based photo acquisition interface that’s available through the Photos app.
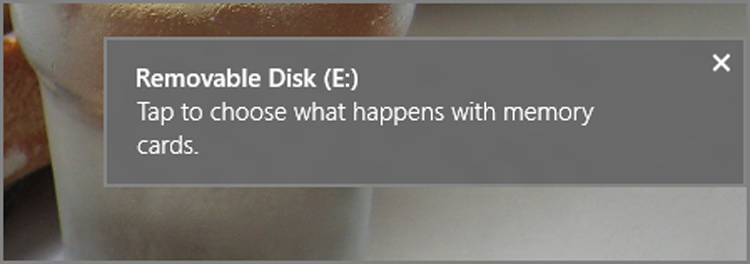
When you plug in a compatible device that contains photos, you’ll see a Metro-style notification flyover, or “toast,” like that shown in Figure 9-14.
Figure 9-14: Windows 8 asks what you’d like to do when you plug in this sort of device.
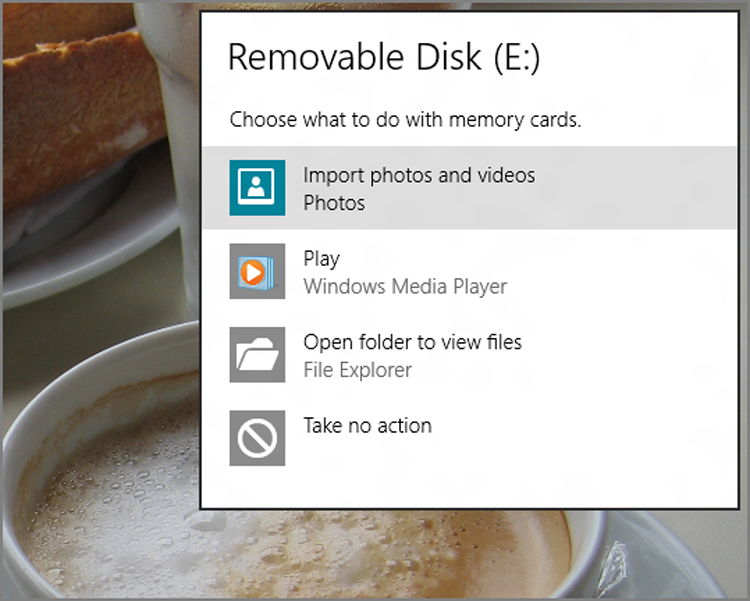
If you select this notification, you’ll see a window similar to that in Figure 9-15; like the notification, this display can appear anywhere in Windows, including Photos or other Metro-style apps, the Start screen, or the Windows desktop.
Figure 9-15: Choose what you’d like to do with devices that contain photos.
The easiest way to find AutoPlay is to use Windows Search: Type autoplay, select Settings, and then choose AutoPlay from the results list.
You may want to use Photos as the default choice when such a device is plugged into the PC, though we feel that you should examine your choices before making such a decision. Remember that you can always change what happens later using the AutoPlay control panel, though. So if you make a mistake, or want to change your selection later, you can do so.
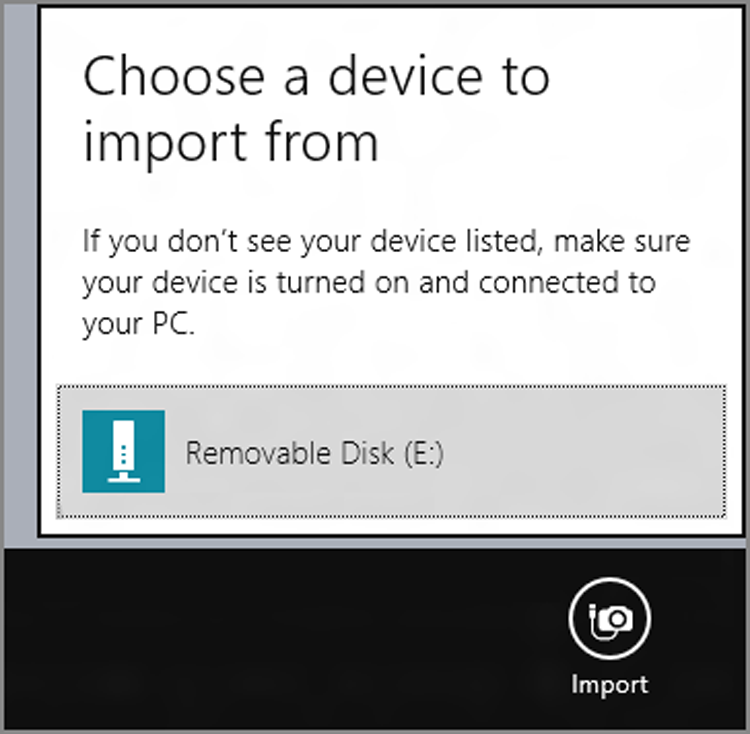
For now, let’s just use Photos to manually acquire photos from an attached camera, memory card, or other device. To do so, launch the Photos app and then display the app bar. On the far right side of this app bar, you’ll see an Import button. Click this, and Photos will prompt you to choose a device, as in Figure 9-16.
Figure 9-16: Choosing a device with photos.
Do so, and you’ll be presented with the full-screen interface shown in Figure 9-17. Here, you can determine which photos to acquire and what the folder name that contains them will be.
What you can’t do, of course, is configure other photo acquisition options, and this is why we noted previously that you may want to review your options first. Photos doesn’t let you name the acquired photos to your liking (unless you happen to like the default, which is to use awful, camera-based names). And it doesn’t let you choose whether to delete the photos from the device once they’re acquired. (They are not deleted.)
Figure 9-17: Choosing which photos to acquire.
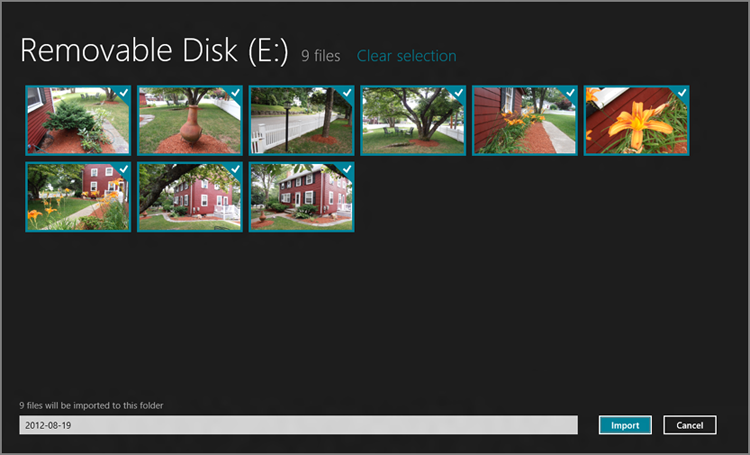
Click Import to acquire the photos.
When you’re done, you’re prompted to open the folder containing the photos you just imported. This will happen in Photos, of course, not in File Explorer on the desktop.
Put simply, the photo acquisition capabilities in Photos are, well, basic. And if you want more control over this process, as we do, you should consider using the free Photo Gallery desktop application instead. We look at this useful tool a bit later in the chapter.
Using the Camera App
As with other mobile, touch-based systems, Windows 8 includes a simple Camera app that works with the camera (or, in the case of some modern devices, the cameras) that is included in (or attached to) your PC or device. This app lets you capture still pictures and short movies. It’s not quite as useful as, say, a camera in a smartphone, but it’s there if you need it.
The first time you run the Camera app, you’ll be prompted to allow the app to use your webcam and microphone. Obviously, you must allow this for the app to function. If you block this access, the app will simply quit.
The Camera app, shown in Figure 9-18, is simplicity itself. There’s an app bar, always visible in this app, with just a handful of buttons.
Figure 9-18: Dashing! The Camera app

Available app bar buttons include:
- Change camera: On PCs or devices with multiple cameras, the Change camera button will let you choose which camera to use. For example, many Windows 8 and RT devices include both front- and rear-facing cameras. This button works like a toggle: Tap it once to change the view to the next camera.
- Camera options: Click this button to see a pop-up display with three options that will be consistent across all Windows 8 PCs: Photo/Video resolution, Audio device, and Video stabilization, though not all options will be configurable on all PCs. You can also click a More link here to view additional camera options. What you see in that interface will vary from PC to PC, but some of the more common options include Brightness, Contrast, Flicker, and Exposure.
- Timer: This button acts as a toggle. When selected, the next photo or video you take will be preceded by a 3-second countdown, giving you time, perhaps, to jump into the frame.
- Video Mode: This button also works as a toggle. By default, Camera is set up to take still photos. But if you enable this button, it is set up to take videos instead. Tap it again to return to camera mode.
Keyboard users can tap Space to take a photo or start/stop video recording.
To take a photo with Camera, simply tap (or click) anywhere on-screen. If you’re in video mode, this will start video recording instead. To stop recording, tap (or click) the screen instead.
Photos and videos taken with Camera can be found in the Camera Roll photo, which is added to the default save location for the Pictures library (My Pictures, by default).
Doing More with Your Pictures
The Photos app is fine for what it is. But it doesn’t have any photo editing features at all. Its photo acquisition features are lackluster at best. And if you want to share photos via an online service that’s not supported by a Metro-style app that’s savvy to the Share contract, you’re out of luck on that count as well.
For these and other slightly more advanced scenarios, you’ll need to turn to the Windows desktop. Here, you’ll find some features that are built into Windows 8 directly, and a few that will require some optional and free Microsoft applications that may or may not be installed on your PC or device.
Since these capabilities haven’t changed since Windows 7, we won’t go into great depth here. But we’ll provide you with a rundown of the applications you can use, and for what activities, and help you find any missing applications that may not be included with your Windows 8 install.
Built Into Windows 8: Photo Viewing on the Desktop
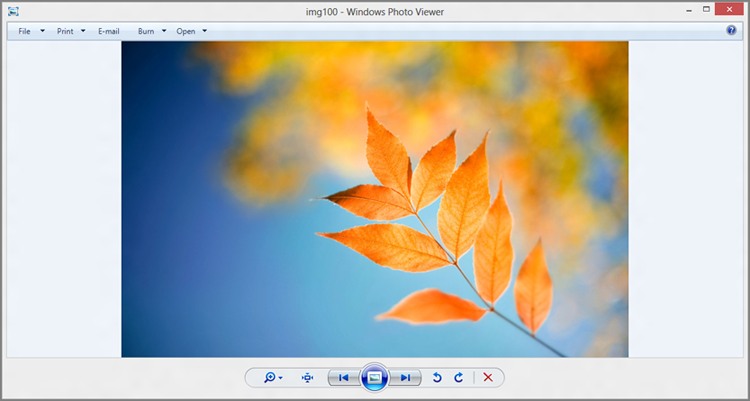
Windows 8 includes an admittedly well hidden desktop application called Windows Photo Viewer that lets you view individual photos and perform other photo-related functions. Windows Photo Viewer is odd in that you can’t actually find the application via normal means—it doesn’t appear in the All Apps view or even via Start Search. But you can access Photo Viewer by right-clicking an image file from the desktop and choosing Open with and then Windows Photo Viewer.
As you can see in Figure 9-19, this application provides print-, e-mail-, and disc burning-based ways to share photos and a handy but simple slideshow feature courtesy of that large button in the lower middle of the window.
Figure 9-19: The Windows Photo Viewer application provides basic features related to viewing and sharing photos from the Windows desktop.
You could also make Windows Photo Viewer the default photo-viewing application if you wanted. To do so, right-click an image file and choose Open with then Choose default program, and then pick Windows Photo Viewer from the list that appears. Or, use the Default programs control panel (via Start Search).
Or don’t. Because there’s a better option for desktop users . . .
Completing the Windows 8 Photo Experience with Photo Gallery
Photo Gallery used to be called Windows Live Gallery, and it was previously available as part of a suite of apps called Windows Live Essentials. The application carriers forward, minus the Live branding.
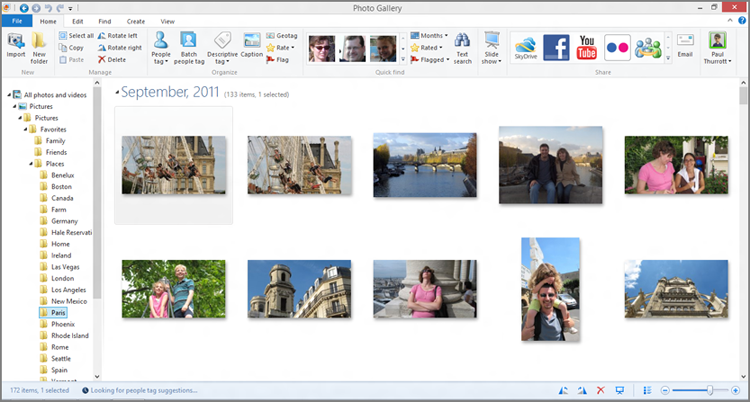
If you’re looking for a more versatile tool that can do it all when it comes to photos— photo acquisition, viewing, editing printing, e-mail sharing, burning to disc, tagging, captioning, geotagging, advanced slideshows, sharing with numerous online services including SkyDrive, Facebook, YouTube, Flickr, panoramas, and more—look no further than Photo Gallery. This amazing application, shown in Figure 9-20, is everything you need, all in one place.
Figure 9-20: Photo Gallery
If you’re in a pinch, Microsoft Paint, included in Windows 8, also provides some basic photo-editing features.
Photo Gallery is the full meal deal, and because it provides a superset of the features available in a basic Windows 8 install, we recommend using it over the built-in tools.
How to Find Photo Gallery
The only problem with Photo Gallery is that you may not find it on your PC or device. If that’s the case, browse to windows.com, where you’ll find this and other useful Windows applications.
Buying, Managing, and Playing Music
Microsoft has supported music lovers with various Windows-based applications and platforms for over a decade, beginning with its first true jukebox, Windows Media Player, which debuted in Windows Millennium Edition (Me), way back in 2000. In Windows 8, well, things get a little Metro-y.
NOTE that Windows Media Player and Media Center are not available in Windows RT at all.
Yes, Windows 8 includes Windows Media Player, which you may remember from Windows 7. And Windows 8 Pro users (only) can optionally buy and install Windows Media Center, which was also available in Windows 7. So the range of functionality provided by these applications is still available in Windows 8, if not improved. (In fact, as far as we can see, they are the versions of Windows Media Player and Media Center from Windows 7, carried across unchanged.)
Over the past several years, Microsoft also cultivated a separate and somewhat incompatible media platform called Zune, which included software, device, and music and video service components. Zune was meant to be a one-stop-shop solution that could compete head-to-head with Apple’s dominant iPod/iTunes, but suffice it to say that never happened despite some interesting advantages on the Microsoft side. So Zune has been discontinued as a brand.
The trouble is, just declaring Zune dead doesn’t magically erase the parts of this tragic platform that are still out in the world. Millions of people still use the Zune PC software, which offers some interesting advantages over both Microsoft’s own Windows Media Player and competing applications such as Apple iTunes. The Zune software and services were integrated into the first two versions of Windows Phone, as well, also in use by several million people around the world. And key parts of the Zune platform, including the music and video marketplaces, are good enough to survive the death of this brand. And, as it turns out, they’re continuing forward, minus the Zune name.
So in addition to carrying forward its legacy music applications for old-timers, Windows 8 also provides a Metro-style music experience, called Xbox Music, which while based on Microsoft’s Zune efforts, now accesses Xbox-branded services on the back end. Not coincidentally, it looks and works much like the Music experience on the Xbox 360, and it accesses the back end Xbox Music Store that used to be part of the Zune platform (as Zune Music Marketplace). Since this is the biggest change, music-wise, in Windows 8, we’ll focus largely on that app and its supporting services here.
Using the Xbox Music App
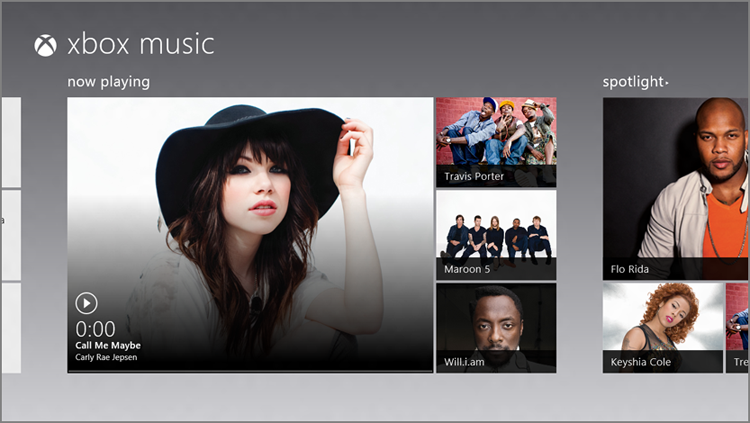
Microsoft’s new Xbox Music app is a front end for your own content—which you store on your own PC or in the cloud-based SkyDrive service—as well as content that’s found in the Xbox Music Store. Shown in Figure 9-21, Xbox Music provides a basic but attractive Metro-style app that uses different functional groups across its horizontally scrolling interface.
Figure 9-21: The Xbox Music app
Oddly, the first group, My Music, is found off to the left of the main view, while the other groups can be found by scrolling more normally to the right. Available groups, from left to right, include:
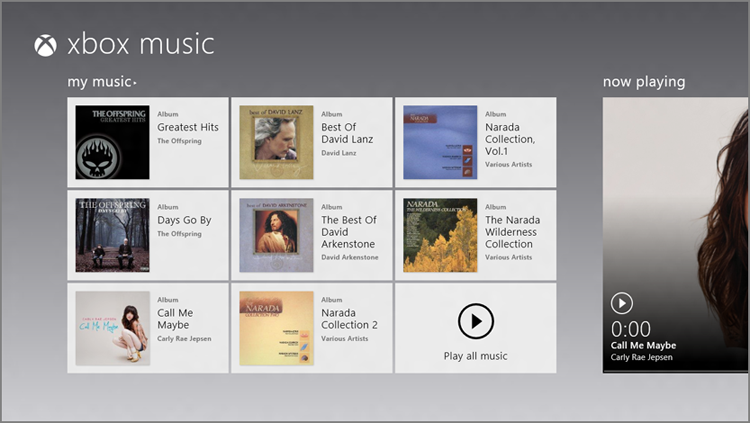
- My Music: Here, you’ll find some of your own music, arranged as a grid of albums, as in Figure 9-22.
Figure 9-22: Your own music collection, or as much of it as will fit in this display
However, if your collection is empty—most likely, since most people don’t have gigabytes of music content sitting on their PCs—this interface will more closely resemble the barren wasteland shown in Figure 9-23.
Figure 9-23: A more typical view of the My Music group
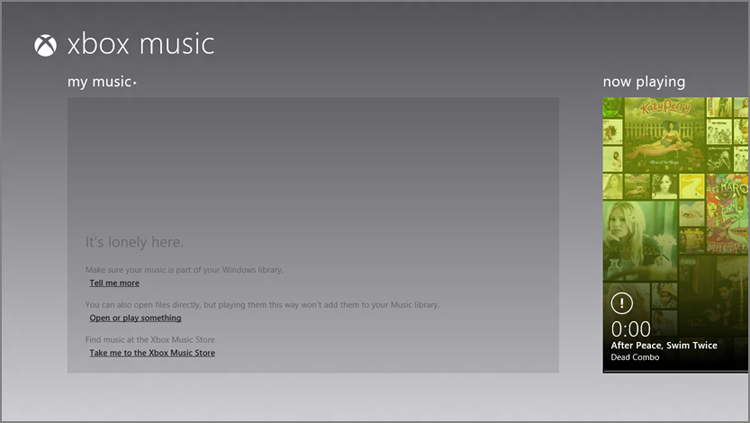
- Now Playing: This group, which is the default view for the app, provides a large Now Playing tile if you’ve been playing music, and a music promotional pane if not, along with a handful of smaller promo panes.
- Spotlight: This group works much like the identically-named group in Windows Store: It’s a place for Microsoft to highlight artists, digital albums, and the like. There’s even an annoying advertisement.
- Most Popular: Here, you’ll find a rundown of the albums and artists that are most popular in the Xbox Music Store right now.
Put simply, there may be multiple groups in the Xbox Music app, but there are really only two basic activities occurring here. You’re going to access your own music collection, or you’re going to browse, potentially buy, and, if you have an Xbox Music Pass, even play music online.
Naturally, we’ll look at both.
Accessing and Playing Your Own Music
To access your music collection, scroll over to the My Music group and tap the My Music heading. You’ll be presented with the full screen My Music view shown in Figure 9-24, which provides a nice if somewhat inefficient album-based view of your music collection by default.
Figure 9-24: My Music
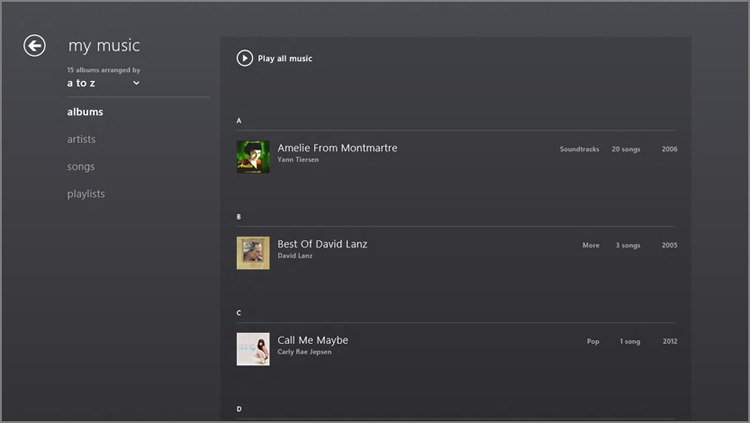
This view is about as simple as it looks, but there are some navigational components worth noting. These include the following:
- Back: As with many multi-screen Metro-style app experiences, the Xbox Music app provides a browser-like Back button for returning to the previous screen.
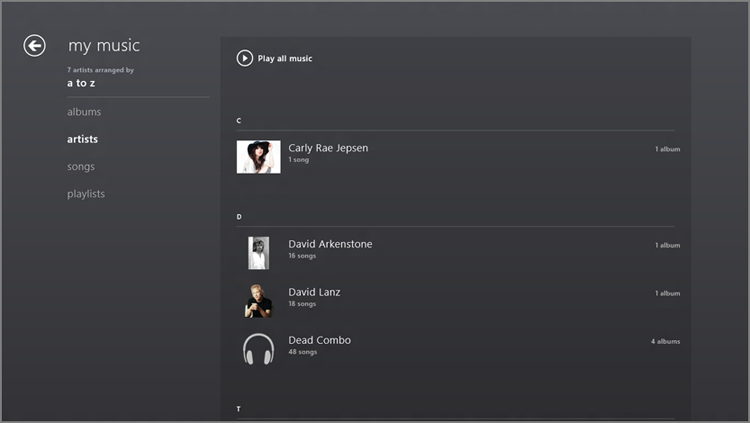
- View menu and Arranged by: You can change the view between Albums, Artists, Songs, and Playlists. Each has a similar presentation, though you can also choose to sort each a bit differently. For example, in Figure 9-25, you can see the Artists view sorted alphabetically.
Figure 9-25: The Artists view, alphabetically
The Music app includes an app bar, but it doesn’t do much beyond allowing you to open an individual music file unless you’re already playing music. We’ll examine that functionality in just a bit.
First, however, let’s dive into the collection a bit deeper. If you’re using the Albums or Artists view and select an item (that is, an album or artist, respectively), it provides a pop-up display providing more information about that item. In Figure 9-26, you can see this effect for a particular artist.
Figure 9-26: Selecting an artist or album provides a pop-up instead of opening a new screen.
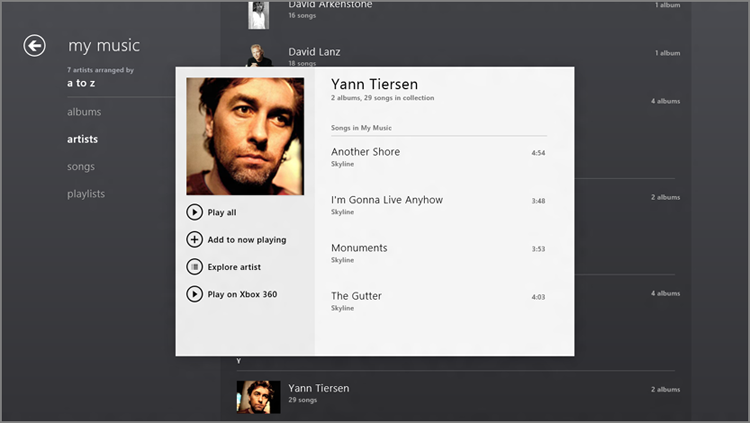
This unique approach displays the information about the artist or album in this new area, but it will typically require more space than the area provides. So this view also enables you to scroll within the area, vertically, to see more information. In either view, for example, you can scroll down (within this pop-up) to see more songs.
This pop-up also provides prominent Play all, Add to now playing, Explore artist, and Play on Xbox 360 buttons. But you may be surprised to discover that tapping an individual song here won’t trigger immediate playback. Instead, this expands the view in-line yet again, providing separate Play and Add to now playing buttons, just for that song, as shown in Figure 9-27.
Here’s a rundown of the actions you can trigger from these pop-ups:
If you click Play, the selected song is added to—and does not replace—any other songs that may already be in the Now Playing playlist.
- Play: This button plays the current selection, which can be a song, an album, or an artist, and triggers the app bar-based Now Playing experience shown in Figure 9-28. Here you’ll find useful on-screen playback controls and other buttons.
Figure 9-27: Selecting a song will expand a new area with unique buttons for just that song.
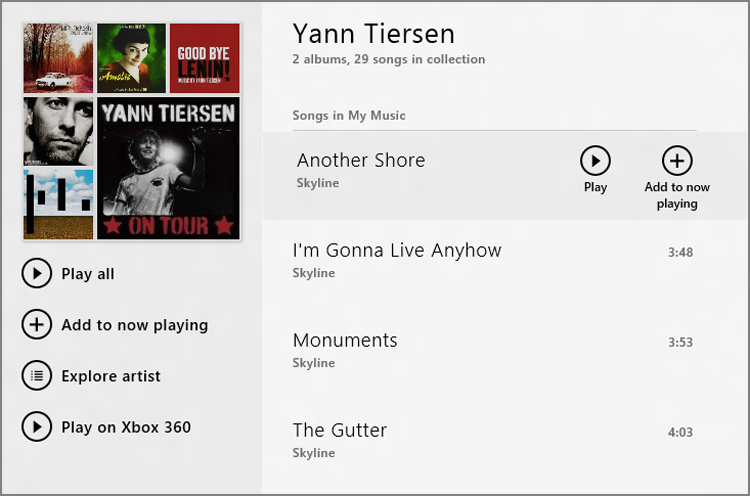
Figure 9-28: The app bar-based Now Playing experience

To see the full-screen Now Playing experience, click or tap the album art view in the app bar. When you do, the screen will change to resemble Figure 9-29. Here, you can see an animated Now Playing area on the left with more information, like artist biography and discography, which can be viewed by scrolling to the right.
Figure 9-29: The full-screen Now Playing experience with additional information showing

Or, you can simply click the little Full Screen widget, in the bottom right of that Now Playing area, to see only the Now Playing view full screen. This can be seen in Figure 9-30. This screen should be familiar to anyone who’s played music via the Zune PC software or Xbox 360.
Figure 9-30: The full-screen Now Playing experience showing only the Now Playing area
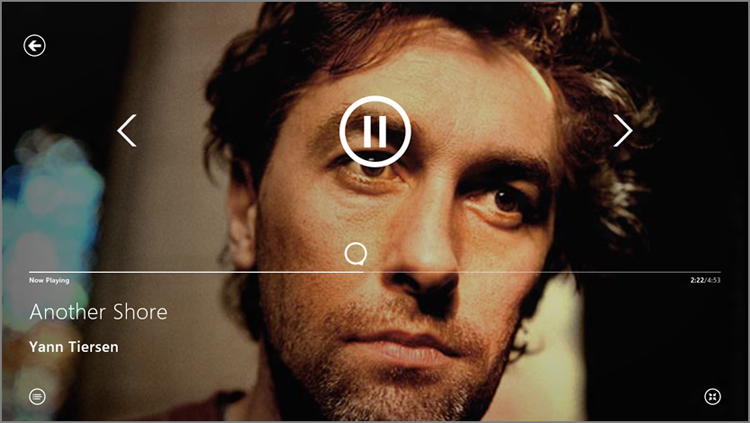
Note that most of the playback controls you see on this screen will disappear if you stop interacting with the PC. Wiggle the mouse, tap the screen or a keyboard key, however, and they’ll return.
Available controls on this screen include:
- Back: Tap here to return to the previous view.
- Rewind: Rewind the currently playing track.
- Play/Pause: Play or pause the currently playing track.
- Forward: Fast forward the currently playing track.
- Now playing: Display the Now Playing list.
- Full-screen toggle: Toggle between the truly full-screen view and the previous full-screen view, which includes additional biographical and discography information about the currently playing artist.
- Add to Now Playing: You can add songs to the Now Playing list at any time by expanding an album, artist, or song, and then clicking the Add to Now Playing button.
- Explore Artist: This button displays the full-screen artist details screen described earlier and provides access to the artist’s biography and discography.
Microsoft will be replacing the Xbox Companion app with a similar but more powerful app called Xbox SmartGlass, which should be available by the end of 2012. You may want to look for this app, too.
If you don’t already have the Xbox Companion (or SmartGlass) app installed, you’ll be prompted to get it from Windows Store.
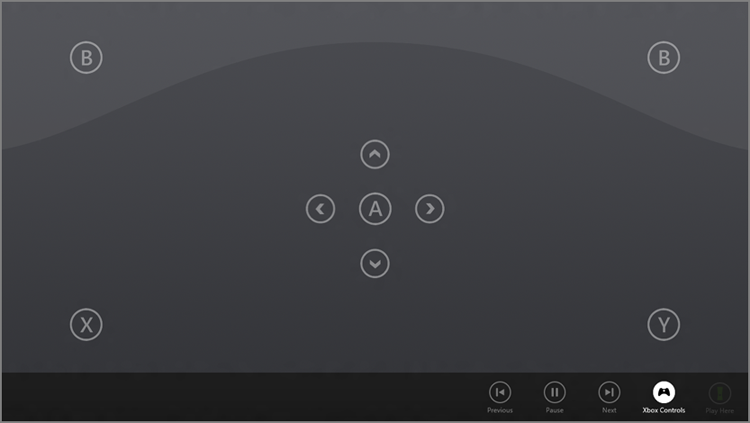
- Play on Xbox 360: This button launches the Xbox Companion app, which will connect you to an Xbox 360 console in your home (it needs to be powered on first) and play the selection there, instead of on the PC or device. Two things happen when this connection is made. On the Xbox 360, a familiar (and Music app-like) Now Playing screen appears for playback and, in fact, gives you additional playlist editing features you don’t even get in the Music app, such as the ability to clear the queue and add and remove songs. And on your PC or device, the Xbox Companion app provides a remote-like experience called Xbox Controls that provides playback buttons, as shown in Figure 9-31.
There’s one more aspect of music playback that needs to be addressed. While Play to Xbox 360 is useful and interesting, it’s not the only solution that Windows 8 provides for playing music from your PC (or device) to another device in your home. That is, in addition to supporting Play to Xbox 360, Windows 8 (and thus the Metro-style Xbox Music app) also supports the Digital Living Network Alliance (DLNA) “Play To” technology, which works with a wide range of devices, including, go figure, the Xbox 360.
NOTE This Play on Xbox 360 functionality is a bit more sophisticated than the Play To feature that’s been in Windows for years. To work, however, Play on Xbox 360 requires that the content you’re playing be found in the Xbox Music (or Video) Store, whereas Play To simply streams music from the PC or device to the console.
The playback controls persist as you navigate through the Music Marketplace, unlike with some online stores.
Figure 9-31: The Xbox Companion app lets you push music playback to your Xbox 360 and use your Windows device like a giant remote.
So why support both Play on Xbox 360 and Play To? Play on Xbox 360 is, of course, Xbox-specific, and it requires that the content you’re playing is found in Microsoft’s Xbox-based online stores. That’s because while using Play on Xbox 360, Xbox Music isn’t streaming the content, it’s handing it off and letting the console play it instead. Play To, meanwhile, is more basic in that you’re just streaming content from the PC (or device) to a compatible set-top box. So if you were to shut down the PC, the music playback would stop. On other hand, Play To lets you play music through the console that isn’t found in the Xbox Music Store.
To utilize Play To, start music playback and then bring up Xbox Music’s app bar. Click the Play To button on the right of the app bar, and then choose the appropriate device from the Play To pane that appears, as in Figure 9-32.
Figure 9-32: Using Play To

From here, playback control works as it does when you play music locally on the PC: You simply use the Xbox Music’s playback controls (in the app bar) to control playback.
Using the Xbox Music Store
Microsoft isn’t shy about its attempts to sell you music via its Xbox Music Store (formerly Zune Music Marketplace), which can be accessed from the Spotlight and Most Popular groups on the Xbox Music home screen as well as through various links like the Artist information interface in your own collection.
Clicking the title of the Spotlight or Most Popular group will provide a view similar to that of My Music. This is a rather paltry front end to what Microsoft claims is an online storefront of approximately 30 million tracks either way, but as you can see in Figure 9-33 it is, at least, simple.
Figure 9-33: Most Popular view of the Xbox Music Store
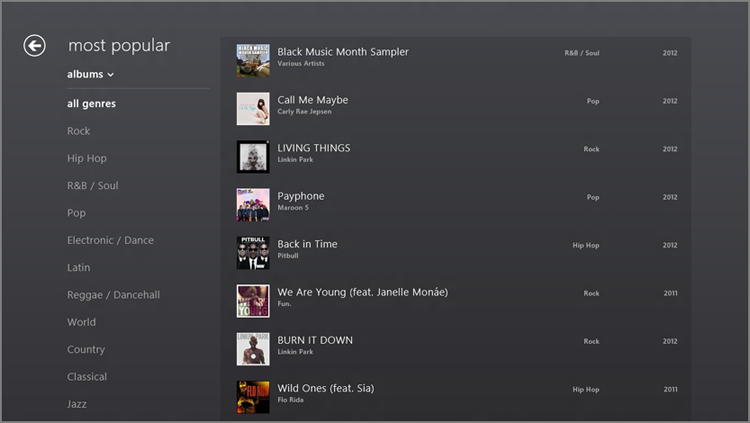
Since this interface is so similar to that of My Music and provides the same ways to filter and view information, drill down into various artists, albums, and genres, there’s no need to cover basic navigational information here. Instead, let’s look at some of the unique things you can do in the Xbox Music Store.
Buying Songs from Xbox Music
To purchase an album or song, click the Buy Album (or Buy Song) button you’ll find in the pop-up for that item. Xbox Music will display a full-screen notification interface like that in Figure 9-34, and step you through the process of purchasing the music.
Figure 9-34: Buying a song from the Xbox Music Store
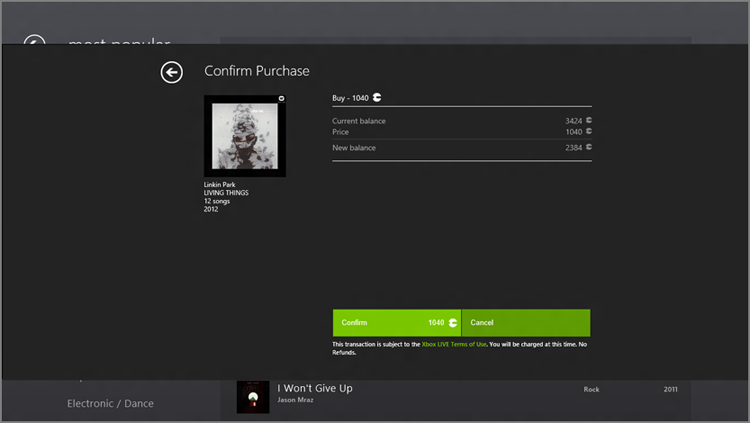
One important note about the music purchasing experience: You must use Microsoft Points. Microsoft doesn’t use your local currency for purchases as do other online music stores like Amazon MP3 and Apple iTunes. Instead, Microsoft uses a system called Microsoft Points, which works across its other online stores, including the Xbox Video Store and Xbox Game Store.
The Microsoft Points system exists for one reason and one reason only: to save Microsoft money—since you must buy points in batches, sparing the company per-transaction credit card fees—but its biggest effect is to make online purchases needlessly confusing for consumers.
For your edification, 80 Microsoft Points is worth $1.00 US, so you can see how the math gets fairly convoluted. But Microsoft sells points, online and via gift card-like cards in retail stores, in bundles of 400 ($5), 800 ($10), 1600 ($20), 4000 ($50), and 6000 ($75) points. So if you’re interested in giving Microsoft an interest-free loan, you can stock up.
Playing Music with Xbox Music Pass
Microsoft has an interesting music subscription service called Xbox Music Pass—formerly Zune Music Pass—which provides you with almost unlimited access to its online music collection for a monthly fee. (In the United States, this fee is $10 per month, but if you sign up for a year upfront, you will receive 12 months for the price of 10, or about $8.33 a month.) Depending on how you feel about owning music and the quality of Microsoft’s Xbox Music Store, this is either a tremendous bargain or something to avoid all together.
Maybe we’re just getting old, or perhaps we’re simply tired of micromanaging a locally saved music collection, but we’ve come to really appreciate and enjoy Xbox Music Pass. But instead of trying to sell you on this service, we’ll simply explain what you can do with (almost) unfettered access to the Xbox Music Store music collection.
First, you can use the Play album, Play song, Play top songs, and other similar buttons you’ll see as you navigate around the Xbox Music Store to stream virtually any music in its entirety. If you were not an Xbox Music Pass subscriber, you’d only get a 30-second preview. (This streaming functionality is also available on Windows Phone handsets, Xbox 360 consoles, and via the web.)
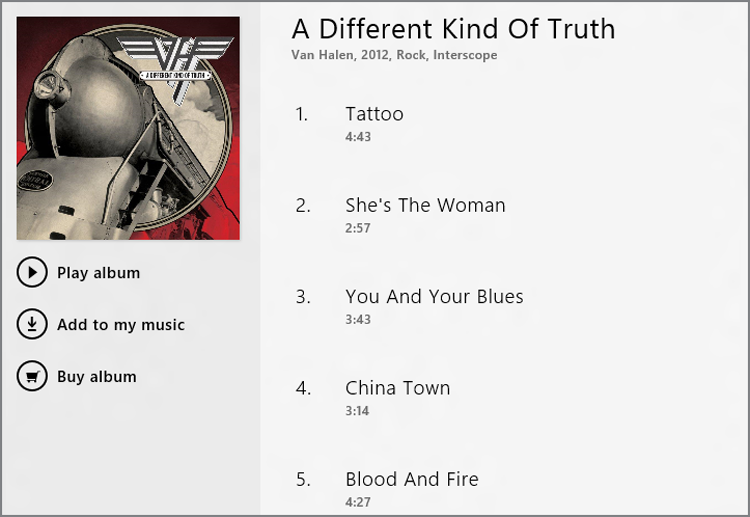
Second, you can arbitrarily download any of this music to your PC and, while your subscription is in place, play it (online or off) on your Windows-based PCs and devices (and Windows Phone handsets). It’s like having 30 million songs in your own music collection—you know, as long as you’re a paying customer. You’ll see a handy Add to my music link, like that in Figure 9-35, letting you copy Store music to your own PC.
Figure 9-35: Using Add to my music to copy music from the Store to your PC
Xbox Music Pass has other advantages, but the point here is that with this service, the Xbox Music Store is suddenly open to you in ways that it isn’t otherwise. You can find out more about the service at www.xbox.com/music.
Searching the Store for Music
Of course, even finding music to buy can be difficult. And while the navigational facilities in the Xbox Music Store are, at best, basic, your best bet is to search for the music you want. And in this one case, Xbox Music Store actually works really well (assuming you know what you want, of course), thanks to its integration with the system-wide Windows 8 search functionality.
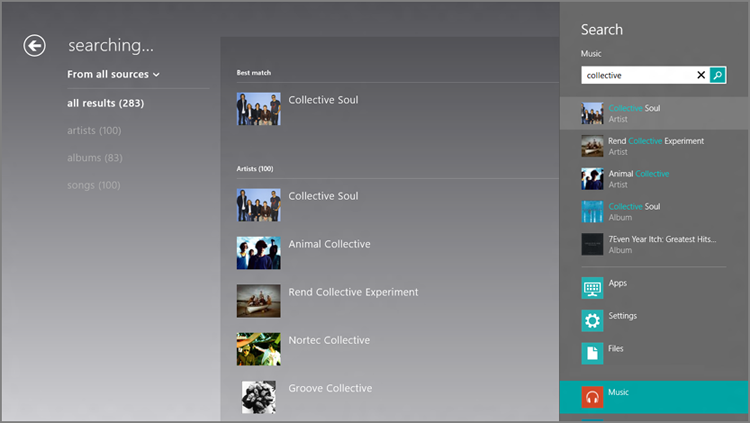
Search works as it does throughout Windows 8, and you can trigger a search of the store from within Xbox Music or at any time from elsewhere in the OS. To do so, display the Search charm (Winkey + Q) and, if you’re not already using Xbox Music, be sure to select Music from the apps list in the search pane.
Then start typing in a search term, perhaps an artist, album, or song name, and the Search experience will often supply suggestions as you type. You can see an example of this in Figure 9-36, and search results appear right in the Xbox Music app, giving you a way to dig deeper into your favorite music.
Figure 9-36: Searching in Xbox Music
What About Podcasts?
While the Music + Videos app on Windows Phone fully supports podcasts, the Xbox Music app in Windows 8/RT doesn’t, so there’s no way to find, subscribe to, or listen to/view podcasts. Instead, you’ll need to try a third-party app. One that’s emerged as an early favorite is SlapDash Podcasts, which you can find in Windows Store.
Doing More with Music
While the Music app provides a handy, consumption-only interface for music, those who have more advanced needs will need to turn to some classic Windows applications that have been kicking around for several years.
Note, however, that neither of these options are available to Windows RT users: Only Windows 8 provides any support for these legacy desktop-based music applications.
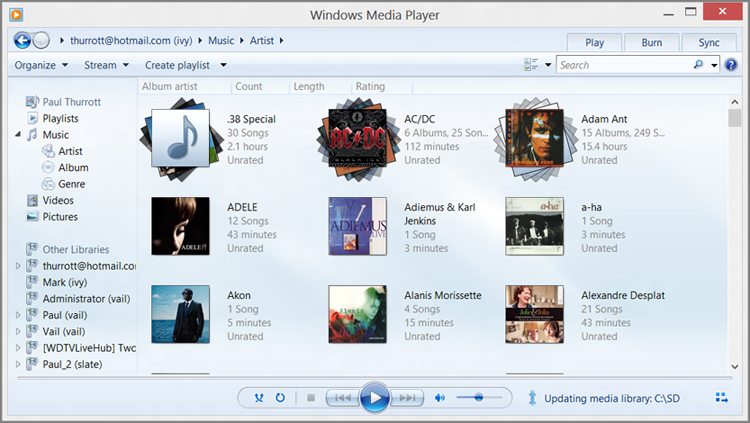
All versions of Windows 8 include Windows Media Player, which is shown in Figure 9-37. This application has historically been used as a media management system, but it hasn’t really changed since Windows 7, for better or worse.
Figure 9-37: Windows Media Player
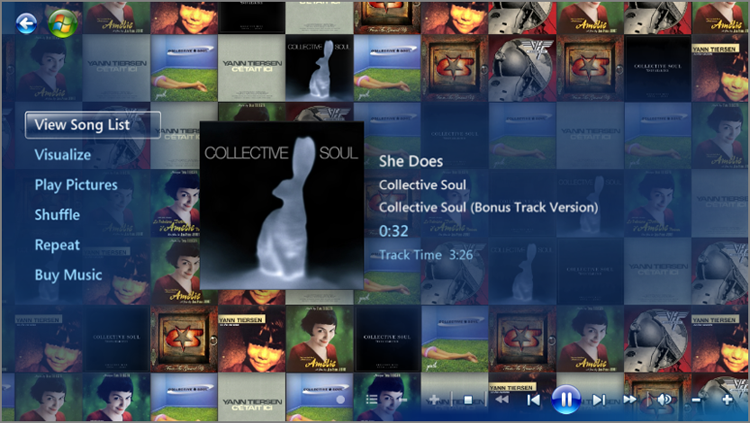
Windows Media Center, meanwhile, started life as a consumption-only application, like today’s Metro-style apps, though it picked up more sophisticated capabilities over time. It features large, touch-friendly controls, works well in full-screen mode, and has a particularly nice Now Playing interface, which is shown in Figure 9-38.
Unfortunately, finding Media Center is a bit problematic.
First, Media Center is not available on Windows RT or the base version of Windows 8, which is called Windows 8 Core. Instead, you must have Windows 8 Pro before you can get Media Center.
Second, even if you have Windows 8 Pro, Media Center isn’t free: You can buy it for a small fee from Microsoft using the new Add Features to Windows interface. (You can easily find this through Start Search.) Why bother? If you have to ask, you don’t want Media Center. And frankly, the world has moved on anyway.
Figure 9-38: The full-screen Media Center music playback experience
Buying, Managing, and Playing Movies and TV Shows
The Windows 8 video experience revolves around a new Metro-style app, called Xbox Video, and some traditional Windows applications—Windows Media Player and Windows Media Center for playback and Movie Maker for video editing and sharing—which carry over from Windows 7.
The Xbox Video app is a bit more limited than that, actually. It can’t play DVD- or Blu-ray-based movies either.
So it shouldn’t be surprising that the video experience is similar to that of music: The Metro-style Xbox Video app works well enough for video playback on tablets, other portable devices, and PCs, and for browsing Microsoft’s new Xbox Video Store online, but doesn’t offer any advanced features. If you want to do more with videos, like edit your own home movies and share them via online services like Facebook or YouTube, you’ll need to stick with the more productive desktop environment and those more mature Windows applications.
NOTE You’ll also need to stick with Windows 8, and not Windows RT. Note that Windows RT does not include or support Windows Media Player, Media Center, or Movie Maker.
Of course, what we’re most concerned with here is the new stuff. And that means the Xbox Video app.
Using the Xbox Video App
If you’ve used the Xbox Music app described earlier in this chapter or are familiar with the video playback capabilities of the Xbox 360 video game console, the Xbox Video app will be immediately familiar. As you can see in Figure 9-39, this app is a typical, Metro-style full-screen experience that extends horizontally and looks and works much like the Xbox Music app.
Figure 9-39: The new Xbox Video app
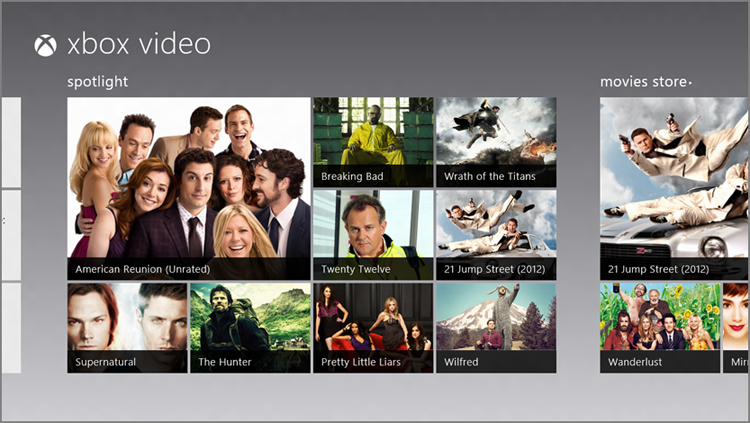
And like the Xbox Music app, the Xbox Video app pushes Microsoft’s online store experiences over your own local video collection, offering Spotlight, Movies Store, and Television Store groups up front, somewhat obscuring your own media.
Frankly, with the prevalence and usefulness of online video stores like Microsoft’s, and the fact that most people simply don’t have massive collections of TV shows and movies as they do music, this isn’t as bothersome as it may be with the Xbox Music app.
Navigating Your Own Videos
You can find Handbrake at handbrake.fr.
If you do have a PC-based video collection for some reason—perhaps you’ve ripped DVDs to the PC’s hard drive using Handbrake or similar tools—or you’ve rented or purchased TV shows or movies from Microsoft—which we describe a bit later—this content will be found by navigating left to the My Videos group on the Xbox Video home screen. This group, shown in Figure 9-40, will show a selection of videos found in your Videos library.
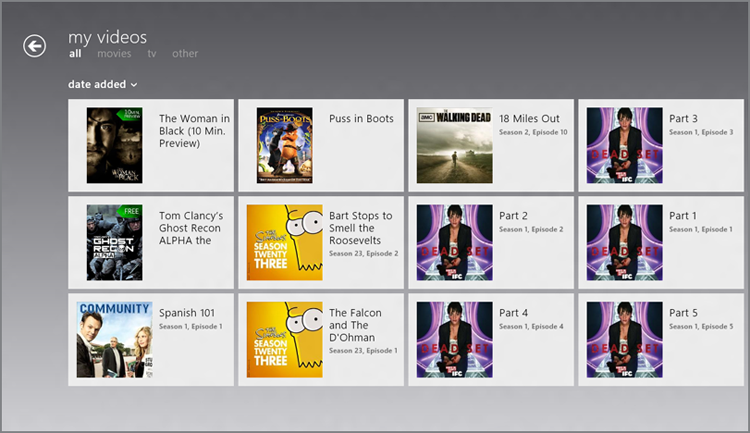
You can click the My Videos title to view your own video collection in a full-screen view like that in Figure 9-41. Here, your collection is divided into All, Movies, TV, and Other categories, and you can sort the view in various ways.
Figure 9-40: The My Videos group is a front end to your own collection.
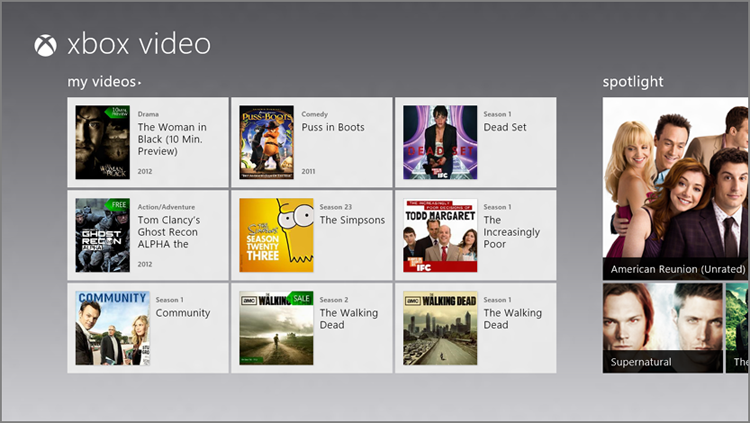
Figure 9-41: My Videos displays all of the videos found in your Videos library.
As you dive into your collection, by selecting a category and then an actual video, the Xbox Video app will display a pop-up for selected video, as shown in Figure 9-42, that offers a variety of options which includes some combination of the choices Play, Play on Xbox 360, Explore movie/series, Play trailer, and more.
Fixing the Video Categories
The Xbox Video app, like the Zune PC software on which it is based, often misfiles videos, assigning many of them to the nebulous Other category. The only way to fix this that we’ve found is to install the legacy Zune PC software (www.zune.net) and use that application’s Edit capability to change the video type of each file to the appropriate value (usually TV Series or Movies). Unfortunately, the Xbox Video app doesn’t provide any editing capabilities of its own.
Figure 9-42: Options for an individual video
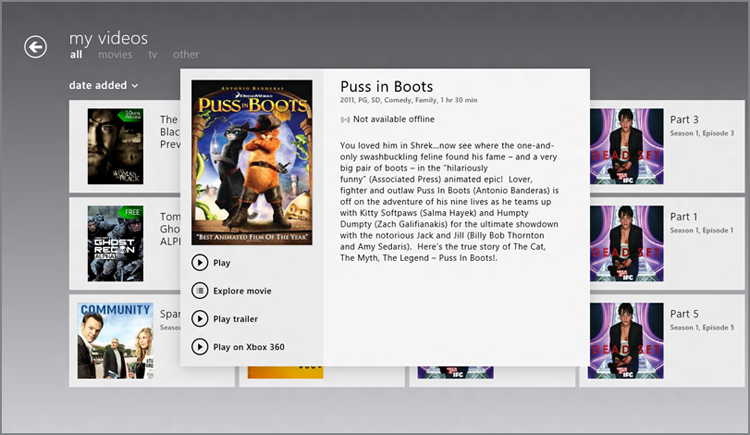
These options work as they do in the Music app, of course, and will vary from video to video. For example, some videos will not have the Play on Xbox 360 button available because of compatibility issues.
Playing a Video
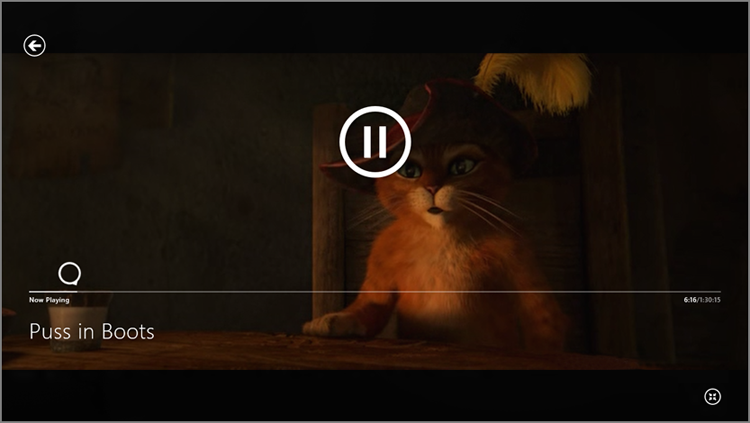
Playing a video works as expected. When you click or tap the Play button, the full-screen playback experience appears, and will look something like Figure 9-43.
Anyone who’s fiddled with the iPad video playback controls will appreciate this.
These simple controls should all be pretty familiar. The timeline scrubber is a big, touch-friendly control that takes the guesswork out of finding the right place in a video, even on a tablet. And Play/Pause works exactly as expected.
Figure 9-43: The Xbox Video playback experience
In addition to the onscreen controls, you can display the app bar during playback to access more playback controls and other options. This app bar is shown in Figure 9-44.
Figure 9-44: The Xbox Video app bar-based controls

Available buttons can include:
- Download: This button will appear only on content you’ve purchased from Xbox Video Store. You’re free to stream this content at any time for the most part (there are exceptions related to “video window” issues, in some cases) and if you’d like to play this content offline, this button will make that option available.
- Delete: This will delete the currently selected video (if in your collection).
- Repeat: When toggled, the current video will play on an endless loop.
- Previous: This button rewinds the current video by 15 seconds.
- Play/Pause: Toggles video playback.
- Next: This button fast forwards the current video by 15 seconds.
We describe Play on Xbox 360 and the related Play To experience back in the Music section.
- Play on Xbox 360: In this scenario, you can hand off the playback of Store-based content from your PC to your Xbox 360, over the same home network only. That is, the content you play to the Xbox doesn’t have to come from Windows 8. Instead, it can be located online, in the Xbox Video Store.
Accessing Store Content
Most people who use the Xbox Video app aren’t going to have large video collections they’ve ripped from optical media. Instead, and in keeping with the modern design of the Metro environment in which it runs, Xbox Video operates as a front end for Microsoft’s Store back end, in this case with the TV and Movie Stores in particular.
You’re probably familiar with how such stores work thanks to previous experience with Apple iTunes and other e-commerce destinations. But Microsoft’s online efforts, perhaps not surprisingly, offer some advantages.
First, the basics. Microsoft offers both TV shows and movies for purchase, and movies for rent. Some of this content is available in a choice of standard definition (SD) or high-definition (HD) formats, where the latter is more expensive but looks better on higher resolution screens. Videos rented or purchased from Microsoft work with the Xbox Video app, Windows Media Player, and Media Center in Windows 8/RT, with the Xbox 360, and on Windows Phone, too. And, as with music, Microsoft unfortunately uses Microsoft Points for its video sales, so you’ll be doing some math.
Intriguingly, you’re given some choices when you buy or rent videos. That is, you can stream the video directly to the current PC or device, bypassing the need to download it before watching it. But if you do want to watch the video later offline (say, on a plane), you can choose to download if you prefer. But you can also simply just make the purchase and then not watch the rented or purchased video at that time. Later, you can access the video content from a Windows 8/RT PC or device, or the Xbox 360, or Windows Phone, and begin watching as you please.
This choice is pretty liberating, and you may find yourself queuing up a few movie rentals for the weekend on your Windows 8 tablet but then watch them at home via your Xbox 360 and HDTV. Or you could stream part of a purchased movie on the 360 and then finish watching it in downloaded form on your Windows 8 tablet on the way to work the next morning (assuming you commute by bus or train, of course).
This content is also compatible with Windows Phone.
And in case it’s not obvious, content you purchase is yours forever, for the most part. This content is associated with your Microsoft account, and anytime you access the Store—from Windows 8 or the Xbox 360—you can browse through your previous purchases, or simply go to an item directly in the marketplace and start streaming it immediately: Instead of a Play/Rent button, you’ll just see a Play button.
The Movies and Television Stores work as expected, offering different navigational schemes—Featured, New releases, Top selling, Genres, and Studios for movies and Featured, Last night’s shows, Free TV, Top selling, Genres, and Networks for television—and, in some views, different filtering and sorting capabilities.
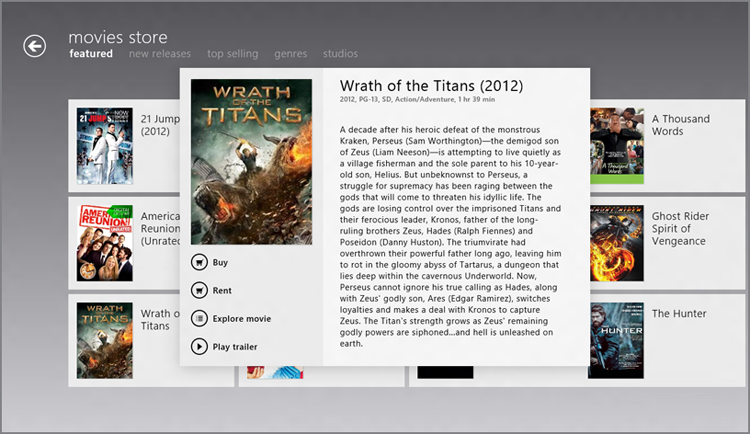
The Movies and Television Stores work a bit differently than does the Music Store in Xbox Music, providing you with a true front end to the whole store experience. But content selection works as it does in Xbox Music: When you select a movie, for example and as shown in Figure 9-45, you’ll see buttons related to buying and renting the film, movie information, Play on Xbox 360 (when available), and to playing the trailer.
Figure 9-45: Options associated with movies in the marketplace
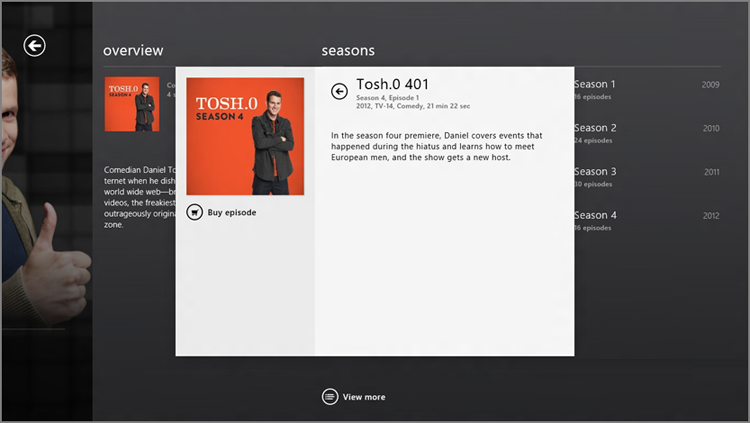
Because TV shows feature multiple episodes across multiple seasons, the Store provides a slightly different layout. When you select a TV show in the Television Store, you’ll only see a few choices, including View seasons and Explore series. When you select the former, a new full-screen view appears, offering information about the show plus links to each of its seasons, as shown in Figure 9-46.
When you select a season, a pop-up appears, as is common in the Xbox Music and Video apps, providing links for each episode in the season. Select an episode and you’ll see buttons related to buying the episode and, depending on the content, playing it on the Xbox 360. This can be seen in Figure 9-47.
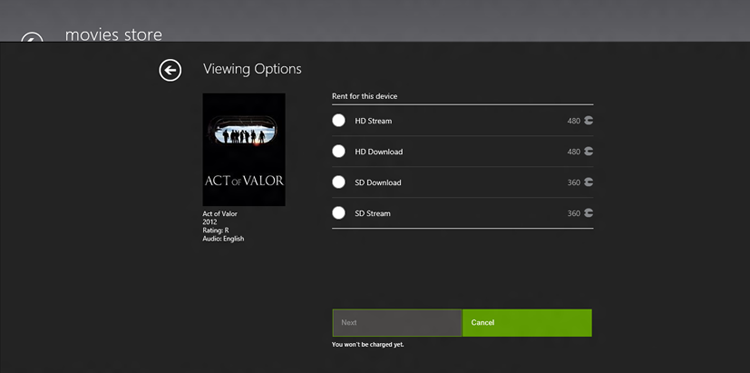
The renting and purchasing experiences differ a bit, and for reasons that are best left to the imagination, not all video content is available in both HD and SD formats, so you may not have that choice. When you do, you’ll see a screen like that in Figure 9-48, letting you choose between both quality sizes and either streaming or download.
Figure 9-46: A set of tiles related to a TV show’s different seasons
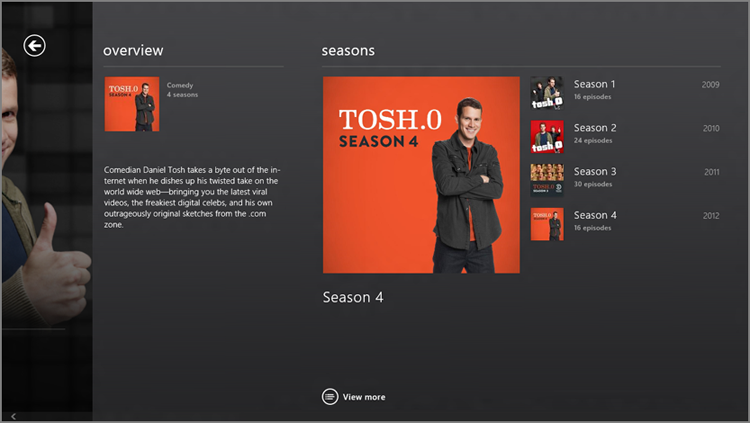
Figure 9-47: TV show episode options
When buying such a movie, your choices are between HD download and stream, and SD download and stream.
When you purchase a TV show, you will also see different choices. There are no TV show rentals, but you can choose to purchase shows in SD or HD (when available), and you always get both download and stream availability. You can also choose to buy a Season Pass, which provides all of the episodes in the given season in a batch, including those seasons that are still in progress. You will see the same HD and SD choices as you do with movies, assuming those options are available for the title you selected.
Figure 9-48: You will often see choices between HD and SD, and between downloading and streaming.
Doing More with Videos
As we discussed in the Music section, the old-school Windows Media Player application is available to all users of Windows 8, and this solution provides decent, desktop-based video playback. You can also purchase and download the Windows Media Center solution if you’re running Windows 8 Pro only. Again, neither application is available to users of Windows RT.
Frankly, we think you can do better. If you want to play videos on the Windows desktop, check out VLC Media Player from videolan.org. It provides all of the video playback features from both Windows Media Player and Media Center but offers some significant advantages over either. First, unlike Media Center, VLC is free. And it also supports all kinds of subtitles and captioning, something that’s decidedly lacking in Microsoft’s video playback applications.
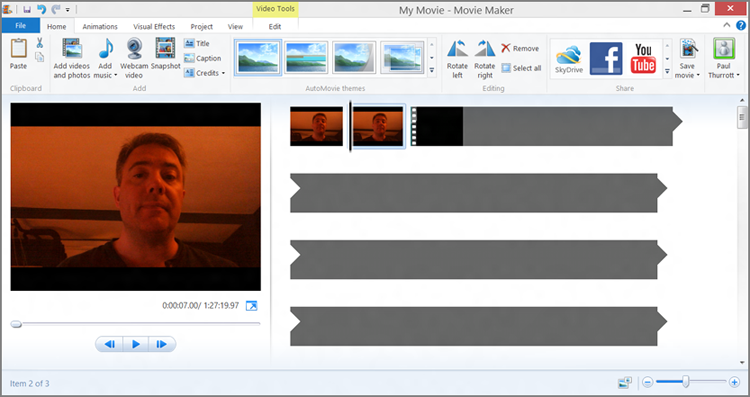
Movie Maker is another useful video tool that’s been kicking around for over a decade in one form or another. The current version is tuned, somewhat, to editing home videos and then sharing them online via YouTube, Facebook, and other services. Movie Maker is shown in Figure 9-49.
How to Find Windows Movie Maker
As with Photo Gallery, Movie Maker may not be preinstalled on your Windows 8-based PC or device. And the solution is the same: Browse to windows.com and download it.
Figure 9-49: Movie Maker helps you edit home videos and post them online.
While the new Metro-style digital media experiences in Windows 8 are almost purely consumption-based, they nicely complement the already rich and mature digital media applications that Microsoft has included in Windows for years. Photos is a simple and attractive, and touch friendly, way to enjoy your photos, no matter where they’re stored. Xbox Music provides a device-like interface for playing music online or off. And Xbox Video integrates nicely with Microsoft’s online marketplace, providing a handy way to access TV shows and movies, at home or on the go. It even lets you play videos through your Xbox 360, using the handy Xbox Companion app.
Together, these apps provide a decent set of basic consumption capabilities. But over time, Windows 8 will be improved both with updates to these apps and by new Metro-style apps that provide additional digital media functionality. As with everything else in this pioneering new OS, what you get in the box, so to speak, is just the beginning.