
Chapter 4
(Still) Alive and Kicking: The Windows Desktop
In This Chapter
- Understanding what’s changed with the Windows desktop
- How Metro experiences are exposed on the desktop
- Using the new File Explorer
- Managing files and folders
- Managing classic desktop applications
- Managing running tasks
- Using SkyDrive with the Windows desktop
While the touch-friendly Metro-style user experience is clearly the big story in Windows 8, most Windows users have a rich history with the Windows desktop and the many, many applications and utilities that have run in this environment for years. Fortunately, all of these things are still available in Windows 8, since this OS includes an updated and enhanced version of the traditional Windows desktop environment, its File Explorer file manager, and the other related capabilities Windows users know and love. And this is true whether you’re using a traditional desktop PC or laptop, or a newfangled tablet computer or hybrid PC, and whether you’re using Windows 8 or Windows RT.
NOTE There is one major exception to this rule. While Windows 8-based PCs and devices of course provide all of the desktop features you’ve come to know and love, those based on Windows RT—the ARM-based variant of Windows 8—are somewhat limited in that they cannot run any third-party Windows desktop software. That said, all of the features described in this chapter work equally well and identically in Windows RT as they do with their Intel-type Windows 8 brethren.
How the Metro-style environment and Windows desktop interact with each other is an important consideration for anyone moving to this new operating system. After all, in previous Windows versions, the Windows desktop was the entire user interface, the face that Windows presented to the world. But in Windows 8, the desktop behaves, conceptually at least, as an app that works within the new Windows Runtime (WinRT) and the Metro-style user experience. As such, even users who stick strictly to the desktop environment will still need to deal with, and understand, various Metro-style user interfaces, including the new Back and Start experiences, Switcher, and the Charms bar. And indignities of indignities, you’ll even need to use Metro to shut down your PC!
This chapter examines each of these issues as well as all of the new Windows desktop features that Microsoft added to this version of the OS. If you were expecting very little in the way of desktop enhancements thanks to a focus on the Metro environment, prepare to be surprised. There are some very nice updates to the desktop in Windows 8.
What’s New on the Windows Desktop?
To best understand what’s new with the Windows 8 desktop, let’s take a quick look back at the Windows 7 desktop, shown in Figure 4-1. This was the default (and only) user experience in the previous version of Windows, and aside from a few minor bits that differed between various product versions, this was essentially what all Windows 7 users saw when they booted into the operating system.
The Windows 7 desktop comprises a few key items, most of which hadn’t changed at all since Windows 95. These include one or more desktop icons (with Recycle Bin being the only icon pretty much guaranteed to appear every time), an optional selection of desktop gadgets (graphical utilities that would “float” over the desktop but under any open windows; these first appeared in Windows Vista), a Start button (or Start orb, as it was officially called), a taskbar, a system tray (with white notification icons and a clock), and the Aero Peek button, which temporarily hid the on-screen windows so you could peek at the underlying desktop.
Figure 4-1: The Windows 7 desktop

The Windows 8 desktop, perhaps not surprisingly, doesn’t look all that different. As you can see in Figure 4-2, it looks almost identical to the Windows 7 desktop, though the Aero “glass” look and feel has been replaced with a flatter, more opaque, and somewhat Metro-like user experience that is battery-life friendly and a bit more consistent with the new Metro user experiences in Windows 8.
Figure 4-2: The Windows 8 desktop looks and works like its predecessor, but with some minor differences.

Look a bit closer, however, and you will notice some other differences. For the most part, these differences involve user interface elements that were present in Windows 7 but are now missing in Windows 8. What’s interesting is that the two biggest—the Start and Aero Peek—are in fact still functionally available in Windows 8, even though they’re no longer visually there.
The Start Button Is Dead. . .Long Live the Start Button
Microsoft’s decision to remove the Start button is, perhaps, one of the more controversial decisions in Windows 8, because this on-screen button has been a ubiquitous mainstay of the Windows user interface since 1995. But before you get too upset over the change, it’s helpful to understand why it happened and how Windows 8 makes an onscreen button on the desktop superfluous anyway.
As discussed in Chapter 3, many capabilities of the old Start menu can now be found in other Metro interfaces, such as the Charms bar.
The why part is straightforward. With the addition of the Metro environment as the default user interface in Windows 8, Microsoft has replaced the application launching capabilities of the desktop-based Start menu (and, in Windows 7, the taskbar) with a new Metro-style interface called the Start screen. Microsoft calls this the new Start experience. (They do love the word experience.) And they wanted it to work equally well—and consistently—from both of Windows 8’s user interfaces, Metro and the desktop.
If you’re using an older or nonstandard keyboard that doesn’t have a Windows key, try Ctrl + Esc instead.
What this means is that every time you tap the Windows key button on your Windows device, or press the Windows key on your keyboard—while the desktop is displayed, that is—the desktop will disappear and be replaced by the new Start screen. This happens instead of the old behavior where the Start menu would display.
But what about mouse or touch users? Your muscle memory is telling you to tap the Start button. But the Start button is gone.
Or is it?
As it turns out, Windows 8 includes methods for triggering this new Start experience for both the mouse and touch. As with other system-wide actions, these new triggers are part of a collective series of edge UIs, and while we cover this topic pretty heavily in Chapter 3, this one is worth discussing here as well since they work with the desktop, too, and many users coming to Windows 8 on a traditional PC will interact with it mostly from the desktop.
To trigger the Start experience with the mouse, move the mouse cursor down into the lower-left corner of the screen, into the area where the Start button used to be.
NOTE You can simply push that cursor right into the corner, since Windows will stop it from moving beyond the edges of the physical display, even on multi-monitor setups.
As you hit the lower-left corner of the screen with the mouse cursor, something new happens: A Start tip appears, providing a visual thumbnail of the Start screen as an indication of what will happen if you click it. This can be seen in Figure 4-3.
Figure 4-3: The new Start tip appears when you mouse into the lower-left corner of the screen.

Power users will want to right-click the tip. When they do, they’ll see the magical power user menu shown in Figure 4-4. Winkey + X will also trigger this menu.
To navigate to the Start screen, simply click the Start tip. (To get back, you’ll need to do one of the following: Click the Desktop tile on the Start screen, press the Windows key on your keyboard, or tap the Windows key button on your Windows device.)
Figure 4-4: A hidden power user menu can be found by right-clicking the Start tip.

To trigger this edge UI with a multi-touch-based device, you can choose between two different edge UIs: the Switcher or the Charms bar. Both are discussed in Chapter 3, and then again later in this chapter, but since the Switcher method more closely mimics the mouse-based description above, let’s look at that quickly here.
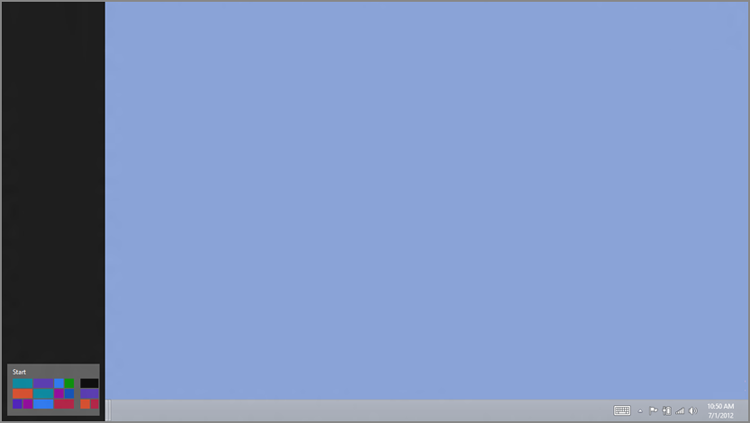
To activate the Switcher edge UI from the desktop, swipe in from the left edge of the screen, and when the previous app thumbnail appears, swipe back to the left. If you do it just right, the Switcher appears, as in Figure 4-5. Just tap the Start tip at the bottom to return to the Start screen.
Figure 4-5: Switcher can appear over the desktop, too.
In case it’s not obvious, all of these methods for accessing the new Start experience from the desktop work like a toggle. So when you’re on the desktop and engage it, using any available method, you will navigate to the Start screen. But if you immediately repeat that step, without launching any other apps, you’ll navigate back to the desktop.
Peek Lives On, Too
Where the Start button disappearing act will no doubt cause much wailing and pontificating, few will cry for Aero Peek, which is also missing, seemingly, in Windows 8. But as with the Start button, rumors of Aero Peek’s death are exaggerated. Although the small UI button that used to trigger this effect is gone, the Peek lives on.
To trigger Peek, you can employ one of the following methods:
- Keyboard: Press Winkey + , (comma)
- Mouse: Move the mouse cursor into the very lower-right corner of the screen.
There’s no way to trigger Peek via touch.
Either way, the effect is the same, and you will visually peek through to the desktop, so that any floating windows that were on-screen will disappear temporarily, replaced by the outlines shown in Figure 4-6.
If you press Winkey + D from the Start screen or from any Metro-style app, you will navigate to the desktop, sans the Peek effect.
Beyond the Start button and Peek, much of what you’ll see initially on the Windows desktop is identical, or nearly so, to the Windows 7 desktop. But with this being a new OS, there are indeed numerous other changes to discover. To find them, all you need to do is move the mouse around a bit or start clicking on things.
Or simply read on.
Figure 4-6: With Peek, you can peek under any windows and see the desktop and the icons it contains.

NOTE You can also right-click on the Peek area to display a context menu that provides an additional choice, Show Desktop. This option minimizes all onscreen desktop windows so you can actually access the icons on the desktop if you’d like, and not just view them as you do with Peek.
Where New Meets Old: Metro Features You Get in the Desktop, Too
While many users of traditional PCs—desktops, laptops, and other devices without touch screens—are likely wondering what good the Metro user experiences are to them, especially if they’re committed to using old-school Windows applications like Office or Photoshop, it’s worth remembering that Metro is, in fact, the underlying operating system and that it pervades (some might say invades) the desktop environment as well. So Metro isn’t an all-or-nothing proposition. Indeed, even those firmly committed to the desktop will find themselves dealing with Metro experiences throughout the day.
This isn’t as bad as it may seem. These experiences work just as well with your keyboard and mouse as they do with touch screens, for example, and they provide a fairly gentle way for recalcitrant desktop holdouts to dip their toes into the Metro waters, so to speak. As a result, these users become acclimated to the new way of doing things, and then perhaps make a future Windows tablet or other touch-based device purchase not just doable but even preferable.
Remember, these Metro features are discussed further in Chapter 3.
OK, no promises. But you need to know how this stuff works, and at the very least, becoming proficient—and thus more efficient—with Metro is a key step toward mastering Windows 8.
Back
The Back stack does not replace existing multitasking actions, such as using the Windows Flip (Alt + Tab) keyboard shortcut or the new Switcher interface, which is described shortly.
As part of the simplified multitasking model in Windows 8, users can access a smartphone-like Back experience (or Back stack) that provides a quick way to return to the most recently used app. And yes, this is part of the reason we describe the desktop as if it were an app (even though, technically, it’s a bit more nuanced than that: The entire desktop is placed in the Back stack, not any of its individual Windows applications.
You can access the most recently used Metro app in the Back stack in the following manner:
- Mouse: Move the cursor to the top-left corner of the screen. A Back tip, in thumbnail form, will appear as shown in Figure 4-7, indicating the most recently used app. Click it to navigate to that app.
Figure 4-7: The Back tip is a thumbnail that indicates the previously used app in the Back stack.

TIP You can right-click the Back tip to see other options related to snapping applications in a side-by-side display, which is described shortly.
You can swipe repeatedly to quickly navigate through every app in the Back stack.
- Touch: Swipe in from the left edge of the screen to navigate immediately to the previous app.
- Keyboard: You can’t directly access Back using the keyboard, but you can still use Windows Flip (Alt + Tab) or the new Switcher interface (Winkey + Tab), described shortly, to access recently used apps.
Start
In previous Windows versions dating back to Windows 95, the Start experience was centered completely on the Start menu. This menu was evolved over the years and expanded in functionality and usefulness fairly dramatically in subsequent Windows versions. So did the ways in which we accessed the Start experience: first via a software button called the Start button (later renamed Start orb) and then via a Windows key on PC keyboards.
In Windows 8, everything is changing yet again. The Start experience is now a full-screen Start screen, though if it helps you to think of it as a Start menu, there’s some logic to that. And Start now acts as a toggle, which is another difference: Activate it from the desktop, or from a Metro-style app, and you’ll navigate to the Start screen. But activate Start from the Start screen and you will return to the previously used app (including the desktop).
How you activate Start has changed, too. And while you can still use the Windows key on a keyboard to access the Start experience, the software Start button is gone. So there are some new ways of doing things.
Here’s how you activate the Start experience from the Windows desktop:
- Mouse: As described earlier in the chapter, the Start button is gone, but you can still move the mouse cursor down to the same basic place on-screen—the lower-left corner—and the Start tip will appear. Click this thumbnail to activate Start and, in this case, navigate to the Start screen.
- Keyboard: Tap the Windows key (Winkey) on your keyboard or use the keyboard shortcut Ctrl + Esc.
You can mix and match, too. For example, type Winkey + C to display the Charms bar and then tap (or click) the Start charm. There are many other combinations, but you get the idea.
- Touch: Touch users have two methods to activate Start. You can swipe in from the right side of the screen to display the Charms bar, and then tap the Start charm. Or, you can activate Switcher (described next) by swiping in from the left, and then quickly to the right; then tap the Start thumbnail.
Switcher
Remember: The desktop is conceptually just an app. So Switcher provides only a single entry for the entire desktop and its contained applications, not one for each Windows application.
Windows 8 features a convenient and consistent new task-switching interface called Switcher that lets you switch between and manage running tasks, including Metro-style apps and the Windows desktop. While we introduced Switcher earlier in the chapter, there are a few additional details that may be of interest.
Activating Switcher
Here are the ways in which you can activate Switcher:
In Windows 7, Winkey + Tab triggered a unique task switcher called Windows Flip 3D. That action is no longer available in Windows 8.
- Keyboard: This is, by far, the easiest way. Just tap Winkey + Tab to activate Switcher. You can hold down Winkey and repeatedly tap Tab to navigate through each of the various available apps. Just let go of Tab when you find the one to which you want to switch.
- Mouse: Move the mouse cursor to the upper-left corner of the screen to activate the Back experience as described previously. Then, move the mouse cursor down the left edge of the screen to activate Switcher and select the app to which you’d like switch.
Note that there is a subtle indication that the Switcher is waiting for you when you engage Back; as you can see in Figure 4-8, there are a few app thumbnail outlines barely visible down the left edge of the screen.
- Touch: This is the hardest one of all. You need to swipe in from the left side of the screen as if you are going to switch to the previously used app. When the previous app thumbnail appears under your finger, move back to the left until Switcher appears. If you do it just right, Switcher will actually dock on the screen and stay there until you do something.
Figure 4-8: Look closely, and you’ll see a hint that Switcher is available.

Advanced Switcher Usage
While Switcher is visible on the screen, either by being docked with touch or just by being made visible with the mouse, there are some additional capabilities you can use. These include the following:
This will not work with Start or the desktop, only Metro-style apps.
- Removing an app from the Back stack: If you’d like to remove a Metro-style app from the Back stack—effectively closing or quitting it—you can do so by dragging its thumbnail out of Switcher and down to the bottom of the screen. You can do this with the mouse or touch input types.
NOTE You can also remove apps from the Back stack by right-clicking and choosing Close.
- Snapping an app for use in side-by-side mode: As described next, Windows 8 supports a unique side-by-side screen sharing mode called Snap that lets you use two apps next to each other on-screen. There are a few different ways to enable this functionality, as you’ll see, but if you’d like to snap a previous app that’s visible in the Switcher to a side of the screen alongside the current app (or desktop), you can right-click it in the Switcher and choose either Snap left or Snap right, as shown in Figure 4-9.
Figure 4-9: A power user method for snapping secondary apps to a side of the screen

Don’t worry if the notion of side-by-side apps is confusing. That’s right: Side-by-side is our next topic.
Switcher vs. Windows Flip
With all this new task switching goodness, you may be thinking that good old Windows Flip—the familiar Alt + Tab task switcher that dates back decades—is on life support in Windows 8. Not so fast. As it turns out, Windows Flip has some important advantages over Switcher, particularly for those who will be spending a lot of time in the desktop. And since Microsoft sees Metro and the desktop coexisting for the foreseeable future, we think it’s fair to say that Windows Flip has some life left in it indeed.
The key advantage of this interface is that it differentiates between multiple desktop applications as well as individual Metro-style apps. So if you have Microsoft Word and File Explorer windows open on the desktop, and Mail and Calendar open in the Metro runtime environment, and then engage Windows Flip, you’ll see five items: Word, Explorer, Mail, Calendar, and Desktop. But in Switcher, you’ll see just three: Mail, Calendar, and Start. (This assumes you activate Switcher from the desktop.) There are no desktop applications—or even the desktop itself—available in Switcher if you use it from the desktop.
This means that Switcher isn’t of use to individual desktop applications at all, especially if you activate it while using the desktop. So Windows Flip will remain a frequently used tool for all desktop users in Windows 8.
That said, it is a bit curious that Start doesn’t appear in the Windows Flip task list. But keyboard users simply need to use the Windows key instead.
Snap: Side-by-Side Apps
The new Metro environment in Windows 8 is designed for apps that run full screen, similar to how smartphone and tablet device apps work. But Windows 8 kicks things up a notch by offering a special side-by-side mode in which two apps can share the screen, albeit in limited ways. And one of those two apps can be the desktop, which is why we’re discussing it here.
Yes, we’re sure this name is an allusion to the Aero Snap window docking feature that debuted in Windows 7 and is still available on the Windows 8 desktop.
Sadly, side-by-side display sharing is not particularly customizable. You can have just two apps, and the one that is considered the primary app takes up about two-thirds of the available on-screen real estate. Meanwhile, the secondary app is stuck with just one-third, roughly, of the available space. Apps that are side by side in this fashion are said to snap into place.
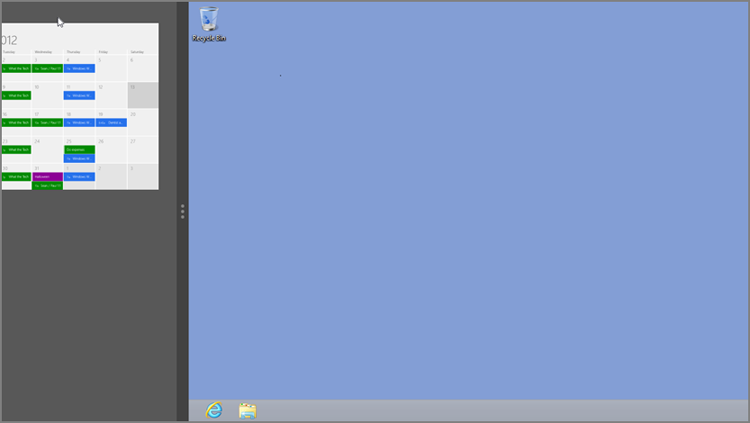
Confused? A picture will make things clearer. Consider Figure 4-10, in which Microsoft’s Calendar (Metro-style) app is snapped next to the Windows desktop.
That configuration in the previous figure is one of two possible ways in which a snapped, or secondary, app can be snapped in place next to another app. The other, of course, has the snapped app placed on the right side of the screen, as shown in Figure 4-11. Which side you use is a matter of taste.
Figure 4-10: You can snap Metro-style apps next to the desktop.

Figure 4-11: You can also snap Metro-style apps to the right of the desktop.

So why would you ever want to snap the desktop? The best reason we’ve seen is to monitor a download that’s occurring in a desktop-based web browser. But frankly, it’s not very useful otherwise.
Conversely, it’s also possible for the Windows desktop to be the snapped, or secondary, app. However, when you enable this view, as in Figure 4-12, you’ll notice that the snapped desktop only displays thumbnails of the available open windows and isn’t too useful.
Figure 4-12: You can even snap the desktop.

NOTE One interface you can’t snap is the Start screen. And to be honest, such a capability would be truly useful, since it could provide a snapped list of tiles with live updates. Maybe in Windows 9.
Using Snap to Place Apps Side by Side on the Desktop
The new side-by-side app mode can be enabled in various ways, but here are some instructions for the common input types. In each case, it’s best to launch the app you intend to use in the secondary, or snapped, mode first and then launch the app you intend to use as the primary app. Then you can use one of the following techniques to enable the snap mode:
- Mouse: Move the mouse cursor to the upper-left corner of the screen to display the Back thumbnail. Then, while holding down the mouse button, drag the thumbnail downward. It will turn into a larger, floating thumbnail, as shown in Figure 4-13, and the side-by-side Snap bar will appear.
Release the mouse button to snap the app into the Snap area on the left.
While there is no keyboard-based shortcut for enabling side-by-side mode, as you’ll discover next, there are keyboard shortcuts for modifying the presentation of side-by-side apps.
- Touch: Swipe in from the left edge of the screen. As you do so, the previous app in the Back stack will appear as a thumbnail image under your finger. Stop moving your finger and the side-by-side Snap bar will appear. When it does, release your hold on the screen and the secondary app will snap in place.
Figure 4-13: You can drag a previous app off Back or Switcher and then snap it in place alongside the desktop or another primary app.
Customizing Side-by-Side Mode
Once you’ve got two apps snapped into position in side-by-side mode, you can further customize the display, albeit in fairly limited ways. Here are the options available at your disposal:
- Snap to the right instead: While many are happy to snap a secondary app to the left side of the screen, some will prefer the snapped app to appear on the right. While performing the snap operation, simply drag the app thumbnail to the right side of the screen instead of down and to the left.
If you’ve already snapped an app to the left side of the screen and would like it to appear on the right side instead, the easiest way to do so is via a mouse: Just move the mouse cursor to the top edge of the snapped app, and when the cursor changes into a small hand, grab the app and then drag it to the right side of the screen. With a keyboard, you may find it easier to simply close the snapped app, as described shortly, and just redo the snap action and place it on the right instead. But the convoluted way in which you can do this goes like so: Press Winkey + . (period) three times to snap the secondary app to the right. Then press Alt + Tab (or Winkey + D) to return the desktop to the primary display area.
- Swap the snapped and primary apps: Press Winkey + J to swap the snapped (secondary) and primary apps on-screen. Or via touch or mouse, simply drag the Snap bar toward the other side of the screen, letting go before you hit the screen edge.
- Close the snapped app: If a secondary app is snapped on the left, press Winkey + Shift + . (period) to close the snapped app. Otherwise, press Winkey + . (period). You can close the snapped app via touch or mouse by dragging the Snap bar to the closest screen edge.
NOTE Side-by-side screen sharing is more interesting for those who wish to stick with Metro-style apps, and we cover this feature in Chapter 3 as well as a result. But it’s worth mentioning here, because the desktop is considered an app, too, and can participate in this task management solution. Certainly, some apps will work well in this snapped mode, even when used in tandem with the desktop.
Charms
In Windows 8, Microsoft exposes many system-level services through a new user experience called Charms. These Charms are accessible via a bar that appears on the right edge of the screen in a manner that is consistent across every user experience in Windows 8, including the Start screen, all Metro-style apps, and the desktop. This can be seen in Figure 4-14.
CROSSREF Charms are central to using and understanding Windows 8, so we cover them as needed throughout this book. The main discussion about this experience, however, can be found in Chapter 3.
Opening the Charms Bar
You can access the Charms bar in a variety of ways, and as a top-level interface in Windows 8, it has simple triggers for all the major input types:
- Mouse: Move the mouse cursor into the lower-right corner of the screen. As the cursor hits against the natural edge of the screen, a transparent preview of the Charms bar appears, as shown in Figure 4-15.
Figure 4-14: The Charms bar is a system-wide user experience that works in the Start screen, Metro-style apps, and the desktop. When the Charms bar displays, an overlay for the time and date also appears.

Figure 4-15: A preview of the Charms bar appears when you mouse into one of the screen’s rightmost corners.

Mouse-based Charms access also works from the top-right corner of the screen. But when the transparent preview of the Charms appears, you must move down the right edge of the screen to fully activate the Charms bar.
To fully enable the Charms, move up the right side of the screen. The Charms bar will appear normally and you can access the various options normally.
This is perhaps the simplest way to enable the Charms, and if you remember just one Windows 8 keyboard shortcut, this should be it.
- Keyboard: To enable the Charms bar from the keyboard, type Winkey + C.
- Touch: With a multi-touch display, you can swipe in from the right edge of the screen to enable the Charms bar.
NOTE Why is the Charms preview shown here? Microsoft realized that many users would move the mouse cursor near the right edge of the screen for a variety of reasons, such as to access the Peek functionality or to click an application’s scroll bar. So the Charms bar appears in preview mode first. If the user doesn’t move the mouse cursor along the right edge of the screen when this preview appears, the Charms will disappear and you can continue doing whatever it is you were doing.
Accessing Charms Features
Once you’ve displayed the Charms bar, you can then access the various Charms and perform system-wide or context-sensitive actions. Some of the more common actions you may access from this interface include Settings, Search—by which you can find desktop applications (as well as Metro apps and PC Settings and Control Panels)—and Devices, which helps you interact with various hardware devices, including secondary displays, removable storage devices like hard drives and USB memory devices, and the like. These functions are all discussed later in this chapter.
Of the remaining two Charms, one, Share, does not work with the desktop or Windows applications at all. Instead, the Share charm is aimed solely at Metro-style apps, which use this system capability to share information with other apps. The other remaining Charm, the Start icon, can be used as a toggle for the Start screen.
How you access these Charms varies by input device. With the mouse, you simply navigate the mouse cursor to the appropriate Charm and click it once. Via touch, it’s a simple tap. And if you access the Charms bar from the keyboard, you can use the arrow keys to navigate around and then press Enter (or Space) to activate a Charm.
Settings
While Windows 8 offers the same Screen Resolution and Personalize context menus from the desktop as did its predecessor, Windows 7, Windows 8 also expands on this notion of desktop settings by making some of these features available via a handy new Metro-based Settings interface as well. This feature is accessed via the Charms bar, as noted previously. But if you’re a keyboard maven, you can also access Settings from the desktop (or from any Metro-style experience) more quickly by tapping Winkey + I.
However you choose to enable it, the Settings pane for the desktop should resemble Figure 4-16.
Figure 4-16: The Settings user experience

The following options are available:
You can also access Control Panel from the power user tasks menu that appears when you mouse into the lower-left corner of the screen to display the Start tip and right-click.
- Control Panel: Opens the classic Control Panel interface, which is largely unchanged from Windows 7. Note that many—but not all—system configuration options can now be accessed from the new Metro-style PC Settings interface instead. This interface is described in Chapters 3 and 5, the latter of which concerns system customization.
You can also access Personalization by right-clicking on a blank area of the desktop and choosing Personalization from the context menu that appears.
- Personalization: Opens the Personalization control panel, which works much like the version from Windows 7, while offering a few new or different options, some as a result of the move away from Aero on the desktop. We discuss this interface in Chapter 5.
- PC Info: This opens the System control panel, which is also largely unchanged since Windows 7. From this interface, you can access your PC’s Windows Experience Index score, Device Manager, Remote Settings, System Protection, Advanced System Settings, and other useful configurations.
You can access Windows Help and Support more quickly by pressing F1 from anywhere in the desktop user interface.
- Help: This option launches Windows Help and Support, Microsoft’s attempt at in-product documentation. They try.
While the top part of the Settings pane is context-sensitive and will change depending on what you’re viewing on-screen, this interface is also a system-wide interface. So the Settings pane also provides various system settings, which always appear near the bottom of the pane. We discuss these settings in Chapter 3.
Notifications
Windows 8 supports new kinds of system and app notifications, both of which work consistently in the Metro and desktop environments. And, as we’re sure you must suspect by now, these notifications are of course Metro-based experiences. So they appear as an overlay of sorts over the screen, whether you’re looking at the Start screen, a Metro-style app, or, yes, the desktop.
The new Windows 8 notifications are also discussed in Chapter 3—along with a ton of other Metro user experiences—but let’s see how they interact with the desktop. There are two key notification types to consider: Full-screen, modal notifications and notification toasts, small floating windows that don’t prevent you from getting other work done.
Okay, they’re not technically modal in that you can, in fact, interact with the underlying screen if you really want to. But the full-screen notifications do make it hard to do so.
An example of a full-screen notification is shown in Figure 4-17. These notifications are modal in the sense that they must be addressed before you can move on. You’ll see this type of notification when something important happens, such as when the new SmartScreen security feature suspects you’re downloading a malicious file and wants you to think twice before proceeding.
Figure 4-17: A full-screen notification

Notification toasts are far more subtle. They appear as small floating windows near the top right of the screen, as shown in Figure 4-18. If you don’t address this kind of notification, it will simply disappear.
Figure 4-18: A notification toast

Notification toasts appear for all kinds of reasons, including when you install a new application that can change file associations, when you plug in a USB-based storage device, and so on. Also, many Metro-style apps, like Mail, Calendar, and Messaging, utilize these types of notifications. For example, Mail can be configured to notify you each time a new e-mail arrives.
File Explorer was called Windows Explorer in previous Windows versions.
As with previous versions of Windows, you use the desktop interface to interact with the filesystem and manage files and folders. This occurs, as before, via the File Explorer interface, which has been nicely updated in Windows 8 with a new, ribbon-based design similar to that used by Microsoft Office and Windows applications, such as Paint and WordPad and a new Metro-like (but not Metro-based) window design. This section examines the new File Explorer and the improvements to the ways in which you interact with files and folders in Windows 8.
Understanding the New File Explorer
File Explorer debuted (as Windows Explorer) in Windows 95, but Windows has of course always had a graphical interface for managing files and folders. In fact, even the first version of Windows, dating all the way back to 1985, included a basic file manager application called MS-DOS Executive.
While File Explorer was evolved over previous Windows versions, it’s been thoroughly overhauled with a new, Metro-like and ribbon-based UI in Windows 8, and as a result, this version is the best yet. But don’t take our word for it. Let’s compare the Windows 8 version of Explorer to Windows Explorer from Windows 7 to better understand what’s changed.
First, take a look at Windows 7. As you can see in Figure 4-19, this version of File Explorer is streamlined, with most advanced options hidden under the Organize command bar item.
In Windows 8, Explorer drops the Aero glass and adopts the new ribbon-based UI, replacing the previous version’s command bar with a more powerful but denser interface that puts all the options you’ll ever need—and then some—right up front. Fortunately, thanks to feedback during the Windows 8 prerelease cycle, Microsoft opted to hide the ribbon by default. So the Explorer UI you’ll probably see the first time you use this application will likely resemble the one shown in Figure 4-20.
Figure 4-19: Explorer from Windows 7

Figure 4-20: The Windows 8 Explorer has a ribbon UI, but it’s hidden by default.

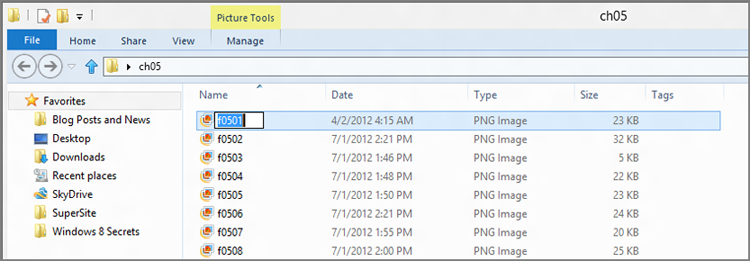
To expand the ribbon and see more commands, click the Expand the Ribbon control in the top-right corner of the window. (It resembles a downward-pointing arrow. You can also type Ctrl + F1.) When you expand the ribbon UI, File Explorer will resemble Figure 4-21.
Other tabs are possible. For example, if you select an image file, you’ll see a Manage: Picture Tools tab appear. Select a disk and Drive: Disk Tools appears.
Interestingly, what you see here only represents a subset of the commands that are available in the new File Explorer. And that’s because the ribbon has several tabs, and only one of them—Home, in this case—is displayed at a time. You can click the other two tabs that are always available, Share and View, to see the commands they provide.
Figure 4-21: With the ribbon displayed, far more commands are readily available.

While it would be overly pedantic to step through every single command in this interface—we do have certain assumptions about your capabilities, after all—a short discussion of each of the new default tabs is perhaps in order.
You can also access Explorer’s Frequent Places list from this menu. This list is otherwise available via the File Explorer taskbar button.
First, there’s a tab that’s not a tab: The colored File tab is really a button that displays the new File menu. Shown in Figure 4-22, this menu provides several useful options, including the ability to open a new window, ideal for side-by-side file copying, open a command prompt or PowerShell window, delete the history in your recent places and address bar history lists, and access help.
Figure 4-22: The new File Explorer File menu

You can jump quickly to the Home tab from another Explorer tab by tapping Alt + H.
Next, the Home tab includes the most commonly needed commands related to files and folders, and for the most part, this is the obvious place to start if you’re a heavy mouse user and like to click on icons to initiate actions, such as Move to, Copy to, and Rename.
Need to access Share quickly? Type Alt + S.
The Share tab contains commands related to sharing, of course, and for this reason it’s a location you most likely won’t be using very often.
The View tab can be displayed by typing Alt + V.
The View tab, conversely, contains a number of commands we wish were more easily accessible, including the various icon sizes—Extra Large Icons, Large Icons, Medium Icons, Small Icons, List, Tiles, Details, and Content—and the various grouping options. It’s perhaps not coincidental that File Explorer has a miniature set of buttons in the status bar in the lower-right corner of the window that lets you toggle between two of the most common icon sizes, Details and Large Icons.
NOTE If you enjoy creating your own libraries, Windows 8 does have a new feature where you can customize a library’s icon to any icon in the system, offering a much more personalized look.
Put simply, the File Explorer ribbon is something that new users should leave displayed until they’re comfortable with the new interface. But power users will likely want to keep it hidden and enjoy the simpler interface afforded by this configuration.
NOTE Hidden in the upper-left corner of the File Explorer window is a new Quick Access Toolbar, which can be customized with the commands you need most often. That’s ideal for power users who want to hide the ribbon but also want access to a handful of useful commands.
OK, it’s time to see what you can really do with this thing. While most of the behaviors you’ll see in File Explorer are the same as with previous Windows versions, there have been some key changes and improvements as well. In keeping with the focus of this book, we’ll assume that you understand the basics, and how things used to work, and highlight only these new features.
Working with Files
While we await a future in which the data we work with is managed for us automatically via some cloud-based mechanism, the reality of today is that we work with files regularly. These include documents related to work, such as Word documents, PowerPoint presentations, and Excel spreadsheets, as well as photo files, music files, video files, and many others. Windows 8, like all previous versions, includes all the basic file operations one might expect—copy, move, rename, delete, and so on—and many of these have been improved nicely in this release.
Copying and Moving Files
Microsoft has significantly updated the file copy and move experience in Windows 8, making it both faster and easier to manage. If you’re familiar with how this works in Windows 7 and older Windows versions, you know that each file and/or move operation you begin creates its own file or move window, and that each subsequent operation slows everything down to an eventual crawl. The multi-window file copy/move experience in Windows 7 can be seen in Figure 4-23.
So how does one improve on a cluttered, slow experience? Simple: Make it streamlined and faster. And that’s exactly what’s happened in Windows 8. Now, file copies and moves all occur in a single window in which you can pause any copy or move processes if you’d like to give precedence to another operation. This can be seen in Figure 4-24
Figure 4-23: In older Windows versions, multiple file copies (and moves) resulted in slower performance and required multiple windows.

Figure 4-24: The new file copy/move experience in Windows 8

You can also click the More Details button to display a new detailed view of the file copy/move experience that shows the speed of the operation, how much data is left to transfer, and so on. This More Details view can be seen in Figure 4-25.
Figure 4-25: Detail view of the new file copy/move experience

Under the hood, things have improved dramatically, and file copies and moves occur much more quickly than before, even when you have multiple file operations going at once.
But what about when things go wrong? One of the most common things that can happen during a file copy or move operation is that one or more of the files involved in the operation already exists in the destination folder. So Windows has always offered up a dialog or window in these situations, asking the user what to do.
In Windows 7, Microsoft improved what it calls Explorer’s “confliction resolution” logic to pretty good effect. But in Windows 8, it’s done so again, offering its most obvious interface yet. This is actually quite important, because when you see the window shown in Figure 4-26 in Windows 7, it’s not always clear which option you should choose.
You can find out more about each of the files in the conflict windows by mousing over them. A small tooltip will appear, displaying its path. Want to view the file? Just double-click it. Yes, really.
Things are considerably clearer in Windows 8. Now, when a file conflict occurs, you see the window shown in Figure 4-27. The Replace or Skip Files window lets you choose which files have precedence globally or choose them on a file-by-file basis.
Figure 4-26: Windows 7 made it somewhat difficult to resolve file copy and move conflicts.

Figure 4-27: In Windows 8, file copy/move conflicts are more easily resolved.

Renaming Files
While the act of renaming a file is simple enough and hasn’t changed markedly since Windows 7, there is one neat aspect to multi-file renaming that’s worth mentioning, since so few are aware of it. And that’s that Windows 8 supports a cool way of renaming multiple files in a folder.
To recap, you can rename an individual file by selecting it and pressing F2, by selecting it and then clicking it again with the mouse, or via touch by selecting it and then tapping it again. When a file is in rename mode, its name is highlighted as shown in Figure 4-28. If you start typing now, you will replace the current name with whatever you type.
Figure 4-28: When a file is in rename mode, its name appears highlighted.
This renaming trick works with folders, too, not just files.
Normally, you hit Enter when you’re done renaming a file. But if you want to move to the next file and rename that, tap Tab instead. This will put the next file in rename mode, allowing you to instantly rename it next. You can keep tapping Tab, instead of Enter, to rename subsequent files in the current folder.
Pin to Start
In Windows 7, Microsoft allowed us to pin application shortcuts to the taskbar for the first time, providing a new way to launch applications. (Previously, you could only pin applications to the Start menu.) And starting with Internet Explorer 9, Microsoft provided this same capability to web apps, letting sites like Hotmail, SkyDrive, Amazon.com, The New York Times, and many others work like pseudo-applications, pinned to the taskbar or Start menu for quick access.
This is very useful because most Windows users don’t spend all day using just Windows applications. They also use a lot of popular web apps and services. And by mixing and matching shortcuts for all of these things side by side on the taskbar, as shown in Figure 4-29, users can organize their workspace in a way that mimics what they’re really doing all day long.
Figure 4-29: You can mix desktop application and web app shortcuts on the taskbar in Windows 7 and 8.

These capabilities carry forward in Windows 8, and you can pin applications and web apps (via Internet Explorer 10, now) to the taskbar just as you did before, using exactly the same methods. But as you know, Microsoft is also replacing the Start menu with the new Start screen in Windows 8, and that interface is the primary place for you to manage and launch the apps you use most frequently. As discussed in Chapter 3, you can easily pin new Metro-style apps to the Windows 8 Start screen. Can you do the same for classic, Windows desktop applications like Microsoft Word, Adobe Photoshop, and the like?
Yes, you can.
There are two basic interfaces for accomplishing this. You can use the new system-wide search functionality that is available in Windows 8, as described later in this chapter. Or you can do so directly from File Explorer.
Here’s the best part. This functionality works for applications, as you’d expect. But it also works for libraries and folders. And you can pin favorite web apps and sites via Internet Explorer 10, though we cover that in Chapter 7.
To pin a folder or library to the Start screen, navigate to the location’s container in File Explorer, right-click it, and choose Pin to Start as shown in Figure 4-30.
Figure 4-30: You can pin applications to the Metro-style Start screen from the desktop environment.

You can also Pin to Start from the new Explorer ribbon. Just select the folder or library and then choose Easy Access and then Pin to Start from the Home tab of the ribbon.
As with anything else that’s pinned to the Start screen, the folder or library is placed at the end of the Start screen. From there, you can position it as needed. (This functionality is discussed in Chapter 3 and Chapter 5.)
Using External Storage
Windows 8 works with external storage devices, such as USB-based hard drives and memory sticks, in a manner that is very similar to Windows 7. That said, the user experience that appears the first time you plug such a device into your computer has changed in Windows 8, and is now a Metro-based notification rather than a dialog box or pop-up window as before.
The first time you plug in a USB storage device, you will see the Metro-style notification toast shown in Figure 4-31.
Figure 4-31: A Metro-style notification toast appears the first time you plug in a USB storage device.

Don’t see an option for ReadyBoost? It’s a technology that requires both the USB device and the PC’s USB hardware to meet certain performance characteristics. So it won’t always appear as a choice.
Tap the notification to choose what to do with these types of devices going forward. As you can see in Figure 4-32, the available choices can include using the device to speed up the PC with ReadyBoost, to back up File History (which is described in Chapter 11), to view the files with File Explorer, or to take no action. Choose wisely because this interface will never appear again, at least not automatically.
Figure 4-32: The choices you see here will vary according to the performance characteristics of your PC and the USB storage device.

You can also configure AutoPlay options at any time, and reset them to their default values. To do so, use Start Search to query auto play, Settings.
Okay, you don’t have to get it right the first time. If you want to change your choice later, you can. Just navigate to the Computer view in File Explorer, right-click the icon for an attached USB-based storage device and choose Open AutoPlay from the context menu that appears. You’ll be provided with the same Metro-style experience shown earlier.
Using Disk Images
In Windows 8, Microsoft has added support for two very popular disc (and disk) image formats, ISO and VHD, allowing users to browse within these special files as if they were physical discs (or disks) connected to the PC.
If you’re not familiar with these formats, a quick overview should get you up to speed. ISO is a disc image format in which the contents of an optical disc (CD, DVD, and the like) are packaged into a single archive file, generally with an .iso extension, which is similar to a ZIP file. You can then later burn this ISO file to disc, creating a copy of the original.
VHD, or virtual hard disk, files are created for Microsoft’s virtualization solutions, including Hyper-V and Windows Virtual PC. These files represent a hard disk drive, and as you’ll discover in Chapter 14, they are useful in a number of scenarios, such as testing operating systems and other software, for help desk support, and for software developers.
While Microsoft has used both ISO and VHD file formats to distribute evaluation and even final versions of Windows and other software in the past, it’s never really formally supported these formats in Windows to any major degree. The one exception is ISO burning support: Starting with Windows 7, you can burn ISO files to disc natively with the integrated Windows Disc Image Burner utility. (This capability also exists in Windows 8, as you’d expect.) But you couldn’t browse into them as you would with a physical disk.
Now you can.
Windows 8 automatically mounts both ISO and VHD files so that they become, in effect, part of the PC’s filesystem, just as with any other attached storage device. For example, when you plug a USB hard drive into your PC, it may become the E: drive, or whatever. So it is with both ISO and VHD files: Simply by opening such a file—by double-clicking it with the mouse, say—it becomes part of the filesystem and immediately picks up the next available drive letter.
Let’s see how this works.
Using an ISO File with File Explorer
If you double-click on an ISO file in Windows 8, two things happen. First, a new Explorer window opens, letting you browse into the contents of the file as if it were a physical storage device. And second, a new virtual optical drive is mounted in the filesystem and given the next available drive letter. Both of these things can be seen in Figure 4-33.
Figure 4-33: ISO files work just like any other storage device in Windows 8.

This is, in fact, the primary reason that Windows 8 offers this capability: It allows you to run the Setup application from an ISO file without first burning the file to disc.
Because an ISO file works like physical storage, it can be used like any other storage device. You can navigate through its virtual directory structure using File Explorer, copy files out as needed, and even run applications contained within the file. This means, for example, that you no longer need to burn an ISO file to disc if you don’t want to. Instead, you can just mount it in the filesystem and run whatever Setup or other applications it contains.
You can also mount an ISO file by right-clicking and choosing Mount from the context menu.
Want to burn an ISO to disc? Right-click the file and choose Burn to disc.
You may have noticed that an ISO file creates a new tab in Explorer when the file is mounted. This Disk Tools: Drive tab is of more use for other types of drives, but for an ISO file it’s pretty much there to provide a way to eject—really, unmount—the ISO. This will remove the ISO from the filesystem, along with its drive letter.
Using a VHD File with File Explorer
VHD files work similarly to ISO files in Windows 8, and offer other unique virtualization-related capabilities. However, there is one subtle but important difference. Whereas an ISO file is treated as a removable disc when it is mounted, a VHD file is treated as a fixed hard disk.
When you double-click a VHD file in Windows 8, a new drive letter is added to Explorer, just as with an ISO file, but it appears as a fixed disk, not a removable disk. You can see this in Figure 4-34, where the VHD appears next to the PC’s main storage device (which is typically a hard drive or SSD).
Okay, so you may be thinking: So what? The icon’s different, but you can still navigate around in the VHD as you do with an ISO, and of course use all the standard file management actions you can with physical storage or ISO files. But there is an important distinction to mounting a VHD vs. an ISO: With a VHD, you get the full suite of Windows 8 disk utilities to work with.
Figure 4-34: VHD files mount as fixed disks in Windows 8: Here, Drive G: is a VHD, not a physical hard disk.

To see what this means, open File Explorer, navigate to the Computer view and select the VHD. As you can see in Figure 4-35, the Disk Tools: Drive ribbon tab is now fully enabled, providing access to advanced capabilities, such as BitLocker, disk optimization and cleanup, format, and more.
Figure 4-35: VHDs offer many more options than ISO files.

That said, you can still eject a mounted VHD just as you do with ISO: Right-click and choose Eject, or select Eject from the Disk Tools: Drive tab in the Explorer ribbon.
Managing Classic Windows Applications
While Windows does offer some basic applications and, in Windows 8, some new Metro-style apps as well, most Windows users will want to install a number of more full-featured Windows applications, such as Microsoft Office, as well. And while Microsoft is moving inexorably to a future of Metro-style apps, Windows 8 also works with traditional (one might say, “old-fashioned”) Windows applications almost exactly like its predecessors. But there have been a handful of improvements in this area, so we’ll discuss the changes in this section.
Configuring Desktop Applications
From a compatibility perspective, Windows 8 works just like Windows 7, though you can now use the built-in Application Compatibility tools to emulate Windows 7 if needed. But from our regular usage of Windows 8, it’s pretty obvious that little in the way of compatibility work will be required, and if you have an application that works with Windows 7, it should work fine with Windows 8 as well.
Of course, with the move to a Metro-like user experience, Windows 8 users will need to deal with a few Metro-related nuances when it comes to working with classic desktop applications. And the big two, in our experience, involve file associations and the pinning of applications to the Metro-style Start screen.
Desktop Applications and File Associations
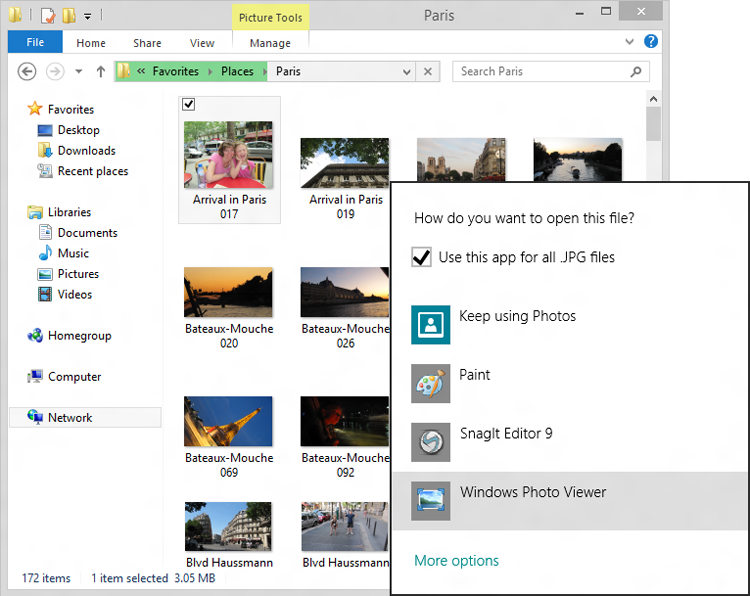
Most Windows users are probably familiar with the notion of file associations, where various applications are known to be compatible with different file types and Windows provides an interface by which you can select which of those applications is used by default. Likewise, Windows has long supported an Open With functionality that lets you override the default file association on the fly and use a different application. This latter capability is usually accessed by a right-click context menu such as the one shown in Figure 4-36. Here, we’re overriding the default file association for .jpg picture files and opening them with Windows Photo Viewer instead.
This functionality works as it did in Windows 7. But there is one major difference in this version of the OS: Windows 8 supports both new, Metro-style apps as well as classic Windows applications. So it’s possible that the list of applications you could use to open a file will contain a mix of both Metro and desktop applications. And aside from Open With, which works as an Explorer extension as before, the interfaces you use to configure file associations are now Metro-based.
Figure 4-36: Overriding a file association with Open With
There are two key times you’ll run into these new interfaces. When you install a new application that tries to associate itself with various file types, Windows 8 will display a notification toast, like the one in Figure 4-37, alerting you that there are new file association choices to make.
Figure 4-37: The new file association notification toast

Figure 4-38: The new Metro-style file association interface
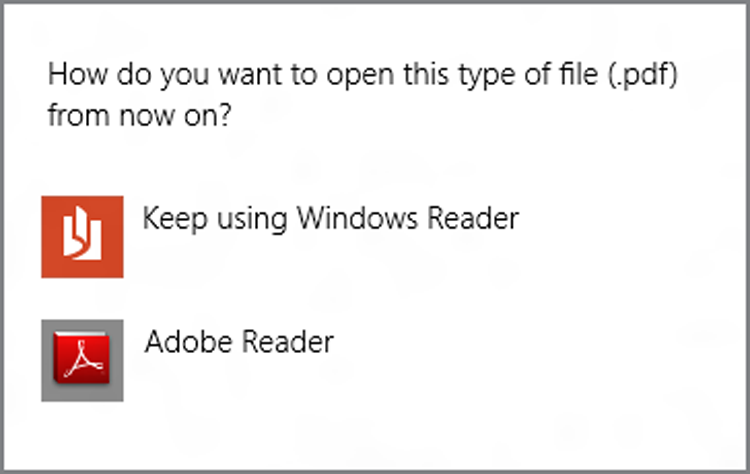
If you click the toast, you’ll be presented with a window similar to the one shown in Figure 4-38. (It will, of course, vary according to the file type.) Here, you see a list of Metro-style apps and desktop applications that can open a certain file type. And if you always want to open that file type with a certain application, this is a great time to make sure that happens.
And be sure to click the See All link to expand the window, when available, to see more options.
But what if you’re not quick enough and the toast disappears? Or perhaps you simply want to change the file association at a later time. In these situations, you can redisplay the new, Metro-style file association interface in a surprisingly old-fashioned way. Simply find a document or file type for which you want to change the associated application, right-click it, and choose Open With and then Choose Default Program. Voila!
How Pin to Start Works for New Application Installs
We discussed how you can pin any application to the Metro-style Start screen earlier in the chapter. What you might not realize, however, is that Windows 8 automatically pins application shortcuts to the Start search for you. This happens when you install any classic desktop application, and depending on the application, it can get ugly.
Some applications are simple, standalone affairs, and thus won’t pollute your Start screen with dozens of new icons. Install the desktop version of Google Chrome for example, and you’ll find that a single new tile is added to the end of the Start screen as shown in Figure 4-39.
Figure 4-39: When you install a desktop application, one or more tiles are added to the Start screen.

When you install more complex applications like Microsoft Office or Visual Studio, you could be in for a surprise: Some will populate the Start screen with multiple tiles, many for applications you’ll never (or perhaps rarely) need.
First, the bad news. You can’t stop this from happening. And the reason is simple: Because the Start screen replaces the Start menu, it emulates the Start menu, and this is the same behavior from Windows 7 and previous Windows versions, just a bit more in your face.
We discuss the many ways in which you can personalize the Start screen (and other aspects of Windows 8) in Chapter 5, but it’s wise to check this screen after each Windows application install to see which tiles were added. And then you can delete the ones you don’t want and, if desired, reorganize those you do.
Remember that deleting tiles from the Start screen won’t remove those applications. You can see this by opening the All Apps view by tapping Winkey (or Start) and then choosing All Apps from the Start screen app bar, which appears at the bottom of the screen. In this All Apps view, all of the installed applications are available and are even segregated in groups.
To display the toolbar-like control called the app bar at the bottom of the screen, right-click with the mouse, swipe up from the bottom of the screen with touch, or press Winkey + Z.
Switching Between Running Applications, Apps, and Open Windows
Even when Windows was just a simple graphical front end to MS-DOS, it supported means by which users could switch between various running applications, bringing one to the visual forefront and making it the current application. These task management capabilities have long worked with both keyboard and mouse, and even with touch, and include such well-understood tools as Windows Flip, the familiar Alt + Tab keyboard shortcut.
These capabilities largely come forward in Windows 8, which for the most part provides a superset of the multitasking and task-switching capabilities in Windows 7. But because Windows 8 includes the new Metro-style environment and full-screen Metro-style apps, there are a few differences.
What’s missing from Windows Flip? The Start screen. If you wish to go there, use the new Start experience, the Windows key on your keyboard, or the Windows key button on your device.
First, it’s now possible to task switch between Metro-style experiences (like the Start screen) and apps and the desktop. To do so, you can use Windows Flip as before, tapping Alt + Tab repeatedly until you find the application or app you want. In Windows 8, Windows Flip provides access to individual desktop applications, individual Metro-style apps, and the desktop, as shown in Figure 4-40.
Switcher treats the desktop environment as a single app, and doesn’t differentiate between individual desktop applications.
You can also use the new Switcher user experience, which was discussed earlier in this chapter. Switcher is mouse- and touch-friendly, and provides a new way to switch between running tasks.
Finally, it’s worth noting that the Windows Flip 3D task-switching interface that was available in both Windows Vista and 7 is no longer available in Windows 8. Now, the Windows Flip 3D keyboard shortcut—Winkey + Tab—activates Switcher instead. Sorry, Flip 3D fans.
Figure 4-40: Windows Flip now works with both Metro-style app and desktop applications.

Using Task Manager
As with the task-switching functionality described earlier, Windows has also offered an interface called Task Manager that, among other things, provides a way for users to manually kill processes and applications. It’s perhaps a sad statement that this interface is one of the most frequently used tools in Windows, but there you go. And in Windows 8, it’s gotten its most impressive upgrade in years, with a simple new user interface that offers a superset of the functionality from previous versions.
You can also access Task Manager from the power user tasks menu that appears when you activate the Start tip and right-click the Start tip thumbnail as described previously in this chapter.
Task Manager is accessible many ways, but the simplest is the tried-and-true method of right-clicking a blank area of the taskbar and choosing Task Manager from the context menu that appears. As you can see in Figure 4-41, the Windows 8 version of Task Manager offers a much simpler interface by default than its predecessors.
From this very simple interface, you can right-click an application and perform a number of actions, the most commonly used of which are End task (kill the application dead), Switch to (to bring that application to the forefront), and Open file location (which will display the application executable in File Explorer). But since End task is the single most common option, there’s a button just for that: To kill any application immediately, select it in Task Manager and click End task.
While it’s possible that the End task button and right-click menu will meet most users’ needs, the power users in the audience are probably looking at the interface and thinking that there are many missing features. But that’s only true because they’re hidden by default. Click More details and Task Manager will expand into a power user’s dream come true. Not only are all the capabilities from the Windows 7 Task Manager present, but there are new capabilities here as well. The advanced Task Manager interface is shown in Figure 4-42.
Figure 4-41: The simpler new Task Manager

Figure 4-42: Task Manager’s advanced UI

There’s a lot going on here, but the highlights include:
- Filtering for better application management: Using the various columns available in the Processes tab—CPU, Memory, Disk, Network, and so on—you can filter and pivot the view of running processes using a visual heat map view and get a better idea of how individual applications are impacting system performance. By filtering on Memory, for example, you can see which applications are sucking up the most RAM.
Try not to micro-manage Metro-style apps. Unless one is hanging, there’s little reason to kill it from Task Manager. Windows 8 will automatically close Metro-style apps when needed.
- Metro-style apps and desktop applications managed together: As you may have noticed, Task Manager lets you manage both traditional desktop applications and new Metro-style apps. And you do so with the same interface and commands.
Metro-style apps cannot auto-start at boot time.
- Manage startup applications: Task Manager now provides an excellent new capability on its Startup tab that helps you manage which desktop applications—not Metro-style apps—auto-start when Windows boots.
- Services: Users who wished to manage system services previously needed to use the Services control panel. While this control panel is still available in Windows 8, Microsoft replicates it in the Task Manager as well. In retrospect, this is a fairly obvious place for this functionality.
Finding and Launching Applications with Search
Windows 7 includes a fantastic feature called Start Menu Search. To use it, you simply tap the Start button, type the term you’re looking for, and the search results are returned right in the Start menu. It provides an amazingly handy way to quickly find an application you want without mousing around the labyrinthine Start menu submenus.
OK, fine. But with Windows 8 doing away with the Start menu, you may be wondering how you can accomplish the same feat in the new operating system version.
Surprise: It works exactly the same way.
You can also trigger app search by pressing Winkey + Q.
That is, if you’re using the desktop environment and would like to find and then run an application, just tap the Windows key on your keyboard (or otherwise return to the Start screen) and start typing. Instead of a Start menu–based search, you’ll see the new full-screen Search experience, now called Start Search, as shown in Figure 4-43. And it’s far more powerful than the old Start Menu Search.
This new Search experience now provides a filter capability where it returns both traditional Windows applications and Metro-style apps by default. But you can use the various items in the Search pane on the right to change the search to Settings (and control panels), Files (documents and other files), and, interestingly, within Metro-style apps that support this functionality.
Keep typing to refine the search. When you see the application (or app) you want, simply click (or tap, or select) it. If it’s a desktop application, the view will switch back to the desktop and the selected application will launch immediately.
Knowing that Start Search now works for settings, files, and apps, you’ll probably use it more than ever. But even if a desktop application search is all you need, you can rest easy knowing that one of Windows 7’s best features has carried forward to Windows 8.
If you know the type of search you wish to perform, you can use different keyboard shortcuts. Winkey + F works for file searches. And Winkey + W will jump right to settings search. Check the appendix for a full list of Windows key keyboard shortcuts.
Figure 4-43: The new Windows 8 Search experience

To the Cloud: Using the SkyDrive Desktop App
While Microsoft built SkyDrive support into the Metro environment, providing File Picker-based access to the files on that cloud service, as well as integrated setting sync for those who want it, there is one crucial bit missing for desktop users: you can’t natively navigate your SkyDrive storage using File Explorer.
Fortunately, you can overcome this issue by downloading a SkyDrive desktop application that integrates your SkyDrive storage with File Explorer, providing a libraries-like interface for exploring SkyDrive, copying and moving files to and from this cloud storage service, and syncing those files with your PC.
The SkyDrive desktop application works in Windows Vista and 7 as well.
Shown in Figure 4-44, the SkyDrive application integrates with File Explorer and also lets you upload large files (up to 2 GB in size) to the service, which isn’t possible through the normal web interface. And even more exciting, it provides a unique Remote Fetch functionality that lets you access files on remote PCs through the SkyDrive web interface.
The SkyDrive application and Remote Fetch aren’t really features of Windows 8, per se, so we won’t waste too much space on them here. But you should know that this application is available, since this functionality will make your Windows 8 experiences even richer.
Figure 4-44: Access and sync your SkyDrive storage from File Explorer.

While Microsoft is very clearly heading to a future in which increasingly sophisticated and full-featured versions of the Metro user experience will eventually squeeze out the classic Windows desktop, we’re a long way from that future. And honestly, Metro and the desktop will coexist for the foreseeable future, thanks to the over one billion PCs out there still running classic Windows applications and the vast depth of experience that users have with this environment.
Fortunately, Microsoft hasn’t left desktop users in the lurch with Windows 8. This version of Microsoft’s client OS includes deep integration with new core Metro user experiences, and many desktop-related improvements like a new File Explorer, a new Task Manager, a new file copy and move experience, and more. So even if you spend most of your day in the desktop, Windows 8 will be a useful and desirable upgrade.