
Chapter 12
Accounts and Security
In This Chapter
- Understanding accounts and account types in Windows 8
- Managing accounts with PC Settings
- Using advanced account management with Control Panel
- Using Microsoft Account features with other account types
- Understanding the new security features in Windows 8
- Protecting your PC from malware and viruses with Windows Defender
- Protecting your PC when Windows isn’t running
- Preventing malware downloads with Windows SmartScreen
- Understanding the Windows 8 improvements to Action Center and other security features
Everyone who uses Windows knows that you typically sign in, or “log in” as we used to say, to the PC using an account with which unique settings, documents and files, and even applications are associated. The types of accounts we’ve used in Windows have certainly evolved over the years, but for the most part, there have been two basic kinds of sign-ins: domain accounts, which are used exclusively by corporations, and local accounts, which are specific only to the PC on which they are used; home users and most individuals have always used this latter account type.
In Windows 8, Microsoft is introducing a new type of sign-in that is tied to a Microsoft account, or what used to be called a Windows Live ID. (With Windows 8, Microsoft is eliminating Windows Live as a brand, but is continuing its most popular products and services, often with new names.) As you’ll discover, this new account type is really just a formalization of a capability that debuted in Windows 7, but it takes on new prominence in Windows 8 thanks to this system’s pervasive PC-to-PC sync capabilities.
Windows 8 also provides interesting new choices for signing in, augmenting the long-lived password system with some new choices that may make more sense on today’s modern Windows devices and PCs. As always, securing your PC against electronic and human attack is job one for Windows 8, and in this version of Windows, you have more tools than ever to help ensure that your PC and its valuable data are safe.
But it all begins with your user account. So let’s look at that first.
Once relegated only to the corporate market, where they have always made sense because of their security and permissions boundaries, user accounts are central to today’s PC experience—so central, in fact, that you establish your user account when you first install Windows or set up your new PC.
Of course, user accounts aren’t generally as restrictive at home as they are at work. It’s your PC, after all, and most people rightly feel that they should be able to do anything they want on their PC. So that first user account you create, during Windows Setup, is automatically an administrator-class account, providing the permissions and access control that one would expect.
Families can further manage accounts using parental controls, which we’ll examine later in the chapter.
These local user accounts, or what we used to call workgroup accounts, work well enough for what they are. And they allow for some niceties, even at home. You can create multiple accounts on a single PC, giving users their own sign-in identity, along with its associated custom settings (desktop wallpapers and so on) and Windows and application configurations.
But local user accounts are starting to show the strain of time, and as our PC usage changes, so do the needs we place on them. For example, most people don’t bother to protect their own user accounts with a password, which can have huge ramifications in the event of a stolen PC. Local accounts are literally local to that one PC and thus hard, if not impossible, to replicate across machines; if you have more than one PC, as so many of us do now, making each one look and work the same is tedious. Local accounts make home network sharing difficult, too, which is why Microsoft created the homegroup sharing technique for Windows 7.
What’s interesting is that Microsoft basically solved these issues over a decade ago when they instituted the Active Directory domain services scheme in Windows Server. This system, which is used by corporations around the world, provides a more centralized approach to user accounts (and other things). So instead of signing in to a single PC and locking all of your personalized settings to that one machine, you sign in, instead, to the domain. And if you need to access a different machine, your customized experience can travel with you, so to speak, from PC to PC. With this scheme, the settings you typically think of being associated with an account are no longer locked into a single PC.
Active Directory is powerful and interesting, but it’s also far too complex for a home network and of course requires expensive and complex servers in addition to the PCs that people actually use each day. So this system isn’t well-suited for regular users at home.
So for Windows 8, Microsoft has created a new type of user account, based on your Microsoft account (previously called Windows Live ID) that provides many of the niceties of Active Directory but with none of the complexity. In fact, for most people, signing in to a Windows 8 PC with a Microsoft account is just as easy as doing so with a traditional local account. But there are numerous advantages to doing so.
So let’s examine them as part of a wider discussion about the types of accounts you can use with Windows 8.
Understanding Account Types
Windows 8 lets you sign in using three different types of accounts: domain, local, and Microsoft.
Domain Accounts
Domain accounts are used by corporations that utilize an Active Directory infrastructure running on top of Windows Server. The account is centrally managed by your employer, as are whatever permissions and capabilities you may be able to enjoy.
You connect Windows 8 to a domain as you did with previous Windows versions, using the advanced system control panel. Once the domain is configured, you reboot the PC and then sign in with your domain account’s username and password. In use, Windows 8 works almost identically to a local user account, but you lose some of the integration pieces that are special to Microsoft account sign-ins. As we’ll see in just a bit, there is a simple way to mitigate that issue.
Local Accounts
In Windows XP, Vista, and 7, most home users signed in to their PC using a local account, or an account that is, literally, local to that one PC. Local accounts are typically one of two account types, administrator or standard. An administrator essentially has complete control of the system and can make any configuration changes they want. A standard user can use most application software and many Windows services, but is prevented from accessing features that could harm the system. For example, standard users cannot install most applications, change the system time, or access certain Control Panel applets.
You can bypass this limitation by entering the credentials for an administrator account. You do so using a feature called User Account Control, which we’ll examine later in this chapter.
In previous Windows versions, most people simply used an administrator-type account because standard user accounts were so limiting and annoying. But with the move to multi-PC households and the PC-to-PC sync capabilities one gets with using a Microsoft account instead of a local account, our expectation is that the vast majority of Windows 8 users will no longer use local accounts. It’s still supported, of course, but it’s just depreciated.
Microsoft Accounts
Signing in to a Microsoft account is now the default, and preferred, way of doing things. A Microsoft account provides you with all of the benefits of a local account—simplicity and the ability to have both administrators and less privileged users—plus the benefits of the multi-PC settings replication of a domain account, and, of course, integration with Microsoft’s online services and third-party services like Facebook, Twitter, and more.
But the Microsoft account is more than a nicety. It’s required for many of the Metro-style apps that are built into Windows 8, including the productivity apps—Mail, Calendar, People, and Messaging—the digital media and Xbox apps—Xbox Music, Xbox Video, and Xbox LIVE Games—and more. Windows 8 was designed to integrate deeply with a Microsoft account, much like Windows Phone before it. And a Microsoft account is super easy to use.
For these reasons, we believe that signing in with a Microsoft account is the obvious choice for most Windows 8 users. Furthermore, we pretty much assume that you’re using a Microsoft account throughout this book because of the advantages of doing so.
There’s just one problem. In some cases, you can’t sign in to your PC with a Microsoft account the first time you set up Windows 8. For example, if your PC is offline the first time you use Windows 8, a Microsoft account won’t even be offered. But the more obvious example, perhaps, is a work PC: There’s no way that corporate will let you or other users bypass the built-in security features of their carefully crafted policies and sign in with your personal Microsoft account.
If only there was a way around this limitation.
Making the Most of a Domain or Local Account
If you are signing in to a PC with a domain or local account, there are some changes you can make to provide you with the best possible experience. Which you do will depend somewhat on whether you’re currently signing in to Windows 8 with a local account or a domain account. These changes include:
You cannot do this with a domain account. Only a local account can be switched to a Microsoft account.
- Switch a local account to a Microsoft account: If you opted out of the Microsoft account sign-in when you first set up Windows 8, perhaps because you were confused by this new account type and simply wanted things to be as close as possible to the way it was in Windows 7, Microsoft actually lets you change your local account after the fact and switch it to a Microsoft account.
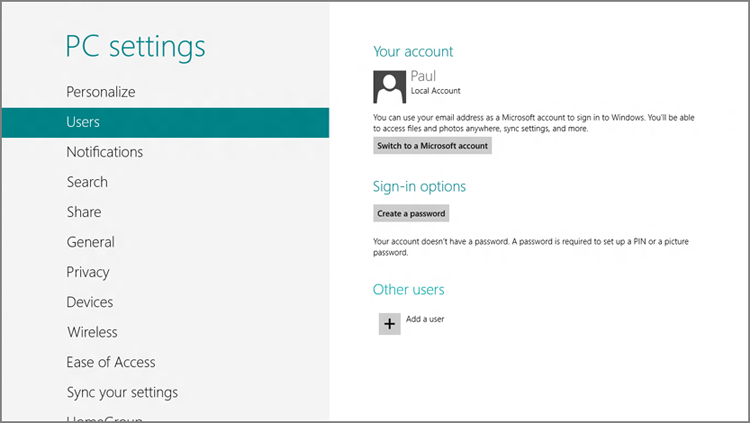
To make this change, navigate to PC Settings and then Users. Then, under Your account, click the Switch to a Microsoft account button, as shown in Figure 12-1. Voila! Problem solved.
You can also use this same interface to switch from a Microsoft account to a local account. And no, we can’t think of a single reason why you’d want to do this.
Figure 12-1: You can convert your local account to a Microsoft account at any time.
- Connect a domain account to a Microsoft account: If you’re using a domain account, you can’t switch it to a Microsoft account. But you can link your domain sign-in with your Microsoft account, achieving the same benefits as you’d get by simply signing in with a Microsoft account. In the business, this is what we call a “best of both worlds” solution.
To do so, navigate to PC Settings and then Users. Under Your account, click the Connect your Microsoft account button. When you do, the screen shown in Figure 12-2 appears. Here, you choose which PC settings you’d like to sync with your domain account.
Figure 12-2: You can connect a domain account to a Microsoft account and even choose which settings to sync.

After choosing which settings to sync, you will sign in to your Microsoft account and confirm or enter your security verification information, just as you do when you sign in with this type of account normally. And from now on, you can use Microsoft’s account services—and the bundled apps in Windows 8 that take advantage of them—seamlessly, without needing to sign in with each app. Actually, it’s even better than that: Some apps simply won’t work unless you sign in with a Microsoft account. This linking process makes them work.
Why This May Not Work
Okay, there’s a huge gotcha to this scheme. (You had to sort of expect there was going to be one.) It goes like this: Your domain administrators simply may not allow it. Whether they do will depend on a number of factors, but it all boils down to whether your environment is highly controlled. So all you can do is try and hope for the best.
- Sign in to app groups with a Microsoft account: There is a third approach, one that provides a more limited way to access some Microsoft account goodness, but without changing your domain or local account in any way. That is, instead of linking or switching your existing sign-in account, you can simply try to run one of the connected apps in Windows 8 and then sign in when prompted by a screen that will resemble Figure 12-3.
Figure 12-3: If you can’t or won’t use a Microsoft account, you can instead sign in to various app groups.
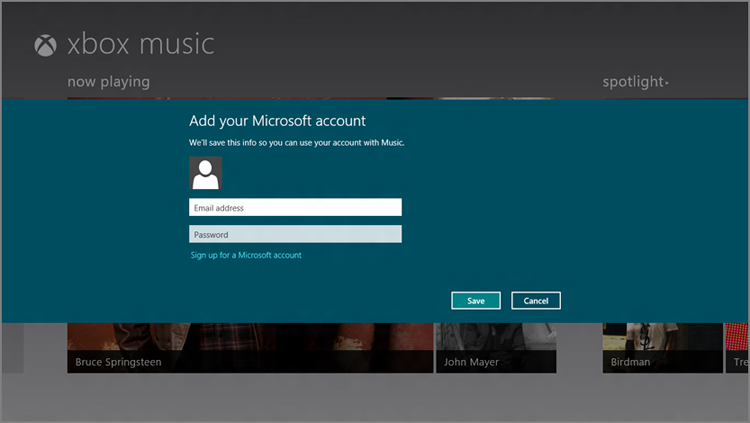
This approach isn’t as sophisticated as using (or linking) a Microsoft account. You’ll need to sign in a few different times, to different app groups—Microsoft considers the productivity (or what it calls “communications”) apps to be one group, for example, and the Xbox (media and games) apps to be a separate group. And you don’t get the PC-to-PC settings sync functionality that’s available with a real Microsoft account sign-in. But if you don’t have a choice—or are just really, really stubborn—this will at least let you use the built-in Metro apps to their fullest.
Managing Accounts
In previous Windows versions, we managed local user accounts in Control Panel, a desktop user interface that dates back to the earliest days of Windows. But in Windows 8, basic user account management tasks now occur within the Metro-based PC Settings instead, while, confusingly, a few more advanced or esoteric features can still be found in legacy control panels. So you may find yourself moving back and forth between the two environments depending on your needs.
Let’s start with the basics.
Managing Accounts in PC Settings
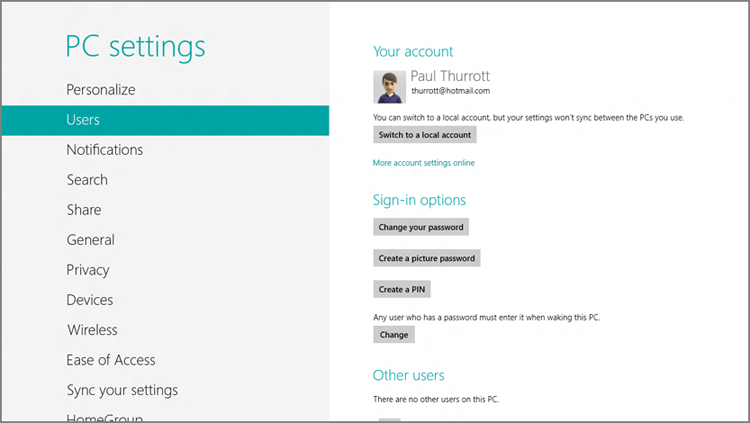
Like many Metro interfaces, the Users section in PC Settings is almost disarmingly simple. As you can see in Figure 12-4, this UI lets you manage features related to your own and other user accounts. (This figure displays the version of this screen that most users will see, since it depicts a Microsoft account.)
Figure 12-4: PC Settings provides a new user management interface.
These features, which vary somewhat depending on the type of account you use to sign in, can include:
- Switch to a local account/Switch to a Microsoft account: If you’re signed in with a Microsoft account, there is a Switch to a local account button that will let you do just that, albeit at the expense of losing all of the included functionality one gets with such an account type. If you are signed in with a local account, however, you will see a Switch to a Microsoft account button instead.
- Connect your Microsoft account/Disconnect your Microsoft account: Those who are signed in with a domain account (used only in corporations and other businesses) will see a button, Connect your Microsoft account, as described earlier in this chapter. If you’ve already connected your domain account to a Microsoft account, you will see a Disconnect your Microsoft account button instead.
- Change your password: Those with local or Microsoft account sign-ins can change their password at any time using this button. Domain users will not see this option; instead, you can type Ctrl + Alt + Del and choose the Change a password option from the full-screen menu that appears. However, your ability to actually change your password will be based on corporate policy. (And, in fact, many businesses may require you to change passwords on a regular schedule, whether you want to or not.)
- Create a picture password/Change a picture password: With the advent of touch-based Windows devices, including tablets and other touch screen devices, Windows 8 now offers two fun and efficient new ways to sign in to your computer: picture password and PIN (the latter of which is described next). Neither replaces your normal password. Instead, you can use either to implicitly sign in to the system using your actual password, but using a method that is simpler (and, in this case, a bit more fun) than a normal password. This is especially useful because tapping out a long password on a touch screen can be tedious.
A picture password is essentially a photo over which you trace any combination of three circles, lines, and/or taps, using the device’s touch screen. You might imagine a picture of a family member where you “poke” them in each eye and then draw a smile over their lips as an example of this type of sign-in (though not necessarily one you would want to choose to use, since such a combination of swipes is fairly obvious and could undermine the security of your PC).
Creating a picture password requires completing a short wizard. After providing your password to prove that this is your account, you’re prompted to choose the photo you’ll use. Obviously, you can use any photo of your choosing.
Once you’ve selected the picture and the wizard has verified this selection, you’ll be prompted to set up your gestures, as shown in Figure 12-5. Here, you choose the three gestures you want to use—again, any combination of three circles, lines, and/or taps—as your sign-in.
Figure 12-5: Creating a picture password

The wizard will make you repeat the gestures to ensure that you’ve got the sequence memorized correctly, and then you’re good to go. You can later change the picture password or remove it.
Common Sense Security Tips for Picture Password
With the understanding that common sense is a key aspect of anyone’s personal security regimen—and, on the flip side, that human error is almost certainly the number one factor behind most security mishaps—we feel compelled to remind readers that picture password, like any other authentication scheme, is only as secure as you make it. So use some common sense when creating a picture password, keeping the following tips in mind:
- Complexity: It’s not hard to guess that a picture password that uses a person’s headshot as the picture most likely involves poking both eyes and making a smile across the lips. Be more creative than that and use a photo that is more complex, with less obvious points of interest.
- Use different gestures: Three identical straight lines do not secure apicture password make. Consider mixing it up, using a combination of taps, straight/curved lines (in both directions), and circles that move in both directions (clockwise and counter-clockwise).
- Physically shield the screen: You wouldn’t let strangers watch you enter your bank card’s PIN at a cash machine. Don’t let onlookers see your picture password . . . no matter how cute you think it is.
- Clean the screen: Today’s touch-screen devices leave indelible smudges each time you tap or gesture. So be sure to keep your screen clean, reducing the chance that someone could tilt the device in the light and quickly guess which gestures you use to sign in.
You’re not locked into using this or any other sign-in type. You could have a password, a picture password, and a PIN all configured for the same account and then choose which to use at sign-in time.
- Create (or change) a PIN: If you’ve ever used a smartphone, you know that four-digit PINs, or personal identification numbers, are the norms for securely signing in on such devices. This sign-in option allows you to use the same convenient sign-in type on your Windows PC or device, and while it’s particularly nice for touch-screen devices, we’ve both switched to using this sign-in type on our traditional desktop PCs, too, since it’s so fast. Setting up a PIN is very straightforward, and each digit must be a number.
NOTE Oddly enough, you can use the picture password and PIN sign-in types even with a domain account. However, some corporations have very strict password policies, so as is the case with other options in this chapter, you may not be able to use these features with a work-based domain account.
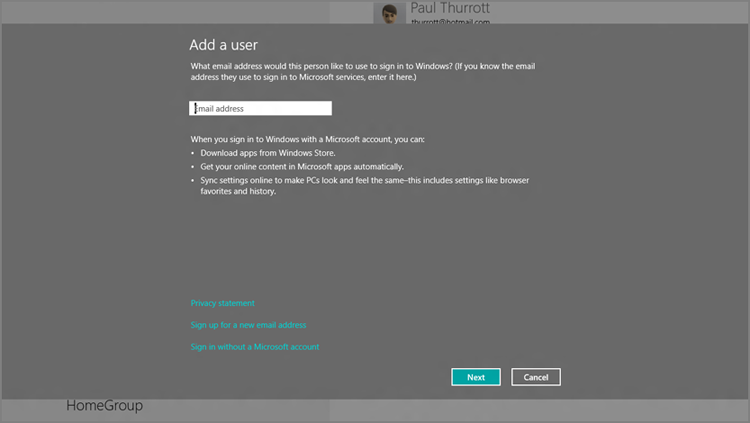
- Add a user: If you select the Add a user link under Other users, you’ll be presented with the new full-screen interface shown in Figure 12-6. It’s set up for a Microsoft account by default, but you can click the link titled Sign in without a Microsoft account to configure a traditional local user account instead.
Figure 12-6: Add a user, Metro-styled
So, yes, you can mix and match Microsoft and local accounts (and even domain accounts) on a single PC, though our general rule about using Microsoft accounts exclusively when possible still applies for your own PCs.
Advanced User Management with Control Panel
PC Settings is cute and everything, but if you want to dive into the nitty-gritty of user account management, you’ll need to visit the old-school Control Panel interface instead. And yes, you still want to know about this interface even if you’re not particularly interested in advanced features. And that’s because there are certain things related to account management that you can only do from Control Panel.
For example, the very first account you create with Windows 8 is always an administrator-class account, and that’s true whether that account is a Microsoft account, as recommended, or a traditional local account. But when you create other accounts, as explained earlier, those accounts are not administrator-type accounts. And the Metro-style PC Settings interface doesn’t offer any way to change them.
But Control Panel does. In fact, Control Panel provides so much additional functionality with regards to user accounts that it seems a shame to ignore it.
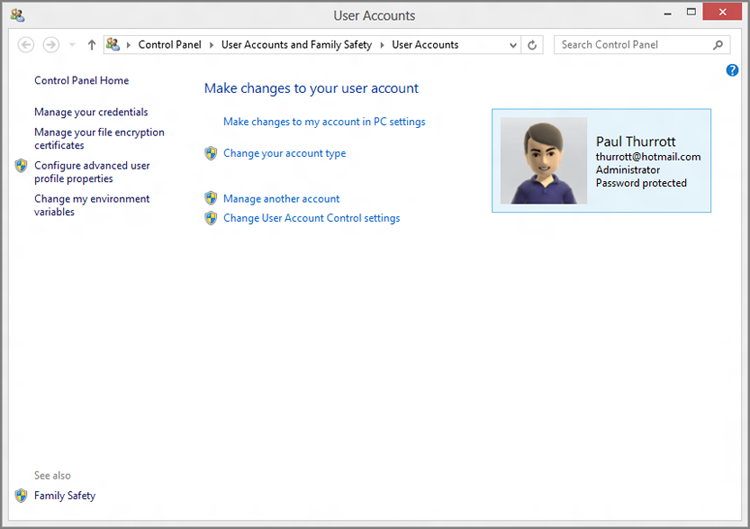
Of course, you need to find it first. The easiest way is via Start Search: Display the Start screen, type user, select the Settings filter in the right pane, and then choose User Accounts in the results list. This displays the old-school User Accounts control panel, as shown in Figure 12-7.
Figure 12-7: User Accounts control panel
Here are some of the user account–related tasks you can only complete using Control Panel:
If you have only configured one user account, you cannot, however, change it from an administrator-type account to a standard user account. You must always have one administrator configured on the PC.
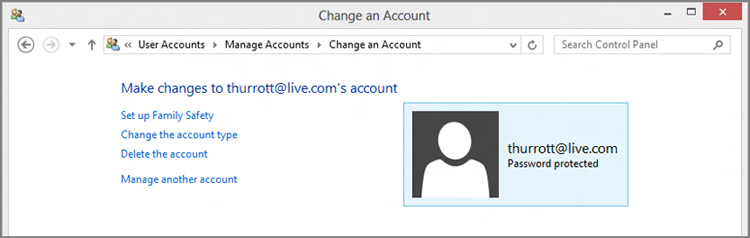
- Change an account type: As noted previously, the first account you configure on your PC—whether it’s a Microsoft account or a local user account—is an administrator-type account. But what about subsequent accounts? As it turns out, all subsequent account additions—be they Microsoft or local accounts—are created as standard users, not administrators. This may be desirable, but if you’d like to change an account from one type to the other, you can do so.
To change an account’s type, click the link Manage another account in the User Accounts control panel. This will change the display to resemble Figure 12-8, where you can choose an account to change.
Figure 12-8: The Manage Accounts interface lets you configure user accounts.

When working with a local account, you can also use this screen to change the account name, create or change the password, set up parental controls, or delete the account.
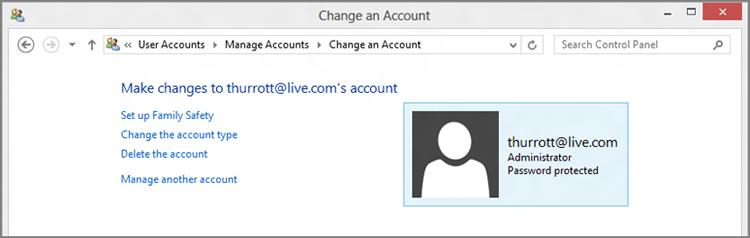
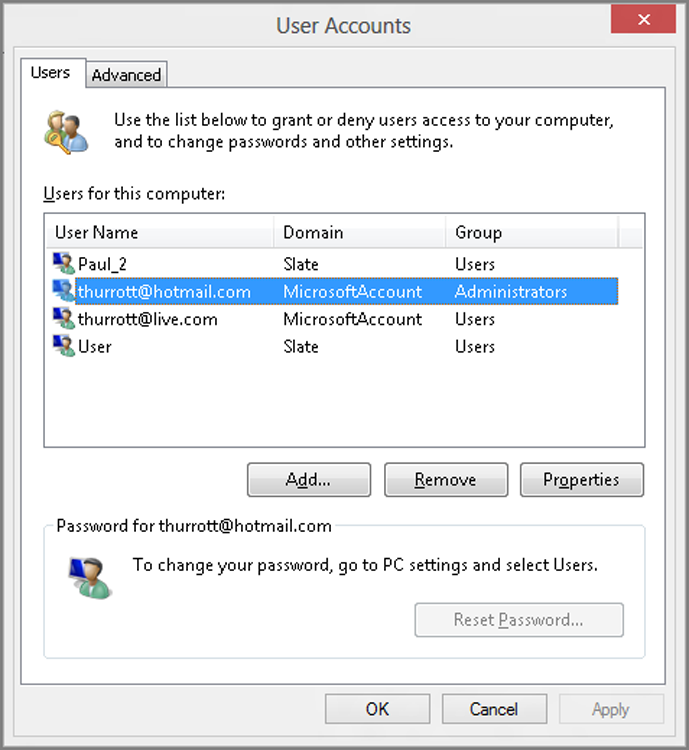
Select the account you wish to modify to display a screen like that in Figure 12-9. Here, you can see a secondary Microsoft account that was automatically configured as a standard account type when it was added to the system.
Figure 12-9: If it doesn’t say Administrator above “Password protected,” it’s not an administrator.
When working with a Microsoft account, you can also use this screen to set up parental controls or delete the account (from the PC).
Click the Change the account type link, choose Administrator, and then click the Change Account Type button. Now, you can see as in Figure 12-10, that this other Microsoft account is an administrator too.
Figure 12-10: The secondary Microsoft account has been transformed from peasant to lord.
- Manage User Account Control: In Windows Vista, Microsoft introduced what was then a very controversial feature called User Account Control, or UAC, which took advantage of Microsoft’s efforts to componentize Windows by dividing each of the system’s functional entities, or components, into one of two groups: those that require administrative privileges and those that don’t. Those that don’t would just work and you could just go about your day and not really think about the security implications of anything underpinning the system.
But then there are those other components that do require an administrator-class account to actually work. Those components are a bit trickier. These components will trigger a UAC dialog, or prompt, that must be bypassed before you can continue whatever task you are trying to complete.
UAC is theoretically annoying, but it’s been refined over the past two Windows versions to be, well, less noisy. That is, it doesn’t rear its head very often anymore, and if you’re logged in with administrator privileges—and chances are, you are—it will rarely do more than interject a small “Are you sure?” type dialog to interrupt your workflow.
This interruption will vary according to what you’re trying to do—a UAC prompt appears when you try to install an application, for example—and according to what type of user account you’re using. But the important thing to note is that the presentation of UAC prompts hasn’t really changed since Windows 7. So unless you’ve been using Windows XP for the past few years, you already get the drill. It works much as it did in Windows 7 and is much less annoying than it was in Windows Vista.
Configuring User Account Control works as it did in Windows 7, via the User Account Control Settings control panel. So there’s no need to waste time on it: UAC works as before, isn’t annoying, and shouldn’t be messed with.
NOTE Okay, there is one interesting side note about UAC in Windows 8: One place you’ll never see this prompt is in any of Windows 8’s Metro experiences. That’s because UAC is a desktop technology, and the Metro environment has its own more pervasive protections built in and designed to protect the OS from exactly the kinds of issues that UAC, too, is aimed at.
- Enable and configure Family Safety: Microsoft first provided pervasive Windows-based parental controls functionality in Windows Vista, providing parents with a way to create and enforce settings related to computer usage, including a web filter (for allowing and disallowing individual websites and downloading), time limits, games, and applications (including which can and cannot be used).
Parental controls are not available when you sign in as a domain user.
In Windows 8, Microsoft is carrying forward the parental control functionality from its predecessor, and it works almost exactly the same way, with a few useful improvements. Parental controls, called Family Safety in Windows 8, can be applied only to non-administrator accounts—including Microsoft accounts, which is indeed new to Windows 8—and is administered one account at a time.
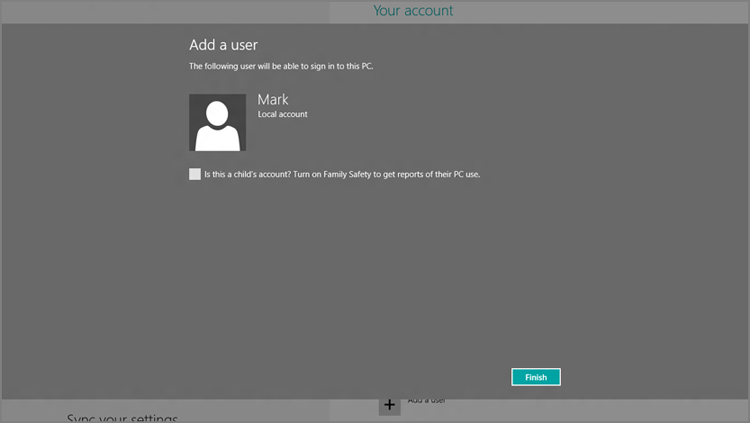
There are two ways to add parental controls to an account. You may recall that when you add a new account to the system, it’s silently created as a standard user account, and not as an administrator. So as an added nicety, Windows 8 provides a check box option, shown in Figure 12-11, which lets you enable Family Safety right when the account is created.
Figure 12-11: You can enable parental controls when you add a new account to the PC.
Or, you can add parental controls to an account after it has been created. To do so, select Manage another account from the main User Accounts control panel, select the account you want to manage, and then select Set up Family Safety. The Family Safety interface resembles Figure 12-12.
Figure 12-12: Family Safety helps you protect your children online and on the PC.
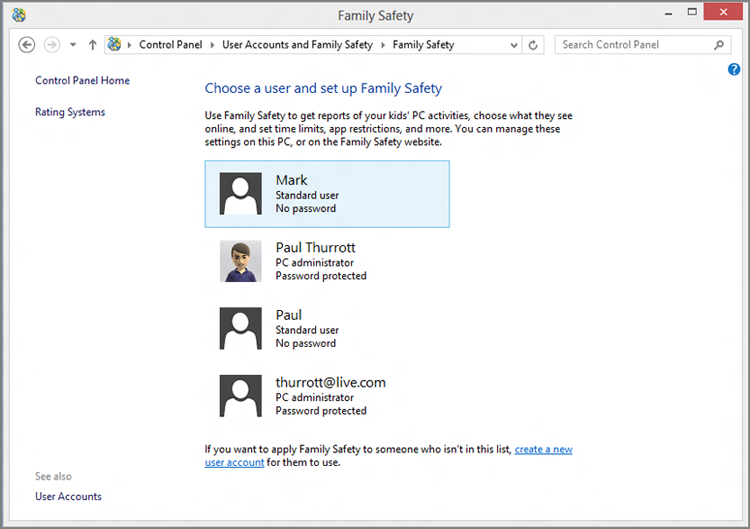
If you’re familiar with the parental controls functionality that was included in Windows 7, all of the functionality from that release carries over into Windows 8. But there are a few useful additions in this release, too. For example, where the Windows 7 parental controls allowed you to specify the hours of each day that the child could use the PC—this feature is now called “curfew”—Windows 8 adds the ability to limit how many hours they can use the PC each day as well. Additionally, Family Safety integrates with Windows Store so you can see and control which Metro-style apps and games your child downloads, based on country-specific ratings; in the United States, we use ESRB (Entertainment Software Ratings Board) ratings.
- Enable the Guest account: While you can go to great lengths to protect standard user accounts with parental controls, sometimes all you’re looking for is a single, temporary user account with standard user privileges that anyone can use. As with previous Windows versions, Windows 8 includes such an account, called the Guest account, and it’s a safe and easy way to let others use your PC without worrying that they’re going to view, modify, or delete any crucial data, uninstall or change an application, or perform other dangerous tasks.
To enable the Guest account, select Manage another account from the main User Accounts control panel. Then, in the Manage Accounts screen, choose Guest. (Its icon will note that the Guest account is off.)
The control panel will ask you whether you’re sure you wish to enable this account, noting that password-protected files, folders, and settings are not accessible to guest users. Click Turn on to enable the Guest account.
Now, when you leave the computer, you can lock your account (easiest way: Winkey + L). And then your children or actual guests can browse the web, run apps, and perform other common duties using the Guest account while you’re away: A new Guest option will appear on the lock screen.
Remember that the Guest account is temporary to each sign-in. So when the user signs out of the Guest account, any settings changes or documents they’ve created will be deleted. Each time you sign in to the Guest account is like the first time that account is used, and nothing is retained.
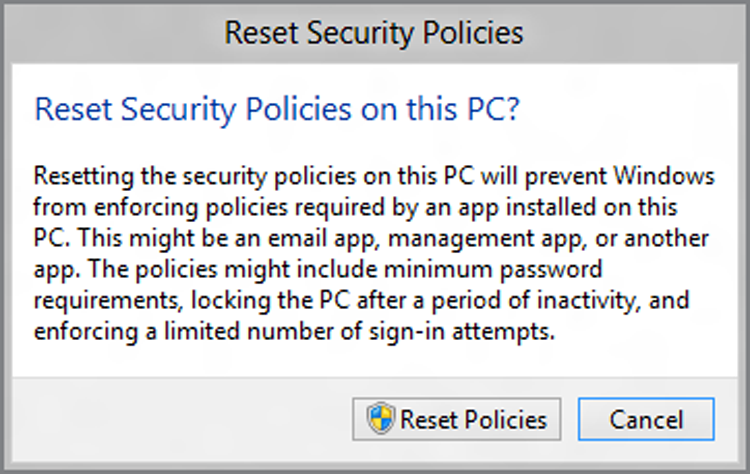
- Reset EAS Policies: When you sign in to a Windows 8 PC or device with a Microsoft account, you’re using a technology called Exchange ActiveSync (EAS) under the covers to provide push-based access to your Hotmail-based e-mail, calendar, contacts, and other data. EAS is a Microsoft-created corporate standard that is used by Hotmail and Microsoft’s Exchange- and Office 365-based services, and also by competing services from Apple, Google, and other companies. (In this way, it’s a de facto standard for all modern mobile devices.) And one of its big advantages is that it supports the notion of EAS policies, which can set restrictions on the device—smartphone, tablet, or PC—that you use to access the underlying services. For example, your workplace may want to ensure that you sign in with an account that has an acceptable password (from a length and complexity standpoint) and then auto-locks after a certain period of inactivity.
When you sign in with a Microsoft account, whatever restrictions Hotmail enforces are automatically applied to your PC. But this is only required if you are using Microsoft’s bundled Mail app. If you access Hotmail’s e-mail, calendar, and contacts from a Windows application, or from the web, you can decouple Hotmail’s EAS policy requirements from your PC. And, oddly enough, you do this from the User Accounts control panel: Just click Reset EAS Policies on the left, and you’ll see a window like the one shown in Figure 12-13.
Figure 12-13: You can reset EAS policies on your PC.
The User Accounts Control Panel and Domain Accounts
The User Accounts control panel experience described in this chapter applies only to those who sign in with a local or Microsoft account. If you sign in with a domain account—or on a PC for which a domain account has been configured—you’re going to see some different options in the User Accounts control panel.
While many of these options are only of interest to domain administrators, it’s worth pointing out one of the common tasks we mentioned earlier is managed using this interface: changing an account type. To change an account type, click Manage User Accounts. Instead of opening a new view in the User Accounts control panel window, you will see the old-school windows in Figure 12-14.
Figure 12-14: User Accounts management on a domain-based system.
Now, select the account you want to change—and if you see two entries for one account, as you will for Microsoft accounts, choose the top one—and click Properties. Then just choose Standard user or Administrator from that window.
The easing of restrictions will apply until and unless you run the Mail, Calendar, People, or Messaging app(s) again. At that time, the EAS policies required by Hotmail will be simply be silently reapplied. If you sign in with a corporate account, however, it won’t be so silent: You’ll be prompted to accept the policies change.
Security and Windows 8: Keeping Your PC Safe
While Mac partisans and tech pundits like to present a tortured view of how difficult it is to secure a Windows PC, the truth is far less dramatic. Previous to Windows 8, there were a few simple steps you could take to technically secure your PC—enabling automatic updates and installing an antivirus solution—and that, combined with some good old-fashioned common sense was all that was required.
In Windows 8, you’ll be ecstatic to know, it’s even easier.
Under the hood, of course, Microsoft’s decades-long commitment to system security continues. This version of Windows includes the same anti-malware technology, firewall, User Account Control, and other security features that made Windows 7 the most secure version of Windows yet. And then they turned it up a notch by adding two crucial new features: Antivirus is now included in the OS, finally, so you won’t need to add that separately. And the SmartScreen protection feature that the company debuted in Internet Explorer 9 is now part of Windows, so you’re protected even if you use competing browsers.
You’ll still want to employ common sense. But that’s not a focus of this book.
Windows Defender
Microsoft has included an integrated anti-spyware and anti-malware solution called Windows Defender since Windows Vista. Defender was good at what it did—in fact, most Windows users simply aren’t even aware of its existence, which is proof of its efficiency—but it’s always been lacking one crucial feature: It didn’t include antivirus functionality. So we recommended an external and free utility called Microsoft Security Essentials (MSE) for this purpose: MSE looked and worked just like Defender, but it added that one crucial feature, completing the Windows security picture.
Now, Windows Defender includes the same antivirus functionality that used to be part of Microsoft Security Essentials. It’s built into Windows 8, it’s enabled by default, and you get it for free, just for buying into Windows 8.
This is exciting because both of us have used MSE for years, and we trust it to protect not only our own PCs, but more crucially those of our families and friends. And we’ve experienced no major issues yet. Not once.
So our advice is simple. Assuming you’re not spending your time in the nether regions of the web, downloading illegal software and goodness knows what else, Windows Defender is enough. It’s lightweight and quiet, and it won’t bother you with annoying pop-up dialogs. You won’t need other security applications or even more expensive security suites. You know, assuming that common sense is employed.
TIP Okay, there is one more thing you can continue doing from time to time: Use a second anti-malware utility. (You should never use two antivirus solutions, however, because they will interfere with each other.) It’s not necessary to leave the second anti-malware utility running in real time, but it’s a good idea to run it once in a while, just to make sure something hasn’t slipped by.
But we know you want to know a bit more about Windows Defender.
Shown in Figure 12-15, Windows Defender has a simple interface. From here, you can trigger a malware and virus scan, check for updates, view the history of Defender’s activities, or access various options. It works just as Defender did in Windows 7, except that it’s now checking, in real time, for viruses as well as spyware and other malware.
Figure 12-15: Windows Defender
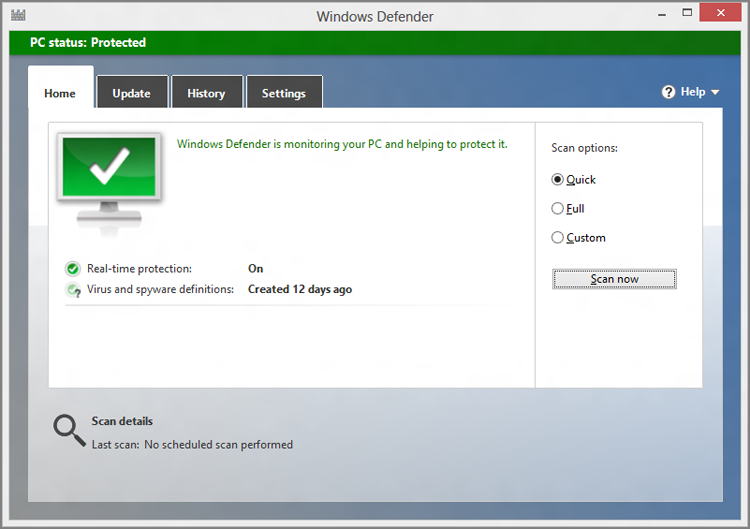
There’s not a heck of a lot to do here. Configured properly, Defender’s real-time protection against viruses and malware will be enabled, and its virus and malware definitions—part of its ability to detect errant software—should be up to date. You can manually update the definitions from the Update tab, but it’s unlikely there’s an issue here unless the PC has been offline for weeks or longer.
Potentially harmful items that have been found are cataloged on the History tab. Here, you’ll see different buckets for quarantined, allowed, and all detected items. If there are any items here, you can further remediate them if you’d like—perhaps by removing them entirely—but there’s usually no reason to bother.
The Settings tab has, as expected, a number of configuration options and is worth looking at. For example, you can configure Defender to scan removable drives during a full scan. This is desirable if you regularly use an external disk, like a USB hard drive, when you’re home. You can also configure Defender to automatically remove quarantined items after a set time period—by default it does nothing—and determine whether to participate in Microsoft’s Active Protection Service, or MAPS, which is used to make Defender more effective for everyone. Do your part: We recommend at least a basic membership.
Boot-Time Security
Windows Defender, like its predecessor, is great at what it does. But there’s one problem with an integrated antivirus and anti-malware solution like Defender, and that is that Windows 8 must be running for it to work. There are certain situations in which you may wish to secure your PC’s hard disk—just as when it’s booting—or need to run a security scan against the hard disk when Windows isn’t running. And while one might argue that these capabilities aren’t technically Windows 8 features per se, you need to know about them.
First, as PCs have become more sophisticated, the architecture on which Windows runs has evolved. And one of the biggest changes that Windows 8 has been designed to accommodate is the long overdue switch from the primitive BIOS (basic input/output system) environments that have graced (disgraced?) PCs since the 1980s. BIOS is a type of firmware, a tiny bit of software that runs before Windows when the PC first powers on. And while it’s possible to run Windows 8 on a BIOS-based computer—basically every single PC made before 2012—a new generation of more sophisticated PCs and devices are instead using BIOS’s replacement. It’s called UEFI, or the Unified Extensible Firmware Interface.
UEFI provides many advantages over BIOS, but from a security perspective the big deal is that PCs based on this firmware type can support a new technology called Secure Boot. Based on industry standards, Secure Boot ensures that a system hasn’t been tampered with while offline. (That is, while Windows isn’t running.)
It sounds Orwellian but the purpose of Secure Boot is valid: It targets a growing class of electronic attacks that insert code before Windows boots and try to prevent the OS from loading security software like Windows Defender at boot time, leaving the system vulnerable to further attack. Secure Boot ensures that only properly authorized components are allowed to execute at boot time. It is literally a more secure form of booting.
All Windows 8 PCs and devices will be configured from the factory to support Secure Boot and have this firmware feature enabled. But if you are going to install Windows 8 on a previous PC, you can check to see whether this feature is supported and then enable it before installing the OS.
As a feature of the PC firmware, Secure Boot isn’t configured in Windows; it’s configured in the UEFI firmware interface. This interface will vary from PC to PC, but it’s generally available via a Boot or Security screen in the firmware and is toggled via an option that will be labeled UEFI Boot. This can be set to Enabled or Disabled.
The other security issue that arises at boot time occasionally is the need to scan an offline system. That is, you may want to run a Windows Defender security scan against a Windows 8 hard disk, but when Windows isn’t running. This can be a vital capability if your system is infested with a bootkit or rootkit, malicious forms of software that are both hard to detect and almost impossible to remove . . . when Windows is running. But if you can attack bootkits and rootkits while Windows is offline, then voila! Problem solved.
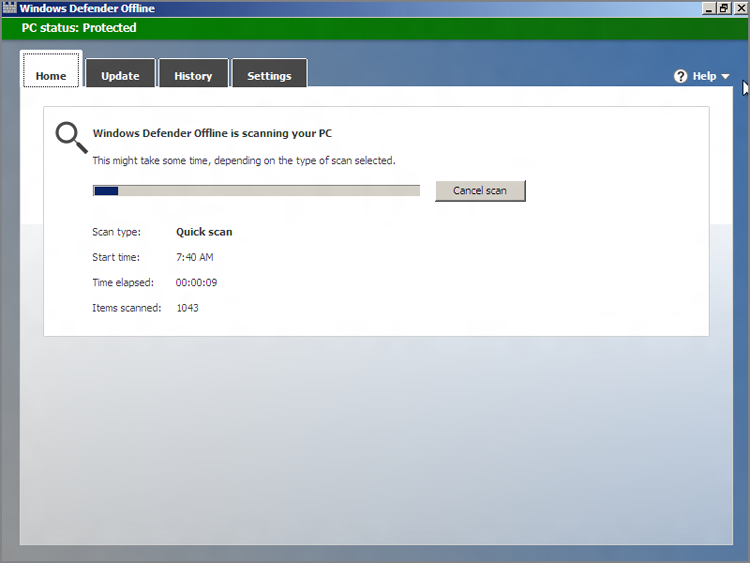
Fortunately, Microsoft makes a standalone version of Windows Defender called the Windows Defender Offline. As you might expect, it is based on Windows Defender, and looks almost identical to that tool. But you install it to a bootable optical disc or USB memory stick and then boot the PC from that. Windows Defender Offline is shown in Figure 12-16.
Strictly speaking, there’s no reason to run Windows Defender Offline unless you know you have a problem. But don’t wait to create a bootable Windows Defender Offline disc or USB key until you have a problem: This is a tool you should have at the ready, just in case. You can download Windows Defender Offline from the Microsoft website at tinyurl.com/defenderoffline.
CROSSREF Some related security features, BitLocker and EFS, can be used to protect the contents of a Windows PC’s hard drive. These are discussed in Chapter 14.
Figure 12-16: Windows Defender Offline can clean an offline PC.
Windows SmartScreen
Microsoft added an interesting and useful security feature to Internet Explorer 9 called SmartScreen that helps guard your PC against malicious software downloads. IE 9’s SmartScreen feature works very well, but of course it can’t help you if you use a different browser, such as Google Chrome or Mozilla Firefox, or if you download a malicious file through another means, such as an e-mail application or USB storage device.
SmartScreen uses a Microsoft hosted “reputation” service that uses actual user feedback to help determine whether files are trustworthy. So that means you can help make the service more useful for everyone simply by using this feature.
To help protect you against malicious software more globally, Windows 8 includes a special version of SmartScreen, called Windows SmartScreen, which protects the filesystem against malicious files, no matter where they come from. Windows SmartScreen works exactly like IE 9’s SmartScreen feature, meaning it utilizes both holistic sensing technologies and an Internet-hosted service to determine whether files are malicious or at least suspected of being so.
Configuring Windows SmartScreen
To configure Windows SmartScreen, you’ll need to launch Action Center, which is available via the system tray (it’s the icon that resembles a cute little white flag) or through Start Search.
Using the Action Center route, you’ll see an option on the left of the window called Change Windows Start Screen settings. Click this option to display the window shown in Figure 12-17.
Figure 12-17: Windows SmartScreen settings
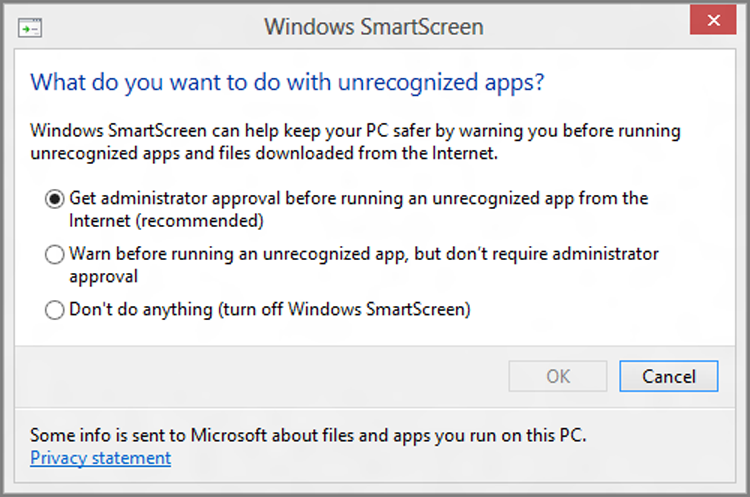
We recommend using the default setting, which is “Get administrator approval before running an unrecognized app from the Internet.” Unless you’re regularly hanging out in torrent sites or other gray areas of the Interwebs, you’ll find this isn’t too annoying.
Using Windows SmartScreen
When Windows SmartScreen fires up, you’ll know it: The full-screen notification shown in Figure 12-18 displays, interrupting whatever you were doing.
Figure 12-18: Windows SmartScreen notifications are a bit hard to miss.
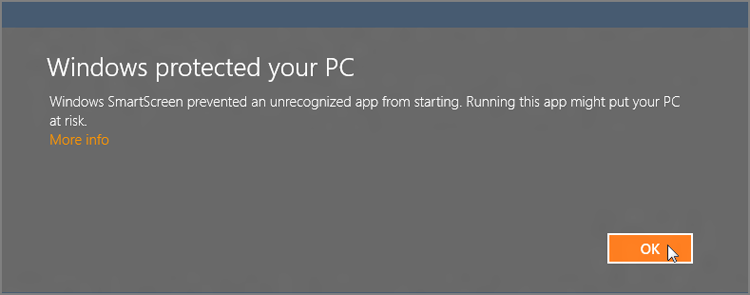
As with any full-screen notification, you’ll want to deal with this before proceeding. And while SmartScreen can certainly suffer from false positives, our advice is to think very carefully before just dismissing this. It’s warning you for a reason.
Action Center Improvements
If you’re familiar with Action Center from Windows 7, you know that it’s an improved version of the Security Center that dates all the way back to Windows XP with Service Pack 2. In Windows 8, Action Center carries forward largely unchanged in that it still performs the same function of tracking security and troubleshooting items in the OS and popping up notifications when something goes wrong.
What’s changed is that Action Center now tracks far more items than it did in Windows 7. And while many of the items it tracks are, as you might expect, related to new features in Windows 8, some aren’t. It’s just fleshed out better.
In Windows 8, Action Center now tracks these additional items:
- Windows SmartScreen: This security feature, described earlier, debuted in Windows 8 and provides anti-malware protection directly through the Windows filesystem.
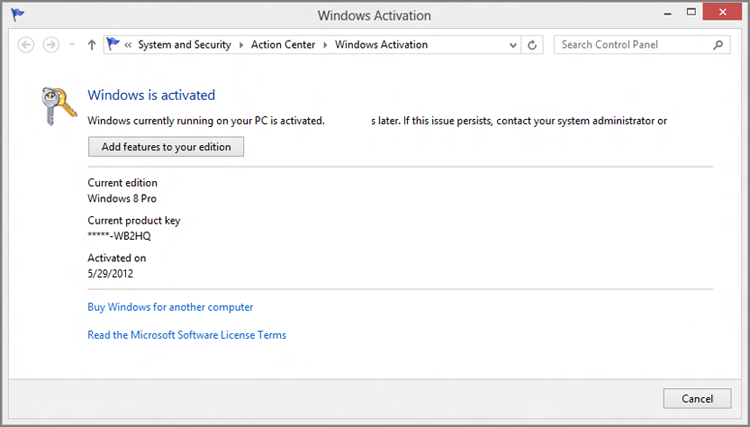
- Windows activation: While activation is hardly new to Windows 8, Microsoft has created an Action Center experience in this release that tracks whether your copy of Windows is activated, and thus valid. You can see this interface in Figure 12-19.
Figure 12-19: Windows is activated
- Microsoft account: The ability to sign in to Windows 8 with a Microsoft account is obviously new to this version of the OS, but the underlying technology that Action Center is actually tracking here is whether your account is working properly and syncing settings from the PC to SkyDrive (and thus to other PCs) and vice versa.
- Automatic maintenance: Like previous Windows versions, Windows 8 will automatically run a scheduled maintenance routine at a set time, 3:00 a.m. What’s changed in Windows 8 is that this activity is now tracked by Action Center to ensure that it completes successfully. But you can use the Start maintenance link to run a manual check or Change maintenance settings to configure a new time.
- HomeGroup: Action Center now checks to see whether you’re part of a homegroup. This is important because signing in with a Microsoft account breaks the normal workgroup-style home network sharing we used to use.
CROSSREF We examine networking issues in Chapter 13.
- File History: The new File History feature works with the Push Button Reset functionality in Windows 8 to create a more flexible way of restoring lost data than the old method, a combination of Previous Files (which no one even knew existed) and Windows Backup (which was ponderous and slow).
- Drive status: Action Center now checks to see whether all of the fixed disks attached to your computer are working properly.
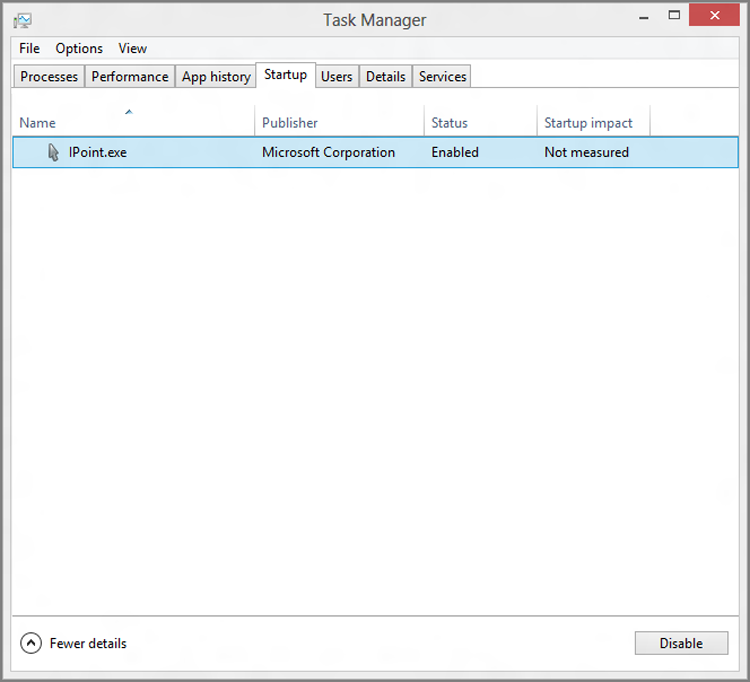
When Action Center detects an issue, it provides notifications via its system tray icon. Clicking these, or the associated warnings that appear in the Action Center control panel, brings you to the user interface you need to mitigate the issue. For example, as part of its overall system performance and reliability tracking, Action Center could eventually warn you to disable app[lication]s to help improve performance. This slightly off-base recommendation—it really means, “disable startup applications to improve boot-time performance” and has nothing to do with Metro-style apps—links to the Task Manager. In Windows 8, the Task Manager now provides a Startup tab that lets you enable and disable applications (but not Metro-style apps) that are configured to run at boot time. This can be seen in Figure 12-20.
But Wait, There’s More
In addition to the features discussed previously, Microsoft has improved a number of security features that debuted in previous Windows versions, too. Most of the features don’t require any user interaction. They simply work in the background, ensuring that Windows 8 is as secure as it can be.
Figure 12-20: Task Manager now helps you disable boot-time applications.
A small sampling includes the following:
- Credential Manager: Windows has long included a Credential Manager interface—previously called Windows Vault—that helps you combine the usernames and passwords for the local network and for websites with your Windows user account. New to this release is that you can now tie these other sign-ins with your Microsoft account for the first time, since most people will be signing in to Windows 8 with that account type.
- Windows kernel: The innermost part of Windows has been shored up with protection technologies that were curiously available only to other Windows components in previous OS versions.
- ASLR: Since Windows Vista, Windows has employed a technique called address space layout randomization (ASLR) to randomly load code and data into different memory addresses at run time, cutting down on an entire class of memory-based attacks. In Windows 8, ASLR has been improved with even more randomness. And it’s been extended to even more Windows components.
- Memory: Modern Windows versions have of course always included various forms of protection against memory-based attacks, and the move to isolated Metro-style apps will help in this and other regards. But Windows 8 also includes new protections against “use after free” vulnerabilities, where rogue or malicious applications are able to examine and exploit freed up memory that still includes valuable data or other code.
There’s still more, but you get the idea. While many Windows 8 security features are in your face when required, some simply work behind the scenes, tirelessly keeping you safe without you doing a thing. What’s missing is the “security theater” that used to dog older Windows versions, where the security features were purposefully made to be overly chatty and interruptive, providing you with a sense that something good was happening.
With Windows 8, Microsoft offers the first major change to user accounts since, well, it added user accounts to Windows. Now, home users can get the same kind of settings-roaming functionality that was previously available only in expensive and complex corporate environments, tied to the online ID—the Microsoft account—we all already use. Of course, those using traditional workgroup-type local accounts or domain accounts won’t be left behind either, and you can mix all three account types on the same PC if desired.
From a security perspective, Microsoft has finally closed the loop and silenced the critics by adding an excellent and effective antivirus solution to the OS. That, combined with new boot-time security protections, new security features like Windows SmartScreen, a host of new Action Center-based reliability and security tracking functionality, and, of course, all the excellent security features from Windows 7, makes Windows 8 the most secure Windows yet.
But then you expected nothing less, right?