
Chapter 13
Networking and Connectivity
In This Chapter
- Understanding which Windows 7 networking features carry over to Windows 8
- Connecting to and managing wired networks
- Connecting to and managing Wi-Fi wireless networks
- Understanding how cellular data networks work and how they are different from other network types
- Connecting to and managing cellular data networks
- Using Airplane Mode
- Using HomeGroup to share resources on a home network
- Using Credential Manager to share with older Windows-based PCs
After making major improvements to its networking infrastructure in Windows XP with Service Pack 2 a decade ago, Microsoft has been evolving this technology in subsequent Windows versions. In Windows 8, you see the most refined version of this technology yet, with new Metro-based interfaces for connecting to wired and Wi-Fi wireless networks. Windows 8 also includes a Metro-based front end to the HomeGroup network sharing scheme, which takes on all new importance in this release thanks to Windows 8’s Microsoft account sign-in capabilities.
More revolutionary, however, is Windows 8’s support for the cellular data networks that are becoming more and more ubiquitous thanks to the rise of smartphones, tablets, and other modern computing devices. Windows 8 treats this network type specially, with an understanding of their metered nature that will help users avoid overage charges and automatically switch to more efficient—and less costly—networks when available.
All of the networking functionality you’re familiar with from Windows 7 is present in Windows 8, though some of these interfaces have been updated to accommodate the new Metro environment that sits at the core of this new OS. Features that carry forward to Windows 8 include the following:
- HomeGroup sharing: In addition to older, traditional network-based resource sharing techniques from previous versions of Windows, Windows 7 added a simple new scheme called HomeGroup sharing. This makes it easy to share digital media content, documents, and printers on a home network. Because of the move to Microsoft account-based sign-ins in Windows 8, HomeGroup sharing is more important than ever in this release, so we explore this topic in more detail later in the chapter.
- Network and Sharing Center: This complex interface provides a single place to go to view, configure, and troubleshoot networking issues, and access new and improved tools. It’s still there, virtually unchanged in Windows 8. If you’re lucky, you will never need to use it.
If you’re unlucky, you can access Network and Sharing Center via Start Search. Or, right-click the Network notification icon in the Notification Area and choose Network and Sharing Center from the pop-up menu that appears.
The Network and Sharing interface also includes a feature called Network Map that visually shows how your PC is connected to the Internet and other devices, an issue that is particularly important to understand when troubleshooting.
- Seamless network connections: In Windows XP, unconnected wired and wireless network connections would leave ugly red icons in your system tray, and creating new connections was confusing and painful. Now Windows connects to secure networks automatically. Windows will also automatically disable networking hardware that isn’t in use, a boon for mobile computer users on-the-go who want to preserve battery life.
The interface for managing wireless networks is now a Metro experience. Since it’s new, we’ll discuss that in the next section.
- Network explorer: The old My Network Places explorer from previous versions of Windows has been replaced and upgraded significantly with the new Network explorer. This handy interface supports access to all of the computers, devices, and printers found on your connected networks, instead of just showing network shares, as XP did. You can even access network-connected media players, video game consoles, and other connected device types from this interface.
- Network locations: Windows 7 featured a Set Network Location wizard that would appear whenever you connected to a new wired or wireless network for the first time. This wizard let you set multiple complex network characteristics under the hood by providing a simple list of choices for the type of network you were connecting to: Home, Work, or Public. Home and Work were essentially the same, in that both opened up sharing between your PC and other PCs and devices on the network. Public, meanwhile, was for public network connection, like the Wi-Fi connections you might run into at cafés, airports, and similar locations.
In Windows 8, network location is handled differently and, believe it or not, it’s even easier than before. Now, there are only two states, and instead of forcing the user to think about the network type, you choose between whether you want to share or connect to devices. We explain this functionality and how to configure it on a per-connection basis in the next section.
Connecting to and Managing Wired and Wireless Networks
With the move to a Metro-based infrastructure in Windows 8, many core system tasks now occur within that interface rather than in the classic desktop environment. So while many of the advanced networking features from Windows 7 are still present, largely unchanged, in Windows 8, the most frequently-needed features for connecting to and managing networks—both wired and wireless (Wi-Fi/802.11-style)—have changed.
Using Wired Networks
A wired Ethernet network is the simplest type of network to connect to, from the perspective of Windows at least. That’s because Microsoft is making a big—and usually correct—assumption with this type of connection. And that’s that anyone who signs in to Windows using a local or Microsoft account and then connects a network cable to the PC is doing so on their own home network. And that network, by definition, is trusted, a private network type, and one in which being able to share with other PCs and connect to devices is not only safe, but desirable.
Connecting to a wired network is as easy as plugging an Ethernet cable into your home router on one end and the appropriate port on your PC on the other. When you do, a few things happen. Under the hood, Windows establishes the connection and enables sharing and device connections. Then the Network icon in the Notification Area (of the Windows desktop) changes to indicate that you’re connected, similar to the way it did in Windows 7.
If you click this Network icon, a new Metro-style interface, the Networks pane, will appear. This interface, shown in Figure 13-1, will help you manage not only wired networks, but also wireless (Wi-Fi) and cellular data networks.
Figure 13-1: The new Metro-style Networks pane helps you manage networks of all kinds.

NOTE The Networks pane is important enough that you may need or want to access it from the Start screen or a Metro-style app. To do so, you must first enable the Settings bar (Winkey + I being the easiest way) and then select the Network icon at the bottom of that pane.
There isn’t a lot of configuring you can do with a wired network from this interface, but there is one bit of functionality: You can disable (or enable) PC sharing and device connections. To do that, right-click the wired connection in the Networks pane and choose Turn sharing on or off from the little pop-up menu that appears. This won’t be hard since that’s the only choice, as you can see in Figure 13-2.
In the resulting display, you’ll be confronted with a question, part of Microsoft’s never-ending attempts to turn something technical into child’s play: Do you want to turn on sharing between PCs and connect to devices on this network?
Figure 13-2: If you’re looking for lots of options, look elsewhere; this is all you get for a wired network.

There are two possible answers:
- No, don’t turn on sharing or connect to devices. For networks in public places.
- Yes, turn on sharing and connect to devices. For home or work networks.
In case it’s not obvious, the first choice—for public places—maps to the old Public network location type from Windows 7. And the second choice, for home or work networks, maps to the Home and Work network location types, respectively.
Using Wi-Fi Networks
Wireless networks, of course, require a bit more finesse. Unlike wired networks, they’re not assumed to be safe, since you could be connecting to the Internet from a café, airport, or other location where electronic predators are lurking, waiting to steal your valuable personal information directly from the airwaves. Furthermore, not all wireless networks were created equal: There are wide-open, unprotected wireless networks and protected networks that offer various levels of security. But even the various types of networks aren’t completely safe, so it’s best to err on the side of safety, which is exactly what Windows 8 does.
To connect to a wireless network, you display the Networks pane. As described previously, you can do so by clicking the Network icon in the Notification Area or by typing Winkey + I and then clicking the Network icon in the Settings pane that appears. As you can see in Figure 13-3, when you’re within in range of one or more wireless networks, those networks will appear listed in the Networks pane under the heading Wi-Fi.
You will see two types of wireless networks here: unprotected and protected. An unprotected network is noted with a small exclamation point emblem to indicate that it could be unsafe. And as shown in Figure 13-4, when you select this type of warning, Windows provides a final warning before you connect.
Figure 13-3: Available wireless networks are displayed in the Networks pane.
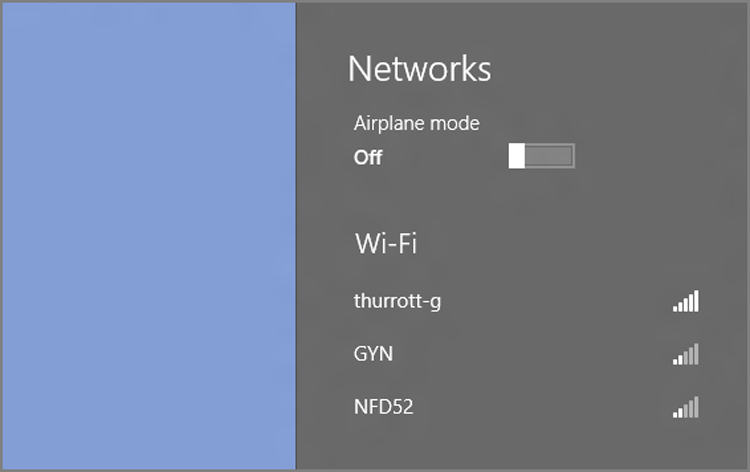
Figure 13-4: Windows 8 warns before letting you connect to an unprotected wireless network.

Connect automatically is deselected by default for open, unprotected networks and selected for password-protected networks.
Regardless of the protected status of the network, you’ll see two other choices when you select a wireless network in the Networks pane: Connect and Connect automatically. If you check the latter option before connecting, Windows 8 will automatically connect to this network whenever it’s within range. (If there are two or more such networks, Windows 8 will intelligently select the one with the best connectivity.)
Once you click Connect, one of two things can happen.
For a password protected network, you’ll be prompted to enter the password, as shown in Figure 13-5, and then Click Enter.
Figure 13-5: You need to enter a password for a protected network.

If you are accessing an open, unprotected network, the Networks pane will ask you whether you want to turn on sharing between PCs and connect to devices on this network. (For protected networks, this is the next step.) As with any other network type, there are two possible answers:
- No, don’t turn on sharing or connect to devices. For networks in public places.
- Yes, turn on sharing and connect to devices. For home or work networks.
Mouse over a connected network and Windows will provide information about the type of the network (for example, 802.11g or similar for wireless networks) and the type of security it uses, if any.
Choose accordingly, and you’ll be connected to the network. In the Networks pane, the connection will be accompanied by a Connected notation.
Wireless networks provide many more configuration options than do wired networks. If you right-click a wireless network to which you’re connected, you’ll see a number of options, though it should be noted that not all of them are relevant to Wi-Fi networks. (Some are more applicable to cellular data connections, as described in the next section.) These options include:
- Show/Hide estimated data usage: This option is actually a toggle. When it’s enabled, you’ll see a data usage estimate whenever you select the connection, as shown in Figure 13-6.
Using this information to keep track of usage is, of course, valuable for cellular data connections, which are always metered. You can click the Reset link in the Networks pane to reset the data usage estimate to 0.
Figure 13-6: Keep track of your data usage.

- Set as metered/non-metered connection: This option changes the behavior of certain connected Windows features when enabled. Since it’s more typically needed for cellular data networks, we’ll discuss this feature in the next section.
- Forget/Remember this network: If you’ve configured Windows 8 to remember a wireless network and thus reconnect to it automatically, you can change that behavior using this option (and vice versa).
- Turn sharing on or off: This option displays the same interface described previously, letting you choose between enabling and disabling PC sharing and device connections.
- View connection properties: Choosing this option displays an old-school desktop-type configuration window like the one shown in Figure 13-7. This interface lets you configure advanced settings for obscure, non-typical wireless networks and isn’t generally needed.
Connecting to Cellular Data Networks
Over the years, the support in Windows for different network types and networking technologies has of course evolved. And in Windows 8, finally, Microsoft is explicitly supporting the 3G and 4G/LTE cellular data networks that are now becoming ubiquitous.
Figure 13-7: Back to the Stone Age

Understanding Cellular Data Networks
3G refers to the third-generation cellular data networks that are now considered the baseline—that is, the slowest—for such networks.
4G, confusingly, refers broadly to a range of cellular network types, including pseudo-4G data networks such as HSPA (high-speed packet access) and HSPA+ that are really based on the older 3G standard.
LTE, or long-term evolution, is, for now at least, the “true” standard for 4G cellular data connectivity and offers the best performance of these network types.
Prior to this release, you could connect to such networks using third-party software, which was generally acquired from the wireless carrier or device maker that provided the connectivity, perhaps through a USB-based add-on peripheral or internal SIM card interface in a laptop or other device.
NOTE A SIM (subscriber identity module) card is a small integrated circuit on a plastic card that is used to authenticate your device, and thus you, the wireless subscriber, to the cellular data network. These cards are used in smartphones, tablets, and modern PCs, and while they come in various sizes, they are functionally identical.
But now, in Windows 8, this capability is just built-in. And that integration into the OS isn’t just a convenience. In addition to providing the functionality that used to require third-party software installation, the built-in cellular data connectivity that’s available in Windows 8 is also more intelligent. It will use your Wi-Fi or other network connectivity whenever possible, switching off of cellular as frequently as possible in order to save you money. That’s because cellular data is notoriously expensive and almost always metered, with a set monthly or per-use allotment of data.
Put simply, Windows 8 treats cellular data just like your smartphone does, neatly bridging the connectivity gap between those small and highly portable devices and the monolithic PCs of the past.
Choosing a Cellular Data Connection
To use a cellular data connection with the integrated Windows 8 capabilities, or what Microsoft calls mobile broadband, you must have a Windows PC or device that includes a built-in SIM port. If you don’t have such a thing, you utilize external methods for connecting to the Internet via a cellular data connection. Some of the more obvious choices include the following:
- Portable wireless router: Many wireless carriers sell tiny wireless routers that access their data networks and then broadcast a Wi-Fi network that you can use with multiple devices and PCs. From the perspective of Windows 8, connecting to such a device is no different from connecting to any Wi-Fi wireless network. A typical device, such as the Novatel MiFi, is resold by a number of wireless carriers and shown in Figure 13-8
- Smartphone or tablet Internet sharing: Smartphones and tablets are generally available with built-in SIM cards and cellular data connectivity of their own, and some can share that connection over Wi-Fi with other devices and PCs, much like a wireless router. This process is sometimes called Internet tethering, because sharing a smartphone’s Internet connection in particular can lead to a quick loss of battery life. So it’s advisable to connect, or tether, the phone to your PC via a USB cable to keep it charged. Windows 8 interacts with these networks as it does with any Wi-Fi type wireless network.
Figure 13-8: A portable wireless router can connect multiple PCs and devices to a cellular data network.

- USB dongle: Many wireless carriers also provide small USB devices that plug into a PC (or Windows-based device with a USB port), providing cellular connectivity directly to that PC. These devices typically come with their own software stack, so that they work with all modern versions of Windows, and if you use such a device, it’s likely that you’ll need to install this software before you can get online. In such cases, usage will vary, since the provided utilities will vary from device to device. A typical cellular data dongle is shown in Figure 13-9.
Figure 13-9: You can add cellular data connectivity to any PC using an external USB dongle.

If you’ve purchased a modern Windows 8 PC or device, especially a portable computer such as a laptop, Ultrabook, tablet, or hybrid PC, chances are good that it came with at least a SIM module, which would allow you to later add a SIM card and associated data plan from your wireless carrier of choice and use that connectivity to access the Internet on the go.
The placement and accessibility of this SIM port will vary from machine to machine. They’re generally well-hidden, hard to access, and only need to be fiddled with once (if at all): when you install the SIM card the first time.
Availability and cost of cellular data will also vary by wireless carrier, so you’ll want to consider your needs—that is, whether you’ll typically use the connectivity from the same basic location (home, work, the local coffee shop) or while traveling. That’s because cellular data coverage varies from place to place, and while certain carriers offer great coverage in one area, they may offer terrible coverage elsewhere, if at all.
You’ll also need to consider your data needs, planning, and shopping accordingly. Some wireless carriers offer pay-as-you-go plans, while others require you to sign up for 2 years and pay a standard monthly fee for a set amount of data (with additional payments made for overages). We happen to use AT&T Wireless in the United States at the time of this writing, and this company offers the following pay-as-you-go data plans for Windows-based PCs and tablets with a built-in LTE-based SIM card.
Prepaid plans with an auto-renew option and anytime termination:
250 MB monthly pass $15
3 GB monthly pass $30
5 GB monthly pass $50
These plans expire when you have used all the data in your plan or your time expires, whichever occurs first. Any “leftover” never carries forward to the next time period, sorry. But AT&T also happens to offer international data add-ons for world travelers, another option to consider. However, this is just an example; you’ll want to shop around.
Determining how much data you need can be difficult. Fortunately, with a pay-as-you-go plan, you can adjust over time until you settle on the plan that makes the most sense for you.
Setting Up a Cellular Data Connection
Figure 13-10: Cellular data connections receive their own special area in the Networks pane.

To set up a cellular data connection in Windows 8, you use the same Networks pane that is used for wired and wireless (Wi-Fi) connections. This is accessed from Settings (Winkey + I), Network, or by clicking the Network icon in the Notification Area in the desktop environment. Either way, you’ll see a Mobile broadband area in the Networks pane, as shown in Figure 13-10, with an entry representing your cellular data connection.
When you select the cellular data connection, the Networks display expands to show additional options. As you can see in Figure 13-11, these include View my account, Connect automatically, and Roam automatically.
Figure 13-11: Options associated with a cellular data connection

We’ll look at these options in a moment. For now, the goal is to get this connection set up. So click Connect to continue.
After a bit of configuration, you’ll be connected to the wireless carrier’s custom Metro-style experience where you can create a (or connect to an existing) account, determine which data plan you would like to use, and so on. This experience will vary by wireless carrier, but in Figure 13-12, you can see an AT&T account portal for a pay-as-you-go data plan.
Meanwhile, back in the Networks pane, the cellular data connection will note that it’s connected. You will need to disconnect from that network to configure the two other options noted previously. These include the following:
- Connect automatically: If selected, your cellular data connection will attempt to connect anytime you are otherwise not connected to the Internet via a wired or Wi-Fi connection. Most users with 2 GB of more of monthly data allowance are probably safe with this option enabled, though you’ll want to monitor it and ensure that it’s configured as a metered connection; both of these options are discussed in the next section.
- Roam automatically: If selected, your cellular data connection will attempt to connect anytime you are otherwise not connected to the Internet, even if you’re outside of your own wireless carrier’s network. This is not recommended unless your carrier explicitly allows this and doesn’t charge extra for the privilege; such connections often come with additional charges. Check with your wireless carrier to be sure.
Figure 13-12: AT&T Wireless has adopted the Metro design style for its own Windows 8 connectivity experience.

Further Configuring a Cellular Data Connection
As with a wireless (Wi-Fi) connection, you can right-click (or tap on and hold) a cellular data connection to view additional options. These include the following:
We’re not sure why this isn’t enabled by default for a cellular data connection, since it is such useful information. Our advice is to enable it and, especially on connections with a limited data allowance, keep an eye on usage.
- Show/Hide estimated data usage: This option is actually a toggle. When it’s enabled, you’ll see a data usage estimate whenever you select the connection.
- Set as metered/non-metered connection: This option is enabled by default for cellular data connections, meaning that Windows 8 correctly treats such networks as metered. A metered connection is one that is limited to a certain amount of bandwidth for a certain period of time, typically a month. Most wireless carriers offer tiers of service, with monthly allotments of 250 MB, 2 GB, 5 GB, and so on. So most users will want to ensure that their device isn’t sopping up the available bandwidth each month. And this is where Windows 8 provides some interesting functionality.
When you’re connected to the Internet with just a metered connection, Windows 8 changes its behavior to be less data hungry. For example, Windows Update will not automatically download updates in the background, even if you have Auto Updates enabled (as you should). There’s no exception to this: If Microsoft feels that a security update is particularly important, it will enable the downloading of that fix regardless of the connection type.
And just in case it’s not clear why this ability to configure a connection as metered is important, consider this example: In the writing of this book, your authors of course spent a lot of time testing things—a process that involves reinstalling Windows 8 again and again and reconfiguring the OS from scratch to ensure that the behaviors we see and describe aren’t colored by other user or application configurations. While doing that for this chapter, the process of updating the OS and the bundled Metro-style apps (through Windows Store) consumed an entire 250 MB monthly cellular allotment in about half an hour. The ability to configure a metered connection isn’t just useful, it’s necessary.
- Forget/Remember this network: Cellular data networks are configured to be remembered by default. If you’d like to forget the network for some reason, you can do so.
- View connection properties: Choosing this option displays an old-school desktop-type configuration window, as it does for wireless networks. However, there is one useful option in this window when used with a cellular data connection: You can enable a PIN for the PC or device’s SIM card to help protect against theft.
Comparing this list to that of a wireless network, you may have noticed that the Turn sharing on or off option is unavailable. This makes sense since a cellular data connection, by definition, cannot connect you to your local network. It is instead used to connect to the Internet directly and thus will always be public.
Using Airplane Mode
Like a smartphone, Windows 8 actually supports a useful Airplane Mode toggle that instantly disables all of the wireless (Wi-Fi and cellular data) connections in your PC or device without requiring you to fumble with multiple interfaces, as you did in previous Windows versions.
You access Airplane Mode from two different locations. The easiest is the Networks pane (Winkey + I, Network). As you can see in Figure 13-13, it’s the toggle right at the top of the pane. So if you’re on an airplane, literally, or wish to otherwise disengage the various antennas in the device to preserve battery life, this is your go-to toggle.
Figure 13-13: Airplane mode is available from Networks.

You can also access Airplane Mode from PC Settings under the Wireless entry. As shown in Figure 13-14, this interface lets you toggle Airplane Mode as you would from the Networks pane, but you can also individually toggle the availability of specific wireless (Wi-Fi plus cellular data) connections.
This is dramatically simpler than with previous Windows versions. Before, you had to find the Network Connections explorer and then manually disable each device individually.
Figure 13-14: From PC Settings, you can enable Airplane Mode or configure individual wireless connections.

Sharing Files, Media, and Printers at Home with HomeGroup
Prior to Windows 7, most home users with two or more PCs would employ a simple strategy to easily share files over their home networks: They would simply configure each PC with at least one user account with the same username and password. This way, they wouldn’t need to enter a username and password combination each time they accessed a shared folder on the other PC.
This type of workgroup networking scheme worked well enough but it also required users to understand how to actually share folders, too—a process that was fairly arcane even after the addition of a Simple Sharing functionality in Windows XP Home Edition. So with Windows 7, Microsoft finally moved to formalize a simpler method for sharing resources on a home network, which included not only files, but also printers and digital media (for streaming purposes via Windows Media Player and Media Center). Dubbed HomeGroup, it was one of the nice, consumer-oriented innovations in Windows 7, though we suspect it was underutilized in that release.
HomeGroup sharing didn’t replace the old-school workgroup-style sharing technique, and that’s still true in Windows 8. This means you’re free to share as you’d like. But in Windows 8, HomeGroup sharing is more desirable than ever, thanks to the addition of Microsoft account sign-ins, as you’ll soon discover. But first, let’s review what HomeGroup sharing is all about.
NOTE Microsoft’s use of the word HomeGroup may seem inconsistent because the word appears variously as HomeGroup, Homegroup, and homegroup throughout the Windows user interface. However, Microsoft tells us this is all by design. The word HomeGroup is a trademarked term and refers to the sharing feature itself. A homegroup, meanwhile, is the generic “thing” that is created by the feature. And if you see it spelled as Homegroup (with a capital H but a small g, that’s just because it’s a title or other place in the UI where an initial capitalization is required. Seriously, they told us this. And yes, they really believe it.
HomeGroup sharing works much as it does in Windows 7, though as part of a wider effort to streamline, well, virtually everything in Windows 8, it’s no longer an option during Windows Setup. So you’ll need to create—or join—a homegroup after you’re done installing Windows 8.
HomeGroup allows you to easily share three items that, prior to Windows 7, required three different interfaces. They are as follows:
- Libraries: Previously, you could create individual folder shares to share documents and other files, but now you can share these through your various libraries—Documents, Music, Pictures, and Videos—and individually determine which ones are shared. This is more powerful than sharing individual folders for many reasons, but one obvious reason is that since libraries by definition aggregate multiple physical locations in the filesystem, what you’re really sharing are discrete groups of files (or documents) rather than individual folders.
- Printers and devices: When you configure a printer or other attached device for one PC, it can be made automatically available to all the other home PCs that join the homegroup.
- Media devices: You can provide access to your media collection for purposes of media streaming to compatible devices such as an Xbox 360 or other Windows 8 PCs using software such as Windows Media Player. As with library-based sharing, this makes far more sense than being forced to remotely browse folders of content on your PC from a device. Instead, you can simply connect to a media library and browse the actual content.
In addition to not being part of the Windows 8 Setup process, the interface you use to configure a homegroup is now a Metro-style experience that can be found in PC Settings. To access this interface, navigate to Settings (Winkey + I) and select More PC settings at the bottom of the Settings pane. This will load the full-screen PC Settings interface. When you select HomeGroup from the list of options on the left, you’ll see a screen like that in Figure 13-15.
Figure 13-15: It’s time to join the homegroup.

Enter the homegroup password and click Join. Once the PC is connected to the homegroup, you’ll be able to choose which items to share, including individual libraries—Documents, Music, Pictures, and Videos—as well as printers and devices, and media devices.
When you’re done, you can exit PC Settings.
You can access the shared resources of other PCs on your homegroup using new Metro-style apps that support this feature. Your homegroup is also available via the standard Metro-style file picker, which can of course be integrated into any app. As you can see in Figure 13-16, the file picker displays each of the machines in your homegroup, letting you dive into the shared libraries on each and find what you’re looking for.
Homegroups are also available from the Windows desktop, of course. When you open an Explorer window, you’ll see a Homegroup node in the navigation pane, and you can easily browse through the shared items on your home network-connected PCs. This works as it did in Windows 7, as you might expect, where files and other resources exposed through the homegroup are available to any desktop-type application, too. For example, applications can open and save files to homegroup locations.
Figure 13-16: Your homegroup is accessible by any Metro-style app, including via the standard file picker.

Put simply, HomeGroup works much as it did in Windows 7, aside from the new Metro-style configuration interface. But there is one more wrinkle.
As you know, Windows 8 provides a new sign-in model where you use a Microsoft account (previously called a Windows Live ID) instead of a traditional local account to sign in to the PC. This new sign-in type provides many advantages related to PC-to-PC sync settings and more, and as a result we recommend eschewing old-fashioned local accounts in favor of this new sign-in type. But using a Microsoft account also comes with a few challenges. And key among them is home network interoperability. If you need to access shared resources on other PCs on your home network, whether they’re using Windows 8, Windows 7, or whatever Windows version, you could experience some difficulty.
That is, if you use the standard Network explorer to access shares on your other PCs, you’re going to be seeing the dialog in Figure 13-17 all too often. And that’s because you’re now signing in with a Microsoft account. If the other PC isn’t also signed in with the same account, you won’t be automatically authenticated to access that shared resource.
Figure 13-17: Not-so-seamless network connectivity

You could of course enter a correct username and password combination, and chances are you know what these entries are since it’s your home network. And Windows 8 even fixes a long-standing bug in Windows networking so that when you select the option “Remember my credentials,” it actually—get this—remembers your credentials.
So that works. But you could also simply choose to use HomeGroup sharing instead of the Network explorer. (That is, you will access shared resources via the homegroup and not through the Network interface.) This method requires that all of your home machines are running Windows 7, Windows 8 (or, interestingly, Windows Home Server 2011). So if you are using an older Windows version (Vista, XP) on your home network, this method won’t work.
Long story short, you should use your homegroup for all home network-based sharing activities when possible: It’s simpler, more powerful, and it’s automatic. But if you are still using older Windows PCs on your network, Network explorer will make their shared resources available to you as well … as long you know the credentials.
Windows 8 offers all of the power and flexibility of the networking and connectivity services offered in its predecessor, but improves on matters enormously with new Metro-style interfaces that work across the OS, and features new capabilities that make this version of Windows the best yet from a connectivity standpoint.
Key among these new capabilities is the native support for cellular data connections, which achieves first-class status in Windows 8 alongside wired and wireless (Wi-Fi) networking types. If anything, cellular data support is superior to those older types of networking, thanks to intelligent integration with your wireless carrier’s metered and costly data plans. It’s even more powerful than the cellular support in most smartphones.
Windows 8 also expands on the HomeGroup sharing functionality from Windows 7, by adding a new Metro-style interface. And HomeGroup-style sharing is more important than ever because of the prevalence of Microsoft account sign-ins, which makes old-school sharing schemes a bit more difficult. But if you do need to access the network resources of a PC running an older Windows PC, too, the hidden Windows Credentials feature will make that happen.