
Chapter 7. Wireless
Hacks 65-74
It’s an unwired world, and XP is at the center of it. XP was built with wireless in mind. Because it includes a built-in wireless discovery of networks, it’s easy to set up home and corporate wireless networks, as well as connect to hotspots when people travel with their laptops or PDAs.
In this chapter, you’ll learn about wireless hacking—everything from war-driving to find wireless networks, to protecting your home wireless network, using wireless encryption, solving hotspot woes, and more.
Go War-Driving for WiFi Access
WiFi networks are everywhere, it seems; you can get free Internet access on wireless community FreeNets armed with your laptop, a car, and software called Network Stumbler.
One of the coolest technological advances in popular use today is the wireless network. Wireless networks based on the WiFi standard (802.11x) are becoming increasingly common across the country—not only in people’s homes, but also in universities, corporations, coffee shops, airports, and other public places. Now you can bring your email to Starbucks.
Frequently you’ll find dozens of hotspots in one location, particularly in certain urban neighborhoods and suburban office parks that house high-tech companies. Where I live—in Porter Square in Cambridge, Mass.—there are dozens of wireless networks in private homes, apartment buildings, and businesses within a very short walk from my home. There are at least a half dozen on my three-block street alone, in addition to mine. From my back porch, I not only get access to my own wireless network, but can also often pick up signals from four nearby WiFi networks.
The widespread availability of these inexpensive WiFi networks has led to a grassroots community wireless networking movement. The idea is simple: allow people passing by to use your WiFi network to hop onto the Internet, and they in turn let you and others use their WiFi networks for Internet access when you pass near their homes or places of business. These wireless grassroots organizations are often called FreeNets. You’ll find them in cities including New York, Seattle, Houston, and the San Francisco Bay area, as well as others. For more details about them and how to participate, go to the Free Networks.org web site (http://www.freenetworks.org). In fact, some cities are creating free wireless zones in downtown business areas to allow anyone with a wireless-enabled computer to get Internet access. Paris, for example, might soon be known for more than its beauty, culture, good food, and disdain for tourists; it might turn into one giant wireless zone, allowing Internet access anywhere in the city, though for a price.
How do you find these wireless networks? The best way is by doing what has become known as war-driving: driving through neighborhoods with your laptop, special software, and, if you want to pick up more networks, an antenna hooked up to your WiFi card.
Tip
The extremely environmentally conscious prefer to go war-walking, though walking around with a laptop is not particularly easy. A better way is with a WiFi-equipped PDA, like the Palm Tungsten C using a product called NetChaser (http://www.bitsnbolts.com).
Run the software, and it not only locates the network, but also provides a variety of information about it that you can use to connect to it, such as its SSID (network name), whether it uses encryption, and the wireless channel it’s on. Armed with that information, you should be able to connect to it if it’s a FreeNet—for example, if it is set to allow anyone to connect to it, or if it uses a commonly agreed-upon security scheme that everyone in the FreeNet uses for their WiFi networks.
If you walk in certain urban neighborhoods, you might notice strange symbols on the sidewalk that look something like those pictured in Figure 7-1. Yes, it’s a conspiracy, but in the positive sense. These are war-chalking symbols that tell passersby that a WiFi network is nearby. The left symbol means the wireless network is open; the middle one means it is closed; and the right one means it uses WEP encryption.
Sometimes you’ll find additional information next to the symbol that gives information on how to connect to the network, such as the SSID. The symbols were inspired by the practice of hoboes, who during the Great Depression would make chalk marks near homes that were friendly to hoboes and would give them food. For more information about war-chalking, go to http://www.blackbeltjones.com/warchalking/index2.html.
To go war-driving, download the free Network Stumbler program (http://www.netstumbler.com), which shows you detailed information about any nearby wireless networks. Figure 7-2 shows what happens when I run the software on my back porch. I can detect signals from four nearby WiFi networks in addition to my own.

For each WiFi network it uncovers, Network Stumbler tells you the network’s SSID, name, manufacturer, channel, type, signal strength, signal-to-noise ratio, and whether the network’s encryption is enabled, among other details. Armed with that information, you can try to connect to the network.
Tip
If a network uses encryption, a small lock appears next to it; look closely at the Mookieville network in Figure 7-2 and you might be able to see it.
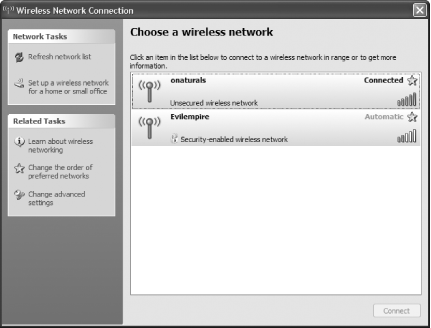
Once you’ve found a network, exit Network Stumbler. Then, to connect to the network, click the small network icon in the system tray (officially known as the XP Notification Area—the area of the taskbar where XP corrals little icons). The Wireless Network Connection screen appears. Click the network to which you want to connect, and after a few moments, you’ll be connected, as shown in Figure 7-3.
Tip
If you’re already connected to a network, when you click the small network icon you’ll be sent to the Wireless Network Connection Status screen, which will show you the current state of your connection. To look for the other network or networks that Network Stumbler found, click View Wireless Networks from that screen, and you’ll see a list of all wireless networks within range. Click any wireless network to connect to it.
If this screen doesn’t show you the network uncovered by Network Stumbler, click Refresh Network List. If the network still doesn’t show up, that’s because the signal is too weak for you to connect to it.
Not everyone will be able to use Network Stumbler, because it won’t work with all wireless network cards. As of this writing, it works with the following cards (and possibly some others not listed here): Lucent Technologies WaveLAN/IEEE (Agere ORiNOCO); Dell TrueMobile 1150 Series (PCMCIA and mini-PCI); Avaya Wireless PC Card; Toshiba Wireless LAN Card (PCMCIA and built-in); Compaq WL110; Cabletron/Enterasys Roamabout; Elsa Airlancer MC-11; ARtem ComCard 11Mbps; IBM High Rate Wireless LAN PC Card; and 1stWave 1ST-PC-DSS11IS, DSS11IG, DSS11ES, and DSS11EG. For more information, go to C:Program FilesNetwork Stumbler eadme.html, assuming you’ve installed the program in C:Program FilesNetwork Stumbler.
Network Stumbler will find all wireless networks near you, not just those that are part of FreeNets. So, you might well find the wireless networks of people who don’t realize others outside of their homes or businesses can tap into their networks. Some law enforcement officials will tell you that tapping into those people’s networks is illegal, so be forewarned.
Mapping Wireless Networks
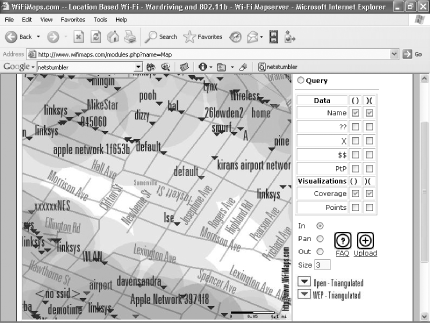
Network Stumbler lets you save your war-driving information in a file, and you can then upload that information to a web site (such as http://wifimaps.com) that uses your information and information provided by many other war-drivers to create maps of WiFi networks across the country. You can zoom in and out on these maps, so you can get a view of the concentration of WiFi networks in a metropolitan area, or you can see individual WiFi networks on individual streets, as shown in Figure 7-4.
Go to http://wifimaps.com to view the maps or to upload your Network Stumbler information. Be aware that the site is a volunteer effort, and, not uncommonly, you’ll find the maps aren’t working. If that happens, check back again in a few days; it usually gets up and running after a while.
Building a Homemade Wireless Cantenna for War-Driving
One way to increase the range of your war-driving and the strength of the signal when you connect to WiFi networks is to build your own wireless antenna. You can build one for a few dollars using a tin can and other stray parts, as long as you’re willing to do a little bit of soldering. Because they’re built out of tin cans, they’re frequently called cantennas.
My 15-year-old son, Gabe, built several for his seventh-grade science fair project several years ago and compared the effectiveness of each. The results were clear: the giant 34.5-ounce coffee cans were far superior to normal-size coffee cans and Pringle’s cans.
If you haven’t bought a WiFi card yet and are considering building one of these cantennas, I suggest buying an Orinoco card. It has a small connector in its side through which you connect a pigtail connector, which can then be hooked up to a small antenna you build out of copper wire and a small connector, which goes inside the tin can. You can buy a pigtail and the required connectors at a number of places, including HyperLink Technologies (http://www.hyperlinktech.com). If you don’t have a WiFi card with a small connector, building one of these cantennas becomes much more difficult.
You can find good directions for making cantennas at numerous web sites. Three good places to start are http://www.oreillynet.com/cs/weblog/view/wlg/448, http://www.netscum.com/~clapp/wireless.html, and http://www.turnpoint.net/wireless/cantennahowto.html. Just so that you get the idea of how to build one, though, I’ll give you an overview here. First you empty and wash the can. Next, you build the small antenna that will go inside the can by soldering a short piece of thick copper wire to a small piece of hardware called an N connector. Then, drill a hole in the can and insert the small antenna you just soldered. Attach the antenna to the can by securing it with small screws and bolts. Attach one end of the pigtail to your wireless card, attach the other end to the N connector, and voilà! You have a cantenna.
See Also
Extend the Range of Your Wireless Network
The efficiency and throughput of WiFi networks can vary dramatically. Make sure you get maximum throughput from your wireless network.
If you have more than one PC at home, the best way to hook them together and share a high-speed Internet connection is via a wireless network—in particular, one based on the WiFi standard, which is actually a family of standards known under the umbrella term of 802.11x.
The biggest problem in setting up a home network usually involves running the wires between PCs and a residential gateway. If your PCs are on different floors of your house, you might have to drill holes in your walls, ceiling, and floors and run wire through them. Even when PCs are on the same floor, you have to deal with the problem of wires snaking along the floor.
That’s the problem I’ve had in my 150-year-old home in Cambridge. Drill through a wall, ceiling, or floor here, and you never know what you’ll find (horsehair insulation was only one of our many surprises). Even my electrician shudders when he has to take out the drill.
So, for me, a wireless network was a no-brainer. I now have a half dozen PCs and laptops and four printers situated in various parts of the house, all connected via a combination wired/wireless network and sharing a single broadband Internet connection. And when the weather is nice here (twice a year, by my last calculation), I take my laptop out on my back porch and work from there while still connected to the Internet and other PCs and printers in the house.
But there’s a catch with all wireless networks, including mine. Wireless networks rarely deliver data at their rated bandwidth speed. One factor affecting bandwidth speed is the distance between the access point and the wirelessly equipped PC. Compaq, for example, notes that at a distance of 150 feet the throughput of its wireless access point drops from 11Mbps to 5.5Mbps, and at a distance of 300 feet it drops to 2Mbps. Even that significantly understates the drop-off in speed, and most people find that the drop-off is much more dramatic than that, most commonly by a factor of two.
Distance is only one factor affecting performance. Interference from other devices and the exact layout of the house or office can also affect it dramatically. However, there are things you can do to extend the range of your network and get more throughput throughout your home:
Centrally locate your wireless access point
This way, it’s most likely that all your wirelessly equipped PCs will get reasonable throughput. If you put your wireless access point in one corner of the house, nearby PCs might get high throughput, but throughput for others might drop significantly.
Orient your access point’s antennas vertically
As a general rule, transmission will be better when antennas are vertical rather than horizontal. Keep in mind, though, that this is only a starting point for positioning the antenna. The exact layout of your house might alter the best positioning of the antenna.
Point the antennas of your wireless PCs toward the access point
Although 802.11 technology does not require a direct line of sight, pointing antennas in this way tends to increase signal strength. USB wireless cards generally have small antennas that can be positioned, but frequently wireless PC cards don’t, so you might have trouble figuring out the antenna orientation in a wireless PC card. If you have a wireless PC card that doesn’t have what appears to be an antenna, the antenna is generally located at the periphery of the card itself, so point that at the access point.
Don’t place your access point next to an outside wall
If you do that, you’ll be broadcasting signals to the outside, not the inside, of the house. That’s nice if you want to give your neighbors access to your network, but not great if you want to reach all the PCs in your house.
Avoid putting your access point or PCs near microwave ovens or cordless phones
Many microwave ovens and cordless phones operate in the same 2.4GHz part of the spectrum as 802.11b WiFi equipment does. So, microwave ovens and cordless phones can cause significant interference. Cordless phones tend to be the bigger problem.
Avoid placing the antennas of access points or PCs near filing cabinets and other large metal objects
They can cause significant interference and dramatically reduce throughput.
Consider using external and booster antennas
Some PC cards, notably Orinoco cards, will accept external antennas that you can buy or build on your own. They have a small connector to which you attach a pigtail and wire and then attach that wire to an antenna. (For information about building your own antenna, see [Hack #65] .) Some access points often accept booster antennas that you can buy as well.
Tip
If you have a Linksys wireless network and are looking to improve its signal strength, you can buy a number of different add-ons that promise to extend its range and strengthen its signal. The WRE54G Wireless-G range expander, for example, is able to take a WiFi signal and bounce it further along, expanding your network’s range. It works with both 802.11g and 802.11b routers. And Linksys High Gain Antennas will strengthen your network’s signal. Unscrew the antennas from your existing Linksys router, and screw these new ones into place. It also works with 802.11b and 802.11g routers.
Note
Other manufacturers sell similar products, so check your router manufacturer’s web site for details.
Try and try again
The ultimate way to find the best placement for your access point and wireless PCs is to continuously experiment and see what kind of throughput you get. Each house and office is so different that no single configuration can suit them all.
Carefully monitor your throughput as you make these changes so that you determine the best positioning for your access point and PCs. To determine your true throughput, use the free network analysis program Qcheck [Hack #67] .
See Also
Check WiFi Network Performance with Qcheck to Help Improve Throughput
XP can’t tell you the true throughput on your wired or wireless network. For that, you’ll need free, third-party software that can help you improve throughput.
When you buy network hardware, including a hub/router and network cards, you’re told that hardware’s rated speed—for example, 100Mbps for an Ethernet network, or 11Mpbs for an 802.11b WiFi network.
But those numbers only tell you how your network might perform in ideal conditions; as the saying goes, “your mileage may vary,” and it usually does. WiFi networks are particularly finicky and are especially prone to being affected by interference and other factors. Where you place your wireless access point and PCs and how you position their antennas [Hack #66] can make a dramatic difference in the actual speed of your network. So, you’ll want to know the true connection speed of your network, WiFi networks in particular, so that you can optimize their performance when you troubleshoot them.
But how can you find out your true network performance? If you have a WiFi card, you can find information about your connection by clicking the small network icon in the Notification Area (also called the system tray). When you do that, the Wireless Network Connection Status screen appears, as shown in Figure 7-5.

There’s only one problem with that screen: it’s highly inaccurate. True, its little green bars and Signal Strength indication give you a broad picture of the relative strength of your network connection. But the Speed indication isn’t an actual measurement as far as I can tell; it appears to tell you only your maximum theoretical connection speed, given the nature of your hardware, and doesn’t reflect your true current connection speed. When I use my WiFi network, it always tells me the speed is 11Mbps, even when actual, real-time measurement shows my true throughput is less than half of that.
So, how do you measure the true speed of a network in your real-world conditions? Get the free program Qcheck (http://www.ixiacom.com/products/performance_applications/pa_display.php?skey=pa_q_check). It performs a series of tests, including throughput and response time, and gives you a good snapshot of your network’s real performance. When trying to optimize a WiFi network, run Qcheck on each PC on the network to get baseline performance results for each. Then run the test for each PC after you move the base station and PCs, change the positioning of the antennas, and so forth, as outlined in [Hack #66] . That way, you’ll be able to fine-tune your network for optimum efficiency.
Once installed on every machine in your network, Qcheck measures the performance of the network between any two of your PCs. Qcheck is made up of two components: the console where you run your tests, shown in Figure 7-6, and an endpoint, which runs invisibly in the background on each PC on which you’ve installed Qcheck. While the exact metrics vary from test to test, the program works by sending data from one PC to another on your network. The data is then sent from the receiving PC back to the originating PC, and Qcheck measures the round-trip time, calculates throughput, and displays the results.
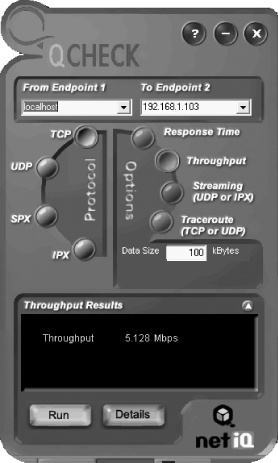
Note the throughput in Figure 7-6; it’s 5.128Mbps. I was measuring the speed of my WiFi network while seated on my back porch, which is about 30 feet and a wall away from my access point. Just to show you how much more accurate Qcheck is, the Wireless Network Connection Status screen reported my speed as 11Mbps—the exact connection speed my laptop would have if I were inches away from the wireless access point. (And in actuality, the connection speed of a WiFi network, even when devices are next to one another, is much slower than 11Mbps.)
To run the Qcheck tests, run the console and then choose the two PCs between which you want to measure speed on your network. Only one must be the PC with the console on it, but each PC does have to have Qcheck on it. You don’t need to run the console on each machine because the endpoints are running on them invisibly in the background; during Qcheck’s installation the endpoints are configured to launch on startup.
You’ll need to know the IP addresses of the PCs you want to test. If one of the PCs you’re testing is the one running the console, choose localhost for that endpoint. To find the IP address of other PCs on your network, first go to that PC, right-click My Network Places, then double-click your network connection (it might read Local Area Connection, for example, or Wireless Network Connection). Click the Support tab, and you’ll see your IP address.
Once you choose the PCs you want to test, choose the specific test to run. The best overall benchmark will be the Throughput test using either the TCP or UDP protocols. If you happen to use IPX or SPX on your network (some people still use these older protocols rather than TCP/IP), you can do benchmark throughput tests using them as well, though few home networks use those protocols. If you run any kind of streaming media across your network—for example, if you will be using your network to play MP3 files or other digital music on a PC and then stream it to another location in your house—choose the UDP streaming test. Streaming media use the UDP protocol, so the only way to test how they will perform on your network is to use the test for that protocol.
Make sure to run your test multiple times, and to be safe, run them a half hour or more apart. Because of the fickle nature of wireless transmissions, you can find dramatic differences in throughput from one moment to the next. For example, a few minutes after running the throughput test shown in Figure 7-6, I ran it again and was shown a throughput of 1.602Mbps. That one test was an anomaly, and other tests were more in keeping with my initial ones.
See Also
Protect Your Home WiFi Network
The bad guys don’t just target corporate networks. If you have a WiFi network at home, intruders are after you as well. Here’s how to keep your network and all your PCs safe.
Your home WiFi network is an open invitation to intruders. It’s like leaving your front door wide open and putting a sign out front saying, “Come in and take anything you want.”
That’s because WiFi broadcasting doesn’t stop at your front door, or even the walls of your house or apartment. It leaks out through them. Anyone with a WiFi-connected device passing by can detect the signal and easily connect to your network [Hack #65] . And once they’ve connected, they can do much more than just steal your bandwidth; if you’ve enabled folder-sharing on any PCs, they can get at your personal information and files, delete files, and wreak a lot more havoc than that.
But there’s a lot you can do to keep out intruders and protect your network and PCs. First, make sure you use encryption on your network [Hack #69] . If you’ve set up PCs on your network for sharing folders, you can require anyone who tries to get into those folders to have a password. Open Windows Explorer, right-click each folder on which you’ve enabled sharing, choose Properties, and click the Sharing tab. (This works in XP Professional only.)
But that’s just the basics. There’s a lot more you need to do. No single hack will keep your network protected, so you should use all of what follows.
Stop Broadcasting Your Network’s SSID
Your service set identifier (SSID) is your network’s name, and if people know what your SSID is, it’s easier for them to find your network and connect to it. Your router broadcasts its SSID, and that broadcast tells passersby there’s a network there. It also gives out the name, which makes it easier to connect to.
So, if you turn off SSID broadcasting, you’ll go a long way toward protecting your network. But doing that, by itself, won’t necessarily solve the problem. Even if you stop broadcasting your network’s name, people might still be able to connect to your network. That’s because manufacturers generally ship their wireless routers with the same generic SSID; for example, Linksys routers all have the SSID “Linksys” by default. So, even if you stop broadcasting your SSID, intruders can easily guess your router’s name and log on.
The answer? First change your SSID’s name, and then hide it. That way, passersby won’t see it, and they won’t be able to guess it either. How you do this varies from manufacturer to manufacturer, and even from model to model from the same manufacturer. But for many models of Linksys routers, here’s what to do.
To change your SSID name and stop broadcasting it, log in to the
setup screen by opening your browser and going to http://192.168.1.1. When the login screen
appears, leave the username blank. In the password section type
admin, and then press Enter.
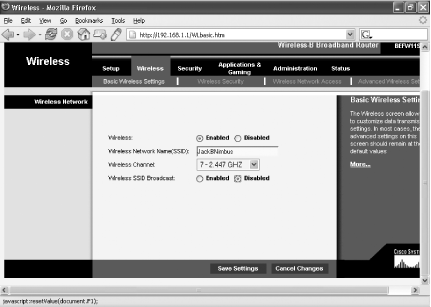
Click the Wireless tab and look for the Wireless Network Name (SSID) box. Enter the new name of your network. On the same screen, scroll down to SSID Broadcast and choose Disabled, as shown in Figure 7-7. Then, click Save Settings. If you are doing this from a wireless PC, you will immediately lose your connection to the access point and the Internet.
Warning
Make sure you don’t disable your wireless network—just disable SSID broadcasting. If you choose Disable under the Wireless setting, you’ll disable your wireless network.
After you change your network name, reconnect each WiFi computer to the network, using the new network name. To reconnect in Windows XP SP2, right-click the small wireless icon in the Windows system tray. From the screen that appears, click Change Advanced Settings, and then click the Wireless Networks tab. Click the Add button in the Preferred Network section, type the network name, click OK, and then OK again. In installation of Windows XP prior to SP2, click the small wireless network icon in the Windows system tray and select the Wireless Networks tab. Click the Add button, type in the network name, click OK, and then OK again.
While you’re at the Wireless screen, there’s something else you can do to help keep your network invisible to outsiders. You should regularly change the channel over which your router transmits. That way, if someone has tapped into it before, she won’t know on which channel it’s now broadcasting. Choose a new wireless channel from the Wireless Channel drop-down list, and then click Save Settings.
Limit the Number of IP Addresses on Your Network
Your wireless router uses DHCP to hand out network addresses to each PC on your network. So, another way to stop intruders from hopping onto your network is to limit the number of IP addresses it hands out to the number of computers you actually have. That way, no one else will be able to get an IP address from your network’s DHCP server because your PCs will use up all the available IP addresses.
Your router’s built-in DHCP server hands out IP addresses whenever a computer needs to use the network, and the router lets you set the maximum number of IP addresses it hands out. To limit the number on a Linksys router, go to the Setup screen and scroll to the bottom. In the Number of Address box, type the number of computers that will use your network and click Save Settings, as shown in Figure 7-8. If you add another computer to your network, make sure you go back to the screen and increase the number of DHCP users by one.
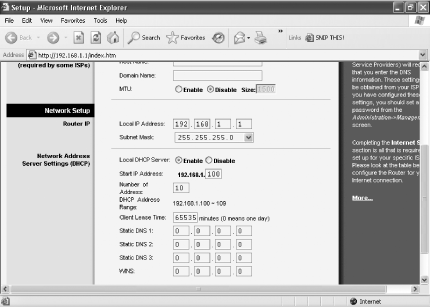
If you use this technique, you’ll also have to change the number of IP addresses your router hands out if you turn off one of your PCs or take it away from the network. For example, if you take a laptop with you on the road, remember to change the number of IP addresses your router hands out and decrease the number by one.
Check and Filter MAC Addresses
The simplest way to check if you have an intruder is to see a list of every PC on your network. If you see an unfamiliar PC, it means you have an intruder.
To see all the computers currently on your network and their MAC addresses, log on to the router, click Status, and then click Local Network. Click the DHCP Client Table button, and you’ll see a list of all the PCs on your network, their IP addresses, and their MAC addresses, as shown in Figure 7-9. If you see an unfamiliar computer listed there, you have an intruder. To kick the intruder off the network, check the box next to its listing and click Delete.
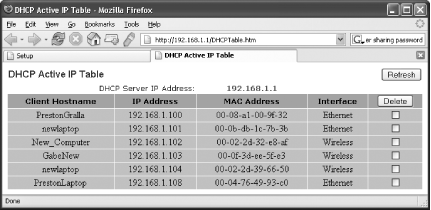
That will only temporarily solve the problem, though. The intruder can simply reconnect to your network and get a new IP address. You can, however, permanently ban any specific PC from ever connecting.
When you see an intruder, write down his MAC address. Then click Security, and from the screen that appears click Edit MAC Filter Setting. From the MAC Address Control Table that appears, type the MAC address onto a line and click Apply. The PC with that MAC address will now be permanently banned from your PC.
For even more security, you can allow only PCs with certain MAC addresses onto your network—just those who you want to let in. How you do this varies from router to router, but on a Linksys, from the main setup screen choose Wireless → Wireless Network Access to get to the Wireless Network Access screen. Select Restrict Access. Scroll to the bottom of the screen and click Wireless Client MAC List. You’ll see a list of every wireless PC on your network, including their MAC addresses. Check the Enable MAC Filter box for each computer and click Save. You’ll be sent back to the Wireless Network Access screen, and the MAC addresses of each PC will be put in a box next to MAC 01, MAC 02, and so on. Click Save Settings. Now, only computers you specify will be allowed onto your network.
If you want to allow a new computer with a different MAC address onto
your network, you need to add that MAC address. To find out the
computer’s network adapter’s MAC
address, at a command prompt type ipconfig /all
and press Enter. The screen will display information. Look
for the numbers next to Physical Address, such as
00-08-A1-00-9F-32. That’s the MAC
address. Copy that number into a MAC box on the Wireless Network
Access screen, and that computer will be allowed to connect to your
network. When you copy the number, don’t include the
hyphens.
Check Your Router Logs and Traffic
Your router keeps logs that track all the activity on your network. So, if you regularly check those logs, you can find out whether you’ve been targeted, or whether an intruder has made his way onto your network.
How you check the logs varies from router to router. But on many Linksys routers, you can examine both your incoming and outgoing logs. Log on to the router, click Administration, and then click Log. You’ll see two buttons: Incoming Log and Outgoing Log.
Click Incoming Log to display a screen that shows the most recent inbound traffic, including the source IP where the traffic is coming from and the destination port number on a PC on your network. It’s tough to decipher this screen, and there’s not much immediately useful information here. Much more useful is the Outgoing Log, which shows all outbound traffic. It shows the LAN IP address of each piece of originating traffic, as well as the destination and the port number used. If you see unfamiliar destinations and LAN IP addresses, you have an intruder.
These two screens provide only a current snapshot of your network use, and they don’t provide immediately useful information. But there’s downloadable software that examines your router logs in much more detail and which can give you much useful information, including whether you’re under attack, where the attack is coming from, the type of attack you’re under, and similar information.
The best of the bunch is shareware, rather than freeware. Link Logger (http://www.linklogger.com) works with routers from Linksys, Netgear, and ZyXEL. When you run it, it automatically gathers information from your router logs, monitors your network, reports on what exploits and weaknesses are being targeted, and provides a wide range of reports and graphs. If you do find you’re being attacked, it will list the attacker’s IP address and computer name and identify the ports on his PC where the attack is coming from, as well as the IP address, computer names, and ports on your network being attacked, as shown in Figure 7-10. It will also specifically identify the type of attack.
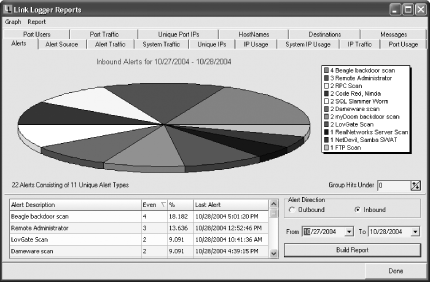
So, for example, you can create a report, like the one shown in Figure 7-10, which lists for you all the attacks and alerts over a given period of time and includes a breakdown of the number of each type of attack.
Get Back at the Attacker
You can also use Link Logger to try to get back at your attackers, by asking that their ISPs investigate them and possibly take action against them. First you need to find out the attacker’s ISP. Then, send an email to the ISP and include the log files in the message.
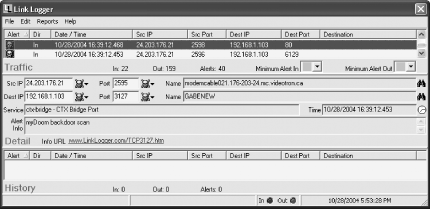
On the Link Logger main screen, scroll until you find an attack or group of attacks from the same person, as shown in Figure 7-11. (Each attack will have an icon of a skull and crossbones next to it.) Do a Whois search, which will match the IP address with its ISP. Then, do an ARIN Whois Database Search at http://network-tools.com by typing the IP address into the box near the bottom of the screen and pressing Enter.
You’ll see the name and contact information for the ISP, as shown in Figure 7-12.
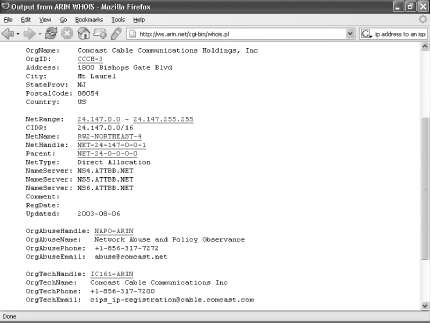
Most of the time, it will also include an email address for the person you should contact if you discover you’ve been attacked by someone who uses the ISP. Often, it’s an address such as [email protected]. (This is the address that would appear if the attacker uses the Comcast ISP.)
Now that you have the right email address, you need to send an email to it and paste log information into the email. Right-click the listing or group of listings that originated the attack and choose Copy. That will copy the log information to the Windows Clipboard. Paste the information into an email, and send it to the ISP of the attacker.
Hacking the Hack
Despite all your precautions, there’s a chance that someone has broken into your network, or at least uncovered information about it. People who go war-driving [Hack #65] often tell the whole world about unprotected WiFi networks they’ve found. So, there’s a chance that information about your network is listed on a publicly available web site, for all the world to see. If so, someone can use that information to try and get into your network.
First, you need to find out the MAC address of your router. It’s often listed on one of your router’s screens, but if you don’t know it, it’s easy to find. To find it, first go to the command line and ping your router’s IP address. You’ll find it in your router documentation. For a Linksys router, the IP address is 192.168.1.1. So, for a Linksys router, at the command line type the following and press Enter:
ping 192.168.1.1
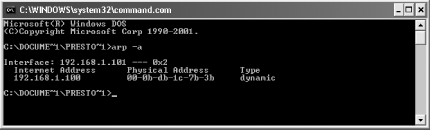
Strictly speaking, you don’t need to ping the router. But it’s a good idea to do it because when you ping it, the router’s MAC address information will be put into your PC’s Address Resolution Protocol (ARP) cache. Then it’s easy to grab the information out of the cache.
After you ping your router, stay at the command prompt, issue the following command, and press Enter:
Arp -a
A screen like the one shown in Figure 7-13 will appear. Your MAC address will be listed directly under Physical Address.
Now that you know your router’s MAC address, you can see whether information about your router is posted on a public web site. Go to http://www.wigle.net. Click the Search link on the lefthand side of the screen. You’ll have to register at the site, but it’s free, so before you search for your MAC address, fill out the registration information.
Once you’ve registered, log in, and the screen shown in Figure 7-14 appears. In the BSSID or MAC box, type in the MAC address of your router, making sure to put colons between the numbers, instead of the hyphens that Arp shows you. For example, you would type in a MAC address like this:
00:0b:db1c:7b:3b
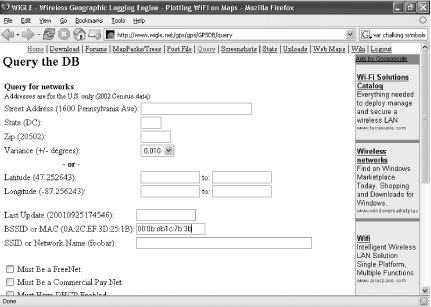
Click Query. If a blank screen comes up, information about your network hasn’t been posted to the site. But if your network is there, there will be a great deal of information about it, including its SSID, the channel it is broadcasting on, and other identifying information.
If your network is found, you should take quick action. Use the techniques in this hack and also turn on wireless encryption [Hack #69] .
See Also
For a list of freeware and shareware that will help you decipher your router’s logs, head to http://lists.gpick.com/pages/Firewall_Log_Tools.htm. That page lists a dozen or more pieces of software and includes reviews and links to where they can be downloaded.
Enable WiFi Encryption
Using an unencrypted WiFi network is like putting a big sign on your front door saying, “Burglars: the door’s open and no one’s home. Come in and help yourself.” Here’s how to put a virtual lock on your WiFi network to stop snoopers from coming in.
WiFi networks are incredibly convenient—and incredibly easy to snoop on. All that data going out over the air between your PCs and between your PCs and the Internet can easily be snooped on by anyone nearby using simple, off-the-shelf software such as packet sniffers. Virtually every keystroke and piece of data that goes out across your network can be read.
[Hack #68] discusses a variety of precautions that will help protect your wireless network. Those hacks will help keep out most snoopers. But the most determined ones might be able to bypass them, so your best bet for the most security is to use encryption.
You can use two encryption standards to protect your network: Wireless Equivalent Protocol (WEP) and WiFi Protected Access (WPA). The WEP protocol is older and less secure than the WPA protocol. But you might be forced to use WEP because older hardware doesn’t support WPA. Keep in mind that all your hardware has to support the encryption standard you choose. So, for example, if you have a newer router that uses WPA, but your WiFi network adapters don’t support it, you won’t be able to use WPA. Instead, you’ll have to use WEP.
Tip
If your current hardware doesn’t support WPA, check the manufacturer’s web site to see whether any firmware upgrades are available that offer WPA support. Some routers might have firmware upgrades for WPA, but WiFi network adapters usually are not upgradeable for WPA support.
How you turn on encryption varies from manufacturer to manufacturer, and even from model to model from the same manufacturer. It also varies depending on your wireless adapter. This hack shows how to set up encryption on a Linksys router.
If your hardware supports both WEP and WPA, choose WPA because it’s a more secure form of encryption. But even though WEP has gotten a bad name among security experts because it isn’t as secure as WPA, for most home networks it’s perfectly suitable. Home networks are not targeted by serious, dedicated intruders, so WEP is perfectly suitable for keeping out passersby. Business networks, though, should upgrade to WPA hardware because valuable information is sent across their networks.
Setting Up WEP Encryption
To use WEP encryption, you must configure your router to use it, choose an encryption key, and then configure all your wireless network adapters to use the encryption with the proper key.
First, go to the Setup screen of your router. For a Linksys router,
open a browser, type http://192.168.1.1 in the
address bar, and press Enter. A login screen appears. Leave the
“User name” field blank; in the
Password field, type admin and press Enter. If
you’ve changed the username and password, use those
instead.
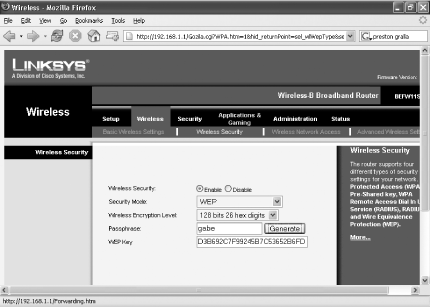
From the Setup screen, choose Wireless → Wireless Security. Select Enable next to Wireless Security. The Wireless Security options, which will have been grayed-out when you came to the page, will now be live so that you can fill them out.
Select WEP from the Security Mode drop-down list. In the Default Key section, choose any key from 1 through 4. (It doesn’t matter which you choose.)
Next, select the wireless encryption level you want to use. You have a choice of 64 bits or 128 bits. Using 128-bit encryption is much more secure than 64-bit encryption, although it will slow down your network to a certain extent. Businesses should absolutely use 128-bit encryption, and home users should consider using it as well, despite potential network slowdowns. But before choosing 128-bit encryption, make sure your WiFi adapter supports it. Some WiFi adapters support only 64-bit WEP encryption. Check your documentation or the manufacturer’s web site for details.
Tip
You might come across some confusing and apparently misleading information when choosing WEP encryption on your router. Some hardware manufacturers give you the choice of 40-bit or 104-bit encryption, rather than 64-bit and 128-bit encryption. In fact, though, 40-bit WEP encryption and 64-bit WEP encryption are two terms for the same thing, and 104-bit and 128-bit WEP encryption are similarly terms for the same thing. WEP uses a 24-bit initialization vector, which means you don’t control that part of the key. So, some manufacturers refer to the standard as 40-bit or 104-bit, and others call it 64-bit or 128-bit.
From the Wireless Encryption Level drop-down box, choose either “64 bits 10 hex digits” or “128 bits 26 hex digits.” Depending on which you choose, the form you have to fill out will change, as illustrated in Figures Figure 7-15 and Figure 7-16.
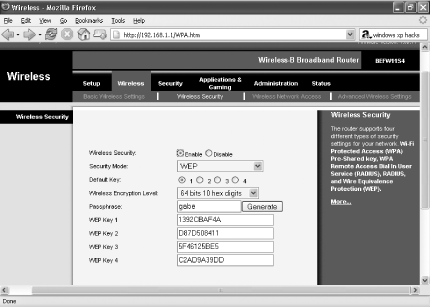
If you chose 64-bit encryption, type a phrase in the Passphrase box and click Generate. That will generate the WEP key you’ll use on your router and each PC on the network. Four keys will be created in the WEP Key boxes. You’ll use only one of these keys at a time, but you generate four of them because you can manually switch between them at regular intervals, for added security. You don’t have to generate your keys this way; you can create them yourself and type them in manually. But, chances are, it will be far easier to crack than one randomly generated by the router’s software, so it’s a good idea to use one the router will create for you.
If you instead selected 128-bit encryption, you’ll be sent to a new screen. In the Passphrase box, type a phrase and click Generate. This will generate a 128-bit encryption key.
Regardless of whether you created a 64-bit key or a 128-bit key, copy the key (or keys, in the case of 64-bit) onto a piece of paper. You’ll use this key for each PC that is going to access the network.
Click Save Settings. That applies the key to your network. From now on, only PCs that use WEP encryption and the key you just generated will be able to get onto your network.
Now that you’ve configured your router to use WEP, you have to configure each wireless computer on your network to use WEP and the key you just generated. On each PC, click the wireless connection icon in the system tray. Then, click Properties, click the Wireless Network tab, highlight your network, click Properties, and then click the Association tab. The dialog box shown in Figure 7-17 appears, although it won’t yet be filled out.
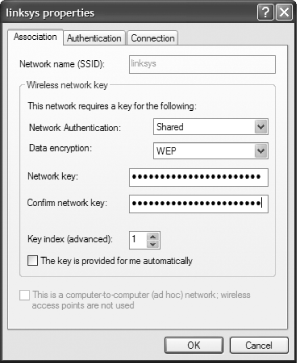
In the Network Authentication drop-down box, select Shared. In the Data Encryption dialog box, choose WEP. When you do that, the box that reads “The key is provided for me automatically” is checked. Uncheck this box.
Tip
If you can’t get WEP to work, it might be due to problems with network authentication. Experiment with using Open and Shared on each PC (choose this option from the Network Authentication drop-down box).
Enter your WEP key in the “Network key” box and type it again in the “Confirm network key” box. From the Key Index, choose the key number that you’ll be using. Click OK and then OK again. Now the PC can connect to your network using WEP encryption.
For added security, change the key number and associated network key on each PC regularly. You shouldn’t need to change the number on your router because it will recognize all the keys you generated. If you use 128-bit encryption, you’ll have only one key to use.
Setting Up WPA Encryption
The process for turning on WPA encryption is similar to that for turning on WEP, with a few differences along the way. First, you need to make sure your version of XP supports WPA. SP2 does; earlier versions don’t. To check whether you have SP2 installed, right-click My Computer, choose Properties, and look on the General tab. If you have SP2 installed, it will tell you at the bottom of the System section near the top of the tab.
If you don’t have SP2, go to http://www.microsoft.com/downloads/details.aspx?FamilyId=009D8425-CE2B-47A4-ABEC-274845DC9E91 and download a system patch that will install WPA on your system. Or, you can update your entire system to SP2 by going to http://windowsupdate.microsoft.com.
Now that your system supports WPA, you need to make sure all your hardware supports it as well, by checking the documentation and manufacturers’ web sites. If not, see if firmware updates are available, and download and install them. Remember, you’ll have to upgrade your router and wireless networking adapters, not just a few components. Also download the latest driver for your network adapters.
Once your system and hardware are WPA-enabled, go to the Setup screen
of your router. For a Linksys router, open a browser, type
http://192.168.1.1 in the address bar, and press
Enter. A login screen appears. Leave the “User
name” field blank; in the Password field, type
admin and press Enter. If you’ve
changed the username and password, use those instead.
From the Setup screen, choose Wireless → Wireless Security. Select Enable next to Wireless Security. The Wireless Security options, which will have been grayed-out when you came to the page, will now be live so that you can fill them out.
Select WPA Pre-Shared Key from the Security Mode drop-down list. In the WPA Algorithms drop-down list, choose TKIP, which is the approved, certified algorithm for WPA. Some products support Advanced Encryption System (AES), but that hasn’t been certified for interoperability among different vendors’ hardware.
In the WPA Shared Key box, type a key between 8 and 63 characters in length. The longer it is and the more random the characters, the more secure it will be. Write down the key. You’ll need to use this on each wireless PC on your network.
Leave the Group Key Renewal row at 3600. Click Save Settings. That applies the key to your network. Figure 7-18 shows what the screen should look like when you’re done. Now, only PCs that use WPA encryption and the key you just generated will be able to get onto your network.

Now that you’ve configured your router to use WEP, you have to configure each wireless computer on your network to use WEP and the key you just generated. On each PC, click the wireless connection icon in the system tray. Then, click Properties, click the Wireless Network tab, highlight your network, click Properties, and then click the Association tab.
In the Network Authentication drop-down box, select WPA-PSK. In the Data Encryption dialog box, choose TKIP. When you do that, the box that reads “The key is provided for me automatically” is checked. Uncheck this box. Enter your WPA key in the “Network key” box, and type it again in the “Confirm network key” box. Click OK and then OK again. Now the PC can connect to your network using WPA encryption.
Tip
For both WPA and WEP, it’s a good idea to change your key regularly because if someone monitors your network and captures network packets for a long enough period of time, they might be able to crack your encryption. If you regularly change your key, it will be much harder for them to crack the encryption because they’ll have less time and data to do so.
See Also
For more detailed instructions on using WPA on your network, see the PC Magazine article “Wireless Security: WPA Step by Step” at http://www.pcmag.com/print_article/0,3048,a=107756,00.asp.
For more information about WPA, see the Microsoft Knowledge Base Article 815485 (http://support.microsoft.com/default.aspx?scid=kb;en-us;815485).
Stop Moochers from Stealing Your WiFi Bandwidth
Everyone these days seems to have a WiFi-equipped laptop or PDA. If you have a WiFi network at home or at work and you are worried that passersby might be connecting to it and stealing your bandwidth, here’s what you can do.
As shown in [Hack #65] , if you have a WiFi network, it’s a breeze for anyone passing by to detect it. And if you haven’t protected yourself properly—or if someone is dedicated enough to stealing your bandwidth—moochers can get in and suck up all your bandwidth by doing things such as downloading movies and MP3s. That means there’s less bandwidth for you.
There’s an easy way to find out if someone is leeching your bandwidth and then to send them alerts telling them you know they’re using your bandwidth and you’d like them to get off your network. Download AirSnare, a free program which monitors your network for wireless intruders, reports on who they are, shows you their activity, and sends them warnings.
Before you install AirSnare, you need to download and install a library of tools called WinPcap, an architecture that captures and analyzes network packets. Get it from http://winpcap.polito.it/install/default.htm and follow the installation instructions.
Next, download and install AirSnare from http://home.comcast.net/~jay.deboer/airsnare.
Tip
Strictly speaking, AirSnare isn’t precisely freeware. Its author calls it beggarware . That is, he lets you use it for free, but he asks that you make a donation to him to help him develop the program further.
Before you use AirSnare, you need to know the MAC address of any network card that will be using your wireless network. The MAC address is a number that uniquely identifies a network card or other piece of communications hardware. You’re going to tell AirSnare that these MAC addresses are trusted ones and shouldn’t be treated as intruders.
You can find out the MAC address for your PCs in several ways. One
simple way is to go to a command prompt in Windows, type
ipconfig /all, and press Enter. In the results you
get, look for the numbers next to Physical
Address, such as 00-08-A1-00-9F-32.
That’s the MAC address.
Copy down the MAC address for every PC on your network. Include the
addresses for all your PCs, even if they connect to the network via
Ethernet rather than wirelessly. For example, if you have a laptop
that you sometimes connect to your network wirelessly and sometimes
via Ethernet, when you issue the ipconfig /all
command and press Enter you’ll see two
sets of entries, each of which has its MAC address. Copy down both of
them.
Next, go to C:Program FilesAirSnare, open
trustedMAC.txt with WordPad, and add each MAC
address (such as 00-08-A1-00-9F-32) on a new line
in the file. Follow it by a space, and then type in a description of
the computer—for example, 00-08-A1-00-9F-32 Preston's
New Laptop.
Now go to C:Program FilesAirSnare and run the file AirSnare.exe. You have to run the file from this location because the program doesn’t install an icon on the desktop or show up as an entry in Windows’ All Programs menu.
Warning
Not all WiFi adapters will work with AirSnare. If you get the error
message runtime error '-2147220982 (8004020a)' procedure
packetsethwfilter failed. error code= 0,
it means your WiFi adapter won’t work with
it. Try installing the software on another computer on your network.
Choose your network adapter from the list that appears, and AirSnare will spring into action. Whenever it finds a MAC address on the network that you haven’t told it is a friendly one, it sounds an alert and changes its screen color to red. Then it starts logging any traffic between the MAC address and the network in its Unfriendly MAC Watch Window. It gives details about all the traffic, including the port being used and the destination IP address. It also identifies common ports such as FTP, Telnet, email, web, DHCP, and other popular ports so that you have more information than just a port number.
You can save all the information to a log file by clicking the Stop button and clicking “Write to log file.” All the information will be saved in a text file. Filenames start with ASlog and are followed by the date and time; for example, ASlog031605_2305.txt indicates the log was saved on March 16, 2005, at 23:05 (that’s 11:05 p.m.).
Once you know someone is using your network, you want to warn them
away, which you can do with the program’s AirHorn
module. Choose Window → AirHorn Window. The screen pictured
in Figure 7-19 appears. In the Server box type in
your computer’s hostname, or its IP address. If
you’re not sure what those are for your PC, use the
ipconfig /all command from earlier in this hack,
and get the information from there.
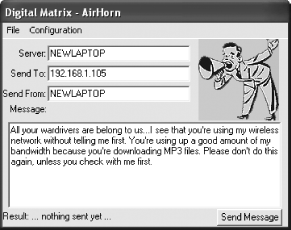
In the Send To box, enter the IP address of the computer to which you’re sending a warning, which you’ll find in the Unfriendly MAC Watch Window. Then, in the Send From box, type your name or how you want to be identified and type the message you want to send, as shown in Figure 7-19. Click Send Message, and the warning will be sent on its merry way.
There’s only one problem with this warning module: it works only if both you and the person on the other end have the Windows Messenger service turned on. The Windows Messenger service isn’t the Windows Messenger chat program. Rather, it’s used to send notifications over local area networks—for example, when a network administrator warns users that a server is about to be taken down. Because the Windows Messenger service has frequently been used to send spam, though, many people have turned it off. And XP SP2 turns it off by default [Hack #33] . So, don’t count on this part of the program working.
Hacking the Hack
Knowing that you have a bandwidth moocher is one thing, but kicking him off your network is another thing entirely. Sometimes a warning will suffice, but if one of you isn’t using the Windows Messenger service, you won’t even be able to warn him. So, what to do if you can’t get through, or you can get through and the moocher ignores you?
You can kick him off your network using your wireless
router’s built-in capabilities. How you do this
varies from router to router, but here’s how to do
it using the Linksys BEFW11S4. Go to the
administrator’s screen by going to http://192.168.1.1. Leave the username blank,
type admin for the password, and press Enter. (If
you’ve changed the username and password from the
default, use those instead.)
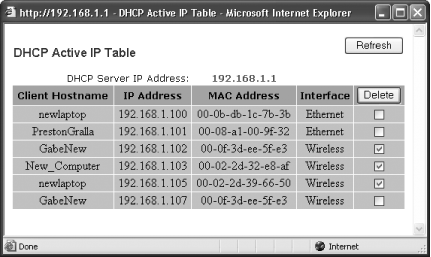
Next, click Status, and from the screen that appears, click Local Network. A page will appear with basic information about your router. Click DHCP Client Table, and you’ll see a list of all the devices on the network with their IP addresses and MAC addresses, as shown in Figure 7-20. Check the box next to the intruder and click Delete, and he’ll be kicked off your network.
To make sure he can’t get on again, you can tell your wireless router not to allow him onto your network. In my example of a Linksys router, log on to the administrator’s screen and click Security. From the page that appears, click Edit MAC Filter Setting. On the Filtered MAC Address page that appears, you’ll be able to ban devices with specific MAC addresses from getting onto your network. Type in the MAC address in an empty box, and click Apply. From now on the intruder will be barred.
Of course, someone else at some point might try to get on as well. Your best bet to keep out intruders is to use encryption and to limit the number of IP addresses on your network. Also, refer to [Hack #68] for several additional security measures you can take.
See Also
Solve Hotspot Woes
Send mail at a hotspot, even if your ISP won’t normally let you do it, and make sure your hotspot connection doesn’t get interrupted by “stuttering."
WiFi hotspots are great ways to connect to the Internet when you’re away from home. They’re practically everywhere these days, from coffee shops to airports, hotels, and even entire sections of metropolitan areas.
But hotspots, despite their convenience, come with problems as well. Depending on your normal ISP, you might not be able to send mail at hotspots. And if you’re in an area that has lots of hotspots close to one another, you might find your connection stuttering ; your current connection might drop, and you might find your PC automatically trying to jump from hotspot to hotspot, leaving you in the cold.
What to do? Here’s how to hack hotspots to solve those problems.
Sending Mail from Hotspots
The Internet is not the cooperative, friendly place it used to be several years ago, particularly because of the spamming scourge. When spam and scams weren’t much of a problem years ago, it was easy to send mail even when you were outside of your normal ISP’s network—and you’re outside your ISP’s network when you’re at a hotspot rather than at home or an office on a broadband connection, or when you’re dialing directly into your ISP.
ISPs used to allow anyone to use their SMTP servers to send mail. But when spam became a big-time problem, they cracked down on that because it allowed spammers to hide the true source of the origin of their spam. Now, most ISPs won’t allow anyone outside their network to use their SMTP servers to send mail. So, when you’re at a hotspot outside your ISP’s network, you’re treated like any outsider, and you won’t be able to use the normal SMTP server to send mail.
There are several ways around this problem. The easiest is to use the SMTP server used by the hotspot. Find out the server address, configure your email software to use it, and you’re ready to go.
Didn’t know that hotspots have SMTP servers? Join the club. Most hotspot providers don’t publicize that fact. In fact, often, their technical support departments don’t even know they have SMTP servers. I made several calls to T-Mobile asking about it and was told each time the servers don’t exist. In fact, though, they do.
The big national hotspot providers all have SMTP servers, although smaller mom-and-pop shops most likely don’t have them. So, here are the SMTP servers for popular hotspot providers:
- T-Mobile
- Boingo
- Wayport
- Surf and Sip
If you happen to connect to a hotspot at a hotel, ask whether the hotel has an SMTP server you can use.
How you configure SMTP varies according to the email software you use. If you use Outlook, choose Tools → Email Accounts and then click “View or change existing e-mail accounts.” From the list that appears, choose your email account, and click Change. In the “Outgoing mail server (SMTP)” box, type in the name of the SMTP server you want to use (for example, http://mail.boingo.com), as shown in Figure 7-21. Click Next and then click Finish. Now you’ll be able to send email at a Boingo hotspot.
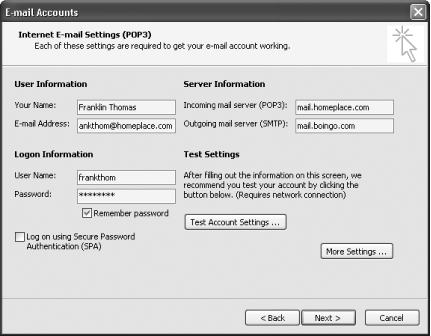
Warning
Before you change your SMTP server address, write down your original one. Make sure, when you leave the hotspot, that you change the address back to the original, because if you don’t you won’t be able to send mail when you’re at your normal ISP.
If you use Outlook Express, choose Tools → Accounts, select the Mail tab, click the Properties button, and then select the Servers tab. In the “Outgoing mail server (SMTP)” box, enter the name of the hotspot’s SMTP server. Click OK, then OK again, and then Close. You’re all set.
Tip
If you’ve followed these steps, checked that the SMTP address is accurate, and checked that your hotspot won’t let you send email, the SMTP server might require authentication. If so, on the screen in Outlook or Outlook Express that requires you to enter the SMTP address, check the “My server requires authentication” box and click the Settings button. From the screen that appears, select “Log on using” and enter your hotspot account name and password where indicated.
What if your hotspot provider doesn’t have an SMTP server? There are still a few solutions for you. One is to pay an SMTP relay service so that you’ll be able to send mail from any hotspot, even if the hotspot provider doesn’t have an SMTP server. Pay the relay service, and then you can use its SMTP server no matter where you are. Configure your email software to use the server, as outlined earlier in this hack, although you should check with the service, in case it has any special setup instructions.
Here are two reputable relay services:
- AuthSMTP (http://www.authsmtp.com)
Pricing plans start at $25 per year, which lets you send 1,000 messages or 100MB of mail per month, and go up to $169 per month, which lets you send 10,000 messages or 1GB of mail per month.
- SMTP.com (http://www.smtp.com)
Has a variety of pricing plans, including a monthly $9.99 plan, which lets you send 50 emails per day; a $29.99-a-year plan, which lets you send up to 30 emails per day; and a $149.99-a-year plan, which lets you send up to 300 emails per day.
There’s one more solution you can turn to. You can install an SMTP server on your own laptop. Then, when you send mail, you configure your laptop to use that SMTP server to send mail. A simple one to set up and use is 1st SMTP (http://www.emailarms.com/downloads/1st_smtp.html). It’s shareware, so you can try it out for free, but it costs $49 if you continue to use it.
Stop Hotspot Stuttering
Some metropolitan areas are so full of hotspots that several of them are available from the same location. When I go to Davis Square, located a few blocks from my house in Cambridge, sit at a café, and fire up my laptop, depending on which café I’m sitting at I usually see at least two hot spots, and sometimes three or more.
If you’re near several hotspots and the connections are weak, your connection will stutter and jump; when one connection fades out, XP will automatically connect you to another one, and that one will stutter, and XP will jump to another connection, and so on. The upshot is that you’re never connected to any one of them long enough to maintain a useful Internet connection.
Stuttering is caused by the very thing that allows you to easily connect to hotspots, XP’s Windows Zero Configuration (WZC) applet, which runs automatically on startup. When running, WZC looks for a new network connection every three minutes, and if, at the point it’s looking for a connection, your current connection fades out, it will search for a new one, and then automatically connect to it. The result is stuttering, jumping, and general uselessness.
How to hack it? Temporarily disable WZC after you’ve made a connection; that way, it’ll stay with your one connection, even as it fades out and in. After you’re finished at the hotspot, turn WZC back on so that the next time you want to connect to a hotspot or your home WiFi network, it will do its job.
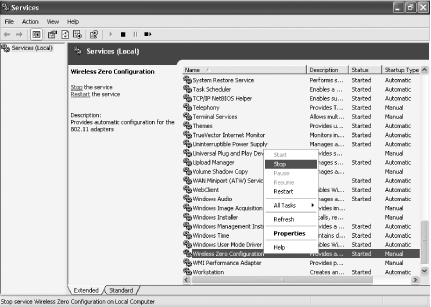
To temporarily disable WZC, select Start → Run and in the
Open box, type services.msc, and press Enter. This
runs the Services console. Scroll down until you see the Wireless
Zero Configuration entry. Right-click it and choose Stop, as shown in
Figure 7-22. That turns the service off;
you’ll stop the stuttering and jumping. When
you’re done with a hotspot, repeat the steps, except
choose Start.
Hacking the Hack
Turning WZC on and off can be a time-consuming chore. So, if you frequently connect to hotspots that stutter, you can speed things up by creating a desktop shortcut that, when double-clicked, will stop WZC, and creating another shortcut that, when double-clicked, will start it back up.
To do this, in Windows Explorer go to
C:WindowsSystem32. Drag the
Net.exe file to the desktop. Right-click it and
select Create Shortcut. Give the shortcut a name by right-clicking
it, selecting Rename, and typing in a name, such as Halt
WZC. Right-click the shortcut again, choose Properties, and
click the Shortcut tab. The target field will read something like
this: C:Documents and
SettingsAdministratorDesktop
et.exe. Replace this with
C:WINDOWSsystem32
et.exe
, enter a space, type
stop wzcsvc, and click OK.
Now the contents of the target field should be
C:WINDOWSsystem32
et.exe
stop
wzcsvc
.
Repeat these steps to create a shortcut for starting WZC. Name it
Start WZC, and type
C:WINDOWSsystem32
et.exe start wzcsvc
in the
target field.
Now, whenever you want to stop WZC, double-click the Halt shortcut. To start WZC back up, double-click the Start WZC shortcut.
Set Up Bluetooth on XP
The Bluetooth wireless standard is a great way to get computers and gadgets to talk to each other. Here’s how to set it up on XP.
Bluetooth wireless support is showing up in all sorts of devices these days, and the software is easy to use. Few consumers know about it or know how to use it, though. This hack will expose you to the basics of Bluetooth, explain how to set up some Bluetooth devices, and point you to some good sources of information about the ways you can use Bluetooth in your life.
Some people confuse Bluetooth with the 802.11x standards (WiFi), since they are both wireless technologies. But WiFi is intended primarily for Internet data and connecting computers, while Bluetooth is used to communicate between a wide variety of devices. Where WiFi needs to get into every corner of your world to be effective, Bluetooth is best at short ranges. In fact, the effective range of most Bluetooth communications is about 32 feet (10 meters).
Bluetooth can be used to connect all kinds of different devices—PCs, cell phones, cell phone headsets, PDAs, keyboards, portable game systems, audio headphones, GPS receivers, printers, digital cameras, barcode scanners, medical equipment, and even your car. Each device supports one or more profiles that dictate what types of devices it can communicate with and how that communication will take place. If two devices share a profile, they can communicate; otherwise, they will not even make the attempt.
Installing Bluetooth
My own initiation into Bluetooth was when I needed a new mouse for my laptop. I had avoided buying one of the infrared wireless mice because of the line-of-sight issues, but a Bluetooth mouse seemed like just the ticket. I purchased a Bluetooth dongle that plugs into my laptop’s USB port and a Bluetooth wireless mouse. In addition to the dongle-type adapters, you can also get permanent Bluetooth cards that go into the PCI slot of your desktop computer. The installation procedure is mostly the same.
The Plug-and-Play mechanism in Windows XP works so well that I usually just attach any new piece of hardware without bothering to use the software CD unless I have to. But due to the way that Bluetooth works, it’s best to install the software first so that you have an opportunity to configure Bluetooth prior to using it.
When you install the software, you’ll find the usual assortment of wizard pages asking you where you want to install the software and such. The installer might display a warning about Bluetooth devices and signed drivers. This is a security precaution and a convenience for you. If you click OK, the installer will temporarily disable the signed drivers messages to install the Bluetooth adapter. Otherwise, you would end up with a lot of messages about unsigned drivers.
Once the installer is complete, attach your Bluetooth adapter. If you have a PCI Bluetooth adapter, install the card in an open slot and restart your PC. Windows XP will detect the adapter and associate the drivers with those that you installed earlier. You will probably see several messages show up in the system tray as it installs the drivers for the Bluetooth adapter.
Once Windows XP has finished loading the drivers, you can start configuring your Bluetooth adapter. The My Bluetooth Places icon, shown in Figure 7-23, will open a window that allows you to discover and browse nearby Bluetooth devices. There is also an icon in the system tray for Bluetooth; it’s a blue circle with the runic B on it. The B in the system tray icon changes color depending on the status of the Bluetooth connection—red for when no Bluetooth adapter is connected, white for when an adapter is connected, and green for when a device is communicating with your PC.
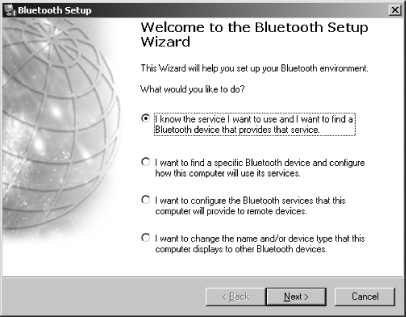
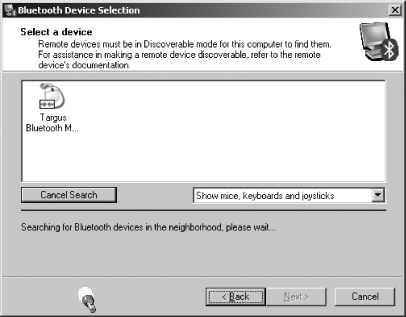
Open the My Bluetooth Places window. If you have a Bluetooth device nearby and it is turned on, it might show up on this list. Ignore any devices for the moment while we go through the configuration process. In the upper-left corner of My Bluetooth Places, there is a list of links under the heading Bluetooth Tasks. Click the link labeled Bluetooth Setup Wizard. The choices you are presented with, shown in Figure 7-24, pertain to how you want to use your Bluetooth adapter. For now, choose the last option, the one that begins with “I want to change the name...”.
If you want to set up service for a particular type of device, such as a mouse or a printer, choose the button labeled “I know the service I want to use...”. If you want to connect to a specific device (in case more than one person is using a Bluetooth device in your proximity), choose the button labeled “I want to find a specific Bluetooth device...” and click the Next button. In this screen, you provide the name of your computer and the type of computer you are using (laptop or desktop). I use a generic name for the computer because this value is broadcast to the world. People who attempt to hack into Bluetooth-connected computers could use this information to their advantage. Click the Finish button to go back to My Bluetooth Places.
If you haven’t already done so, now would be a good time to turn on your Bluetooth device and make sure it is running properly. Click the Bluetooth Setup Wizard link again. This time, when presented with the wizard screen of choices, choose “I know the service I want to use...” and click the Next button. The wizard will present you with a complete list of items that it knows how to communicate with. This is where you will go if you want to add a printer or a headset in the future. To set up the mouse, scroll the list to the bottom, select Human Interface Device, and click the Next button.
The next screen, shown in Figure 7-25, will cause Windows XP to search for all Bluetooth devices in range. If your device does not show up, make sure it is powered on and operating correctly. There might be a Connect or Pair button on the device that you must press to start the communication with the PC. If many devices are in the area, you can use the pop-up box beneath the list to show only certain types of devices. If the device you want to connect is in the list, choose it and click the Next button.
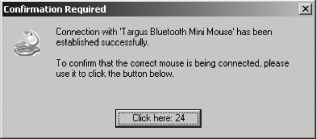
At this point, the Bluetooth wizard will attempt to connect with the device. If all went well, you should see the confirmation window shown in Figure 7-26. This is your way of knowing the device you are looking for is available and communicating with your computer. Once you click the confirmation button, your mouse and your PC are paired. If you ever see this window and you weren’t expecting it, it could be a sign that someone nearby is attempting to communicate with your computer via the Bluetooth connection.
If you are planning to add multiple Bluetooth products to your computer, you add them by going to the Bluetooth Setup Wizard and choosing the “I know the service I want to use...” option for each device. Different devices will follow the same instructions as we’ve done with the mouse in this example, although there might be device-specific settings that you will have to configure once the connection is made.
Securing Your Bluetooth Connection
Bluetooth can make your computing experience more convenient by eliminating some of the need for cables. Unfortunately, because the signal is being broadcast on open frequencies, anyone is free to listen in or even participate in the discussion. That’s why it’s necessary for you to take precautions.
The first precaution is to enable only the services you need for your computer. In the Bluetooth Setup Wizard, the choice labeled “I want to configure the Bluetooth services...” allows you to enable and disable different types of Bluetooth communications. Disable any types of communications that you do not plan to use at that moment. Click the Finish button when you have made the changes you need. These services can be easily re-enabled through the Bluetooth Setup Wizard or from the link labeled View My Bluetooth Services.
The next precaution involves locking out other devices. Go to My Bluetooth Places and choose the link labeled “View or modify configuration.” The Bluetooth Configuration dialog box, shown in Figure 7-27, allows you to choose how your Bluetooth connection communicates to the outside world.
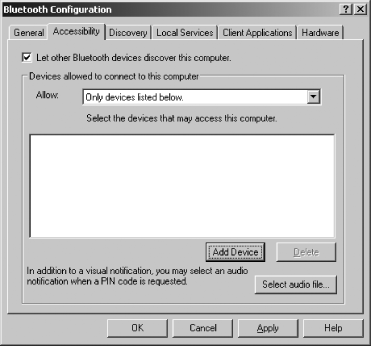
Click the tab labeled Accessibility. Remove the check mark from the box labeled “Let other Bluetooth devices discover this computer.” This will prevent unwelcome intrusions by unknown devices. The Discovery tab allows you to configure which devices your connection can discover. This is useful if you are in an office environment with many different types of Bluetooth devices. The Local Services tab lets you configure how different types of devices interact with software services installed on your PC. This will be necessary for synchronizing a PDA, listening to music, or transferring files.
Two of the more publicized Bluetooth security problems are called Bluejacking and Bluesnarfing. Both of these exploits require the attacker to be within communication range of the victim, which is less than 32 feet (10 meters) for most phones and laptops. Bluejacking involves the unsolicited receipt of messages to a Bluetooth device, usually a phone. It’s primarily used as a prank; your phone starts vibrating and you get a message criticizing your hairstyle or the brand of phone you are using. Your attacker will be close by, and chances are good that he is around 15 years old. Bluesnarfing is more dangerous because the attacker is out to retrieve datebook and contact information from your phone. In both cases, if you disable the Bluetooth features of your phone when you aren’t using them, you won’t have these problems.
Networking with Bluetooth
Bluetooth provides many of the same features WiFi does. Bluetooth has a maximum data transmission rate of somewhere around 100,000 bytes per second, which is much lower than 802.11. Plus, its limited range means all the parties must be in very close proximity. For these reason, it’s not an effective competitor to 802.11 for day-to-day wireless networking.
There are times, however, when an ad hoc wireless network using Bluetooth could be useful. If no network is present and no one has a floppy or flash drive handy, you can use a Bluetooth connection between the computers to share files. Keep in mind that the data rate for Bluetooth is miniscule compared to 802.11, so use it sparingly. For details on how to transfer files between PCs with Bluetooth, see [Hack #74] .
For details on how to pair your PC via Bluetooth with another device such as a cell phone to connect to the Internet, see [Hack #73] .
See Also
The O’Reilly Wireless web site (http://wireless.oreilly.com) has a good deal of Bluetooth-related information.
Windows XP Unwired by Wei-Meng Lee (O’Reilly) is a good source for Bluetooth-related advice.
Wireless Hacks by Rob Flickenger (O’Reilly) contains many more Bluetooth hacks.
—Eric Cloninger
Connect to the Internet with a Bluetooth Phone
Don’t worry about normal phone dial-in connections, hotspots, or WiFi. No matter where you are, the Internet is with you, as long as you have a Bluetooth-enabled phone.
Lots of phones these days include Bluetooth connections, and if you have one, Internet access for your laptop is only a phone call away. All you’ll need to do is fire up your laptop and phone, connect them to one another, and make the Internet connection. To do this, you’ll of course need a laptop with Bluetooth capabilities as well.
Tip
If your laptop doesn’t have Bluetooth capability, it’s easy to add. You just need a USB Bluetooth adapter. Companies including D-Link, Keyspan, Belkin, and many others sell them, often for around $30. Just plug the little device into your USB port, follow installation instructions, and you’ll be set.
Don’t expect broadband connection speeds when you do this—at least not yet. The exact connection speed you’ll get varies according to the precise technology your cell phone uses and, of course, depending on the quality of your current cell phone connection. These days, though, expect 20 to 40Kbps with a GSM/GPRS cell phone, 20 to 150Kbps with EDGE, about 50 to 120Kbps with CDMA 1xRTT, and from 300 to 500Kbps with CDMA 1xEV-DO. If you don’t know which technology your cell phone uses, check with your cell phone carrier, and they’ll let you know.
The exact screens you’ll see when you make the connection will vary somewhat from phone to phone, so for this hack, I’ll show you how to do it with the Sony Ericsson T68i Bluetooth-enabled phone. The steps with other Bluetooth-enabled cell phones should be very similar.
First, turn on your cell phone and laptop, and make sure they’re within range of one another. Then turn on the phone’s Bluetooth radio. To do this on the Sony Ericsson T68i, press the joystick button and select Connect → Bluetooth → Options → Operation Mode → On.
Next, you’ll have to make the phone discoverable so that your laptop can find it. On the Sony Ericsson T68i, press the joystick button, and select Connect → Bluetooth → Discoverable.
Now you need to discover the phone in XP. In XP, go to My Bluetooth Places and select View Devices in Range. You should see the Sony Ericsson T68i icon. Right-click it and select Discover Available Services. You’ll get to a group of icons that show the list of available services. Right-click the Dial-Up Networking service and select Connect Dial-up Networking, as shown in Figure 7-28.
You’ll be asked whether you want to accept or decline the connection or “Add to Paired.” It’s a good idea to select the “Add to Paired” option. That way, the next time you want to connect to the Internet using your laptop and cell phone, they’ll automatically discover one another, and you won’t have to go through the entire discovery process.
When you select “Add to Paired,” the screen shown in Figure 7-29 will appear. The device name will already be filled in for you. Make up a PIN that you want to use for pairing the devices, and type it into the Bluetooth PIN Code box.
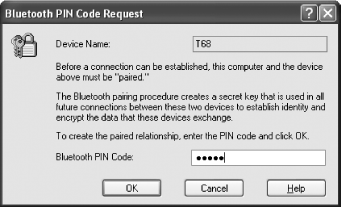
Tip
It’s a good idea to use only numbers for your PIN; otherwise, you might have problems with keying in alphabetic characters using your phone’s PIN dialog box.
On your cell phone, you’ll have to accept the pairing. A dialog box will appear asking if you want to accept the pairing. Select “Add to Paired,” and type in the same PIN you used on your laptop.
From now on, connecting to the Internet is the same as with any other dial-up connection. The familiar dial-up connection dialog box will appear in XP, asking for a username, password, and phone number. Enter the information you normally use to connect to your ISP, including your username, password, and phone number. Click the Dial button, and you’ll dial in and connect.
Set Up an Ad Hoc WiFi Network
Don’t have a WiFi router handy, but want to set up a network among multiple PCs? It’s easy to do using the ad hoc networking built into XP.
There are times when you don’t need a network to share a single Internet connection. Instead, you just want to share files, use the printer of another PC, send and receive instant messages; in other words, do pretty much everything you can do on a network.
But what if you want to do all that and you don’t have a router?
You can set up an ad hoc network, in which you connect on a peer-to-peer basis with other computers and PDAs. You don’t need any extra software for it. The capability is built right into XP.
All you need are WiFi-equipped PCs. To establish an ad hoc network, first one PC does the basic setup and then the rest of the PCs connect to that ad hoc network.
On the PC that’s setting up the network, double-click the Wireless Network icon in the system tray. Click the Properties button, and then click the Wireless Networks tab. Click the Add button and make sure you’re on the Association tab. The screen shown in Figure 7-30 appears.
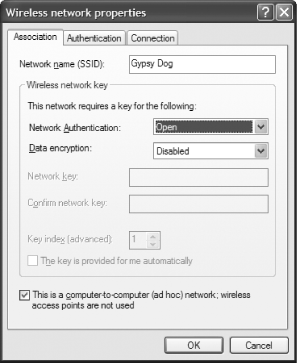
Type a name for your network in the SSID box. At the bottom of the screen, check the box next to “This is a computer-to-computer (ad hoc) network; wireless access points are not used.”
If you’re not using encryption to protect the ad hoc network, choose Disabled from the “Data encryption” drop-down box. If you are going to use encryption, follow the instructions in [Hack #69] .
Click OK and then OK again. Your network is now set up. Even though you’ve set it up, it won’t be visible to you. But it will be visible to people nearby, and they can easily connect to it.
On each PC that you want to connect to the network, right-click the Wireless Network icon in the system tray and choose View Available Wireless Networks. You should see the SSID of the network you’ve just set up. To connect to the network, just click the Connect button. Depending on how you’ve set up your PC’s security, you can now share files, browse each other’s hard disks, send messages, use each other’s printers, and so on.
If for some reason another PC doesn’t find your ad hoc network, you’ll need to check that second computer’s wireless settings. It might be set up to hide ad hoc networks. Double-click the Wireless Network icon in the system tray, click the Properties button, and then click the Wireless Networks tab. On that tab, click Advanced to display the dialog box shown in Figure 7-31. Make sure you haven’t selected “Access Point (infrastructure) networks only.” Then click Close. Now the network will show up.
Because there is no router for the network, there’s no DHCP server, but all PCs on the network get temporary IP addresses called link local addresses, ranging from 169.254.0.0 through 169.254.0.16.
Bluetooth File Transfers
Bluetooth also allows you to set up ad hoc networks. In fact, by their very nature, Bluetooth connections are in essence ad hoc networks. So, every time you set up a Bluetooth connection, you’re setting up an ad hoc network. For details, see [Hack 72] and [Hack #73] .
To transfer files between two PCs with Bluetooth, first pair the PCs [Hack #73] . Then, from one PC, right-click the other paired PC and choose Discover Available Services. You’ll see a file transfer icon. Double-click it. Depending on the security settings, you might be prompted to enter a PIN. If so, you’ll use the same PIN on both PCs.
Tip
Bluetooth is much slower than WiFi when it comes to file transfers—from 100Kbps to a maximum of 750Kbps, compared to up to 54Mbps for the 802.11g version of WiFi.
The other PC will now show up in My Bluetooth Places, and now you can navigate through it to transfer files from it to your PC.
Hacking the Hack
You can use an ad hoc network to share a single Internet connection among multiple users. In that case, the user that sets up the ad hoc network configures his PC to allow others to share his Internet connection. Then, when other PCs connect to the ad hoc network, they can get onto the Internet. Of course, to be able to do this, the PC has to have a live Internet connection, such as a broadband cable modem or DSL modem connection.
On the PC that set up the ad hoc network, right-click My Network Places and choose Properties. The Network Connections dialog box appears. Right-click the wireless connection and choose Properties. Click the Advanced tab to bring up the dialog box shown in Figure 7-32.

Check the box next to “Allow other network users to connect through this computer’s Internet connection” and click OK. Don’t check the box next to “Allow other network users to control or disable the shared Internet connection,” unless you want to give them that kind of control over the connection. Then click OK again.
If you have servers or network services on your PC that you want to give others access to, such as FTP servers and mail servers, click the Settings button and put checks next to each server or service. Then click OK and OK again.
When you do all this, your PC will function like a DHCP server and hand out private network addresses to the other PCs accessing the Internet. In essence, you’re turning your PC into a wireless router.