Chapter 2
Setting Up the Lab
The first chapter was all book learning. This chapter is different—you start to get your hands dirty. You want to start analyzing actual network traffic. Of course, to get the required network traffic, you need multiple systems. You could install Wireshark on a local system and capture just any traffic, but this chapter prepares something far better. You create a lab on which you can apply Wireshark to many interesting protocols and scenarios. All this setup will benefit you, not just for the rest of the book, but also for many captures to follow.
You're familiar with Wireshark's layout, and you understand how easily filters sift through a million packets to present just what you want. So we need to create an environment meant for experiments and learning. The environment you set up in this chapter takes care of your needs in a few different forms. Thankfully, you don't need to buy or put together several systems to do so. (Or maybe just your spouse thanks us.)
Because this book is focused on information security, we also spend time with the Metasploit framework and Kali Linux. The Kali Linux distribution is a suite of tools, including Metasploit, that every information security professional should be aware of, if not already experienced with. In this chapter, we introduce Kali Linux, less for its tools and more as the lab platform.
These tools are open source and should be a part of any security professional's toolkit. The number of tools included in Kali Linux in particular is such that no one could actually master all of them. Like the different disciplines of information security, there are similar categories of tools in Kali, such as reconnaissance, information gathering, penetration testing, wireless tools, and so on. In this chapter, we take a high-level look at these categories and specific tools before making use of them in detail in the labs to come.
While everyone learns differently, there is no doubt that getting hands-on practice is the best way to reinforce a skill. To this end, we wanted to provide ample opportunities for hands-on practice. In addition to the exercises, we developed a lab environment, called the W4SP Lab.
The W4SP Lab will run as a container within your Kali Linux virtual machine (VM). We might assume some users are familiar with or already use Kali Linux, but experience with Kali Linux is not required to use the W4SP Lab. However, it is highly recommended that you use Kali Linux to follow along with the lab, exercises, and the book.
For the question of which desktop to work with throughout the book, we chose a Windows desktop, namely Windows 10. Although Windows 7 and Windows 8.x may still be widely used, Windows 10 is fast becoming the most popular Windows desktop version, if it isn't already. We appreciate there are plenty of operating systems used by security professionals, and the main tools we use are cross-platform. Therefore, the vast majority of desktop and server platforms are covered with the tools and labs.
To ensure the lab is independent of people's choices of desktop operating system, the lab runs from within a VM of Kali Linux. While the base or host operating system is Windows 10, the lab environment runs within a Kali Linux VM, and the bulk of the hands-on exercises are the same, regardless of which operating system you use.
Finally, if you are relatively familiar with virtualization and already use VirtualBox, feel free to skip to the Kali VM installation. If you happen to already have a Kali VM with Kali Linux installed (not LIVE), feel free to skip to the W4SP Lab section, though it might be best to review the section regarding installing and setting up the virtual lab environment so that you can follow along with the exercises throughout the book.
Kali Linux
Back to Kali Linux: Kali is an excellent resource for both security neophytes and seasoned professionals. It comes preinstalled with numerous security tools and frameworks, and makes it easy to hit the ground running when performing just about any security-related task, from wireless hacking to forensic analysis. Oftentimes, getting certain security tools installed is a pain if it depends on other software components. Kali helps to alleviate these issues by making sure these tools can be easily installed in Kali. It is important to keep in mind, however, that, like with anything built by humans, it is not always perfect, and you may find yourself wrestling with getting a certain tool installed.
As mentioned, we recommend using the Kali Linux distribution as you follow along with this book. If you work in security, you are probably already familiar with the excellent work the OffSec Security guys do in putting together the Kali Linux distribution. For those who are not familiar with Kali, it is a security-themed Linux distribution. For those who are not even familiar with Linux, it is the open-source alternative operating system that practically powers the Internet; in fact, the majority of websites are running on Linux. Without going into too much of a history lesson, Linux was initially released by Linus Torvald in 1991 and has been under active development since then.
The operating systems that people use are often the result of a long-waged religious-like war. The quickest way to start a flame war is to sing praises of a specific text editor (Vim FTW!) or to bring up other operating systems or distributions. Personally, I have a very practical view regarding this. The answer to which operating system you should use generally comes down to the one with which you are most familiar. All the capabilities, bells, and whistles of an operating system don't mean much if you can't effectively leverage them for the task at hand. That being said, there are definitely advantages and disadvantages to varying operating systems. For example, there is no comparison between the networking capabilities of Linux when compared to Windows. Windows is designed for ease of use and reliability when it comes to networking. On the other hand, Linux is geared for maximum flexibility, so much so that many advanced firewalls are actually running Linux. Linux is also open-source, which helps to foster and lower the entry level for development. As a result, security tools are often written for Linux first before being ported to Windows. Because of this, it is important to make sure you are familiar with Linux if you are involved in the security industry. Now I realize that Windows and Linux are not the only operating systems out there. There are BSD-based operating systems such as OpenBSD and Mac OSX, which also have their own advantages and disadvantages. I suggest you spend some time installing and trying out varying operating systems to get an idea of what they offer.
Kali recommends at least 10 GB disk size, but we recommend at least a 20 GB file to make sure you have enough room for the virtual lab environment you are going to build later.
This brings us to another nice thing about Kali Linux: the community that has been built up around it. Finding answers to issues in Kali is often as simple as a Google search or swinging by the Kali forums or IRC channel. (Check out the note for links and further information.)
Virtualization
Installing an operating system used to mean that you used a dedicated physical computer to run that operating system. One set of hardware resources would become one, and only one, server. All resources would be allotted for that one operating system and its applications. This all changed with the advent of virtualization technology.
Virtualization allows you to run multiple operating systems on the same computer. Using virtualization, hardware and resources normally available to one operating system are now shared among other installed systems. The installed systems function independently from one another. Any one of the virtual operating systems knows no different from the operating system actually using the physical resources. In reality, each virtual operating system is running alongside the operating system, akin to an application running on it.
Before we go further, it should be clear: virtualization can take many forms. The one type we focus on here is server virtualization, meaning you can run multiple servers or systems on one actual hardware system. There is also storage virtualization, where storage capacity appears as one resource but the actual disk drives are likely spread across multiple physical storage systems. And there is network virtualization, where very different virtual networks with networked services are running “together” on the single physical medium, but each can appear independent. There are other types in addition to these, but they all seem to say the same: don't let the physical aspect of hardware limit who can use it.
Ultimately, virtualization is a feature provided by the CPU. Years ago, the ability to run VMs was limited to CPUs found in enterprise servers, in the data center. Up to a few years ago, if consumers wanted to run VMs on their desktops, they would need to verify their CPU choice could support the feature before buying it. Today virtualization support is widely available. Support is likely with any semi-recent chipset, released by just about any CPU manufacturer. So unless your desktop is several years old, you should be fine running any of the solutions presented in this chapter.
Virtualization is here to stay. It has moved steadily for more than 15 years from being the exception to now being the norm in data centers. Virtualization is implemented in many forms: for example, the operating system platform, the network, or storage. And in more recent years, the hottest byproduct to come from virtualization has been cloud computing. Services offered from the cloud are possible because of virtualized resources. Entire books have been written on virtualization. To sum up, virtualization is not new, nor is it going away any time soon, and for the sake of honing your Wireshark skills, virtualization will serve you here well.
Basic Terminology and Concepts
When talking about virtualization, we need to define a few terms. The hypervisor is the software responsible for leveraging the virtualization features of the specific chipset in use. The host is the operating environment on which the hypervisor is running. In your case, this would be whatever operating system you currently have installed on the physical machine. The term guest is generally used to refer to the virtualized operating system. So, when we say hypervisor or host, we are talking about the underlying physical machine, and when we say guest, we are talking about the VM.
When it comes to using and managing VMs, like with operating systems, there are plenty of choices. Three main virtualization solutions are available, and they can vary depending on whether it is an enterprise solution or designed for personal or desktop use. We are strictly interested in the personal or desktop virtualization solutions where KVM, VirtualBox, and VMware are the major players. Both KVM and VirtualBox are open-source solutions, while VMware is a commercial offering. It used to be that VMware was the market leader in functionality, but that has changed. Generally speaking, all three are equal in terms of features and functionality. For this book, we recommend using VirtualBox. It is free, cross-platform, and has an easy-to-use graphical interface. If you already happen to be familiar with another virtualization solution, feel free to use it.
Benefits of Virtualization
As previously mentioned, there is more than enough material out there to answer the question: why virtualize? We won't bother regurgitating the generalized benefits. For here, let's stay brief and focus on why security professionals like yourself want to virtualize.
Sandboxes Can Get Dirty
Security professionals know better than anyone else about the risks of being online, both for us and the systems we protect. They know well the consequences that can happen, no matter how carefully they work. By the nature of their work, they work with questionable conditions. Your job title doesn't need to be malware analyst to discover you have malware on your system. Sometimes we experiment with a certain tool, open the wrong attachment, click on the wrong link during research—suddenly, our machine is rendered suspect at best. This is a great selling point for VMs, which when rendered suspect can, just as quickly, be rolled back to a state before that action.
Resources and System Scale Quickly
Ever notice how we treat resources between virtual systems and bare metal systems? You appreciate VMs consume resources like any other system—that is, any system, either virtual or bare metal, needs storage, memory, and processing power. But the reasoning behind how we install or allocate resources is the key differentiator.
When building a bare metal server, normally resources are bound by:
- How much we can afford
- The limits of the hardware; for example, the motherboard supports a maximum amount of memory
When we build a virtual server, we allocate resources according to:
- What today's intended use will be, not next year's
- How many other VMs we might need up at the same time
In short, resources for VMs get allocated for the short term, while real hardware resources get purchased for the long term. Once you have the hardware available, it's nice knowing whatever VMs might demand, they will have it.
VirtualBox
It is not easy selecting one from the options available today. However, for creating VMs for the most common desktop environments, VirtualBox from Oracle is the solution we use.
Installing VirtualBox
VirtualBox can be downloaded from https://www.virtualbox.org/wiki/Downloads. Be sure to select the version that matches your operating system. Notice that on that page you can also download the VirtualBox Extension Pack. This allows for various advanced features, such as USB pass-through and shared folders between the guest and host machine. We walk through how to install the VirtualBox Extension Pack, but it is important to note that these features do not fall under the same open-source license as the rest of VirtualBox, and there are certain restrictions that need to be taken into account if you plan on using the Extensions for anything other than personal use or evaluation. The details of the VirtualBox Personal Use and Evaluation License (PUEL) can be found at https://www.virtualbox.org/wiki/VirtualBox_PUEL.
We will walk through the installation of VirtualBox for the Windows operating system. If you happen to be running Linux as your host operating system, we assume that you are familiar with how to install software using the recommended tools for whichever distribution you are running. After downloading the VirtualBox installer, it is simply a matter of double-clicking to start the installation. Depending on your Windows configuration, you may be prompted with a warning stating the file has been downloaded from the Internet and asking if you are sure you want to run it.
Double-click the installation file to run it. A dialog box appears similar to what is shown in Figure 2-3. You need to make sure either that you have administrative privileges on your Windows machine or that you have a means of obtaining the necessary privileges to install VirtualBox.

Figure 2-3: VirtualBox installation window
Click Next to continue the installation. The next window, as shown in Figure 2-4, allows you to choose which features you want to install. For our purpose, the default options are acceptable, so just click Next again.
Figure 2-4: VirtualBox feature selection
The next window (Figure 2-5) provides the option of creating various shortcuts and the registering of various file extensions. You are more than welcome to uncheck either of the shortcut options, but make sure to keep the checkbox regarding registering file extensions checked. This will make it so that various files associated with VirtualBox are automatically handled by the VirtualBox application. Again, click Next to proceed with installation.
Figure 2-5: VirtualBox shortcut creation
The next window (Figure 2-6) provides a warning that the VirtualBox networking features will cause a temporary network disruption. Proceed with the installation by clicking Yes.
Figure 2-6: VirtualBox networking warning
The next window (Figure 2-7) is the last one prior to the installer actually beginning the installation process. Click Install to kick off the installation process.

Figure 2-7: VirtualBox installation window
You should see a window with a status bar that displays the progress of the installation process (Figure 2-8).

Figure 2-8: VirtualBox installation status
At some point during this process, you will likely be presented with another window regarding installation of device software (Figure 2-9). This is the dialog the Windows operating systems prompts an end user for when system drivers are being installed. VirtualBox uses the system drivers to handle various tasks, such as managing the virtualization features of the host CPU. This window appears numerous times throughout the installation process. Click Install each time to complete the VirtualBox installation.

Figure 2-9: VirtualBox driver installation prompt
After clicking through the driver installation prompts, you should eventually end up at a window specifying that the installation has been completed and asking if you want to launch the VirtualBox application (Figure 2-10). Click Finish. By default, the VirtualBox graphical interface launches.
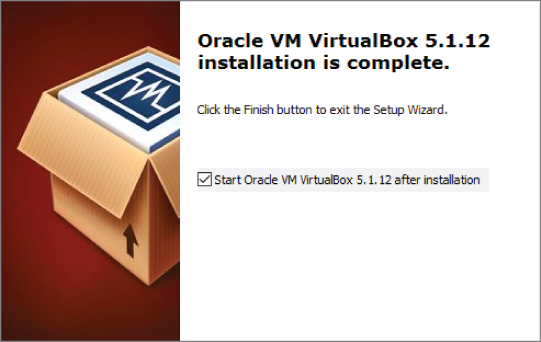
Figure 2-10: VirtualBox installation finished
You should be presented with the VirtualBox graphical interface. You might also be prompted to restart your machine to finish configuring VirtualBox (Figure 2-11), depending on your Windows version. Make sure you have saved any important things you are working on and click Yes to start the reboot.
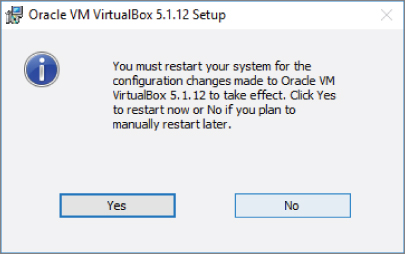
Figure 2-11: VirtualBox GUI and restart window
You should now be able to select VirtualBox via one of the shortcuts created during installation or through the Start menu.
Installing the VirtualBox Extension Pack
With VirtualBox installed, you can install the VirtualBox Extension Pack so that you can access some of the more advanced features. You need to make sure that you download the version that supports the version of VirtualBox you have installed. For the figures, we installed VirtualBox verson 5.1.12, so we clicked the appropriate link on the VirtualBox Download page, as shown in Figure 2-12.
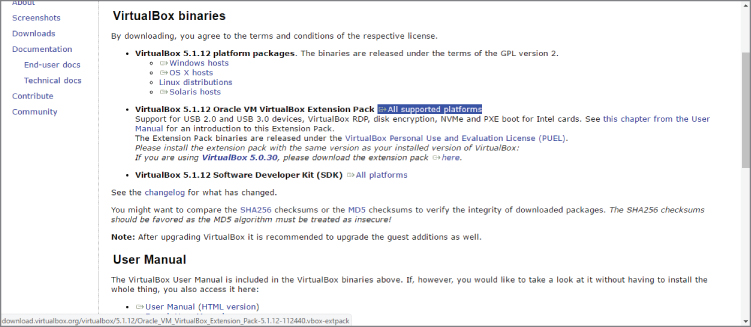
Figure 2-12: VirtualBox Extension Pack download
As with the installer, you want to follow the same process of checking the SHA-256 hash to ensure that the file was not modified in transit. Copy and paste the PowerShell code used earlier into a PowerShell window, making sure to change the $vboxinstaller variable to the name of the VirtualBox Extension Pack that you just downloaded. After getting the SHA-256 hash, make sure that it matches the checksum provided on the VirtualBox website. Assuming they match, continue with the installation process.
First, launch the VirtualBox GUI by clicking the VirtualBox shortcuts created during installation or by selecting it from the Start menu. With the VirtualBox GUI open, click File on the menu bar, then select Preferences from the pull-down menu. A new dialog box appears. Highlight Extension from the left pane to show what extension packs have been installed. None is installed yet, but you are about to install one. On the far right of the dialog box is a triangle and square-shaped button. Click that button to add a VirtualBox Extension Pack. Figure 2-13 should help make this process clearer.

Figure 2-13: VirtualBox Extension Pack preferences
You should now have a file dialog box. Select the VirtualBox Extension Pack file that you previously downloaded. With that, you should be presented with another window (see Figure 2-14) regarding the installation of the Extension Pack. Click Install to continue or Upgrade, if a previous version was already installed.

Figure 2-14: VirtualBox Extension Pack installation
You will be prompted with the VirtualBox Personal Use and Evaluation License (PUEL). Read it and click I Agree. After a quick status bar pops up, you should be presented with a window similar to what is shown in Figure 2-15. This specifies that the VirtualBox Extension Pack is now installed.
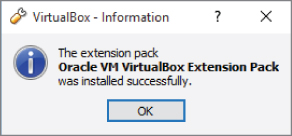
Figure 2-15: Successful VirtualBox Extension Pack installation
Click OK, and then click Cancel to exit the preferences window. Congratulations! You now have VirtualBox installed and are ready to install your first guest operating system.
Creating a Kali Linux Virtual Machine
Let's not waste a minute more—time to create the first VM. Because we are using Kali Linux throughout this book, our VM will run Kali Linux. A big advantage to using Kali is that it is supported on multiple architectures. You can even install a version of Kali on your Android phone.
The first action to take is to download Kali. You can find the download at the https://www.kali.org/downloads/ website. As shown in Figure 2-16, there are several options.

Figure 2-16: Kali download web page
You may notice there is an option to download prebuilt VMware and VirtualBox images. These images are only available via Torrent download (in this case, a legal Torrent). We avoid this option for two reasons: First, we don't want to require you to download more software than necessary—in this case, a Torrent client. Second, it is best to have the Kali ISO image handy. This file can be burned directly to a CD and can be used to boot a machine directly into Kali. So, let's download the Kali Linux ISO image.
The ISO image is 2.9GB, so before you start, make sure you have enough room on your hard drive. Once the download finishes, fire up VirtualBox and select the New icon (see Figure 2-17) to create a new guest VM.
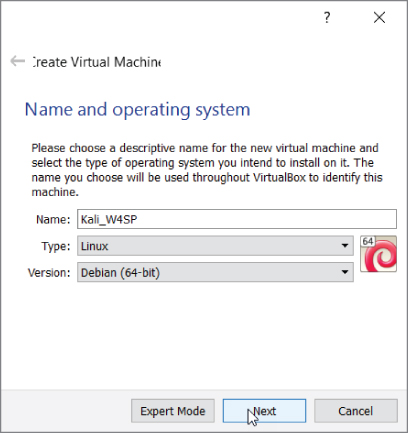
Figure 2-17: Creating a new virtual machine
Use any name you like but make sure the type is set to Linux and the version to Debian (64-bit), as Kali is based off of Debian. Click Next to display the window allowing you to choose the amount of memory (RAM) to give the VM. Be wary of how much RAM you currently have available and try to give ample memory to your VM. You could give as much as possible, but also consider whether you intend to have multiple VMs running simultaneously. If possible, give the VM at least 1GB (1024MB) of memory. As you see in Figure 2-18, 2GB of memory is allotted for our future VM.
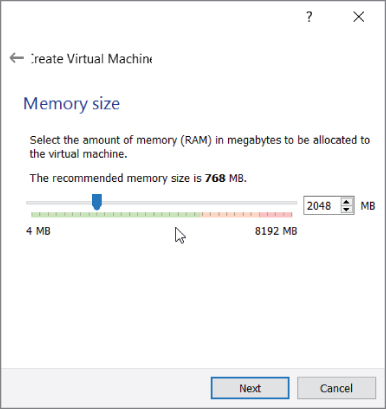
Figure 2-18: Selecting virtual machine memory
The next screen (Figure 2-19) gives the option for specifying the storage your VM will use as a hard disk. The default is to create a virtual disk. This will be the file that the VM will use as its virtual hard drive.
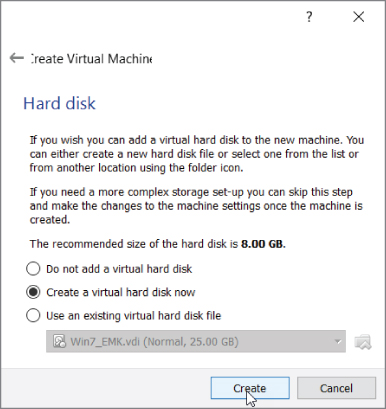
Figure 2-19: Creating virtual disk
Ensure that Create a Virtual Hard Disk Now is selected to get to the screen for selecting the disk type. For the hard disk file type, ensure that VDI (VirtualBox Disk Image) is selected (see Figure 2-20).

Figure 2-20: Selecting virtual disk type
The next option is for how the data is stored on the file. We want the default option, Dynamically Allocated. This option means our Virtual Disk Image (VDI) file will grow as the VM requires, up to the limit stated here. If we were to select Fixed size, VirtualBox would create a VDI file on the hard drive taking up 50GB. Instead we choose the option of Dynamically Allocated (see Figure 2-21) to ensure the only space taken up by the VDI is what is needed by the guest VM. Obviously this helps save hard drive space. Note that if your required space gets smaller, the VDI size does not shrink but remains at the largest needed so far.
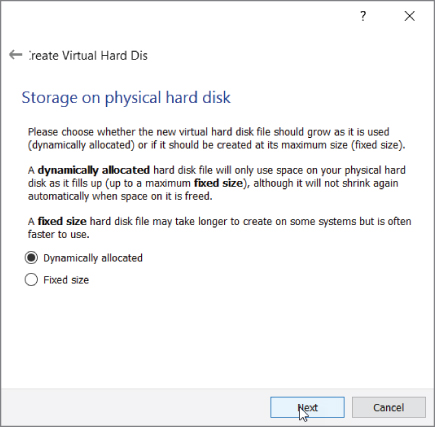
Figure 2-21: Storage on physical disk
The next window gives the option to select the size of the virtual disk file (see Figure 2-22). Kali recommends a disk size of at least 10GB, but we recommend at least a 20GB file to make sure you have enough room for the lab environment you are going to build later in the book.

Figure 2-22: Virtual disk size
After you click Create, your new VM is available. To start this VM, you can just highlight the newly created guest and click Start. Before you do this, however, you need to enable the PAE feature; otherwise, you will not be able to install Kali. As mentioned earlier, a 32-bit processor can only address up to 4GB of RAM. This is only partially true: There are actually features in newer 32-bit processors that allow an operating system to address more than the traditional 4GB limit. This feature is known as Physical Address Extension (PAE), also known as Page Address Extension. The Kali Linux kernel, which is the core of the operating system, is configured with PAE, so it expects to be running on a CPU that can support that.
To enable PAE, select Settings, highlight System in the left pane, and then click the Processor tab. Note that clicking Settings applies to whatever VM you have highlighted—an important tip for when you'll have several VMs built. Make sure the Enable PAE/NX checkbox is selected and click OK (see Figure 2-23). The NX refers to the No-eXecute processor bit that helps defend a CPU against malicious software attacks. On a physical PC, enabling the NX bit, if available, is done through the BIOS.
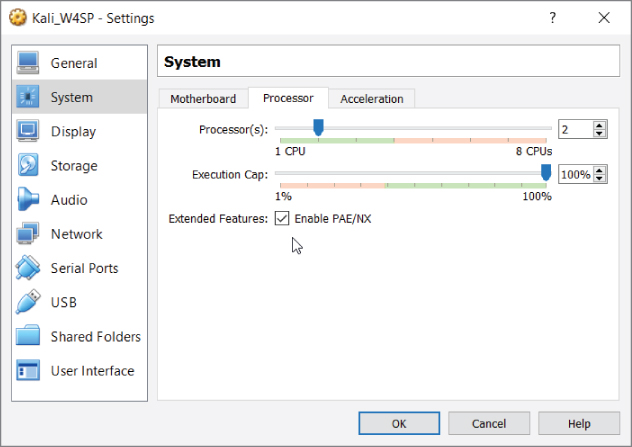
Figure 2-23: Enabling PAE
After enabling PAE, you can start the VM. Make sure the Kali VM is highlighted, and then click Start. You are then prompted for a start-up disk (see Figure 2-24). This is going to be the ISO file you downloaded earlier, so click the icon that displays the open file dialog box and select the Kali ISO image you downloaded earlier.
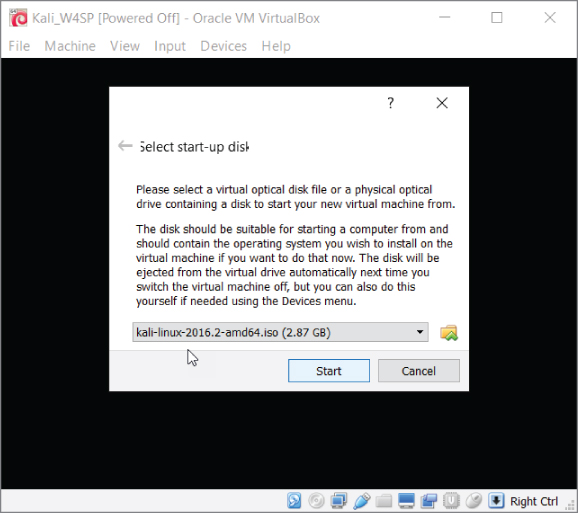
Figure 2-24: Selecting start-up disk
Clicking Start starts the VM with your Kali ISO image as the boot device. This should present you with the Kali boot menu (see Figure 2-25).

Figure 2-25: Kali boot menu
Installing Kali Linux
So far you have a VM that starts up to a boot menu. This section covers installing the operating system.
Move down the options to Install and click to continue. (Important: Be sure to choose Install, not any of the Live versions.) Keep in mind that as the VM has captured the input, you will have to press Ctrl+Alt to have control back to your host machine. You can have the VM regain capture of your input devices by again clicking anywhere on the VM window.
You might briefly see an error that resembles Figure 2-26. The error might appear for a second or two, if at all. Then the installation will proceed to prompt you for configuration questions. The installation prompts you to configure the language, country, and keymap (keyboard letter assignment).
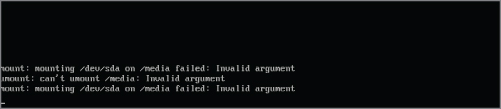
Figure 2-26: Possible temporary error
After selecting your personal choices, you will be prompted for a system name. Again, this is a personal choice. As shown in Figure 2-27, we chose “w4sp” as our system name.

Figure 2-27: Entering a hostname
The installation prompts for a domain. This is not necessary; you may choose to continue, as shown in Figure 2-28.

Figure 2-28: Skipping the domain
The next prompt is for the password for the root account, as shown in Figure 2-29.

Figure 2-29: Entering a root password
Obviously, you should choose this password carefully. You will be prompted to enter the password again to verify.
The next prompt will be to select your time zone. Select the time zone that corresponds to your location.
The next prompt is configuring the disk partition. Select the default option of Guided – Use Entire Disk, as shown in Figure 2-30.
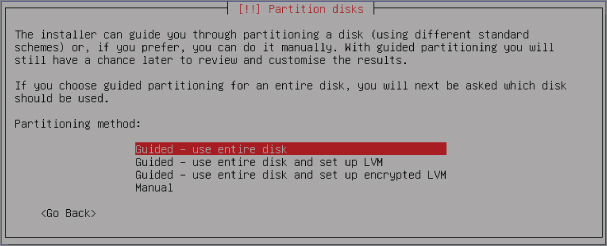
Figure 2-30: Partitioning the disk
The installation process requests you confirm the disk as presented. For our machine, Figure 2-31 shows we confirmed to partition SCSI1 (0,0,0).
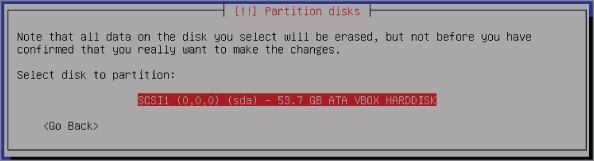
Figure 2-31: Confirming the disk
Following the confirmation, you are prompted to select whether you want all files in one partition. Select the default, All Files in One Partition, as shown in Figure 2-32.
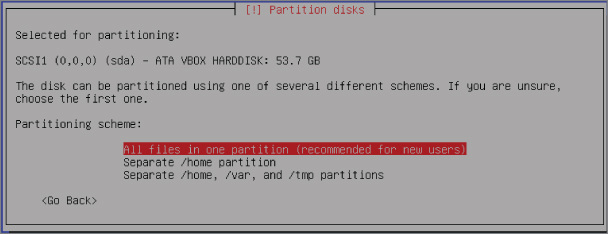
Figure 2-32: Confirming a single partition
At this point, you are shown an overview of your partition-related choices. Select the option Finish Partitioning and Write Changes to Disk to continue, as shown in Figure 2-33.
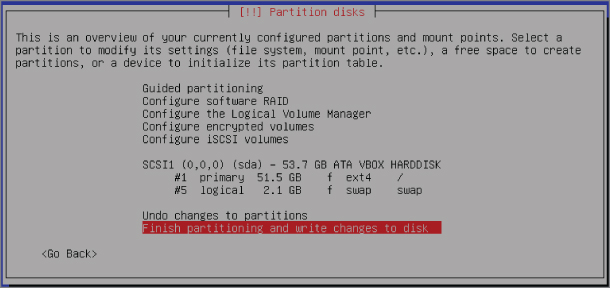
Figure 2-33: Writing changes to the disk
One final confirmation prompt: Select Yes to write the changes to the disk, as shown in Figure 2-34.

Figure 2-34: Confirming disk changes
Once confirmed, the installation proceeds to copy data to the disk. As you have come to expect with any installation, a status bar (see Figure 2-35) shows the progress. Along the bottom of the full VM application window, you should see a number of icons symbolizing the virtual hardware. The first one, a hard drive, denotes activity. The installation might take several minutes to finish.
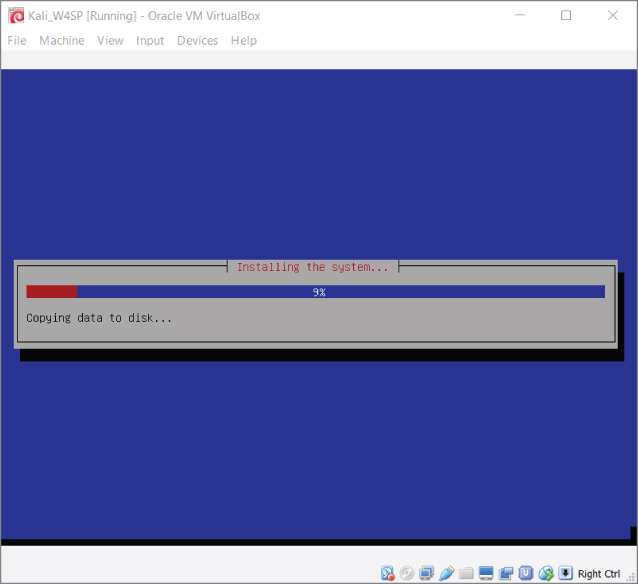
Figure 2-35: The installation progress bar
After data copying is finished, you are prompted whether you want to have a network mirror (see Figure 2-36).

Figure 2-36: The option for a network mirror
A network mirror is the source from which your Linux distro will update. If you are keeping an Internet connection to the host machine, then select to use a network mirror. The installation process then has an opportunity to enter a proxy, if applicable, as shown in Figure 2-37.
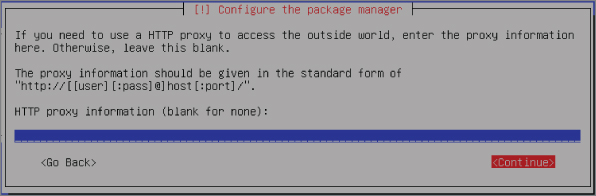
Figure 2-37: Network connection proxy
If your Internet connection does not rely on a proxy, leave the field blank and continue. After this step, the installation will retrieve updates for the Linux distribution. Depending on your connection speed and how long it has been since the distro you're using was released, the subsequent update might take several minutes to an hour.
After the update completes, it is time to install the GRUB boot loader. Your new Kali Linux VM has only one operating system (Kali Linux), and the GRUB boot loader recognizes that. Continue to the prompt where you confirm the device for boot loader installation. Select the drive presented, which in our case is /dev/sda, as shown in Figure 2-38.
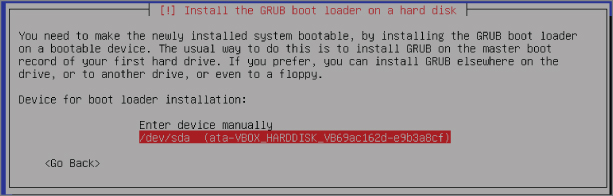
Figure 2-38: GRUB boot loader
After a few progress bars showing the final installation steps, you are prompted to restart the system (see Figure 2-39). Restart the system to your freshly installed Kali Linux VM. Once Kali reboots, you are prompted for the username and password. Log in as root.

Figure 2-39: Installation is complete
In the next section we introduce the W4SP Lab, a full environment of systems for experimenting and testing with Wireshark.
The W4SP Lab
The W4SP Lab is an environment presenting a subnet of VMs. Unlike with VMs created in VirtualBox, however, the systems presented in the W4SP Lab consume far less memory and occupy far less disk space. This is possible because the lab technically is not run using virtualization, but with Docker. More on that soon, but first let's discuss the requirements needed to run the W4SP Lab.
Requirements
A key requirement for the W4SP lab is a VM running 64-bit Kali Linux. For this, host machine's CPU should be capable of handling 64-bit addressing.
The W4SP Lab is run from within the Kali Linux VM you just installed. And that VM must be the 64-bit version, which requires a host system to have a 64- bit-capable processor. Again, this is fairly common already for desktop computers, but it's best to verify. On a Windows machine, this is done through Settings ⇨ System ⇨ About, revealing specifications about the current operating system installation, as shown in Figure 2-40.

Figure 2-40: System settings
If you see your host operating system is a 64-bit version, then your VM and W4SP Lab should both run as needed.
A Few Words about Docker
An alternative to creating a VM is containerization. Containerization is a big word for its small footprint. There are key differences between running VMs (using virtualization) and using containerization. A VM is a complete operating system, including its kernel and any applications you want running on that VM. A container, however, is just the application you want running, wrapped in just enough software to keep it independent. With containers, you can have several applications running, but sharing the Linux kernel of their host operating system. When you need to run many systems at once, containerization quickly benefits from the economy of scale, versus trying to have ample host memory for the same number of VMs to parcel up.
Docker is a relatively new project, becoming open source only a few years ago. In a short time, Docker has grown to become one of the most popular open-source projects, with major contributions by companies such as Google, Cisco, Red Hat, Microsoft, and others. And at the time of this writing, Docker is widely seen as the successor to VMs. Rightfully so, we think, so we made use of Docker to create an entire virtual network of systems on which to run your own labs.
This environment built with Docker is special because, unlike creating VMs from scratch with VirtualBox, this W4SP Lab provides a subnet of VMs, all self-contained.
Now, given we just discussed Docker, containerization, and VMs, it's time to offer a small technical disclaimer. Our W4SP Lab uses Docker and containerization to provide you with several virtual systems. Technically, these systems are Linux containers, using Docker, not VMs using a hypervisor. Conceptually, however, the containers can be thought of as VMs, which is why throughout the book we refer to the systems within the W4SP Lab as VMs.
What Is GitHub?
We won't assume you've ever visited GitHub before. Maybe you heard of it or came across a link to someone's project hosted on GitHub. But unless you're a software developer or web programmer, clicking on a GitHub link ends with backing out and mumbling “Someday I'll figure out how that helps me… .” Well, today's that day.
Yes, information security is very broad, with people often staying in specialties, many of which require no coding or development. But for infosec folks who do write code, even the smallest scripts, there are common headaches with coding that GitHub helps to cure. Let's take a few words to explain how GitHub got so important.
Developing a piece of software seems to be a thing you can start but can never completely finish. It starts with developers writing enough code to perform the function they wanted. Then end users enjoy it (ideally). But then end users want another function and to tweak the function already there. So, the developer returns to the code to add and tweak. And add and tweak. It never ends, see?
On top of that, software development is something at which you can be good, but likely you are not the very best in the world. As with everything, there is always someone with value to offer and share. With writing software, you want that someone to see your code and you need a way to keep track of any tweaks he or she suggests for your own approval. Enter GitHub.
GitHub is a place where people can publish their code, keep track of changes done so far (versioning), as well as invite others to make changes. GitHub is a hosted Git service with a fancy web user interface. In GitHub speak, coders publish their repositories, or repos, for others to collaborate on. Being a collaborative service, GitHub also has a social network feel to it. The social network side of it empowers different repo owners and collaborators to interact. To see more of what GitHub collaborators are up to, visit GitHub.com and click Explore.
As a security person, you are likely concerned about the “making changes” part. Don't worry. No one makes permanent, unauthorized changes to someone else's repo. For every GitHub repo, there is the owner who reviews, and (maybe) approves, those changes. In the case of the W4SP Lab to accompany this book, the authors are the repo owners. We'll be watching the repo and bug tracker for suggested updates.
Creating the Lab User
As a security professional, you are well aware of the risks of always being logged in as root. Best practice dictates that normal day-to-day work be done under a different account. Your lab work is no different.
Before installing the Lab, you create the user “w4sp-lab.” To do so, you start by opening a Terminal window. Terminal is found two ways: by clicking either on Applications at the top left of the Kali desktop or on the black Terminal icon on the left dock. A Terminal window opens, starting with you in the directory /root.
At the root prompt, type useradd -m w4sp-lab -s /bin/bash -G sudo -U at a Terminal window. Hit Enter to create the user. Nothing is echoed back.
The next step is to set the new user's password. Again, in Terminal, type passwd w4sp-lab and hit Enter. You will be prompted for the password and again to confirm, as shown in Figure 2-41.
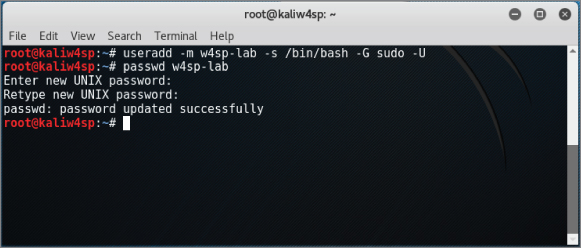
Figure 2-41: New user w4sp-lab
Now that you have this new user, you need to log out and log back in, as the user w4sp-lab.
Installing the W4SP Lab on the Kali Virtual Machine
Where to find this lab? Why, it's available on GitHub, of course: https://github.com/w4sp-book/w4sp-lab/.
There's no need to sign up on GitHub to get the W4SP Lab. Only sign up if you're interested in submitting bugs, contributing to it, or forking the code (copying the code to branch off of in your own repo).
Always check out the GitHub repo for updates to the lab. Any changes that are not reflected in the book will be noted in the repo. In addition to creating your own lab of VMs, there is available a fully contained “lab” of virtualized systems.
Note that you visit GitHub from a browser in the Kali VM, not from your host machine's browser. As shown in Figure 2-42, the Firefox web browser is used, the icon for which is at the top of the stack of icons on the Kali desktop. Browse to the GitHub address from above.
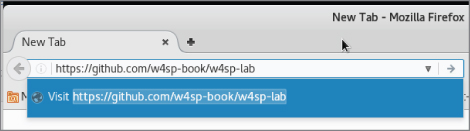
Figure 2-42: Firefox to GitHub
Clicking the green button labeled Clone or Download on the right expands to show a blue Download ZIP. Click to download as a ZIP file.
The file is named w4sp-lab-master.zip. A pop-up window should appear asking what to do with the file (see Figure 2-43). Select the option Save File and click OK. You open it in a Terminal window.
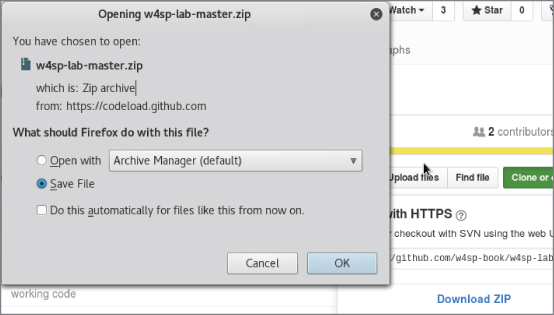
Figure 2-43: Saving the W4SP Lab file
Once downloaded, unzip the compressed file and run the Lab installation script. To unzip the file, open a Terminal window. Open Terminal by clicking on Applications at the top left of the Kali desktop (see Figure 2-44).

Figure 2-44: Opening Terminal
A Terminal window opens, starting with you in the directory /w4sp-lab. The downloaded file is in the Downloads directory. To unzip the file, first enter the command cd Downloads, then the command unzip w4sp-lab-master.zip, as shown in Figure 2-45.
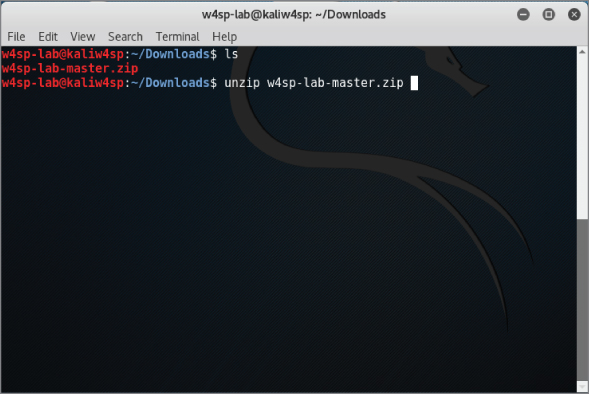
Figure 2-45: Unzipping the W4SP Lab
The zipped file expands into its own directory, /w4sp-lab-master/. The ls command will list the files. Type ls to see the files, including the installation script, w4sp_webapp.py.
Now it's time to run the Lab installation script. In the w4sp-lab-master directory, type python w4sp_webapp.py to run the Python script. The Terminal window should be similar to Figure 2-46.

Figure 2-46: Running the W4SP Lab installation script
The installation will take several minutes, echoing on the screen the script's progress through its steps. Be aware that there will be only minor screen activity during when Docker is building the images. (You will recognize this when the more recent screen statements mention “images found, building now” and slowly listing the base, switch, victim images, and so on.) It could take 10–20 minutes for most peoples' lab installs to finish.
You will know the W4SP Lab installation is finished when the final line confirms the installation and opens the browser. The browser should open to go to the localhost, port 5000: http://127.0.0.1:5000.
Setting Up the W4SP Lab
The W4SP Lab was developed as a learning tool. Many books out there can teach a subject through text, figures, and otherwise showing the material. But it's something special to be able to demonstrate that material. This lab gives you the environment to trial and demonstrate what's covered in the book—and much more, obviously.
After the W4SP Lab is installed, the web browser is launched. The browser opens to the localhost at port 5000. The browser presents the front end for the W4SP Lab. After briefly looking it over, click the SETUP button on the left. Setup will start, as shown in Figure 2-47.

Figure 2-47: Running the W4SP Lab setup
In about a minute or less, setup will be complete and the Lab installed and ready to go. We will return to the Lab on multiple occasions throughout the book.
The W4SP Lab facilitates certain attacks (with the associated traffic) with confidence because whatever systems are needed per attack, the Lab creates those systems. Throughout this book, you will be tasked with exercises and read through demonstrations, both of which will require a system or group of systems. In some exercises it might be necessary to set up certain customizations or additional systems. In those cases you will be instructed to press a button on this W4SP Lab browser page to set up the needed changes.
Disclaimer: The Lab is a continual work in progress and will be updated and fixed as time goes on. If at any point there is a discrepancy between what you are seeing in the book and in the lab, you can always refer to the GitHub project Wiki for details on any changes.
The Lab Network
Once the setup procedure finishes, the network diagram, which was one system (the local Kali box), has now grown to multiple systems, as shown in Figure 2-48.

Figure 2-48: The full W4SP Lab network
The first thing you'll notice after setup completes is the network diagram in the middle of the screen. Each circle denotes a device, be it a switch (sw1, sw2) or router (r1, r2), servers of various services (ftp1, ftp2, smb2, and so on), or a victim machine (vic1, vic2, and so on).
The network topology is not fixed in the W4SP Lab. The topology changes according to what's needed for different scenarios. Of course, we'll get more into each scenario as we first use them in later chapters. The red buttons on the right will customize the lab to prepare for particular exercises and demonstrations. For example:
- Start mitm—Places Kali VM for a man-in-the-middle attack (Chapter 5).
- Start ips—Launches an intrusion detection/prevention system (Chapter 6).
- Start sploit—Launches Metasploitable (Chapter 6).
- Start elk—Launches the Elastic Stack (Chapter 6).
On occasion, however, we noticed it should have changed but didn't. In that case, it might be necessary to click REFRESH on the left to jog it a bit.
Summary
In this chapter, you understood the benefits of virtualization and why it provides a flexible and secure working environment. You gained a working knowledge of virtualization and installed a mainstream platform for hosting VMs, VirtualBox from Oracle. You then installed the Extension Pack for VirtualBox.
You created a VM, allowing for a 64-bit installation of Debian Linux. During the VM setup, you configured the allocated memory, drive space, and processor settings to ensure it would run as needed. In your first VM, you installed Kali Linux from an ISO image. You configured Kali from the start, setting up the hostname, partitioning the disk, and installing the GRUB boot loader.
Given the Kali Linux machine, you then went to GitHub for the source code of our Wireshark for Security Professionals Lab. After an introduction to GitHub and the containerization software Docker, you installed the W4SP Lab on the Kali Linux VM. Lastly, we briefly introduced the layout of the W4SP Lab front end.
In the Chapter 3, we must prepare ahead of the book's exercises and labs involving packet analysis and network investigation. To ensure everyone is at the same level for the analysis, we cover a wide range of network fundamentals, plus information security and attack concepts.
Exercises
- Build a second VM on VirtualBox. Know any other ISO images? If not, browse here for many great ideas:
https://www.reddit.com/r/computertechs/comments/1g1z7q/index_of_useful_isos_for_technicians/. (Beware of massive free time lost.) - Build another VM using another Linux distro or Windows installation but with different settings. Experiment with the options regarding the drive size, drive capacity, or memory settings. Experiment with the ability to copy/paste information directly between host and guest operating systems or to mount the USB.
- Explore a different virtualization platform, such as VMware. Currently VMware Workstation Player is free and allows you to host any Windows or Linux guest operating system. The application is available at
www.vmware.com/go/tryplayeror search for VMWare Workstation Player.