
Chapter 12
WordPress as a Content Management System (CMS)
In This Chapter
![]() Assigning a static page as the front page of your site
Assigning a static page as the front page of your site
![]() Adding a blog to your site
Adding a blog to your site
![]() Defining different templates for pages on your site
Defining different templates for pages on your site
![]() Building new Sidebar and Footer templates
Building new Sidebar and Footer templates
![]() Customizing styles for sticky, category, and tag posts
Customizing styles for sticky, category, and tag posts
![]() Supporting built-in features in a theme
Supporting built-in features in a theme
![]() Optimizing your site for search engines
Optimizing your site for search engines
WordPress isn’t simply a blogging platform; it’s also a solution for building your own website. WordPress is a powerful content management system that’s flexible and extensible enough to run an entire website — even without a blog, if you prefer.
A content management system (CMS) is a system used to create and maintain your entire site; it includes tools for publishing and editing as well as for searching and retrieving information and content. A CMS lets you maintain your website with little or no HTML knowledge. You can create, modify, retrieve, and update your content and never even touch the code required to perform those tasks.
This chapter shows you a few ways that you can use WordPress to power your entire website, with or without a blog. I cover various template configurations that you can use to create separate sections of your site. I also show you how to use the front page of your site as a static page (a page that isn’t dynamically updated, chronologically, as a blog is) or a portal (a page that contains snippets from other sections of your site, with links to those sections), which can include a link to an internal blog page, if you want a blog.
 You can also add tools to your WordPress website that extend the basic functions of WordPress, by adding elements, such as an e-commerce store, photo galleries, and social communities. Chapter 15 recommends plugins you can add to WordPress to extend it to meet your needs, whereas this chapter shows you how to use the internal, built-in features of WordPress to get started using it as a full-blown CMS tool.
Creating the Front Page of Your Website
For the most part, when you visit a blog powered by WordPress, the blog is on the main page. My personal blog (http://lisasabin-wilson.com), powered by WordPress (of course), shows my latest blog posts on the front page. This setup is typical of a site run by WordPress (see Figure 12-1).
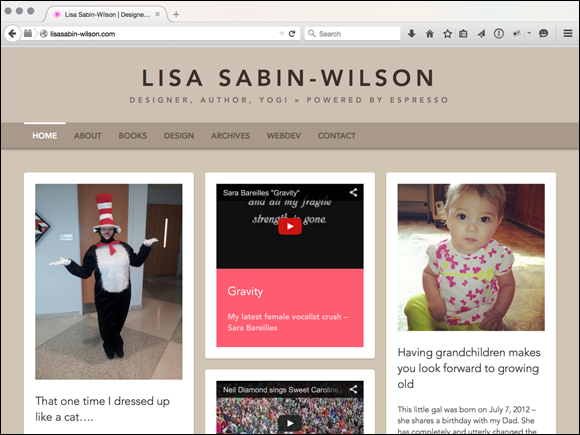
Figure 12-1: My personal blog, set up like a typical site powered by WordPress.
But the front page of my business site (http://webdevstudios.com), also powered by WordPress, contains no blog (see Figure 12-2). This site doesn’t display any blog posts; rather, it displays the contents of a static page that I created in the WordPress Dashboard. This static page serves as a portal to my design blog and my portfolio and to other sections of my site. The site includes a blog but also serves as a full-blown business website, with all the sections I need to provide my clients the information they want.

Figure 12-2: My business site, set up as a business website rather than as a blog.
Both of my sites are powered by WordPress, so how can they differ significantly in what they display on their front pages? The answer lies in the template files that make up the theme (see Chapter 9).
You use static pages in WordPress to create content that you don’t want to display as part of your blog but do want to display as part of your overall site (such as a bio page and a page of services).
Creating a front page is a three-step process:
- Create a static page.
- Designate that static page as the front page of your site.
- Tweak the page to look like a website rather than a blog.
Using the three-step method, you can create an unlimited number of static pages to build an entire website. You don’t even need to have a blog on this site unless you want to include one.
Creating a static page
To have a static page display on the front page of your site, you need to create that page. Follow these steps:
From the Dashboard, select Pages
 Add New.
The Edit Page screen opens, where you can write a new page to your WordPress site, as shown in Figure 12-3.
Type a title for the page toward the top.
For example, I want to create a Welcome page as the front page of my website, so I entered WordPress is the Perfect Foundation for the Web as the page title.
Type the content of your page in the text box.
The content you include here is up to you. You can simply use text or a combination of text and images (see Chapter 6 for information on including images and photo galleries), and even a featured image if your theme is using that feature in WordPress (see Chapter 15).
- In the Page Attributes section, set the options for this page, as needed:
- Parent: Leave this option set to (No Parent) because this page is the one you use (in the next section) as the home page of your site. With other pages, you can set the page as a subpage, underneath a top-level (or parent) page to create a hierarchy of pages for your site navigation.
- Template: The Template option is set to Default Template. This setting tells WordPress that you want to use the default Page template (page.php in your theme template files) to format the page you’re creating. The default template is the default setting for all pages you create. I discuss assigning a page to a different template in Chapter 9.
- Order: This is the order in which you want this page to appear in the navigation menu, if you aren’t using the built-in menu feature in WordPress (see Chapter 9) and you are using the wp_list_pages() template tag (see Chapter 9).
- (Optional) If you want to preview your page before publishing it, click the Preview Changes button in the upper-right corner.
When you’re satisfied with your page, click the Publish button.
The page is saved to your database and published to your WordPress site with its own individual URL (or permalink). The URL of the static page consists of your website URL and the title of the page. For example, if you title your page About Me, the URL of the page is
http://yourdomain.com/about-me.
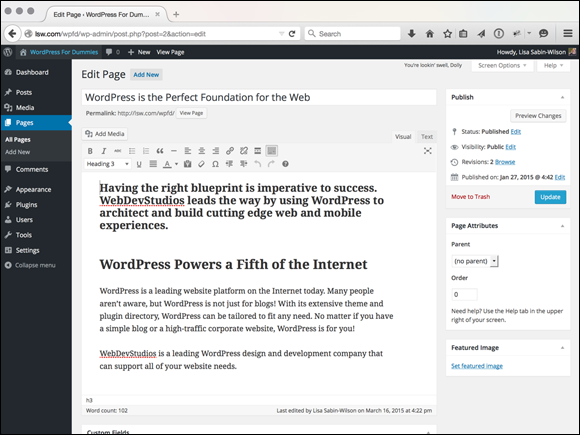
Figure 12-3: Create the static page that you want to use as your front page.
Assigning a static page as the front page
After you create a static page, you need to tell WordPress that you want it to serve as the front page of your site. To do so, follow these steps:
From the Dashboard, select Settings
Reading.The Reading Settings page appears.
- In the Front Page Displays section, select the A Static Page radio button.
From the Front Page drop-down list, select the static page that you want to serve as your front page.
In Figure 12-4, I select to display the WordPress is the Perfect Foundation for the Web page (which I created in the preceding section) as the static page to use as the front page of my site. Don’t worry about the rest of the options on the Reading Settings page; they don’t pertain to configuring which page to use for the front page of your site.
Click the Save Changes button at the bottom of the page.
WordPress displays the page you selected in Step 3 as the front page of your site. Figure 12-5 shows my site displaying the page I created as my front page.

Figure 12-4: Selecting a page to display as the front page.
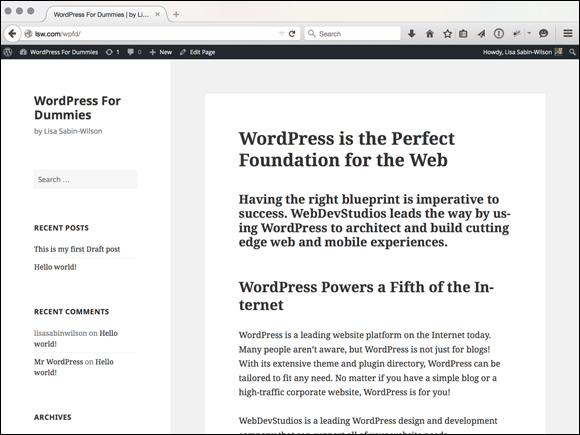
Figure 12-5: WordPress displays the page you selected as your front page.
Tweaking the page to look like a website rather than a blog
Using a static page as a home page allows you to get creative with the design and layout of your home page by assigning a page template and/or using different widgets to include several different types of content and information (see the “Creating Custom Page Templates to Achieve Different Layouts and Styles” section later in this chapter, where I cover the use of page templates), such as the following:
- Featured Images: Later in this chapter, I cover how to add the built-in feature in WordPress called Featured Images (or post thumbnails). You can create a page template that includes the titles and excerpts of your most recent blog posts (if you’re using a blog) and display them in the body, or sidebar, with a featured image thumbnail. You use the WP_Query() class tag shown in the following code sample, which displays the four most recent posts from your blog:
<?php$the_query = new WP_Query ( ‘posts_per_page=4’ );while ( $the_query->have_posts() ) :$the_query->the_post();?><a href="<?php the_permalink() ?>" rel="bookmark" title="Permanent Link to<?php the_title_attribute(); ?>"><?php the_title(); ?></a><?phpif ( has_post_thumbnail() ) { the_post_thumbnail( ‘thumbnail’ ); }the_excerpt();endwhile;?> - Featured Content Slider: Using the nifty plugin for WordPress named Easing Slider (
https://wordpress.org/plugins/easing-slider), you can include a slideshow of your most recent posts that contains featured images, text excerpts, and the titles of your posts on the front page, which is a nice way to invite readers into your site to read the posts you have written. The Easing Slider plugin provides you with an easy options page and widget that you can use on your front page (see Chapter 9 for more about getting widgetized by adding widget areas to your theme templates). - Testimonials: Many business sites like to include client testimonials on their websites, and one of the best places to display them is on your front page so that your visitors can immediately see quotes from your happy clients. You can accomplish this task easily with a plugin for WordPress called Easy Testimonials (
https://wordpress.org/plugins/easy-testimonials/). After this plugin is installed, you can create testimonials and include them on your front page using a widget that the plugin provides. (The plugin also allows you to create a full testimonials page to display all testimonials — be sure to read the plugin documentation to find out how!) Portfolio: Designers like to show off a portfolio page of web design projects they have completed, and photographers use a portfolio-style display for their photographs. You can accomplish a portfolio display by using WordPress categories, featured images, and the WP_Query() class.
Create a category in your WordPress Dashboard (select Posts
Categories) called Portfolio (or whatever you want to call your body of work), and then create posts within the category. Be sure to assign featured images to the posts. The images could be screen shots that represent the design work you’ve done, or photography you’ve taken, or any images that reflect a body of work you have completed. Add a specific size for the images in the Theme Functions template called portfolio, and then using the WP_query() template class, insert these lines of code in your home page template to display just the images (linked to the individual posts) in a portfolio: <?php$the_query = new WP_Query ( ‘posts_per_page=3&category_name=portfolio’ );while ( $the_query->have_posts() ) :$the_query->the_post();?><a href="<?php the_permalink() ?>" rel="bookmark" title="Permanent Link to<?php the_title_attribute(); ?>"><?php the_title(); ?><?php if ( has_post_thumbnail() ) { the_post_thumbnail( ‘portfolio’ ); } ?></a><?php endwhile; ?>
Adding a Blog to Your Website
If you want a blog on your site but you don’t want to display the blog on the front page, you can add one in your WordPress Dashboard.
Creating a blank page for the blog
To create a blog for your site, first you need to create a blank page:
From the Dashboard, select Pages
Add New.The Edit Page screen appears (refer to Figure 12-3). On this page, you can write a new post on your WordPress blog.
Type a name for the page in the text box toward the top of the page.
For example, because this page will be the main page of your blog, enter Blog for the name to automatically set the page slug to /blog. (See Chapter 5 for information on permalinks and slugs.)
Leave the text box blank.
The text box remains blank here because you don’t want to display page content on your blog; rather, WordPress displays your blog posts using this page after you assign it as your blog (see the steps in the next section).
Click the Publish button.
The blank Blog page is saved to your database and published to your WordPress site.
You have a blank page that redirects to
http://yourdomain.com/blog.
Next, you need to assign the page you just created as your Blog page.
Assigning the new page as a blog
To designate your new blank Blog page as a page for your blog posts, follow these steps:
Select Settings
Reading.The Reading Settings page opens (refer to Figure 12-4).
From the Posts Page drop-down list, select the page you just created.
For example, select the Blog page as a posts page.
In the Blog Pages Show at Most section, type the number of posts you want to display in the Posts text box.
This setting specifies the number of posts you want to display on that page at any time. If you enter 5, for example, the Blog page shows the last five posts you’ve made to your blog. Enter the number of posts you want to display based on your preference.
Click the Save Changes button.
The options you just set are saved, and your blog is now located at
http://yourdomain.com/blog(where yourdomain.com is the actual domain name). Figure 12-6 shows my Blog page with my latest post.
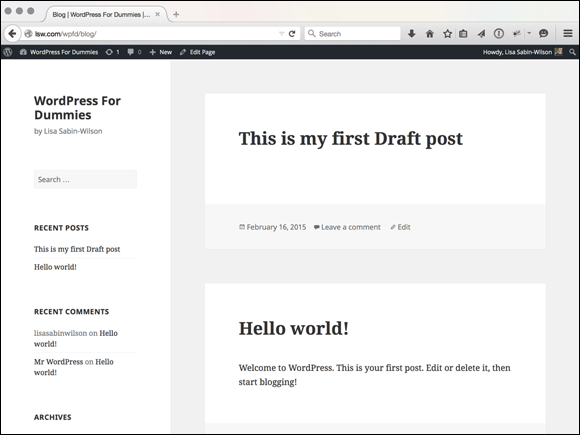
Figure 12-6: My blog at /blog with a single post displayed.
 You can add a link to your blog by adding it to your custom menu. To find out how to build your own custom menu, check out Chapter 10.
Creating Custom Page Templates to Achieve Different Layouts and Styles
In Chapter 9, I introduce you to using content-specific WordPress templates to apply different display views for content on your website. Using Page and Category templates, you can provide a different type of reader experience by defining the style with CSS and the features and functions with template tags.
You often see this concept in play on websites that offer more than simply blogs. Websites that sell products or services — or news websites that focus on articles, content, and advertising — use different page, or content, templates to achieve various layouts and styles all within the same website, using the tools WordPress gives them to accomplish it.
Viewing the default Page template (page.php)
Using my own business website as an example, you can see that the standard Page template (page.php) file displays regular static pages on my site in a two-column format. The content is on the left, and a sidebar is on the right of the Jobs page at http://webdevstudios.com/jobs (see Figure 12-7).
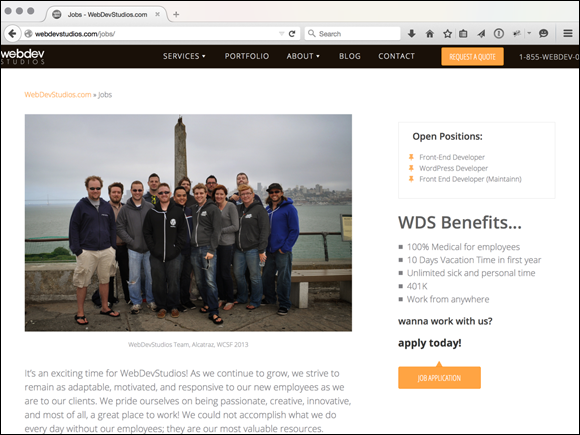
Figure 12-7: A standard two-column page layout.
The default Page template that creates the display in Figure 12-7 uses basic WordPress template tags to call in the header, content, sidebar, and footer files. The code within the template looks like Listing 12-1 in the page.php template file for my theme.
Listing 12-1: Default Page Template (page.php)
<?php
/**
* The template for displaying all pages.
*
* This is the template that displays all pages by default.
* Please note that this is the WordPress construct of pages
* and that other ‘pages’ on your WordPress site will use a
* different template.
*/
get_header(); ?>
<div class="site-content-wrap">
<div id="content" class="site-content">
<div id="primary" class="content-area col">
<main id="main" class="site-main" role="main">
<?php while ( have_posts() ) : the_post(); ?>
<article id="post-<?php the_ID(); ?>" <?php post_class(); ?>>
<div class="entry-content">
<?php the_content(); ?>
<?php
wp_link_pages( array(
‘before’ => ‘<div class="page-links">’ . __( ‘Pages:’, ‘wds7’ ),
‘after’ => ‘</div>’,
) );
?>
</div><!-- .entry-content -->
</article>
<?php endwhile; // end of the loop. ?>
</main><!-- #main -->
</div><!-- #primary -->
<?php get_sidebar(); ?>
</div><!-- #content -->
</div><!-- .site-content-wrap -->
<?php get_footer(); ?>
Creating a new category Page template
You can use the Page template (page.php) in Listing 12-1 to define the layout and style for all internal pages on your website, providing a standard and consistent style for your site visitors. However, if your website also publishes a portfolio of completed work for clients, you probably want that page to have a different style from the rest of the pages, mainly because it presents images that represent your past work.
To accomplish this, create a Design Portfolio category on your site, and for every entry you want to display on the Portfolio page, create a post and assign it to the Design Portfolio category. Figure 12-8 shows how my Portfolio page at http://webdevstudios.com/portfolio displays in a web browser. You can see that the page is made up mainly of thumbnail images that are clickable through to a full article that provides a case study on the design project itself.
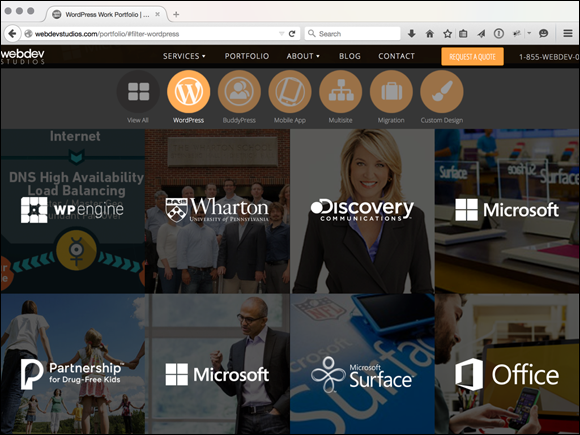
Figure 12-8: My Portfolio page layout.
To accomplish this display, create a specific template for the Design Portfolio category: category-design-portfolio.php. Every post you create that’s assigned to the Design Portfolio category displays in the format that you’ve defined in the category-design-portfolio.php template in your theme folder.
If you want the Portfolio page to display a listing of images only, assign a featured image to each portfolio post; then in the category-design-portfolio.php template, follow these steps by using the code shown in Listing 12-2:
- Tell WordPress to display each post from the Design Portfolio category but display only the featured image.
- Link that featured image to the individual post page.
The code to create the Design Portfolio display looks like Listing 12-2.
Listing 12-2: Category Page Template (category-design-portfolio.php)
<?php get_header(); ?>
<div id="main" class="fullwidth">
<?php if (have_posts()) : while (have_posts()) : the_post(); ?>
<div id="post-<?php the_ID(); ?>" <?php post_class(); ?>>
<div class="entry">
<a href="<?php the_permalink(); ?>"><?php the_post_thumbnail( ‘thumbnail’ ); ?></a></div>
<?php endwhile; else: ?>
<p><?php _e(‘Sorry, no posts matched your criteria.’); ?></p>
<?php endif; ?>
</div>
</div>
<?php get_footer(); ?>
Comparing two Page templates
The differences between the default Page template (refer to Listing 12-1) and the template used for the Category template (refer to Listing 12-2) are subtle and are explained in Table 12-1.
Table 12-1 Differences Between the Page and Category Templates
Element |
In Page Template? |
In Design Portfolio Template? |
Call to the Header template <?php get_header(); ?> |
Yes |
Yes |
Two-column layout |
Yes. The <div id="main"> styling is defined in CSS with a width of 600px. |
No. The <div id= "main" class= "fullwidth"> is defined in CSS with a width of 900px. |
Call to the post/page title <?php the_title(); ?> |
Yes |
No |
Call to the post/page content <?php the_content(); ?> |
Yes |
No |
Call to the featured image <?php the_post_thumbnail(); ?> |
No |
Yes |
Call to the Sidebar template <?php the_sidebar(); ?> |
Yes |
No |
Call to the Footer template <?php the_footer(); ?> |
Yes |
Yes |
The differences between the standard, default page layout and the Portfolio category page layout are only one example of the power behind the WordPress theme engine. You use the theme engine to designate and define different types of looks, layouts, and designs for different types of content. This feature helps you create unique websites for you and your clients, and it’s the true power behind using WordPress as a CMS.
Pulling in content from a single category
WordPress makes it possible to pull in specific types of content on your website through the WP_Query(); template class. You place this template tag before The Loop, and it lets you specify which category you want to pull information from. If you have a category called WordPress, and you want to display the last three posts from that category on your front page, in your blog sidebar, or somewhere else on your site, you can use this template tag.
Looking at some of the parameters
The WP_query(); template class has several parameters that let you display different types of content, such as posts in specific categories, content from specific pages/posts, or dates in your blog archives. Here’s an example of two parameters you can use with the WP_Query(); tag:
- posts_per_page=X: This parameter tells WordPress how many posts you want to display. If you want to display only three posts, for example, enter posts_per_page=3.
- category_name=X: This parameter tells WordPress that you want to pull posts from the category with this specific slug. If the category slug is books-i-read, for example, enter category_name=books-i-read. (Be aware that this parameter also pulls posts from any subcategories listed within the indicated category.)
The WP_Query(); template class has several parameters that let you display different types of content, such as posts in specific categories, content from specific pages/posts, or dates in your blog archives. The WP_Query(); class lets you pass many variables and parameters; it’s not just limited to categories either, you can use it for pages, posts, tags, and more. Visit the WordPress Codex at http://codex.wordpress.org/Class_Reference/WP_Query and read about this feature.
Adding the WP_Query(); tag
Select which category you want to list posts from and locate the slug that belongs to the category. After you do that, you’re ready to add the WP_Query(); tag to your template. The category slug is usually the same as the category name, except in lowercase with words separated by dashes; for example, the Books category on my site has a books slug. To double-check, visit the Category page in your Dashboard by selecting Posts ![]() Categories, click the name of the category you want to use, and find the category slug listed. The line of code to display five posts from the Books category looks like this:
Categories, click the name of the category you want to use, and find the category slug listed. The line of code to display five posts from the Books category looks like this:
<?php $the_query = new WP_Query( ‘posts_per_page=5&category_name=books’ ); ?>
It’s not enough just to add that one line of code, however; the WP_Query(); class needs to be used within The Loop in WordPress (see Chapter 9 for more information on The Loop). Follow these steps to include a WP_Query within The Loop in your template:
In your Dashboard, select Appearance
Editor.The Edit Themes page opens.
In the Templates list on the right side of the page, click the template in which you want to display the content.
For example, if you want to display content in a sidebar, select the Sidebar template: sidebar.php.
The template you select appears in the editor in the middle of the page.
Locate the first closing </ul>
or</div> tag in the Sidebar template for the theme you’re using.If you’re using the Twenty Fifteen theme, for example, the ending </div> looks like this: </div><!-- .widget-area --> at line 42.
Type the following code directly above the ending
</div>tag:<?php$the_query = WP_Query( ‘posts_per_page=5&category_name=books’ );while ($the_query->have_posts()) : $the_query->the_post();?><a href="<?php the_permalink() ?>" rel="bookmark" title="Permanent Link to<?php the_title_attribute(); ?>"><?php the_title(); ?></a><?phpthe_excerpt();endwhile;?> In the first line, I indicated the following: posts_per_page=5&category_name=books.You can change these numbers to suit your specific needs. Just change 5 to whatever number of posts you want to display (there is no limit!), and change books to the specific category slug that you want to use.
- Click the Update File button to save the changes to your template.
When you view your website now, you find a listing of the titles of the blog posts from the Books category displayed in your sidebar.
A lot of people still think of WordPress as simply a blogging platform on which you can have and display a typical blog on your domain. However, in the example I just demonstrated, you can see how you can have a blog but also have so much more on your website by making a few simple tweaks and adjustments to the templates that power your website theme.
Creating Different Sidebar and Footer Templates for Your Pages
You can create separate Sidebar templates for different pages of your site by using a simple include statement. When you write an include statement, you’re telling WordPress that you want it to include a specific file on a specific page.
The code that pulls the usual Sidebar template (sidebar.php) into all the other templates, such as the Main Index template (index.php), looks like this:
<?php get_sidebar(); ?>
What if you create a page and want to use a sidebar that has different information from what you have in the Sidebar template (sidebar.php)? Follow these steps:
- Create a new Sidebar template in a text editor, such as Notepad (in Windows) or TextEdit (on the Mac).
- Save the file on your computer as sidebar-second.php .
Upload sidebar-second.php to the folder containing your theme on your web server (for example: /wp-content/themes/your-theme-name).
See Chapter 3 for more on transferring files with FTP.
The new Sidebar template is listed in your theme files on the Edit Themes page. You can open this page by selecting Appearance
Editor in the Dashboard.- To include the sidebar-second.php template in one of your Page templates, open the template on the Edit Themes page (Appearance Editor) and then find this code:
<?php get_sidebar(); ?> - Replace the preceding code with this include code:
<?php get_template_part(‘sidebar’, ‘second’); ?>
With the get_template_part(); function, you can include virtually any file in any of your WordPress templates. You can use this method to create Footer templates for pages on your site, for example. To do this, first create a new template with the filename footer-second.php and then locate the following code in your template:
<?php get_footer(); ?>
Then replace the preceding code with this code:
<?php get_template_part(‘footer,’ ‘second’); ?>
You can do multiple things with WordPress to extend it beyond the blog. This chapter gives you a few practical examples with the default Twenty Fifteen theme. The point is to show you how to use WordPress to create a fully functional website with a CMS platform — anything from the smallest personal site to a large business site. See Chapter 9 for a greater explanation of using template parts.
Creating Custom Styles for Sticky, Category, and Tag Posts
In Chapter 9, I discuss putting together a basic WordPress theme, which includes a Main Index template using The Loop. You can use a custom tag to display custom styles for sticky posts (posts that stay at the top of your blog at all times), categories, and tags on your blog. That special tag looks like this:
<div <?php post_class() ?> id="post-<?php the_ID(); ?>">
The part of that template tag that is so cool is the post_class() section. This template tag tells WordPress to insert specific HTML markup in your template that allows you to use CSS to make custom styles for sticky posts, categories, and tags.
To follow along easily in this section, you should read the earlier chapters in this book about the use of WordPress basic features so that you already know all about how to publish new posts to your blog, including the different options you can set for your blog posts, such as categories, tags, and publishing settings. One setting is the Stick This Post to the Front Page setting. In this section, I show you how to custom-style those sticky posts — it’s not as messy as it sounds!
For example, I’ve published a post with the following options set for it:
- Stick This Post to the Front Page
- Filed in a Category Called WordPress
- Tagged with News
By having the post_class() tag in your template, WordPress inserts HTML markup that allows you to use CSS to style sticky posts or posts assigned to specific tags or categories, differently. WordPress inserted the following HTML markup for the post:
<div class="post sticky category-wordpress tag-news">
In Chapter 10, I talk about CSS selectors and HTML markup and how they work together to create a style and format for your WordPress theme. You can go to your CSS file and define styles for the following CSS selectors:
.post: Use this as the generic style for all posts on your blog. The CSS for this tag is
.post {background: #ffffff; border: 1px solid silver; padding: 10px;}A style is created for all posts that have a white background with a thin, silver border and 10 pixels of padding space between the post text and the border of the post.
.sticky: The concept of sticking a post to your front page is to call attention to that post, so you may want to use different CSS styling to make it stand out from the rest of the posts on your blog:
.sticky {background: #ffffff; border: 4px solid red; padding: 10px;}This line creates a style for all sticky posts that display with a white background, a thicker red border, and 10 pixels of padding space between the post text and border of the post.
.category-wordpress: If you blog a lot about WordPress, your readers may appreciate having a visual cue to which posts on your blog are about that topic. You can provide the cue through CSS by telling WordPress to display a small WordPress icon in the top-right corner of all your posts in the WordPress category:
.category-wordpress {background: url(wordpress-icon.jpg) top right no-repeat; height: 100px; width: 100px;}This line of code inserts a graphic — wordpress-icon.jpg — that is 100 pixels in height and 100 pixels in width at the top-right corner of every post you’ve assigned to the WordPress category on your blog.
.tag-news: You can style all posts tagged with
newsthe same way you’ve styled the categories:.tag-news {background: #f2f2f2; border: 1px solid black; padding: 10px;}This CSS line styles all posts tagged with
newswith a light gray background and a thin, black border with 10 pixels of padding between the post text and border of the post.
Using the post-class() tag, combined with CSS, to create dynamic styles for the posts on your blog is fun and easy!
Adding Theme Support for Built-In Features
The WordPress core offers a number of helpful tools that can be easily added to a theme to give the theme more customization options. WordPress provides you with several built-in features that let you enhance your site and theme. This section covers three of the most popular features, including
- Custom post types
- Post formats
- Post thumbnails (or featured images)
Each of these features is part of the WordPress core; however, they aren’t activated by default. By adding theme support, I mean that you’re activating a built-in feature in your theme. When you’re traveling around the WordPress community — whether on a support forum or at a WordCamp event — and you hear someone say, “That theme supports a certain feature,” you can smile because you know exactly what she’s talking about.
You need to activate support for these features in the theme you’re using:
- Core function: Adding support for the feature in your theme by including the core function in the Theme Functions (functions.php) file in your theme.
- Template function: Adding the necessary function tags in your theme template(s) to display the features on your website.
- Templates: In some cases, you can create feature-specific templates to create additional enhancement to display and include the feature on your site.
The following sections walk you through each feature, in this order: First, add the core function to your theme; second, add the function tags to your templates; and last, if indicated, create a feature-specific template in your theme that will handle added features.
Adding support for custom post types
Custom post types and custom taxonomies have expanded the content management system (CMS) capabilities of WordPress and are likely to be a major part of plugin and theme features as more developers become familiar with their use. Custom post types allow developers to create new content types, such as movie reviews or recipes, which are separate from posts and pages. Custom taxonomies allow developers to create new types of content groupings, such as genres for movie reviews or a season for recipes (for example, fall, spring, or winter recipes), which are separate from categories and tags.
Posts and pages are simple, generic containers of content. A page consists of timeless content that has a hierarchical structure because a page can have a parent (forming a nested, or hierarchical, structure of pages). A post consists of content that is listed in linear (not hierarchical) order based on when it was published, and a post can be organized into categories and tags. What happens when you want a hybrid of these features? What if you want content that doesn't appear in the post listings and has neither categories nor tags, but displays the posting date? Custom post types satisfy this desire to customize content types.
By default, WordPress already has different post types built in to the software, ready for you to use. These default post types include
- Blog posts
- Pages
- Menus
- Attachments
- Revisions
Custom post types let you create new and useful types of content on your website, including a smart and easier way to publish those content types to your site.
The possibilities for using custom post types are endless, but here are a few ideas to kick-start your imagination and to represent some of the more popular and useful ideas that others have implemented on sites:
- Photo galleries
- Podcasts or videos
- Book reviews
- Coupons and special offers
- Events calendars
Creating a custom post type
To create and use custom post types on your site, be sure that your WordPress theme contains the correct code and functions. In the following steps, you create a basic and generic Custom Post Type called Generic Content, and later in this section, you find detailed information on the different parameters you can use with custom post types to create different types to suit your needs:
In your Dashboard, select Appearance
Editor Link.The Edit Themes page opens.
Click the Theme Functions template link to open the functions.php file.
The Theme Functions template opens in the text editor on the left side of the Edit Themes page.
Add the custom post type code to the bottom of the theme functions template file.
Scroll down to the bottom of the functions.php file and include the following code to add a Generic Content custom post type to your site:
// ADD CUSTOM POST TYPEadd_action( ‘init’, ‘create_post_type’ );function create_post_type() {register_post_type( ‘generic-content’,array('labels' => array(‘name’ => __( ‘Generic Content’ ),'singular_name' => __( 'Generic Content' )),'public' => true));} The function register_post_type(); can accept several arguments and parameters, which I detail in Table 12-2. You can use a variety and a combination of arguments and parameters to create a specific post type. You can find more information on custom post types and using the register_post_type(); function on the WordPress Codex page at
 http://codex.wordpress.org/Function_Reference/register_post_type.- Click the Update File button to save the changes made to the functions.php file.
Table 12-2 Arguments and Parameters for register_post_types();
Parameter |
Information |
Arguments |
Example |
label |
The name of the post type. |
None |
‘label’ => __( ‘Generic Content’ ), |
singular_label |
Same as label, but in singular, not plural, format (posts become post, for example). |
None |
‘singular_label’ => __( ‘Generic Content’ ), |
description |
The description of the post type; displayed in the Dashboard to represent the post type. |
None |
‘description’ => __( ‘This is a description of the Generic Content type’ ), |
publicshow_uipublicly_queryableexclude_from_search |
public sets whether the post type is public. show_ui either shows or doesn’t show admin screens. publicly_queryable allows this post type to be included in public queries within template code. exclude_from_search either shows or doesn’t show the post type in search results. |
true or false (default) |
‘public’ => true,‘show_ui’ => true,‘publicly_queryable’ => true,‘exclude_from_search’ => false, |
menu_position |
Sets the position of the post type menu item in the Dashboard navigation menu; by default, custom post types appear after the Pages menu in the Dashboard. |
Default is 25; sets integers in intervals of 5 |
‘menu_position’ => 25, |
menu_icon |
Defines a custom icon (or graphic) to the post type menu item in the Dashboard navigation menu; creates and uploads the image into the images directory of your theme folder. |
None |
‘menu_icon’ => get_stylesheet_directory_uri() . ‘/images/generic-content.png’, |
hierarchical |
Tells WordPress whether to display the post type content list in a hierarchical manner. |
true or false; default is false |
‘hierarchical’ => true, |
query_var |
Controls whether this post type can be used with a query variable, such as query_posts. |
true or false; default is true |
‘query_var’ => true, |
capability_type |
Defines permissions for users to edit, create, or read the custom post type. |
post (default); gives the same capabilities for those who can edit, create, and read blog posts |
‘query_var’ => post, |
supports |
Defines what meta boxes, or modules, are available for this post type in the Dashboard. |
title (text box for the post title); editor (text box for the post content); comments (check boxes to toggle comments on and off); trackbacks (check boxes to toggle trackbacks and pingbacks on and off); revisions (allows post revisions to be made); author (drop-down box to define post author); excerpt (text box for the post excerpt); thumbnail (featured image selection, see the section “Adding support for post thumbnails” later in this chapter); custom-fields (custom fields input area); page-attributes (page parent and Page template drop-down lists) |
‘supports’ => array( ‘title’, ‘editor’, ‘excerpt’, ‘custom-fields’, ‘thumbnail’ ), |
rewrite |
Rewrites the permalink structure for the post type. |
true or false; slug (permalink slug to prepend custom post types); with_front (if you’ve set your permalink structure with a specific prefix, such as /blog) |
‘rewrite’ => array( ‘slug’ => ‘my-content’, ‘with_front’ => false ), |
taxonomies |
Uses existing WordPress taxonomies (category and tag). |
Category post_tag |
‘taxonomies’ => array( ‘post_tag’, ‘category’), |
If you don’t feel up to writing all this code in the theme functions file, the Custom Post Type UI plugin from WebDevStudios (http://webdevstudios.com) provides you with an easy interface in your WordPress Dashboard. This plugin also simplifies the creation of custom post types on your site and bypasses the need to create the code in the Theme Functions (functions.php) file. You can find the free plugin at https://wordpress.org/plugins/custom-post-type-ui.
After you complete the steps to add the Generic Content post type to your site, it’s added to the left navigation menu in the Dashboard, as shown in Figure 12-9.
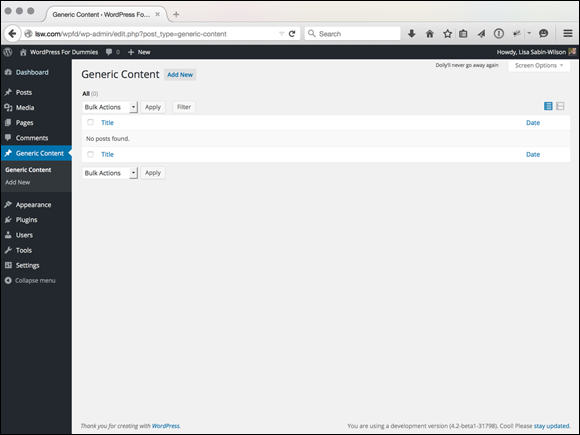
Figure 12-9: The Generic Content post type is added to the Dashboard.
You add and publish new content using the new custom post type just as you would when you write and publish blog posts. The published content isn’t added to the chronological listing of blog posts but is instead treated as separate content, just like static pages.
When you view the permalink for the custom post type, you see that it adopts the post type name, Generic Content, and uses it as part of the permalink structure. The permalink looks like this: http://yourdomain.com/generic-content/new-article.
Listing 12-3 gives you a real-life example that I use on the No Rules Theatre site I developed; see it at http://norulestheatre.org. This site uses a Shows custom post type to create custom content for the shows that the theatre produces each season. Reference the parameters and information in Table 12-2 while you read the lines of code in Listing 12-3 to see how the custom post types for the No Rules Theatre site were created and applied.
Listing 12-3: Custom Post Types from the No Rules Theatre Site
// ADD CUSTOM POST TYPE: SHOWS
add_action( ‘init’, ‘create_my_post_types’ );
function create_my_post_types() {
register_post_type( ‘shows’,
array(
'labels' => array(
‘name’ => __( ‘Shows’ ),
‘singular_name’ => __( ‘Show’ ),
‘add_new’ => __( ‘Add New Show’ ),
‘add_new_item’ => __( ‘Add New Show’ ),
‘edit’ => __( ‘Edit’ ),
‘edit_item’ => __( ‘Edit Show’ ),
‘new_item’ => __( ‘New Show’ ),
‘view’ => __( ‘View Show’ ),
‘view_item’ => __( ‘View Show’ ),
‘search_items’ => __( ‘Search Shows’ ),
‘not_found’ => __( ‘No shows found’ ),
‘not_found_in_trash’ => __( ‘No shows found in Trash’ ),
‘parent’ => __( ‘Parent Show’ ),
),
‘public’ => true,
‘show_ui’ => true,
‘publicly_queryable’ => true,
‘exclude_from_search’ => false,
‘menu_position’ => 10,
‘menu_icon’ => get_stylesheet_directory_uri() . ‘/img/nrt-shows.png’,
‘hierarchical’ => true,
‘query_var’ => true,
‘rewrite’ => array( ‘slug’ => ‘shows’, ‘with_front’ => false ),
‘taxonomies’ => array( ‘post_tag’, ‘category’),
‘can_export’ => true,
'supports' => array(
‘post-thumbnails’,
‘excerpts’,
‘comments’,
‘revisions’,
‘title’,
‘editor’,
‘page-attributes’,
‘custom-fields’)
)
);
}
To add custom post types to the Menus options on the Menus page that are accessible from the Dashboard (select Appearance ![]() Menus), click the Screen Options tab in the top-right corner of that page. You see a check box next to Post Types that you can select to enable your custom post types in the menus you create. (The Post Types appear in the screen options only if you have custom post types enabled in your theme.)
Menus), click the Screen Options tab in the top-right corner of that page. You see a check box next to Post Types that you can select to enable your custom post types in the menus you create. (The Post Types appear in the screen options only if you have custom post types enabled in your theme.)
Building a template for a custom post type
By default, custom post types use the single.php template in your theme — unless you create a specific template for your custom post type. You might find the regular WordPress single.php template limiting for your post type, depending on the type of content you want to include and whether you want to apply different formats and styles for your custom post type with HTML and CSS markup.
In the preceding section, I share the code to build a simple Generic Content custom post. After you add that, the Generic Content menu in the WordPress Dashboard appears (refer to Figure 12-9). Select Generic Content ![]() Add New and then publish a new post with some content for testing. For example, add a new Generic Content type with a Test title and a test slug. Because the Generic Content type has no specific template yet, it uses the single.php template, and resulting posts look no different from the standard.
Add New and then publish a new post with some content for testing. For example, add a new Generic Content type with a Test title and a test slug. Because the Generic Content type has no specific template yet, it uses the single.php template, and resulting posts look no different from the standard.
If a Not Found page appears when you try to access a new custom post type entry, reset your permalink settings. Select Settings ![]() Permalinks in the WordPress Dashboard, and then click the Save Changes button. This forces WordPress to reset the permalinks for your site and adds the new, custom post type permalink formats.
Permalinks in the WordPress Dashboard, and then click the Save Changes button. This forces WordPress to reset the permalinks for your site and adds the new, custom post type permalink formats.
To build a template specifically for the Generic Content post type, add a new single-posttype.php template (posttype is the first argument passed to the register_post_type function from the preceding section). In this example, the template file that’s specific to the Generic Content post type is single-generic-content.php. Any modifications made to this template file are shown only for instances of the Generic Content post type.
The basic structure for single-generic-content.php for the Twenty Fifteen theme is
<?php get_header(); ?>
<div id="primary" class="content-area">
<main id="main" class="site-main" role="main">
<?php // Start the loop.
while ( have_posts() ) : the_post();
// Include the page content template.
get_template_part( ‘content’, ‘generic’ );
// End the loop.
endwhile;
?>
</main><!-- .site-main -->
</div><!-- .content-area -->
<?php get_footer(); ?>
By using the template part, creating a content-generic.php file allows for easy customization of The Loop for the Generic Content post type entry.
Adding support for post formats
Including the post formats in your theme allows you to designate a different content display and styling for certain types of designated posts. Unlike custom post types, you can’t create different post formats, because WordPress has already assigned them for you; you decide which post format, if any, to use in your theme. You can, however, use one or all of them, depending on your needs.
This list describes the post formats that are designated in WordPress:
- Standard: Displays your blog posts in the default manner — as an ordinary blog post without special formats applied to it.
- Aside: A short post (but not a full post) to share a random thought or idea. Typically, an Aside is shared without a post title or category/tag designations. An Aside is simply a random, one-off thought shared on your blog.
- Chat: A transcript of an online chat conversation that can be formatted to look just like a chat (or instant messaging) window.
- Gallery: A gallery of images in which each image can be clicked to access a larger version. Often, these post formats contain no text and display only a gallery (but they may have a title).
- Image: Used for displaying one image, such as in a photo blog. The image may or may not have text or a caption to go along with the post.
- Link: Displays a short post that provides a link that you find useful and want to share with your readers. This post format often contains a title and sometimes a short bit of text that describes the link you’re sharing.
- Quote: Displays a quotation on your blog. Often, users include the quotation along with a byline for its source.
- Status: Provides a short status update, usually limited to 140 characters or fewer (think Twitter!).
- Video: Displays a video, usually embedded within a handy video player (à la YouTube) so that your readers can simply click to play the video without leaving your site.
- Audio: The post format for sharing audio files, or podcasts. Usually, an Audio post has very little text included and instead includes items such as a built-in audio player that visitors can click to listen to audio files.
To see a helpful, real-world example of post formats in practice, see the website shown in Figure 12-10. The site separates the chosen formats to use, in the individual post styling and icons used to designate the different formats. (In Figure 12-10, you see the small post icon used to designate video posts.)
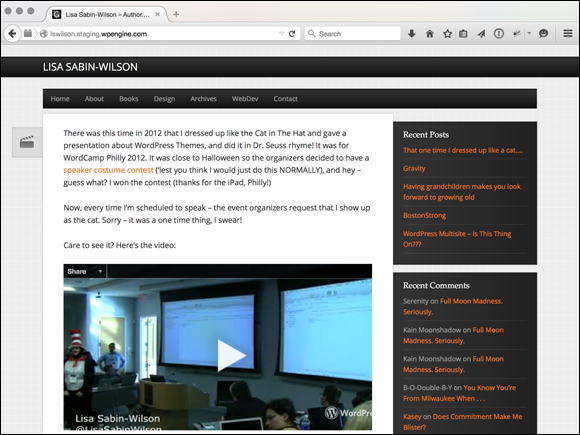
Figure 12-10: Video post formats in use.
If your site needs a different type of a post format that isn’t available, consider adding it as a custom post type instead. (See the earlier sections in this chapter for details.)
Adding post formats to a theme
To add support for post formats in your theme (assuming it does not already have support for this features), you first need to add the function call to your Theme Functions (functions.php) template. After you follow these few steps to make that happen, I show you the magic that occurs on the Add New Post page in your WordPress Dashboard. But first follow these steps to add post formats support in your theme:
- From your Dashboard, select Appearance Editor.
- Click the Theme Functions (functions.php) file in the Templates list on the right to open the Theme Functions file.
In the text editor box, add the following function on a new line in front of the closing ?> tag:
add_theme_support( ‘post-formats’, array(‘aside’,‘chat’,‘gallery’,‘image’,‘link’,‘quote’,‘status’,‘video’,'audio') ); The preceding code sample adds available post formats to the theme. You don’t have to use all of them; you can simply include only those formats that you think you’ll use in your theme and leave out the rest.- Click the Update File button to save the changes made to the functions.php file.
You don’t notice an immediate change to your site when you save your new Theme Functions file with the post formats support added. To see what WordPress has added to your site, visit the Add New Post page by selecting Posts ![]() Add New in the Dashboard. A Format item in the Publish section on the right side of the page appears and lists the different formats you added to your theme, as shown in Figure 12-11. Because I added all nine post format options, in the figure they’re all listed as available formats that I can select. You also see a tenth format option — Standard — which is the format that’s used if you don’t select a specific format for your post.
Add New in the Dashboard. A Format item in the Publish section on the right side of the page appears and lists the different formats you added to your theme, as shown in Figure 12-11. Because I added all nine post format options, in the figure they’re all listed as available formats that I can select. You also see a tenth format option — Standard — which is the format that’s used if you don’t select a specific format for your post.
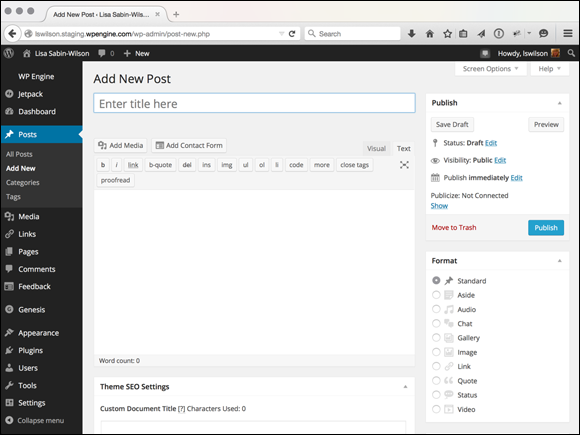
Figure 12-11: Adding post format options on the Add New Post page.
Using template tags for post formats
Adding post format support to your theme isn’t enough. If you endure the hassle of adding post format support, you should provide some unique styling for each type of format. If you don’t, your different post formats look just like the rest of your blog posts, and the point of adding them to your theme is lost.
You can provide a unique display for your post formats in two ways:
- Content: For each format, you can designate the content you want to display. For example, if you don’t want to display a title for an Aside, leave out the template tag that calls it but leave in the template tag that calls the title for your Video post format.
- Style: Each of your formats has its own CSS class assigned to it. Use those CSS classes to provide unique styles for fonts, colors, backgrounds, and borders to your different post formats. In the following sidebar, “Post class defined,” I discuss using the HTML markup that’s provided by the post_class(); tag.
Adding unique styles for your post formats starts with creating the content designations you want to display for each format. Earlier in this chapter, I describe the possible post formats and give you some ideas on what you can do to display them on your site. The possibilities are endless, and they’re all up to you. See Chapter 9 for more information on the different content-related template tags you can use in these areas.
In the following steps, you create a simple, stripped-down Main Index (index.php) file to use on your site and include post format support. This template is only a sample for you to follow and refer to when you create your custom display for your post formats. There’s no time like the present, so follow these steps:
- Open your favorite text editor, such as Notepad (PC) or TextEdit (Mac).
Enter the code in Listing 12-4 to create a simple template for post formats.
I describe the various lines in the code in Listing 12-4.
- Save the file as index.php on your local computer.
Upload the file into your theme folder (located in the /wp-content/themes/your-theme-name directory), replacing the existing index.php file.
See Chapter 3 for details on transferring files by using FTP.
Listing 12-4 A Simple Template for Post Formats
<?php get_header(); ?>
      #1
<?php if (have_posts()) : ?>
      #2
<?php while (have_posts()) : the_post(); ?>
      #3
<div id="post-<?php the_ID(); ?>" <?php post_class(); ?>>
      #4
<?php
      #5
if ( has_post_format( ‘aside’ )) {
      #6
         echo the_content();
      #7
}
      #8
elseif ( has_post_format( ‘chat’ )) {
      #9
         echo ‘<h3>’;
      #10
         echo the_title();
      #11
         echo ‘</h3>’;
      #12
         echo the_content();
      #13
}
      #14
elseif ( has_post_format( ‘gallery’ )) {
      #15
         echo ‘<h3>’;
      #16
         echo the_title();
      #17
         echo ‘</h3>’;
      #18
         echo the_content();
      #19
}
      #20
elseif ( has_post_format( ‘image’ )) {
      #21
         echo ‘<h3>’;
      #22
         echo the_title();
      #23
         echo ‘</h3>’;
      #24
         echo the_post_thumbnail(‘image-format’);
      #25
         echo the_content();
      #26
}
      #27
elseif ( has_post_format( ‘link’ )) {
      #28
         echo ‘<h3>’;
      #29
         echo the_title();
      #30
         echo ‘</h3>’;
      #31
         echo the_content();
      #32
}
      #33
elseif ( has_post_format( ‘quote’ )) {
      #34
echo the_content();
      #35
}
      #36
elseif ( has_post_format( ‘status’ )) {
      #37
         echo the_content();
      #38
}
      #39
elseif ( has_post_format( ‘video’ )) {
      #40
         echo ‘<h3>’;
      #41
         echo the_title();
      #42
         echo ‘</h3>’;
      #43
         echo the_content();
      #44
}
      #45
elseif ( has_post_format( ‘audio’ )) {
      #46
         echo ‘<h3>’;
      #47
         echo the_title();
      #48
         echo ‘</h3>’;
      #49
         echo the_content();
      #50
}
      #51
else {
      #52
         echo ‘<h3>’;
      #53
         echo the_title();
      #54
         echo ‘</h3>’;
      #55
         echo the_content();
      #56
}
      #57
?>
      #58
</div>
      #59
<?php endwhile; else: ?>
      #60
<?php endif; ?>
      #61
<?php get_sidebar(); ?>
      #62
<?php get_footer(); ?>
      #63
Here’s a breakdown of the lines of code in Listing 12-4:
- Line 1: A function that includes all code from the header.php file of your theme.
- Lines 2 and 3: Indicates the beginning of The Loop (see Chapter 9).
- Line 4: Provides HTML and CSS markup using the post_class(); function that provides you with unique CSS classes for each of your different post formats (see the earlier sidebar, “Post class defined”).
- Line 5: Initiates the start of a PHP function.
- Lines 6–8: Provide content for the Aside post format.
- Lines 9–14: Provide content for the Chat post format.
- Lines 15–20: Provide content for the Gallery post format.
- Lines 21–27: Provide content for the Image post format.
- Lines 28–33: Provide content for the Link post format.
- Lines 34–36: Provide content for the Quote post format.
- Lines 37–39: Provide content for the Status post format.
- Lines 40–45: Provide content for the Video post format.
- Lines 46–51: Provide content for the Audio post format.
- Lines 52–57: Provide content for all other Default posts.
- Line 58: Ends the PHP function.
- Line 59: Closes the HTML div tag that was opened in Step 4.
- Lines 60 and 61: Close the endwhile and if statements that were opened in Lines 2 and 3.
- Line 62: This function calls in the code included in the sidebar.php file of your theme.
- Line 63: This function calls in the code included in the footer.php file of your theme.
Listing 12-4 is a simple example and doesn’t include a lot of HTML markup or CSS classes. I made it this way on purpose to focus on the code bits that are required in order to designate and define different content displays for your post formats. You can see in Listing 12-4 that some formats contain the template tag to display the title — the_title(); — and that others do not. However, they all contain the template tag to display the content of the post: the_content();. As I mention earlier, you can play with different content types and markup that you want to add to your post formats.
Couple your template additions for post formats with the post_class(); that adds special CSS classes and markup for each post format type. You can truly customize the display of each individual post format to your heart’s content.
Adding support for post thumbnails
Using post thumbnails (or featured images) takes a lot of the work out of associating an image with a post and using the correct size each time. A popular way to display content in WordPress themes includes a thumbnail image with a snippet (or an excerpt) of text; the thumbnail images all use the same size and placement within your theme.
Before the inclusion of post thumbnails in WordPress, users had to open an image in an image-editing program (such as Photoshop) and crop and resize the image. Or they had to use fancy scripts that would resize images on the fly; however, because this type of script tends to be resource intensive on web servers, it wasn’t an optimal solution. How about a content management system that crops and resizes your images to the exact dimensions you specify? Yep — WordPress does that for you, with only a few adjustments.
By default, when you upload an image in WordPress, it creates three versions of the image based on dimensions that are set in your Dashboard’s Media Settings page (select Settings ![]() Media):
Media):
- Thumbnail size: Default dimensions are 150px x 150px.
- Medium size: Default dimensions are 300px x 300px.
- Large size: Default dimensions are 1024px x 1024px.
So, when you upload one image, you end up with four sizes of that same image stored on your web server: thumbnail, medium, large, and the original (full size) image you uploaded. Images are cropped and resized proportionally, and when you use them in your posts, you can typically designate which size you want to use in the image options of the uploader (which I describe in more detail in Chapter 6). You can find the uploader on the Add New Post, Add New Page, and Add New Media pages in your WordPress Dashboard.
Within the WordPress image uploader, you can designate a particular image as the featured image of the post and then, using the Featured Images function that you add to your theme, include template tags to display your chosen featured image with your post. This is helpful for creating magazine- or news-style themes that are popular on WordPress sites. Figure 12-12 displays my personal blog, where I used post thumbnails and featured images to display a large featured image associated with each post excerpt on my home page. It’s at http://lisasabin-wilson.com.

Figure 12-12: A large featured image on my site.
In Chapter 6, I cover the default image sizes that are set on the Media Settings page in your Dashboard. Having default image sizes is helpful when you have sections of your site in which you want to display a much smaller thumbnail or a larger version of the medium size but not as big as the large size.
Adding the post thumbnails to a theme
Adding support for post thumbnails includes a single line of code added to your theme functions (functions.php) file:
add_theme_support( ‘post-thumbnails’ );
Many themes, including the default themes that come packaged in WordPress, already have support for post thumbnails. If a theme you are using (or creating) does not, you can add it with the snippet previously provided.
After you add this line to your Theme Functions file, you can use the featured image for your posts because it requires the Post Thumbnails function to be activated. You can then start designating images as featured by using the built-in featured image found in the WordPress image uploader and on the Add New Post page, where you write and publish your posts.
After you start adding featured images to your posts, make sure that you add the correct tag in your template(s) so that the featured image displays on your site in the area you want it. Open your index.php template, for example, and add the following line of code to include the default thumbnail size version of your chosen featured image in your posts:
<?php if ( has_post_thumbnail() ) { the_post_thumbnail( ‘thumbnail’ ); ?>
The first part of this line of code checks to see whether a featured image is associated with the post; if one is, the image displays. If a featured image doesn’t exist for the post, nothing returns. You can also include the other default image sizes (set in your Media Settings page in the Dashboard, as shown in Figure 12-13) for medium, large, and full-size images by using these tags:
<?php if ( has_post_thumbnail() ) { the_post_thumbnail( ‘medium’ ); ?>
<?php if ( has_post_thumbnail() ) { the_post_thumbnail( ‘large’ ); ?>
<?php if ( has_post_thumbnail() ) { the_post_thumbnail( ‘full’ ); ?>
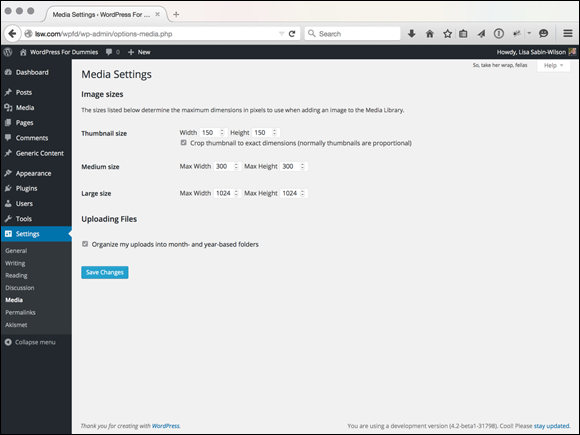
Figure 12-13: The Media Settings page in the Dashboard.
Adding custom image sizes for post thumbnails
In case the predefined, default image sizes in WordPress (thumbnail, medium, large, and full) don’t satisfy you and you have an area on your site in which you want to display images with dimensions that vary from the default, WordPress makes it relatively easy to add custom image sizes in your Theme Functions file. You then use the the_post_thumbnail function to display the featured image in your theme.
You aren’t limited to sizes you can add for your images. Say that you want to add a new image size of 600px x 300px. Your Theme Functions file (functions.php) has the function add_theme_support(‘post-thumbnails’). (See the previous section, “Adding the post thumbnails to a theme.”) Below that function, add this line of code:
add_image_size( ‘custom’, 600, 300, true);
This line tells WordPress that it needs to create an additional version of the images you upload and to crop and resize them to 600px wide and 300px tall. Notice the four parameters in the add_image_size function:
- Name ($name): Give the image size a unique name that you can use later in your template tag. In my example, I gave the new image size the name ‘custom’.
- Width ($width): Give the image size a width dimension in numbers. In my example, I defined the width as 600.
- Height ($height): Give the image size a height dimension in numbers. In my example, I defined the height as 300.
- Crop ($crop): This optional parameter tells WordPress whether it should crop the image to exact dimension or do a soft proportional resizing of the image. (Rather than be cropped to exact dimensions, dimensions are automatically corrected by WordPress based on the width of the thumbnails settings.) In my example, I set this to true (the accepted arguments are true or false).
Adding the custom image size to your template to display the image you’ve designated as featured is the same as adding default image sizes, except that the name of the image is set in the parentheses of the template tag. To add my example custom image size, use this tag:
<?php if ( has_post_thumbnail() ) { the_post_thumbnail( ‘custom’ ); ?>
Optimizing Your WordPress Site for Search Engines
Search engine optimization (SEO) is the practice of preparing your site to make it as easy as possible for the major search engines to crawl it and cache your data in their systems so that your site appears as high as possible in the search returns.
If you visit Google at www.google.com and search for WordPress For Dummies author, my personal blog at http://lisasabin-wilson.com is in the top-ten search results (at least, it is as I write this chapter). Those results can change from day to day, so by the time you read this book, someone else may well have taken over those coveted positions. The reality of chasing those high-ranking search engine positions is that they’re here today, gone tomorrow. The goal of SEO is to make sure that your site ranks as high as possible for the keywords that you think people will use to find your site. After you attain those high-ranking positions, the next goal is to keep them.
Check out Search Engine Optimization For Dummies, 5th Edition, by Peter Kent (John Wiley & Sons, Inc.) for valuable information on keeping those high rankings through ongoing optimization of your site.
WordPress is equipped to create an environment that’s friendly to search engines, giving them easy navigation through your archives, categories, and pages. This environment is provided by a clean code base, content that’s easily updated via the WordPress interface, and a solid navigation structure.
To extend SEO even further, you can tweak these five elements of your WordPress posts, pages, and templates:
- Custom permalinks: Use custom permalinks, rather than the default WordPress permalinks, to fill your post and page URLs with valuable keywords.
- Posts and page titles: Create descriptive titles for your blog posts and pages to provide rich keywords in your site.
- Text: Fill your blog posts and pages with keywords for search engines to find and index. Keeping your site updated with descriptive text and phrases helps the search engines find keywords to associate with your site.
- Category names: Use descriptive names for the categories you create in WordPress to place helpful keywords directly in the URL for those category pages, if you use custom permalinks.
- Images and alt tags: Place <ALT> tags in your images to further define and describe the images on your site. You can accomplish this task easily by using the Alternate Text field in the WordPress image uploader, covered in Chapter 6.
Planting keywords in your website
If you’re interested in a higher ranking for your site, I strongly recommend using custom permalinks. By using them, you automatically insert keywords into the URLs of your posts and pages, letting search engines include those posts and pages in their databases of information on those topics. If your site is hosted by a provider that has the Apache mod_rewrite module enabled, you can use the custom permalink structure for your WordPress-powered site.
Using keywords is the first step on your journey toward great search engine results. Search engines depend on keywords, and people use keywords to look for content.
The default permalink structure in WordPress is pretty ugly. When you’re looking at the default permalink for any page, you see a URL that looks something like this:
http://yourdomain.com/?page_id=2
This URL contains no keywords of worth. If you change to a custom permalink structure, your post URLs automatically include the titles of your posts to provide keywords, which search engines absolutely love. A custom permalink may appear in this format:
http://yourdomain.com/the-page-title
I explain setting up and using custom permalinks in detail in Chapter 4.
Optimizing your post and page titles for search engine success
Search engine optimization doesn’t completely depend on how you set up your site. SEO also depends on you, the site owner, and how you present your content.
One way to present your content in a way that lets search engines catalog your site easily is to give your blog posts and pages titles that make sense and coordinate with the actual content being presented. If you’re creating a page on a certain topic, make sure that the title of the page contains at least one or two keywords about that particular topic. This practice gives the search engines even more ammunition to list your site in searches that are relevant to the topic of your page.
A page with the title “A Book I’m Reading” doesn’t tell anyone what book it is, making it difficult for people searching for information on that particular book to find the page. If you give the page the title “WordPress Web Design For Dummies: My Review,” you provide keywords in the title, and (if you’re using custom permalinks) WordPress automatically inserts those keywords into the URL, giving the search engines this keyword triple play:
- Keywords exist in your page title.
- Keywords exist in your page URL.
- Keywords exist in the content of your page.
As your site’s presence in the search engines grows, more people will find your site and your readership will increase as a result.
Writing content with readers in mind
When you write your posts and pages and you want to make sure that your content appears in the first page of search results so that people will find your site, you need to keep those people in mind when you compose the content.
When search engines visit your site to crawl through your content, they don’t see how nicely designed it is — they look for words to grab and include in their databases. You, the site owner, should ensure that your posts and pages use the words and phrases that you want to include in search engines.
If your post is about a recipe for fried green tomatoes, for example, you need to add a keyword or phrase that you think people will use when they search for the topic. If you think people would use the phrase recipe for fried green tomatoes as a search term, you may want to include that phrase in the content and title of your post. Apply the same technique to pages you create on your website.
The title “A Recipe I Like” isn’t as effective as the title “A Recipe for Fried Green Tomatoes,” right? Including it in your post or page content gives the search engines a double keyword whammy.
Here’s another example: I once wrote a post titled “Does Commitment Make Me Blister?” about a rash I developed on my finger, under my ring. I wrote that post in April 2006, not really meaning to attract a bunch of people to that particular post. However, it seems that many women around the world suffer from the same rash, because years later that post still attracts at least one comment a month. When people use Google to search for the keywords commitment blister, out of a possible 370,000+ results returned, my blog post appears in the top five slots.
This is how great blogs are! I was able to solve my problem of the rash under my finger because one woman from Australia found my blog through Google, visited my blog post, and left a comment with a solution that worked. Who says blogs aren’t useful?
Creating categories that attract search engines
Here’s one little-known SEO tip for WordPress users: The names you give the categories you’ve created for your blog provide rich keywords that attract search engines like bees to honey. A few services — Technorati is one of the biggest — treat categories in WordPress like tags. These services use those categories to classify recent blog posts on any given topic.
Search engines also see your categories as keywords that are relevant to the content on your site. In this regard, make sure that you’re giving your categories names that are relevant to the content you provide on your site.
If you sometimes blog about your favorite recipes, you can make it easier for search engines to find your recipes if you create categories specific to the recipes you’re blogging about. Rather than have one Favorite Recipes category, you can create multiple category names that correspond to the types of recipes you blog about — Casserole Recipes, Dessert Recipes, Beef Recipes, and Chicken Recipes, for example.
Creating specific category titles helps not only search engines, but also your readers.
You can also consider having one category — Favorite Recipes — and creating subcategories (or child categories) that give a few more details on the types of recipes you’ve written about.
Categories use the custom permalink structure as well. So, links to your WordPress categories also become keyword tools within your site to help the search engines — and ultimately, search engine users — find the content. Using custom permalinks gives you category page URLs that look something like this:
http://yourdomain.com/category/Category_Name
The Category_Name portion of that URL puts the keywords directly into the hands of search engines.
Using the <ALT> tag for images
When you use the WordPress image uploader to include an image in your post or page, you’re given a Description text box in which you can enter a description of the image. This text automatically becomes the <ALT> tag.
The <ALT> tag’s true purpose is to provide a description of the image for people who, for one reason or another, can't see the image. In a text-based browser that doesn’t display images, for example, visitors see the description, or <ALT> text, telling them what image would be there if they could see it. Also, the tag helps people with impaired vision who rely on screen-reading technology, because the screen reader reads the <ALT> text from the image. You can read more about website accessibility for people with disabilities at www.w3.org/WAI/intro/people-use-web/Overview.html. (Capitalization in this URL matters.)
An extra benefit of <ALT> tags is that search engines gather data from them to further classify the content of your site. The following line of code inserts an image, with the <ALT> tag of the code in bold to demonstrate what I’m talking about:
<img src="http://yourdomain.com/image.jpg" alt="This is an ALT tag within an image" />
Search engines harvest those <ALT> tags as keywords. The WordPress image uploader gives you an easy way to include those <ALT> tags without worrying about inserting them into the image code yourself. Just fill out the Description text box before you upload and add the image to your post.