
Chapter 14
Upgrading, Backing Up, and Migrating
In This Chapter
![]() Finding the Dashboard upgrade notification
Finding the Dashboard upgrade notification
![]() Backing up your database before upgrading
Backing up your database before upgrading
![]() Upgrading WordPress automatically and manually
Upgrading WordPress automatically and manually
![]() Moving to WordPress from a different platform
Moving to WordPress from a different platform
![]() Transferring your website from one host to another
Transferring your website from one host to another
You may, at some point, need to move your site to a different home on the web, either to a new web host or into a different account on your current hosting account. You may also be reading this book because you’re moving your blog from a completely different platform to WordPress. You will also find that during your time as a WordPress user, upgrading the WordPress software is important, as is maintaining backups of your site so that you don’t lose precious months or years of content.
In this chapter, you discover the WordPress upgrade notification system and what to do when WordPress notifies you that a new version of the software is available. This chapter also covers the best practices in upgrading the WordPress platform on your site to ensure the best possible outcome (that is, how not to break your website after a WordPress upgrade).
This chapter also covers how to migrate a blog that exists within a different blogging platform (such as Movable Type or TypePad) to WordPress. And finally, it takes you through how to back up your WordPress files, data, and content and move it to a new hosting provider or different domain.
Getting Notified of an Available Upgrade
When you install WordPress and have logged in for the first time, you can see the version number located at the bottom-right corner of the WordPress Dashboard. So, if anyone asks you what version you’re using, you now know exactly where to look to find that information.
So, you have WordPress installed and you’ve been happily publishing content to your website with it for several weeks, maybe even months. Then one day, you log in and see a message at the top of your Dashboard screen that you’ve never seen before: WordPress 4.1.1 is available! Please update now. You can see such a message displayed in Figure 14-1.
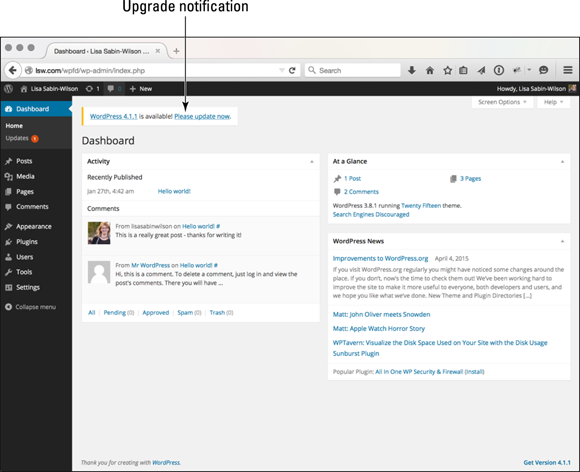
Figure 14-1: Alert notification of the available WordPress upgrade in the Dashboard.
Both the message at the top of the screen and the notification bubble on the Dashboard menu are visual indicators that you’re using an outdated version of WordPress and that you can (and need to) upgrade the software.
The message at the top of your Dashboard has two links that you can click for more information. The first, in Figure 14-1, is a link called WordPress 4.1.1. Clicking it takes you to the WordPress Codex page titled Version 4.1.1 that’s filled with information about the version upgrade, including
- Installation/upgrade information
- Summary of the development cycle for this version
- List of revised files
The second link, Please Update Now, takes you to the WordPress Updates page in the WordPress Dashboard, shown in Figure 14-2.
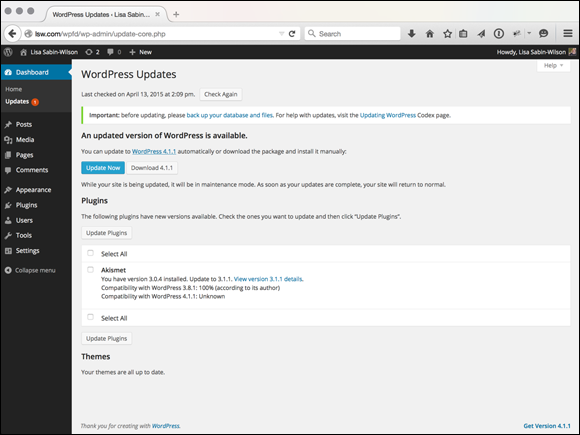
Figure 14-2: Get the latest version of WordPress through the WordPress Updates page.
At the very top of the WordPress Updates page is another important message for you (see Figure 14-2): Important: before updating, please back up your database and files. For help with updates, visit the Updating WordPress Codex page. Both links in that message take you to the WordPress Codex pages that contain helpful information on creating backups and updating WordPress.
The WordPress Updates page tells you that an updated version of WordPress is available and you have two different ways to update:
- Automatically: By using the built-in WordPress updater (this is the recommended method)
- Manually: By downloading the files and installing them on your server
Backing Up Your Database
One step I recommend you take before upgrading your WordPress software installation is to back up your database. This step isn’t required, of course, but it’s a smart step to take to safeguard your website and make absolutely sure that — should the upgrade go wrong for some reason — you have a complete copy of all your website data that can be restored if needed.
The best way to back up your database is to use the MySQL administration interface provided by your web-hosting provider.
 cPanel is a web-hosting interface provided by many web hosts as an account management tool containing phpMyAdmin as the preferred tool to manage and administer databases. Not all web hosts use cPanel or phpMyAdmin, however; so if yours doesn’t, consult the user documentation for the tools that your web host provides. The instructions in this chapter are provided using cPanel and phpMyAdmin.
To create a database backup using the phpMyAdmin interface, follow these steps:
Log in to the cPanel for your hosting account.
Typically, you will browse to
http://yourdomain.com/cpanelto bring up the login screen for your cPanel. Enter your specific hosting account username and password in the login fields and click OK to log in.Click the phpMyAdmin icon.
The phpMyAdmin interface opens and displays your database. (Depending on your hosting environment, you may also have to log in to phpMyAdmin.)
Click the name of the database that you want to back up.
If you have more than one database in your account, the left-side menu in phpMyAdmin displays the names of all of them. Click the one you want to back up, and that database loads in the main interface window on the side of the screen.
Click the Export tab at the top of the screen.
The page refreshes and displays the backup utility screen.
- Select the Save as File check box.
Select the “zipped” option.
This compiles the database backup file in a .zip file and prepares it for download.
Click the Go button.
A pop-up window appears, allowing you to select a location on your computer to store the database backup file. Click Save to download it and save it to your computer.
With your WordPress website data safely backed up, you can proceed to upgrading the WordPress software. If anything happens to go wrong, you have a full copy of the content from your website, which can be restored at a future date if necessary.
Upgrading WordPress Automatically
To update WordPress automatically, follow these steps:
Back up your WordPress website; do not skip this step!
Backing up your website includes taking a backup of your database (covered in the previous section) and downloading the crucial elements via FTP (see Chapter 3). The crucial elements include the entirety of the /wp-content folder, which contains your plugins, themes, and all media (images, videos, documents, and so on) that you’ve uploaded to your website. Also download a backup of your wp-config.php file, located in the root install.
Deactivate all plugins.
This ensures that any plugin conflicts caused by the upgraded version of WordPress cannot affect the upgrade process. It also ensures that your website doesn’t break after the upgrade is completed. You can find more information on working with and managing plugins in Chapter 7; for the purpose of this step, you can deactivate plugins by following these steps:
Click the Plugins link in the Plugins menu in the Dashboard.
This loads the Plugins page.
- Select all plugins by selecting the box to the left of the Plugin column (see Figure 14-3).
- In the drop-down menu at the top, select Deactivate.
- Click the Apply button.
Click the Please Update Now link on the WordPress Updates page.
This reloads the WordPress Updates page with the following messages:
- Downloading update from
http://wordpress.org/wordpress-4.1.1.zip… - Unpacking the update…
- Verifying the unpacked files…
- Installing the latest version…
- Upgrading database…
- WordPress updated successfully
- Welcome to WordPress 4.1.1. You will be redirected to the About WordPress screen. If not, click here.
The Dashboard refreshes to display the welcome page for the latest version. This informational page (as shown in Figure 14-4) displays all of the important information about this upgrade, including version number and any major features that were added or bugs that were fixed.
- Downloading update from
Wait until your screen redirects to the welcome page.
The welcome page loads in your web browser, and you can see that both the update alert message at the top of the site and the notification message on the Dashboard menu isn’t there anymore. The welcome page displays a listing of new features in the version you just installed, shown in Figure 14-4. You’re now using the latest version of WordPress.
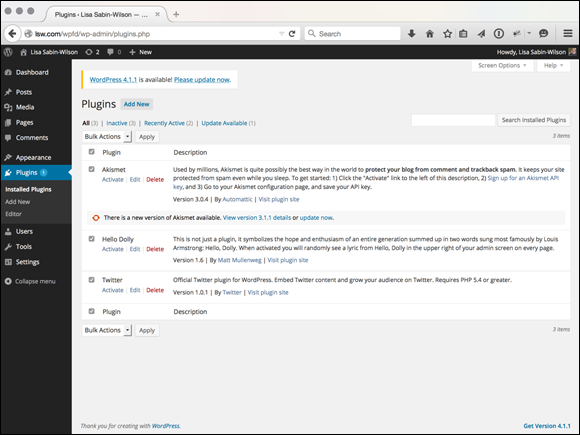
Figure 14-3: The Plugins page with all plugins selected, ready to deactivate.

Figure 14-4: The welcome page.
Upgrading WordPress Manually
The second — and least used — method of upgrading WordPress is the manual method. It’s the least-used method mainly because the automatic method, discussed in the previous section, is so easy, quick, and reliable. In some rare circumstances, you would manually upgrade WordPress because your web-hosting environment can’t accommodate the automatic upgrade process, or maybe you just wanted to go through the experience of manually updating the software, for whatever weird reason.
The steps to manually upgrade WordPress are as follows:
Back up your WordPress website and deactivate all plugins.
See Steps 1 and 2 in the previous section, “Upgrading WordPress Automatically.”
- Navigate to the WordPress Updates page by clicking the Please Update Now link.
Click the Download button.
This opens a dialog box that allows you to save the .zip file of the latest WordPress download package to your local computer, shown in Figure 14-5.
Select a location to store the download package and click Save.
The .zip file downloads to your selected location on your computer.
- Browse to the .zip file on your computer.
Unzip the file.
Use a program such as WinZip (
www.winzip.com) to unzip files contained within a .zip file.Connect to your web server via FTP.
See Chapter 3 for a refresher on how to use FTP.
- Delete all the files and folders in your existing WordPress installation directory except the following:
- /wp-content folder
- .htaccess
- wp-config.php
Upload the contents of the/wordpress folder — not the folder itself — to your web server.
Most FTP client software lets you select all the files and drag and drop them to your web server. Other programs have you select the files and click a Transfer button.
Navigate to the following URL on your website: http: //yourdomain.com/wp-admin.
Don’t panic: Your database still needs to be upgraded to the latest version; so instead of seeing your website on your domain, you see a message telling you that a database upgrade is required, as shown in Figure 14-6.
Click the Upgrade WordPress Database button.
This action causes WordPress to initiate the upgrade of the MySQL database associated with your website. When the database upgrade is complete, the page refreshes and displays a message saying so.
Click the Continue button.
Your browser loads the WordPress login page. The upgrade is now complete, and you can continue using WordPress with all of its newly upgraded features.
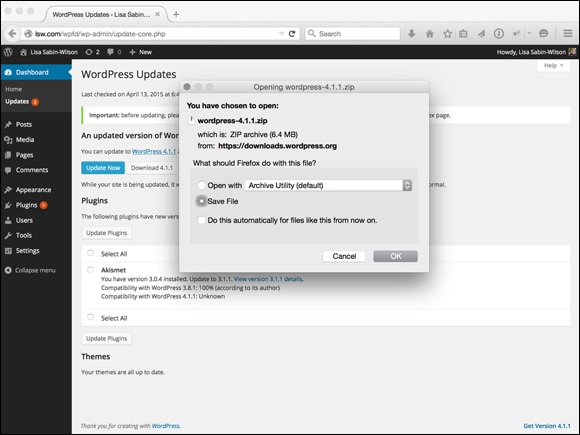
Figure 14-5: Downloading the WordPress files to your local computer.
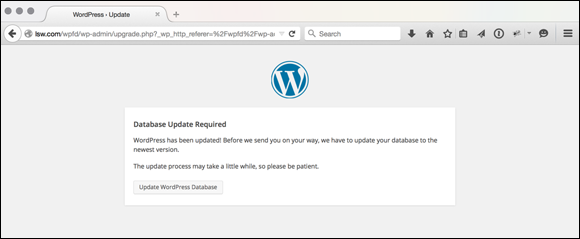
Figure 14-6: Press the button to upgrade your WordPress database.
During your time as a WordPress user, you’ll upgrade on a regular basis, at least three to four times per year. For some users, this is a frustrating reality of using WordPress; however, because of the very active development environment of the WordPress project, WordPress is the most popular platform available today. Because WordPress is always adding great new features and functions to the platform, upgrading always ensures that you’re on top of the game and using the latest tools and features available.
If you’re uncomfortable performing administrative tasks such as upgrading and creating database backups, you can hire someone to perform these tasks for you — either a member of your company, if you’re a business, or a WordPress consultant skilled in these tasks.
Migrating Your Existing Site to WordPress
So you have a website on a different content management system and want to move your site to WordPress? This chapter helps you accomplish just that. WordPress makes it relatively easy to pack up your data and archives from one platform and move to a new WordPress site. WordPress lets you move your website from platforms such as Blogger, TypePad, and Movable Type. It also gives you a nifty way to migrate from any content management system via RSS feeds, as long as the platform you’re importing from has an RSS feed available.
 For some of the existing content management systems out there, the WordPress platform provides you with a quick and easy-to-install plugin that allows you to import and use your content right away. The importers are packaged in a plugin format because most people use an importer just once, and some people don’t use the importer tools at all. The plugins are there for you to use if you need them. WordPress.com, on the other hand, has the importers built right into the software. Note the differences for the version you’re using.
Movin’ on up
Website owners have a variety of reasons to migrate away from one system to WordPress:
- Simple curiosity: The use of WordPress — and the whole community of WordPress users — is generating a lot of buzz. People are naturally curious to check out something that all the cool kids are doing.
- More control of your website: This reason applies particularly to those who have a site on Blogger, TypePad, or any other hosted service. Hosted programs limit what you can do, create, and mess with. When it comes to plugins, add-ons, and theme creation, hosting a WordPress blog on your own web server wins hands down. In addition, you have complete control of your data, archives, and backup capability when you host your blog on your own server.
- Ease of use: Many people find the WordPress interface easier to use, more understandable, and a great deal more user-friendly than many of the other blogging platforms available today.
 In the WordPress software, the importers are added to the installation as plugins. The importer plugins included in the previous list are the plugins packaged within the WordPress software, or they can be found by searching in the Plugin Directory at
 https://wordpress.org/plugins/tags/importer. You can import content from several other platforms by installing other plugins not available from the official WordPress Plugin Directory, but you may have to search on Google to find them.
Preparing for the big move
Depending on the size of your site (that is, how many posts and comments you have), the migration process can take anywhere from 5 to 30 minutes. As with any major change or update you make, no matter where your site is hosted, the very first thing you need to do is create a backup of your site. You should back up the following:
- Archives: Posts, pages, comments, and trackbacks; do this by taking a backup of your database.
- Template: Template files and image files; do this by transferring the /wp-content/themes folder from your hosting server to your local computer via FTP.
- Plugins: Plugin files; do this by transferring the /wp-content/plugins folder from your hosting server to your local computer via FTP.
- Images: Any images you use in your blog; do this by transferring from your hosting server to your local computer via FTP (images uploaded to blog posts are generally stored in /wp-content/uploads).
Table 14-1 gives you tips on creating the export data for your blog in a few major blogging platforms. Note: This table assumes that you’re logged in to your blog software.
Table 14-1 Backing Up Your Blog Data on Major Platforms
Blogging Platform |
Backup Information |
Movable Type |
Click the Import/Export button on the menu of your Movable Type Dashboard; then click the Export Entries From link. When the page stops loading, save it on your computer as a .txt file. |
TypePad |
Click the name of the blog you want to export; then click the Import/Export link in the Overview menu. Click the Export link at the bottom of the Import/Export page. When the page stops loading, save it on your computer as a .txt file. |
Blogger |
Back up your template by copying the text of your template to a text editor such as Notepad. Then save it on your computer as a .txt file. |
WordPress |
Click the Export link on the Tools menu in the Dashboard; the Export page opens. Choose your options on the Export page and then click the Download Export File button, then save this file on your computer. |
RSS feed |
Point your browser to the URL of the RSS feed you want to import. Wait until it loads fully (you may need to set your feed to display all posts). View the source code of the page, copy and paste that source code into a .txt file, and save the file on your computer. |
This import script allows for a maximum file size of 128MB. If you get an “out of memory” error, try dividing the import file into pieces and uploading them separately. The import script is smart enough to ignore duplicate entries, so if you need to run the script a few times to get it to take everything, you can do so without worrying about duplicating your content.
Converting templates
Every blogging program has a unique way of delivering content and data to your blog. Template tags vary from program to program; no two are the same, and each template file requires conversion if you want to use your template with your new WordPress blog. In such a case, two options are available to you:
- Convert the template yourself. To accomplish this task, you need to know WordPress template tags and HTML. If you have a template that you’re using on another blogging platform and want to convert it for use with WordPress, you need to swap the original platform tags for WordPress tags. The information provided in Chapters 8–11 gives you the rundown on working with themes as well as basic WordPress template tags; you may find that information useful if you plan to attempt a template conversion yourself.
- Hire an experienced WordPress consultant to do the conversion for you. You can find a list of available WordPress consultants, assembled by the folks at WPEngine (a premier managed hosting provider for WordPress) at
http://wpengine.com/consultants.
To use your own template, make sure that you save all the template files, the images, and the stylesheet from your previous blog setup. You need them to convert the template(s) for use in WordPress.
Hundreds of free templates are available for use with WordPress, so it may be a lot easier to abandon the template you’re currently working with and find a free WordPress template that you like. If you’ve paid to have a custom design done for your blog, contact the designer of your theme and hire him to perform the template conversion for you. Also, you can hire several WordPress consultants to perform the conversion for you — including yours truly.
Moving your website to WordPress
You’ve packed all your stuff and you have your new place prepared. Moving day has arrived! This section takes you through the steps for moving your site from one platform to WordPress. This section assumes that you already have the WordPress software installed and configured on your own domain.
Find the import function that you need by following these steps:
In the Dashboard, click the Import link on the Tools menu.
The Import page opens, listing platforms from which you can import content (such as Blogger and Movable Type). Figure 14-7 shows the Import page in the WordPress Dashboard.
Click the link for the blogging platform you’re working with.
Click the Install Now button to install the importer plugin to begin using it.
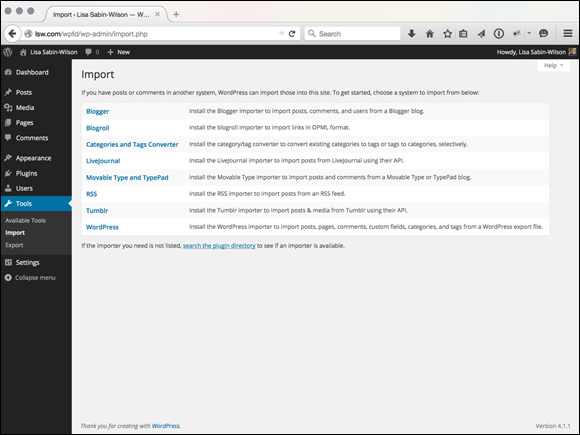
Figure 14-7: The Import page in the WordPress Dashboard.
The following sections provide some import directions for a few of the most popular content management systems (other than WordPress, that is). Each platform has its own content export methods, so be sure to check the documentation for the platform that you’re using.
Importing from Blogger
Blogger is the blogging application owned by Google (it’s also called Blogspot).
To begin the import process, first complete the steps in the “Moving your website to WordPress” section, earlier in this chapter. Then follow these steps:
Click the Blogger link on the Import page and install the plugin for importing from Blogger.
Click the Activate Plugin & Install Importer link, and the Import Blogger page loads with instructions to import your file, as shown in Figure 14-8.
Click the Authorize button to tell WordPress to access your account.
A page from Google opens with a message that says your WordPress blog is trying to access your Google account.
Enter the email address and password you use for Google; then click the Sign In button.
The Access Request page in your Google Account opens. When you have successfully logged in, you receive a message from Google stating that your blog at WordPress is requesting access to your Blogger account so that it can post entries on your behalf.
Give your permission by clicking the Allow Access button on the Access Request page.
If you have many posts and comments in your Blogger blog, the import can take 30 minutes or more.
After the import script has performed its magic, you’re redirected to your WordPress Dashboard, where the name of your Blogger blog is listed.
To finish importing the data from Blogger, click the Import button (below the Magic Button header).
The text on the button changes to Importing … while the import takes place. When the import is complete, the text on the button changes to Set Authors (no wonder it’s called the Magic Button!).
Click the Set Authors button to assign the authors to the posts.
The Blogger username appears on the left side of the page; a drop-down menu on the right side of the page displays the WordPress login name.
Assign authors using the drop-down menu.
If you have just one author on each blog, the process is especially easy: Use the drop-down menu on the right to assign the WordPress login to your Blogger username. If you have multiple authors on both blogs, each Blogger username is listed on the left side with a drop-down menu to the right of each username. Select a WordPress login for each Blogger username to make the author assignments.
Click Save Changes.
You’re done!
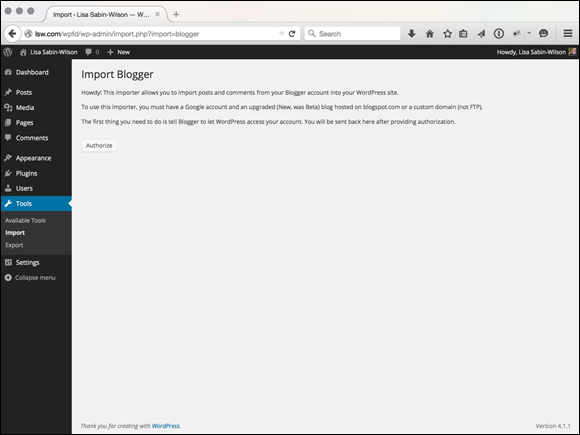
Figure 14-8: The Import Blogger page in the WordPress Dashboard.
Importing from LiveJournal
Both WordPress.com and WordPress.org offer an import script for LiveJournal users, and the process of importing from LiveJournal to WordPress is the same for each platform.
To export your blog content from LiveJournal, log in to your LiveJournal blog and then type this URL in your browser’s address bar: www.livejournal.com/login.bml?returnto=%2Fexport.bml.
LiveJournal lets you export the XML files one month at a time, so if you have a blog with several months’ worth of posts, be prepared to be at this process for a while. First, you have to export the entries one month at a time and then you have to import them into WordPress — yep, you guessed it — one month at a time.
To speed up the process a little, you can save all the exported XML LiveJournal files in one text document by copying and pasting each month’s XML file into one plain-text file (created in a text editor such as Notepad), thereby creating one long XML file with all the posts from your LiveJournal blog. You can then save the file as an XML file to prepare it for import into your WordPress blog.
After you export the XML file from LiveJournal, return to the Import page in your WordPress Dashboard and follow these steps:
Click the LiveJournal link and install the plugin for installing from LiveJournal.
Click the Activate Plugin & Install Importer link, and the Import LiveJournal page loads with instructions to import your file, as shown in Figure 14-9.
Click the Browse button.
A window opens, listing files on your computer.
- Double-click the name of the XML file you saved earlier.
Click the Upload and Import button.
When the import script finishes, it reloads the page with a confirmation message that the process is complete. Then WordPress runs the import script and brings over all your posts from your LiveJournal blog.
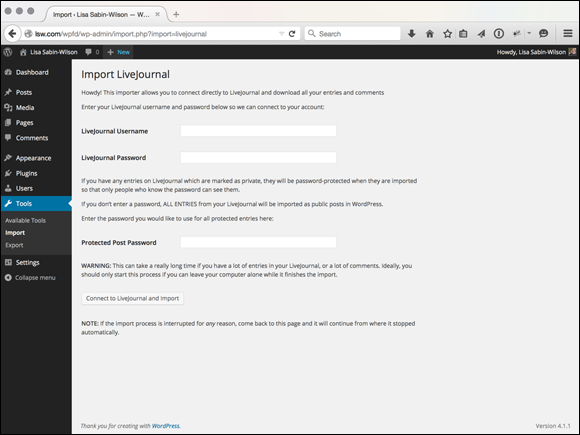
Figure 14-9: The Import LiveJournal page in the WordPress Dashboard.
Importing from Movable Type and TypePad
Movable Type and TypePad were created by the same company, Six Apart. These two blogging platforms run on essentially the same code base, so the import/export procedure is basically the same for both. Refer to Table 14-1 for details on how to run the export process in both Movable Type and TypePad. This import script moves all your blog posts, comments, and trackbacks to your WordPress blog.
Go to the Import page in your WordPress Dashboard by following Steps 1 and 2 in the “Moving your website to WordPress” section, earlier in this chapter. Then follow these steps:
Click the Movable Type and TypePad link and install the plugin for importing from Movable Type and TypePad.
Click the Activate Plugin & Install Importer link, and the Import Movable Type or TypePad page loads with instructions to import your file, as shown in Figure 14-10.
Click the Browse button.
A window opens, listing your files.
- Double-click the name of the export file you saved from your Movable Type or TypePad blog.
Click the Upload File and Import button.
Sit back and let the import script do its magic. When it’s done, it reloads the page with a confirmation message that the process is complete.

Figure 14-10: The Import Movable Type or TypePad page in the WordPress Dashboard.
When the import script is done, you can assign users to the posts, matching the Movable Type or TypePad usernames with WordPress usernames. If you have just one author on each blog, this process is easy; you simply assign your WordPress login to the Movable Type or TypePad username using the drop-down menu. If you have multiple authors on both blogs, match the Movable Type or TypePad usernames with the correct WordPress login names and then click Save Changes. You’re done!
Importing from WordPress
With this WordPress import script, you can import one WordPress blog into another, and this is true for both the hosted and self-hosted versions of WordPress. WordPress imports all your posts, pages, comments, custom fields, and categories into your website. Refer to Table 14-1 to find out how to use the export feature to obtain your blog data.
When you complete the exporting, follow these steps:
Click the WordPress link on the Import page and install the plugin to import from WordPress.
Click the Activate Plugin & Install Importer link, and the Import WordPress page loads with instructions to import your file, as shown in Figure 14-11.
Click the Browse button.
A window opens, listing the files on your computer.
- Double-click the export file you saved earlier from your WordPress blog.
Click the Upload File and Import button.
The import script gets to work and when it’s done, it reloads the page with a confirmation message that the process is complete.
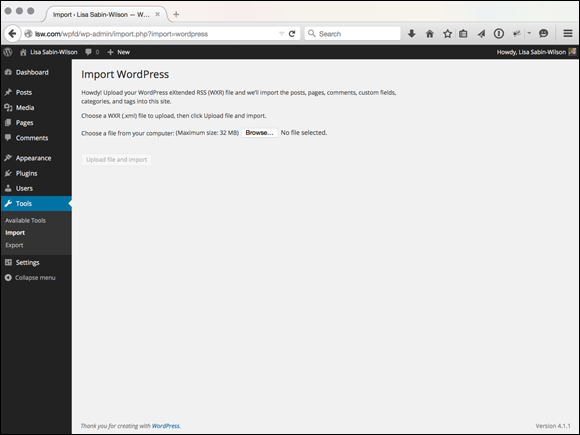
Figure 14-11: The Import WordPress page in the WordPress Dashboard.
Importing from an RSS feed
If all else fails, or if WordPress doesn’t provide an import script that you need for your current blog platform, you can import your blog data via the RSS feed for the blog you want to import. With the RSS import method, you can import only posts; you can’t use this method to import comments, trackbacks, categories, or users. WordPress.com currently does not allow you to import blog data via an RSS feed; this function works only with the self-hosted WordPress.org platform.
Refer to Table 14-1 for information on creating the file you need to import via RSS. Then follow these steps:
On the Import page in the WordPress Dashboard, click the RSS link and install the plugin to import from an RSS feed.
Click the Activate & Install link, and the Import RSS page loads with instructions to import your RSS file, as shown in Figure 14-12.
Click the Browse button.
A window opens, listing the files on your computer.
- Double-click the export file you saved earlier from your RSS feed.
Click the Upload File and Import button.
The import script does its magic and then reloads the page with a confirmation message that the process is complete.
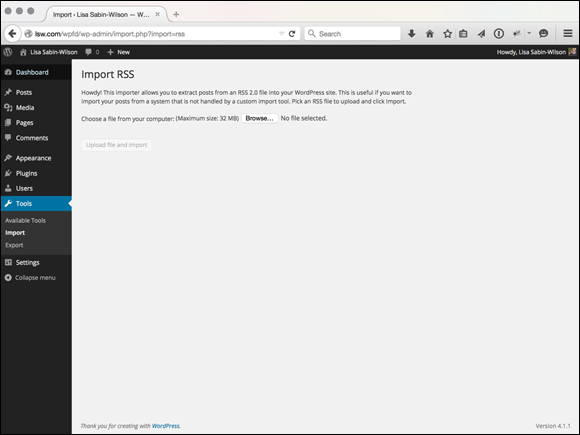
Figure 14-12: The Import RSS page in the WordPress Dashboard.
Finding other import resources
The WordPress Codex has a long list of other available scripts, plugins, workarounds, and outright hacks for importing from other platforms. You can find that information at http://codex.wordpress.org/Importing_Content.
Note: The WordPress Codex is run by a group of volunteers. When you refer to the Codex, be aware that not everything listed in it is necessarily up to date or accurate, including import information (or any other information about running your WordPress blog).
Moving Your Website to a Different Host
You may decide at some point that you need to switch from your current hosting provider to a new one. You may have to do this for several different reasons — maybe you’re unhappy with your current provider and want to move to a new one, or your current provider is going out of business and you’re forced to move.
Transferring from one host to another is a reality that some website owners must face, and transferring an existing website, with all its content, files, and data, from one host to another can seem a daunting task. This section of the chapter should make it easier for you to face.
You have two different ways to go about it:
- Manually, through backing up your database and downloading essential files
- Using a plugin to automate as much of the process as possible
Obviously, using a tool to automate the process is the easier and more desirable way to go, but just in case you need to do it manually, in the next section of this chapter, I provide you with the instructions for doing it both ways.
Creating a backup and moving manually
Earlier in this chapter, in “Backing Up Your Database,” I provide you with step-by-step instructions on how to make a backup of your database using phpMyAdmin. Follow the steps in that section and you will have a backup of your database with all the recent content you’ve published to your blog. However, when I say “content,” I mean the content that you (or others) have written or typed into your blog via the WordPress Dashboard, including
- Blog posts, pages, and custom post types
- Links, categories, and tags
- Post and page options, such as excerpts, time and date, custom fields, categories, tags, and passwords
- WordPress settings you configured under the Settings menu in the Dashboard
- All widgets that you’ve created and configured
- All plugin options that you configured for the plugins you installed
Other elements of your website aren’t stored in the database, which you need to download, via FTP, from your web server. The following is a list of those elements, including instructions on where to find them and how to download them to your local computer:
- Media files: These are the files you uploaded using the WordPress media upload feature, including images, videos, audio files, and documents. Media files are located in the /wp-content/uploads/ folder; connect to your web server via FTP and download that folder to your local computer.
- Plugin files: Although all the plugin settings are stored in the database, the actual plugin files that contain the programming code are not. The plugin files are located in the /wp-content/plugins/ folder; connect to your web server via FTP and download that folder to your local computer.
- Theme files: Widgets and options you’ve set for your current theme are stored in the database; however, the theme template files, images, and stylesheets are not. They are stored in the /wp-content/themes folder; connect to your web server via FTP and download that folder to your local computer.
Now that you have your database and WordPress files stored safely on your local computer, moving them to a new host just involves reversing the process:
Create a new database on your new hosting account.
You can find the steps for creating a database in Chapter 3.
- Import your database backup into the new database you just created:
- Log in to the cPanel for your hosting account.
- Click the phpMyAdmin icon and click the name of your new database in the left menu.
- Click the Import tab at the top.
- Click the Browse button and select the database backup from your local computer.
- Click the Go button, and the old database imports into the new.
Install WordPress on your new hosting account.
See Chapter 3 for the steps to install WordPress.
- Edit the wp-config.php file to include your new database name, username, password, and host.
- Upload all that you downloaded from the /wp-content/ folder to your new hosting account.
In your web browser, browse to your domain.
Your website should work, and you are able to log on to the WordPress Dashboard using the same username and password as before because that information is stored in the database you imported.
Using a plugin to back up and move to a new host
A plugin that I use on a regular basis to move a WordPress website from one hosting environment to another is aptly named BackupBuddy. This plugin isn’t free or available in the WordPress Plugin Directory — you need to pay for it, but it’s worth every single penny because it takes the entire backup and migration process and makes mincemeat out of it. This means that it’s very easy, and you can be done in minutes instead of hours. You can purchase the BackupBuddy plugin from iThemes at https://ithemes.com/purchase/backupbuddy — currently pricing starts at $80 per year. Once you’ve purchased it, you can download the plugin and install it (see plugin installation instructions in Chapter 7) and follow the instructions given to you in the WordPress Dashboard to make a backup copy of your website and move it to another server.