
Chapter 13
Hosting Multiple Sites with WordPress
In This Chapter
![]() Deciding whether multiple sites are for you
Deciding whether multiple sites are for you
![]() Exploring web-hosting considerations
Exploring web-hosting considerations
![]() Enabling the WordPress Network capabilities
Enabling the WordPress Network capabilities
![]() Administering and managing a network
Administering and managing a network
![]() Diverting spammers and sploggers
Diverting spammers and sploggers
In this chapter, I introduce you to the network feature that is built in to the WordPress software. The network feature allows you, the site owner, to add and maintain multiple blogs within one installation of WordPress. In this chapter, you discover how to set up the WordPress network feature, explore settings and configurations, gain an understanding of the Network Administrator role, determine which configuration is right for you (do you want subdirectories or subdomains?), and find some great resources to help you on your way.
With the network features enabled, users of your network can run their own sites within your installation of WordPress. They also have access to their own Dashboard with the same options and features as you’ve read about in the past 12 chapters. Heck, it would probably be a great idea to buy a copy of this book for every member within your network so everyone can become familiar with the WordPress Dashboard and features, too. At least have a copy on hand so people can borrow yours!
Considering Web-Hosting Services
This chapter assumes that you already have the WordPress software installed and running correctly on your web server, and that your web server meets the minimum requirements to run WordPress (see Chapter 2).
Before you enable the WordPress network feature, you need to determine how you are going to use the feature. You have a couple of options:
- Manage just a few of your own WordPress blogs or websites.
- Run a full-blown site network with several hundred different sites and multiple users.
If you are planning to run just a few of your own sites with the WordPress network feature, your current hosting situation is probably well suited (see Chapter 3 for information on web-hosting services). However, if your plans are to host a large network with hundreds of blogs and multiple users, you should consider contacting your host and increasing your bandwidth, as well as the disk space limitations on your account.
The best example of a large, multisite network with millions of websites and users is the hosted service at WordPress.com. At WordPress.com, people are invited to sign up for an account and start a website using the network feature within the WordPress.com platform on the WordPress.com server. When you enable this feature on your own domain and enable the user registration feature (covered later in this chapter), you are inviting users to:
- Create an account.
- Create a site on your WordPress installation (on your domain).
- Create content by publishing content.
- Upload media files such as photos, audio, and video.
- Invite their friends to view their site, or sign up for their own account.
 In addition to the necessary security measures, time, and administrative tasks that go into running a community of websites, you’ve got a few other things to worry about. Creating a community will increase the resource use, bandwidth, and disk space on your web server. In many cases, if you go over your allotted limits given to you by your web host, you will incur great cost. Make sure you anticipate your bandwidth and disk space needs before running a large network on your website. (Don’t say I didn’t warn you!)
Many WordPress Network communities start with grand dreams of being a large and active community — be realistic about how your community will operate in order to make the right hosting choice for yourself, and your community.
Small multisite communities can be easily handled using a shared-server solution, whereas larger, more active communities should really consider a dedicated server solution for operation. The difference between the two lies in their names:
- Shared-server solution: You have one account on one server that has several other accounts on it. Think of this as apartment living. One apartment building has several apartments for multiple people to live, all under one roof.
- Dedicated server: You have one account. You have one server. That server is dedicated to your account, and your account is dedicated to the server. Think of this as owning a home and not sharing your living space with anyone else.
A dedicated server solution is a more expensive investment for your blog community, whereas a shared-server solution is the most economical. Your decision on which solution to go with for your WordPress Network blogging community will be based on your realistic estimates of how big and how active your community will be. You can move from a shared-server solution to a dedicated server solution if your community gets larger than you expected; however, it is easier to start with the right solution for your community from day one.
Enabling the WordPress Network Feature
WordPress makes it pretty easy to enable the network feature, but it does require opening a file on your web server called wp-config.php and making a small alteration. Follow these steps to get the process started:
Download the file called wp-config.php from the WordPress installation on your web server.
It’s easiest to use an FTP program to download a copy of this file from your web server to your computer. Chapter 3 covers the information you need about using FTP.
Using your preferred text editor, open the wp-config.php file.
PC users can use Notepad to edit the file; Mac users can use TextEdit.
- Find the line that says define( 'DB_COLLATE', ' ' ); and click at the end of that line. Press Enter to create a new blank line.
Type define ( ‘WP_ALLOW_MULTISITE’, true );
Save the file to your computer as wp-config.php. Your wp-config.php file should look similar to mine, shown in the code on line 37 in Figure 13-1. Save the wp-config.php file to your computer.
- Upload the new file to your web server in your WordPress installation directory.
Go to your WordPress Dashboard in your browser.
You now see a new item, labeled Network Setup, under the Tools menu.
Click the Network Setup link in the Tools menu.
A page called Create a Network of WordPress Sites loads in your browser window, shown in Figure 13-2.
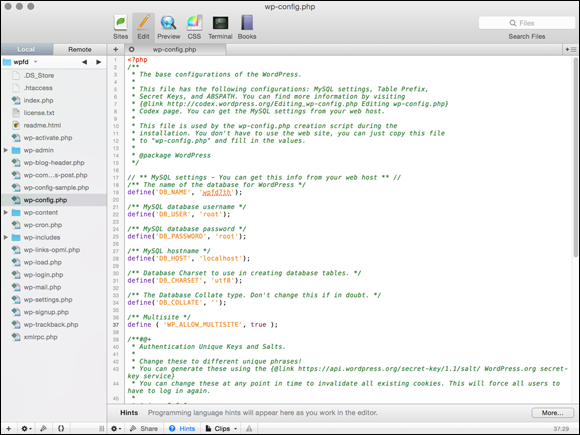
Figure 13-1: The wp-config.php file with the network features enabled.
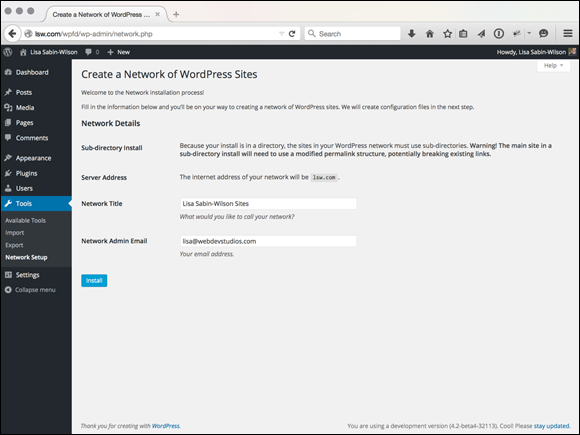
Figure 13-2: The Create a Network of WordPress Sites page in your WordPress Dashboard.
 If you have any plugins installed and activated on your WordPress installation, deactivate them before you proceed with the network setup — WordPress won’t allow you to continue until you deactivate all your plugins.
Before proceeding with the final steps in enabling the WordPress network feature, you need to get a few items in order on your web server. You also need to make a decision about how the multiple sites within your network will be handled. These configurations need to be in place so that you can run the WordPress Network successfully. If you can perform the configurations in this section yourself (and if you have access to the Apache configuration files), this section is for you. If you don’t know how, are uncomfortable with adjusting these settings, or don’t have access to change the configurations in your web server software, ask your hosting provider for help or hire a consultant to perform the configurations for you. You can hire a consultant that is local to your area, or several consultants are available worldwide who can work with you remotely. A listing of consultants can be found on the Code Poet (by Automattic) website: http://directory.codepoet.com/.
DNS (domain name server)
The WordPress network feature gives you two different ways to run a network of sites on your domain, with one installation of WordPress. You can use the subdomain option or the subdirectory option. The most popular option (and recommended structure) sets up subdomains for the sites created by your WordPress Network. With the subdomain option, the username of the blog appears first, followed by your domain name. With the subdirectory option, your domain name appears first, followed by the username of the blog. Which one should you choose? The choice is yours. You can see the difference in the URLs of these two options by comparing the following examples:
- A subdomain looks like this:
http://username.yourdomain.com. - A subdirectory looks like this:
http://yourdomain.com/username.
If you want to use a subdomain for each site in your WordPress Network, you must add a wildcard record to your DNS records. You need to add a hostname record pointing at your web server in the DNS configuration tool available in your web-server administration software (such as WebHost Manager [WHM], a popular web-host administration tool). The hostname record looks like this: *.yourdomain.com (where yourdomain.com is replaced with your actual domain name).
Apache mod_rewrite
Apache (http://httpd.apache.org) is web-server software that’s loaded and running on your web server. Not everyone has access to Apache files, however. Usually, the only person who has access to those files is the web-server administrator. (This is usually your web host.) Depending on your own web server account and configuration, you may or may not have access to the Apache software files.
The Apache module that’s necessary for the WordPress Network to create nice permalink URLs (see Chapter 5 for information on pretty permalinks) is called mod_rewrite. This module must be configured so that it’s active and installed on your server.
You or your web host can make sure that the Apache mod_rewrite module is activated on your server; open the httpd.conf file and verify that the following line is included within:
LoadModule rewrite_module /libexec/mod_rewrite.so
If it isn’t, type that line on its own line and save the file. You will probably need to restart Apache before the change takes effect.
Virtual Host
In the same httpd.conf file that I discussed two paragraphs ago, you need to make some adjustments to the <VirtualHost> section of that file. Follow these steps:
Find the <VirtualHost> section in the httpd.conf file.
This line of the httpd.conf file provides directives, or configurations, that apply to your website.
- Find a line in the <VirtualHost> section of the httpd.conf that looks like this:
AllowOverride None - Replace that line with this line:
AllowOverride FileInfo Options On a new line, type ServerAlias *.yourdomain.com .
Replace yourdomain.com with whatever your domain is. This line defines the host name for your Network site and is essential for the virtual host to work correctly.
- Save the httpd.conf file and close it.
PHP (PHP Hypertext Processor)
In this section, you edit the PHP configuration on your web server. PHP needs to have the following configurations in place in the php.ini file on your web server to run WordPress Multisite on your server:
- Set your PHP to not display any error messages in the visitor’s browser window. (This is usually already turned off by default; just double-check that to be sure.)
- Find out whether your PHP is compiled with memory limit checks. You can find this out by looking for the text memory_limit in the php.ini file. Usually, the default limit is 8MB. Increase the memory limit to at least 32MB, or even 64MB, to avoid PHP memory errors when running WordPress Multisite.
- Global variables should be set to Off. Usually, the default setting does have global variables turned off; double-check to be sure. An easy way to configure this is to open the .htaccess file (found on your web server in the same directory to which you installed the WordPress Multisite files) and add the following two lines to the very top of the .htaccess file:
php_flag register_globals 0php_flag display_errors 0
Installing the Network on Your Site
The Network Details heading on the Create a Network of WordPress Sites page has options filled in automatically (refer to Figure 13-2). The server address, for example, is pulled from your installation and isn’t editable. The network title and administrator email address are pulled from your installation database, too, because your initial WordPress site is the main site in the network.
Follow these steps to complete the installation of the Multisite Feature on the Create a Network of WordPress Sites page that appears after you install the Network in the previous section — be sure to have your preferred text editor program handy, as you will be editing files in the following steps:
Click the Install button at the bottom of the Create a Network of WordPress Sites page in your WordPress Dashboard.
This opens the Enabling the Network page in the network Dashboard.
Add the Network-related configuration lines to the wp-config.php .
On the Create a Network of WordPress Sites–Enabling the Network page, WordPress gives you up to six lines of configuration rules that need to be added to the wp-config.php file. The lines of code you add look something like this:
define(‘MULTISITE’, true);define(‘SUBDOMAIN_INSTALL’, false);define(‘DOMAIN_CURRENT_SITE’, ‘localhost’);define(‘PATH_CURRENT_SITE’, ‘/’);define(‘SITE_ID_CURRENT_SITE’, 1);define(‘BLOG_ID_CURRENT_SITE’, 1);These lines of code provide configuration settings for WordPress by telling it whether it is using subdomains, what the base URL of your website is, and your site’s current path. This code also assigns a unique ID of 1 to your website and blog for the main installation site of your WordPress Multisite network. By default, WordPress sets up your network to use subdirectories, instead of subdomains. If you would like to use subdomains, change this line of code: define('SUBDOMAIN_INSTALL', false); to define('SUBDOMAIN_INSTALL', true);. Make sure that you have the VHost and Apache mod_rewrite configurations on your server in place before you do this.
The lines of code that are given to you on the Create a Network of WordPress Sites page are unique to your installation of WordPress. Make sure that you copy the lines of code that are given to you on the Create a Network of WordPress Sites page on your installation because they are specific to your site’s setup.Add the Rewrite Rules to the .htaccess file on your web server.
WordPress gives you several lines of code that you need to add to a file called .htaccess on your web server. You find that file in the WordPress installation directory. These lines look something like this:
RewriteEngine OnRewriteBase /wpfd/RewriteRule ^index.php$ - [L]# add a trailing slash to /wp-adminRewriteRule ^([_0-9a-zA-Z-]+/)?wp-admin$ $1wp-admin/ [R=301,L]RewriteCond %{REQUEST_FILENAME} -f [OR]RewriteCond %{REQUEST_FILENAME} -dRewriteRule ^ - [L]RewriteRule ^([_0-9a-zA-Z-]+/)?(wp-(content|admin|includes).*) $2 [L]RewriteRule ^([_0-9a-zA-Z-]+/)?(.*.php)$ $2 [L]RewriteRule . index.php [L] Earlier in this chapter, I discussed the required Apache module called mod_rewrite and how you must have that installed on your web server to run WordPress Multisite. The rules that you just added to the .htaccess file on your web server are mod_rewrite rules, and they need to be in place so that your web server tells WordPress how to handle things like permalinks for blog posts, pages, media, and other uploaded files. Without these rules in place, the WordPress multisite feature will not work correctly.
Copy the lines of code from the Create a Network of WordPress Sites: Enabling the Network page in Step 3. Then open the .htaccess file and paste the lines of code there.
Completely replace the rules that already exist in that file.
- Save the .htaccess file and upload it again to your web server.
Return to your WordPress Dashboard and click the Log In link at the bottom of the Create a Network of WordPress Sites: Enabling the Network page.
You are logged out of WordPress because by following these steps, you have changed some of the browser cookie-handling rules in the wp-config.php and .htaccess files.
- Log in to WordPress by entering your username and password in the login form displayed.
Exploring the Network Admin Dashboard Menu
With the WordPress Network now fully enabled and configured, you see a new link in the menu at the top right of your WordPress Dashboard called My Sites. In this section, I show you how to become a Network Admin and explain everything you need to know about being a Network Admin in your new WordPress Network.
With the network (or multisite) feature enabled, you see the link to My Sites — if you hover your mouse pointer over that link, the Network Admin link displays in the drop-down menu on the upper-left side of the Dashboard, as shown in Figure 13-3. WordPress has separated the Network Admin menu features from the rest of the regular (Site Admin) Dashboard menu features to make it easier for you to know which part of your site you are managing. For example, if you are performing actions that maintain your main website — publishing posts or pages, creating or editing categories, and so on — you work on the regular Dashboard (Site Admin). However, if you are managing any one of the network sites, plugins, and themes for the network sites or registered users, you work in the Network Admin section of the Dashboard.

Figure 13-3: Link to the Network Admin Dashboard.
It is important to keep in mind the distinct difference between the Site Admin and Network Admin Dashboard, as well as subsequent menu features. WordPress tries its best to assume which features you are attempting to work with; however, if you find yourself getting lost in the Dashboard and not finding a menu or feature that you’re used to seeing, double-check to make sure you’re working in the correct section of the Dashboard.
The Network Admin Dashboard (see Figure 13-4) looks similar to the regular WordPress Dashboard, but as you may notice, the modules shown on the Network Admin Dashboard pertain to the network of sites. Options there include letting you create a new site, create a new user, and search existing sites and users. Obviously, you won’t perform this search if you don’t have any users or sites yet. However, this function is extremely useful when you have a community of users and sites within your network.

Figure 13-4: The Network Admin Dashboard.
The Network Admin Dashboard is configurable, just as the regular Dashboard is, and you can move the modules around and edit the settings of the modules. Refer to Chapter 4 for more information about arranging the Dashboard modules to suit your tastes.
The Search Users feature allows you to search usernames and user email addresses. If you search for the user Lisa, for instance, your results include any user whose username or email address contains Lisa — so you can receive multiple returns when using just one search word or phrase. The Search Sites feature returns any sites within your network that match the terms you’ve searched for.
The Network Admin page has two useful links near the top left of the page:
- Create a New Site: Click this link to create a new site within your network. After you click the link, the Sites page appears, on which you can add a new site. I cover how to do this in the upcoming “Sites” section.
- Create a New User: Click this link to create a new user account within your community. After you click the link, the Users page appears, on which you can add a new user to your community. I cover how to do this in the upcoming “Users” section.
Additionally, the WordPress Network Admin page gives you a real-time count of how many sites and users you have in your network, which is nice-to-know information for any Network Admin.
Managing Your Network
As mentioned, the Network Admin Dashboard has its own set of unique menus separate from the regular Site Admin Dashboard. Those menus are located on the left side of the Network Admin Dashboard. This section goes through each menu item and provides you with explanations and instructions on how to work with the different settings and configurations to help you manage your network, sites, and users.
The full list of menus available on the Network Admin Dashboard includes
- Sites: View a list of the sites in your network, along with details about them.
- Users: See detailed info about current users in your network.
- Themes: View all the currently available themes to enable or disable them for use in your network.
- Plugins: Manage (activate or deactivate) themes for use on all sites within your network.
- Settings: Configure global settings for your network.
- Updates: Upgrade all sites in your network with one click.
All the items in the Network Admin Dashboard are important, and you will use them all frequently throughout the life of your network. Typically, I would take you through each of the menu items in order so that you could easily follow along on your own Dashboard; however, you should set some important preliminary configurations for your network before you do anything else, so the following section starts with the Settings menu and then takes you through all the other menu items in order of appearance on the Network Admin Dashboard.
Settings
Click the Settings menu link on the Network Admin Dashboard. The Network Settings page loads in your browser window. The Network Settings page contains several sections of options for you to configure to set up your network the way you want.
Operational Settings
The Operational Settings section, shown in Figure 13-5, has Network Title and Network Admin Email:
- Network Title: This is the title of your overall network of sites. This name is included in all communications regarding your network, including emails that new users receive when they register a new site within your network. Type your desired Network Title in the text box provided here.
- Network Admin Email: This is the email address that all correspondence from your website is addressed from, including all registration and signup emails that new users receive when they register a new site and/or user account within your network. Type in the email that you would like to use for these purposes in the text box provided here.

Figure 13-5: The Operational Settings section on the Network Settings page.
Registration Settings
The Registration Settings section (see Figure 13-5) allows you to control aspects of allowing users to sign up to your network. The most important option is whether to allow open registration.
Decide how you want to handle registration on your network and select one of the following options by selecting the radio button to the left of each option:
- Registration Is Disabled: Disallows new user registration completely. When selected, this option prevents people who visit your site from registering for a user account.
- User Accounts May Be Registered: Gives people the ability to create only a user account; users will not be able to create a blog within your network.
- Logged In Users May Register New Sites: Allows only existing users — that is, those who are already logged in — to create a new blog within your network. This also disables new user registration completely. This is an option you would use if you didn’t want just anyone registering for an account. Instead, you, as the site administrator, can add new users at your own discretion.
- Both Sites and User Accounts Can Be Registered: Gives users the ability to register an account and a site on your network during the registration process.
These options apply only to outside users. As a Network Admin, you’re able to create new sites and users at any time you would like by using options available to you on the Network Admin Dashboard (see the information about creating new users in the “Users” section, later in this chapter).
The remaining options under the Registration Settings heading are as follows:
- Registration Notification: With this option selected, an email is sent to the Network Admin every time a user or a site is created on the system, even if it’s the Network Admin who creates the new site.
- Add New Users: With this option selected, your community blog owners (individual site admins) have the ability to add new users to their own community blog via the Users page within their individual dashboards.
- Banned Names: By default, WordPress bans several usernames from being registered within your community, including www, web, root, admin, main, invite, and administrator. For good reason: You don’t want a random user to register a username such as admin because you don’t want that person misrepresenting himself as an administrator on your site. You can enter an unlimited amount of usernames that you do not want to allow on your site in the Banned Names text box.
- Limited Email Registrations: You can limit signups based on email domains by filling in this text box with one email per line. If you have open registrations but you’ve limited the email addresses, anyone who tries to sign up who doesn’t match a domain on the list will be unable to register. This is an excellent option to use in a school or corporate environment in which students or employees get their own email addresses and you’re providing them with their own sites.
- Banned Email Domains: This feature, the reverse of the preceding, blocks all signups from a particular domain, which can be useful in stopping spammers. For example, you can type gmail.com in the field, and anyone trying to sign up with a Gmail address will be denied.
New Site Settings
The New Site Settings section is a configurable list of items that populates default values when a new site is created. These include the values that appear in welcome emails, on a user’s first post page, and on a new site’s first page, as shown in Figure 13-6.
Welcome Email: This is the text of the email that owners of newly registered sites in your network receive after their registration is complete. You can leave the default message in place, if you’d like. Or you can type the text of the email you want new site owners to receive when they register a new site within your network.
A few variables you can use in this email aren’t explained entirely on the Site Options page, including
- SITE_NAME: Inserts the name of your WordPress site
- BLOG_URL: Inserts the URL of the new member’s blog
- USERNAME: Inserts the new member’s username
- PASSWORD: Inserts the new member’s password
- BLOG_URLwp-login.php: Inserts the hyperlinked login URL for the new member’s blog
- SITE_URL: Inserts the hyperlinked URL for your WordPress site
- Welcome User Email: This is the text of the email that newly registered users receive after they’ve completed the registration process. The variables used in the preceding point apply to this email configuration as well.
First Post: This is the first, default post displayed on every newly created site in your network. WordPress provides you with some default text that you can leave in place, or you can type your desired text in the provided text box that you want to appear in the first post on every site that’s created in your community.
You can use this area to provide useful information about your site and services. This also serves as a nice guide for new users because they can view that post on their Dashboard, on the Edit Post page, and see how it was entered and formatted; it therefore can serve as a guide for creating their own blog posts. You can also use the variables described in the bullet points in the Welcome Email bullet (earlier in this list) to have WordPress automatically add some information for you.
- First Page: Similar to the First Post setting, this is the default text for a default page displayed on every newly created site in your network. (The First Page text box does not include default text; if you leave it blank, no default page is created.)
- First Comment: This is the first default comment displayed on the first default post on every newly created site within your network. Type the text that you want to appear in the first comment on every site that’s created in your community.
- First Comment Author: Type the name of the author of the First Comment on new sites in your network.
- First Comment URL: Type the web address (URL) for the author of the First Comment; this will cause the First Comment Author’s name to be hyperlinked to the URL you type here.
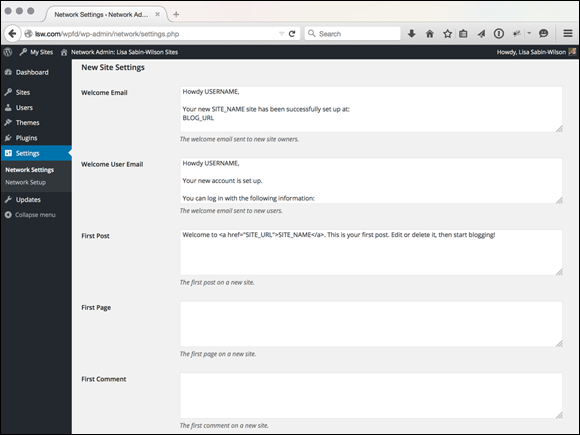
Figure 13-6: New Site Settings on the Network Settings page.
Upload Settings
The Upload Settings section (see Figure 13-7) defines global values pertaining to the type of files you will allow the site owners within your network to upload using the file upload feature in the WordPress Add Media window (see Chapter 6). The types of files that site owners can upload include
- Images
- Videos
- Documents
- Music
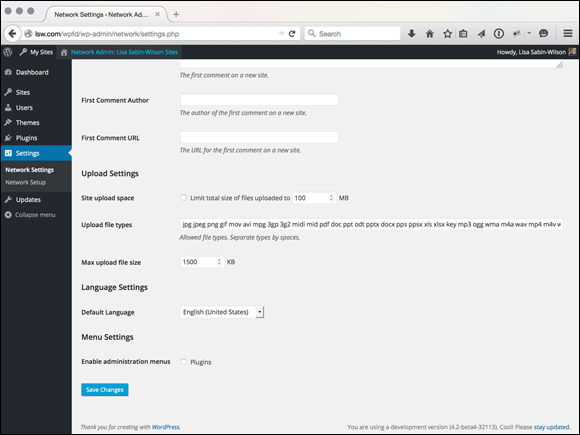
Figure 13-7: Upload Settings on the Network Settings page.
The first option in the Upload Settings section is Site Upload Space. The amount is in megabytes (MB), and the default storage space is 100MB. This amount of hard drive space is what you give users to store the files they upload to their blog. If you want to change the default storage space, type a number in the text box provided.
The next text field is labeled Upload File Types, which defines the types of files that you, as the Network Admin, will allow the site owners to upload to their sites on their Dashboards. Users cannot upload any file types that do not appear in this text box. By default, WordPress includes the following file types: .jpg, .jpeg, .png, .gif, .mp3, .mov, .avi, .wmv, .midi, .mid, .mt2s, and .pdf. You can remove any default file types and add new ones.
The final option under Upload Settings defines the Max Upload File Size. This amount is in kilobytes (K), and the default file size is 1500K. This means that a user cannot upload a file that is larger than 1500K. Adjust this number as you see fit by typing a new number in the text box provided.
Menu Settings
The Plugins administration menu is disabled within the Dashboard of all network sites (except for the Network Admin). However, the Network Admin always has access to the Plugins menu. If you leave this option unselected, the Plugins page is visible to users on their own site’s Dashboard. Select the box to enable the Plugins administration menu for your network users (see Figure 13-7). For more information about using plugins with WordPress, see Chapter 7.
When you have completely finished configuring the settings on the Network Settings page, don’t forget to click the Save Changes button at the bottom of the page, underneath the final Menu Settings section (refer to Figure 13-7). If you navigate away from the Network Settings page without clicking the Save Changes button, none of your configurations will be saved, and you will need to go through the entire process again.
Sites
Clicking the Sites menu item on the Network Admin Dashboard takes you to the Sites page, where you can manage your individual sites. Although each site in the network has its own Dashboard for basic tasks, such as posting, changing themes, and so on, the Sites page is where you create and delete sites and make edits to properties of the sites within your network. Editing information from this page is handy when you have issues accessing a site’s Dashboard.
The Sites page also lists all the sites within your network. The listing shows the following statistics about each community site:
- Path: The site’s path in your network. For example, in Figure 13-8, you see a site listed with the path: newsite. This means that the site’s domain is newsite.yourdomain.com if you are using a subdomain setup, or yoursite.com/newsite if you are using a subdirectory setup.
- Last Updated: The date the site was last updated (or published to).
- Registered: The date the site was registered in your network.
- Users: The username and email address associated with the user(s) of that site.

Figure 13-8: Individual site management options on the Sites page.
When you hover your mouse pointer over the path name of a site in your network, you see a handy listing of links that help you manage the site. The options that appear underneath a site listing when you hover on a site name in the list include:
- Edit: A link to the Edit Site page (see Figure 13-9), where you can change aspects of each site.
- Dashboard: A link to the Dashboard of the site.
- Deactivate: Click this link to mark the site for deletion in your network. After clicking the Deactivate link, a message appears in a pop-up window that asks you to confirm your intention to deactivate the site. Click the Yes button to confirm. The user’s site displays a message stating that the site has been deleted. This action can be reversed by revisiting the Sites page and clicking the Activate link that appears underneath the site pathname. (The Activate link appears underneath only sites that are marked as Deactivated.)
- Archive: Click this link to archive the site in your network, which prevents it from being viewed by visitors. The user’s site displays a message stating This site has been archived or suspended. This action can be reversed by revisiting the Sites page and clicking the Unarchive link that appears underneath the site’s pathname. (The Unarchive link appears underneath only sites that are marked as Archived.)
- Spam: Clicking this link marks the site as spam and blocks the users from being able to access the Dashboard. It also displays a message stating This site has been archived or suspended. This action can be reversed by revisiting the Sites page and clicking the Not Spam link that appears underneath the site’s pathname. (The Not Spam link appears underneath only sites that are marked as Spam.)
- Delete: Click this link to delete the site from your network of sites permanently. Although you see a confirmation screen that asks you to confirm your intention to delete the site, after you’ve done it, you cannot reverse this decision.
- Visit: Click this link to visit the live site in your web browser.
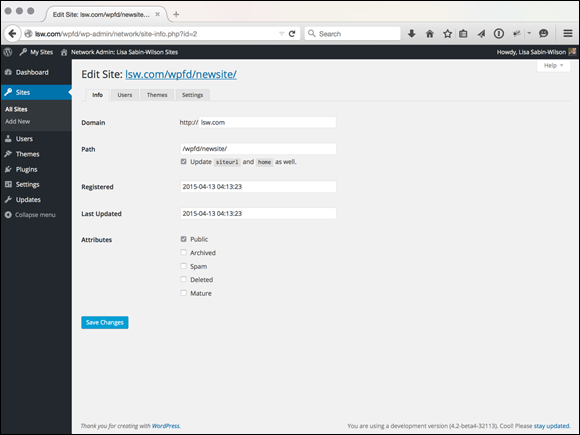
Figure 13-9: The Edit Site page.
Generally, you use the Edit Site page only when the settings are unavailable from the Dashboard of that particular site, by configuring the options that appear underneath each of the four tabs on the Edit Sites page, as shown in Figure 13-9:
- Info: Under this tab, you can edit the site’s domain, path, registered date, updated date, and attributes (Public, Archived, Spam, Deleted, Mature).
- Users: Under this tab, you can manage the users that are assigned to the site, as well as add new users to the site under the Add New User section.
- Themes: Under this tab, you can enable themes for this site. This capability is particularly useful if you have themes that are not Network Enabled (see the “Themes” section later in this chapter) because all the themes that are not enabled within your network are listed under the Themes tab, which allows you to enable themes on a per-site basis.
- Settings: The settings under this tab cover all the database settings for the site that you are editing. You will rarely, if ever, need to edit these settings because as the Network Admin, you have access to each user’s Dashboard and should be able to make any changes to the site’s configuration settings there.
Also in the Sites menu on the Network Admin Dashboard, you see a link called Add New — click that link to load the Add New Site page on your Network Admin Dashboard. You can create a new site from the Add New Site page, shown in Figure 13-10. Fill in the Site Address, Site Title, and Admin Email fields and then click the Add Site button to add the new site to your network. If the Admin Email you entered is associated with an existing user, the new site is assigned to that user in your network. If the user doesn’t exist, a new user is created and an email is sent with a notification. The site is immediately accessible. The user receives an email containing a link to his site, a login link, and his username and password.

Figure 13-10: The Add New Site page on the Network Admin Dashboard.
Users
Clicking the Users menu link on the Network Admin Dashboard takes you to the Users page, where you see a full listing of members, or users, within your network. The Users page (see Figure 13-11) lists the following information about each user:
- Username: This is the login name the member uses when she logs in to her account in your community.
- Name: This is the user’s real name, taken from her profile. If the user has not provided her name in her profile, this column is blank.
- E-mail: This is the email address the user entered when she registered on your site.
- Registered: This is the date when the user registered.
- Sites: If you enable sites within your WordPress Network, this lists any sites the user is a member of.

Figure 13-11: The Users page.
Similarly to the Sites page, you can add and delete users to the network, as well as manage users by clicking either the Edit or Delete link that appears under their names when you hover over them with your mouse pointer (just as you do with sites on the Sites page).
To delete a user, simply hover over the username in the list that appears on the Users page. Click the Delete link and a new screen appears with a page telling you to transfer this user’s posts and links to another user account (yours, most likely). Then click the Confirm Deletion button, and WordPress removes the user from the network, permanently. This action is irreversible, so be certain about your decision before you click that button!
You can also edit a user’s profile information by clicking the Edit link that appears underneath his name when you hover your mouse pointer over it on the Users page. Clicking that link takes you to the Edit User profile page, shown in Figure 13-12, where you are presented with several options, which just happen to (mostly) be the very same options and settings that you configured for your own profile information in Chapter 4.
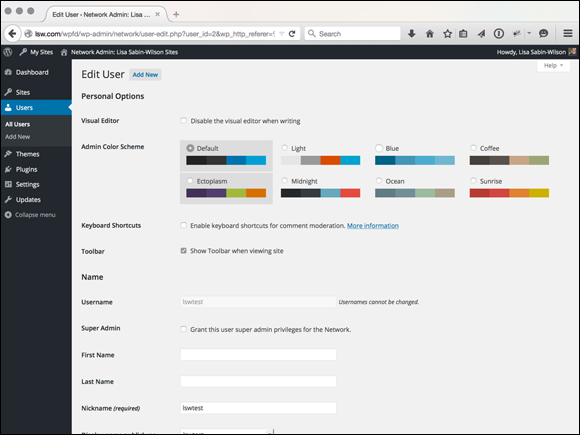
Figure 13-12: The Edit User profile page.
The only difference with the Edit User profile page within the Network Admin Dashboard is one setting labeled Grant This User Super Admin Privileges for the Network. This setting is deselected by default; however, if you select this box, you grant this user Network Admin privileges for your network. Basically, this means that the user has the exact same access and permission as you do.
At the time of this writing, the terms Super Admin and Network Admin are interchangeable. When WordPress first merged the WordPress MU code base with the regular WordPress software, the term used to describe the Network Admin was Super Admin. Right now, Network Admin is the standard term; however, the term Super Admin is still used within some areas of both the Network Admin and the regular Dashboard. We will most likely see that change in the very near future when the folks at WordPress realize the discrepancy and make the updates in later versions of the software.
Also in the Users menu on the Network Admin Dashboard, you see a link called Add New; click that link to load the Add New User page on your Network Admin Dashboard (see Figure 13-13).

Figure 13-13: The Add New User page on the Network Admin Dashboard.
You can add a new user from the Add New User page by filling in the Username and Email fields of the user you’d like to add and then clicking the Add User button. The new user is sent an email notification alerting her of the new account, along with the site URL, her username, and her password (randomly generated by WordPress at the time the user account is created).
Themes
When a network is enabled, only users with Network Admin access have permission to install themes, which are shared across the network. You can review details on how to find, install, and activate new themes with your WordPress installation in Chapter 8. After you install a theme, you must enable it in your network to have the theme appear in the Appearance menu of each site, where users in your network can activate it on their site. To access the network Themes page (shown in Figure 13-14), click the Themes link under the Themes menu on the Network Admin Dashboard.

Figure 13-14: The network Themes page.
Plugins
By and large, all WordPress plugins will work on your network. There are, however, some special plugins and some special considerations for using plugins with a network.
If you need a refresher on how to find, install, and activate plugins in WordPress, see Chapter 7.
Browse to the Plugins page on your WordPress Network Admin Dashboard by clicking the Plugins link under the Plugins menu. You find that the Plugins page is just as described in Chapter 7, but if you don’t know where to look, you can easily miss one very small, subtle difference. Check out Figure 13-15 and have a look below the name of the plugin. Do you see the Network Activate link? That is the big difference between plugins listed on the regular Dashboard and those on the Network Admin Dashboard. As the Network Admin, you can enable certain plugins to be activated globally, meaning across your entire network. This means that all sites in your network will have the network activated plugin features available on their site, in contrast to plugins that you activate on the regular Dashboard (under Site Admin), which are activated and available only for your main website.

Figure 13-15: The network Plugins page.
If you select the Plugins administration menu (as I describe in the “Menu Settings” section, earlier in this chapter) on the Network Settings page, users see the plugins listed on their Plugins page on their Dashboard. In their list of plugins, they see only the plugins that you have not network activated; that is, they see a list of all the plugins you installed in your WordPress installation, but none of them are activated on that user’s site. Users have the ability to activate and deactivate those plugins as they desire.
Only the Network Admins have access to install new plugins on the site; regular users within the network do not have that kind of access (unless you’ve made them Network Admins in their User settings).
Also located in the Plugins menu on the Network Admin Dashboard are two other links: Add New and Editor. The Add New link lets you add and install new plugins by searching the WordPress Plugin Directory within your Dashboard, and the Editor link gives you access to the Plugin Editor. I cover these topics in more detail in Chapter 7.
Updates
Clicking the Updates link on the Network Admin Dashboard menu gives you access to the WordPress Updates page, which takes you through the same process of upgrading your WordPress installation software. WordPress takes the extra step of also upgrading all sites within your network so that they are all using the same, upgraded feature sets.
If the process of upgrading network sites stalls or stops, the URL of the last site upgraded appears on the WordPress Updates page. The Network Admin can access the Dashboard of the site where the upgrade stopped, which usually clears up the issue. A user accessing his site Dashboard after an upgrade also triggers the process of completing the upgrade.
Stopping Spam Signups and Splogs
If you choose to have open signups in which any member of the public can register and create a new site on your network, at some point, automated bots run by malicious users and spammers will visit your network signup page and attempt to create one, or multiple, sites in your network. They do so by automated means, hoping to create links to their sites or fill their site on your network with spam posts. This kind of spam blog or site is a splog.
Spam bloggers don’t hack your system to take advantage of this; they call aspects of the signup page directly. You can do a few simple things to slow them down considerably or stop them altogether.
Diverting sploggers with settings and code
In the “Registration Settings” section earlier in this chapter, I go over a few options, including areas in which you can specify email addresses to allow or block. The Add New Users check box (refer to Figure 13-5) stops many spammers when it is deselected. When spammers access the system to set up a spam site, they often use the Add New Users feature to programmatically (through the use of programs built into the bots) create many other sites.
Spammers often find your site via Google Search, and that’s where they find the link to the signup page. You can stop Google and other search engines from crawling your signup page by adding rel=nofollow,noindex on the signup page link. To do so, wherever you add a link to your signup page, inviting new users to sign up, the HTML code you use to add the nofollow,noindex looks like this:
<a href="http://yoursite.com/wp-signup.php" rel="nofollow,noindex ">Get your own site here</a>
You can add this code to any page or widget area as a normal link to instruct legitimate visitors to sign up for a site in your network.
Plugins that help prevent spam
Plugins can help stop spam blogs, too. The Moderate New Blogs plugin interrupts the user signup process and sends you (the Network Admin) an email notification that a user has signed up for a site. You can then determine whether the site is legitimate. Download the plugin at https://wordpress.org/plugins/moderate-new-blogs.
The WangGuard plugin was written mainly to stop sploggers and prevent spam signups on a WordPress site — with or without the network feature activated. You can get the plugin at https://wordpress.org/plugins/wangguard. This plugin is free for personal use, or for sites with fewer than 500 daily user registrations.
The Cookies for Comments plugin (available at https://wordpress.org/plugins/cookies-for-comments) leaves a cookie in a visitor’s browser. If the signup page is visited, the plugin checks for the cookie. If there isn’t a cookie, the signup fails. Be sure to check the installation directions on this because it requires an .htaccess file edit.