
14 Illustrating with impact
Of course, there will always be those who look at technique, who ask ‘how’, while others of a more curious nature will ask ‘why’. Personally, I have always preferred inspiration to information. (Man Ray)
The end product [of magazine design] should be a fusion of words and visuals, a creation that is greater than the sum of the separate elements. (John Morrish, Magazine Editing)
Illustration to accompany features in newspapers and magazines means photographs, and that means black and white prints or colour transparencies. It also means non-photographic visual art: both kinds, as Morrish points out, are an applied discipline and not a form of fine art.
That visual art takes many forms: line drawings, sketches, cartoons, caricatures, old prints and engravings, charts, flowcharts, maps, tables, diagrams, graphs, computer graphics. It involves negotiations and briefing (of the experts), cover fee, rights, size of illustration to be delivered, the size it will be reproduced and the deadline.
As a freelance writer you have to decide when to offer illustrations with your features and whether it’s worthwhile attempting to provide them yourself. Can you (or can you learn to) produce them to the level of competence required?
As a freelance writer, should you hire the services of a professional photographer or illustrator? Should you do some picture research and deal with picture libraries? (Working as a picture researcher for a publisher or picture library is a good way to start a career as a writer/photographer.) Should you try to obtain free pictures from the publicity departments of manufacturing or retail companies, or the press offices of institutions, agencies, charities and other non-profit-making organizations? If you’re freelance and versatile it will be well worth your while exploring the possibilities of taking your own photographs. Raise your standards by taking courses, joining a camera club (a good place to pick up a second-hand camera) and subscribing to a photography magazine. Many magazine features are picture-led and welcome proposals more promptly if they see excellent pictures already obtained or can be assured that they will come with the package. You can sell your pictures over and over again to fit different pieces – it isn’t usual to sell the copyright. If you build up a large stock of photographs you may want to do some photojournalism (communicating news by means of photographs) as a sideline, but that is outside our remit. It is also a good idea to take photos of places and objects you’re writing about for the record, so that you can refer to them for exact details.
This chapter will help you decide in what ways and how far you want to be involved with illustration. We’ll look at the market, the likely subjects, the equipment, the essential skills, the business aspects and the online possibilities.
ENTERING THE MARKET
The marketing guides will suggest likely publications for illustrated features. Try Freelance Photographer and Willing’s Press Guide. Let’s concentrate for the moment on photographs. Look for magazines that rely on freelances, even if they have photographers on the staff and a picture library.
Check on the way prospective publications use illustration. What kind of features, how much black and white and how much colour? Glossy or matt for B&W? Sharp focus? What influences the decisions? How closely allied to the text are a publication’s pictures? How important is overall design?
When proposing your ideas give details of pictures available or promised. When a proposal is accepted, talk to the editor or art editor and get as much detailed briefing about the photography as you can. When you’re established as a writer/illustrator ideas for pictures may come first and you will try them out on those picture-led publications.
RELEVANCE OR ART?
There are obvious places where the art, meaning high quality, of your photographs may be what sells them rather than their relevance, but most often it’s relevance that editors look for first. Any photograph sold for publication should:
• have enough impact to make the reader want to read the feature
• engage the attention and emotions more firmly than the words themselves could achieve (a picture isn’t always ‘worth a thousand words’ but it can try)
• help to tell the story; make the message clearer
• conform to the requirements of the publication as briefed – its policy for pictures, format, size and so on
• have high quality, which usually means sharp detail, though special artistic effects such as fuzziness or graininess may occasionally be appropriate.
SUBJECTS FOR YOUR PICTURES
The hundreds of subjects that travel provides? Of course, but the competition is fierce, and picture libraries are groaning under the loads of excellent material supplied by top photographers and writer/photographers. Editors may prefer to use those rather than commissioning you, even if you have a reasonable track record for pictures.
If you’re building up that track record, start nearer home perhaps. Try to sell illustrated reports of local events that staff of local papers haven’t time to cover. Try a few pieces on spec. Then there are the numerous how-to subjects, hobbies, oddities, people in pictures that tell a funny or dramatic story, arts and antiques, inn-signs, strange animal behaviour (you might need a zoom lens), and so on. These are well-worn subjects but still in demand by popular publications.
There are cliché shots that need to be avoided, unless used as background for a relevant scene: Sydney Harbour and Big Ben, for example. You’ll be lucky to have accepted shots of crowded beaches, people lined up posing. Take them off guard, take a bullfighter in action, but there’s a caveat: permission may be required (see below).
If you know a fair amount about the techniques the photography magazines have a regular demand for how-to-photograph features. You may be able to use again photographs that have illustrated various of your features for how-to examples: how to compose, how to use different lenses effectively, the use of flash, lighting tricks and so on.
Landscape, apparently easy, needs particular skills and preferably special equipment. You may be able to obtain free photographs of relevant scenery from tourist organizations in the UK and abroad that are of a much higher standard than you could produce. If the scenery is merely a background to interesting people or animals that may be another matter.
Whatever your subject, take many more than you need so that you can illustrate more than one project, offering a different selection to different editors, and so that you’ll be prepared for future assignments that are similar. Take shots of different kinds so that editors can choose those that will add up to a good design: vertical, horizontal; distant, middle distance, close-up.
Getting permissions
It is good manners to ask permission from people if you intend to photograph them close up, making their faces recognizable. They may be delighted by the opportunity but they may need persuading – and in some tourist spots there are people who expect payment and make a living at it. Some American magazines (see Writer’s Market) demand signed permissions from people you’ve photographed who have recognizable faces.
Some English plane-spotters took pictures at a Greek airport and ended up in a Greek jail, accused of spying. In many countries you need written permission before you photograph in art galleries, museums and archaeological sites. In the UK you need permission to photograph from the National Trust, English Heritage and other places that attract tourists.
Make sure you are on the same wavelength as your editor in the sphere of photographic ethics and legalities, a subject covered in Chapter 21.
CHOOSING YOUR EQUIPMENT
If photography is new to you start with a medium-priced camera, an inconspicuous, 35 mm SLR (single-lens reflex) – which means you see through the lens that takes the picture. It’s a general-purpose lens quite adequate for most tasks. This will deliver 36 exposures and accommodate interchangeable lenses. You will be able to switch off the automatic functions and do your own adjusting of apertures, shutter speed and focusing.
Cheaper and less ambitious are the lightweight pocket-sized APS (Advanced Photo System) and the 35 mm compact. Both have automatic functions that produce good quality prints without need of any expertise.
It’s probably best to start with automatic exposure and focusing and to avoid the expense of sophisticated, and often heavy, gadgetry. When your work justifies it, and you’re getting more sophisticated yourself, wanting to experiment more, then is the time to add equipment. You will have much more scope to create different effects, to take several shots of the same subject with different exposures (‘bracketing’) for example, comparing the results.
A telephoto lens is useful for interviews, a flash gun if you do plenty of interiors, a tripod if you need plenty of ‘mug shots’.
The basic technique
‘Fill the frame’ is the essential advice. The eye should not be distracted by much space or fuzziness around the target, so that the target makes a sharp image and it’s clear at once what the picture is all about. Avoid any kind of distracting background such as fussy wallpaper.
To return to the question of having plenty of choice when you’ve finished shooting. Expanding on that, an illustrated feature generally needs three kinds of picture: long shot, medium and close. Take these shots from various viewpoints and angles, and you may want to vary the lighting too. Take plenty so that the edition will choose from the best. Figure 14.1 shows a clever choice of pictures to project a feature, with the page design in mind.
Digitally speaking
Increasingly publications are organized to receive digital photographs, and the prices of digital cameras are dropping rapidly. You need the computer programs to change the contents of the camera into something you can send an editor, and that’s an extra skill to acquire.
Have a look at the digital photography magazines as well as the digital sections of the general photography magazines. A good website for beginners is Photoexpert, run by Epson (www.photoexpert.co.uk). This provides online tutorials, product reviews and practical advice on getting the best out of digital camera and printer.

Figure 14.1
How display techniques project a feature. Bold pictures are used in this Sunday Times travel page to offset a dominant advertisement. The byline is incorporated in the standfirst above the intro, and it is used to explain what the writer is doing. The big capital ‘W’ at the start of the article is typical of the ‘stand-up drops’ used decoratively in the paper’s travel articles. With kind permission of The Sunday Times
Some of the advantages of digital are:
• You view your pictures immediately; you don’t have to wait for film to be developed. If they’re not right you can erase them and try again. That facility encourages you to experiment.
• It’s easy to use pictures to record details of places/objects that you need to describe (see above), and you can build up your picture library online. You can file them under keywords and rapidly locate them.
• You can produce your own illustrations to enhance your website, and these will be of higher quality than any used by scanning photographs.
• There are computer programs that enable you to make all kinds of improvements to digital pictures.
• You can send your pictures along with your feature by email.
Some of the disadvantages are:
• For top quality, greater versatility with lenses and more film speeds, film cameras are best.
• Battery life in digital cameras can be short. This can be solved by using lithium-ion rechargeables.
• Because of ‘shutter lag’ (the delay in your picture being recorded) digitals are not good for action pictures.
Your choice clearly depends on your priorities.
WORKING WITH A PHOTOGRAPHER
You may prefer to work with a photographer. To find one you might try the press photographers of local publications, the names of photographers credited under their pictures in magazines, the classified adverts in photography magazines, photographers’ associations, Writers’ and Artists’Yearbook for photography agencies, or the Publishers’ Freelance Directory.
You can arrange for article and photographs to be paid for separately. If the fee is for a package, work out a division with the photographer. Be wary. For speculative projects the photographer may expect a fee whether the feature sells or not. Make sure you’re going to get what your editor will want. Ideally, work with a few photographers who can produce exactly what you want.
Photographers who work regularly with journalists can obviously be useful contacts. They will hear of feature requirements and let you know, or recommend you.
PICTURES FROM OTHER SOURCES
Once commissioned, you may prefer simply to pass on to the commissioning editor information about where to get pictures, and the questions of permissions, copyright and credits are taken out of your hands.
Free pictures can be obtained from tourist offices, PR companies and various organizations, including commercial companies, voluntary associations and research institutes. Museums and picture agencies normally charge a reproduction fee. BAPLA (The British Association of Picture Libraries and Agencies) will give advice. Check copyright and licensing agreements.
Digital photographs (images) can be obtained free online and sent directly to your editor. Multimedia companies supply cheap CD-ROMs that contain stocks of picture libraries that have been converted to digital format. If you have the necessary software you can view these pictures and copy those you want to send to your editor.
GRAPHICS
The simplest kind of flow diagrams, charts or maps to illustrate articles require little artistic skill. Use a pen with a fine nib, black ink and drawing paper. Line drawings should be made at about twice the size they will be reproduced. Leave out lettering: indicate it on an attached photocopy – the publication will get it set in type. If your artistic skill is as limited as mine, find a talented friend. If substantial skill is needed try the picture libraries or the Publishers’ Freelance Directory. Figure 14.2, which illustrated a news feature in Press Gazette shows how computer graphics can come to your aid.
Your editor may employ an artist who will do the whole drawing to your rough sketch or specifications. Where precision is needed, the graphics must be done with great care – see the line drawings illustrating a how-to feature (Figure 19.2). Line drawings of the artistic kind – cartoons, caricatures and so on – aim at an immediate and powerful impact and must be done by experts. You can download maps and other graphics on CD-ROM from the Internet.
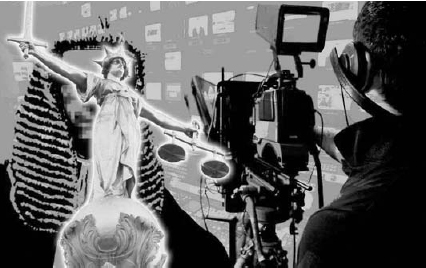
Figure 14.2
Graphics from Press Gazette (30 July 2004). With kind permission of John Rooney/Press Gazette
CAPTIONS
Captions anchor the pictures to the text. In photojournalism the captions are the text, in effect. Typically the caption is in the present tense: it describes what the picture is saying, the message. It doesn’t, of course, merely describe the picture. That’s obvious enough as stated but remember that if you’re to write the caption you need to know if it’s going to be cropped, and if so how exactly? Thus the final form of the caption normally is the concern of the subeditor. Subs and photographers may get together at the final stage of page design.
A caption normally adds something to the picture: it gives information that cannot be obtained from the picture alone, and may give needed explanation. It may have to answer some of those ‘wh’ questions, identifying people and places without stating the obvious. It can say which meaning out of many possible meanings will relate to the text. It can establish the required mood; it may amuse, entertain. It’s a bridge between the title and the text – part of the teamwork of the various presentational elements.
Here are a few samples of captions to photographs:
1 ENABLER social worker Gaye Petek at her office at Elele, an association that helps Muslim women in crisis.
Feature about the enforced use of Islamic headscarves in French schools (Vanity Fair).
2 The Trojan war, as chronicled by Homer and depicted here by Jean Maublanc, is now examined in scientific detail by Horizon.
The painting reproduced is a stirring entree to the documentary produced under the BBC2 TV Horizon rubric (Radio Times).
3 Barbara and George Bush joking with fellow Texans Charlie Wilson and former governor Ann Richards.
An edited extract from a book about congressman Charlie Wilson’s support for the CIA-backed war of the Afghan mujahideen against the Soviet army. The names are in left to right order. That has to be spelt out if there are many names (Financial Times Magazine).
4 Light at the end of the tunnel: the memorial to victims of 11 September may yet attract back the visitors.
The New York memorial at night, festooned in lights. A feature by Jason Cowley in New Statesman of 22 April 2002 describes the slow recovery from the trauma of 11 September 2001.
5 Cloistered gardens and Moorish architecture: the Hotel Babylon offers the ultimate in luxurious good taste – and a regime of salt-water baths and seaweed massages.
The feature describes the unusual services of this luxurious hotel in southern Spain (Sunday Times Magazine).
THE BUSINESS ASPECTS
Illustrations can sell a feature so it’s advisable to be well organized. Pictures can go astray, get stolen, be damaged. Be professional in the way you do your negotiating, processing, submitting, storing, and record keeping. Here are a few hints.
Negotiating
Since supplying photographs and graphics, either your own or from various sources, may entail much expense, make sure you have been commissioned for an illustrated feature, establish exactly what is wanted and what the fee will be for supplying them. Editors can assume the feature/pictures package is what is being discussed and may not offer a separate fee for pictures. You should make it clear that the copyright for your own pictures remains with you and that the fee is for one use. See the NUJ’s Freelance Handbook for guidance on fees.
Processing
It is not usual to send illustrated features out on spec. Get a commission or a ‘we’ll look at it’ first, and it’s best to let an editor choose from your black and white contact prints those they like and to arrange for the publication to do the processing. If you’re sending from a country where the developing is not of high quality, you may be asked to send a whole exposed roll of film to be developed by the publication.
If you do your own processing, note that B&W prints should be glossy, (usually) borderless, not less than 7 in. by 5 in. and at least as big as they will be reproduced, since quality diminishes with enlargement. Colour pictures must be sent as transparencies (35 mm is the usual size). Cardboard mounts are best, because you can write captions or caption numbers on them (see below). Plastic mounts with glass inserts run the risk of damage in transit.
Most writer-photographers, however, prefer to spend their time writing than processing, which can be time-consuming and costly. Some High Street chemists or developers may not produce the quality you need to reach, in which case find an established photography shop. There you’ll get good professional advice as well.
Recording
As you take pictures, make notes on the subject matter, which will form the basis of your captions. These are sometimes best left to subeditors but your label, indicating subject and location, should give them help. Devise a number system for your illustrations, recording the date photographs were taken or graphics completed. For example, 0426 can refer to the 26th picture taken in 2004. You can then list details in a record book or typed list or database, where you can add such details as exact date taken, subject matter of picture, feature(s) which it illustrates (and perhaps the captions used for them).
Storing and submitting
Whether stored in file cabinets, three-ring binders or acid-free boxes, transparencies and negatives should be labelled with the photographer’s name, phone number and subject/location. You may want to put this information on cardboard mounts of transparencies. Put ‘copyright’ (or the symbol) and your name, address and phone number on the back of your own photographs and drawings. Either type the information on self-adhesive labels, or labels stuck on with a rubber solution, or get a rubber stamp made with the details. Put captions for B&Ws on labels. Peel-off labels are useful for photos not your own.
Keep a record book or database separate from that used for features and keep a copy of every letter sent that refers to illustrations, and a record of every phone call made about illustrations, separate from those that referred to the features themselves. Remember that you may want to offer your illustrations over and over again. The records will stand you in good stead when returning to clients.
Find out what size of prints are wanted. Initially, submit copies rather than original illustrations to obtain approval. Send a proof sheet of B&Ws and a laser copy for transparencies or (if you have the computer program and a colour printer) produce your own copies. Send photocopies of graphics.
Once you’ve been given the go-ahead to send originals, send illustrative material in hard-backed envelopes. Transparencies should be sent in plastic presentation sheets, repeating copyright symbol, name and address. BAPLA supplies printed forms to send with transparencies, spelling out terms and conditions of your agreement with the publication. Send recorded delivery or registered. Valuable photographic material should be insured.
A NOMADIC CAREER
The following is the result of an exchange of emails with Natasha Babaian, who pursues a varied and sometimes adventurous career as a writer/photographer in the USA (http://www.nomadcamera.com).
In her early thirties, Natasha Babaian has established a career as writer/photographer/picture researcher. Born in New York City, she has dual American/British nationality and has divided much of her life between New York and London. At the time of writing she is based in Cape Cod, Massachusetts, but she is often on the road, and the road might be almost anywhere in the world. She graduated with a Bachelor of Fine Arts degree from the State University of New York at Purchase, where she majored in Photography.
She has produced illustrated features or photographs for various American newspapers and magazines, written pieces and supplied photographs for Berlitz travel books and Insight Guides, and has done the picture research for these books and for freelance writers.
She uses Canon A1 and Nikon F series SLR cameras. ‘I usually shoot 35 mm colour slide film. At this time I have no plans to go digital and am happy shooting slides and negatives that I can scan for professional use when necessary. I don’t use a lot of equipment – different lenses, tripod and so on. Since I specialize in travel photography and am often on the go, I try to carry a minimum of equipment and to keep things as simple as possible. I like the immediacy that the 35 mm offers, as compared with larger format cameras, which require more set-up time and bits and pieces.’
She thinks that a writer/photographer starting off would ideally be equipped with a laptop computer (preferably with a built-in CD burner) and a slide/print scanner of sufficient quality to make high-resolution images. ‘The scanner is especially important for photographers who shoot negatives or slides rather than digital images. The ability to transmit images digitally (via email, disk or CD) to prospective clients with a minimum of fuss is very useful.’ Beginners must keep in mind that competition is strong. ‘To be noticed and remembered it really is important to present yourself and your work in the best possible light, and that means to be well organized with your storage and submission systems. Building a body of work and a client base takes time, patience, determination and professionalism.’
She finds that the Internet can provide useful technical advice and instruction, especially when she’s off the beaten track, but in general prefers to use it for both picture and story research. ‘Many picture libraries have their collections available for online viewing, which can save time and unnecessary travel. Of course the speed with which portals can open is problematic too – one too many clicks and you can get nonsense.’
Babaian’s versatility has extended to working for TV film-makers Subtractive Media (director Dave Kennedy, writer Scott Norman Howe) in Wellfleet, Massachusetts, who were doing spoofs of old westerns. Figures 14.3 and 14.4 are examples of her work as a production stills photographer on the set of the film Spaghetti Vision. Figure 14.3 shows a hangman’s rope in the foreground with a bandito in the background. Figure 14.4 has actor Eric Martinson as a bandito with writer/director Dave Kennedy holding the camera.
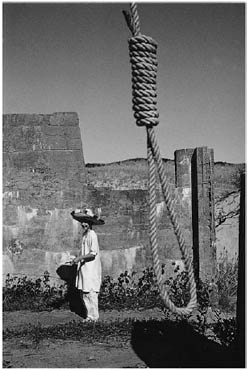
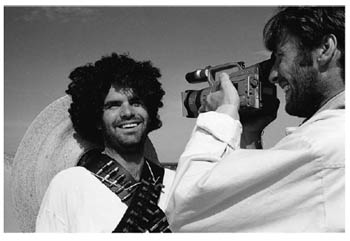
Figure 14.3 (left) and Figure 14.4 (above)
Photographer collaborating with a writer on a film set for The Advocate. Photographs by Natasha Babaian
‘Heat, long days, intense light reflected off hot sand was a challenge,’ says Babaian, ‘but I enjoyed the work.’
ASSIGNMENTS
1 For any of your recent features use a camera to provide either three B&Ws or three colour prints. Supply appropriate captions. Copy the pictures and print out from your computer or photocopy them. Then devise a layout for a two- or three-page feature, cutting and pasting the text and pix.
2 As above, but cut out appropriate pix from magazines.
3 Take three magazines and study the captions. Improve six that you think need improving. Keep to the same length, within a word or two. Explain your rewordings.
4 Study the travel magazines and come up with ideas for three of them. It’s not easy to come up with new ideas for this market, for obvious reasons. Remember to check back some way to ensure they haven’t been done recently. One or two subjects that might be developed into good ideas (if they’re not overdone) are as follows (there may be cities or countries where the subject might be fairly new):
• lighthouses
• children’s museums
• tree houses
• resorts that cater for people with food allergies
• the nation with the tallest/shortest/fattest (be careful), thinnest people.