
Mapping between XML and worksheets
Flattening structure for data analysis
XMLSS: The Excel XML vocabulary
Narrative text may be the most flexible way to communicate data, but when you want to see how it all lines up, there is nothing quite like a spreadsheet. It was the original “killer app” for the PC, and now, with a strong shot of XML, it is more powerful and useful than ever.
This chapter teaches you how to create worksheets that import and export XML data. Excel makes it easy: you don’t have to write scripts or code to work with XML.
And XML import means you can use Excel’s advanced capabilities for data analysis on almost any data, whether it comes from a database, Web service, or an XML file.
Skills required

Experience using Microsoft Excel to perform basic tasks, such as creating and editing worksheets. Sharing data with some kinds of XML documents requires knowledge of XSLT (see Chapter 18, “XSL Transformations (XSLT)”, on page 392).
Excel is a powerful tool for tabular, especially numeric, data. It allows you to analyze that data using charts and graphs, and perform calculations based on that data. In previous versions of Excel, the sources of that data were limited. Importing data into Excel either required programming, or it involved a lot of manual shuffling of data once it was imported.
Excel 2003 allows you to specify a particular area of a worksheet into which you can import XML data. Once you set up the map between the schema and the worksheet, you can import new data at any time without having to do any reformatting or shuffling around of data. Excel simply knows where each item of imported data should appear in the worksheet. Because most data is now available as XML, either in its native form or through a tool export, this opens up a much broader set of source data for Excel analysis. You can:
use all of Excel’s data analysis features (charts, graphs, calculations) on almost any data
save the worksheets that contain this analyzed data to use as reports
calculate new data from this analysis and save it as XML for use by other applications
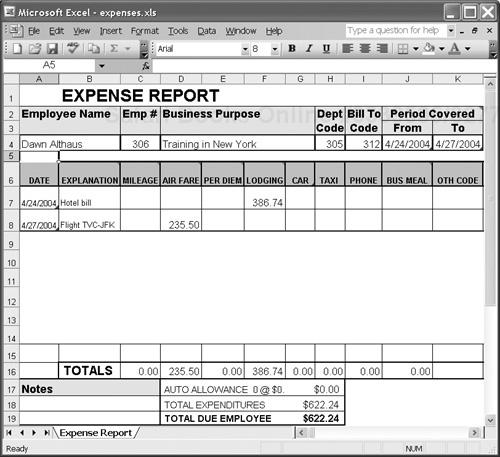
Figure 7-1 shows the Worldwide Widget Corporation expense report.[1]
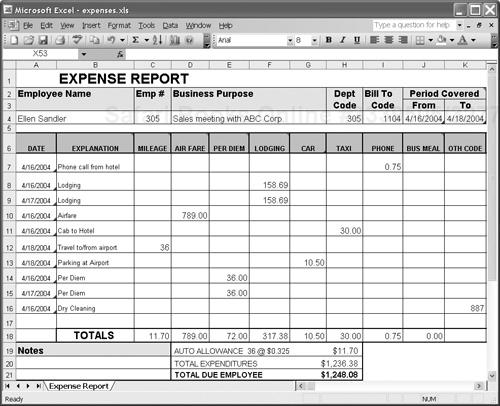
Excel, like the other Office products, has no restricted list of “supported XML vocabularies”. Accordingly, Worldwide has developed its own vocabulary for expense reporting. The XML representation of a report is shown in Example 7-1.
Example 7-1. Expense report in XML (expenses.xml)
<?xml version="1.0" encoding="UTF-8" standalone="yes"?>
<expenseReport xmlns="http://xmlinoffice.com/expenses"
  xmlns:xsi="http://www.w3.org/2001/XMLSchema-instance"
  xsi:schemaLocation="http://xmlinoffice.com/expenses
                      expenses.xsd">
  <empName>Ellen Sandler</empName>
  <empNum>305</empNum>
  <purpose>Sales meeting with ABC Corp.</purpose>
  <deptCode>305</deptCode>
  <billToCode>1104</billToCode>
  <periodFrom>2004-04-16</periodFrom>
  <periodTo>2004-04-18</periodTo>
  <expense>
    <date>2004-04-16</date>
    <explanation>Phone call from the hotel</explanation>
    <phone>.75</phone>
  </expense>
  <!-- ... -->
  <expense>
    <date>2004-04-16</date>
    <explanation>Dry Cleaning</explanation>
    <other>
      <code>883</code>
      <amount>16.75</amount>
    </other>
  </expense>
</expenseReport>
The report conforms to the schema shown in Example 7-2. As we’ll see in 7.5.2, “Inferring a schema”, on page 150, Excel doesn’t require a schema, but Worldwide has one as part of its comprehensive XML-based information management plan.
Example 7-2. Expense report schema (expenses.xsd)
<?xml version="1.0" encoding="UTF-8" standalone="yes"?>
<xs:schema targetNamespace="http://xmlinoffice.com/expenses"
           xmlns="http://xmlinoffice.com/expenses"
           xmlns:xs="http://www.w3.org/2001/XMLSchema"
           elementFormDefault="qualified">
  <xs:element name="expenseReport" type="ExpenseReportType"/>

  <xs:complexType name="ExpenseReportType">
    <xs:sequence>
      <xs:element name="empName" type="xs:string"/>
      <xs:element name="empNum" type="xs:integer"/>
      <xs:element name="purpose" type="xs:string"/>
      <xs:element name="deptCode" type="xs:integer"/>
      <xs:element name="billToCode" type="xs:integer"/>
      <xs:element name="periodFrom" type="xs:date"/>
      <xs:element name="periodTo" type="xs:date"/>
      <xs:element name="expense" type="ExpenseType"
                  maxOccurs="unbounded"/>
    </xs:sequence>
  </xs:complexType>

  <xs:complexType name="ExpenseType">
    <xs:sequence>
      <xs:element name="date" type="xs:date"/>
      <xs:element name="explanation" type="xs:string"/>
      <xs:element name="mileage" type="xs:integer" minOccurs="0"/>
      <xs:element name="airFare" type="xs:decimal" minOccurs="0"/>
      <xs:element name="perDiem" type="xs:decimal" minOccurs="0"/>
      <xs:element name="lodging" type="xs:decimal" minOccurs="0"/>
      <xs:element name="auto" type="xs:decimal" minOccurs="0"/>
      <xs:element name="taxi" type="xs:decimal" minOccurs="0"/>
      <xs:element name="phone" type="xs:decimal" minOccurs="0"/>
      <xs:element name="businessMeals" type="xs:decimal"
                  minOccurs="0"/>
      <xs:element name="other" type="OtherExpenseType"
                minOccurs="0"/>
    </xs:sequence>
  </xs:complexType>

  <xs:complexType name="OtherExpenseType">
    <xs:sequence>
      <xs:element name="code" type="xs:integer"/>
      <xs:element name="amount" type="xs:decimal"/>
    </xs:sequence>
  </xs:complexType>
</xs:schema>
Excel handles the relationship between schemas, XML documents and their presentation somewhat differently from Word. A worksheet should be considered as a reporting template that you can reuse for various different sets of data, rather than a container for the data itself.
You create a map that causes the items of XML data to be connected with the cells where they will appear in the worksheet. Each cell may only be mapped once.
Each map is associated with one schema. Excel allows you to map your schema to a worksheet using a drag-and-drop facility. It is possible to have more than one map associated with a worksheet. This is useful if data is coming from two or more different sources, using different schemas.
Both the map and the schema are stored in the .xls file along with the worksheet. In the case of the schema, it is a copy of the schema file that you selected for mapping. Therefore, changing or deleting the schema file after you have selected it has no effect on the worksheet.
Caution
Excel makes it very difficult to change the map, and almost impossible to change the schema once you have created the map. Make sure your schema is the way you want it before you start mapping it.
A map causes a worksheet to be linked to the source of its data. If you import XML into a worksheet, the map maintains a link to that source. However, when you save a worksheet, Excel will save the data that is currently in the cells. If you reopen the worksheet and the source data has changed, Excel will not refresh the data automatically. You have to refresh the data explicitly to get the changes.
Let’s see how Ellen created the map for the expenses.xls worksheet, using the expenses.xsd schema. She might have started from scratch, defining a map between the schema and a blank worksheet. However, since World-wide already had a worksheet design, she started with that.
To associate the worksheet with the schema:
Open
expenses.xlsin Excel.On the Data menu, point to XML, then click XML Source. This brings up the XML Source task pane.
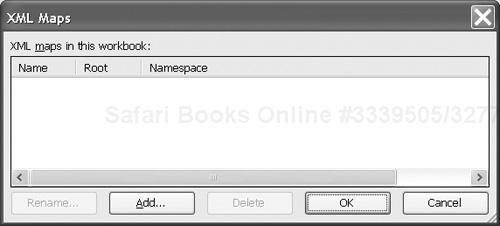
At the bottom of the XML Source task pane, click XML Maps. This brings up the XML Maps dialog, shown in Figure 7-2.
Click Add to add a map.
Browse to the location of
expenses.xsd, select it from the list, and click Open. The XML Maps dialog will now list the new map.Click OK to return to the main window. The XML Source task pane will now show the expense report structure from the schema.
The XML Source task pane is used during the mapping process to create the links between the XML element types and the worksheet cells. The top part of the XML Source task pane shows the general structure allowed by the schema, as shown in Figure 7-3.[2]
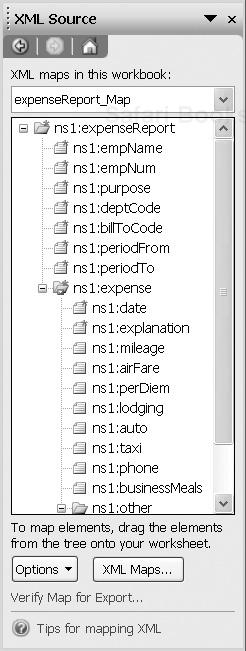
The task pane shows all the XML element types and attributes, organized into the hierarchical structure allowed by the schema. There are several things to notice about the way element types and attributes are displayed:
Required element types and attributes, such as
empNameandexplanation, are displayed with a red asterisk.Element types that can have children have a folder icon, while element types that can only have character data content have a document icon. Attributes have a slightly darker icon.
Repeating element types have a blue rectangle at the base of the folder or document icon.
Bold font indicates element types that have already been mapped to the worksheet.
Once an element type or attribute is mapped, selecting it in the XML Structure task pane causes Excel to select its mapped cell(s) in the worksheet. Likewise, when you select a mapped cell in the worksheet, Excel selects the element type or attribute to which it is mapped in the task pane.
Element types and attributes can be mapped to cells by dragging them from the task pane to the worksheet. It is also possible to right-click the element type or attribute in the task pane. From the resulting context menu, click Map element.
During the mapping process, Excel makes a distinction between repeating and non-repeating element types. The latter only occur once within the XML structure, according to the schema. In our example, they include the element types that make up the header of the expense report, such as empName, empName, and billToCode.
Repeating element types may appear more than once. In our example, the expense items, such as explanation and mileage, are repeating. Even though they may only appear once in their parent element, expense, the parent may appear more than once, so the children are therefore considered repeating.
Excel looks at the maxOccurs attributes in the schema to determine whether an element type is repeating. The default for this attribute is 1. If an element type, or any of its ancestors, is declared with a maxOccurs value of more than 1 (including “unbounded”), it is considered to be repeating.
Attributes are considered repeating if they belong to repeating element types; otherwise they are non-repeating.
The mapping process differs depending on whether the element type or attribute is repeating or non-repeating, so we will discuss each separately.
You generally map a non-repeating element type or attribute to a single cell in the worksheet.[3]
Let’s map the non-repeating element types of the schema to our expense report worksheet. To do this, drag each one to the cell that is to contain the data. For example, drag the empName element type onto cell A4.
This will cause a smart tag to appear next to the cell. Clicking it reveals three options, as shown in Figure 7-4:
My Data Already Has a Heading
Place XML Heading to the Left
Place XML Heading Above
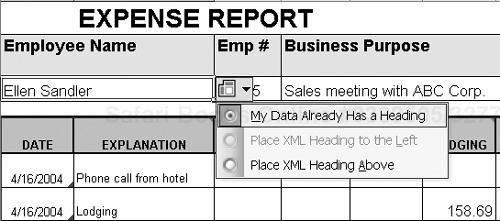
These choices allow you to insert a heading for your cell. Since we already have column headers in our worksheet, we can choose the first option (the default). If you choose either of the other two options, the XML name will be placed in the cell to the left of or above the chosen cell.
Notice that the cell that we have mapped now has a blue border around it. Continue to map the rest of the non-repeating element types and attributes.
To change the map, you can right-click the name in the XML Structure task pane, and click Remove element. This will remove the link between that element type or attribute and the cell. You can then remap the element type or attribute to another cell.
Dragging a repeating element type to the worksheet has a somewhat different result. Instead of associating the element type with a single cell, Excel creates a list range. A list range is a vertical column (or columns) of data that can be manipulated and sorted as a group.
The element type should be dragged to the cell that contains the header for the column. In our example, you simply drag the element types to the existing header cells. If you drag the element type to an empty cell, for example in a blank worksheet, Excel will insert the XML name as the header in the empty cell you selected, and assume that the actual data starts in the cell below the header.
For example, drag the date element type to cell A6, which contains the word DATE. Excel will create a list range and outline it in blue. Excel makes an assumption about where the list range ends based on the data that is currently in the worksheet (if any). In our example, it takes the list range all the way to the last expense item. If Excel assumes the size of the list range incorrectly, you can adjust the size by selecting a cell in the list, clicking List on the Data menu, and clicking Resize List on the List menu.
Drag the rest of the repeating element types to the appropriate header cells. When the columns are adjacent, as they are in our case, Excel expands the list range to add the additional columns.
List ranges are a handy tool for analyzing data. The drop-down menus on each of the column headers allow you to perform operations on the range quickly. You can sort the rows by any of the columns, or filter the data to include only rows matching a particular value. You can also select the “top 10” values or write custom queries to filter out other rows.
Once you have set up the map, you can import and export XML data from the worksheet. In this scenario, the Excel worksheet serves as a report template that you can regularly update with new data. You can also use Excel as a tool for entering data that you can then export in a format that is reusable and accessible to other applications.
You can export the data that is currently in the worksheet as an XML document by clicking Export on the XML submenu. This will save a document that conforms to the expenses.xsd schema.
Unlike Word, Excel is not constantly validating your data against the schema as you edit it. When you export it, though, it does validate it and it reports any errors it finds. These errors might include:
required elements that are missing, because they were not mapped
values that do not conform to the datatypes declared in the schema
elements that appear more times than allowed by the schema
Excel will inform you about the first of the validation errors it encounters (not all of them), but it will save the exported XML anyway. An example of what is saved is shown in Example 7-3.
Example 7-3. Exported XML fragment (expenses exported.xml)
<?xml version="1.0" encoding="UTF-8"?>
<ns1:expenseReport xmlns:ns1="http://xmlinoffice.com/expenses">
  <ns1:empName>Ellen Sandler</ns1:empName>
  <ns1:empNum>305</ns1:empNum>
  <ns1:purpose>Sales meeting with ABC Corp.</ns1:purpose>
  <ns1:deptCode>305</ns1:deptCode>
  <ns1:billToCode>1104</ns1:billToCode>
  <ns1:periodFrom>2004-04-16</ns1:periodFrom>
  <ns1:periodTo>2004-04-18</ns1:periodTo>
  <ns1:expense>
    <ns1:date>2004-04-16</ns1:date>
    <ns1:explanation>Phone call from hotel</ns1:explanation>
    <ns1:mileage/>
    <ns1:airFare/>
    <ns1:perDiem/>
    <ns1:lodging/>
    <ns1:auto/>
    <ns1:taxi/>
    <ns1:phone>0.75</ns1:phone>
    <ns1:businessMeals/>
    <ns1:other>
      <ns1:code/>
      <ns1:amount/>
    </ns1:other>
  </ns1:expense>
       ...
  <ns1:expense>
    <ns1:date>2004-04-16</ns1:date>
    <ns1:explanation>Dry Cleaning</ns1:explanation>
    <ns1:mileage/>
    <ns1:airFare/>
    <ns1:perDiem/>
    <ns1:lodging/>
    <ns1:auto/>
    <ns1:taxi/>
    <ns1:phone/>
    <ns1:businessMeals/>
    <ns1:other>
      <ns1:code>887</ns1:code>
      <ns1:amount>16.75</ns1:amount>
    </ns1:other>
  </ns1:expense>
</ns1:expenseReport>
Notice that all possible elements are included in the exported XML. If a cell is empty, an empty element appears, rather than the element simply being omitted. This can sometimes cause a problem for elements with numeric or date types, for which an empty element is not valid.
New XML data can also be imported into the worksheet. This is accomplished by clicking Import on the XML submenu, and selecting the name of the XML file to import.
Importing XML data into an existing worksheet is quite different from simply opening an XML document in Excel, as we will see in 7.5.1, “Using a schema”, on page 148. When XML data is imported, Excel will place all the data from the XML document into the correct cells based on the maps.
For example, we can import a new expense file called new expenses.xml to see how the import works. To do this:
You will now see the new data in the worksheet. Note that the number of lines in the list range has been reduced, as shown in Figure 7-5.
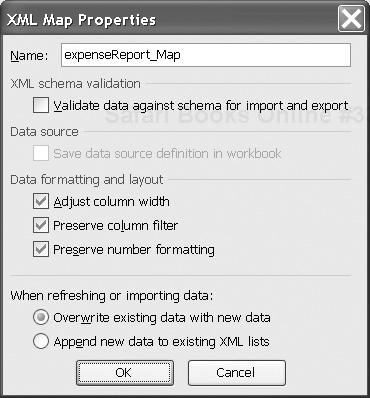
By default, importing XML data will overwrite the data that is currently in the cells, and it will alter the size of the list range (by adding or deleting rows) to accommodate the new data. It is also possible to append repeating data to what already exists, adding new rows to the list range while preserving the existing ones. This process can be controlled by a number of options that are available by clicking XML Map Properties from the XML submenu. The resulting dialog is shown in Figure 7-6.
The following options are available from this dialog:
Validate data against schema for import and export. If this box is checked, Excel will validate imported and exported XML documents against the schema.
Adjust column width. The column widths will be automatically updated to accommodate the width of the data that is imported. If you have carefully formatted your worksheet, you may wish to uncheck this box.
Preserve column filter. The current options specified for the list range will not be overwritten on import.
Preserve number formatting. The formatting of the numbers in cells will not be overwritten on import.
Overwrite existing data with new data. All existing data will be deleted and new data inserted.
Append new data to existing XML lists. New data will be appended to the existing data in the list range. This does not affect non-repeating elements, which will be overwritten.
The imported XML file must be well-formed XML. If you have checked the Validate data against schema for import and export box on the XML Map Properties dialog, Excel will validate the document upon import. The imported document must have the same namespace as the target namespace of the schema. If not, Excel will prompt you to indicate where you want the data imported, and it will not import it according to the map.
Otherwise, Excel will report any errors it finds in the document. It is very forgiving if the document is not valid and it will import the invalid data into the worksheet. Missing elements are represented as empty cells, and invalid values are simply shown as they appear in the document.
In our previous example, we started with an Excel worksheet and mapped a schema to it. There is another alternative: You can open an XML document in Excel and it will bring up a blank worksheet. You can then map to that using either the schema of the XML document, or an inferred schema.
The advantage to this approach is that you can refresh the data during the mapping process to ensure that it is being imported correctly from the XML document. The disadvantage is that you have to start from scratch with the formatting and layout of the worksheet.
Some XML documents, such as the expenses.xml document, shown in Example 7-1, use the xsi:schemaLocation attribute to specify the location of the schema. When you open such a document, Excel knows about the schema and it automatically brings it up in the XML Source task pane.
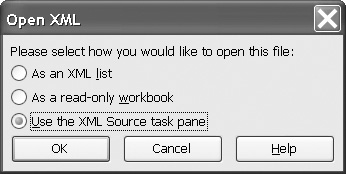
To open an XML document with a schema in Excel:
Click Open on the File menu.
Select XML Files (*.xml) from the Files of type: list.
Select the
expenses.xmlfile and click Open. You are given a dialog with three options, as shown in Figure 7-7.Choose the third option, Use the XML Source task pane. The first two options bring in the XML data in a less useful way.
The schema structure automatically appears. The worksheet is a completely blank slate, and you can begin mapping to it.
For non-repeating element types, you can use the smart tag that appears to the right of a recently mapped cell to add a label for the data, namely the element-type name. For repeating element types, the list column headers are automatically populated with the element-type names.
You can map a parent element type and all its children in one step by selecting the parent and dragging it to the worksheet. For example, select expense and drag it to cell B2. This will create a list range starting at B2 which has a column for each child of expense. You can remove any unwanted columns from the list range by selecting a column (for example phone), right-clicking it, and clicking Remove element.
Once you have mapped some element types, you can populate the data to ensure that the map is correct. To do this, position your cursor in a mapped cell and click Refresh on the XML submenu. You can refresh as often as you like during the mapping process.
If you don’t have a schema, Excel will infer a schema from an XML document. If you attempt to open an XML document that does not make use of the xsi:schemaLocation attribute to indicate a schema, Excel will prompt you with a dialog saying “The specified XML source does not refer to a schema. Excel will create a schema based on the XML Source data.” It will then infer a schema from the XML document.
We do not recommend this approach. The problem is that Excel may not get the schema 100% right, because it has limited information. That is understandable, but there is no way to change the schema once it is inferred. It is embedded in the Excel workbook and you cannot edit it. One of the most common problems is that the schema inference tool assumes that some non-repeating element types are actually repeating. This wreaks havoc on the ability to map them to the worksheet.
To avoid writing a schema from scratch, you can use a separate tool to infer a schema from an XML document. Microsoft provides a free schema inference tool at:
http//apps.gotdotnet.com/xmltools/xsdinference
Once you have generated a schema, you will have the ability to fine-tune it before you begin mapping.
Dawn, the Worldwide Widget accountant, finds that XML has added benefits when she wants to analyze all the expense reports that were submitted to her.
In the past, when all the employees submitted their Excel expense reports to her, Dawn had to do a lot of cutting and pasting to get any kind of summary reports. Now that they are submitting XML documents, she can create her own workbook to utilize a whole set of analysis tools.
Employees submit their expense reports by e-mail. They attach XML documents named EXP_nnn_YYYYMMDD.xml, where nnn is their employee number, and YYYYMMDD is the end date of the expense report.
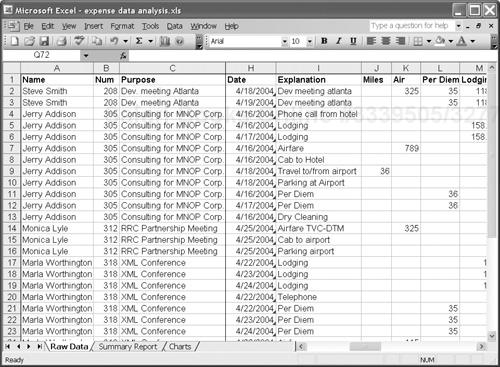
Dawn creates an Excel workbook that consists of several worksheets. The first worksheet, entitled Raw Data, contains the map to import all the data from the expense reports.
Dawn wants to import expense reports from several different employees into the same worksheet. The worksheet we created earlier in this chapter would not work, because it would overwrite all the non-repeating elements every time a new expense report was imported. Instead, Dawn needs a worksheet that will repeat all the normally non-repeating “header” information in each row, alongside the repeating expense item elements.
You can think of this as flattening the hierarchy. We are extracting the elements with data content, regardless of the level they are at, and presenting them in adjacent cells in the same rows of the spreadsheet.[4]
To do this:
Open a new, blank worksheet.
Create a new map based on the expenses.xsd schema, as described in 7.3.1, “Creating a map”, on page 138.
This time, instead of dragging each element type onto the worksheet individually, select the
expenseReportelement type and drag it to the worksheet.
You now have a large list range with a column for each element type that can contain only data (i.e. that cannot contain elements). The column headings (element-type names) are shown in Table 7-1.
Table 7-1. Column headings for flattened structure
|
|
|
|
|
|
|
|
|
|
|
|
|
|
|
|
|
|
|
During import, the data in the non-repeating element types is repeated in each expense item row.
To import several expense reports at once:
Click Import on the XML submenu.
Select all the files in the
raw datadirectory at once, using Shift+click or Ctrl+click.Click Open.
This will import all the data from all of the expense reports, as shown in Figure 7-8.
Caution
The flattened data cannot be exported using the map with which you imported it. Excel will warn that the map is not exportable because it contains denormalized data. However, you can export the data – or calculations based on the data – by creating a separate range of cells that reference the data using cell equations. This second range of cells can be mapped to a separate schema and exported.
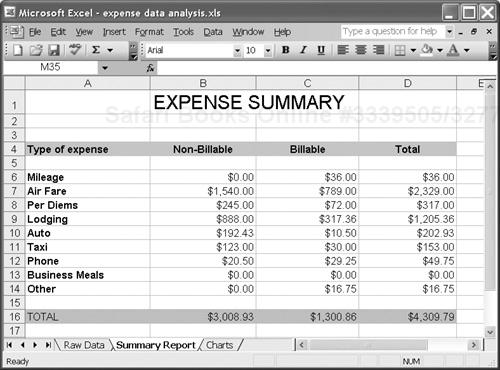
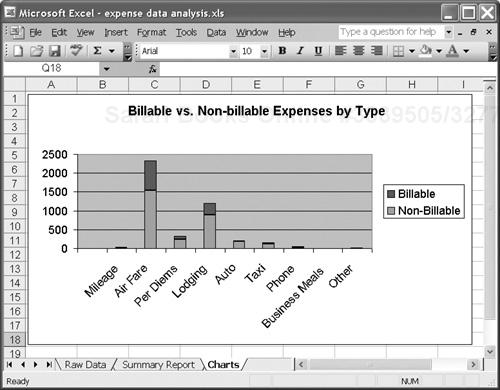
Now that the data is combined, Dawn can use summary reports and charts to analyze it, as shown in Figure 7-9 and Figure 7-10. When she wants to update the analysis, she can simply import new XML data (or refresh the current data) and the summary report and charts will automatically be updated. A working version of this worksheet is in expense data analysis.xls.
Excel works best with tabular data that naturally fits into rows and columns. XML documents, on the other hand, can have virtually any structure. This can make it challenging to map some XML document types to a worksheet. In our prior example, we had a simple XML document with some header information and some repeating element types that fit conveniently into one column each.
Worldwide accumulates all of its expense reports in a database for long-term analysis of trends. The database format has a slightly different structure. Instead of individual mileage, airFare, etc. elements, it has a single repeating amount element with an expenseTypeCode attribute indicating the type of expense.
The corresponding XML document is shown in Example 7-4.
Example 7-4. Modified expense report (expenses modified.xml)
<?xml version="1.0" encoding="UTF-8" standalone="yes"?>
<expenseReport xmlns="http://xmlinoffice.com/expenses">
  <empName>Ellen Sandler</empName>
  <empNum>305</empNum>
  <purpose>Sales meeting with ABC Corp.</purpose>
  <deptCode>305</deptCode>
  <billToCode>1104</billToCode>
  <periodFrom>2004-04-16</periodFrom>
  <periodTo>2004-04-18</periodTo>
  <expense>
    <date>2004-04-16</date>
    <explanation>Phone call from the hotel</explanation>
    <amount expenseTypeCode="801">.75</amount>
  </expense>
  <!-- ... -->
  <expense>
    <date>2004-04-16</date>
    <explanation>Dry Cleaning</explanation>
    <amount expenseTypeCode="883">16.75</amount>
  </expense>
</expenseReport>
The schema for this document does not map directly to the expense report worksheet because the data that belongs in the various expense type columns comes from the same amount element. Excel does not allow you to map, say, the “Phone” column to “all amount elements with an expenseTypeCode attribute whose value is 801”.
XSLT stylesheets can be used to create compatibility between the worksheet-friendly XML and the database-compatible alternative.
from worksheet to database
Export the data to XML in the usual way. A stylesheet will then transform the XML data from its exported structure, shown in Example 7-3, to the database structure shown in Example 7-4.
from database to worksheet
For analysis of the historical data, you can create an XSLT stylesheet that works in the opposite direction. It transforms the database-compatible document structure into a structure that can be mapped directly to Excel.
Paired transforms can also be used with other document types that don’t naturally fit into a tabular structure. For example, those with multiple levels of hierarchy, or that contain element types whose content must be combined or split apart for use in the worksheet.
Like Word, Excel has an XML vocabulary that can be used to save entire Excel workbooks as XML documents. It is known as XML Spreadsheet (XMLSS). You can save any workbook as XMLSS, and you can open any XMLSS document as a workbook.
An XMLSS document contains the contents of each cell, as well as formatting and datatype information. Like WordML, XMLSS is very verbose. Example 7-5 shows the XMLSS representation of two rows of our expense report.
Example 7-5. XMLSS document fragment (expenses XMLSS.xml)
<Row ss:AutoFitHeight="0" ss:Height="22.125">
  <Cell ss:StyleID="s114">
    <Data ss:Type="DateTime">2004-04-16T00:00:00.000</Data>
  </Cell>
  <Cell ss:StyleID="s115">
    <Data ss:Type="String">Phone call from hotel</Data>
  </Cell>
  <Cell ss:StyleID="s187"/><Cell ss:StyleID="s75"/>
  <Cell ss:StyleID="s75"/><Cell ss:StyleID="s75"/>
  <Cell ss:StyleID="s75"/><Cell ss:StyleID="s75"/>
  <Cell ss:StyleID="s75">
    <Data ss:Type="Number">0.75</Data>
  </Cell>
  <Cell ss:StyleID="s75"/><Cell ss:StyleID="s187"/>
  <Cell ss:StyleID="s75"/>
</Row>
<Row ss:AutoFitHeight="0" ss:Height="21.5625">
  <Cell ss:StyleID="s114">
    <Data ss:Type="DateTime">2004-04-16T00:00:00.000</Data>
  </Cell>
  <Cell ss:StyleID="s115">
    <Data ss:Type="String">Lodging</Data>
  </Cell>
  <Cell ss:StyleID="s186"/><Cell ss:StyleID="s77"/>
  <Cell ss:StyleID="s77"/>
  <Cell ss:StyleID="s75">
    <Data ss:Type="Number">158.69</Data>
  </Cell>
  <Cell ss:StyleID="s77"/><Cell ss:StyleID="s77"/>
  <Cell ss:StyleID="s77"/><Cell ss:StyleID="s77"/>
  <Cell ss:StyleID="s186"/><Cell ss:StyleID="s77"/>
</Row>
Caution
Unlike a WordML document, an XMLSS document does not contain everything there is to know about an Excel worksheet. Saving a document as XMLSS and then reopening that document in Excel may result in some missing information, in particular the macros and charts associated with that worksheet.
To save a worksheet as XMLSS:
On the File menu, click Save As.
Select XML Spreadsheet (*.xml) in the Save as type list.
Type the name of the file and click Save.
If you save a mapped document as XMLSS, it does not intertwine the custom tags (for example, <empName>) with the XMLSS tags, the way Word does with WordML. However, it does save a copy of the schema, as well as the XPath expressions that map between the cells and the element types.
XMLSS is potentially useful for software that converts Excel worksheets to and from other spreadsheet representations. However, it is of limited utility for general applications because:
It does not contain any information about the meaning of the data.
It is rather verbose and difficult to understand.
It is difficult to write a stylesheet to extract information from XMLSS because most data items are not in fixed cells; their position varies from one worksheet to the next, depending on the amount of data.
[1] You can find the worksheets used in this chapter among the book’s example files.
[2] The XML Source pane is different from the top part of the XML Structure pane in Word. Word only shows the individual elements of the current document, while Excel shows the element types allowed by the document’s schema.
[3] Sometimes you may want it to appear in a list; we describe that later in the chapter.
[4] In the punched card data processing days, this was called a unit record because it was a self-contained complete record of a transaction and therefore could be sorted and tabulated.