
Exporting Access tables as XML
Transforming exported data
Importing XML data to Access
This chapter covers the XML features of Microsoft Access, specifically the tasks of importing and exporting XML. These features allow Access databases to be integrated into XML workflows with other enterprise systems.
Skills required
Experience using Microsoft Access to create and query databases. To use transforms, you’ll need to know about XSLT (see Chapter 18, “XSL Transformations (XSLT)”, on page 392).
The XML features of Microsoft Access consist of an export and import process.
XML can be generated from any Access tables, queries or forms. Doing so makes the data available for a variety of processes, such as:
Reporting on the data in a Web page or Word document;
Sending the data to a business partner as part of an e-commerce transaction;
Analyzing the data in Excel; and
Importing the data into a different database for business integration, reporting, and/or backup.
Worldwide Widget Corporation is famous for its award-winning employee incentive program. Managers are given an incentive budget with which they can purchase discontinued Widget Wear items to reward outstanding people.
To keep track of these internal reward sales, the company maintains a small, simple Access database named order.mdb. Its design is shown in Figure 12-1. You can find the order.mdb database among the example files for this book.

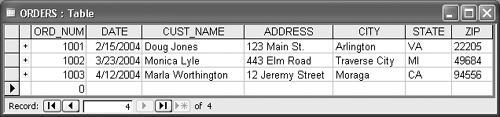
There are three tables: ORDERS, ORDER_ITEMS, and PRODUCTS. The ORDERS table contains such information as the order number, date, customer name, and shipping address. The primary key of the ORDERS table is the ORD_NUM column. The table contents are shown in Figure 12-2.
The PRODUCTS table contains information such as product number, name, price and department. Its primary key is the NUM column. Its contents are shown in Figure 12-3.

The ORDER_ITEMS table contains the list of items for each order. Its primary key is a combination of the ORDER_NUM column, which has a foreign key relationship to the ORD_NUM column of ORDERS, and the PROD_NUM column, which has a foreign key relationship to the NUM column of PRODUCTS. Its contents are shown in Figure 12-4.

Exporting Access table data as XML generates three kinds of files, all of them optional. They are:
A data file, with a
.xmlextension, that contains the data from the contents of the table(s).A schema document, with a
.xsdextension, which describes the structure of the data file.A pair of presentation files, with the extensions
.xsland either.htmor.asp, which will display the data in a browser.
First, let’s look at a simple export of a single table using all the default settings. To do this:
Select the table you want to export from the list of tables. In this case, select
ORDERS.On the File menu, click Export.
Select XML (*.xml) from the Save as type list.
The File name box will default to the table name. Use the default value or type a different name into the box. Do not use a file extension; if you type a file extension other than xml, Access will append another file extension to it.
This will bring up the Export XML dialog shown in Figure 12-5. The three options shown in this dialog represent the three optional components to be generated. For now, leave the default settings (with the first two check boxes checked).

This simple export saves two files: in our example, ORDERS.xml and ORDERS.xsd.
The generated XML data document, ORDERS.xml, is shown in Example 12-1. [1]
Example 12-1. The exported XML (ORDERS.xml)
<?xml version="1.0" encoding="UTF-8"?>
<dataroot xmlns:od="urn:schemas-microsoft-com:officedata"
          xmlns:xsi="http://www.w3.org/2001/XMLSchema-instance"
          xsi:noNamespaceSchemaLocation="ORDERS.xsd"
          generated="2004-02-26T16:53:27">
  <ORDERS>
    <ORD_NUM>1001</ORD_NUM>
    <DATE>2004-02-15T00:00:00</DATE>
    <CUST_NAME>Doug Jones</CUST_NAME>
    <ADDRESS>123 Main St.</ADDRESS>
    <CITY>Arlington</CITY>
    <STATE>VA</STATE>
    <ZIP>22205</ZIP>
  </ORDERS>
  <ORDERS>
    <ORD_NUM>1002</ORD_NUM>
    <DATE>2004-03-23T00:00:00</DATE>
    <CUST_NAME>Monica Lyle</CUST_NAME>
    <ADDRESS>443 Elm Road</ADDRESS>
    <CITY>Traverse City</CITY>
    <STATE>MI</STATE>
    <ZIP>49684</ZIP>
  </ORDERS>
  <ORDERS>
    <ORD_NUM>1003</ORD_NUM>
    <DATE>2004-04-12T00:00:00</DATE>
    <CUST_NAME>Marla Worthington</CUST_NAME>
    <ADDRESS>12 Jeremy Street</ADDRESS>
    <CITY>Moraga</CITY>
    <STATE>CA</STATE>
    <ZIP>94556</ZIP>
  </ORDERS>
</dataroot>
The structure of the XML document closely parallels the structure of the table. There is a root element, dataroot, which contains one or more ORDERS elements. Each ORDERS element represents a row in the table. It contains a child element for each column in the table, for example ORD_NUM and DATE. The names used in the XML document (with the exception of dataroot) are taken directly from the Access table design.
Each of these children contains the data contained in that column for that row. If there is no value for that column in that row, an empty element is generated. The format of the data is dependent on the type of the column. In our example, the content of each DATE element is formatted as YYYY-MM-DDTHH:MM:SS, which is the XML Schema dateTime format that corresponds to the Date/Time type in Access.
The generated schema, ORDERS.xsd, is shown in Example 12-2.
Example 12-2. The generated schema (ORDERS.xsd)
<?xml version="1.0" encoding="UTF-8"?>
<xsd:schema xmlns:xsd="http://www.w3.org/2001/XMLSchema"
            xmlns:od="urn:schemas-microsoft-com:officedata">
  <xsd:element name="dataroot"><xsd:complexType><xsd:sequence>
    <xsd:element ref="ORDERS" minOccurs="0" maxOccurs="unbounded"/>
  </xsd:sequence></xsd:complexType></xsd:element>
  <xsd:element name="ORDERS">
    <xsd:annotation><xsd:appinfo>
      <od:index index-name="PrimaryKey" index-key="ORD_NUM"
           primary="yes" unique="yes" clustered="no"/>
      <od:index index-name="CUST_NUM" index-key="CUST_NAME"
           primary="no" unique="no" clustered="no"/>
      <od:index index-name="ORDER_NUM" index-key="ORD_NUM"
           primary="no" unique="no" clustered="no"/>
    </xsd:appinfo></xsd:annotation>
    <xsd:complexType><xsd:sequence>
      <xsd:element name="ORD_NUM" minOccurs="0" od:jetType=
                   "longinteger" od:sqlSType="int" type="xsd:int"/>
      <xsd:element name="DATE" minOccurs="0" od:jetType="datetime"
                   od:sqlSType="datetime" type="xsd:dateTime"/>
      <xsd:element name="CUST_NAME" minOccurs="0" od:jetType="text"
                                    od:sqlSType="nvarchar">
           <xsd:simpleType><xsd:restriction base="xsd:string">
                           <xsd:maxLength value="50"/>
           </xsd:restriction></xsd:simpleType></xsd:element>
      <xsd:element name="ADDRESS" minOccurs="0" od:jetType="text"
                                  od:sqlSType="nvarchar">
           <xsd:simpleType><xsd:restriction base="xsd:string">
                           <xsd:maxLength value="50"/>
           </xsd:restriction></xsd:simpleType></xsd:element>
      <xsd:element name="CITY" minOccurs="0" od:jetType="text"
                               od:sqlSType="nvarchar">
           <xsd:simpleType><xsd:restriction base="xsd:string">
                           <xsd:maxLength value="50"/>
           </xsd:restriction></xsd:simpleType></xsd:element>
      <xsd:element name="STATE" minOccurs="0" od:jetType="text"
                                od:sqlSType="nvarchar">
           <xsd:simpleType><xsd:restriction base="xsd:string">
                           <xsd:maxLength value="50"/>
           </xsd:restriction></xsd:simpleType></xsd:element>
      <xsd:element name="ZIP" minOccurs="0" od:jetType="text"
                              od:sqlSType="nvarchar">
           <xsd:simpleType><xsd:restriction base="xsd:string">
                           <xsd:maxLength value="50"/>
           </xsd:restriction></xsd:simpleType></xsd:element>
    </xsd:sequence></xsd:complexType>
  </xsd:element>
</xsd:schema>
The schema describes the structure of the generated XML document. It first contains the dataroot element declaration, which specifies that a dataroot element can contain zero, one or many ORDERS children. The ORDERS element declaration appears next, along with embedded declarations for the four allowed children.
The generated schema defines simple types for some of the elements that contain the data. For columns whose type is Text in Access, such as the CITY column, it generates a type that is a string whose length can be up to 50 characters. In other cases, for example the DATE column, it simply uses XML Schema built-in types like dateTime. Additional Access-specific type information is included in the schema using attributes that are prefixed with od. These additional attributes are used by Access if you re-import the data into an Access database.
The generated schema also contains information about the primary keys and indexes on the table. This information is included in the xsd:appinfo element, within the declaration of ORDERS.
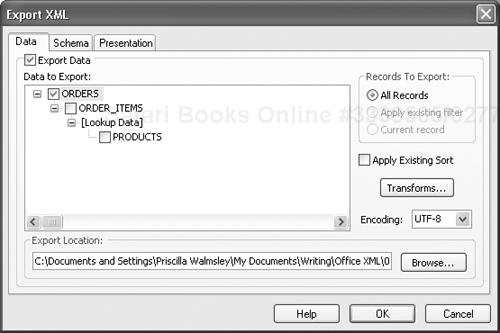
In our previous example, we exported all the data from a single table. There are additional options which allow you to export data from more than one related table at once, and allow you to filter the data that is exported. These options are specified on the Data tab of the expanded Export XML dialog, shown in Figure 12-6.
This dialog has several sections:
The Data to Export section allows you to select the tables you want to export. This is described in 12.3.2.1, “Selecting tables to export”, on page 276.
The Records To Export section at the top right allows you to choose the specific records you want to export. This is described in 12.3.2.2, “Exporting using filters and sorts”, on page 278.
The Apply Existing Sort check box allows you to specify a sort. This is described in 12.3.2.2, “Exporting using filters and sorts”, on page 278.
The Transforms button allows you to select a transformation to apply to the data upon export. This is described in 12.5, “Applying a transform on export”, on page 285.
The Encoding list allows you to specify an encoding for your XML document.
The Export Location section allows you to choose the location where your XML document will be saved.
The Data to Export section of the Data tab shows the tables in the database in a tree structure. At the top is the table that was selected when you initiated the export. If you wish to start with a different table, you can exit the dialog, select a different table, and restart the export.
Access constructs the hierarchy of tables based on primary and foreign key relationships in the database. Only tables related to the table of interest are displayed in the hierarchy. A [Lookup Data] node appears when following a many-to-one relationship, for example from ORDER_ITEMS to PRODUCTS.
Each table is accompanied by a check box that allows you to select the tables that you want to export. You can select any or all of the tables to export, and it will export the data from all the selected tables to the same XML document. Access will join the tables based on the joins in the database. If you choose to export all three tables, a fragment of the resulting XML document is shown in Example 12-3.
Example 12-3. Generated XML data from related tables (ORDERS all tables.xml)
<ORDERS>
  <ORD_NUM>1001</ORD_NUM>
  <DATE>2004-02-15T00:00:00</DATE>
  <CUST_NAME>Doug Jones</CUST_NAME>
  <ADDRESS>123 Main St.</ADDRESS>
  <CITY>Arlington</CITY>
  <STATE>VA</STATE>
  <ZIP>22205</ZIP>
  <ORDER_ITEMS>
    <ORDER_NUM>1001</ORDER_NUM>
    <PROD_NUM>219</PROD_NUM>
    <QUANTITY>1</QUANTITY>
    <SIZE>L</SIZE>
  </ORDER_ITEMS>
  <ORDER_ITEMS>
    <ORDER_NUM>1001</ORDER_NUM>
    <PROD_NUM>334</PROD_NUM>
    <QUANTITY>1</QUANTITY>
    <SIZE>L</SIZE>
  </ORDER_ITEMS>
</ORDERS>
<!--...-->
<PRODUCTS>
  <NUM>233</NUM>
  <NAME>Silk 2-Pocket Blouse</NAME>
  <PRICE>59.99</PRICE>
  <DEPT>WOMEN</DEPT>
</PRODUCTS>
<PRODUCTS>
  <NUM>241</NUM>
  <NAME>Deluxe Golf Umbrella</NAME>
  <PRICE>39.99</PRICE>
  <DEPT>ACCESSORY</DEPT>
</PRODUCTS>
<PRODUCTS>
<!--...-->
The XML document contains ORDERS elements just as before. However, they now contain one or more ORDER_ITEMS elements that are related to that ORDERS row by the key relationship. In addition, PRODUCTS elements contain the product information. The PRODUCTS are listed separately at the end of the document rather than contained in the ORDER_ITEMS elements. This is because of the cardinality of the relationship in the database design.
The newly generated schema reflects the new structure of the document. It contains declarations for all of the element types in ORDERS, ORDER_ITEMS and PRODUCTS.
The Records To Export section of the Data tab allows you to choose the specific records you want to export. There are three choices:
All Records exports all the records in the table(s), as we have done in our previous examples.
Apply existing filter allows you to apply a filter to the export. If a filter exists for the table you have chosen, and you choose this option, it will be applied on export. If no filter exists for the table, this option cannot be selected.
Current record allows you to export the current record. You can only choose this option if you had a table open with a record selected when you initiated the export process. Access will export the current record, along with any related records in other tables (for example the
ORDER_ITEMSelements that relate to that order). If you include a lookup table, as inPRODUCTS, it will still continue to export all thePRODUCTSrecords, not just the ones related to the exportedORDER_ITEMS.
The Apply Existing Sort check box allows you to specify whether to use the sort that currently exists on the table. A sort exists if, for example, you opened the datasheet view of the ORDERS table, sorted the records by CITY, and saved the table design. Checking the Apply Existing Sort box will cause the exported XML to also be sorted by CITY. If the box is unchecked, the records will be exported in the order in which they are physically stored in the table.
The schema is useful as a guide to the structure of the exported document. In addition, if you plan to re-import the XML data into another Access database, the schema is essential to ensure that all of the table relationships and data types are preserved upon re-import.
The schema export options are shown in Figure 12-7.

The Export Schema check box indicates whether to export the schema at all; if you do not check this box, no schema will be generated.
The Include primary key and index information check box indicates whether to include the primary key information as an annotation in the schema, as was shown in Example 12-2. This only matters if you want to re-import the data into another Access database, and you want Access to recreate those tables with their key relationships in the other database.
The Export Location section allows you to specify whether Access should embed the schema directly in the XML document that contains the data, or create a separate schema document (the default). In general, you should avoid embedding the schema, since this is not a customary practice and a schema processor may not be able to validate such a document.
When you choose to generate a presentation from a table, Access will generate documents that allow you to view the data in a tabular format in a Web browser. This involves two additional files:
an XSLT stylesheet, with the extension
.xsl, that transforms the generated XML data to HTML for presentation; anda file that is used by a Web server to apply the XSLT stylesheet. This file is either an HTML document containing a script, or an Active Server Page (ASP).
An example presentation is shown in Figure 12-8. Note that only the “main” ORDERS table is presented; the data from related tables is omitted. To include the data from the related tables, you would need to write a custom XSLT stylesheet, or use a tool like FrontPage to generate the XSLT based on your requirements.

There are several options relating to generating the presentations. They can be set in the Presentation options dialog, shown in Figure 12-9.
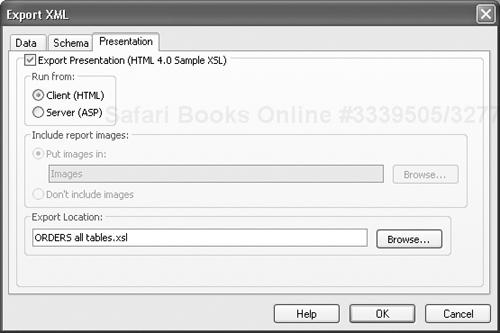
The Export Presentation check box indicates whether to export the presentation files at all; if you do not check this, no presentation will be generated.
The Run from section allows you to specify whether the generated transformation is to be run from the client or server. If you choose Client (HTML), it will generate an HTML page, with the file extension .htm. If you choose Server (ASP) it will generate an Active Server Page (ASP), with the file extension .asp.
The Include report images section indicates whether or not to include images. This is only relevant to exporting forms and reports, as described in 12.4.2, “Exporting forms”, on page 284.
The Export Location section allows you to specify the location for the XSLT stylesheet file. The related HTML or ASP document is always saved in the same directory as the data, regardless of the location of the stylesheet.
Tip

The presentation generation capabilities of Access are useful for taking a quick look at the exported data. For more powerful presentation capabilities, FrontPage offers a GUI editor for generating Web pages from XML documents. These capabilities are described in Chapter 13, “Publishing XML to the Web with FrontPage”, on page 294.
In addition to exporting data directly from tables, you can also export queries, forms and reports from Access. This is useful when you want a different view of the data from what the table provides.
Exporting a query is useful if you don’t want to export all the columns of a table, if you want to join the tables on relationships other than the key relationships, or if you want to specify complex conditions that filter the exported rows.
Our orders database has a query named ORDERS WITH MENS DEPT ITEMS, shown in Figure 12-10.
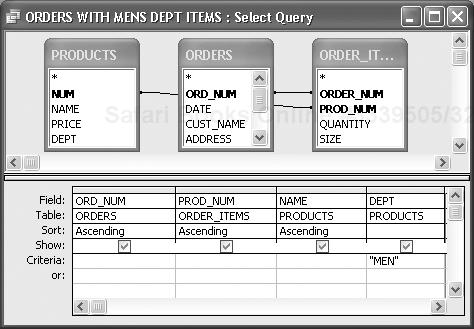
The query selects all the orders, along with their item information, that contain a product whose department is “MEN”. We can export the results of this query using the exact same export procedure we used for tables. The result is the XML document shown in Example 12-4.
Example 12-4. Exported query data (ORDERS WITH MENS DEPT ITEMS.xml)
<?xml version="1.0" encoding="UTF-8"?>
<dataroot xmlns:od="urn:schemas-microsoft-com:officedata"
xmlns:xsi="http://www.w3.org/2001/XMLSchema-instance"
xsi:noNamespaceSchemaLocation=
"ORDERS%20WITH%20MENS%20DEPT%20ITEMS.xsd"
generated="2003-08-26T18:22:43">
<ORDERS_x0020_WITH_x0020_MENS_x0020_DEPT_x0020_ITEMS>
<ORD_NUM>1001</ORD_NUM>
<PROD_NUM>219</PROD_NUM>
<NAME>Cotton Rugby Shirt</NAME>
<DEPT>MEN</DEPT>
</ORDERS_x0020_WITH_x0020_MENS_x0020_DEPT_x0020_ITEMS>
<ORDERS_x0020_WITH_x0020_MENS_x0020_DEPT_x0020_ITEMS>
<ORD_NUM>1001</ORD_NUM>
<PROD_NUM>334</PROD_NUM>
<NAME>Wool Fisherman's Sweater</NAME>
<DEPT>MEN</DEPT>
</ORDERS_x0020_WITH_x0020_MENS_x0020_DEPT_x0020_ITEMS>
</dataroot>
Each row is represented by an element whose element-type name matches the query name. In this case, since our query name has spaces, and spaces are not allowed in XML names, each space is replaced by the string _x0020_.
The row element has a child element for every column returned by the query. The element-type names are the column names from the tables used in the query. To change them, in the Field box of the query design view, you can specify an alias as a prefix, followed by a colon and a space as shown in Figure 12-11.

When the query is exported, the prefixes –A, B, C and D– are used as the element-type names.
It is also possible to export the data behind a form as XML. This is useful if a user working with the form wants to export a single record. Our orders database contains a form named ORDERS, shown in Figure 12-12.

The structure of the exported data is exactly the same as that of data exported directly from the ORDERS table, as shown in Example 12-3. The export doesn’t leave out the items that are not displayed on the form, nor does it structure the data any differently. You can, however, choose to only export the current order record by specifying that option on the Data tab of the Export XML dialog.
When saving a presentation with the form data, the HTML page that is generated has the same look and feel as the form, including the colors, fonts and general layout. You can also choose to export the images by selecting Put images in and specifying a directory. This will include all images, including any background pattern, that appear on the form.
Unfortunately, only the main form is displayed, and not the subforms. In our example, only the order header information is displayed, and not the individual items within an order. This limits the usefulness of the presentation somewhat.
In addition to exporting data from Access databases, it is possible to export data from Access projects. Access projects, files with the extension .adp, allow a user to access and report on Microsoft SQL Server data using the front-end tools of Access. XML data can be generated from an Access project table, view or form, in exactly the same way as it is generated from an Access database table or form.
If you are already using an Access project to manipulate or report on SQL Server data, this can be a convenient way to extract data. XML data can also be exported directly from SQL Server.
In some cases, you may want the exported XML to conform to a particular schema, rather than using the names and structure of the Access database. For example, if you are exporting an order that is to be used in an e-commerce transaction, you may need it to conform to a specific e-commerce schema.
Suppose you have agreed on such a schema with your customers. An example of a conforming exported order is shown in Example 12-5.
Example 12-5. Order conforming to a different schema (order diff structure.xml)
<?xml version="1.0" encoding="UTF-8"?>
<order xmlns="http://xmlinoffice.com/orders"
       number="1001">
  <date>2004-02-15T00:00:00</date>
  <customer>Doug Jones</customer>
  <shipTo>
    <addr>123 Main St.</addr>
    <city>Arlington</city>
    <state>VA</state>
    <postal_code>22205</postal_code>
  </shipTo>
  <items>
    <item number="219">
      <quant>1</quant>
      <size>L</size>
    </item>
    <item number="334">
      <quant>1</quant>
      <size>L</size>
    </item>
  </items>
</order>
To accomplish this, you can transform the XML when you export it using an XSLT stylesheet. The stylesheet shown in Example 12-6 will transform the default export of the orders database into a new order that conforms to our desired schema.
Example 12-6. Transforming the order on export (order transform for export.xsl)
<?xml version="1.0" encoding="UTF-8"?>
<xsl:stylesheet version="1.0"
                xmlns:xsl="http://www.w3.org/1999/XSL/Transform"
                xmlns:ord="http://xmlinoffice.com/orders">
<xsl:template match="/dataroot">
  <ord:order number="1001">
    <xsl:attribute name="number">
      <xsl:value-of select="//ORD_NUM"/>
    </xsl:attribute>
    <ord:date><xsl:value-of select="//DATE"/></ord:date>
    <ord:customer>
      <xsl:value-of select="//CUST_NAME"/>
    </ord:customer>
    <ord:shipTo>
      <ord:addr><xsl:value-of select="//ADDRESS"/></ord:addr>
      <ord:city><xsl:value-of select="//CITY"/></ord:city>
      <ord:state><xsl:value-of select="//STATE"/></ord:state>
      <ord:postal_code>
        <xsl:value-of select="//ZIP"/>
      </ord:postal_code>
    </ord:shipTo>

    <ord:items>
      <xsl:apply-templates select="//ORDERS[1]/ORDER_ITEMS"/>
    </ord:items>
  </ord:order>
</xsl:template>

<xsl:template match="ORDER_ITEMS">
  <ord:item>
    <xsl:attribute name="number">
      <xsl:value-of select="PROD_NUM"/>
    </xsl:attribute>
    <ord:quant><xsl:value-of select="QUANTITY"/></ord:quant>
    <ord:size><xsl:value-of select="SIZE"/></ord:size>
  </ord:item>
</xsl:template>

</xsl:stylesheet>
You can specify the transform to be used on export on the Data tab of the Export XML dialog. Clicking Transforms takes you to the Export Transforms dialog, shown in Figure 12-13.

To add a transformation, simply click Add and specify the name of the XSLT stylesheet.
The Export Transforms dialog lists all the available transforms. It is possible to add more than one transform to the list. However, only one will be applied on any given export: the one that is selected when OK is clicked.
It is also possible to import XML data into an Access database. This is a useful way to populate an Access database initially, or to add new data incrementally over time.
First, let’s perform a basic import of an entire set of tables. To do this:
Start with an empty, newly-created database.
On the File menu, point to Get External Data, then click Import.
In the Files of type list, select XML (*.xml;*.xsd).
Select the XML file containing the data you wish to import. For our example, use
ORDERS all tables.XML.Click Import.
This displays the Import XML dialog shown in Figure 12-14.

The large pane in the Import XML dialog shows the structure of the data to be imported. This is for informational purposes only; selecting table or column names has no effect on the import. At the bottom of the dialog (after you have clicked Options), you have three Import Options:
Structure Only will create a table but will not populate it with data.
Structure and Data (the default) will create a table and populate it with data. If a table by that name already exists, it will create a new table by appending a number to the name. For example, if the
ORDERStable already exists, it will createORDERS1.Append Data to Existing Table(s) will add the data to an existing table with the same name. If it cannot find a table with the appropriate name, it will create it.
For this first example, click Structure and Data, then OK. You will see that it creates all three tables and populates them with all the existing rows.
The designs of the tables match the design of the tables in the order.mdb database. This is because the schema that is related to the ORDERS all tables.xml file, ORDERS all tables.xsd, contains information about the keys and column datatypes of the table. If the schema were not present, the import would still have created the tables, but it would not have defined keys for the tables, and it would have given every column the type Text.
If you are interfacing your Access database with an e-commerce system, you may want to append data to existing tables rather than create new ones. For example, if a new order is received from a customer, you want to add it to the orders database. This can be accomplished checking the Append Data to Existing Table(s) box in the Import XML dialog.
The import process will generate errors for any records that have duplicate keys. For example, if your order contains products information that is already in the database, Access will raise an error message saying that it could not insert the row because of a duplicate key. It will not update the product row with the new information from the XML document.
So far we have assumed that you already had a valid import file handy. However, you may be trying to map an existing XML document to Access, or creating one from scratch. In this case, it is helpful to understand how Access maps XML elements to tables and columns.
Access makes certain assumptions about the way the XML document is organized, namely that:
The
datarootelement contains all of the data.Any elements (other than the root element) that have child elements are assumed to represent rows in tables whose name is the same as the row’s element-type name.
For example, in Example 12-1, since
ORDERSelements have children, Access assumes that it should create or use a table namedORDERS, and insert a row in this table for everyORDERSelement in the XML document.The children of these row elements are assumed to represent columns. For example, in Example 12-1, Access creates columns for all the children of
ORDERS, such asDATEandCITY.
Access will simply ignore elements that do not fit into this paradigm, such as elements that are children of the root element and do not have children of their own. Access will also ignore any data in attribute values.
Tip
There is a fairly easy way to determine how your XML document needs to be structured for import into Access. You can export an example from the database using the Export process described earlier in this chapter. You can then use the generated data file as an example, and use the generated schema to validate any incoming documents.
The XML document you want to import will not always be structured as described in the previous section. You may have different element-type names in your XML document, or an entirely different structure from the one to be used in the database.
For example, suppose we were starting with the other kind of order document that was shown in Example 12-5, and we wanted to import it into our ORDERS database. We would need a transformation to change the element-type names and structure to match the Access tables. A simple XSLT stylesheet that accomplishes this transformation is shown in Example 12-7.
Example 12-7. Transforming the order on import (order transform for import.xml)
<?xml version="1.0" encoding="UTF-8"?>
<xsl:stylesheet version="1.0"
                xmlns:xsl="http://www.w3.org/1999/XSL/Transform"
                xmlns:ord="http://xmlinoffice.com/orders">
<xsl:template match="/ord:order">
  <dataroot xmlns:xsi="http://www.w3.org/2001/XMLSchema-instance">
   <ORDERS> <!--assumes only 1 order in the source document-->
     <ORD_NUM><xsl:value-of select="@number"/></ORD_NUM>
     <DATE><xsl:value-of select="ord:date"/></DATE>
     <CUST_NAME><xsl:value-of select="ord:customer"/></CUST_NAME>
     <ADDRESS><xsl:value-of select="ord:shipTo/ord:addr"/></ADDRESS>
     <CITY><xsl:value-of select="ord:shipTo/ord:city"/></CITY>
     <STATE><xsl:value-of select="ord:shipTo/ord:state"/></STATE>
     <ZIP><xsl:value-of select="ord:shipTo/ord:postal_code"/></ZIP>
     <xsl:apply-templates select="ord:items/ord:item"/>
   </ORDERS>
  </dataroot>
</xsl:template>

<xsl:template match="item">
<ORDER_ITEMS>
  <ORDER_NUM><xsl:value-of select="/ord:order/@number"/></ORDER_NUM>
  <PROD_NUM><xsl:value-of select="@number"/></PROD_NUM>
  <QUANTITY><xsl:value-of select="ord:quant"/></QUANTITY>
  <SIZE><xsl:value-of select="ord:size"/></SIZE>
</ORDER_ITEMS>
</xsl:template>

</xsl:stylesheet>
To specify that a transform should take place on import:
From the Import XML dialog, click Transform. This brings up the Import Transforms dialog shown in Figure 12-15.
Add a transform by clicking Add, browsing to the XSLT file name, and clicking Add. In our example, use
order transform for import.xsl.Select the transform you want to use, and click OK to apply the transform.

The Import Transforms dialog lists all the available transforms. It is possible to add more than one transform to the list. However, only one will be applied on any given import: the one that is selected when the OK button is clicked. If the transform generates an XML document that cannot be imported into Access, you will receive an appropriate error message. You will then be asked whether you want to save a copy of the transformed file to a temporary directory. It is useful to do this, since examining the transformed file often makes any errors in the stylesheet obvious.