
Forms on steroids
Using a form
Designing a form
InfoPath, a new addition to the Office suite, is at heart a forms processor, although with novel features that transcend the category. Nevertheless, we pragmatic authors would have named it “Microsoft Forms”.
But Jean Paoli, who conceived the product, has a philosophic bent. Jean says the name InfoPath was chosen to connote the idea of “providing a path for information to travel among the disconnected islands of a business”.
In this chapter we’ll help you get your information traveling. We’ll teach you how to design forms and how end users go about completing them.
Skills required

No special skills are required for this chapter. However, general familiarity with Office products will be helpful as InfoPath uses some Office functions and provides a similar interface and environment.
Whether on paper or electronic, forms are the dominant form of business transaction record where humans are involved. That’s because a well-designed form provides the guidance and constraints that help you get the data entry right.
guidance
A form guides you by providing a separate space for each piece of information, with the appropriate granularity (e.g. one address field, or separate fields for street, city, and state).
constraints
A form can constrain the length of each field (perhaps with a box for each character), or limit data values to items checked off from a printed list.
But these strengths of traditional forms – guided entry and constrained data values – can be weaknesses as well. InfoPath improves on conventional forms software in several ways:
InfoPath guides data entry based on a schema of the form designer’s choosing. It will even help you create a schema.
InfoPath enforces the constraints of the schema, plus additional constraints that the form designer can specify.
The user is actually creating an abstract XML document while completing the form, although he only sees the rendered form view. The experience is similar to other Office products.
The user can add and delete repeating elements, or even groups of repeating elements. The form view expands and contracts as needed.
There can be multiple form views for a single document type. The layout of the fields in the form views does not have to follow the order in the underlying XML document.
The form can have XHTML rich text elements, with lists, highlighted phrases, etc.
Worldwide Widget Corporation has an award-winning logo merchandising program. Although its widgets have lost money from the beginning, the company makes a healthy profit from its popular line of “Widget Wear”, emblazoned with its distinctive “W2C” logo.
Worldwide’s order clerks have quickly become comfortable with InfoPath because of its similarity to their other Office tools. With most forms software, end users operate in “form completion” mode, filling in the blanks. The InfoPath end user environment offers much more flexibility than a typical forms package, with many familiar features from the other Office products.
For this reason, Microsoft refers to the forms completion process as forms editing.
Just as when working with XML in Word, the document on the screen is a rendition of an underlying abstract XML document. However, users normally do not need to know that they are editing an XML document, let alone understand its structure. They simply enter data into the form with help from the various features of InfoPath.
This is known as working in edit mode. Edit mode allows users to enter and modify data, and to open and save documents. The users cannot affect the design of the form.
Upon launching InfoPath, the Fill Out a Form task pane appears on the right side of the window. There are several ways to bring up an empty form to begin entering data:
You can select a form in the Fill out a form section of the task pane. This will immediately bring up the form associated with that name.
You can click On My Computer or On My Web Sites from the Open a form section of the task pane. This will allow you to browse for form files on your computer or on the Web.
You can click Open on the File menu, then select a file and click Open. If you choose a form file (with a
.xsnextension), InfoPath will open a blank form of that kind. If you choose an XML document, InfoPath will open that document as a form.
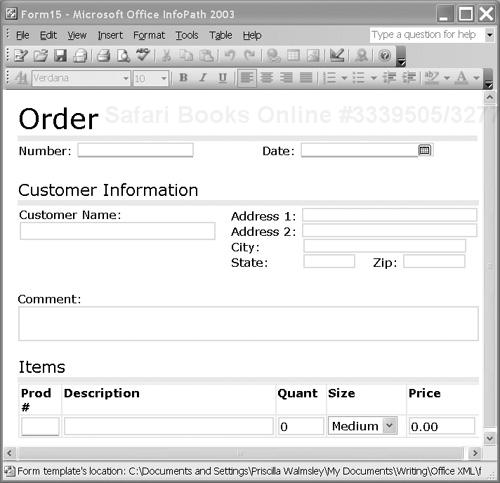
To use the Worldwide example, choose either of the last two options. Select the order.xsn file and click Open. This will bring up an order form, shown in Figure 9-1.
InfoPath offers a familiar environment that is consistent with the rest of the Microsoft Office products. It has many of the same features as other Office products, including:
Cut, copy and paste
Spell check
Find and replace
Undo and redo
Select all
Print, print preview and page setup
Just as a spreadsheet mapped to an XML document has repeating and non-repeating cells, a form has repeating and non-repeating fields. In our example, Items is a repeating table. Its rows repeat for each item ordered, which means the five fields in a row are repeating fields.
Filling out the form is simply a matter of filling in the blanks. As you position the cursor over an editable field, its border becomes a dark gray. The Tab key can be used to move between fields. Fields that are required to contain data are underlined in red. In our example, the Number, Date and Product Number fields are required.
Every field has an associated datatype. Some, such as Customer Name, are simply strings, which allow any data to be entered. Others have specific types, such as dateTime for the Date field, and integer for the Quant field. Additional constraints can be placed on the contents of a field, as discussed in 9.3.4.2, “Field-based constraints”, on page 199.
If you enter a value in a field that is invalid for the field’s datatype, or violates a constraint, a red-dashed border will appear around the field. Right-clicking the field will bring up a description of the violation.
Controls can be used to change the appearance and/or capabilities of a field. Most fields in our form have ordinary text boxes for controls, but three fields are associated with other kinds of controls:
The Date field has a calendar control, which allows the user to select the date from a calendar.
The Comment field has a rich text box control, which allows the user to format the text of the comment by using fonts, sizes, colors, lists and styles.
The Size field has a drop-down list associated with it, allowing the user to select from the values Small, Medium or Large.
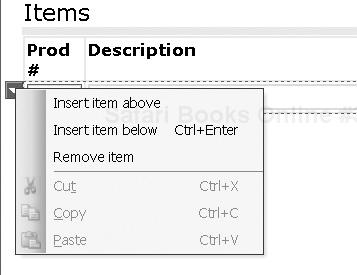
The last part of the order form is a table, which allows repeating items for the order. Only one row is initially displayed in the empty form. When the cursor is positioned in any field on the row, you can click the down arrow at the left of the row to bring up the table menu, shown in Figure 9-2. This menu allows you to insert and remove rows.
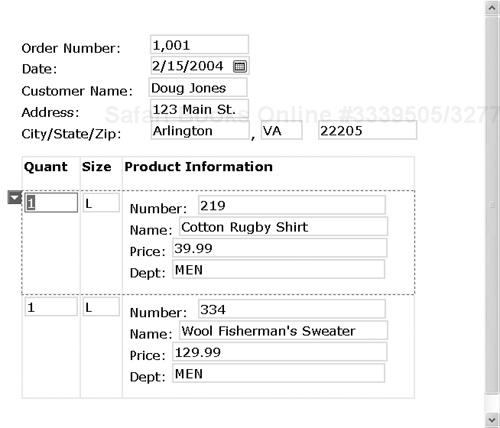
As an exercise, fill in the order form with data, including more than one item in the table. The completed form will look something like Figure 9-3.
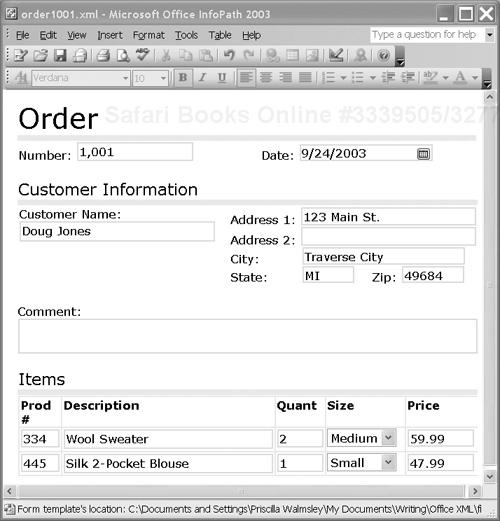
Once the form is completed, you can save the data as an XML document. To do this, simply click Save on the File menu and specify a file name. Note that it is possible to save a document that contains errors; the resulting document simply won’t be valid according to its associated schema.
The generated document is shown in Example 9-1. An end user will probably never have to look at it, but as we are going to be designing forms, it may be helpful to know what InfoPath is generating.
Example 9-1. Saved XML document (order1001.xml)
<?xml version="1.0" encoding="UTF-8"?>
<?mso-infoPathSolution productVersion="11.0.5531"
                       PIVersion="1.0.0.0" href="order.xsn"
                       language="en-us"
                       solutionVersion="1.0.0.197" ?>
<?mso-application progid="InfoPath.Document"?>
<ns1:order number="1001"
           xmlns:ns1="http://xmlinoffice.com/orders">
  <ns1:date>2003-09-24T00:00:00</ns1:date>
  <ns1:comment></ns1:comment>
  <ns1:customer>Doug Jones</ns1:customer>
  <ns1:shipTo>
    <ns1:addr>123 Main St.</ns1:addr>
    <ns1:addr2></ns1:addr2>
    <ns1:city>Traverse City</ns1:city>
    <ns1:state>MI</ns1:state>
    <ns1:postal_code>49684</ns1:postal_code>
  </ns1:shipTo>
  <ns1:items>
    <ns1:item number="334">
      <ns1:desc>Wool Sweater</ns1:desc>
      <ns1:quant>2</ns1:quant>
      <ns1:size>M</ns1:size>
      <ns1:price>59.99</ns1:price>
    </ns1:item>
    <ns1:item number="445">
      <ns1:desc>Silk 2-Pocket Blouse</ns1:desc>
      <ns1:quant>1</ns1:quant>
      <ns1:size>S</ns1:size>
      <ns1:price>47.99</ns1:price>
    </ns1:item>
  </ns1:items>
</ns1:order>
Note that there are two processing instructions at the beginning of the document. The first, labeled mso-infoPathSolution, indicates the form associated with this document, namely order.xsn.[1] This allows InfoPath to associate the document with the form when it is opened.
The second processing instruction, labeled mso-application, indicates that the program used to open this document should be InfoPath. Documents with a .xml extension that do not contain such a processing instruction are usually opened in a Web browser.
Instead of starting out with an empty form, you can open an existing XML document, edit it, and resave it. However, in order to open a document in InfoPath it must have the two processing instructions shown in Example 9-1. Otherwise, InfoPath will not know what form to associate with the document. This means that if the XML document was generated by some other process, those two instructions must be added before it can be used in InfoPath.
There are two ways to open an existing XML document in InfoPath:
You can click On My Computer or On My Web Sites from the Open a form section of the Fill Out a Form task pane.
You can click Open on the File menu, then select the file and click Open.
In either case, this will allow you to browse for files on your computer or on the Web. If you choose an XML document that has the appropriate processing instructions, it will be opened in InfoPath.
You can save your completed form as an XML document. In addition, you can export it to either an HTML page, or to Microsoft Excel. To export a completed form, click Export on the File menu.
InfoPath’s design mode allows us to create or modify the layout of the form. Just as with Word, we will be creating a rendition of the XML document we want the end user to complete. Unlike Word, however, InfoPath can create the necessary XSLT stylesheet – and other information needed to render the form from the XML document – entirely from the design mode interface.[2]
To enter design mode, when the order form is open in edit mode, click Design this Form on the Tools menu.
This brings up the form in design mode, along with the Design Tasks task pane. This is shown in Figure 9-4. There is a lot there to experiment with and you are encouraged to do so as we move ahead with the design.
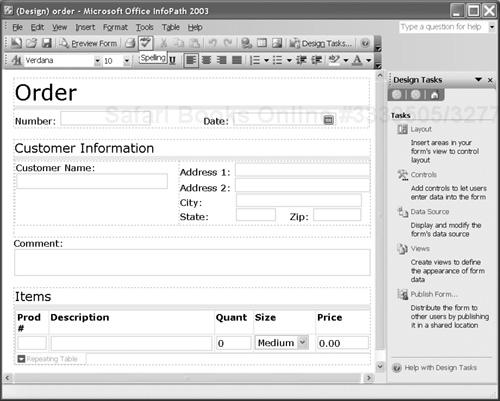
Designing a form in InfoPath involves heavy use of the task panes as well as the main window. Individual fields and parts of the form layout can be dragged from the task pane onto the form. The form is displayed roughly as it will appear to the user.
The Design Tasks task pane provides links to the four other task panes that are relevant to designing forms, namely:
The Layout task pane allows you to manage the layout of the form using layout tables. It is discussed in 9.3.2, “Laying out the form”, on page 193.
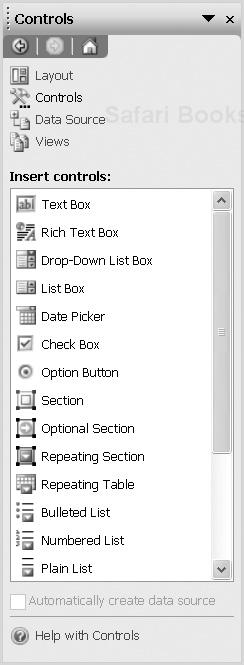
The Controls task pane allows you to add controls to fields. It is discussed in 9.3.3, “Fields and controls”, on page 196.
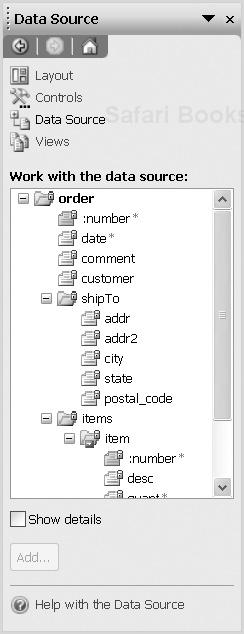
The Data Source task pane shows the structure allowed by a schema, and allows you to add fields to the form. It is discussed in 9.3.1, “Working with the data source”, on page 191.
The Views task pane allows you to create more than one view of the data, and manage the views. It is discussed in 9.3.7, “Views”, on page 218.
Each of these four task panes can also be selected from the task pane menu, which is displayed by clicking the name of the currently displayed task pane.
The Data Source task pane, shown in Figure 9-5, displays the structure allowed by the schema of the underlying XML document. It displays the element types and attributes (preceded by a colon) in a tree structure. Element types and attributes that are required are displayed with a red asterisk.
Tip
Some element types that are in fact required by the schema are not marked as required in the data source structure. This is because they have datatypes (for example, string) that allow empty values.
If you check the Show details box, InfoPath will show you the datatypes of each of the element types and attributes.
Element types and attributes can be added to the form by dragging them from the Data Source task pane to the appropriate location in the form. They can be dragged into an empty area of the form, or dragged into a layout table, as we will see in 9.3.2, “Laying out the form”, on page 193.
The structure shown in the task pane may have one of several origins. It may have been loaded from a schema definition, which it was in our case. It can also have been loaded from a schema inferred from a database or Web service. In any of these cases, the structure is static and cannot be changed by the form designer in InfoPath. That is because InfoPath assumes your intention is to create XML documents that are compatible with those schemas, databases, or Web services.
Alternatively, the structure may have been inferred from an example XML document, or constructed by the form designer from scratch. In either of these two cases, the form designer can modify the structure in the Data Source task pane. Modifying the XML structure is discussed further in 9.3.6.6, “Starting with a blank slate”, on page 215.
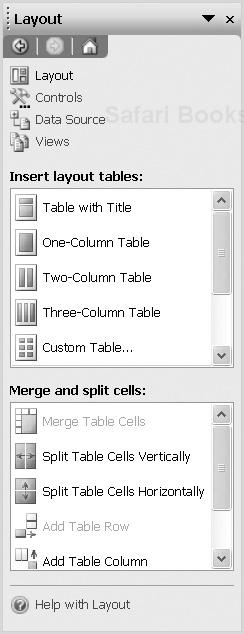
The overall layout of a form can be modeled as one or more tables. The Layout task pane, which is shown in Figure 9-6, provides a set of design aids called layout tables. They can be added to the form by dragging them from the task pane.
Caution
Layout tables are used to organize fields on the form page. They should not be confused with repeating tables, such as the Items table in our order form, which are used to hold data.
The top half of the Layout task pane shows the types of layout tables that can be added to a form. The first choice, Table with Title, will add a one-column table that has a textual title associated with it. In fact, any layout table can have a title associated with it by inserting a row at the beginning and placing text in it. The Table with Title option is simply a shortcut.
The next four choices allow you to insert tables with varying numbers of columns and rows. Layout tables can be inserted within other layout tables for more complex layouts.
The bottom half of the Layout task pane allows you to manipulate a layout table once it has been added to a form. It allows you to merge and split cells, and add rows and columns. All of the functions that can be performed from the Layout task pane are also commands on the Table menu on the main menu bar. The Table menu also allows you to delete columns and rows, select parts of tables, and specify formatting options such as borders and shading. These table-related functions are very similar to the table-related functions in Word.
Text and images can be added anywhere on the form, within any of the cells of a layout table or on the form background. The text can be formatted by changing its font, size or style.
In most business documents, some or all of the structure repeats itself. In our order example, a single order can contain multiple items, each of which has a product number, quantity and size. InfoPath allows you to render repeating elements using three different controls:
lists
A list is a collection of text items that can be increased or decreased by the form user. Each item in the list is one field, a text string, which will be saved as the content of a single repeating element. Lists may be bulleted, numbered or plain (i.e. with no symbol preceding each item). A list might be used to represent repeating address lines or comments.
repeating tables
For lists of items that are made up of multiple fields that can fit on a single line of the form, repeating tables can be used. In our example, the order items were represented by a repeating table because they have five fields: Prod #, Description, Quant, Size and Price. The table is shown on the form as a grid that allows the form user to add or delete rows. Don’t let the name confuse you: the table itself doesn’t repeat, it is the rows that repeat.
repeating sections
A section is a grouping of controls in a form. Another way to represent repeating element types with multiple children is with repeating sections. Repeating sections don’t have the restrictions of lists or repeating tables.
Repeating tables are a good choice when there are few enough fields that they fit easily on a single line. In other cases, repeating sections are used.
As repeating sections can contain repeating tables and/or other repeating sections, they can be used to render repeating element types that contain child repeating element types.
Each of these three controls for repeating element types can be added to the form from the Controls task pane, described in 9.3.3, “Fields and controls”, on page 196.
Each of the controls must be associated with a specific element type that is allowed to repeat according to the data source. For example, our repeating table for order items is associated with the item element which is allowed to repeat within an items element. If the element type is not allowed to repeat according to the schema, InfoPath will not let you associate it with a list, repeating table, or repeating section.
An Optional Section is a section that may or may not appear in a completed form. A form user can delete the section, or add it if it is not displayed. If the section does not appear, no corresponding element will occur in the saved XML document. To render complex element types that are both repeating and optional, you can place a repeating section within an optional section.
Each field in the form is the rendition of a particular element type in the schema. Certain aspects of a field are inherited from the element type, including the expected datatype (such as string, integer or date), the default value, whether or not it is required, and any additional validation constraints.
In addition, each field is associated with a particular control, which handles how the field appears to the user and in some cases what kind of data can be entered. For example, a date field might use a date picker control, which allows the user to select a date from a calendar. A complete list of the controls that can be related to individual fields is provided in Table 9-1.
Table 9-1. Types of field-related controls
Control type | Description |
|---|---|
Text box | Plain text only, on one or more lines. |
Rich text box | Text with formatting, such as fonts, sizes, bold and italics. It can also contain tables, images, and bulleted lists. |
Drop-down list box | A drop-down list from which the user can choose one value. |
List box | A scrollable menu of items that allows more than one value to be selected. |
Date picker | A date/time box, with a displayable calendar that helps the user choose the date. |
Check box | A box can either be checked or unchecked. |
Option button | A set of radio buttons that can be used to select from a group of choices, with one selection being the default. Only one in the group can be selected. |
Button | A button that is pushed to perform a particular action, such as resetting a value in the form, performing a calculation, or submitting the document to a SOAP Web service. |
Hyperlink | A textual link to a resource (such as a Web page). |
Picture | An image that links to a resource (such as a Web page). |
Expression box | A read-only box that displays the result of a particular XPath expression. This is useful for displaying a calculation, such as a count or sum, or for numbering items in a repeating table. |
When a simple element type is dragged from the Data Source task pane to the form, a field is created with the default control for its type, usually a text box. It is possible to change the control used by the field by right-clicking it, and clicking Change To from the resulting context menu. Alternatively, you can start out with the control you want by dragging it from the Controls task pane, shown in Figure 9-7.
When a control is dragged to the form from the task pane, InfoPath will display a Binding dialog which asks you to specify the element type to which you want to bind the field.
It is possible to edit the properties of a field by double-clicking it. The properties differ depending on the control type, but many of them are associated with the way the data is validated or displayed. It is also possible to change the XML element type to which a field is bound. This is accomplished by right-clicking the field and clicking Change Binding on the resulting context menu.
InfoPath validates field values as the user enters them. Fields that contain errors are marked with a red dashed border. This allows the user to correct the error immediately rather than waiting until she saves the document.
There are three levels of validation in InfoPath: schema validation, declarative validation and script-based validation. Values entered into a field must be valid at all three levels in order to be accepted.
XML Schema allows you to specify constraints on a document. Some are related to the document’s structure, such as the number and order of child elements that may appear in the content of an element. Others are related to the content of an individual element. A schema can constrain:
the datatype of a value (e.g. string, integer, date)
whether a value is required
the minimum and maximum value
the minimum and maximum length of the value, or the number of digits
the list of possible valid values
In addition, you can specify patterns (in the form of regular expressions) to which the values must conform.
InfoPath allows you to declare further constraints on data. It is not possible to override or loosen the constraints specified by the schema, but you may add new constraints. This is useful if the schema is not restrictive enough, or if you want to enforce constraints that cannot be expressed in a schema definition.
One common example is known as a co-constraint. In it, the validity of one field depends on the value (or presence) of another field.
To declare additional constraints on a field:
Right-click the field and click Properties on the resulting context menu.
On the Data tab, click Data Validation.
Click Add.
This brings up the Data Validation dialog shown in Figure 9-8. This dialog takes you through expressing these constraints in an intuitive way. A constraint can specify that a value must:
be equal to, greater than or less than a specific value, or the value of another field
be present or absent
contain or begin with (or not) a specific string
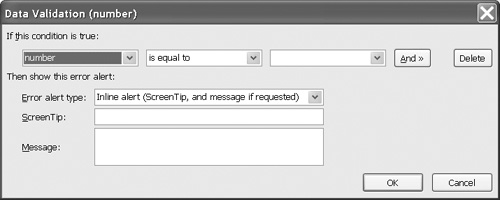
You can specify multiple constraints and join them using either “and” or “or”. You can also control the way the user is notified if there is an error, and provide an error message.
Note that a constraint is not limited to a single field. You can specify multiple constraints on multiple fields in the same data validation rule, even though that validation will be associated with a particular field.
For highly complex validation, InfoPath allows an Office developer to write custom scripts that can be run when the form user opens a document, places the cursor on a field, or leaves a field.
InfoPath gives you quite a lot of control over the look and feel of the form. You can format any of the text in the form, such as the table titles and field labels. You can alter the color scheme or background color used in the form by clicking Color Schemes or Background Color on the Format menu.
As for the data itself, there are several different ways to customize its formatting and appearance:
You can change the font, size or style in which the data appears by clicking Font on the Format menu or using the task bar.
You can change the way the data is formatted by right-clicking the field, clicking Properties, then Format. This allows options similar to those in Excel; for example, choosing to display a date as MM-DD-YYYY, or displaying a comma separator in a number.
Right-click the field, click Properties, then Display. Here are other options related to displaying the data, such as placeholder text, whether text should be wrapped, and how the data should be aligned. The options available depend on the control type.
With some controls, you can use conditional formatting to specify that a data value should be displayed in a certain color or style if a condition is met. This is useful as a signal to the user that, for example:
A financial number is negative rather than positive (often displayed in red).
A data value is exceptionally high or low, indicating a possibly invalid value.
An item is urgent and requires immediate attention.
To use conditional formatting:
Double-click the field to display its properties.
On the Display tab, click Conditional Formatting.
Click Add. This brings up the Conditional Format dialog shown in Figure 9-9.
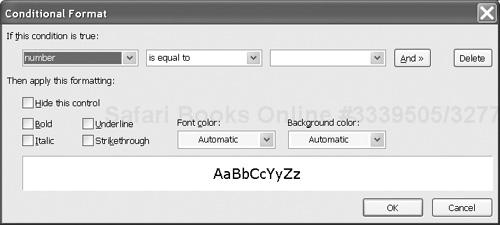
This dialog is similar to the Data Validation dialog in that it allows you to specify one or more conditions. If the conditions, collectively, are true, the formatting designated in the dialog is applied. Multiple conditions can be added to a single field.
So far, we have worked with a form that already exists. When creating a new form, there are actually six ways to get started:
Modify an existing form. You can adapt an existing form to your needs.
Load a schema. If you already have a schema, you can load it and base the form design on it.
Use an XML example. InfoPath will infer a schema from an example XML document.
Start from a database. InfoPath will infer a schema from an Access or SQL Server database.
Start from a Web service. InfoPath will infer a schema from the result of a call to a SOAP Web service.
Start with a blank slate. You can start from scratch, creating the schema manually.
Each of these methods is discussed in the following sections.
InfoPath comes with some excellent examples that exhibit all of the form design features. It is well worth looking through the examples to get a full appreciation for InfoPath’s capabilities. It is possible to customize these examples as well. To do this:
Bring up the Design a Form task pane.
Click Customize a Sample.
Select a form of interest. This will open it in design mode.
Tip
If you want to use one of these examples, but want to change the structure of the XML document somewhat, you will have to save the form to a folder, as described in 9.3.9, “Saving form designs”, on page 220, and edit the schema manually. You cannot modify the structure in the Data Source task pane, except to add new element types.
InfoPath will accept a schema as input and fill in the data source pane with the structure allowed by the schema. This is a useful way to start if you already have a schema and want to design the form around it.
Warning
Once you have loaded a schema, modifying the schema file (.xsd) that you loaded has no effect on the structure in the form, and the schema cannot be modified using the Data Source task pane. You can, however, save the form to a folder and edit the schema manually as described in 9.3.9, “Saving form designs”, on page 220.
To load a schema:
Bring up the Design a Form task pane.
Click New from Data Source.
Choose XML Schema or XML data file and click Next.
Type the location of the schema file and click Finish.
This will bring up a blank form, with the XML structure in the Data Source task pane.
InfoPath will infer a schema from an example XML document. It will make assumptions about the allowed children (and their order), the datatypes, and optionality based on the content of the example document. To use an XML example:
Bring up the Design a Form task pane.
Click New from Data Source.
Choose XML Schema or XML data file and click Next.
Type the location of the XML document and click Finish.
In this case, unlike when you load a schema, you will have an opportunity to edit the structure once it is loaded. Modifying the data source structure is discussed in 9.3.6.6, “Starting with a blank slate”, on page 215.
InfoPath will also allow you to specify the location of an Access or SQL Server database, from which it will infer a schema. To do this:
Click Design a form from the task pane list.
Click New from Data Source.
Click Database (Microsoft SQL Server or Microsoft Office Access only), and click Next.
Click Select Database and choose a database file from the list. For this example, use
order.mdbfrom the example files.This will bring up the Select Table dialog shown in Figure 9-10. This dialog lists the tables, views and queries in that database.
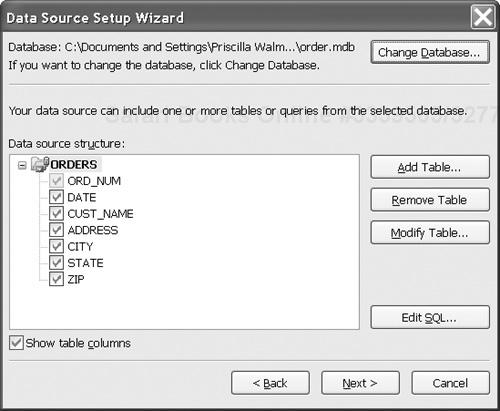
Select
ORDERSand click OK. This will display the structure of the data source, as shown in Figure 9-11.

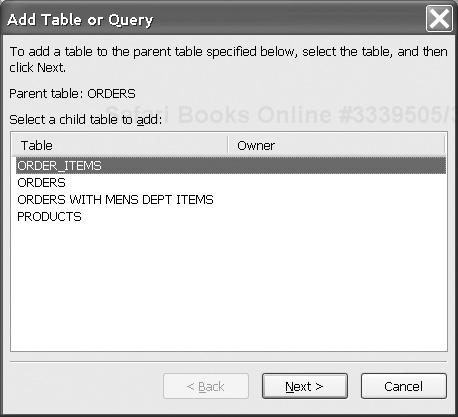
The next order of business is to add the related ORDER_ITEMS table to the data source. To do this:
Click Add Table. This will bring up the Add Table or Query dialog shown in Figure 9-12.
Select
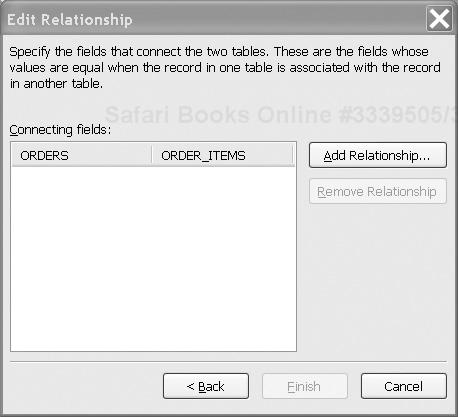
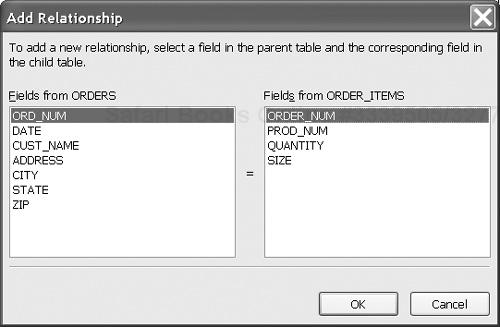
ORDER_ITEMSand click Next. This will display the Edit Relationship dialog, shown in Figure 9-13.Click Add Relationship..., which will in turn bring up the Add Relationship dialog, shown in Figure 9-14.
Select
ORD_NUMfrom theORDERSlist, andORDER_NUMfrom theORDER_ITEMSlist. This specifies the columns to be used to relate the two tables.Click OK, which will return you to the Edit Relationship dialog, this time with the relationship between
ORDERSandORDER_ITEMSlisted.Click Finish to return to the Data Source Setup Wizard.
Repeat the above steps to create a relationship between
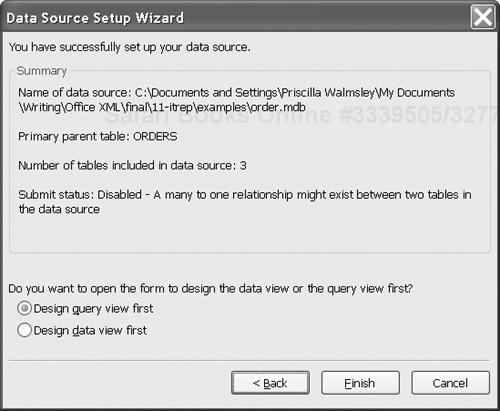
ORDER_ITEMSandPRODUCTS. ThePROD_NUMcolumn ofORDER_ITEMSshould be related to theNUMcolumn ofPRODUCTS.Once you have returned to the Data Source Setup Wizard dialog, click Next. This will display a dialog like the one shown in Figure 9-15. Click Finish.
You now have a form with two views. One, called Query, will contain a field for each column in the main table (in this case, ORDERS), as shown in Figure 9-16. The other view, called Data Entry, will start out blank. You can switch between the two views by selecting Views on the task pane and selecting either one.
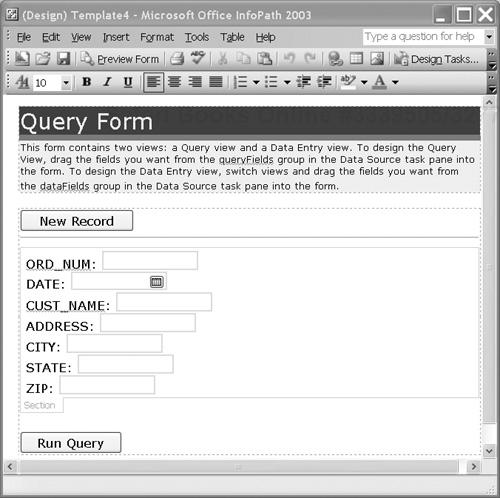
The Query view is designed for a user to specify criteria on which to search the database for records. When the user enters information into one of the fields and clicks Run Query, InfoPath will automatically switch to the Data Entry view, displaying the records that matched the criteria. The user can then edit the records and submit the changes to the database. The user can also insert a new record by clicking New Record on the Query view.
The Query view can be used as generated, but the Data Entry view starts out blank, so it needs to be designed. To do this:
Switch to the
Data Entryview by selecting it on the Views task pane.Click Data Source on the task pane to bring up the database structure.
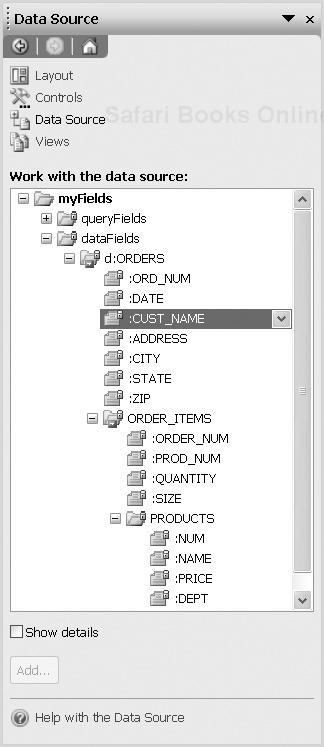
In the data source structure, the children of
dataFieldsare intended to be used on theData Entryview, while the children ofqueryFieldsare intended to be used on theQueryview. ThedataFieldsstructure is shown in Figure 9-17.Drag the
d:ORDERSelement type to the empty form. Click Repeating Section on the resulting menu.Drag the individual element types under
ORDERS(e.g.ORD_NUMandDATE) to the repeating section you just created.Drag the
ORDER_ITEMSelement type to the repeating section. Click Repeating Table on the resulting menu.
After some reformatting and deletion of columns, you might have the form shown in Figure 9-18.

As always, the form can be tested by clicking Preview Form on the toolbar. You can switch views by clicking the appropriate view name on the View menu. If, for example, you enter 1001 in the ORD_NUM field of the Query view and click Run Query, you will see the Data Entry view with the data for order 1001, as shown in Figure 9-19.
This particular Data Entry view does not allow the user to make changes and submit them to the database. This is because there is a many-to-one relationship between ORDER_ITEMS and PRODUCTS. If PRODUCTS were not included in the list of tables in the data source, we would be able to add a Submit button that updates the database from the form.
InfoPath will also infer a schema from a Web service to which you plan to submit data, or from which you plan to receive data (or both). To do this:
Click Design a form on the task pane list.
Click New from Data Source.
Click Web service.
Indicate whether you plan to receive and submit data, submit data or just receive data. For this example, click Receive data.
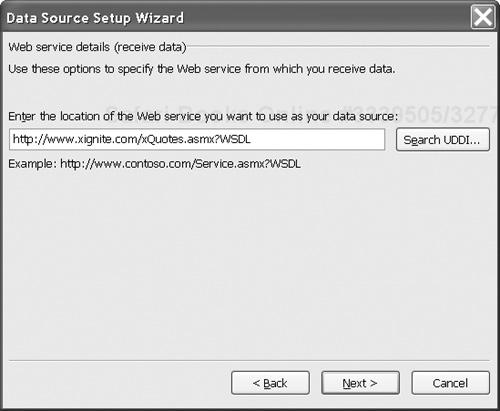
Type the URI of the Web service. For this example, type in
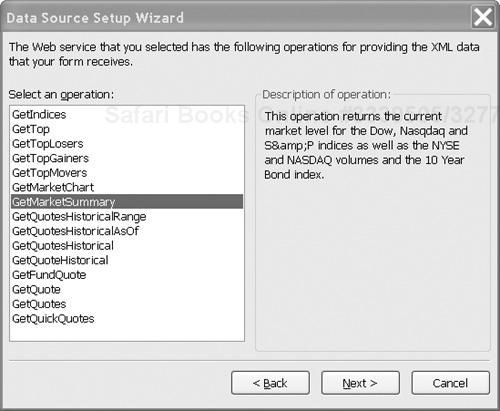
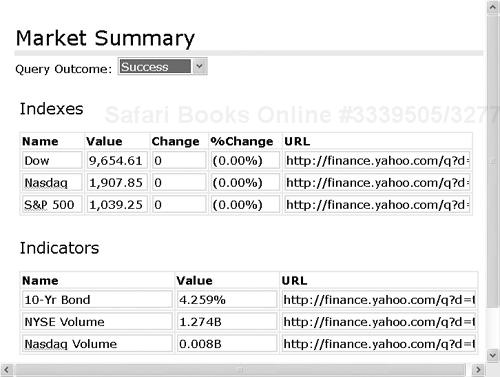
http://www.xignite.com/xQuotes.asmx?wsdl, as shown in Figure 9-20, and click Next.This will bring up a list of all the operations for that Web service. Select GetMarketSummary, as shown in Figure 9-21, and click Next.
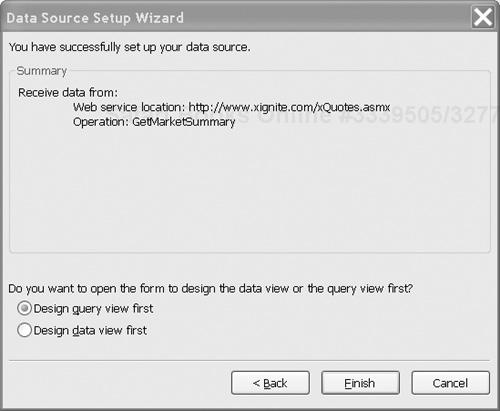
InfoPath will then display a summary dialog, shown in Figure 9-22. Click Finish.
Starting from a Web service is similar to starting from a database, in that two views are generated: a Query view and a Data Entry view. If there are parameters to pass to the Web service, you can drag them to the Query view. In this case, no parameters are required.
You can then design the Data Entry form based on the results of the Web service. You do this by dragging element types from the dataFields data source onto the form, just as in the database example in the previous section. The result might look like Figure 9-23.
This example simply receives data from a Web service and displays it. You can also allow users to fill out a form, then submit it to a Web service. For example, a purchase order might be filled in using InfoPath and then submitted to a Web service for processing by the ordering system. You can also receive data from one Web service, then submit it to another. In our example, we might want to pass the retrieved market summary data to a Web service that updates our internal database with the statistics.
If none of the above options is appropriate, you can start without a schema and construct it yourself. There are two ways to do this: you can manually create the structure in the data source task pane, or you can have InfoPath add the element types as you drag controls to the form. The advantage of either approach is that the structure is highly flexible; you can tweak it as you design the form.
To manually construct the schema:
The data source will be displayed with a root element type myFields. From there, you can add children to myFields using the Add button on the task pane or by right-clicking the desired parent and clicking Add. Adding a field brings up the Add Field or Group dialog shown in Figure 9-24.
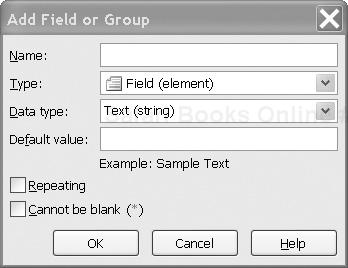
The dialog allows you to specify the Name of the item to be added to the schema and its so-called Type, which is one of the following designations:
Attribute
Means that the added item is an attribute. If placed in the form it will be rendered as a field.
Field
Means that the added item is a child element type that can only contain data. If placed in the form it will be rendered as a field.
Group
Means that the added item is a child element type that could contain other elements (i.e. be a subtree). If placed in the form it will be rendered as a group of fields, either a section or a table.
You can also indicate whether an item is repeating. And for Attribute and Field you can also specify a Data type and Default value and whether the content or value can be empty (i.e. left blank in the form).
Caution
Despite its name, the Add Field or Group dialog does not add a field or group to the form. You can do that by dragging the added element type or attribute from the task pane.
From the Data Source task pane, you can also delete and move element types and attributes, and modify their properties.
The alternative is to have InfoPath create the structure based on the form you design. InfoPath will insert element types with generic names (field1, field2, etc.) as you drag controls to the form. If you add a repeating table or section, it will add an element type with child element types to the structure. You can modify the structure as desired, including changing properties such as the name and datatype.
Multiple views can be created for the same form. For example, it may be useful to have one set of users edit some fields, while another set of users edits other fields. One view may present summary level data, while another allows editing of line item data. One view might be more appropriate for printing, while another is more appropriate for editing.
The views can be completely different, with different fields, and a different look and feel. The only connection is the underlying XML document. By default, InfoPath creates one view named View 1 when you begin form design. You can add views from the Views task pane, shown in Figure 9-25.

The Views task pane allows you to add and delete views, as well as switch between them. You can also modify the properties of the view by double-clicking its name in the task pane. Properties of a view include its name, background color, default fonts, and print settings. You can designate one of the views as the default, which is brought up when the document is opened. In edit mode, the form user can switch between views by clicking the view name on the View main menu.
Users can fill in forms and save them as XML documents on their file system. Those XML documents can then be emailed, moved to a server, or passed to an application for processing.
InfoPath can eliminate the extra step of passing the XML file around by allowing users to submit their documents directly from InfoPath. To set this up:
Click Controls on the task pane to bring up a list of controls.
Drag a button onto the form.
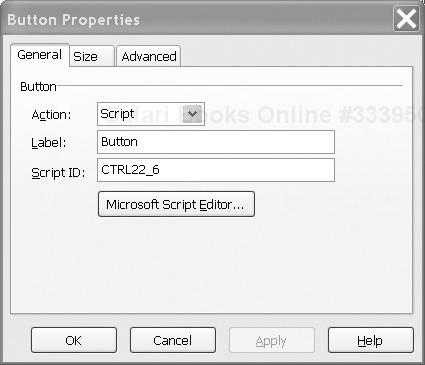
Right click the button, and click Button Properties on the resulting menu. This will bring up the Button Properties dialog shown in Figure 9-26.
Select Submit from the Action list. This will bring up the Submitting Forms dialog shown in Figure 9-27.
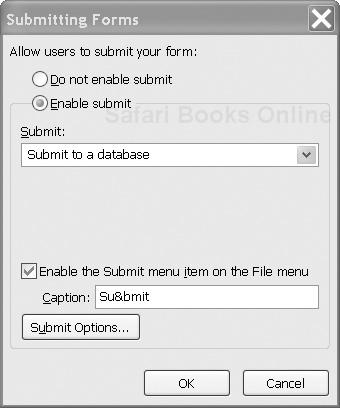
From here, you can choose to submit the form to a SOAP Web service or a database (if the original data source was a database), or you can write a custom script for submission. The custom script could be used, for example, to email the completed form to a specific person, or to place it at a specified location on a server.
If you saved a form that you were designing in the previous section, you may have noticed that it was saved with a .xsn extension. That extension identifies a form template, a set of documents related to the form that is compressed and stored in a Microsoft cabinet archive.[3]
Table 9-2 describes the components of the form template for our order form example.
Table 9-2. Components of the order form template
Extension or fileid | Description |
|---|---|
| An XML directory of the form template. It identifies the files and contains supplementary information (beyond the stylesheets) for rendering views, validating input, and supporting structural changes during editing. (A schema for |
| The all-important schema definition, plus a common library of schema components. The schema defines a document type named |
| Stylesheets: InfoPath provides one for each view. |
| Graphics files for decorating the views. |
| Scripts and program code written by the designer or provided by InfoPath. |
| An empty |
| An |
There are two ways to save a form and its related files. The default, when you create a new form or adapt a sample form, is to save all the components in the same cabinet (.xsn) archive. A file can be extracted from the .xsn file by opening it in InfoPath and resaving it, or by using cabinet archive utilities.
Another method of saving a form is by clicking Extract Form Files on the File menu. After you have chosen a folder, InfoPath will save all the component files, uncompressed, in that folder. You can reopen a form from a folder, by opening the manifest (.xsf) file. When you resave it, it will save it to the folder rather than to a .xsn file.
Once you have completed your form design, you may wish to roll it out to a number of users. To do this, you use the publishing feature of InfoPath. Clicking on Publish on the File menu will bring up the Publishing Wizard, which will guide you through the process.
You can choose to publish the form to a shared folder on a computer or network, a Web server, or a SharePoint form library. In the latter case, form users can open a form library and select the form from the Fill out a form task pane.
[1] Normally, the entire path is included; we have shortened it to simplify the example.
[2] And if you need to do more than the interface supports, you can supplement it with scripting, as we’ll show you in Chapter 10, “Using scripts with forms”, on page 226.
[3] Cabinet archives normally have a .cab extension. However, cabinet software can also be used to process .xsn archives.