Chapter 2. Installation and Deployment of the XPages Extension Library
Users wishing to begin utilizing the new controls from the XPages Extension Library (ExtLib) in an application need to install the library to both the Domino Designer and the Domino server, as well as consider various deployment strategies for the Notes Client end users. This chapter is written for the XPages developer and the administrator of the Domino environment. It shows how to deploy the ExtLib for various scenarios.
Until the release of the IBM Lotus Notes Domino 8.5.3 Upgrade Pack 1 in December 2011, a common misconception was that the installation, deployment, and maintenance of the ExtLib was quite an undertaking. However, the ExtLib is constantly evolving to meet the needs of the enterprise while delivering expected feature functionality to users. Thus, it became necessary to maintain the Extension Library post-initial setup. This chapter illustrates how you can easily deploy the Extension Library in your IBM Lotus Notes Domino or IBM XWork environment. It takes you through downloading the latest releases to enabling automated deployment.
The ExtLib from OpenNTF requires IBM Lotus Domino Server version 8.5.2 or higher to work, whereas the IBM supported version of the ExtLib requires IBM Lotus Domino Server version 8.5.3 to work. The ExtLib does not work on Domino 8.5.1 or lower, because the server does not include any of the required extension points that ExtLib hooks into to provide the additional controls and artifacts.
Downloading the ExtLib
You can download the ExtLib from two places: the OpenNTF website (http://extlib.openntf.org) for IBM Lotus Notes Domino 8.5.2 and above or as part of the IBM Lotus Domino 8.5.3 Upgrade Packs available from Passport Advantage® (http://www.ibm.com/software/passportadvantage) for IBM Lotus Notes Domino 8.5.3 or above. There are two available places for download because of license and, more significantly, because the download from Passport Advantage is fully supported by IBM.
Customers and business partners have access to Passport Advantage. Once you’re there, it’s easy to navigate to the Online section to sign in and download the build. For IBM Lotus Notes Domino 8.5.3 Upgrade Pack 1, the build part number that locates the downloadable file is CI5GIEN. There is only one download for the complete Upgrade Pack; the zip file contains all platform installs for the server, client, and designer client. It isn’t possible to take one part of this install; you must download all parts under the same part number.
After you’ve downloaded the file, extract the contents of the zip file to a temporary folder. The extract zip contains three folders: client, designer, and domino, along with a readme.txt file. The readme is small but contains a link to the Lotus Notes and Domino Application Development Wiki (http://www-10.lotus.com/ldd/ddwiki.nsf), which contains the documentation to accompany the Upgrade Pack. The three folders contain the install executables for each platform that Lotus Notes Domino 8.5.3 supports.
You can also download the ExtLib from the OpenNTF project under the same name (http://extlib.openntf.org).
Once you’re at the site, go to the Download/Releases section, as shown in Figure 2.1, and select the latest release.

Figure 2.1. ExtLib download and releases.
Tip
It is best to use the same release of ExtLib on the servers as what the developers and end users are using in the organization.
The downloaded file from the OpenNTF project is in zip format. It contains numerous files; an example of which from the 8.5.3 release in January 2012 is shown in Listing 2.1.
Listing 2.1. Files Extracted from the ExtLib Download
discussion8xl.ntf
doclib8xl.ntf
DominoDataServiceDoc.zip
Extension Library REST Services.pdf
ExtLib-Notes85.zip
FirebugLiteLicense
LICENSE
NOTICE
readme.pdf
SLF4JLicense
srcOpenNTF-designer.zip
srcOpenNTF.zip
srcOpenNTFSamples.zip
teamrm8xl.ntf
updateSiteOpenNTF-designer.zip
updateSiteOpenNTF.zip
updateSiteOpenNTFSamples.zip
WebSecurityStore.ntf
XPages Extension Library - Slides.pdf
XPages Goes Relational.odp
XPages-Doc.zip
XPagesExt.nsf
XPagesJDBC.nsf
XPagesSBT.nsf
The src*.zip files contains the open source files for the ExtLib. Developers proficient in Java can use those files to explore the controls and customize them for their own use.
Developers interested in enhancing and exploring the ExtLib through the modification of the Java source files can reference the Javadoc documentation found in XPages-Doc.zip. Extract the files to a local directory. Loading index.html in a web browser gives you one-click access to information on the various ExtLib controls, their properties, and more (see Figure 2.2).

Figure 2.2. ExtLib documentation from the download from the OpenNTF website.
The PDF files, XPages Extension Library - Slides.pdf, Extension Library REST Services.pdf, and readme.pdf, and the XPages Goes Relational.odp file, give developers and server administrators an introduction to this OpenNTF project. From the high-level architectural overview to instructions on how to use some controls, developers and administrators have what they need to go beyond the introductory level.
The ExtLib demonstration application, XPagesExt.nsf, is a powerful education tool in itself, but it does require a configured instance of the ExtLib to render. (An online demo of this application is available. Go to http://xpages.info/, select the Demo tab, and then go to the Live XPages Development Controls from OpenNTF section. Note, however, that the version of the application being demonstrated won’t likely match the version downloaded.) This application will show the developer live, working examples of most of the ExtLib controls. By exploring this application in Domino Designer, developers are given an application they can reverse-engineer. This allows the discovery of the technological principles behind the XPages contained within the application and shows how certain controls are used in each of the examples.
Along with the XPagesEXT.nsf, the download contains a number of other demo apps. The file XPagesJDBC.nsf demonstrates the Relational support from the ExtLib, while XPagesSBT.nsf is the app that shows off the capabilities of the Social Enabler from the ExtLib. Both of these applications demonstrate the experimental features in the ExtLib.
It is advised that you put this application on the Domino server so that the user can refer to it when needed. Many of the examples demonstrated in this application are described in later chapters.
The Notes Domino templates, Discussion (discussion8xl.ntf) and TeamRoom (teamrm8xl.ntf) are also part of the ExtLib download. These are fully functional templates that are ready to use enterprise environments and are also a showcase for the features of the ExtLib.
The most important files in the archive are the updateSiteOpenNTF*.zips, which contain the ExtLib Eclipse plugins. These files contain everything that the administrator and developer need to deploy ExtLib on both servers and end users’ machines.
Installing the ExtLib via the Upgrade Pack
If you’re installing the ExtLib for the first time on a system that has never had it deployed, this process is relatively straightforward. You must have a licensed version of the product to install the Upgrade Pack. The install executable locates the installed product on the system and completes the installation of the Upgrade Pack as long as that product isn’t running. The Upgrade Pack installer is an addon that installs to an existing install. It doesn’t contain a standalone edition of the product.
For more information on installing the Upgrade Pack to Lotus Notes Domino 8.5.3 and beyond, refer to the online documentation available from the Lotus Notes and Domino Application Development wiki (http://www-10.lotus.com/ldd/ddwiki.nsf).
Installing the Upgrade Pack on a system that has the OpenNTF version of the Extension Library installed is likely to cause problems, chief being that the runtime will not function as expected and possibly not at all. The systems do use the same class files, plugin names, and so forth, but that is where the similarities end. Mismatches will occur particularly if the release data stamp of either is out of sequence. Even if they are within sequence, there is no guarantee that they will work together; in addition, IBM doesn’t support this configuration. So before installing the Upgrade Pack, manually remove any previous version of the Extension Library from your designated system that originated from an OpenNTF release.
The Upgrade Pack uses an add-on installer. Future Upgrade Packs should be able to install over the previous version without breaking the functionality of the server, so removing the previous version of the Extension Library isn’t a requirement.
Deploying ExtLib to Developers in Designer
Developers need to install the Extension Library to Domino Designer before they can begin using the various controls in their applications. The great advantage of installing the ExtLib into the Designer is that developers can begin creating applications with the library and see the result of their endeavors when they run the XPages application in the Notes Client (XPiNC) locally. Developers can also preview the application locally in the web browser, but this requires an additional manual step post-installation of the Extension Library from OpenNTF: copying the runtime ExtLib files to the same location as the existing XPages runtime files, which is usually the osgi folder off the Designer root. One of the many advantages of installing the Designer executable (853UpgradePack1_20111208-0717.exe) from the Upgrade Pack is that it installs the Extension Library runtime to the local preview HTTP server as well as to XPiNC with the design runtime.
If developers want to use the preview server in Windows® Vista or Windows 7, they need to launch Lotus NotesDesigner via Run as Administrator.
If end users are required to use the ExtLib controls in XPiNC applications, administrators need to deploy the ExtLib to all who use Notes Client. (The various deployment strategies are described in “Deploying the Extension Library to End Users,” later in this chapter.) XPages developers can take advantage of this same end user deployment strategy and skip the following ExtLib installation instructions.
If, however, developers are planning to create only server-based web applications, they need to have the ExtLib deployed to their machines, and the administrators need to deploy the ExtLib to the server machines.
Developers can take care of manual deployment using an update site from OpenNTF or using the installer executable from the Upgrade Pack. If administrators are using automatic server deployments, as described later in this chapter under the “Automatic Server Deployment in Domino for 8.5.3” section, it is recommended that developers use the same update site to ensure that the developers are running the same version of ExtLib as the servers.
For OpenNTF release, the first step in a manual deployment is to verify in Domino Designer that the Preferences option to Enable Eclipse Plug-in Install is selected, as in Figure 2.3. If this menu option is not visible, the Domino administrator may have disabled it via a policy document and need to re-enable it before continuing.

Figure 2.3. Enable Eclipse Plugin Install in Domino Designer.
Start the installation process by selecting the File → Application → Install menu options, as in Figure 2.4.

Figure 2.4. Begin the installation of the ExtLib on Domino Designer.
In the next dialog box, select the Search for New Features to Install option, as shown in Figure 2.5. Then click Next to continue.

Figure 2.5. Select the Search for New Features to Install option.
The dialog that follows may appear empty; regardless, you need to add the location of the new update site. If you’re using the update site downloaded from OpenNTF, select the Add Zip/Jar Location button and then select the updateSite.zip file, as shown in Figure 2.6.

Figure 2.6. Installing from the updateSite.zip file.
If you’re using the update site created for your automatic server deployments, select the Add Remote Location button and fill in a name and URL for the update site (see Figure 2.7).

Figure 2.7. The server deployment database or update site.
Regardless of which update site you added or which method you used, click the Finish button. You’re next shown a list of features you can install into the Domino Designer client (see Figure 2.8).
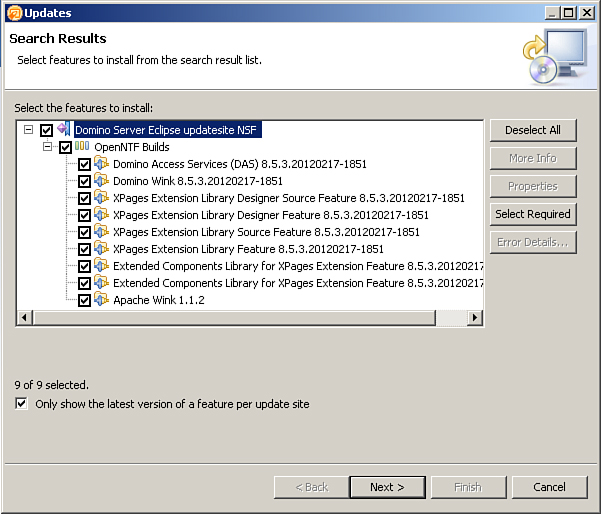
Figure 2.8. ExtLib update site version.
You may select all the available features to install as illustrated, or just select one if desired, and then click Next and then Accept to accept the Apache license agreement, if you’re using the OpenNTF version. Click Next and then Finish.
Because the plugins don’t have a digital signature, depending on the client’s security settings, a dialog box may appear asking if the user still wants to perform the install, as in Figure 2.9. Select the option Install This Plug-in, and then click OK.

Figure 2.9. Plugin install confirmation.
After the plugin has been installed, the user must restart the Lotus Notes Client to complete the install.
Once Designer has restarted, the developer can quickly verify that the installation of the Extension Library has been successful. Create a new application and then an XPage within this application. When this XPage launches, the palette on the right side becomes populated with the newly installed extended controls, as in Figure 2.10.
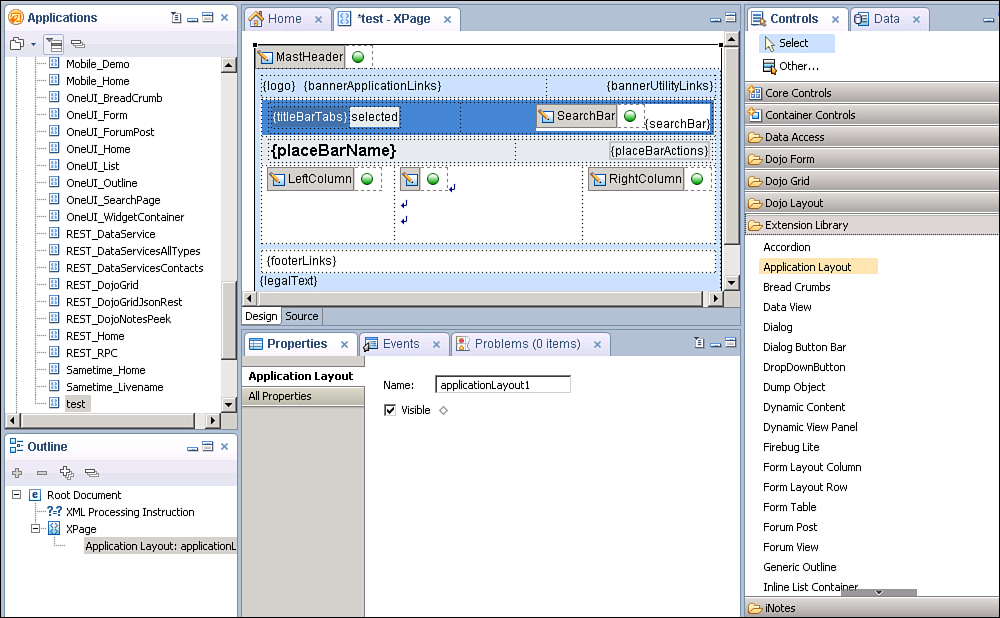
Figure 2.10. The new extended controls in Designer post installation.
The palette may seem cluttered with the extra options available from the Extension Library, but you can remedy this in Designer 8.5.3 by using Palette Profiles. Add these by selecting File → Preferences from the main menu, and then select Domino Designer and then Palette from the dialog box. From here, select the New button to create a name for the profile. Then select the desired palette drawers to appear in this profile. The user can then switch to this palette profile and tidy up the XPages palette.
Taking this one step further, the XPages developer can run applications that use the extended controls in the Notes Client locally. The ExtLib Demo application comes with the OpenNTF download. This application provides examples of most of the extended controls available on the library. It is a valuable education tool that can help the XPages developer get started on the extended controls.
You can also preview this application in the Notes Client, as shown in Figure 2.11. Do this by selecting Design → Preview in Notes Client.

Figure 2.11. Running the ExtLib Demo application in the Notes Client.
Uninstalling the Extension Library from Designer
Uninstalling the Extension Library from Domino Designer is straightforward. The reasons for uninstalling can vary. One reason might be to install a previous version of the Extension Library to what is currently installed. Another could be to keep the development environment tidy and not have multiple versions of the library cluttering the file system.
The way the Extension Library is uninstalled differs depending on the installation type. If installed through the Upgrade Pack, the ExtLib is uninstalled along with the rest of the Upgrade Pack through the Program and Features program, as you would do with any other installation in Windows. Uninstalling the Extension Library that originated from OpenNTF is completely different.
In Designer, select File → Application → Application Management to launch the Application Management dialog. From this dialog, you have several options for the management of the plugin, namely Disable, Uninstall, and Show Properties, as shown in Figure 2.12.

Figure 2.12. The Application Management dialog with the Extension Library highlighted.
Select the Uninstall option for the Extension Library feature. A message prompt then appears to confirm the selection of this option. After you’ve confirmed the option, the user is prompted to restart Designer; this completes the uninstallation of the Extension Library.
Server Deployment
The way the ExtLib is deployed to Domino or XWork servers depends on the source of the download. If you’re using the Upgrade Pack, an AddOn installer is provided for server installations. If you’re using releases from OpenNTF, which doesn’t have an installer executable, other methods are required to deploy the ExtLib.
Automatic Server Deployment in Domino 8.5.3
Domino 8.5.3 (which was released in September 2011) contains a feature that makes it easy for the administrator to deploy and update an Extension Library from OpenNTF without manually copying files to the Domino Server. Using a standard Notes Storage Facility (NSF) based on updateSite.ntf, the administrator can dynamically deploy OSGi plugins to the server.
This new feature is optional and simple to use. By default, the dynamic contribution is turned off. To enable it, you must add a variable to the notes.ini that contains the database paths allowed to contribute dynamic plugins: OSGI_HTTP_DYNAMIC_BUNDLES=updateSite1.nsf,updateSite2.nsf, for example. For each database specified in OSGI_HTTP_DYNAMIC_BUNDLES, the server administrator needs to create a database based on the updateSite.ntf template and then create replicas in all the servers (upon which the above variable must be set) of the cluster or domain. This enables the deployment of Extension Library almost seamlessly.
For the server’s administrator, the steps to enable this feature are straightforward, although they’re configured in a number of places. The first step is to create a database on the server using the Eclipse update site (updateSite.ntf) template. Select File → Application → New, which launches the New Application dialog. From here, select a server where the application is to be created. Then on the same dialog select a server upon which the updateSite.ntf template resides, as in Figure 2.13.

Figure 2.13. The New Application dialog where the update site application is created.
Selecting the OK button on this dialog creates the application. Then it is a matter of modifying the application’s Access Control List (ACL) for those who are to be allowed to create documents, and thus deploy plugins to the server. Modify the ACL of the databases to only allow trusted users (Author Access at a Minimum). No one else should have access. Also, set the Do Not Show in Open Application Dialog flag on the database.
The application is now ready to begin deploying the Extension Library. On the view, Main Features, select the Import Local Update Site action button. This launches a dialog that allows you to select a site.xml file from an Eclipse plugin project, as in Figure 2.14. For the ExtLib, this is located in the updateSite.zip file, which when extracted contains the site.xml file and two folders: Features and Plugins. Select OK on this dialog to begin the import process.
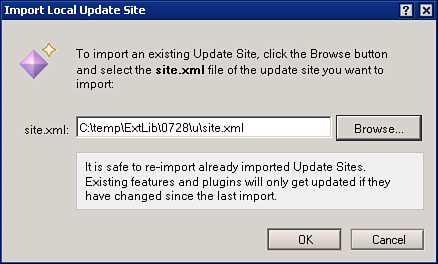
Figure 2.14. The Import Local Update Site dialog with the site.xml file from the ExtLib updateSite zip file.
Once the import is complete, the view of the update site database is updated with a document representing the import of the plugin, as shown in Figure 2.15.

Figure 2.15. The updated site installation has been completed.
After it’s installed, the default state of the update site is to be enabled. You can disable this same project document, which means that it will not be picked up by the OSGi runtime when the server HTTP task has been restarted. The same project document can tell the user a lot of information about the update site installed—most importantly, the project version number and the fragments and plugins bundled with this feature (see Figure 2.16).
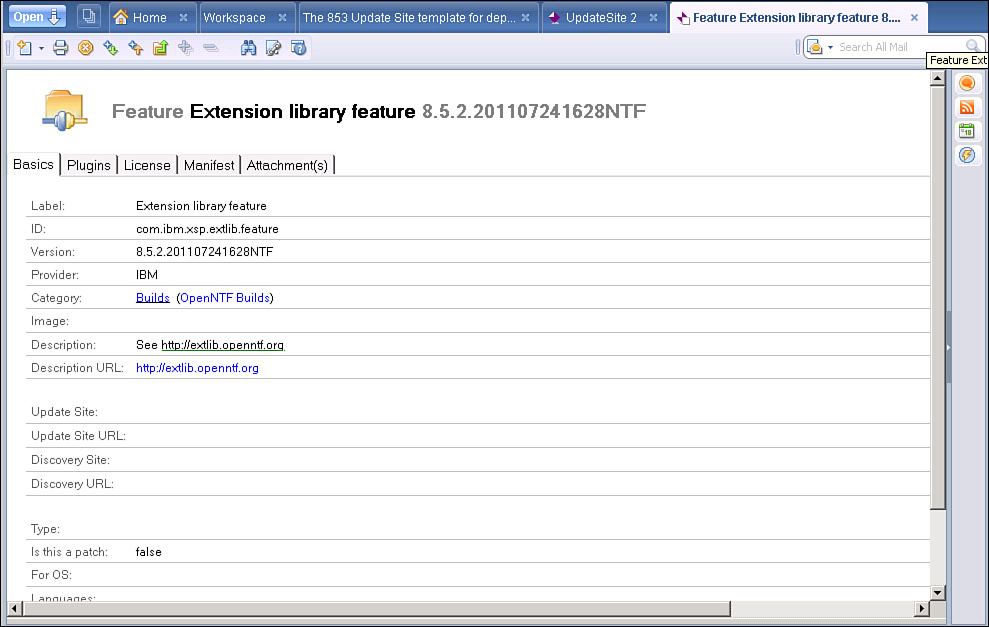
Figure 2.16. The update site document.
All that is left to do here is to put the reference to this update site database in the notes.ini, OSGI_HTTP_DYNAMIC_BUNDLES=updateSite1.nsf, for example. As long as this same notes.ini variable is set on other Domino servers, this application can be replicated to these servers; the Extension Library is deployed here as well.
After you change the notes.ini variable, you will need to restart the server’s HTTP task. This can be done by either restarting the entire Domino server or by issuing the command Restart Task HTTP on the server console. When the HTTP task starts back up or when the server’s HTTP Task has been restarted using the Restart Task HTTP command in the server’s console, a highlighted message appears on the server console indicating that the NSF-based plugin is being installed on the server (see Listing 2.2).
Listing 2.2. Server Console Output of the NSF-Based Plugins Deployment
restart task http
29.11.2011 10:47:04 HTTP Server: Using Web Configuration View
29.11.2011 10:47:15 JVM: Java Virtual Machine initialized.
29.11.2011 10:47:15 HTTP Server: Java Virtual Machine loaded
29.11.2011 10:47:16 HTTP Server: DSAPI Domino Off-Line Services HTTP
extension Loaded successfully
29.11.2011 10:47:18 HTTP JVM: CLFAD0330I: NSF Based plugins are being
installed in the OSGi runtime. For more information please consult the
log
29.11.2011 10:47:29 XSP Command Manager initialized
29.11.2011 10:47:29 HTTP Server: Started
When the server is restarted or the server’s Http task has been restarted, the OSGi launcher introspects the update site databases, automatically detects the features, and dynamically loads the associated plugins in the OSGi runtime. Internally, the OSGi launcher references each plugin using a URL with a proprietary protocol that knows how to access the attachment plugin.
The URL format follows:
osginsf:<dbPath>/<documentUNID>/<pluginJarName>
For example:
osginsf:updateSite.nsf/1234...890/com.ibm.extlib.demo_1.0.0_02102011.jar
Deployed in this way, the plugins are not physically installed on the Domino server. Also, after the HTTP task is shut down, the plugins are not persisted anywhere on the server. If there is more than one version of the same feature, the Domino OSGi launcher uses only the latest version; any older versions are ignored. The launcher only compares the major, minor, and service parts of the version. If two features have the same major, minor, and service parts, the Domino OSGi launcher relies on the last modified date of the feature document.
Deploying the OSGi plugins using this method is easy, but not just anyone can be allowed to import plugins to the server. Many security safeguards are built in to this feature. As with any code running from an NSF, be careful about what code you trust and who created it.
The first layer of security is that the server’s administrator can enable/disable NSF-based plugin contributions. By default, the feature is disabled; to enable it, the administrator uses the OSGI_HTTP_DYNAMIC_BUNDLES notes.ini variable containing the list of comma-separated NSF paths that are authorized to contribute dynamic plugins. This notes.ini variable must be either manually entered into the notes.ini file or automatically added using a server configuration document. The Domino Administrator cannot use the set config method of adding this notes.ini variable from the Domino console.
The next layer of security is the ACL of the update site database. The ACL should only allow the Domino Administrator access to create documents in the database. End users should only have reader access to this database.
The OSGi runtime also checks document signatures. Documents storing the plugins and fragments are signed when they’re imported into the database. If they are not signed or the signature has been tampered with, the OSGi runtime will not load them, and a warning message will be added to the log.
Additionally, for the plugin/fragment to be loaded, the person who signed the document must be included in the Sign or Run Unrestricted Methods and Operations field in the Security tab of the server document. If that’s not the case, the OSGi runtime adds a warning to the log, and the plugin is not loaded.
Automatic Server Deployment in Domino 8.5.2
Although the dynamic OSGI deployment feature is not available in Domino 8.5.2, the administrator can still automatically deploy the Extension Library plugins to the Domino server using an additional OpenNTF project called Plugins Deployment for Domino.
This project is principally a modified Domino updateSite.ntf template that contains one additional form, where the administrator can specify the features and plugins to be deployed into the Domino server, along with a LotusScript class (triggered by various agents) that copies the plugins and features into the designated locations on the server and issues (if checked) a restart HTTP command on the console. Because the ability to deploy into the server file system is powerful, the administrator needs to carefully control access to any database created with this template. (Read-only is okay.) The database solves for 8.5.2 the problem of deploying extension libraries. Keeping a replica on each server eases the rollout of updates.
The administrator can download the latest release of the project from OpenNTF by navigating to http://plugindeploy.openntf.org (see Figure 2.17) and going to the Downloads/Releases section of the project.
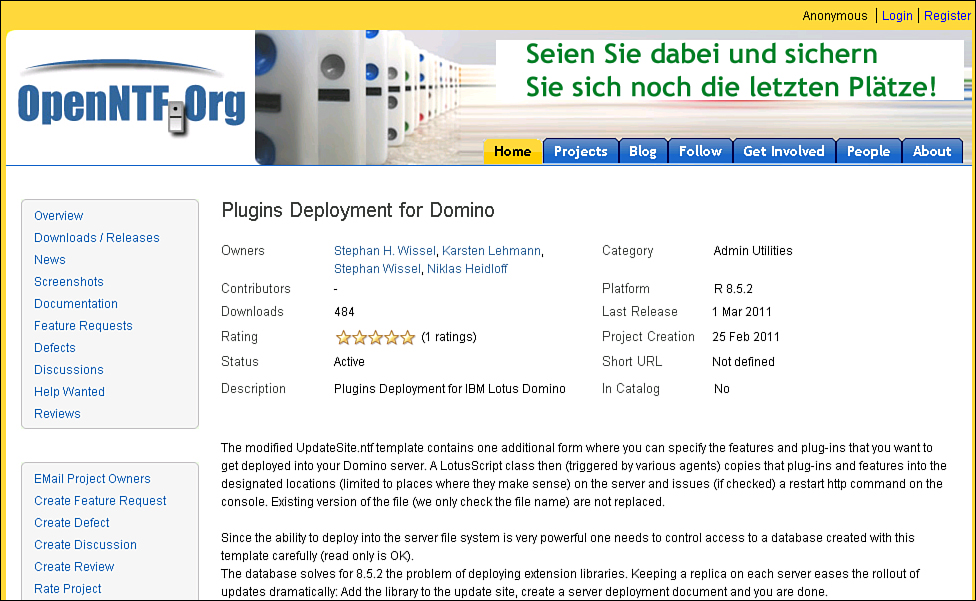
Figure 2.17. The home page of the Plugins Deployment for Domino project for pre-R8.5.3 Domino ExtLib installations.
Once you have downloaded the zip file, unpack it and copy the newupdatesite.ntf to the Domino server’s Data directory.
You then need to sign the template with an ID that is allowed to run unrestricted agents using the Domino Administrator client.
After you have completed this step, you can create a new database on the server using this template. Once the database has been created, it automatically launches on the Notes Client.
This database is similar to the current update site application that is distributed with Domino 8.5.2 with the exception of a couple of new views and agents that do the server deployment.
The next step is to import the Extension Library update site into this database. Select the Import Local Update Site action button. In the dialog that appears, click the Browse button and select the site.xml file from an unpacked updateSite.zip. Then click OK. The site then imports into the database; the user should see, depending on the release of ExtLib, a number of Features, Plugins, and Fragments in the update site database, as shown in Figure 2.18.

Figure 2.18. Features view of the 8.5.2 updated site application with the Extension Library installed.
Next, click on the Create Server Deployment action button to bring the user into a new document in the database. Select to which servers to deploy the ExtLib, and then select the features and all the plugins/fragments to be deployed. It is recommended that you select the Restart HTTP After Deployment box so that the Domino server will know to start using ExtLib immediately, as in Figure 2.19.
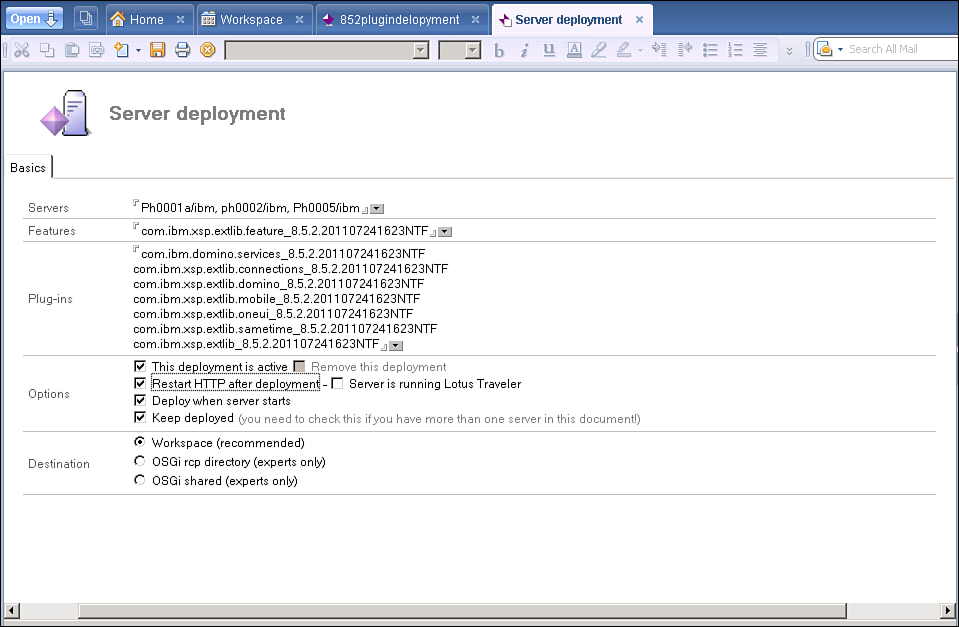
Figure 2.19. New server deployment document.
If the Domino server is also running IBM Lotus Traveler, it is recommended that you select the Server Is Running Lotus Traveler box so that the deployment agent will know that it needs to shut down and restart Traveler as part of the process. If you don’t do this, the HTTP task can’t restart correctly.
Before the new server deployment document can start working, you need to perform one last step: enable the deployment agents. Open the database in the Domino Designer client and select the Agents section of the design. Select and enable the two agents, DeployOnSchedule and DeployOnServerStart, as highlighted in Figure 2.20.
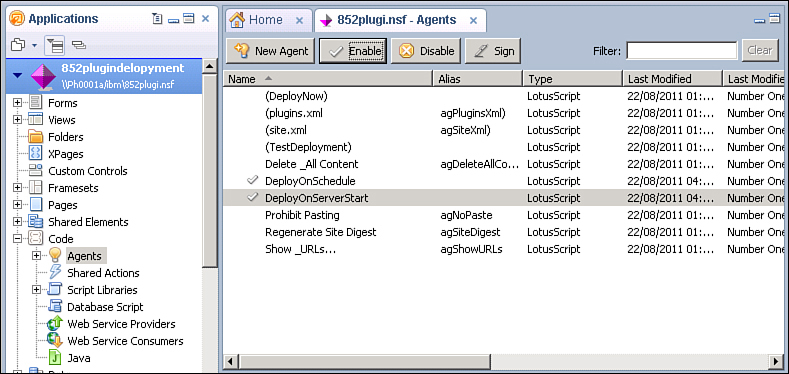
Figure 2.20. The Agent Configuration Setting for pre-8.5.3.
The DeployOnSchedule agent is designed to run every four hours, and the DeployOnServerStart agent runs when your Domino server is restarted.
Once the agents have been enabled, the ExtLib plugins are automatically deployed to the selected Domino servers. The administrator can verify this by looking in the Activity Log contained within the same application.
Manually Deploying Libraries to a Server
Manually deploying libraries to a server requires the administrator to have access to the server’s file system so that the required files can be manually copied the required location. This procedure is the least convenient of the Extension Library deployment scenarios to maintain and is not really recommended over the automatic server deployment methods mentioned previously. However, it is included here so that the user can understand how an Extension Library is deployed on a server in the rare event that the administrator needs to remove it under certain circumstances.
Note
If you are using the 8.5.3 method for automatic server deployment, no physical files are deployed to the server, so you don’t need to manually remove old versions.
The file updateSite.zip, which is contained in the download from the ExtLib release downloaded from OpenNTF, is copied into a temporary directory or folder in the server machine.
The user should locate and open the Domino server’s Eclipse Workspace directory. This is normally found in the DominoWorkspace directory under the Domino server’s Data folder. Inside this folder is the applicationseclipse folder, which contains both a features and a plugins folder, as shown in Figure 2.21.

Figure 2.21. Default location for a manual installation of the ExtLib on a Domino server.
The files are then unpacked from the updateSite.zip into the relevant folders. You can delete the file site.xml after it is unpacked. You don’t need that file for manual deployments.
Once the files have been transferred, the administrator needs to restart the HTTP task on the Domino server by issuing the Restart Task HTTP command on the console. It might be tempting to use the command Tell HTTP Restart, but that does not restart the JVM that the XPages runtime uses.
To verify that the ExtLib has been installed on the server, issue the command Tell http osgi ss com.ibm.xsp.extlib. It reports to the console, as shown in Figure 2.22.
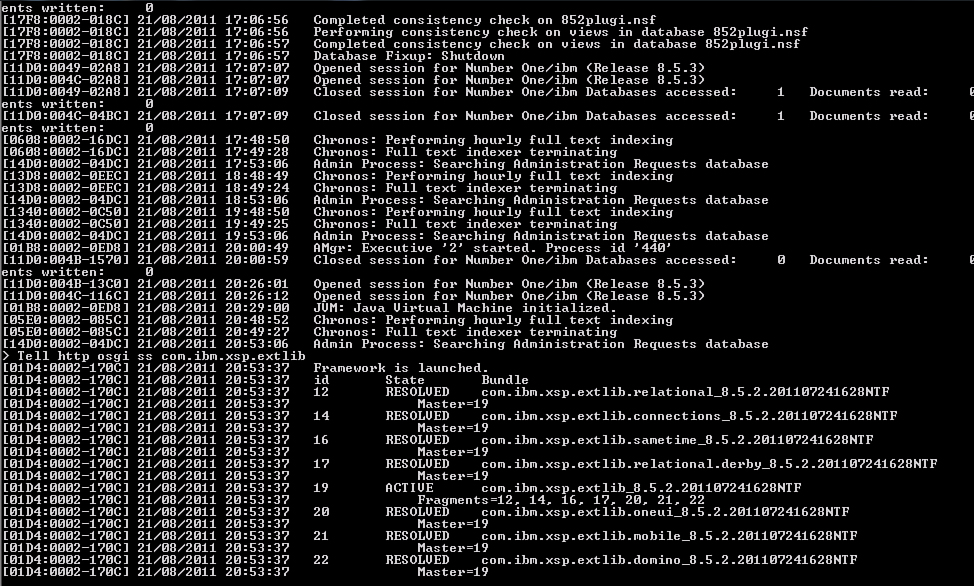
Figure 2.22. Server console command and output.
The output to the server console is from the version of the Extension Library from the 8.5.2.201102282303 release. It changes depending on the version of the ExtLib deployed. The Domino server also makes sure that two different versions of ExtLib deployed at any one time can run at the same time. If you upgrade the ExtLib by copying the files from a newer release to the directories mentioned earlier and restart the HTTP task, the Domino server activates only the newer version.
Deploying the Extension Library to End Users
If the developer is planning to create XPiNC applications that use the new ExtLib controls, it’s necessary to deploy these controls to the end users of Lotus Notes Client. Again, this depends on the original of the Extension Library. The Upgrade Pack has its own add-on installer for the Notes Client. This installs the ExtLib runtime to exist alongside XPages runtime in the Notes Client. Using releases from OpenNTF of the ExtLib requires a completely different deployment method. This section shows you how to automatically deploy ExtLib to these users.
Automatic end user deployment of ExtLib involves the use of update sites, widget catalogs, and policies. Although this book covers the basics of how to set up ExtLib for deployment, it is advised that Domino administrators familiarize themselves with these topics before continuing, because some of the explanations are beyond the scope of this book.
Widget Catalog Setup
Most modern servers contain a widget catalog application, which is a vital resource for publishing and provisioning widgets, tools, and services. The catalog increases individual and team productivity within an organization.
If the administrator has yet to create a widget catalog for the server, here is an opportunity to do so. If there isn’t a widget catalog on the server, creating a new database based on the widget catalog template is relatively easy. As highlighted in Figure 2.23, the toolbox.ntf template is used to create this application.
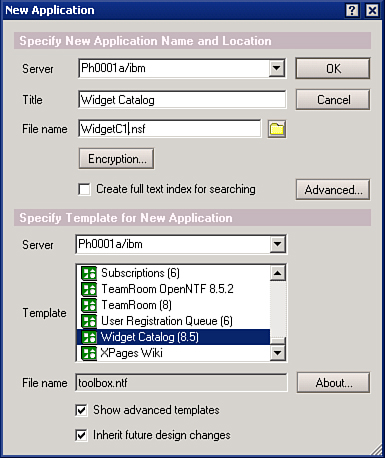
Figure 2.23. The New Application dialog box for the widget catalog.
If the server already has a widget catalog database, the administrator must ensure that whoever has the rights to provision the Extension Library as a widget has the access to do so. The Admins and WidgetAuthor roles need to be selected for this person in the database’s ACL.
To use this widget catalog on the Notes Client, you need to enable it in the Preferences, as shown in Figure 2.24. This is a necessary setting for the administrator, but end users could use a widget category to install.
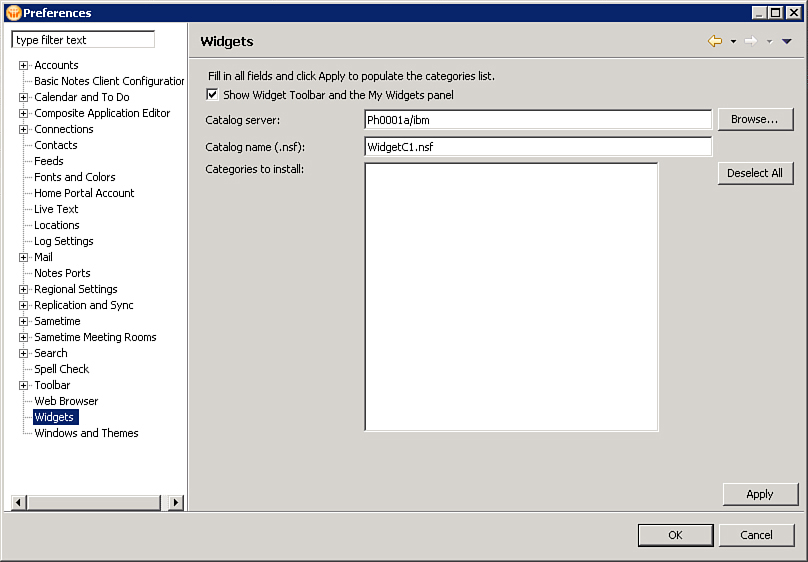
Figure 2.24. Enabling the Notes Client to use widgets via the Preferences dialog.
Creating a Widget Configuration
Now that the widget catalog is available, you can create a widget for the Extension Library. First, however, the Extension Library update site is required, which can come from two sources. One source can be from unpacking the updateSite.zip file from the Extension Library download. The other source can be the update site document created for automatic server deployment, as explained in the earlier section, “Automatic Server Deployment in Domino 8.5.3.” The update site document on the server’s update site application might be the preferable method to use here because it leads to a certain amount of control for the server administrator over the version of the Extension Library used in the organization.
The next step is to return to the server administrator’s Notes Client and navigate to the My Widgets panel on the right pull-out. Here, if no other widgets are installed on the end user’s Notes Client, there will be a link to Start Creating Your Own Widgets; otherwise, the administrator can start creating widgets by selecting from the Get Started drop-down menu. Selecting this launches the Start Configuring Widgets dialog, as in Figure 2.25. Select the radio button beside Features and Plugins, and then click Next.

Figure 2.25. The Features and Plugins radio button selected on the Start Configuring Widgets dialog.
The next dialog along the wizard allows the user to put in either the location of an update site site.xml file in the system or a URL to an update site application located on a trusted server, as in Figure 2.26. Selecting the Load button to the right of the URL displays the available plugins and features at that location. If loading is successful, the user can select from the list the associated plugin and features from a particular download of the Extension Library. Selecting Next moves the wizard onto the next dialog.

Figure 2.26. Add the URL to the update site database on the server.
As shown in Figure 2.27, the administrator then gives this widget a unique name and confirms the description. Click Next.
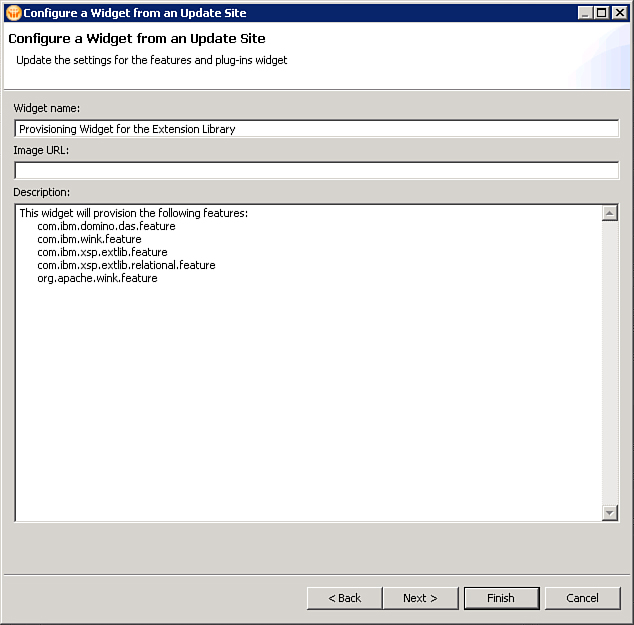
Figure 2.27. Give the widget a unique name, and then click Next.
The wizard moves on to a more important window, one that shouldn’t be ignored, in Figure 2.28. It’s an opportunity to modify the install manifest, which becomes the extension.xml when published to the catalog (see Listing 2.3).
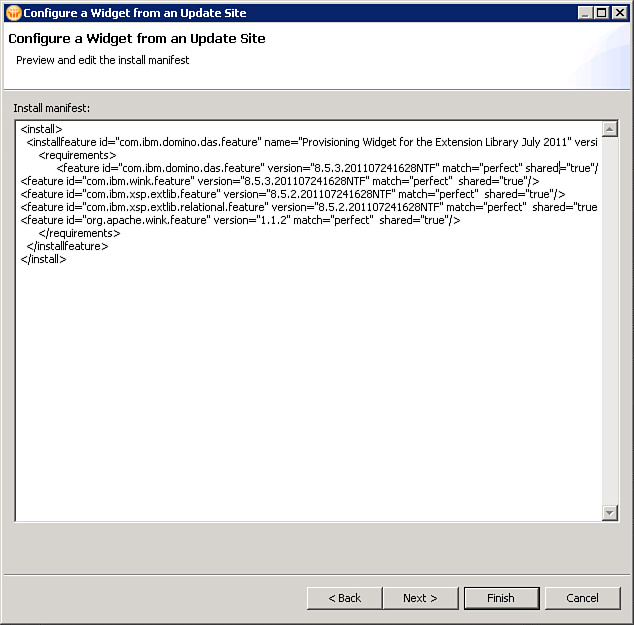
Figure 2.28. Here the install manifest can be previewed and edited.
It’s worth noting the various properties:
• url=“”—This can be either a http/nrpc/file URL that points to updateSite.nsf or a local site.xml file.
• hideThumbnail=“true”—Set this flag to tell the widget to hide in My Widgets sidebar pane. It will only be shown if the user chooses Show All in the My Widgets sidebar.
• match=“perfect”—Guarantees that the provisioning engine will attempt to install the exact version that has been specified in the install manifest.
• shared=“true”—Provided that shared=“true” is set in the install manifest snippet, as below, the plugin is installed to Notes_install_dirframeworksharedeclipse. If there is no write access to that directory, the plugin is installed to Notes_install_dirdataworkspaceapplications. This property is also important for multiuser Notes Clients. If this property is set to “false,” the widget and the Extension Library are installed only for the one user, as with the example in Listing 2.3. The example in Figure 2.28 shows this property set to “true,” which means it is installed to all multiusers.
Listing 2.3. Sample Source of XML with Features Highlighted
<webcontextConfiguration version="1.1">
<palleteItem title="OpenNTF ExtLib"
url="http://yourserver/admin/update/extlib.nsf/site.xml"
providerId="com.ibm.rcp.toolbox.prov.provider.ToolboxProvisioning"
imageUrl="" id="com.ibm.xsp.extlib">
<preferences />
<data>
<installManifest>
<![CDATA[ <install>
<installfeature description="OpenNTF ExtLib" id="com.ibm.xsp.extlib"
name="OpenNTF ExtLib">
<requirements>
<feature id="com.ibm.xsp.extlib.feature" match="perfect" shared="false"
action="install" version="8.5.2.201102282303NTF"/>
</requirements>
</installfeature>
</install> ]]>
</installManifest>
</data>
</palleteItem>
</webcontextConfiguration>
Selecting Next on the wizard brings the user to the final dialog, shown in Figure 2.29. After selecting Finish, the user must restart the Notes Client.

Figure 2.29. The widget for the ExtLib is complete. Review and click Finish.
Once the Notes Client has restarted, the administrator can publish the newly installed Extension Library widget to the widget catalog by selecting this option shown in Figure 2.30.
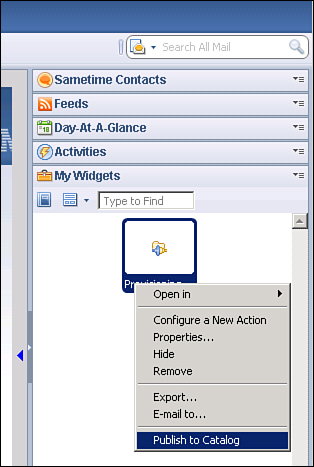
Figure 2.30. Right-click on the ExtLib widget in My Widgets and select Publish to Catalog.
This action creates a new document in the widget catalog and imports the extension.xml file, as shown in Figure 2.31. Here the administrator specifies a category for the widget so the widget can be deployed to end users when this category is specified. The administrator also specifies the platform and checks the box for Plugin and Features.

Figure 2.31. Composing the widget document in the widget catalog.
Now the widget containing the ExtLib is ready to be deployed to other Notes Client users.
Provisioning the Extension Library Widget to Other Users
Provisioning the ExtLib widget to end users on the Notes Client can be done in two ways: manually and automatically with a desktop policy.
Manual Deployment
The administrator can make available the details of the widget catalog application and server to connect to for the end user. Then end users can enable widgets on the Notes Client by selecting File → Preferences → Widgets. Figure 2.32 shows the check box selected, the server and the catalog selected, and, more importantly, the category selected. Selecting Apply installs the widget and the Extension Library. Restarting Notes makes this feature functional.

Figure 2.32. Manually installing the Extension Library widget on an end user’s Notes Client.
Alternatively, an administrator can send the end user an XML definition—install manifest—by email, which can then be dragged to the My Widgets sidebar.
Automatic Deployment with Policies
Desktop policies control a user’s workspace, so the administrator can use them to force the end user to use the Extension Library and a particular version on the client machine. All the administrator must do is point the desktop policy to a widget catalog and a certain category contained within that application. These policies can be used to update the settings of the Notes workspace.
Desktop policies are created through the Domino administrator. On the People & Groups tab, select Policies and then Add Policy. Enter a name for the policy.
In the row for the Desktop field, click the New button, which creates a new Desktop Settings policy. Enter a name for the Desktop Settings policy, and then switch to the Widgets tab. As shown in Figure 2.33, the important fields are the Widget Catalog Server, the Widget Catalog Application Name, and the Widget Catalog Categories. After that, it is up to the server administrator to decide how to enforce the widget policy for the desktop. For example, by leaving the default setting for How to Apply This Setting on the widget catalog server and application of Set Value and Prevent Changes, the end user cannot change the values in the Widgets preference panel.

Figure 2.33. Creating a desktop policy for the widget catalog category.
Server administrators compose the policies based on the organization’s requirements. They can set in the outer policy to whom the policy is to be assigned, users, or groups. For more information on Domino policies and how they are configured, go to the Lotus Domino Administration Help. (It is available from the Domino Administrator client by selecting Help → Help Topics. You can also find the documentation online at http://publib.boulder.ibm.com/infocenter/domhelp/v8r0/index.jsp; select the Domino 8 Administrator link.)
The next time the user starts Notes, the library is installed automatically.
Conclusion
This chapter explored the various ways to install and deploy the ExtLib. Initially, deployment to the Domino server was time-consuming and labor intensive, which posed a real barrier to the adoption of the Extension Library as a platform to base production applications upon. This has been overcome with the ability to deploy NSF-based plugins to the server.
With the IBM supported version of the XPages Extension Library in the Upgrade Pack, installation, deployment, and adoption can be accomplished without too much fuss. With no excuses, it’s time to play with the XPages ExtLib.