
Chapter 12. XPages Gets Relational
Until recently, native access to data in XPages has been restricted to data stored within the Notes Storage Facility (NSF). Access to Relation Database Management Systems (RDBMS) data was only available by direct access to the core Java Database Connectivity (JDBC) application programming interfaces (APIs), and even then surfacing that data to standard XPages controls required a strong understanding of the XPages runtime. Now, in the Experimental package of the Extension Library (ExtLib) but not included in Upgrade Pack 1 (UP1), read-only and full read/write access to relational databases becomes a reality. This release opens the door to utilize XPages as the integration point between disparate systems.
Through the use of these components, relational data can be utilized in the same manner that data from the NSF is used to populate components such as view panels and edit controls. This allows you to directly integrate and extend non-Notes-based data from enterprise applications without having to synchronize it to an NSF.
This chapter reviews concepts behind integrating relational data and the new relational database components that the ExtLib provides, including JDBC, the Connection Pool and Connection Manager, the datasources, and the Java and Server-Side JavaScript (SSJS) APIs included to help integrate relational data into an XPages application.
Accessing Relational Data Through JDBC
Because XPages is an implementation of Java Server Faces (JSF), it would make sense that access to relational data would be made through the standard APIs that provide Java programmers with connectivity to those datasources. These APIs, known as Java Database Connectivity, or JDBC for short, define how Java applications, serving as the client, may access a database. The ExtLib utilizes JDBC to provide connections to other data stores, so a little background information on how JDBC operates will make implementing relational datasources in XPages easier.
JDBC uses a driver manager to load a vendor-specific implementation of a Java class that is responsible for the low-level communication between the application and the database. Depending on the type of database and the connection used, this driver may implement any one of a number of driver types of connectivity models. For example, a JDBC driver may be what is called a type 1 driver, or a JDBC-Open Database Connectivity (ODBC) bridge, where the calls to the JDBC driver are converted into ODBC calls and then executed against the datasource using ODBC. Alternatively, the JDBC driver may have direct native access to the database and may be able to manipulate and update the database directly. This driver model is known as a type 4 driver. The XPages ExtLib ships with prebuilt connectivity to a type 4 driver for Apache Derby, which is a lightweight open source relational database implemented entirely in Java. Other types of drivers integrate platform-specific libraries (type 2 drivers) or connectivity to a middleware application server (type 3 driver) that acts as an intermediary to access the data. The type of driver available to provide connectivity to a given database may depend on factors such as the database platform and the Client-Side operating system. Any available JDBC driver compatible with the JDBC version in use in the Java Virtual Machine (JVM) can provide connectivity for an XPages datasource. Figure 12.1 illustrates how these JDBC drivers and the JDBC API interacts with the datasources to provide SQL access to an XPages application.
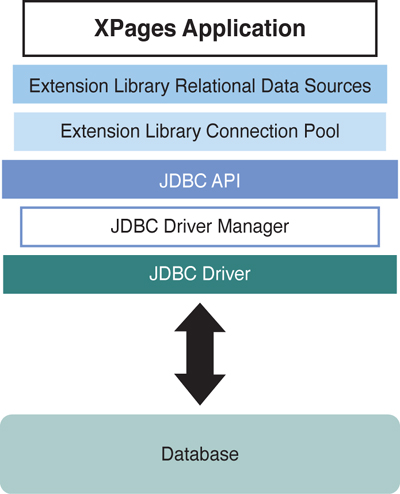
Figure 12.1. XPages JDBC connectivity model.
Installing a JDBC Driver
The only built-in database connectivity provided out of the box with the ExtLib is to an Apache Derby database, which is included only as a demonstration datasource since it is not intended for production use. As a result, one of the first steps to implementing relational data in an XPages application is acquiring and installing the appropriate JDBC driver for the RDBMS that will be accessed. The examples in this chapter will be connecting to an instance of IBM DB2® Express-C, which is the free community edition of IBM’s powerful and popular relational and XML data server available at http://www-01.ibm.com/software/data/db2/express/download.html. As seen in Figure 12.2, from this page, you can download the full DB2 Express-C package in installable or virtual machine form, or you can just download the database drivers. Other RDBMS drivers will be available from the vendor of the RDBMS and may be included on the distribution media or downloadable from their site.
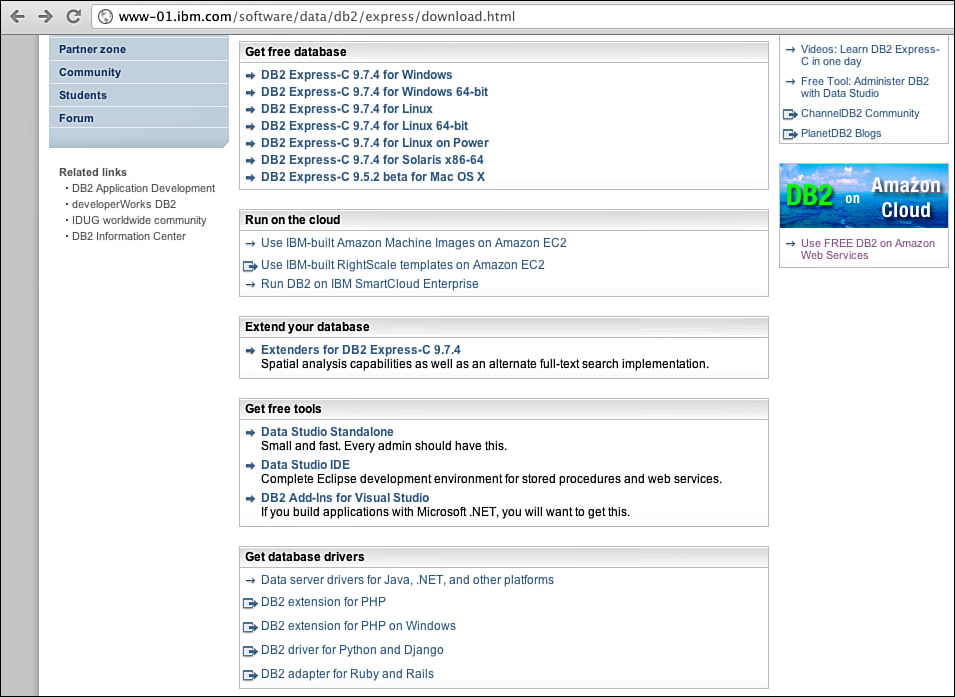
Figure 12.2. Downloading the DB2 JDBC Driver from IBM.com.
Included in the DB2 Express-C installation is a type 4 JDBC driver composed of two files, db2jcc4.jar and db2jcc_license_cu.jar, as seen in Figure 12.3. These files must be available to the Domino JVM. This chapter covers all three ways to install the JDBC driver, but only one is recommended because the other methods have drawbacks.

Figure 12.3. The DB2 Express-C drivers located in the DB2 installation folder on Linux.
The db2jcc_license_cu.jar filename may vary because of the licensed options of the DB2 server. The community edition includes the db2jcc_license_cu.jar license file.
Installing the JDBC Driver into the jvm/lib/ext Folder on the Domino Server (Not Recommended)
Copying the two JAR files and placing them into the jvm/lib/ext folder of the Lotus Domino server’s installation is the simplest way to install the driver. The driver needs to call methods that the Java Security Manager (as implemented in Domino by default) does not allow. Placing the driver in this folder grants it the required permissions because the code base is in this trusted location. However, if you do not use the optional Database Connection Pool, discussed later, you must load and register the driver manually when it is required. Additionally, because this type of installation requires access to the server’s file system, it may not be an acceptable option in some Lotus Domino environments. Due to these drawbacks, this approach of installing the JDBC driver into the jvm/lib/ext folder is not recommended.
Installing the JDBC Driver in the NSF (Not Recommended)
Alternatively, you can install the JDBC driver inside the NSF. Similar to installing on the server file system, a JDBC driver in the NSF requires manual registration. However, the NSF is not a trusted location, and it causes the Java Security Manager to block the execution of code in the JAR file. To overcome this problem, modify the java.policy file in the server’s jvm/lib/security folder, adding the location of the NSF as a trusted location. Doing so instructs the Java Security Manager to allow the execution of code located in the JAR from within the NSF.
This method of installation is not recommended, however, since the JDBC Driver Manager is a global instance for the entire JVM. Because a JAR file in each NSF is on a different path, the Driver Manager loads each JAR instance separately. If two NSFs contain the same driver, each instructs the Driver Manager to load its own JAR, essentially causing multiple versions of the same driver to be loaded, the Driver Manager becomes confused, and instability results. Moreover, an NSF can be discarded from memory after a period of inactivity, leaving the JDBC registry in a bad state, and even introducing memory leaks.
Installing the JDBC Driver via an OSGi Plugin (Recommended Approach)
The recommended approach is to deploy the driver via an OSGi plugin. This allows the code to be executed from a trusted location and the driver to be dynamically loaded, only once and as needed, automatically by the JDBC Driver Manager. You can package the plugin into an update site and deploy it automatically in the same manner that you deploy ExtLib to servers through the use of the update site database as described in Chapter 2, “Installation and Deployment of the XPages Extension Library.” Doing so removes the need to directly deploy the drivers to the server’s file system and simplifies distributing and managing the drivers across multiple servers.
Although it’s not difficult, the development of an OSGi plugin may be new to many Lotus Notes and Domino developers. Lack of knowledge on how to accomplish the task may make it seem more difficult that it needs to be. The ExtLib comes with a sample OSGi plugin for the Apache Derby driver that can serve as a template for other drivers.
You can develop the plugin using either Domino Designer in the Plug-In Development Perspective or the Eclipse Integrated Development Environment (IDE) (which you can download from http://www.eclipse.org/downloads). As seen in Figure 12.4, the user interface for the Eclipse IDE should be familiar to most Domino developers because Domino Designer 8.5 and later is based on the Eclipse IDE. Regardless of the environment chosen to create the plugin, the steps are the same.
Figure 12.4. The Eclipse 3.5 Galileo IDE.
You begin creation of an OSGi plugin by switching Domino Designer to the Plug-In Development Perspective by selecting Window → Open Perspective → Other, locating and selecting Plug-In Development, and then clicking OK. Once you’re inside the Plug-In Development perspective, you can start the project by creating a new Plug-In Project, found in the New Project Wizard by selecting File → New → Project in the IDE. Then expand the Plug-In Development category and click Next, as seen in Figure 12.5.

Figure 12.5. Selecting the new Plug-In Project Wizard.
The first step in the wizard is to set up the basic properties for the new project, including a project name, setting paths, and selecting the plugin target for the project. In Figure 12.6, the project name has been set to com.ZetaOne.JDBC.drivers.DB2, which is a descriptive namespace to avoid conflicting with another plugin that might already exist.

Figure 12.6. Setting the project’s name and settings.
After setting the project properties, you set the properties for the plugin, including the ID, version, and provider. Then set the Execution Environment to No Execution Environment and deselect Generate an Activator, a Java Class That Controls the Plug-In’s Life Cycle (see Figure 12.7).

Figure 12.7. Setting the plugin’s name and settings.
Finally, in the last window of the wizard, deselect the Create a Plug-In Using One of the Templates, as shown in Figure 12.8. Click the Finish button to generate the project stub.
Figure 12.8. Finishing the New Plug-In Project Wizard.
As seen in Figure 12.9, after the project is created, Domino Designer opens it. The project folder appears in the Package Explorer; furthermore, the project Overview, where the settings for the project are maintained, is displayed. To complete the project, the JDBC driver JARs need to be imported into the project, several settings within the project need to be modified, and an extension must be built to provide the driver to the XPages runtime environment.
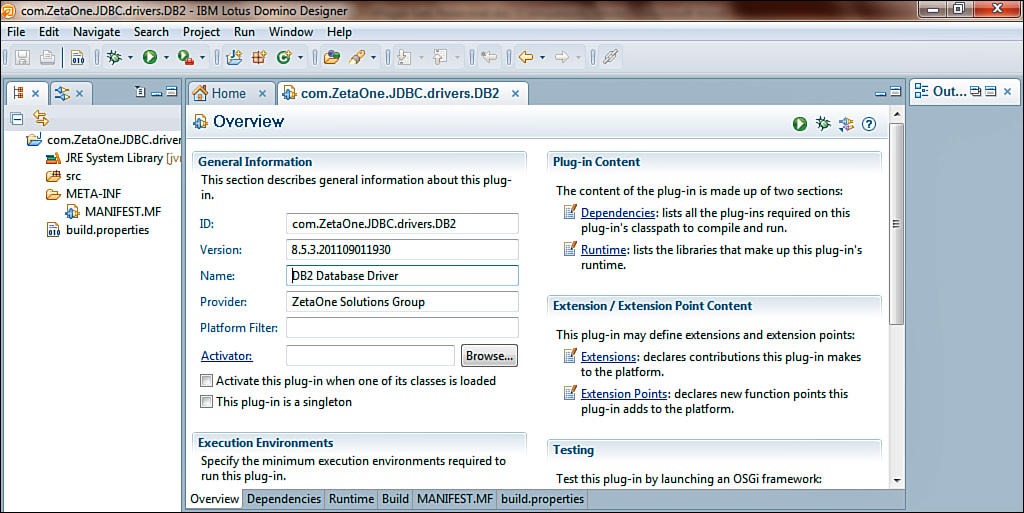
Figure 12.9. The new plugin project open in Domino Designer.
The first modification to make occurs on the Overview tab. Identify the plugin as a singleton. To enable this, select the This Plug-In Is a Singleton check box, as seen in Figure 12.10.
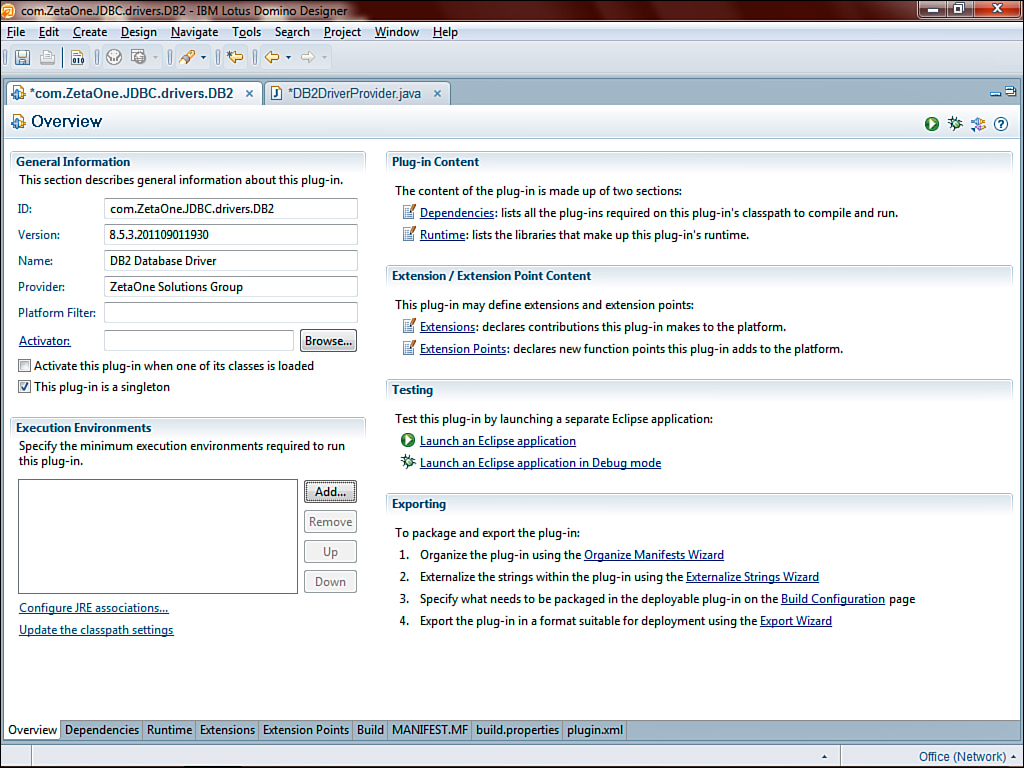
Figure 12.10. Enabling the singleton setting for the plugin.
To deploy the JDBC driver, import the driver JAR files from Figure 12.3 into the lib folder of the plugin project. To import them, right-click the project in the Package Explorer and select the Import option, as seen in Figure 12.11.

Figure 12.11. Importing the JDBC driver JARs into the project.
Clicking the Import menu item opens the Import Select dialog that allows you to select the type of import to be performed (see Figure 12.12). For this example, the JDBC driver JAR files are on the file system, so select File System and click Next.

Figure 12.12. Selecting the Import type for the import of the JDBC driver JAR files.
Then in the File System Import dialog, you locate the folder containing the driver JARs by clicking the Browse button. Select the individual files for import. For DB2, you need to import both the driver (db2jcc4.jar) and the license (db2jcc_license_cu.jar). In the field for Into folder, /lib is added to the end of the project file, so the JARs are added to a lib folder within the project, as seen in Figure 12.13, and the Finish button is clicked.
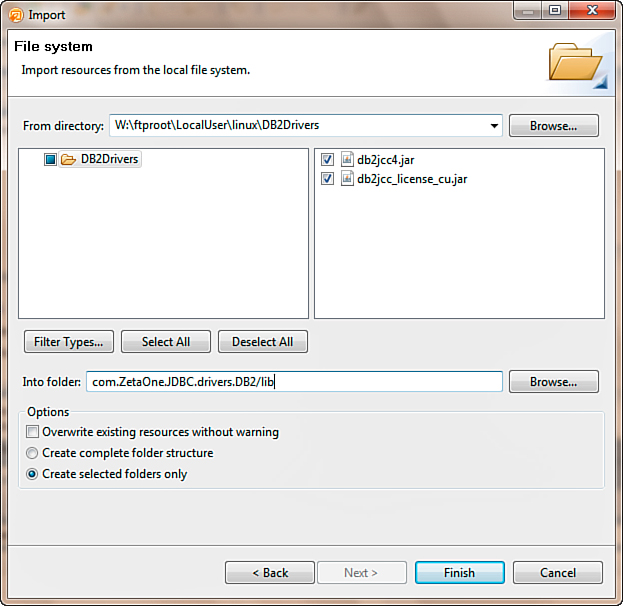
Figure 12.13. Importing the DB2 JDBC driver JARs into the lib folder of the project.
Once the import has completed, the new lib folder appears under the project in the Package Explorer. To make the JARs available to the project, you must add them to the project’s Build Path by expanding the lib folder, selecting the JAR files, right-clicking them, and selecting Build Path → Add to Build Path from the pop-up menu (see Figure 12.14). Once you have added the JARs to the build path, a new folder named Referenced Libraries appears with the JAR files underneath.
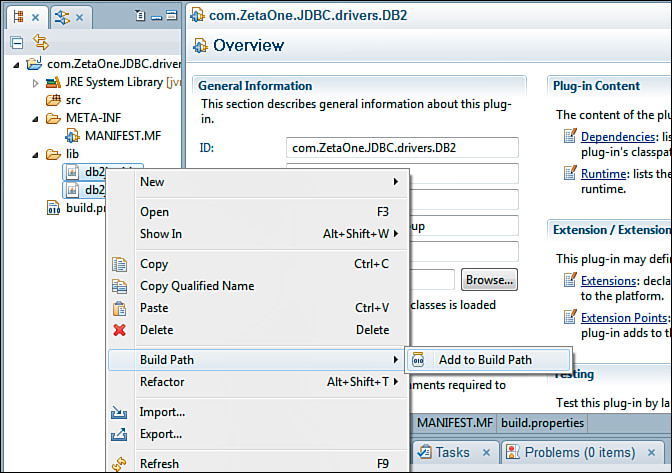
Figure 12.14. Adding the JDBC driver JARs to the project’s build path.
Now that the JARs are properly added to the build path, you can go to the Runtime tab of the project properties to update the plugin to export the classes from within the driver JARs. The classes are exported by clicking the Add button under Exported Packages and selecting all the packages that appear in the dialog (see Figure 12.15).
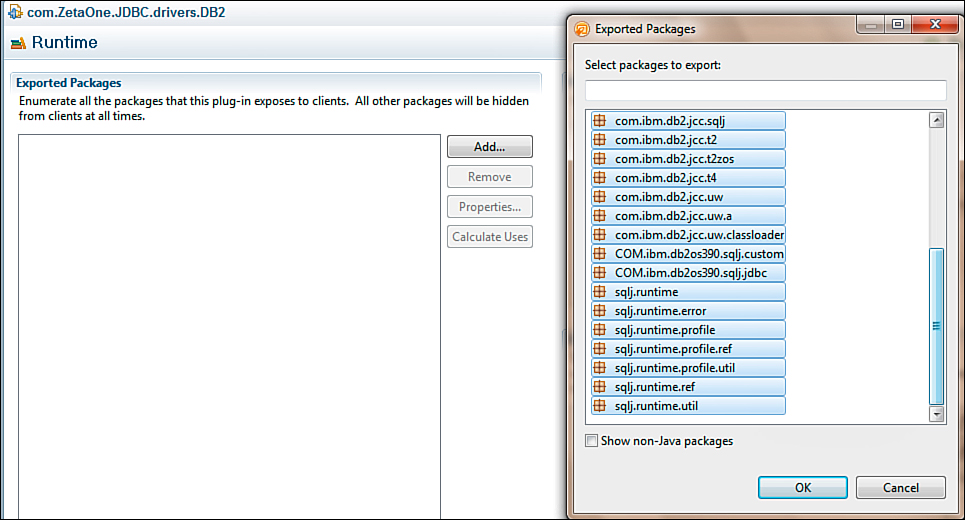
Figure 12.15. Selecting the classes the plugin will export.
Additionally, you need to add the JARs in the project to the classpath, which is set on the Runtime tab. Adding the JARs to the classpath is done under Classpath by clicking the Add button and expanding and selecting the JARs in the lib folder, as seen in the JAR selection dialog displayed in Figure 12.16.
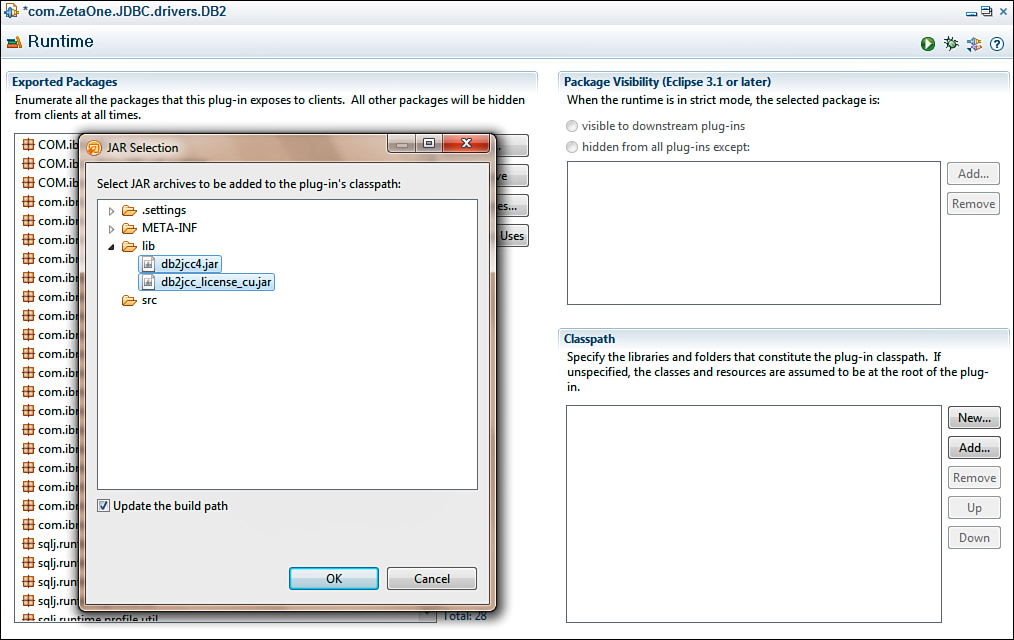
Figure 12.16. Adding the JDBC driver JARs to the classpath.
The next step in prepping the OSGi plugin is to create a driver provider and plug it into the proper extension point. To identify the extension point, the Extension and Extension Point pages must be enabled for the project. To do this, on the Overview tab, click the Extensions link under Extensions / Extension Point Content. Domino Designer confirms that the pages should be displayed, as seen in Figure 12.17.
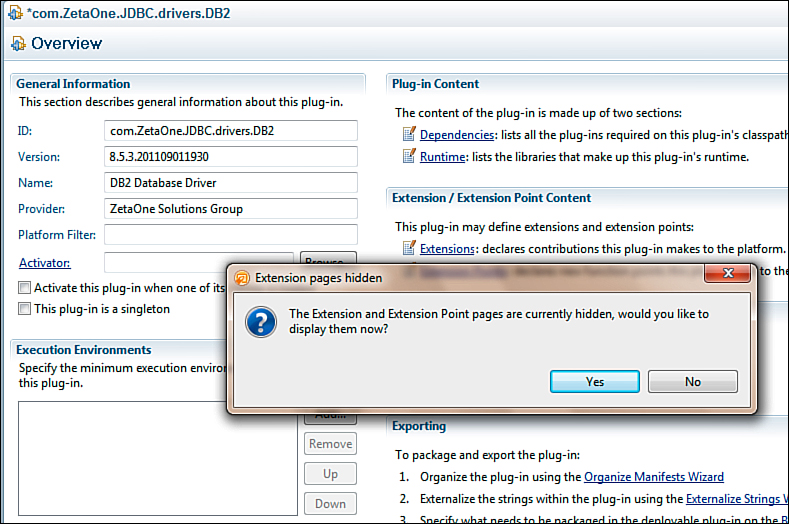
Figure 12.17. Enabling the Extensions and Extension Point Content pages.
After you have enabled the pages, you use the Extensions page to add the extension point that will be used by clicking the Add button under All Extensions. The Extension Point Selection dialog appears. You select the extension point by typing the beginning of its name in the Extension Point Filter edit box (see Figure 12.18). The extension point to be selected is com.ibm.commons.Extension.

Figure 12.18. Selecting the extension point in the Extension Point Selection dialog.
Once you have located the extension point, select it from the list, and click the Finish button. Domino Designer confirms that the plugin com.ibm.commons should be added to the list of dependencies, as seen in Figure 12.19.
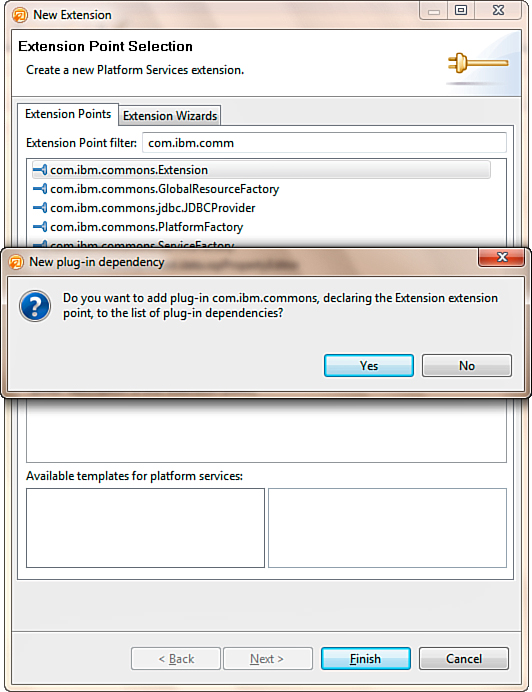
Figure 12.19. Confirming the addition of the com.ibm.commons plugin to the dependencies.
After you have added the extension point, under the All Extensions header, expand the extension and select the (service) item. On the right side of the window, enter a type and Java class to provide the extension. Populate the type field with com.ibm.common.jdbcprovider. The class is the fully qualified name of a Java class that you need to create in this project. In this example, the class name is derived from the namespace for the project and the class name DB2DriverProvider, as seen in Figure 12.20.
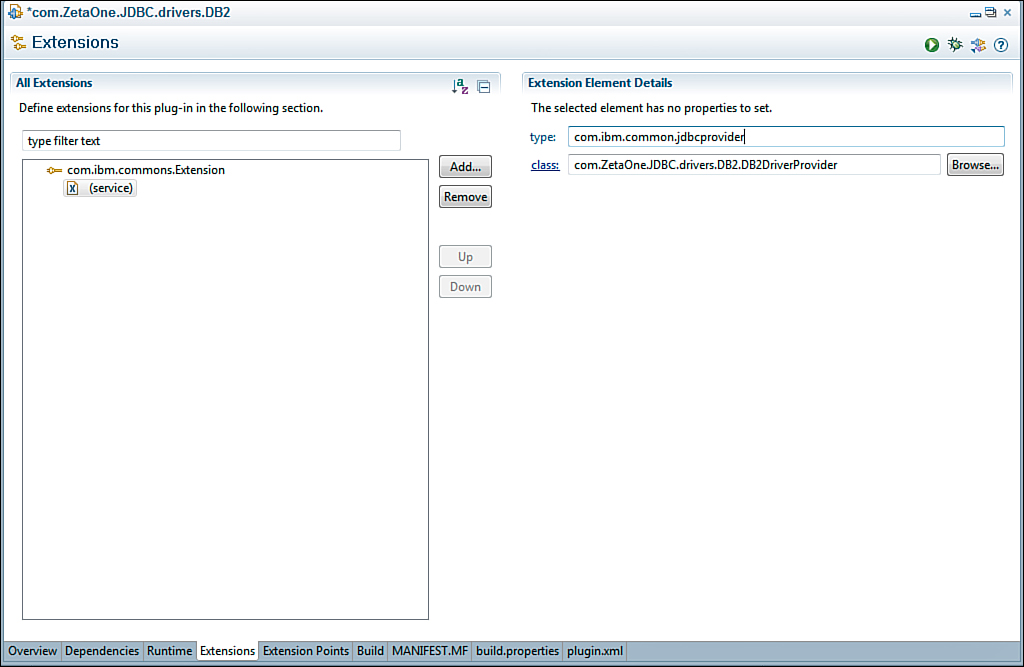
Figure 12.20. Populating the com.ibm.common.jdbcprovider extension point with the DB2DataProvider class.
Once you have populated the extension point, you must create the DB2DriverProvider class. You do this by right-clicking the src folder in the project and selecting New → Class, as seen in Figure 12.21.

Figure 12.21. Launching the New Java Class Wizard.
Once the New Java Class dialog opens, as pictured in Figure 12.22, you can enter some of the basic settings for the class, such as the package and class name. Then click the Finish button.
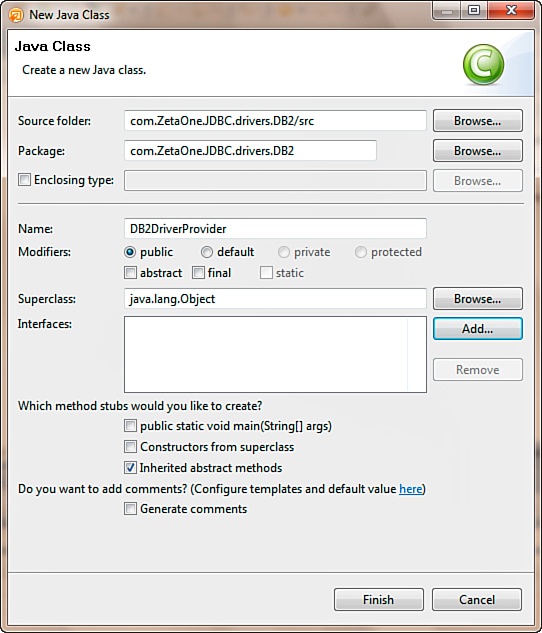
Figure 12.22. Setting the properties for the new DB2DriverProvider Java class.
At this point, Domino Designer or Eclipse reads the project settings and creates the required source code for the plugin’s Java class, as displayed in Figure 12.23.
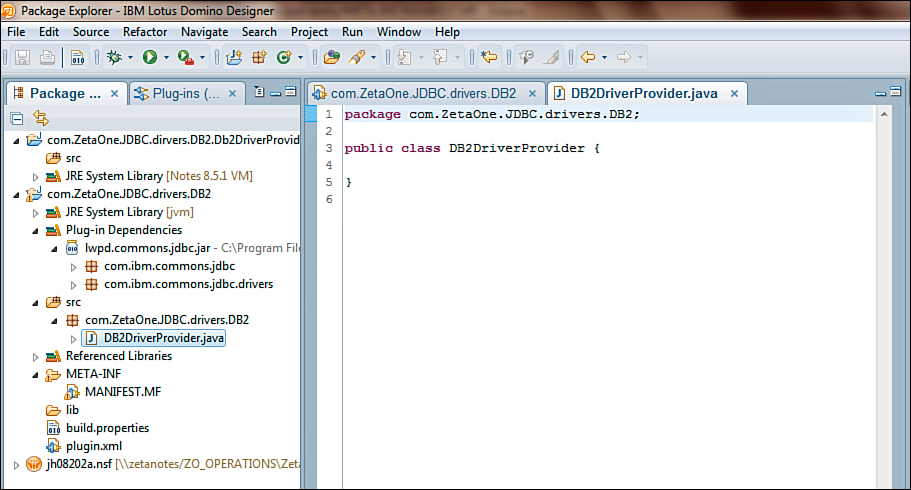
Figure 12.23. The DB2DriverProvider Java class stub.
The DB2DriverProvider class depends on two classes that must be included in the dependencies of the plugin. You can resolve these dependencies by adding the com.ibm.commons.jdbc plugin to the dependencies list, found on the Dependencies tab of the Manifest. Click the Add button, and the Plug-In Selection dialog is displayed. Within the dialog, the edit box serves as a filter selection to list plugins that are below. In the filter box, when you enter com.ibm.commons, the list of matching plugins is displayed (see Figure 12.24). Once you find the com.ibm.commons.jdbc plugin, select it and click OK.
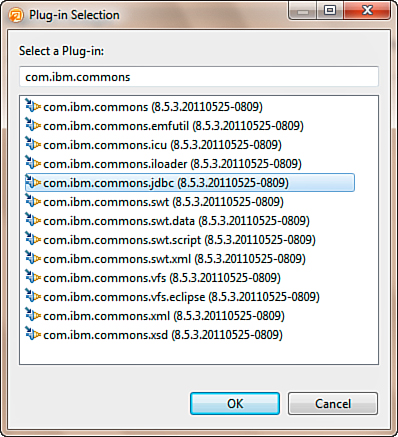
Figure 12.24. Adding the com.ibm.commons.jdbc plugin to the plugin dependencies.
After you resolve the dependency, you can finish the driver provider class. The class must implement the com.ibm.commons.jdbc.drivers.JDBCProvider interface and contain two methods: loadDriver(String className) and getDriverAliases(). The loadDriver() method should check the name of the requested driver passed in className. If it matches the driver’s class, a new instance of the driver should be returned; otherwise, null should be returned. You can use the getDriverAliases() method to retrieve any driver aliases. Generally, it returns null. Figure 12.25 shows a sample implementation of the class for the DB2 driver.

Figure 12.25. The full DB2 driver provider class.
Once you have created the driver provider class, select the class for export. You do this in the Manifest by clicking Add under Exported Packages on the Runtime tab. The driver provider package should appear for selection, as shown in Figure 12.26.
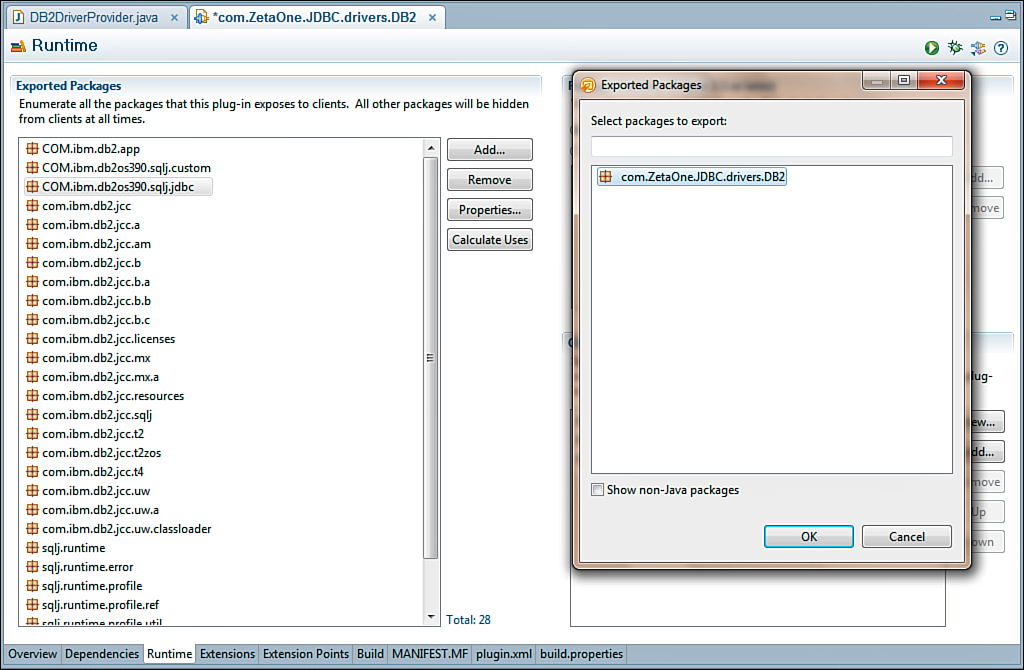
Figure 12.26. Exporting the package that contains the driver provider class.
At this point, you can save the plugin project. It is ready to export and deploy to the server. As discussed earlier, there are two ways to deploy the OSGi plugin: by either exporting the plugin and then placing the OSGi driver package directly on the server’s file system, or deploying the plugin via an update site in an NSF-based update site. The export process to place the plugin on the server’s file system is quick and can be accessed by right-clicking the project in Package Explorer and selecting Export from the pop-up menu. In the Export Select dialog that appears (see Figure 12.27), under Plug-In Development, select the Deployable Plug-Ins and Fragments option, and click the Next button to perform the export.

Figure 12.27. Selecting the Deployable Plug-Ins and Fragments export.
In the Export dialog, select the plugin project for export. Then set the export path in the Directory field on the Destination tab, shown in Figure 12.28, and click the Finish button.
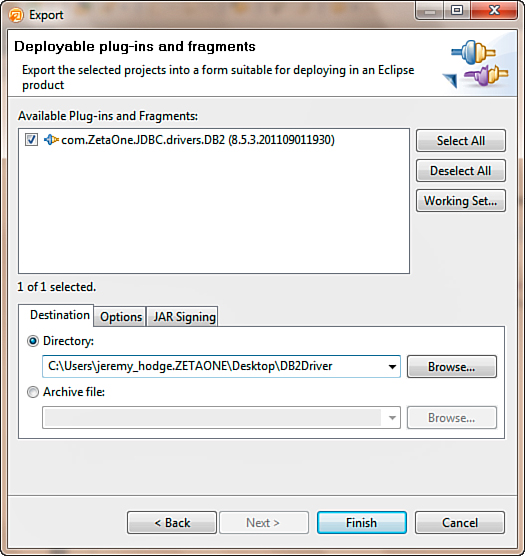
Figure 12.28. Exporting the plugin using the Deployable Plug-Ins and Fragments Wizard.
The export processes the plugin, as seen in Figure 12.29; the result of the export is a JAR in the location selected during the export.
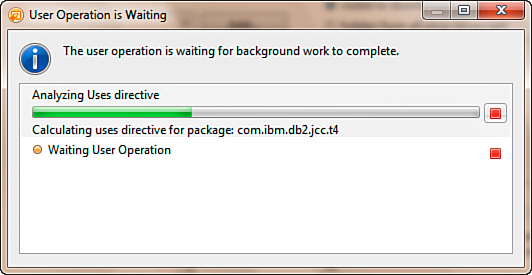
Figure 12.29. The plugin export in progress.
You can deploy this JAR file, as seen in Figure 12.30, to the <data>dominoworkspaceapplicationseclipseplugins directory of the Domino server. Placing the JAR in this directory should make the drivers available to the XPages runtime.

Figure 12.30. The result of the project is a plugin JAR file.
To verify that the drivers are available, you can query the OSGi console in Domino with the command tell http osgi ss com.ZetaOne, where com.ZetaOne is a filter that restricts the list of results. The filter should be the beginning of the name of the class, long enough to uniquely identify it and display it in the results (see Figure 12.31).

Figure 12.31. Querying OSGi on the console to determine whether the plugin is resolved.
For 8.5.3 and above, the preferred method for distributing the plugin is through an Eclipse update site using the Domino update site database that was described in Chapter 2. You create the update site in two steps. First create a Feature project by right-clicking inside the Package Explorer and selecting New → Other. In the Select a Wizard dialog, expand Plug-In Development, select Feature Project, and click Next.
In the Feature Properties page, add a project name, such as com.ZetaOne.JDBC. drivers.DB2.feature, and update the various Feature Properties, similar to what you see in Figure 12.32, and click Finish.
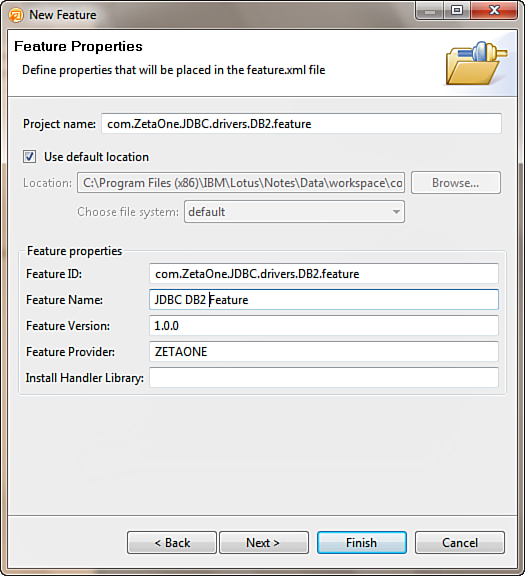
Figure 12.32. Creating a new Feature Project for the DB2 drivers.
When the new feature project opens, switch to the Plug-Ins tab, and click the Add button under Plug-Ins and Fragments. In the Select a Plug-In dialog, type com.ZetaOne in the Edit box to filter the list of plugins, and select the DB2 driver plugin shown in Figure 12.33. Then save the project.
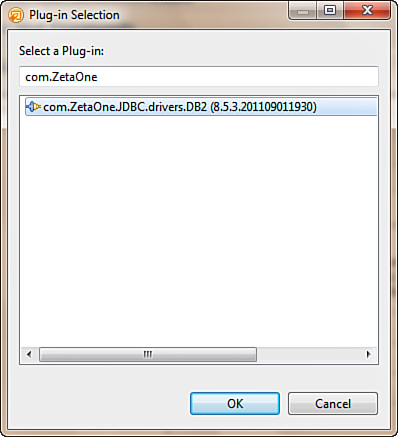
Figure 12.33. Adding the DB2 JDBC Plug-in to the frature project.
The final steps in creating the update site are to create the actual update site project by right-clicking in the Package Explorer, again selecting New → Other, expanding Plug-In Development, selecting Update Site Project, and clicking Next. In the Update Site Project Wizard, enter a project name such as com.ZetaOne.JDBC.drivers.DB2.updateSite and click Finish. Once the update site project opens, click the New Category button. Give the category a unique Name and Label. Then click the Add Feature button. In the Select a Feature dialog, type com.ZetaOne in the Filter box and select the DB2 driver feature. The final update site project should look similar to Figure 12.34.
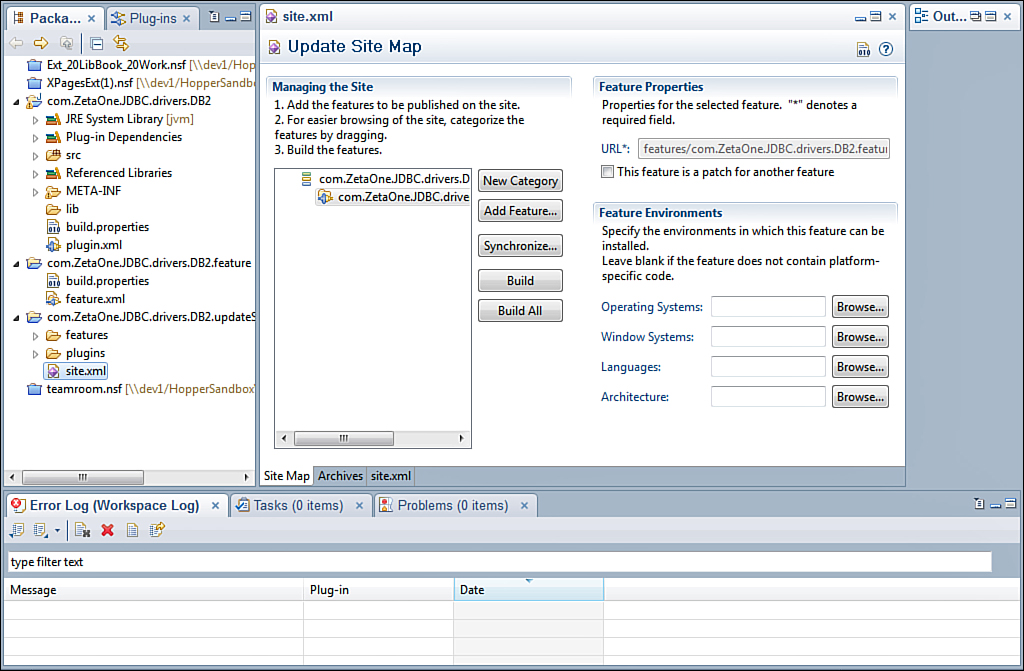
Figure 12.34. The final Update Site project for the DB2 drivers.
To import the plugin into the update site, click the Synchronize button. In the Features Properties Synchronization dialog, select the Synchronize All Features on This Site option and click Finish. Finally, to create the actual update site, click the Build All button. After the build process has completed, the update site has been created and is ready for import into the update site application from the project’s folder in your workspace (for example C:ProgramFilesIBMLotusNotesDataworkspacecom.ZetaOne.JDBC.drivers.DB2.updateSite). Import the update site into the NSF update site database in the same manner that you imported the ExtLib in Chapter 2. The driver will be available on any server where the NSF-based update site is installed.
Creating a Connection to the RDBMS
Now that the JVM has access to the JDBC drivers, the next step is setting up the connection between the driver and the RDBMS. You can establish connections to an RDBMS by creating connections in the NSF.
Creating Connection Files
The connection file is a simple XML file that contains the driver, a uniform resource locator (URL) pointing to the server, and other connection-related information. The connection file is named connectionName.jdbc, where connectionName is the unique name that will be given to the connection and the name used when access to the datasource is required. The format for the connectionName.jdbc file is shown in Listing 12.1.
Listing 12.1. Definition of a JDBC Connection File
<jdbc type="connection-pool-type">
<driver>driver-class</driver>
<url>url-to-database</url>
<user>user-name</user>
<password>password</password>
</jdbc>
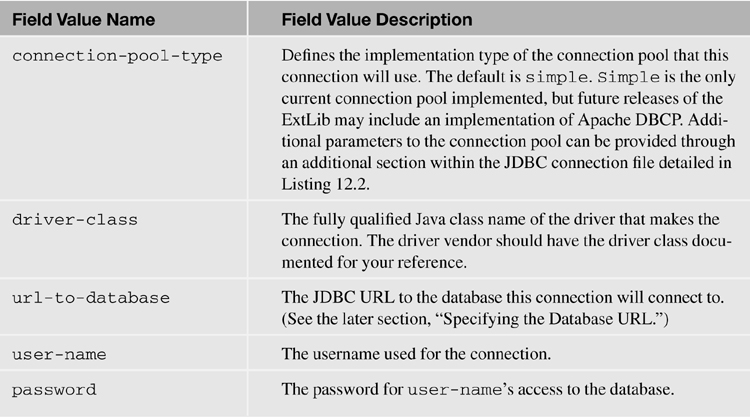
Table 12.1 describes each of the field definitions used within the JDBC connection file.
Table 12.1. JDBC Connection File Field Definitions
As mentioned in the connection-pool-type definition in Table 12.1, there are additional parameters you can set in the JDBC connection file to control the settings for the connection pool for this connection. To set these, you use an additional section that’s included at the end of the connection file. The section is enclosed by a tag set using the name of the selected connection-pool-type. For example, if the connection-pool-type is set to simple, the tag set would be <simple>...</simple>. Enclosed within the tag set are the connection-pool-type specific settings for that connection. Listing 12.2 defines the parameters and default values for the simple connection-pool-type, and Table 12.2 defines each of the parameter’s usage.
Table 12.2. Connection File Connection Pool Parameter Definitions for the Simple Pool Type

Listing 12.2. Simple Connection Pool Optional Parameters and Default Values
<simple>
<minPoolSize>10</minPoolSize>
<maxPoolSize>20</maxPoolSize>
<maxConnectionSize>200</maxConnectionSize>
<useTimeout>0</useTimeout>
<idleTimeout>0</idleTimeout>
<maxLiveTime>0</maxLiveTime>
<acquireTimeout>10000</acquireTimeout>
</simple>
Figure 12.35 shows a fully formed implementation of a JDBC connection file in Domino Designer with both the JDBC connection and the connection pool values set and customized. At the time of this writing, it is planned to include a way to create a global connection for all applications on the server. Discussions are ongoing as to how this global connection and connection pool would be created and managed (for example, whether it would be in the server’s names.nsf or a separate database). Review the release notes in future releases of the ExtLib for more information on this option.
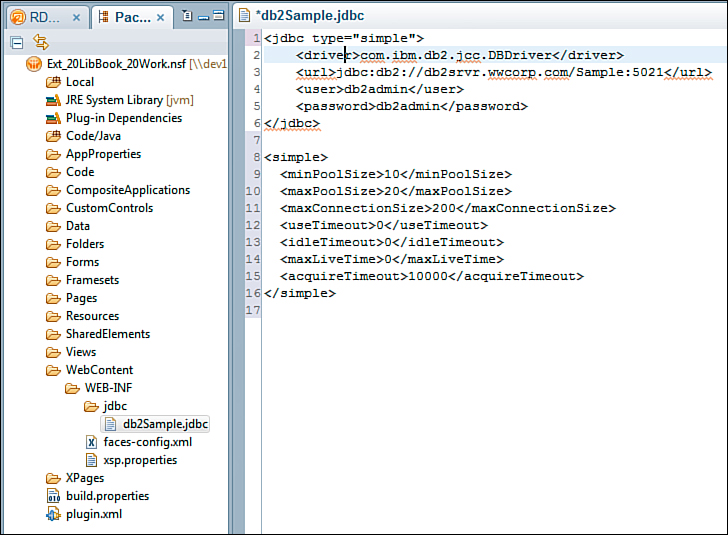
Figure 12.35. A sample NSF-specific DB2 connection in the WebContentWEB-INFjdbcfolder.
Specifying the Database URL
The syntax of the URL is defined by the driver you are trying to access, but it is generally defined as jdbc:DRIVER:server:port:additional-parameters. For example, a DB2 connection, connecting to the database northwood on server db2.wwcorp.com on port 5021 would be jdbc:db2://db2.wwwcorp.com:5021/northwood. For a local Apache Derby database however, the connection URL jdbc:derby:${rcp.data}derbyXPagesJDBC; create=true would connect to a derby database file derby/XPagesJDBC located in the local data directory. Notice in the previous example the use of the configuration property rcp.data in the computed expression ${rcp.data}. The connection files can take advantage of computed properties in their definitions.
Creating Connections and the Connection Pool
The XPages runtime environment implements a simple connection pool to improve performance, concurrency, and scalability. A connection pool is a global object within the XPages runtime that manages the open connections to JDBC datasources. When an XPage object needs to interact with a JDBC datasource, it can request a connection from the connection pool. This pool is likely to have already established connections to the datasource because other XPages and processes have requested access previously. If the specific connection requested is not in the pool, the connection is established and then stored in the pool.
Creating these connections can be expensive because of the overhead in network traffic and processing time in connection initialization. If every XPage session on the Domino server had to open and manage its own connection to a database, and the application was heavily used, the sheer number of connections could severely limit the scalability of the application. Likewise, if the connection was instead managed by every page, each page would have to open and then close the connection each time the page was accessed. Performance would suffer greatly as each page took the time to open and process the connection to the RDBMS. With the connection pool, each of these potential issues is solved because the pool can share these connections between different sessions and users. The expensive start-up of a connection is only incurred when the pool has insufficient cached connections for the current demand that the users and the application place on the server. Once demand drops, the pool will prune out stale connections, releasing and closing the connections, and tuning the pool to maintain only enough connections to service all the concurrent connection requests without having to initialize new ones.
The existence of the connection pool is practically unknown to developers and creates no extra effort. The connection pool and the management of its connections are automatic. Once the JDBC driver is provided to the runtime environment and the connection is defined via the JDBC connection, Java Naming and Directory Interface (JNDI) publishes the connection at java:comp/env/jdbc/connectionName, where connectionName is the name of the connection used in XPages RDBMS component’s connectionName. (connectionName is also the filename of the connection file in the WebContent/WEB-INF/jdbc folder of the NSF. If you exclude the jdbc/ prefix from the connection name, the runtime automatically adds it.) When the XPage request ends, the JNDI implementation ensures the connection is properly returned to the pool, without having to explicitly close it. However, it is best practice when acquiring a connection programmatically from the pool to close it as soon as it is no longer required. This keeps the connection pool from establishing too many connections and overusing system resources.
Using Relational Datasources on an XPage
The ExtLib’s RDBMS support adds two new datasource types for use with data-aware components. Both xe:jdbcQuery and xe:jdbcRowSet components provide access to RDBMS data to controls in an XPage, but they have different uses and performance implications. The xe:jdbcQuery component returns a data set based on a query statement and stores its data using a JDBC result set. The returned record set is read-only and caches data up to maxBlockCount pages of data at one time. It is optimal for large read-only data sets, where the result set would be displayed in a view-like interface such as a data table. Conversely, the xe:jdbcRowSet is based on a JDBC CachedRowSet object, and the results (up to a maximum number of rows) of the query are loaded and cached in memory. The larger the returned record set, the more memory the results consume. The xe:jdbcRowSet, however, is a read-write data set. The cached records capture all changes to the record set and hold the changes in cache until the data is committed back to the RDBMS.
Adding a JDBC Datasource to an XPage
Note
To enable these new datasources, you must first enable the ExtLib in the application. The ExtLib is enabled the first time you use an ExtLib component from the component palette, or you can manually enable it in the Application Properties’ Advanced panel. Until the ExtLib is enabled, the relational datasources do not appear in the list of datasource types on data-aware components.
The JDBC datasources are available anywhere that an xp:dominoDocument or xp:dominoView datasource would be. In the Data tab of a data-aware component (that is, the XPage itself, or in a View Panel), you can click the Add button to select the available datasources. Once added, the property list appears in any control where a datasource can be added, as shown in Figure 12.36.
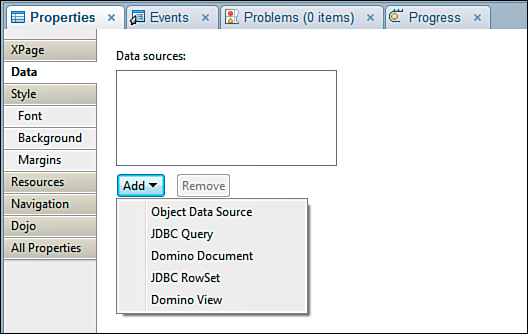
Figure 12.36. Adding a JDBC datasource to an XPage.
Creating a connection to a datasource requires at least two properties to be populated. These properties are either connectionName or connectionURL and either sqlFile, sqlQuery, or sqlTable. As previously discussed, the connectionName is the JNDI name of a connection defined by a JDBC connection file. The connectionUrl property takes precedence over the connectionName property and provides a direct JDBC URL to the database, such as jdbc:db2://db2srvr.wwcorp.com:5021/database:user=db2adm;password=db2adm;. Utilization of the connectionUrl bypasses the JDBC Connection Pool and should be used for testing only. The sqlFile, sqlQuery, and sqlTable properties establish the SQL statement to retrieve the data. Only one of the three properties defines the SQL statement. The precedential order for properties is sqlTable, sqlQuery, and sqlFile. sqlFile is used only if both sqlQuery and sqlTable are empty, and sqlQuery is used only if sqlTable is empty.
Specifying the SQL Statement
Use of the sqlTable property instructs the JDBC datasource to return a SQL table, view, or stored procedure. The value of the sqlTable property should be the name of the table, view, or stored procedure from which the datasource should retrieve its result set. The SQL query executed when using the sqlTable property is SELECT * FROM sqlTable. You can use a custom SQL query statement by populating either the sqlQuery or the sqlFile property. The sqlQuery property directly specifies the query. The sqlFile property specifies the filename of a text file (with the file extension .sql) containing the SQL query stored in the WebContent/WEB-INF/jdbc folder of the NSF. The SQL statement in both sqlQuery and sqlFile can be parameterized by using the sqlParameters property.
Adding Parameters to a SQL Statement
Parameters can be inserted into a prepared SQL statement provided in either the sqlQuery property or in the text file identified in the sqlFile property. In each instance where a portion of the SQL statement needs to be dynamically updated, you insert a question mark (?) character as a placeholder. At runtime, before the SQL query is executed, the XPages RDBC components evaluate SQL statement, and each ? is replaced with the corresponding value from the sqlParameters property. For example, given the following parameterized SQL statement and parameters in Figure 12.37, the resulting SQL query that would be executed would be SELECT TOP 10 FROM ORDERCOUNTS WHERE STATE='MI' ORDERBY QUANTITY. The order of parameters in the sqlParameters property must match the order in which each parameter is inserted into the SQL statement.

Figure 12.37. Parameterizing a SQL statement.
It is highly recommended that prepared SQL statements with parameters be used rather than calculating dynamic queries. Doing so increases performance because the query can be cached rather than having to be recomputed on each request. In addition, the use of the prepared SQL statement with parameters increases security, preventing SQL injection attacks.
Working with the xe:jdbcQuery Datasource
As previously mentioned, the xe:jdbcQuery datasource is a read-only datasource that’s ideal for displaying large amounts of data because of the way data is cached for the datasource. Unlike the xe:jdbcRowSet, which caches the entire result set by default, the xe:jdbcQuery caches blocks of data.
A block of data is the result set returned to fulfil a “page” of data. For example, using the View Panel that displays 30 rows of records, those 30 lines are one page. The maxBlockCount property of the xe:jdbcRowSet controls the number of blocks that can be cached. If a database connection is slow, increasing the number of cache blocks can increase performance, but it comes at the expense of server memory. By default, the xe:jdbcRowSet does not perform caching. (maxBlockCount is set to 0.)
The xe:jdbcQuery datasource, displayed in Figure 12.38, supports page and record counts for the implementation of a pager. When it’s set to true, the calculateCount property manipulates the SQL statement for the query to add a COUNT(*) function to the statement to return the number of rows available to the data set. For example, if the generated SQL statement is SELECT * FROM tableName WHERE COUNTY="BRANCH", the component converts the statement to SELECT * COUNT(*) FROM tableName WHERE COUNTY="BRANCH". Additionally, you can use the properties sqlCountQuery and sqlCountFile to set a custom SQL query statement to generate the count. This allows the use of a higher-performing SQL statement to generate the count that excludes directives such as ORDERBY that would increase computational overhead and time for the execution of the count statement.
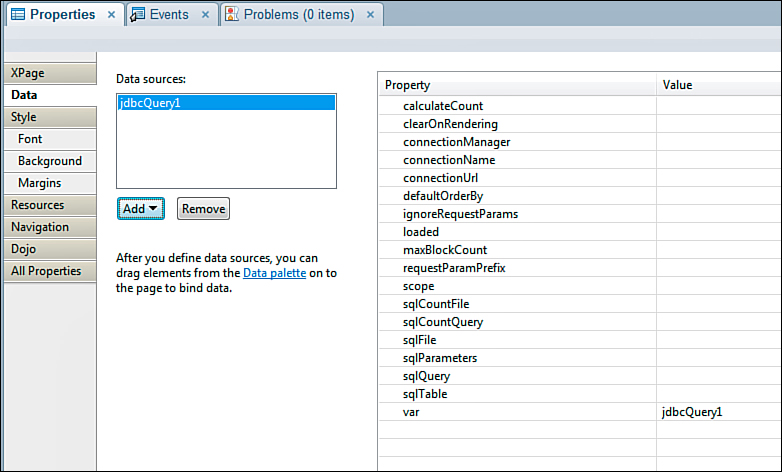
Figure 12.38. The xe:jdbcQuery datasource added to an XPage.
The xe:jdbcQuery component supports setting a default sort order through the use of the defaultOrderBy property. Setting the value of the property to a list of comma-separated column names establishes the default sort order. The datasource also supports user-sorted columns, which override the defaultOrderBy property.
Working with the xe:jdbcRowSet Datasource
The xe:jdbcRowSet datasource, pictured in Figure 12.39, is optimal for smaller data sets. This datasource reads and caches all records in the dataset by default. The more records the SQL statement returns, the more memory the component consumes. You can limit the total number of cached records by setting the maxRows property. It is a read-write datasource; changes made to the records are held in the cache until the entire record set is committed to the RDBMS. Unlike the xe:jdbcQuery, xe:jdbcRowSet does not support a full record count for paging. The record count available from the datasource is the current number of records currently cached in the datasource.

Figure 12.39. The xe:jdbcRowSet datasource added to an XPage.
Properties Common to Both the xe:jdbcQuery and xe:jdbcRowSet Datasources
In addition to the standard component properties that all datasources have, such as ignoreRequestParams, scope, var, and loaded, both data JDBC sources contain the property clearOnRendering. This property, when set to true, instructs the data set to clear all caches before the XPage has rendered, forcing the XPage to acquire the latest data from the RDBMS.
JDBC Datasources and Concurrency
In the typical XPages application based on NSF data, the application architecture exists prebuilt into the platform to deal with concurrent data access. If you’re building applications on the platform, you don’t need to worry about issues resulting from concurrent data editing related to the semi-automated nature of resolving the issue. With an RDBMS, concurrent data editing is a real concern; transactions can read and write records without an indication that a conflict has occurred. Because an XPages application is multi-threaded and can serve many requests concurrently, multiple users modifying the same data set can raise concerns about data integrity.
Additionally, when a single XPage contains more than one JDBC connection to the same connection, a performance hit can be incurred because each JDBC datasource executes its transaction independently. At the end of each transaction, a commit is made to update the transaction to the RDBMS. Each one of these commits adds overhead to the process, but a commit is not needed after every transaction if multiple transactions are going to be made to the same datasource.
A commit is the process by which a change to a record becomes permanent in an RDBMS. During a transaction, a change, or series of changes, is performed against a database, but the change is held in memory until the RDBMS is instructed to commit the change permanently. Until the commit is executed, you can instruct the RDBMS to roll back any changes made during a transaction.
By placing an xe:jdbcConnectionManager component on the XPage, you can alleviate both issues. When you’re using the xe:jdbcConnectionManager, you set the connectionName (or connectionURL) property on the xe:jdbcConnectionManager component instead of the datasource. Then you set each datasource’s connectionManager property to the ID of the appropriate xe:jdbcConnectionManager component. By default, the xe:jdbcConnectionMananger’s autoCommit property is set to false; you can execute multiple JDBC calls within a single transaction with a single commit after the grouped transaction, negating the performance hit.
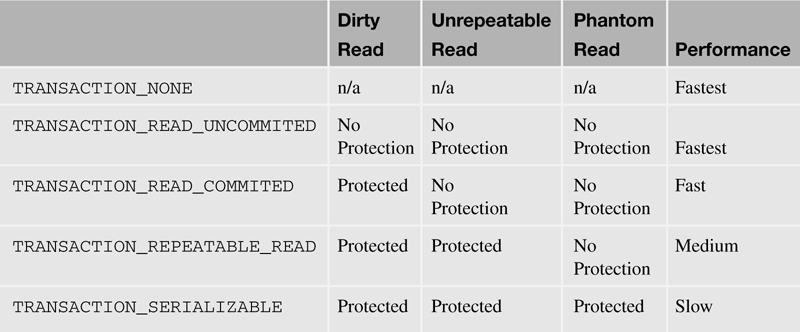
The Connection Manager can also set a transactional isolation level using the transactionIsolation property to help alleviate concurrency issues and maintain data integrity. Three different concurrency issues exist. Each of the five levels of transaction isolation is meant to alleviate different issues of concurrency, with varying impacts on performance.
A concurrency conflict occurs when two separate connections start a transaction simultaneously and want to interact with the same record. The three types of concurrency conflicts are Dirty Read, Unrepeatable Read, and Phantom Read. Each concurrency conflict can cause data integrity issues for different reasons.
A Dirty Read occurs when the first transaction changes the value of fieldA from A to a value of B. The second transaction then reads the same record and is given the new value of B. The second transaction then commits a change back to the RDBMS, with fieldA now equalling B. Finally, the first transaction encounters some state that would cause the transaction to roll back, but the record has already been committed with the value of fieldA being equal to B by the second transaction, causing invalid data to be stored in the record.
An Unrepeatable Read occurs when the first transaction reads the record and retrieves the value A from fieldA. The second transaction then initiates a change to fieldA, setting the value to B, and then commits the change. Transaction 1 then rereads the record and retrieves the new fieldA value of B, while continuing to process and eventually committing the record.
A Phantom Read occurs when a transaction reads a record set with a SELECT statement that causes a set number of records to be returned (for example, five records). The second transaction then inserts and commits a new record that matches the SELECT criteria. The first transaction re-executes the SELECT and returns six records.
Table 12.3 identifies each of the five levels of transaction isolation, the concurrency conflicts they address, and their impact to performance.
Table 12.3. Transaction Isolation Levels and Performance Impact
The xe:jdbcConnectionManager also provides a method binding called initConnection that allows you to hook into the connection initialization routine to perform tasks. The connection object is available using the variable connection from within the method.
Note that the available isolation methods depend on what the RDBMS implements. Be sure to consult the database vendor’s documentation to confirm what levels of isolation are implemented.
Server-Side JavaScript JDBC API for XPages and Debugging
Several @Functions have been added to Server-Side JavaScript to enable programmatic interaction with JDBC datasources. Each @Function performs a transaction of a specific type and makes programmatic access to JDBC data as easy as access to NSF data. Those methods that operate on a record set do not commit after they are called. It is up to you to ensure that either autoCommit is turned on (it is by default) or a call to commit is made at the appropriate time. Each of the @Functions is discussed next.
@JdbcGetConnection(data:string)
The @JdbcGetConnection function, an example of which appears in Listing 12.3, returns a JDBC connection for use within the other @Functions and is a shortcut to the JNDI call. The data parameter is the name of the connection to return. The connection follows the same rules as the connectionName parameter used in the JDBC datasources. The connection is released back to the connection pool when the request is completed.
When you’re using @JdbcGetConnection, you should wrap the code block in a try...finally block. Inside the finally block, the connection should be closed. This ensures that the connection is properly closed and returned to the connection pool, even if an exception is raised.
Listing 12.3. @JdbcGetConnection(data string)
var con:java.sql.Connection;
try {
con = @JdbcGetConnection("HR");
// Execute additional operations here...
} finally {
con.close();
}
@JdbcDbColumn(connection:any, table:string, column:string) : Array
@JdbcDbColumn(connection:any, table:string, column:string,
where:string) : Array
@JdbcDbColumn(connection:any, table:string, column:string,
where:string, orderBy:string) : Array
This method returns an array of all the values from the specified column in the selected table. You can use the results of this call, for example, to populate the selection values in a comboBox. You can filter the values by providing a SQL where clause in the where parameter. You can provide a comma-separated list of column names by which to sort the results in the orderBy parameter.
Listing 12.4 illustrates the simplest form of use for the method, taking the connection upon which to act, the table from which to retrieve the column, and the column’s name as parameters.
Listing 12.4. @JdbcDbColumn(connection:any, table:string, column:string): Array
var con:java.sql.Connection;
try {
con = @JdbcGetConnection("HR");
var results:Array =
@JdbcDbColumn(con, "employees", "employeeNumber");
} finally {
con.close();
}
Listing 12.5 builds upon the example from the previous listing and adds the additional where parameter. The where parameter filters the results of the function by appending a SQL where clause, which is passed as the where parameter, to the SQL statement. In this example, the results returned from Listing 12.5 are filtered down to records where the value of the field Active is set to Y.
Listing 12.5. @JdbcDbColumn(connection:any, table:string, column:string, where: string): Array
var con:java.sql.Connection;
try {
con = @JdbcGetConnection("HR");
var results:Array =
@JdbcDbColumn(con, "employees", "employeeNumber",
"Active='Y'");
} finally {
con.close();
}
The orderBy parameter sorts the results of the function by appending a SQL order by clause, which is passed as the orderBy parameter, to the SQL statement. Listing 12.6 adds this additional orderBy parameter to the results of Listing 12.5 and sorts the results by last name and then first name.
Listing 12.6. @JdbcDbColumn(connection:any, table:string, column:string, where: string, orderBy: String): Array
var con:java.sql.Connection;
try {
con = @JdbcGetConnection("HR");
var results:Array =
@JdbcDbColumn(con, "employees", "employeeNumber",
"Active='Y'", "employeeLast, employeeFirst");
} finally {
con.close();
}
@JdbcDelete(connection:any, table:string, where:string) : int
@JdbcDelete(connection:any, table:string, where:string, params:Array) :
int
This method deletes a set of records from the specified table in the specified connection that meet the criteria specified in the where parameter. The return value of the @Function is the number of rows affected by the delete statement. In the JDBC @Functions, connection can be either a java.sql.Connection object returned from @JdbcGetConnection or a string specifying the name of the connection to be used. Listing 12.7 demonstrates the simplest form of @JdbcDelete, performing a simple unparameterized query to the employees table of the HR connection to delete a record, where the employeeNumber field matches the value 1234.
Listing 12.7. @JdbcDelete(connection:any, table:string, where: string): int
var cnt:int = @JdbcDelete("HR", "employees", "employeeNumber='1234'");
Additionally, through the use of the optional params parameter, you can send an array of values to parameterize the SQL table or where parameters. In each instance where a portion of the SQL statement needs to be dynamically updated, as Listing 12.8 demonstrates, you can insert a question mark (?) character as a placeholder. Before executing the SQL query, the SQL statement is evaluated, and each ? is replaced with the corresponding value from the params parameter. The return value from the function is the number of records deleted from the selected table. Notice in Listing 12.8 that after the call to @ JdbcDelete the code checks to ensure the connection’s auto commit is set to true. If it isn’t, the code permanently commits the change to the dataset.
Listing 12.8. @JdbcDelete(connection:any, table:string, where: string): int
var con:java.sql.Connection;
try {
con = @JdbcGetConnection("HR");
var parms = ['employees','1234'];
var cnt:int =
@JdbcDelete(con, "?", "employeeNumber='?'",parms);
If (!con.getAutoCommit()) {
con.commit();
}
} finally {
con.close();
}
@JdbcExecuteQuery(connection:any, sql:string) : java.sql.ResultSet
@JdbcExecuteQuery(connection:any, sql:string, params:Array) :
java.sql.ResultSet
This method executes a custom SQL statement and returns the results of the query as a java.sql.ResultSet object. Listing 12.9 demonstrates executing a simple query that returns all the records found in the employees table from the HR connection where the ACTIVE field is set to Y.
Listing 12.9. @JdbcExecuteQuery(connection:any, sql: string): java.sql.ResultSet
var con:java.sql.Connection;
try {
con = @JdbcGetConnection("HR");
var results:java.sql.ResultSet =
@JdbcExecuteQuery(con,
"SELECT * FROM employees WHERE ACTIVE='Y'");
} finally {
con.close();
}
You can also pass the optional params parameter to @JdbcExecuteQuery to construct the query from a parameterized query. The value of the params parameter is an array of values you can use to parameterize the SQL table or where parameters. In each instance where a portion of the SQL statement needs to be dynamically updated, you can insert a question mark (?) character as a placeholder. Before you execute the SQL query, the SQL statement is evaluated, and each ? is replaced with the corresponding value from the params parameter.
Listing 12.10. @JdbcExecuteQuery(connection:any, sql: string, params: string): java.sql.ResultSet
var con:java.sql.Connection;
try {
con = @JdbcGetConnection("HR");
var params = ['employees','1234'];
var results:java.sql.ResultSet =
@JdbcExecuteQuery(con,
"SELECT * FROM ? WHERE ACTIVE='?'", params);
} finally {
con.close();
}
@JdbcInsert(connection:any, table:string, values:any) : int
The @JdbcInsert function inserts a new record with values specified in the values parameter. The values parameter can be either a Java map or an array. For a Java map, the field names are specified as the map keys. For an array, the values can specify either columnName=value or just the field values. When the array specifies just field values, they must correspond to the column order of the specified table. The return value is the number of records inserted. Listing 12.11 demonstrates using the @JdbcInsert function with a simple JavaScript array to provide the values for each column of the new row in the specified table.
Listing 12.11. @JdbcInsert(connection:any, table: string, values: any): int
var con:java.sql.Connection;
try {
con = @JdbcGetConnection("HR");
// Specifying the values as an array of values
var vals = [ "1234", "Y", "Smith", "Joe" ];
var results:int = @JdbcInsert(con, 'employees', vals);
if (!con.getAutoCommit()) {
con.commit();
}
} finally {
con.close();
}
Listing 12.12 demonstrates using the @JdbcInsert function with a simple JavaScript array, where each entry in the array is a name/value pair that specifies which value goes into which column within the table.
Listing 12.12. @JdbcInsert(connection:any, table: string, values: any): int
var con:java.sql.Connection;
try {
con = @JdbcGetConnection("HR");
// Specifying the values as an array of name=value pairs
var vals = [ "employeeNumber='1234'", "Active='Y'",
"lastName='Smith'", "firstName='Joe'" ];
var results:int = @JdbcInsert(con, 'employees', vals);
if (!con.getAutoCommit()) {
con.commit();
}
} finally {
con.close();
}
Listing 12.13 demonstrates using the @JdbcInsert function with a java.util.HashMap, where each entry in the map is a name and value pair that correlates to the column name and value that will be inserted into the new row.
Listing 12.13. @JdbcInsert(connection:any, table: string, values: any): int
var con:java.sql.Connection;
try {
con = @JdbcGetConnection("HR");
// Specifying the values using a Java HashMap
var vals:java.util.HashMap = new java.util.HashMap();
vals.put("employeeNumber","1234");
vals.put("Active","Y");
vals.put("lastName","Smith");
vals.put("firstName","Joe");
var results:int = @JdbcInsert(con, 'employees', vals);
if (!con.getAutoCommit()) {
con.commit();
}
} finally {
con.close();
}
Listing 12.14 demonstrates yet another way to use the @JdbcInsert function, this time with the JSON object, where the variable name of each member of the object represents the column name, and the value assigned is the value that will be inserted into that column.
Listing 12.14. @JdbcInsert(connection:any, table: string, values: any): int
var con:java.sql.Connection;
try {
con = @JdbcGetConnection("HR");
// Specifying the values as a simple JavaScript object
var vals = {
employeeNumber: "1234",
Active: "Y",
lastName: "Smith",
firstName: "Joe"
};
var results:int = @JdbcInsert(con, 'employees', vals);
if (!con.getAutoCommit()) {
con.commit();
}
} finally {
con.close();
}
@JdbcUpdate(connection:any, table:string, values:any) : int
@JdbcUpdate(connection:any, table:string, values:any, where:string) : int
@JdbcUpdate(connection:any, table:string, values:any, where:string,
params:Array) : int
This method updates one or more records that match the where clause with values specified in the values parameter. Like @JdbcInsert, the values parameter can be a JavaScript array, a JavaScript object, or a Java map.
The optional where parameter appends a where clause to the generated SQL statement that filters the list of records that will receive the update. Pass the entire contents of the where conditional (without the WHERE keyword) as the value of the where parameter.
The optional params parameter is an array of values you can use to parameterize the SQL table or where parameters. In each instance where a portion of the SQL statement needs to be dynamically updated, you can insert a question mark (?) character as a placeholder. Before executing the SQL query, the SQL statement is evaluated, and each ? is replaced with the corresponding value from the params parameter.
The return value is the number of records updated. For this method, connection can be either a java.sql.Connection object returned from @JdbcGetConnection or a string specifying the name of the connection to be used.
Listing 12.15 is an example of a parameterized @JdbcUpdateFunction using the where clause.
Listing 12.15. @JdbcUpdate(connection:any, table: string, values: any, where: string, params: string): int
var con:java.sql.Connection;
try {
con = @JdbcGetConnection("HR");
// Specifying the values as a Java Hash Map
var vals:java.util.HashMap = new java.util.HashMap();
vals.put("Active","?");
var parms = [ "N" ];
var results:int =
@JdbcInsert(con, 'employees', vals,
"employeeNumber='1234'", parms);
if (!con.getAutoCommit()) {
con.commit();
}
} finally {
con.close();
}
Debugging with the xe:dumpObject Component
For debugging purposes, the ExtLib’s dump object xe:dumpObject, which is available under the Create → Other menu by expanding the Extension Library category and selecting Dump Object, is able to dump the database metadata and the contents of a JDBC datasource to an HTML table. The dump is executed by adding the xe:dumpObject component to the XPage and selecting the JDBC datasource to be dumped. Listing 12.16 illustrates how to use the dump object with an xe:jdbcQuery datasource.
Listing 12.16. Using the xe:dumpObject with a JDBC Datasource
<?xml version="1.0" encoding="UTF-8"?>
<xp:view
xmlns:xp="http://www.ibm.com/xsp/core"
xmlns:xe="http://www.ibm.com/xsp/coreex"
dojoParseOnLoad="true"
dojoTheme="true">
<xp:this.data>
<xe:jdbcQuery
var="jdbcQuery1"
connectionName="HR"
sqlFile="activeEmployees.sql">
</xe:jdbcQuery>
</xp:this.data>
<xe:dumpObject
id="dumpObject1"
objectNames="jdbcQuery1">
</xe:dumpObject>
</xp:view>
Java JDBC API for XPages
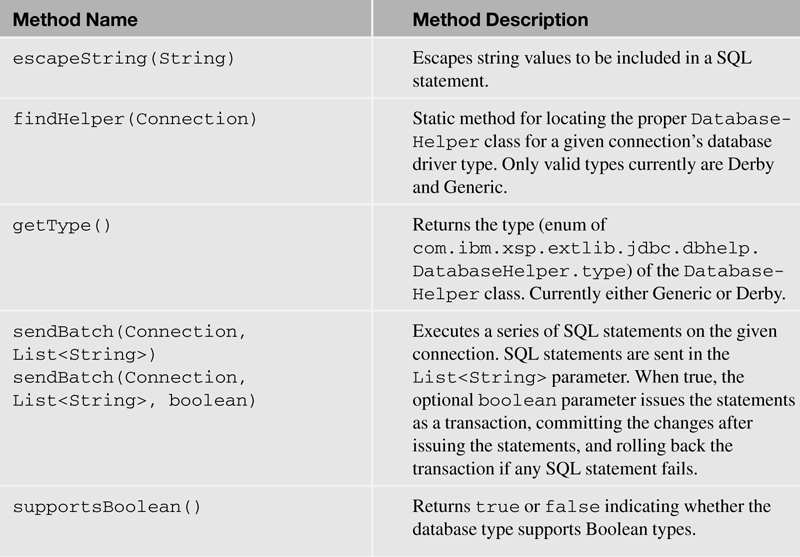
Two Java classes are included with the RDBMS support in the ExtLib that give you additional tools to work with RDBMS datasources in your XPages application. The class com.ibm.extlib.util.JdbcUtil provides several methods to acquire connections, check for tables, and load SQL statement design resource files from the NSF. The com.ibm.xsp.extlib.jdbc.dbhelper.DatabaseHelper class has functions to aid in the generation and issuance of SQL statements to a given connection.
The com.ibm.xsp.extlib.jdbc.DatabaseHelper class is designed mainly to assist in the generation and issuance of SQL commands to an RDBMS. Several methods, named appendSQLType(), take a StringBuilder object as the first parameter and the appropriately typed value as the second and append the value to the StringBuilder object. The available StringBuilder-related methods are listed in Listing 12.17.
Listing 12.17. appendSQLType() Methods to Build a SQL Statement Using a StringBuilder
appendSQLBoolean(StringBuilder, boolean)
appendSQLDate(StringBuilder, Date)
appendSQLDouble(StringBuilder, double)
appendSQLFloat(StringBuilder, float)
appendSQLInteger(StringBuilder, int)
appendSQLLong(StringBuilder, long)
appendSQLNull(StringBuilder)
appendSQLShort(StringBuilder, short)
appendSQLString(StringBuilder, String)
appendSQLTime(StringBuilder, Time)
appendSQLTimestamp(StringBuilder, Timestamp, Calendar)
appendUnicodeSQLString(StringBuilder, String)
Additionally, several methods that return just the SQL statement-compatible string version of a value are available as getSQLType(). Listing 12.18 lists these methods.
getSQLBoolean(boolean)
getSQLDate(Date)
getSQLDouble(double)
getSQLFloat(float)
getSQLInteger(int)
getSQLLong(long)
getSQLNull()
getSQLShort(short)
getSQLString(String)
getSQLTime(Time)
getSQLTimeStamp(Timestamp, Calendar)
getUnicodeSQLString(String)
In addition to the methods to help build SQL queries using a string builder, Table 12.4 lists several additional helper methods that can be used for various JDBC actions.
Table 12.4. Additional Methods to Perform Other JDBC-Related Actions
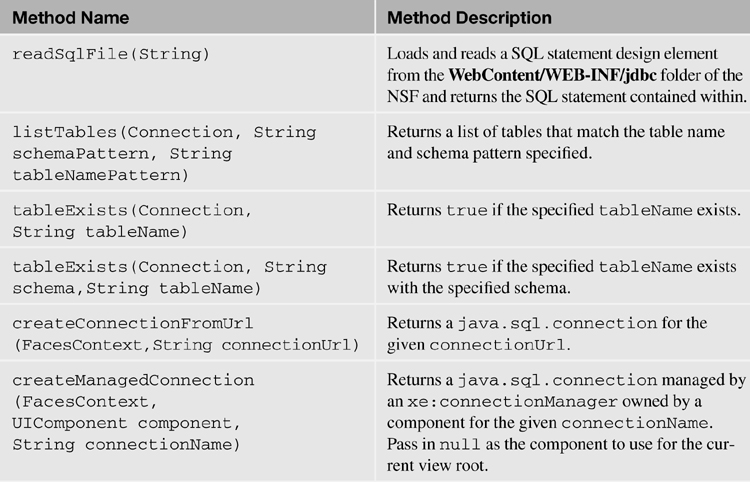
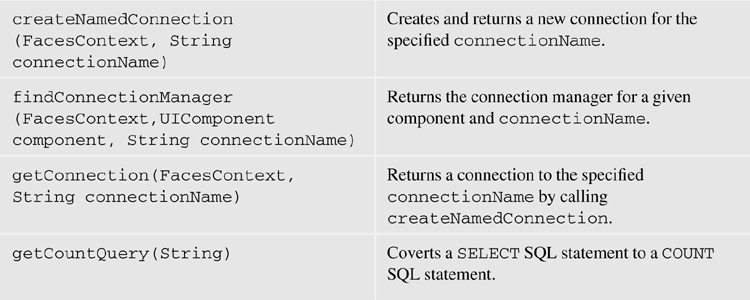
In addition to the DatabaseHelper class, the com.ibm.xsp.extlib.util.JdbcUtil class, detailed in Table 12.5, includes several methods that are useful for Java development in XPages. The class mainly focuses on getting and creating connections, reading SQL design elements, and listing and checking for the existence of tables.
Table 12.5. Method Summary for com.ibm.xsp.etlib.util.JdbcUtil Class
Conclusion
With the addition of relational database access to XPages, the ability for the platform to truly become an integration point between disparate systems in the enterprise becomes a reality. Although support of RDBMS is new to XPages and the tools to integrate it into the Domino Designer UI are still forthcoming, RDBMS in XPages is already a powerful new tool in the XPage developer’s arsenal. With a little work and a good understanding of RDBMS systems design, application developers will find it easy to create and deploy high-performing and highly scalable applications that cross both Lotus Domino and RDBMS stacks.