
Chapter 7
Buying Paid Ad Media
IN THIS CHAPTER
![]() Getting set up with Google Ads
Getting set up with Google Ads
![]() Familiarizing yourself with the Google Ads interface
Familiarizing yourself with the Google Ads interface
![]() Setting up different campaign types
Setting up different campaign types
![]() Exploring advanced customization features
Exploring advanced customization features
The Google Ads solution is a comprehensive tool that you can use to create your video advertising campaigns. In this chapter, you master the interface and discover its powerful advanced features. Google Ads is your key to running your paid media campaigns to deliver against your business goals.
Getting to Know Google Ads
Google Ads is the name for Google’s complete advertising offering, which allows you to buy media and run advertising campaigns across Google, YouTube, and the Google Display Network, a network of millions of websites where your ads can appear. Although this deep and comprehensive tool allows for a lot of sophisticated targeting and customization options, it is easy to set up.
 Google Ads is the new name for what used to be called Google AdWords, so you may see some references online to Google AdWords. You should know that the interface can vary a bit depending on your country, but don’t be too concerned if you see minor differences. The principles covered in this chapter still apply.
If for any reason you can’t create video campaigns with your newly created Google Ads account, call the Google support line. You can find the relevant support number for your country in the Google Ads tool. If you’re in the U.S., the number is 1-844-201-2399.
Signing up with Google Ads
Before you can access the full system and start setting up your YouTube campaign, you need to sign up for a Google account, if you don’t have one, by visiting https://accounts.google.com/signup and following the steps. You also need to sign up for Google Ads with your Google account. Sign up at https://ads.google.com
 In the past, Google required people signing up for the first time to create an initial campaign for text-based ads to run on Google’s search engine. If you’re required to do so, go ahead because you can immediately pause or delete it once done.
Getting a tour
When you first arrive at the main Google Ads interface, you may be offered a tour that walks you through key features of your account. Taking this tour is a great idea because it familiarizes you with the options available.
You also see the campaign you might have created as part of the initial setup as well as various toolbars with lots of options. Bookmark this site in your browser because you’ll be visiting the tool every day when you have active campaigns.
Google Ads offers helpful guidance in a variety of different ways.
- When you click on the question mark icon attached to a feature or section, simple definitions appear.
- Clicking on a link to Learn More opens a help tool with an article explaining the relevant feature or section.
- A large searchable library of content appears when you click on the upper-right corner of the question mark icon and then click on Get help.
- Google’s support team is available by phone Monday through Friday from 9 a.m. to 9 p.m. ET. You can find the relevant number listed on the Google Ad’s website. If you’re in the United States, you can call 1-844-201-2399.
Setting Up Video Campaigns
Google Ads has a handy flow that walks you through the best advertising options and settings to deliver to your campaign’s goal. It’s virtually the same for all the different campaign types you can create, with just a few different options enabled or disabled.
To set up a campaign, follow these steps:
- Click on All Campaigns.
- Click on Campaigns.
Click the blue + button to create a new campaign and choose your campaign type.
Seven options appear, as shown in Figure 7-1. I list only the ones that include YouTube as an option. You can choose a campaign for
- Leads
- Website traffic
- Product and brand consideration
- Brand awareness and reach
- Create a campaign without a goal’s guidance
After you choose your campaign type, choose the Video option.
You may see some campaign subtype options (see details in the following campaign sections).
Click on Continue.
The Create your campaign page appears, as shown in Figure 7-2.
Enter your campaign name.
Choose a unique name that describes the campaign — for example, Q3 Email List Campaign.
Set your budget.
You can enter a dollar amount for what you’d like to spend each day, or you can select Campaign Total from the drop-down menu to set the total amount you’d like to spend.
You may see an additional drop-down menu, which allows you to choose your delivery method. Standard mode delivers your campaign evenly over the time you allot. Accelerated mode delivers your campaign as quickly as possible while maintaining performance.
Choose your Start and End dates.
You can choose to have your ads start as soon as they’re approved, which is usually within one business day. Google employs both machine learning and human input to ensure that all ads meet their policies.
Choose your networks.
Various options appear in the Networks box, shown in Figure 7-3: YouTube search results, YouTube videos, and Video partners on the Display Network.
Depending on the campaign you’re setting up, some network options may not be available. For example, if you’re driving leads, only YouTube videos is selected because lead-generation campaigns make use of the TrueView for Action ad format, which can run only on YouTube videos. Different flavors of TrueView run within the YouTube search results and on the Display Network.Choose your language, location, and bidding options.
You can target certain languages and locations — for example, Spanish speakers in the United States.
Depending on your campaign type, you see different bid strategies selected like cost per view, or cost per thousand. For example, if you’re driving leads, Target CPA is selected, and the other options are greyed out. With Target CPA, you can set an average amount you’re willing to pay for a conversion — for example, each time someone takes the desired action.
In the Content Exclusions section, select where your ads can show.
You can choose from Expanded, Standard, and Limited Inventory options. I recommend Expanded because it excludes most sensitive content, such as profanity, graphic content, and violence, but isn’t overly limiting.
Decide whether you want to show your video on all eligible devices.
Unless you’re concerned with reaching specific device users, choose all eligible devices.
Click on Additional Settings to set your frequency capping by entering a number of how many times you want your ad shown or viewed per day.
Frequency capping is a great option if you’d like to limit how many times your ad is shown to the same user.
For example, you can set your ad to be shown only a certain number of times per day or during the campaign.
- Schedule your ad to run on all days and at all times or add in time and day restrictions.
Create your ad groups.
In a campaign, you can create more than one ad group. For example, your campaign may have five ad groups, one for each product you’re promoting and each with different ad creative. Say that you’re selling sports equipment online, and you’re creating a campaign to promote your full range of clothing, including shoes. You can create an ad group with video ad creative that focuses just on footwear, a second ad group at a later stage that focuses on clothing, and a third ad group that focuses on accessories. These ad groups can all exist within the same campaign. Make sure that you use an ad group name that best describes the ad you’ll be running in this group.
In the People section, choose your target audience.
You can target your audience using demographics, such as gender, age, parental status, and, in some countries, household income. Depending on the campaign type you’re setting up, you can target by audience type based on their interests and habits (affinity and custom affinity targeting) or what they are actively researching or planning for (in-market, life events, and custom intent). You can also target your audience based on how they’ve previously interacted with your business, including remarketing, which means showing your ad to people you’ve previously touched somehow, such as previous website visitors, or similar audiences, which lets you upload a list of customers and find people who are similar to them.
In the Content section, choose where you’d like your ads appear.
You can have your ads run anywhere, or you can narrow the focus using certain keywords, topics, or placements.
Add your video ad.
Take a look at Figure 7-4 to see a video ad being added. It’s a good idea to have your video already uploaded to your YouTube channel. In another browser tab, visit your video and grab the link from the browser bar so that you can copy and paste this into the input box. Google Ads pulls your video in and displays an example of how the ad will appear on the right-hand side. The Video Ad Format option is set depending on the campaign type you’re creating. For example, if you’re driving leads, it is set to In-Stream ad.
Chapter 11 delves into how to create your own video, and Chapter 14 walks you through the simple steps to uploading your video.
Enter the URL of where the ad will click through to, along with a Display URL, which is the web address that will be shown on the ad.
As you enter information, the preview ad updates.
- Add in your call to action and your headline.
- Preview your ad on both mobile and Desktop devices.
Add a banner.
For some campaign types, you can include a companion banner. Google Ads can automatically generate a companion banner that displays on desktop computers, or you can upload your own image. The banner, or display ad, is the image that appears to the right of your video. Chapter 4 has all the details on companion banners and display advertising.
When you’re happy with everything, click on Save and Continue.
A final screen confirms the details.
Click on Continue to Campaign.
You return to the main Google Ads screen that shows a list of all your campaigns.

FIGURE 7-1: Google Ads offers a simple starting point to create a campaign, asking you to choose the focus of what you’d like your campaign to deliver.

FIGURE 7-2: Enter your campaign name, set your budget, and choose your start and end dates.
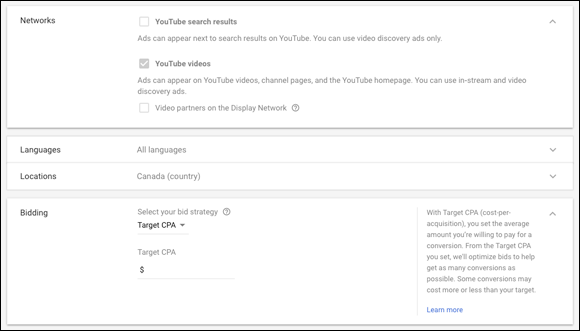
FIGURE 7-3: Depending on your campaign type, you’ll have different network options available to you for where your video ad will run.
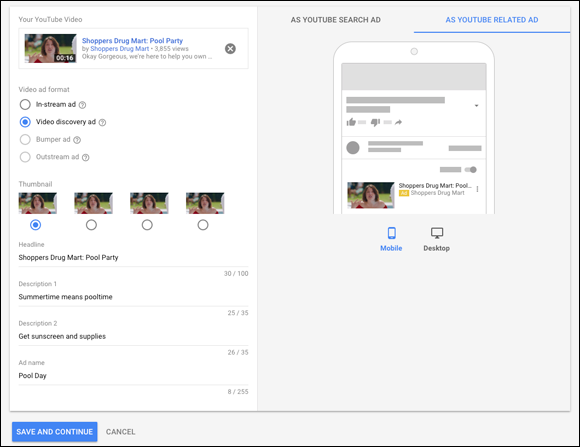
FIGURE 7-4: Setting up your video discovery ad for your product and brand consideration campaign.
After you set up your first video campaign, the left-hand side menu lists
- Search campaigns, where you can access any text or display campaigns that you’re running on Google’s search engine or on the Google Display Network.
- Video campaigns, where all your video campaigns that run on YouTube or the Google Display Network live.
Driving leads
You can create a video campaign designed to drive leads by encouraging people to explore your product or service, sign up for an email or provide their contact information, or engage in other actions that help drive your business.
This campaign type uses an ad format known as TrueView for Action. This skippable video ad format runs in-stream, meaning that your video ad plays before, during, or after another video on YouTube. These ads give users the option to skip them after five seconds.
Along with your video, you’ll be able to include a text headline and a call to action (CTA.) Headlines can contain up to 15 characters and is the primary line of text next to your video ad. Use headlines to promote your product or service. Your call to action can contain up to ten characters and appears alongside your headline. You’ll use your CTA to direct people to the website you specify as your final URL.
Go to Chapter 4 to find out more about skippable ad formats and Chapter 6 to discover creative tips to ensure that your ad creative performs well.
Delivering website traffic
If you’re interested in getting more traffic to your website, you can create a video campaign against this goal.
Just start by following the steps listed in “Setting up video campaigns,” earlier in this chapter and choose the option Website Traffic. When you’re asked to select a campaign type, choose Video.
If you haven’t yet setup conversion tracking, you’re asked to do so. Check out the sidebar “Conversion tracking,” earlier in this chapter.
Growing product and brand consideration
Marketers looking to move people from awareness to consideration in the marketing funnel by encouraging them to explore their brand, products, and services can set up a campaign to drive product and brand consideration.
Follow the steps in the section “Setting Up Video Campaigns” earlier in this chapter, choosing product and brand consideration and then selecting video. You’re offered a campaign subtype:
- Standard consideration, where you can drive views of or engagement with your product or service, leading to increased consideration. This campaign type uses videos to encourage consideration by driving interactions and engagements.
- Shopping, which enables you to promote relevant products alongside your video ads, encouraging people to learn about your products and services and to shop on your website.
- Ad sequence, which lets you tell your story by showing ads in a particular sequence. It uses a mix of ad formats so that you can show a sequence of ads to people over time. See the nearby sidebar “Ad sequencing.”
When it comes to creating your video ad, you have a new option available to you. You can create in-stream ads, but you can also create TrueView Discovery Ads (formerly known as TrueView in-display ads). These ads let you place your video ad in moments of discovery — for example, your video ad can appear next to related YouTube videos, as part of a YouTube search result, or even on the YouTube mobile home page.
Unlike in-stream ads, which play before, during, or after videos on YouTube, these discover ads consist of a thumbnail image taken from your video along with some text. The size and appearance of the ad can vary a bit depending on where the ad is appearing, but the idea is that discovery ads invite people to click to watch your video.
Think of it this way: Discovery ads are a bit like inserting your ad in a moment of intent, when someone has searched for something (see Chapter 5 for more on moments of intent). You’re charged only when the viewer watches your ad by clicking on the thumbnail.
Adding the link to your video ad and choosing the video discovery ad option gives you some choices and some input boxes to complete. Follow these steps:
- Choose a thumbnail from the four that Google Ads automatically suggests.
- Write a headline of under 100 characters.
- Write two lines of description, both under 35 characters
Give your ad a name.
This name appears only in Google Ads, so viewers do not see it.
Preview your ad.
You can toggle between As YouTube Search Ad and As YouTube Related Ad to see how your ad looks in different placements (refer to Figure 7-4). You can also see how it appears on mobile versus desktop.
Creating brand awareness and reach
You can create a brand awareness and reach campaign if you’d like to reach a big broad audience in order to create awareness of your brand, product, or service.
If you choose standard awareness when you create your video ad, you can see how your ad will appear on YouTube and on the Google Display Network. Figure 7-5 shows the different examples.

FIGURE 7-5: An in-stream ad on YouTube on mobile devices and on video partner sites in the Google Display Network on desktop computers.
You’ll have a few campaign subtype options:
- Standard awareness: This subtype lets your reach viewers on YouTube and across the web. It’s designed to deliver reach, impressions and views using in-stream video ads.
- Skippable in-stream: This subtype lets you reach people on YouTube and across the web with skippable in-stream ads optimized for efficient impressions.
- Out-stream: This subtype helps you expand your audience reach specifically with ads designed for mobile devices, reaching people on their phones and tablets.
- Ad sequence: This subtype lets your drive deeper awareness or consideration by showing video ads in a specific order. Tell your story by showing ads in a particular sequence to a single user. Use in-stream or bumper ads, or a mix of both. See the nearby sidebar “Ad sequencing.”
If you choose out-stream, you have some additional options to create your ad. You can include a headline of up to 80 characters, a description of up to 100 characters, and a call to action of 15 characters or less. You can upload a logo to accompany your ad and, of course, enter the URL where people will be taken if they click on your ad.
 In-stream videos are what most people are familiar with. Also referred to as pre-roll, mid-roll, and post-roll, these video ads run before, during, or after a video. Simply put, in-stream video ads run when you’re watching a video.
Out-stream video ads can appear in nonvideo environments. Say that you’re reading an article online, and you’re scrolling through the page of content. You may have seen that sometimes a page of content opens up and gives way to a video ad that’s effectively been placed in the middle of the nonvideo content. That content is an out-stream ad.
If you’re feeling unsure about which type of video ad is right for you, start with in-stream. In my opinion, it’s the most flexible, useful format and works just as well for beginners to advanced marketers.
Designing your own custom campaign
While Google Ad’s option to let you choose a goal and build a video campaign based on preselected choices makes things quick and easy to get started, sometimes you may want more control over your video campaign and the variables you’ll customize. This desire is especially true if you’re an advanced marketer with your own methodologies and approaches that you’d like to follow.
When you’re setting up a custom campaign, all the variables are open to you. Note that some options toggle on and off as you make selections, so play around if you find something is greyed out that you want to use.
Navigating the Google Ads Interface
After you have a campaign running, you can explore the many options and features that Google Ads offers. I recommend that you check in on your campaign each day (or at the very least weekly) to see how things are performing and make tweaks as needed.
When you’re viewing your video campaigns, you’ll have an additional left-hand side menu with of the following sections:
- Overview
- Recommendations
- Campaigns
- Ad groups
- Ads & extensions
- Videos
- Landing pages
- Keywords
- Audiences
- Demographics
- Topics
- Placements
- Settings
Overview
The Overview section gives you a bird’s-eye view of all your campaigns, showing you data from the last seven days. You can change the date range in the upper right-hand corner. All the different data found in the Overview section has its own matching section within the left-hand menu, allowing you to dive deeper.
If you have time to check only one thing every day or so, make it the Overview section. It’ll give you confidence, at a glance, that things are chugging along how you’d like.
I particularly like to look at the Biggest Changes box, which shows you the last seven days compared with the previous seven days, showing all your various campaigns listed by those who have had a large increase or a significant drop in the spending of your media budget.
Recommendations
The Recommendations section is an incredibly useful tool that takes some of the thinking out of optimizing your campaign.
After your campaigns have run for a few days or weeks, recommendations will appear in this section, advising of tweaks you can make to improve the performance of your campaigns. These recommendations will appear and refresh periodically, so check this section at least once a week.
Don’t worry if you don’t see any recommendations —you may not need any! All the recommendations that do appear here are customized to be relevant just to you and your campaigns; they aren’t blanket messages applied to all accounts. New feature suggestions also appear here.
Campaigns
The Campaigns section provides a complete listing of all your campaigns in your account at any one time. Each campaign you have is listed with columns for budget, campaign type, summaries of the number of impressions and views delivered, the view rate, average cost per view, and total cost.
You can select one or more campaigns and
- Copy and paste the campaign to duplicate it.
- Enable, pause, or remove the campaign.
- Change your budgets or bidding strategy.
- Create automated rules that change how and when your ads appear or adjust bids based on dynamic conditions.
- Tweak your targeting criteria.
You can also search, filter, and segment your campaigns so that only certain ones appear.
As you’re creating and running campaigns, compare their performance to determine why one campaign did better than the other. It may be your ad creative, your bidding or placement choices, or other variables.
Ad groups
Each campaign you create can have one or more ad groups within it. For example, you may create Cardio Classes, Strength Training, and Dance as ad groups in a Group Fitness Class campaign.
Although these ad groups are all subject to the budget set at the campaign level, they can have their own bidding strategy, targeting and placement, and video ad creative.
To create a new ad group:
- Choose your campaign from the left-hand side menu.
Click on Ad Groups.
A list of all the created ad groups for that campaign appear. (You created at least one ad group when you set up the campaign.)
Click on the blue plus icon.
You see a screen, shown in Figure 7-6, that lets you create your new ad group.
Enter a name for the ad group.
Choose something distinct that describes your ad group. For example, for a Group Fitness Class campaign, you might create an ad group for Cardio Classes.
- Set your maximum bid.
- Make your selections around demographics and audience targeting and where this ad group’s ads will run based on keywords, topics, or specific placements.
- Paste in the URL of your video to create your video ad.
After you complete everything, click on Save and Continue.
A new ad group appears in the campaign.

FIGURE 7-6: You can create ad groups for each different set of ad creative you want to run.
You can pause ad groups if they aren’t performing well, which directs more of your campaign’s budget to the other ad groups.
Just like the Campaigns section (see the preceding section), you can view the performance of ad groups, and filter, download, and email reports.
Ads & extensions
The Ads & extensions section lets you review all the ads you have running in a campaign.
You see a thumbnail of each video ad, the campaign and ad group that the ad lives in, whether the ad has been approved, its type, and data about how well the ad is performing. You can also see the impressions, views, view rate, average cost per click, and total cost of each ad.
If you look at Figure 7-7, you can see that the top listed ad has a cost per view of only $0.02. That amount is a really cheap cost per view and a great use of the media budget. It means that it costs only 2 cents per view of the ad. You can also see that 1,793 people have seen the ad. The ad below it has a cost per view of $0.10, which is still a great cost per view but a lot more than the ad in the top spot. The marketer behind this campaign will be considering why the first ad performed so well and whether there is anything to learn and apply to other ads moving forward.
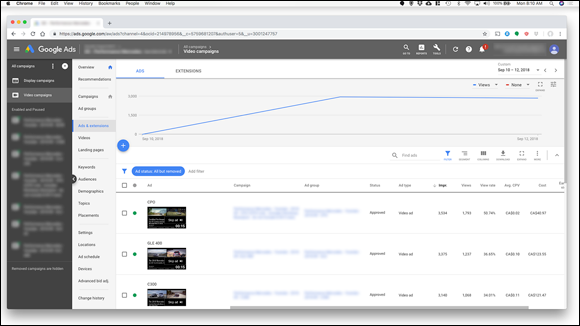
FIGURE 7-7: A listing of the performance of all of your ads appears in the Ads & extensions section.
When you scroll to the bottom of this page, you get a summary of your Total Video Campaign results.
 Campaigns, ad groups, and ads all work together in a nesting hierarchy. Your campaign sets your total budget, bidding type, places your ads will run, start and end dates, and other campaign-level settings. Ad groups live within campaigns. You can create several ad groups and tweak settings for your maximum bid and your target audience and further narrow where your ads will appear. Ads live within ad groups. You can create several different video ad creatives within an ad group.
You can see extensions in the Extensions tab at the top of the page. Extensions are a powerful way to improve your ads and help potential customers find you. However these extensions typically apply only to text ads running in your campaign, not your video ads.
Videos
Clicking on the Videos section shows you a list of all the videos you’ve uploaded to your Google Ads account, along with how they have performed.
I like to sort video ads by average cost per view to see which ones performed the best by the dimension of cost.
Landing pages
The Landing Pages section collects a list of all the web pages where your ads click through to. A landing page is the page on your website that you designate as the destination for someone to click through it. It’s effectively where they land after they have clicked your ad.
Keywords
When you first set up any campaign or ad groups, you can choose where your ads run and include keywords that can trigger your ad to show. For example, you can create a list of keywords that cause your ad to appear when people view content related to those keywords on YouTube, websites, and apps.
If you set up keywords, a list of them and their associated performance data appears.
To add keywords:
- Click on the Keywords left-hand side menu to visit the Keywords section and then click on the blue + icon.
- Choose which campaign or ad group you’d like to add keywords to.
Enter keywords, one per line (see Figure 7-8).
You can copy and paste them from a list, if you’ve created one. You can also enter related websites or details about your product and service, and Google will automatically generate example keywords for you.Choose your Keyword setting.
Audience shows ads to people who are likely to be interested in these keywords. Content shows your ads on webpages and videos related to those keywords.
Choose Audience because you want to reach people interested in those keywords, regardless of the site they’re visiting or video they’re watching.Click on Save.
You return to the Keywords section, which now lists the keywords you added to your campaign or ad group.
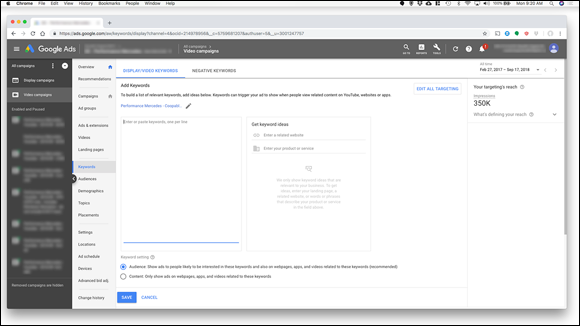
FIGURE 7-8: You can add keywords to your campaigns that will trigger your ad to show when people are viewing related content on YouTube, websites, or apps.
Audiences
When you first set up your campaign or ad group, you chose the types of audience you’d like to reach in the People section. The Audiences section breaks out a complete list of all these people, your audiences, broken down by their type and the campaigns and ad groups where they appear.
To add audiences to your campaigns or ad groups:
Click on the blue pencil icon.
A screen that allows you to edit audiences appears.
- Click on Select an ad group.
- Select the ad group you’d like to edit.
- Select audiences to add to your group.
- After you finish making your choices, click on the Save button.
In-market audiences are the people who are actively browsing, researching, or comparing the types of products or services you sell. Based on signals of behavior and intent, you can reach these people directly. Don’t worry: The people in-market are anonymous to you — you can’t target a specific individual, only groups of people who appear to exhibit the behavior that suggests they’re actively looking to buy.
Affinity audiences are those people you can target who have certain interests. For example, if you want to reach people with your group fitness classes, you can target people who like sports and activities, health and fitness, diet and nutrition, and other related areas of interest.
Try different audience targeting techniques to see whether you can uncover people who are more interested in seeing your video ads and taking your desired actions.
Demographics
You can use the Demographics section to see the different demographics your campaigns and ad groups are reaching.
Topics
The Topics section displays a list of all the topics your ads are running against. You can choose topics to show ads on content related to a certain subject, with the option to set up the ads when you first set up your campaign or ad group or add more topics later. For example, you can add topics to your ad group for cardio classes for Beauty & Fitness, Health, Hobbies & Leisure, and Sports.
To add topics:
Click on the blue pencil icon.
You a screen that allows you to edit topics.
- Click on Select an ad group.
- Select the ad group you’d like to edit.
- Select topics to add to your group, as shown in Figure 7-9.
- When you finish making your choices, click on the Save button.

FIGURE 7-9: You can add topics to your campaigns and ad groups.
Placements
In the Placements section, you can choose to show your ads on certain websites, apps, or videos. You can list specific YouTube channels, YouTube videos, websites, apps, or app categories.
To add placements to your ad groups:
Click on the blue pencil icon.
You a screen that allows you to edit placements.
- Click on Select an ad group.
- Select the ad group you’d like to edit.
- Select the placements to add to your group.
- When you finish making your choices, click on the Save button.
You can start your campaign running as broadly as possible, without limiting your targeting, or you can start small, being specific with who you want to reach, slowly opening up to new broader audiences. Both strategies help you find the right people.
In the Placement sections, you can also
- See where ads are shown: Click on Where Ads Showed in the top horizontal menu to see a long list of every single instance of where your ad showed.
- Add criteria that lets you specifically exclude certain placements: If you click on Exclusions in the top horizontal menu bar, you can add criteria so that your campaign or ad group doesn’t run in excluded placements.
Settings
The Settings section lets you edit the settings applied to your campaigns and to your account as a whole so that you can make broad changes to everything in one go.
In Campaign settings, you can enable, pause, or remove your campaigns and change budgets, dates, rotation settings, and more.
The Account settings section lets you edit some advanced settings that apply at your account level. These settings are the upper-most level settings and apply to your entire account with Google Ads and all your campaigns contained within it.
Locations
The Locations section provides a list of all the locations you have chosen to either target or exclude. You can choose to see a geographic report that shows you where your customers were physically located when the ad was shown.
Ad schedule
If you’ve set up your campaigns to follow an ad schedule, showing ads only at certain times or on certain days, you can find details in this section. You can choose to drill down by day and hour.
Devices
The Devices section breaks out where your video ads ran for each of your campaigns. It’s interesting to compare whether you get better results from one type of device over another.
Advanced bid adjustment
In the Advanced bid adjustment section, you can adjust bids. Bid adjustments allow you to show your ads more or less frequently based on where, when, and how people search. For example, sometimes a click is worth more to you if it comes from a smartphone, at a certain time of day, or from a specific location.
Change history
Given that Google Ads is such a comprehensive tool that lets you customize so many different options, the Change history section may be the best feature of all. Visit this section to see a list of all the changes you’ve made to your ads, bids, budgets, keywords, placements, and so on.
You can find details of your changes here, which is helpful if you find that you’ve made a mistake or a change you’ve made has negatively affected performance but you can’t quite remember the change you made.
Exploring More Google Ads Features
A series of icons appear in the upper right-hand corner of Google Ads houses even more tools to help you with your campaigns. This menu bar contains
- Go To, where you can search for any page and quickly navigate to that section.
- Reports, where any reports you’ve created will live (see Chapter 16 for more on reports).
- Tools, which holds a lot of special tools that I describe in the next section.
- Refresh, which is a simple click to refresh your page and is helpful if something hasn’t appeared to have updated.
- Help, which is a deep library of help features and contact options to get more help with your campaigns.
- Alerts, which displays notifications that alert you to if your campaign is ending soon or that certain settings need your attention.
- Your account information, which includes your account number, name, and the email address with which you are logged in. (You can click on your profile icon and log in to a different account if you use multiple accounts for Google Ads.)
Tools
Despite being not much more than a little spanner icon in the upper right-hand menu, the Tools section contains a lot of incredibly useful and compelling tools that you can try out.
Some of the best tools for your video campaigns are
- Keyword planner: The Keyword planner is a cornerstone tool of the Google Ads solution. While it’s primarily used to generate keywords that will trigger your text ads running on Google’s search engine, you can use keywords to trigger your video ads on sites and videos that feature those keywords.
Audience manager: Audience lists help you reach people who have visited your website, watched your video, engaged with your app, or shared their contact information. You can set up an audience source to reach the right people, with the right message, at the right moment.
You can set up campaigns that remarket to people who have visited your YouTube channel. The Audiences section shows you a list of any audiences you’ve created. Clicking the blue pencil icon lets you ad selected audiences to campaigns or ad groups.
- Portfolio bid strategies: Portfolio bid strategies let you automatically set bids for multiple campaigns. Think of this tool as a way to create an overarching bidding strategy for all your campaigns rather than specifying unique bidding strategies for each campaign you’re running.
- Shared budgets: You can apply a shared budget to any campaign or create a new one. The idea here is that you can set your overall budget available and make all your campaigns share from that pool.
Bulk actions
Bulk actions is an advanced section where you can create automated rules that do things like pause or enable your campaigns based on certain triggers.
Measurement
Measurement of your Google Ads campaigns is so important and fully featured that it has its own chapter! For details on the Measurement section, see Chapter 16.
Setup
In the Setup section, you can edit your billing and payment information and manage account access, including users, managers, and security settings, as well as your general preferences, such as language, number format, and more.
If you need help, you can call Google. You can find the telephone number for your country in the Google Ads tool. If you’re in the United States. you can dial 1-844-201-2399 Monday through Friday from 9 a.m. to 9 p.m. ET.