
Chapter 11
Creating Video
IN THIS CHAPTER
![]() Making equipment decisions
Making equipment decisions
![]() Planning your shoot in preproduction
Planning your shoot in preproduction
![]() Shooting video in the production phase
Shooting video in the production phase
![]() Editing your video in post-production
Editing your video in post-production
![]() Exploring advanced video types
Exploring advanced video types
Creating great-looking videos yourself has never been easier as most people have a powerful camera in their pocket already. Whether you’re making ads or content, keeping a few considerations in mind can set you up for video production success.
In this chapter, I walk you through the gear you need and describe the decisions you need to make about the script and shots. I also cover shooting and editing the video, as well as what you need to do to polish it for publishing.
Gathering Your Gear
Gear refers to the hardware and equipment used to create your video. Before you hit record, take inventory of the gear you have access to. Thinking through some choices and potentially upgrading components of your gear with cost-effective options can make for a much better quality video result. Some simple and smart choices with gear can ensure that the visual and audio quality of your end product are where you want them to be.
Cameras
You have a few options when it comes to cameras, ranging from the phone that is probably already in your pocket to high-end cameras used for top-quality production needs.
The two main recording qualities are 1080p HD and 4k UHD:
- 1080p HD (High Definition) has long been the standard for high definition and delivers high quality video up to 1920 x 1080 pixels in size. This quality is perfectly acceptable. It is lighter on memory storage space and works well for YouTube.
- 4k UHD (Ultra High Definition) delivers almost four times the number of pixels on a screen compared with 1080p, and more people are using this resolution. The quality is exceptional, but it does take up more memory storage space. If you’re making video advertising, use this format.
 At the very least, ensure that your camera of choice shoots in 1080p HD at a rate of 30 frames per second (fps). However, consider shooting in 4K. The biggest benefit of 4K beyond the fact that it is an ultra-high definition level of quality that is good enough for movies in the theater is that you can scale down your video to lower resolutions. Think of it this way: If you shoot your video in 4K, you can play it on the largest screens and scale it down to the smallest of screens. If you shoot in 1080p, you won’t be able to scale it up to a quality suitable for the movie theater, and hey, there’s always a chance your video could make it to the big screen!
Your phone camera
Don’t think that the camera that’s built into your phone isn’t up to the job just because it’s part of your phone. If you have an Apple iPhone 6S or above or are an Android user with a phone such as the Google Nexus 5 or any of the Google Pixel range, you’ll be able to shoot in 4K. Take a look at your phone’s tech specs in the manual or online to see what your camera is capable of.
If you’re not sure whether your phone shoots in 4K, search for its technical specifications online. You may need to go into your phone’s settings to tweak your video recording resolution because it may be set at something like 1080p by default. The camera on your phone is typically more than enough for most people’s needs when it comes to creating video for YouTube. Because you probably already have one, your phone’s camera is a cost-effective camera option to start out with.
Assuming that you have a phone that can shoot 4K, you may want to use the camera on your phone because
- You already have one and don’t need to buy more equipment.
- It’ll shoot in a quality more than you need.
- You can buy accessories like tripods to help with shooting.
- It’s incredibly easy to record and upload footage to edit later.
- You can start recording something immediately.
DSLR
DSLR stands for digital single-lens reflex, which refers to the way in which the camera’s mechanism works. Inside the camera, a mirror reflects light from the lens into the viewfinder, through a prism or mirrors, which allows you to see exactly what you’re capturing in real-time. This mechanism is a more accurate way to capture exactly the shot you want.
DSLRs have some major benefits over the camera built into your phone — for example, they can typically autofocus a lot better. When you’re moving around or shooting yourself, the camera is better able to keep everything in focus, whereas phones tend not to be as good at this task.
DSLRs have a flip-out screen that you can turn to face you so that you can see yourself as you record. This feature makes these cameras especially popular with vloggers.
Some DSLRs have a remote-control app that you can add to your phone, which easily lets you start and stop recording even when the camera is set up on a tripod across the room from you.
DSLRs allow for interchangeable lenses so that you can shoot different kinds of videos in various situations. The lens that comes with your DSLR is a great general-purpose lens suitable for all kinds of video shooting, but you can try out many other lenses, such as a macro lens that lets you do super close-up shots.
DSLRs also offer better memory options, with a memory card slot that you can switch out quickly rather than having to wait for your phone to upload to the cloud.
All in all, the DSLR is your professional solution for video capture. Most people won’t need a top of the range DSLR, and many excellent mid-range options are available, such as the Canon T7i, which starts at $700, or the Canon 70D, which starts at around $1,000.
You may want to choose a DSLR if you
- Want more options for greater image resolution quality
- Like the idea of an easier shooting solution
- Use different lenses for different situations
- Want something that is faster to start up and focus
- Like having a more expandable memory storage option
- Want the freedom to tweak with manual controls
- Don’t mind spending the money
Look out for deals on second-hand DSLRs. Lots of people buy equipment thinking they’ll use it and then sell it after they find they’ve not really made much use of it at all. Make sure to check that everything is in working order before purchasing and consider buying from a trusted second-hand retailer or camera specialist.
Memory
Video footage takes up a lot of memory storage space and you don’t want to run out of space when shooting.
If you’re shooting with your phone, delete old apps that you no longer use and archive things like photos to clear up memory space. Check how much storage you have available and test how much space a 10-minute video takes up. Make sure that you’ve got enough space available in your phone’s memory to shoot the videos you want. Some phones have slots for memory expansion.
If you’re using a DSLR, you’ll be able to purchase memory cards that you can swap out as you’re shooting. If you have two cards, you can use one to shoot, while the other uploads its files to a hard drive ready to be cleared out and swapped back in. For more on memory cards, see the nearby sidebar.
Audio
Without good audio, people will turn off your video. If you think the audio you’ve recorded isn’t great but is acceptable, it’s not; it has to be really good every time. This may not seem super important, but if your audio is bad, people will almost always immediately click away. You must nail the audio.
The main kinds of microphones for shooting video are
Built-in microphones: Your phone has a microphone built right in, but you can also buy external microphones, for as little as $10, that connect to your phone through a cord.
DSLRs don’t usually have a mic built in, so you need to invest in another piece of equipment to record sound. Different kinds of mics have different pickup ranges, meaning, the area around them where they can successfully capture audio.Shotgun microphones: A shotgun mic sits directly on top of the camera and points right at you. These kinds of microphones are highly directional with a pickup range aimed directly at the target. They’re great when you’re facing the camera directly, such as when you’re interviewing someone or recording yourself.
This type of mic attaches to the hot shoe of your DSLR. The hot shoe is the mounting point on top of your camera where you attach different accessories. It’s essentially a universal bracket that lets you add different tools, such as mics, lights, and flashes. You can even get a bracket that extends your hot shoe, giving you ways to add more accessories at the same time.
- Lavaliers: The lavalier, or lav for short, is the kind of microphone that clips to your clothing. It has a wire running to a transmitter that sends the audio via radio frequency to the device recording the sound. You may have seen presenters on stage giving talks wearing these little mics, which are discretely attached to the lapel of their shirt. Their pickup range allows them to capture the sound of the speaker whilst also allowing more movement. Lavaliers are surprisingly reasonably priced.
- Boom mics: A boom mic is a microphone attaches to the end of a boom, a long extendable and adjustable arm. An operator holds these mics above the sound source so that they don’t appear in the shot. They may be covered in a furry cover to reduce the noise from things like wind, and they’re often used when making movies.
- Specialist microphones: Many kinds of microphones are used for specialist applications. If your built-in mic isn’t sufficient, a shotgun mic or lavalier should work for most people. However, if you have a more sophisticated need, you should research which microphones other people recommend for those applications.
Make sure that you test your audio. For example, if you’re going to record yourself unboxing products in your living room, grab your camera and make a quick video to test the audio.
To test your audio:
- Set up your video exactly how you would record your nontest video.
- Record your video.
- Upload your video to YouTube, setting the video to private so that only you can see it.
Watch the video and ask yourself “Is this sound quality sufficient?”
If you’re not confident that the sound is good enough, consider investigating other microphone options.
Lighting
Lighting is just as important as audio because people want to see what’s going on in the video clearly. You can work with the lighting you have, use one light, or use three lights.
Working with what you’ve got
The easiest option with lighting is to simply use what you have available. For example, if you’re shooting an unboxing video in your living room, take advantage of the windows, overhead lights, and floor or table lamps around you.
You can experiment with positioning yourself and your camera setup wherever the natural light is best and augmenting it with your lights in various combinations.
You’re aiming to have yourself clearly lit, not too dim and not too washed out, eliminating shadows on your face. You will probably need to take a few tests to get it right.
 Natural light changes throughout the day. Be cautious of consistency when using lighting sources that include the natural light of your room. If you make a video in the morning when the sun is streaming into the room and then you make another video later that evening, the sun will have shifted, and your lighting will be very different. Always strive for consistency in your videos.
One-light solutions
DSLR cameras have many options available for lights that you can attach to the hot shoe of your camera. Your lighting rig can move around with you as the camera moves, and they’re convenient because they don’t need any special setup. You just attach them to your camera, and you’re good to go. The only con to using only one light is that it may not be as consistent because the camera can move around, which may cause shadows.
A ring light, a popular type of one-light solution provides a nice uniform light that comes straight from the camera’s point of view. A ring light eliminates shadow and is flattering. People who create makeup tutorials often use ring lights because they enhance their facial features and clearly show the products they’re using.
If you’re using your camera phone, lighting accessories are available for that, too!
Three-light solutions
Three-light solutions make use of those black and silver umbrellas that are popular in photography studios. Those umbrellas give a nice wash of light, reducing the harshness of lighting without an umbrella, and add depth and definition.
While having a three-light solution may seem initially like something reserved for more professional shoots, the equipment needed is reasonably priced and can give a great result that may well make the expenditure worth it. Kits can start for as little as $100, and you may be able to find secondhand kits on local listing sites. In a classic three light solution, you’ll have a
- Key light: Your main light, set to the right of the subject, points directly at your subject from an angle and is positioned just slightly above your subject’s eye level.
- Fill light: Your fill light can be softer than the key light and is positioned on the subject on the opposite side of the key light. Your fill light helps eliminate shadows created by the key light, hence the name fill light. It’s essentially filling in the areas that the key light may make darker.
- Back light: The back light creates depth by being positioned behind the subject. A back light helps separate the subject from the background. For example, if you’re shooting your friend who has long dark brown hair and the background is also dark, you’ll see little definition between them. Adding a back light helps cast a thin outline of light around the subject’s head, helping create that depth and detail that’ll look good.
If you’re making professional level commercials or have a shoot that requires lots of different kinds of setups, you’ll need a lighting professional to advise on the needs of your shoot and to execute the lighting during the shoot.
Tripods
A tripod is a stabilizing device you can attach to your camera. You may not think you need a tripod or device to help stabilize your video shot, but you do. People do not want to watch shaky videos. Even the videos you may have seen on YouTube that appear to be handheld probably use a special kind of handheld stabilization device. When people start shooting video, they may prop their phone up on some books, which can work at first. However, getting the right level of adjustments for a truly great shot is hard, so look into stabilization options like tripods from the start.
Tripods come in all sizes, prices and qualities, but most people will be able to meet all their video needs with one of the following options:
- Classic tripod: You can get tripods for your DSLR and your camera phone that let you position your camera to keep it stable and then adjust for height and angle. Most tripods include a spirit-level that so you can level out your shot. You can get full-length tripods that stand on the ground, as well as smaller tripods that sit on your desk or on a shelf.
- Monopod: A monopod is just like a tripod except, as you may expect, it has only one leg instead of three. Monopods are easy and quick to set up and move around. For example, if you’re making videos of birds in nature, you may need to move quickly, quietly, and easily. Although the tripod is a little cumbersome and the legs may need to be adjusted, you can pick up the monopod and hold it in place. You’re effectively creating your own tripod with the monopod and both of your legs, keeping it stable. Selfie-sticks are a kind of handheld monopod that you can use to film yourself as you move around.
- GorillaPod: The popular GorillaPod is another type of tripod and is made up of interconnected ball joints that let you bend and twist it into any shape you’d like. This flexibility results in excellent positioning on uneven surfaces and allows you to wrap it around a tree branch or hook it onto a shelf to secure your camera. If you search for ways to use a GorillaPod, you’ll find many great ideas on ways to use this flexible tripod.
Preparing for Production
The preproduction phase is the stage before you shoot any video. It’s the phase where you make all the necessary plans to ensure your success. The preproduction phase includes
- Developing your idea
- Storyboarding your vision
- Crafting your script
- Developing your shot list
- Choosing locations
- Creating the call sheet
- Checking your budget
- Tallying up costs
- Ensuring legal compliance
Time spent in the preproduction phase will save you a lot of time and potential cost down the road.
Developing your idea
Arguably the single most important stage of creating video is spending time developing your idea.
Many of the chapters in this book help you explore ideas and options. Chapter 4 details ad formats you can make videos for. For the best practices on how to create compelling video ads, see Chapter 6. Chapter 8 covers a broad range of content videos types, and Chapter 10 lists best practices for making great video content.
Spend time researching either ads or content videos, using your research to inspire your own thinking about what you want to create.
A great idea for your video
- Delivers to your business and marketing needs. Check Chapter 2 for how to develop a brief, a document that helps ensure that whatever you create will deliver to your needs.
- Is on brand. Your video should look, feel, and sound like it’s coming from you. Avoid the temptation to copy anyone else’s work too closely.
- Speaks to your audience. Chapter 3 addresses how to research your audience and develop actionable insights that can inform your video ideas.
- Is something that you can feasibly create and deliver. It should be something you have the ability to make without overstretching yourself, and ideally, you’ll be able to make more of these videos.
- Inspires you! You should be excited to make this video.
When you’re thinking of ideas,
- Generate as many as possible.
- Think expansively, let your mind roam free, and don’t limit your thinking.
- Brainstorm with friends and colleagues to evolve and improve ideas.
- Picking your favorites from your many ideas and further refine them.
- Land on your best idea or two and write a one-page description of what will happen in the video.
After you choose your top ideas, wait and revisit them later, that way, you can reflect on whether you still like your idea.
Storyboarding your vision
A storyboard is a tool that helps you visually organize the narrative of your video. A storyboard helps create a shared understanding of your vision for the video. You can use a storyboard to make sure that all team members and stakeholders are on board with the shared vision of what will be produced.
A storyboard is a visual representation of what you’ll actually shoot in the production phase (see Figure 11-1). Using a series of sketches to represent the shots you want to capture, each sketch helps you make decisions about the camera angle, lighting, and transitions and how the visuals match up with your script. You don’t need to be good at drawing to create a storyboard, although it does help.
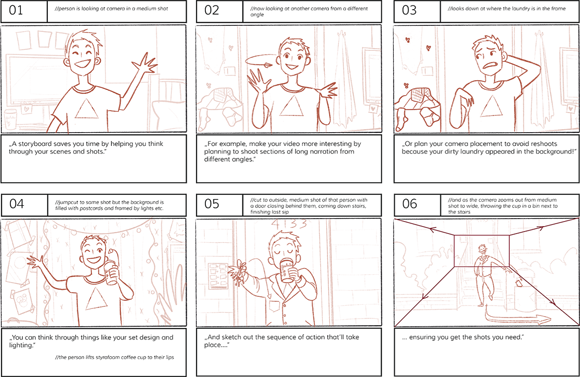
FIGURE 11-1: A sample storyboard.
Think of your storyboard as a dress rehearsal. When you force yourself to create a storyboard, you’ll find yourself thinking through questions and challenges that may not have occurred to you. Your idea will evolve as you see it come to life in the storyboard.
Creating your storyboard
Search Google for “storyboard template,” and you’ll find options for lots of different storyboards. You can also use tools like Microsoft PowerPoint or Google Slides to create storyboards. When you have a template you like, follow these steps:
Establish a timeline.
You can decide the sequence of events in the video and roughly when each one will occur.
Identify your key scenes.
This step is where you choose what will be in the scene — for example, your product.
Think through the details and action required in each scene.
For example, are you simply showing a close-up of your product, or are you showing someone interacting with it?
Write an outline of your script.
Perhaps you want a voiceover describing the product’s features.
Sketch thumbnails to represent the visuals in each shoot.
Stick figures are fine!
Annotate your scenes with necessary details.
Don’t forget to think about the lighting and camera angle, the timing of cuts or transitions to other shots, and any other details related to the shooting itself.
Thinking about your video length
The single most frequent question I ever received when working at Google was “How long should my video be?” It’s a great question with a frustrating answer because there is no definitive length. My answer was always that you should use as much time as you need to tell your story or deliver your message, and as long as the content is good, people will watch.
You can visit Chapter 17 to find more information on measuring the results of your videos. You’re able to see when people stop watching your videos, which is a clue that maybe it was too long. Chapter 4 outlines different ad formats with set lengths, such as 6 seconds, 15 may, and longer. Chapter 8 outlines video content formats, where you might see common lengths for the video type you’re creating.
If you’re not sure how long your video should be, err on the side of caution and go a little shorter. This approach encourages you to keep to the best content without any unnecessary padding.
Crafting your script
In a script, you match the visuals you sketched out in your storyboard (see the preceding section) with the audio. The words you write in your script will be read as a voiceover or delivered by your on screen person. Consider the information that needs to be conveyed and the style in which the dialogue should be delivered, such as the tone of voice, emotion, and accent.
When reading your script, you or your on screen person should
- Read your script to ensure that it matches with your storyboard and the time you’ve allotted for your video.
- Aim for simplicity, removing any unnecessary information.
- Pay attention to the pacing, which refers to whether the dialogue is delivered fast or slow.
- Make space for pauses.
Use any word-processing software to create a document and make two columns. In the left column, make a note of the corresponding storyboard visual. In the right column, write the audio that will match that visual.
You and your cast can use cue cards to help deliver the script to camera, although rehearsing and delivering the script from memory is often best. You can also use teleprompting apps for your phone or tablet. A teleprompter is a digital screen in front of the speaker that feeds the casts their lines. (One famous president refuses to use them!)
Another option is to use the popular quick-cut technique, also known as fast-cutting, where you cut out space between what’s said. That way, you can deliver your script in short bursts, cut out the space in time when you’re looking at what you’ll say next, and then splice things together.
Developing your shot list
With your storyboard and your script in hand, you can create your shot list. Your shot list is a list of every unique scene that you need to capture in video. A director may use a shot list, in concert with the storyboard and script, to ensure that all the required footage is systematically captured.
Each entry on the shot list should address the following:
- Shot type: Is it a wide shot showing a larger space, or is it a closeup shot?
- Camera’s position: Are you placing the camera above, below, or in front the scene you want to shoot?
- Camera movement: Does the camera slowly pan or zoom in?
Search YouTube for videos similar to the video you intend to make to see how other people have shot and edited their video footage. This search can help you make decisions about what you’ll need to shoot, especially if you’re new to making videos. Let other people’s videos guide your choices; they’ve probably already figured out the shots that work best.
Choosing locations
Thinking through your locations and making smart choices can save you time in the production phase when you come to shoot your video. When choosing a location, think about the following questions:
- Can you and your cast and crew easily get to the location?
- Do you need permission to shoot at the location?
- How much time do you need at the location to capture the required footage?
- What will the weather most likely be on the day of your shoot?
- Will the lighting and audio at the location be adequate, or will you need to make plans to ensure that you get clear shots and audio?
Creating the call sheet
Your call sheet refers to the schedule for your video shoot and informs everyone in the cast and crew where they need to be and when. Usually the director or assistant director creates a call sheet for each person and each day of the shoot, updating it as things change.
A call sheet usually includes
- The day of the shoot
- The person or group that the call sheet is for
- When and where people need to report to teams
- When and where the scene will be shot
- Information on how to get to the location(s)
- The weather and how to prepare for inclement weather
- Important contact information
- Local services, such as hospitals, restaurants, and stores.
Search Google for call sheet template, and you’ll find lots of editable templates you can customize. You don’t need to include everything if you think it’s not essential. The most important thing is that people know when and where to be and that you’ve made a reasonable plan for how much you hope to achieve in the given time.
Tallying up costs
Take the budget you’ve assigned to your video’s production, and tally up all the costs you think you’ll incur in the production and post-production phases. This budget can include things like
- Gear rental
- Hiring of crew members
- Location permits
- Transportation
- Meals
Ensuring legal compliance
If you’re using people in your video, they’ll need to sign a personal release granting permission for you to use their likeness. You’ll need signed releases from everyone who is featured in your videos, including people who aren’t part of your cast but who may have been included in the shot somehow, such as passersby.
You can find standard video release forms online that you can download, edit, and use. Professionals should consult a lawyer and have them draft a release form tailored to the project.
If you’re casting professional actors in your videos, you’ll need to determine whether they’re union or non-union. If your actors are in a union, you’ll need to follow specific guidelines on pay, work schedule, and usage rights for your video. Visit http://sagaftra.org, http://actra.ca, or the relevant union in your country for more information.
Shooting Your Video
The production phase is when you actually shoot your video. In this phase, you execute everything you planned in the preproduction phase. (See the section “Preparing for Production,” earlier in this chapter, for more information.)
If you’re making a simple video, such as a vlog (see Chapter 8), you won’t need to worry too much about the advanced production techniques I describe in this chapter. All you’ll need to do is turn on your camera and start recording.
Planning the shot
Before you pick up your camera and hit record, you have some choices to make about how you’d like to shoot your video:
- How do you want the camera to move? It can pan from left to right, zoom in, tilt, and more.
- What kind of shots do you want? You can have close-up shots, medium-distance shots, or wide shots.
- What kind of angles and vantage points do you want to use? You can show the scene from different perspectives.
If you’ve never shot any video, practice first. A cat, dog, or willing friend are the perfect subjects to experiment with, and hone your shooting techniques.
Composition
Composition refers to how you frame the picture within each shot. When you pick up the camera and point it in the direction you’ll be filming, you’ll instinctively move the camera to frame the shot, which is the composition. The rule of thirds and the 180-degree rule are two rules to consider when it comes to composing your shots:
The rule of thirds: Following the rule of thirds places the action of your scene (such as your actors) in one-third of the total shot, meaning that the action doesn’t take place in the remaining two-thirds of what’s being captured. Grab your camera phone and open the settings. You’ll likely have an option to turn on a grid, possibly with options for the style of grid, such as 3 x 3, 4 x 4, or the golden ratio. (I like the golden ratio grid.) These grids help you divide up your shot. To achieve a more interesting visual, place your subject one-third of the way from the edge of the frame (not the center). You can practice the rule of thirds when you’re taking photographs, too.
If you’re shooting a landscape, position the ground in the lower third of the frame, putting buildings, trees, and sky in the upper two thirds of the frame.- The 180-degree rule: The 180-degree rule concerns the on screen spatial relationship between a character and another character or object. When you’re following the 180-degree rule, you keep the camera on one side of an imaginary axis, a line that divides two characters. Your first character is always to the right of the second character. Follow this rule to help your audience visually connect with unseen movement happening around and behind the immediate subject. If you break this rule, it can disorient viewers and confuse them as to where characters are situated.
If you’re shooting using your phone, always shoot horizontally (landscape). If you shoot holding your portrait, your video will have black bars on either side to make it fit the YouTube video player.
By the way, square videos work best with sites like Facebook or Instagram. Camera phones will have a square video setting you can choose. If you’re making videos for Facebook or Instagram stories, vertically shot videos work best.
B-roll
B-roll is simply extra footage that is supplemental to your main shots. Imagine that you’re watching a movie set in New York City. Some footage between scenes may show the city’s skyline and scenes from the street. This footage is often inserted as a cutaway to help tell the story.
Capture b-roll when you’re shooting so that you can edit it into your final video to use for things like establishing where the action is taking place. It adds variety and dimension to the final video.
When shooting your video, overshoot, meaning shoot more video footage than you think you need. Having more footage to work with is always better than not having enough, although you don’t need to go crazy. You’ll likely only get one chance to shoot, so capture everything you need plus a bit more.
Continuity
Continuity is all about maintaining consistency when you’re shooting. You want everything to remain the same, including the lighting, background, audio, and props. If a coffee cup moves around the scene several times, it can be an unhelpful distraction. Unexpected shifts can be jarring for the audience, so as you shoot, keep an eye on any changes and movements, especially when it comes to objects.
Editing Your Video
The post-production phase is when you edit and polish your video for publishing.
 One wrong key can delete everything you’ve shot and edited, so backing up is crucially important.
You may want to have your approach to backing up video ready to go before you even record a video to ensure that you don’t overlook it. When you’re done shooting and have your footage captured in the memory of your phone or on the memory card of your DSLR, immediately back it up. You can then back up your edits as you go and your final files when you’re done editing.
A good backup solution exists in three steps:
Copy your footage to the hard drive of your computer.
This step is the minimum required. If you lose your phone or your memory card becomes damaged, you’ll have the footage available on your hard drive.
Copy of your footage to an external hard drive that you then lock in a fireproof, water-resistant safe.
You may choose not to do this step with all your footage or every time you shoot, but at the very least, back up everything once a week or month on an external hard drive that’s safe from damage and theft.
Upload footage to the cloud or to an off-site storage space.
You can choose to upload all your footage if the files aren’t too massive or just pieces of what you’ve captured. Keep an eye on how much bandwidth and storage space you’re using so that you don’t incur extra charges from your Internet service or cloud space provider. Professional production companies often send their footage to off-site services or even run their own off-site operations.
Back things up. As I’m writing this book, I’m backing up my manuscript on my local hard drive, to the cloud, and to an external hard drive. Imagine the hours and money you’d waste if you lost your work.
Editing process
When you start editing, you use the storyboard you created in the preproduction phase to guide your work. (For more on creating a storyboard, see the section earlier in this chapter.) Don’t worry when things don’t follow the original storyboard exactly, as they rarely do. Instead, think of the storyboard as a guideline to help you make sense of your footage.
In the editing phase, you cut up your video footage, tweak the video’s color, and add effects and sound. You then prepare your video for publishing.
Offline editing is when you edit a copy of the original footage and not the original footage itself. You want to preserve your original footage so that you can always go back to it later, if needed. Instead, make a copy and edit that copy.
The approaches detailed in this section will satisfy the needs of many content and advertising shoot needs, but if you feel like any of these topics are beyond your skillset or you’re going to tackle something more advanced, check out Chapter 12 for details on professionals who can help produce your video.
The rough cut
A common approach when editing is to first create your rough cut. Think of the rough cut as the stage when your video starts to come together and resemble the finished product, but, with errors, omissions, and so on. The rough cut gives you, and anyone you’re working with, an idea of what the video will look like once finished.
Making a rough cut allows you to step back and look at your video to decide if it’s what you want before you spend time on more advanced editing. You can make additional changes before polishing and finalizing the video.
The rough cut is a great opportunity to create more than one version of your video, especially if you’re making an ad where you’d like to test different versions. Chapter 6 covers testing methodologies for ads.
Saving and exporting
Save your work regularly as you edit, saving it in the highest resolution you can in order to maintain quality.
When you’re ready to export your video file, your editing software will likely give you options on file format and quality. For example, in iMovie, you can choose to share the file at theater quality, for e-mailing, and for social sites. A setting specifically for YouTube lets you upload your video directly to YouTube. I recommend sharing or exporting to a file on your computer before uploading your video to YouTube.
After you export your video and are ready to publish, refer to Chapter 14, which breaks down all the steps necessary to get your video live on YouTube.
YouTube is always innovating! YouTube maintains its position as the best video sharing platform in the world by constantly innovating, creating, and testing new technologies and formats all the time. Follow the YouTube blog to keep up to date with the latest developments: https://youtube.googleblog.com.
Exploring Advanced Video Options
All the video creation techniques described in this chapter focus on the most typical applications to create videos. However you may be interested in more advanced video creation options, such as live streaming, 360 video, and virtual reality.
Livestreaming
You can livestream with YouTube, but before you begin your first stream, you must enable your channel.
- Confirm that your channel is verified by following the steps at
www.youtube.com/verify. Confirm that you have no livestream restrictions in the last 90 days.
If you have restrictions, a message appears within the livestream section of your YouTube channel.
To enable live streaming on your desktop, go to Creator Studio tools and then the Live Streaming tab.
Alternatively, in the YouTube app on your phone, click on the camera icon and choose Go Live.
Enabling a livestream can take up to 24 hours the first time you do it. After you complete this step, your stream can go live instantly next time.
After you complete these steps and are able to stream, you have a few options available:
- Stream now automatically starts and stops the stream. YouTube detects your stream’s resolution and frame rate, and it automatically transcodes your stream to the rate that works best for the viewer. You can interact with the audience using live chat, you can share the link to your stream across social media, and you can see real-time analytics. After your stream is over, YouTube archives the event to your channel’s video manager.
- Events lets you preview before you go live. You can include what’s called a backup redundancy stream, so if your main stream stops for some reason, another stream can take its place. You can schedule your streams start time and even create multiple live events.
- Mobile streaming is the option to stream directly from the YouTube app on your phone. After the stream ends, an archive of the stream saves to your channel. You can edit its settings or delete it.
- Webcam is an easy way to go live straight from your computer without the need for an encoder. Visit
http://youtube.com/webcamto get started.
360-degree video
You can watch 360-degree video on YouTube on your computer, on your mobile device, or even using a special headset. This type of video lets you move your device around to see in every direction — for example, moving your mobile phone around moves the video around, too. The viewer can move the video left or right, or bottom to top, in a spherical space.
If you want to create 360 video, you need a special camera, but it isn’t necessarily expensive. Look for cameras that have spherical capture as an option.
Virtual reality
Virtual reality (VR) is similar to 360-degree video (see preceding section) with the exception that the viewer wears a special headset and they’re able to move around and interact with the environment. VR is a more immersive environment than 360-degree video because the rest of your vision is blocked out, making you feel like you’re in the environment itself.
Virtual reality environments are typically computer-generated rather than being solely video based.
If you want to try out VR, Google has two headsets available for virtual reality:
- Google Cardboard (
https://vr.google.com/cardboard) - Daydream (
https://vr.google.com/daydream)