
Chapter 14
Publishing Your Videos
IN THIS CHAPTER
![]() Perfecting title writing
Perfecting title writing
![]() Selecting the most compelling thumbnails
Selecting the most compelling thumbnails
![]() Posting your videos to YouTube
Posting your videos to YouTube
![]() Adding advanced features like end screens and cards
Adding advanced features like end screens and cards
It’s an exciting moment when you’re finally ready to upload your video. All your hard work filming and editing is about to pay off. In this chapter, I walk you through the steps to upload and publish your video.
The process may seem simple at first, but some tips and tricks can help maximize your video’s chances of success. YouTube also provides tools to add more advanced features to your videos like end screens and cards, which can provide interactivity and encourage viewers to watch more of your videos.
Writing Compelling Titles
A well-written title is the difference between a click to watch or being ignored. Title writing is crucial to the performance of your video because people scan YouTube for the video they want to watch, rapidly reading titles and making their choice. Your title should
- Stand out and grab attention compared with other similar videos
- Be an accurate description of your video
- Encourage and entice someone to click
 If your title is misleading and your video doesn’t deliver on its promise, people won’t be happy and will let you know in the comments! Keep the title accurate and don’t oversell it just to get more clicks.
YouTube limits your titles to 100 characters including spaces in total, but only about 50 characters of your title displays on the YouTube desktop home page. Make sure that you get the best information in the first half of your title.
The following sections describes some common title structures.
The hook, explanation, and information
In the hook, explanation, and information structure, you provide an initial hook to snag someone’s interest, follow with an explanation of what the clip is, and finish with information about the show or channel. For example:
- No Soup For You | Seinfeld | TBS (from TBS)
- Fitness Body Transformation | Simple Guide from Fat to Fit (from Buff Dudes)
- How I Grocery Shop! | Food & Meal Planning Tips! | Q&A (from Jordan Page’s channel, FunCheapOrFree)
The question
Posing a question sets up your video nicely as the answer. It’s intriguing and suggests an entertaining or informative explanation will follow. For example:
- What Does Cake Batter Do In a Vacuum Chamber?
- Can you travel Bali with $100? Keeping Paradise Affordable (from LostLeBlanc)
- Would You Swim In This? (from The King of Random)
The statement
The statement structure is similar to formatting your title as a question (see preceding section). You’re stating that your video will provide a compelling explanation of the statement:
- Here’s Why Old Mercedes Live Forever (from Hoovies Garage)
- Testing My Dog’s Trust On A Giant Suspension Bridge (from Drew Lynch)
- Cher Is Not a Cher Fan (from TheEllenShow)
The clickbait
A trend you may have noticed on YouTube is the use of clickbait along with the use of disclaimers that a video is not clickbait. Clickbait is a piece of content designed to attract attention and get a click, often stretching the truth in order to get more clicks and potentially misrepresenting the content.
As people become increasingly aware of clickbait, a trend has arisen where video titles include “Not Clickbait”, which can often be a sign that the video is in fact clickbait! Consider the following (I’ve left out the offending YouTube channels):
- Buying Every Advertisement I See (NOT CLICKBAIT)
- I got arrested! Not Clickbait.
- I’m quitting this channel FOREVER!! *NOT CLICKBAIT*
 I can’t really recommend this type of title, because I think it’s a bit of a cheap and lazy way to get some clicks, but it can work. Use at your discretion!
Crafting a Quality Video Description
Your video description lives beneath your video and appears when people search YouTube. The description provides them with some extra details about your video and encourages them to choose your video over someone else’s. (See Figure 14-1 for an example where I searched “How to knit a scarf.”) The first two lines or so from each video’s description appear beneath the title.
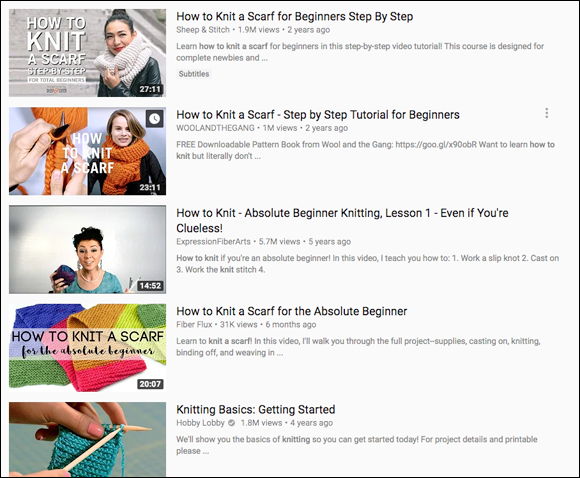
FIGURE 14-1: The first few lines of your description help you encourage people to choose your video over someone else’s. Make sure your description is compelling and accurate.
A great description
- Uses the first few lines to describe the contents of the video and entice people to click. Include your most important keywords here, but use natural language; don’t just list keywords.
- Describes in more detail what’s included in the video, such as what they’ll learn.
- Provides links to any resources you mention in the video and to your site and social media profiles. You can even include hashtags.
- Provides time stamps to let people know the various chapters of your video, helping them skip ahead to the relevant part.
- Encourages people to subscribe, comment, like, and share.
- Suggests other videos or playlists viewers may want to watch.
Some of your description will likely be a standard template you apply across all your videos. A standard template will save you time for each video you upload, but don’t let one description apply to all videos — you’ll still need to customize the description for each video. (Visit Chapter 15 to find out how to set a default description to apply to all your videos.)
Adding Tags
A lot of confusion and debate center around the role of tags. Historically, tags were used in search engines to help websites rank in the results pages. People quickly abused tags as a technique, and the search engines downgraded the importance of tags as an indicator of what the content is actually about and the subsequent priority of the site’s listing.
YouTube still makes use of tags, but it’s not clear how much they affect how your video will be found when people search. Having said that, the general rule is that if YouTube provides you with a feature, maximizing the use of that feature is a good idea as it probably does have an impact.
You can input tags, separated by commas. Tags should be
- Short one- or two-word phrases, known as keywords, that describe your video. Consider adding between 10 and 20 keywords in total.
- Specific whenever possible. Avoid generic tags that are too broad.
- Include your brand, business, and channel name if you want. However, I recommend adding them to the end of the list.
- Only accurate representations of what your video is about. Don’t stuff in irrelevant tags because that can violate YouTube’s policies.
For example, for the video “How to knit a scarf for beginners step by step,” you can add the tags knitting, scarf, scarves, knitting for beginners, how to knit step by step, knitting guide, knitting basics, knit stich, cast off, and knitting needles.
YouTube likely uses your title, description, and tags in some way in its evaluation of your video that informs where it places you in the search results page. Maximizing these added pieces of information not only encourages people to click your video, but helps people find you in searches. For more about search engine optimization, or SEO, check out Chapter 15.
Customizing Your Thumbnail
The best approach is to create a thumbnail separately and upload it instead of using one of YouTube’s automatic selections. This way, you can guarantee that you’re maximizing your thumbnail’s chances of being clicked
A great thumbnail
- Clearly conveys the subject of the video and encourage the viewer to click
- Makes use of bright color to stand out
- Uses a person’s face, when possible, because faces tend to get attention, or demonstrates an action taking place
- Uses text to give extra information about the video and draws the viewer in
- Is clearly and consistently branded and look like it’s your brand’s video
Make your custom thumbnail image as large as possible. Use a minimum resolution of 1280 x 720, in the format .JPG or .PNG. Keep the file under 2MB and use a 16:9 aspect ratio.
Test, test, test! Your thumbnails are something you can experiment with, so test to see which one best encourages people to click. You may discover that people are more likely to click on different colors.
Search Google for YouTube Thumbnail Maker, and you’ll find lots of simple drag-and-drop tools and premade templates to help you make your YouTube thumbnails. These solutions are great if you’re not a whiz with advanced graphics software. You can also use services like Fiverr.com to find people who can create your thumbnails for you.
Uploading Videos
Uploading your videos involves more than just clicking Upload and hoping for the best. You have lots of options and settings to ensure that your video is accurately uploaded and represented on YouTube, maximizing its chances of being found and watched.
To upload your video, follow these steps.
From any page on YouTube, click on the video camera icon in the upper right-hand corner and choose Upload Video.
You’re prompted to choose the files to upload.
- Choose the files to upload by either clicking the larger arrow icon to select files to upload or dragging and dropping your video files into the browser window.
From the drop-down list, choose whether the video will be public, unlisted, private, or scheduled.
It’s a smart best practice to upload your video a day or so before you actually need it to go live and set it to unlisted or private initially. You can then take your time to make sure all the other information is complete and have any other team members review it before you make it available to the world. Just don’t forget to change the setting to public later.
Your video starts to upload automatically, and a message will notify you when it’s completed.
While it’s uploading, further options appear so that you can add information to your video, as shown in Figure 14-2.
Add a title, description, and tag.
 The description field is limited to a maximum of 5,000 characters.
For tips on creating these items, see the earlier sections on “Writing Compelling Titles,” “Crafting a Quality Video Description,” and “Adding Tags,”
Add a thumbnail.
YouTube automatically chooses three potential thumbnails from the first few minutes of your video. You can click on one to set it as the thumbnail, or you can click on Customized thumbnail to upload your own thumbnail image that you created.
If you don’t see the option to upload a custom thumbnail, it’s because your YouTube account isn’t verified. Visit www.youtube.com/verifyto verify your account using your phone.For more tips creating a thumbnail, see the section “Customizing Your Thumbnail,” earlier in this chapter.
Set the video’s status using the drop-down list.
Your video can be
- Public: Anyone can find and watch the video. Choose this setting when you’re ready for your video to be seen by the world.
- Unlisted: Anyone who has the link that you provide to them can view the video. A useful choice when you want to send the video to select people.
- Private: Only those you invite can view the video. This option is the safest if you don’t want people to see your video just yet.
- Scheduled: You make the video live at a set time and date in the future. This allows you to schedule multiple videos ahead of time.
Click on Add to playlist and select the playlists you want to add.
A list of playlists you’ve previously created appears. Simply check the box for any and all playlists that relate to this video to add them.
Always add your videos to playlists, as playlists can surface in YouTube’s search results. It’s a bit like giving your video another chance to be found, and playlists encourage people to watch more of your content. Not assigning videos to playlists is a wasted opportunity.Add a translation by clicking the Translations tab.
Clicking this tab allows you to translate your title and description into other languages, which can help you reach more people around the world.
If you don’t speak other languages, that’s OK! You can use Google Translate or the YouTube community to add translation. Discover more about how to add translation and the benefits of translations and transcriptions in Chapter 15.Adjust any advanced settings for each video you upload.
The Advanced Settings tab, shown in Figure 14-3, has lots more options that you can tweak.
You can set many of these settings as a default to apply to your videos, which saves you time every upload. You won’t need to make every choice time and again if you set your defaults. Check out Chapter 15 for details.When you finish adding information and adjusting your settings, click on Done.
Your video upload process is complete. A box appears and gives you the link where you can access the video. You can copy this link by placing your cursor in the box and selecting it to copy and later paste.
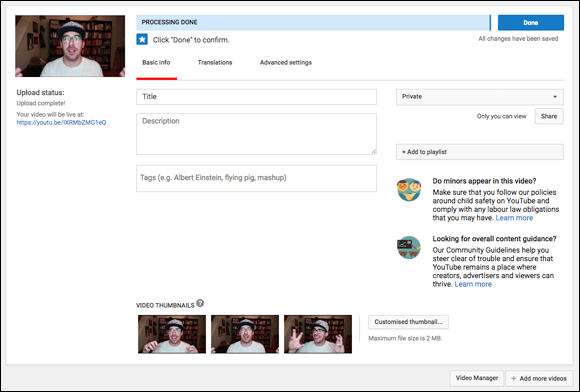
FIGURE 14-2: While your video uploads, take the time to add information, such as a title, description, and tags, to your video.
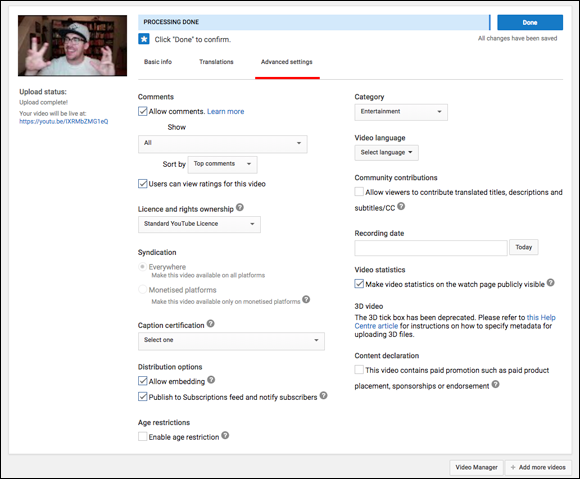
FIGURE 14-3: Use the Advanced settings tab to tweak your video’s settings.
Don’t skip the step of adding information to your videos because titles, descriptions, and tags are crucial to helping people find your video in YouTube. Great titles and thumbnails are what will encourage people to click on your video.
Improving Your Videos with Advanced Customization
Your uploaded video appears along with all your other videos in Creator Studio Classic within the Video Manager section. Use the extra customization options here to improve and power up your video. Simply find the video you want to edit, click on the Edit button, and go to the tab you’d like to edit.
More than likely, you’ll want to
- Apply enhancements to your video
- Adjust audio settings
- Add end screens and annotations
- Add cards
- Modify your subtitles and closed captions
Applying enhancements
In the Enhancements section, you can blur people’s faces and certain areas and trim your video.
Blurring
Blurring is helpful if your video contains people who did not sign a permission waiver allowing them to appear in the video. (See Chapter 11 for more on permissions when featuring people.)
To blur faces:
Go to the Blur Faces section of the Enhancements tab and click on Edit.
An overlay popups while YouTube searches your video for faces. As it finds them, YouTube displays thumbnails of each face it finds in the video.
- Select any faces to have them blurred.
- Watch the video again to verify that the faces have been accurately blurred and then click Save.
You can also use blurring to blur specific areas, such as brand logos on people’s clothing.
To blur a custom area, click on Edit under Custom blurring within the Enhancements tab, and then draw shapes over the areas you want to blur out (see Figure 14-4).
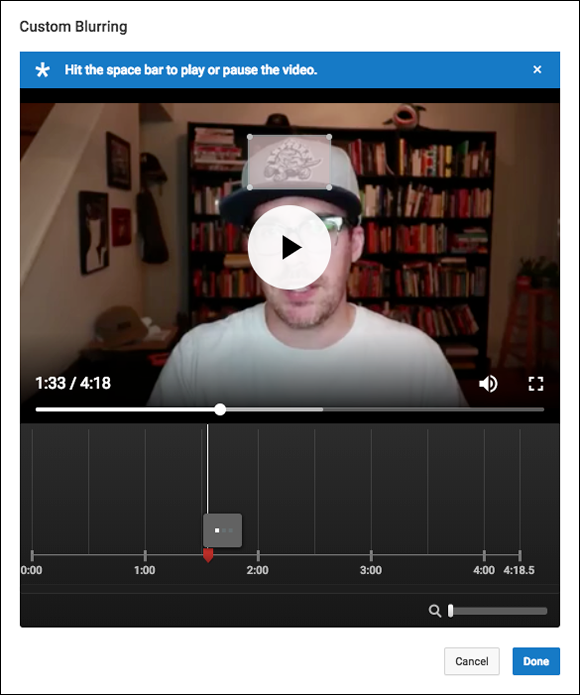
FIGURE 14-4: You can draw shapes to blur specific areas of a video — for example, if you don’t have permission to show something.
You can play the video, drawing shapes as needed. You see a timeline (also known as a scrubber), so you can have your blurred shape appear for more or less time. When you’ve drawn shapes and ensured that they persist long enough to blur the desired area shown on screen, you can just click the Done button when ready.
If at any point you want to undo your work, you can click on Revert to original. You can also click on Save as new video to make a copy with your edits.
Trimming
Chapter 11 covers the more powerful editing options that most marketers will want to leverage. However, the Trimming feature, found under the Enhancements tab, is helpful for some basic edits to make cuts to your video.
To use the Trimming feature:
Click on the Trim button.
You see a screen like the one shown in Figure 14-5.
Add splits to your videos or delete sections.
You can add splits by playing the video and pausing it wherever you want one. Just click on the Split button to add a split. You can also use the timeline/scrubber to move around the video.
If you split your video, an X appears above the split section. Click that X to delete that part of the clip.
If you’re unhappy with your changes, click on the Clear button to undo all edits.
- Click the Done button when you’re finished editing.

FIGURE 14-5: The Trimming feature is a basic editing feature you can use to cut your video.
Adding audio
YouTube offers a deep library of thousands of royalty-free songs that you can use in your videos. In the Audio section, you can search the library and choose to add or replace the audio.
Adding end screen and annotations
End screens (see Figure 14-6) are a fantastic way to promote your content and build your viewership. They work by adding suggested next steps to the final 30 seconds or so of your video.

FIGURE 14-6: Oprah’s YouTube videos make use of end screens, encouraging you to subscribe and watch more videos.
To add end screens:
- Choose the video you want to edit and click on the End screen & Annotations tab.
From the Add element drop-down menu, choose the action you want to take.
You can add a video or playlist, add a message to encourage people to subscribe to your channel, promote another channel, or link through to an approved website.
The element you add appears over the video, as shown in Figure 14-7.
Make your changes to the element.
You can drag to resize the element or move it around the grid to change its placement. You can select the element and hit the Delete key to get rid of it, and you can use the timeline to adjust when they appear and how long for.
- When you’re done making changes, click on Save.

FIGURE 14-7: The elements you add appear over the video and can be resized and moved.
The End screen tool lets you draw your own shapes, but using a template is much easier, saving you time and giving you a better result. When you click on the Use template button, the various template options appear. Click on the one you want to use and then click on the Select button.
When you add a video or playlist, YouTube lets you choose your most recent upload or a specific video or playlist. YouTube also chooses the video that’s best for the viewer if you enable this option. This fantastic feature allows YouTube to select the video that it thinks your viewers will most want to watch next. I highly recommend trying this option!
If you’re going to use end screens (and I recommend you do), include some additional footage to play at the end of your video so that your end screens don’t appear over your video while your content is still playing.
After you create an end screen that you like, you can easily re-use it across other videos. Within the End screen and Annotations tab, you can click on Import from video to choose the end screen you’d like to apply.
Annotations are text overlays that you may recall seeing on videos you’ve watched in the past. Although annotations live in the End screen & Annotations section, this feature was disabled in May 2017. With more people using mobile devices, YouTube found that annotations didn’t work well on smaller screens and replaced annotations with cards (see the next section.) If you have videos that already have annotations, you’ll see details listed in the Annotations subsection within the End screen and Annotations tab.
Adding cards
Cards replaced annotations and add interactivity to your videos. Cards point viewers to websites and show them custom images, titles, and calls to action. Viewers can hover over the video player and see the card icon (i). Clicking that icon allows them to browse all the cards on the video.
Card types include
- Channel cards that link to your or another channel
- Donation cards that can help you fundraise (only available in the United States at the time of writing)
- Link cards let you link to approved websites and is available only to those in the YouTube Partner Program
- Poll cards allow your viewers to vote
- Video or playlist cards link to videos, playlists, a specific time in a video, or a specific video within a playlist
When you set up cards, a teaser — a little hint at a specific time in your video that cards are available — is included. Teasers are a helpful reminder that cards are there. As the video plays, space cards throughout rather than grouping them together.
Modifying subtitles/CC
Subtitles (also known as closed captions) help people watch without audio turned on and give YouTube more information about what’s contained within your video. You can
- Upload a text file containing a transcription or a timed subtitles file. That’s a special file format that includes the text and the time code for when that text was spoken.
- Transcribe the video yourself and have YouTube automatically sync the subtitles with the video.
- Create new subtitles and closed captions. YouTube auto-generates text that you can edit as you watch the video.
See Chapter 11 for more about translations, transcriptions, and subtitles.