
4. Using the Calendar and Clock Apps to Organize Your Personal and Professional Life
In This Chapter
![]() Managing your schedule using the Calendar app
Managing your schedule using the Calendar app
![]() Taking advantage of the Clock app
Taking advantage of the Clock app
As you know, iOS 7 offers a plethora of useful apps that come preinstalled with the operating system, many of which can become indispensible tools in your personal and professional life.
The Calendar app, for example, not only enables you to create and manage your schedule, it’s possible to create separate calendars (for your work, personal life, travel schedule, kids’ schedule, and so on), and view them on a single screen. Calendar is also fully compatible with iCloud, so your scheduling data syncs with your other computers and iOS mobile devices automatically and is accessible anytime directly from the iCloud website.
Meanwhile, in addition to serving as a reliable alarm clock, the Clock app features world clock functionality (showing the specific countries you’re interested in), plus it can serve as a stopwatch or timer.
When traveling on business and staying at hotels, instead of relying on notoriously unreliable hotel wake-up calls, you can set your iPad to wake you up at a predetermined time using the alert tone (or even a song) of your choosing. Just be sure that your tablet is fully charged or plugged in and is not powered down.
Calendar App Basics
With its multiple viewing options for keeping track of the scheduling information, Calendar is a highly customizable scheduling tool that enables you to easily sync your scheduling data with your primary computer’s scheduling software (such as Microsoft Outlook on a PC or the Mac version of Calendar), as well as with your iPhone or smartphone. Like many other apps, Calendar works seamlessly with Notification Center and Apple’s iCloud service.
Note
When using the Calendar app, appointments, meetings, and other items you enter are referred to as events.
Tip
The iCloud website offers an online-based version of the Calendar app that is accessible from any computer or mobile device that’s connected to the Internet. Visit www.icloud.com, log in using your Apple ID and password (or your iCloud account information), and then click on the Calendar app icon within the browser window. As long as you have the Calendar app set up to sync Calendar data with iCloud, all of your up-to-date schedule information is automatically loaded into the online edition of the Calendar app.
Using Calendar, it’s easy to share some or all of your schedule information with colleagues and maintain several separate, color-coded calendars of your own to keep personal and work-related responsibilities and projects listed separately while still being able to view them on the same screen.
Tip
The Calendar app is designed to work seamlessly with Apple’s iCloud service, Microsoft Exchange, as well as other software and online-based calendar/scheduling programs (including Google Calendar, Facebook, and Yahoo! Calendar). This file compatibility enables you to easily synchronize your scheduling data between your iPad and other devices and/or online-based scheduling apps. If you opt to sync Calendar app-specific data with iCloud, however, do not also attempt to sync this data with another online-based service, or you wind up with duplicate entries.
Controlling the View
When you launch the Calendar app, choose which viewing perspective you’d like to use to display your schedule data in. Your options, selectable by tapping the tabs displayed near the top-center of the screen, include the following:
Day View
In one-hour increments, this view (shown in Figure 4.1) displays a day’s worth of events on the left side of the screen, based on the time each event is scheduled for. When you tap on a specific event listing (on the left side of the screen), all of the details pertaining to that individual event are then displayed on the right side of the screen and become editable.

When utilizing the Day view, you can swipe up and down on the left side of the screen to scroll through your day, hour by hour. Near the top of the screen, you can scroll horizontally along the days of the week to advance or go back a week at a time. Tap on a specific day to view its schedule of events/appointments. Access the current day by tapping on the Today button.
Week View
This view uses a grid format (shown in Figure 4.2) to display the days of the week along the top of the screen and time intervals along the left side. With it, you have an overview of all events scheduled in a particular week (Sunday through Saturday).

Tip
When utilizing the Week view, it’s possible to swipe upward or downward to view more of each day or swipe a finger horizontally to advance or go back one week at a time.
Month View
The month-at-a-time view (shown in Figure 4.3) enables you to see a month’s worth of events at a time. You can tap any single day to immediately switch to the Day view in order to review a detailed summary of events slated for that day.

Tip
When accessing the Month view, swipe your finger upward to manually advance to a future month or swipe downward to go back and view previous months.
Year View
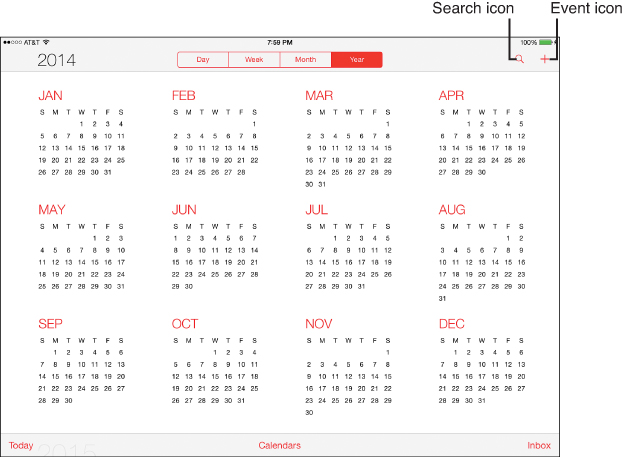
This view (shown in Figure 4.4) enables you to look at 12 mini calendars. From the Year view, swipe your finger upward to manually advance to a future year (an additional 12-month group of mini calendars) or swipe downward to go back and view previous years.
Regardless of which view you select, view the current day’s schedule by tapping the Today option located in the lower-left corner of the screen. On the calendar itself, the current date is always highlighted in red.
The Calendar app works with the iPad held in either landscape or portrait mode, so which you choose is a matter of personal preference. Regardless of which direction you hold your tablet, the onscreen information pertaining to your schedule is the same.
Command Options Available from All Calendar Views
Regardless of which calendar view you’re using, the Search icon and the Add Event icon (refer to Figure 4.4, for example) are continuously displayed near the top-right corner of the screen.
Tap the Search icon (which looks like a magnifying glass) to search the contents of your Calendar app’s database for a specific event. You can enter a time, date, person’s name, location, or any keyword associated with the appointment you’re looking for. Keep in mind, as you create a new event, all data you enter pertaining to that event becomes searchable, so to quickly find events later (using this search feature, iOS 7’s Spotlight Search feature, or Siri), add as much detail as possible, including who it involves, where it takes place, and when the event takes place.
If you’re managing multiple calendars using the Calendar app, you have the option to view events from all calendars on a single screen in a color-coded format or display each calendar one at a time. To determine what calendar data is visible, tap on the Calendars option that’s displayed at the bottom-center of the screen.
One of the features that makes the Calendar app useful in a work environment is the ability for groups of people to share their calendars (or event-specific information) via the Internet. When you’re invited to participate in a new event by someone else, you receive an alert within the app. You can then opt to attend, decline, or do nothing with the electronic invitation. To manage all incoming event invitations from others, tap on the Inbox option in the lower-right corner of the screen.
Note
Once you confirm an incoming event invitation, it will be automatically added to your own calendar.
Creating a New Appointment
No matter which calendar view you’re using, to create a new event, tap the Add Event icon (the plus sign icon) that’s displayed in the top-right corner of the screen. This displays an Add Event window (shown in Figure 4.5).

FIGURE 4.5 From the Add Event window, it’s possible to add a new appointment to the Calendar app and associate an audible alarm with that event.
The first field in the Add Event window is labeled Title. Enter a heading for the event, such as “Lunch with Bob,” “Sales Meeting,” or “Conference call with Natalie.”
Next, if there’s a location associated with the meeting or appointment, tap the Location field and enter the address or location of the appointment. Entering information into the Location field is optional. You can be as detailed as you want when entering information into this field.
To set the time and date for the new appointment to begin and end, use the Starts and Ends fields. These fields expand to allow you to set dates and times for the event using scrolling dials, as shown in Figure 4.6.

FIGURE 4.6 From the Start and End fields, select the start and end times and the dates for each new event you manually enter into the Calendar app.
Tip
If the new event will last the entire day, tap on the virtual switch that’s associated with the All-Day option to turn it on. Then, you no longer need to utilize the Starts and Ends options for the event.
After you enter the start time and end time for the appointment, scroll down to add additional details to the event listing.
If the appointment you’re entering repeats every day, every week, every two weeks, every month, or every year, tap Repeat and choose the appropriate option. The default for this option is Never, meaning it is a nonrepeating, one-time only event.
Tip
When using almost any app, when you enter a day, such as “Monday” or “Wednesday”; a time; or a specific date, this information becomes an active link. By tapping on the link, a New Event window is displayed that allows you to quickly create a new event within the Calendar app. This also applies to text within incoming emails or text messages.
Associating One or Two Alerts with Each Event
To set an audible alarm for the appointment, tap the Alert option displayed in the Add Event window. The Event Alert window temporarily replaces the Add Event window. In the Event Alert window, tap to specify when you want the audible alarm to sound in order to remind you of the appointment.
Your options are None (which is the default), At Time of Event, 5 Minutes Before, 15 Minutes Before, 30 Minutes Before, One Hour Before, Two Hours Before, One Day Before, Two Days Before, or One Week Before.
When you add an alert, a Second Alert option displays within the Add Event window. If you want to add a secondary alarm to this event, tap the Second Alert option, and when the Event Alert window reappears, tap when you want the second alarm to sound.
Additional Ways to Customize Each Event Listing
When you return to the Add Event window, if you’re maintaining several separate calendars using the Calendar app, it’s possible to choose which calendar you want to list the event by tapping on the Calendar option and then selecting the appropriate calendar.
Tip
Once events are scheduled within the Calendar app, the time within the day can be displayed as Free or Busy. As you’re creating an event, tap on the Show As option to switch between these two settings. The default is Busy for a scheduled event.
Continue to scroll down in the Add Event window to access optional URL and Notes fields. You can enter a website address (URL) that corresponds to the event. Likewise, tap on the Notes field and manually type notes pertaining to the appointment (or paste data from other apps into this field). You can use the Dictation feature as another way to input notes or other Calendar data.
Caution
It is absolutely essential that you tap the red Done option that’s displayed near the top-right corner of the Add Event window in order to save the new event information; otherwise, the information you entered is not saved to your calendar.
Tip
The Calendar app works with several other iPad apps, including Contacts and Notification Center. For example, in Contacts, you can enter someone’s birthday in their entry, and that information can automatically be displayed by the Calendar app.
To display birthday listings within Calendar, tap the Calendars button, which is displayed at the bottom-center of the screen, and then tap the Birthdays option to add a check mark to that selection. All recurring birthdays stored in your Contacts app appear in Calendar.
The alternative to manually entering appointment information into the Calendar app is to enter your scheduling information within a scheduling program on your primary computer, such as Microsoft Outlook (PC), the Mac version of Calendar (Mac), or Microsoft Entourage (Mac), and then sync this data with your iPad using the iTunes sync process, iTunes Wireless Sync process, or via iCloud. You can also sync scheduling data with your iPhone, as well as several different online or network-based scheduling applications.
Using Siri to Enter and View Calendar Data
Instead of manually typing new events into the Calendar app, it’s possible to dictate the information using Siri. To create a new event, activate Siri by pressing and holding down the Home button for 2 to 3 seconds, and then say something like the following:
![]() “Set up a meeting at 10 a.m. with Emily at her office.”
“Set up a meeting at 10 a.m. with Emily at her office.”
![]() “Meet with Ryan at noon at Starbucks.”
“Meet with Ryan at noon at Starbucks.”
![]() “New appointment with John Doe on Thursday, July 18, at 2 p.m. at his office.”
“New appointment with John Doe on Thursday, July 18, at 2 p.m. at his office.”
When using Siri, if you give only a time for the meeting, Siri assumes you’re referring to the present day and schedules the meeting accordingly. However, you can also refer to a date in the future by saying something like, “next Wednesday at 2 p.m.,” or you can provide a detailed date and time (such as July 7, 2013 at 4:14 p.m.).
After events are entered into the Calendar app, it’s possible to use Siri to cancel (delete) or reschedule them. For example, you can say, “Cancel my meeting at 3 p.m. today,” “Reschedule my appointment with Natalie to next Wednesday at 11 a.m.,” or “Move my 4 p.m. meeting to 4:30 p.m.”
It’s also possible to use Siri to review your schedule. For example, you can ask Siri, “What does the rest of my day look like?”, “When is my next appointment?”, or “When am I meeting with Ryan?” You can also issue Siri a command, such as “Show me my schedule for today” or “Show me my appointments for this week.”
Tip
By utilizing the Location field within the Add Event window as you’re creating a new event, you can later reference this information by asking Siri a question like, “Where is my next appointment?” or “How do I get to my next appointment?”
Viewing Individual Event Details
From the Day, Week, or Month view within the Calendar app, tap any individual event to view all of the details related to that item. When you tap a single event in the Week or Month view, a new window opens. If you’re in the Day view, the event’s details are displayed on the right side of the screen.
In the upper-right corner of the event window is an Edit button. Tap it to modify any aspect of the event listing, such as the title, location, start time, end time, alert, or notes.
To delete an event entry entirely, tap the Edit button followed by the red-and-white Delete Event button that’s displayed near the bottom of the Edit window.
Tip
When you’re done making changes to an event entry, don’t forget to tap on the Done option that’s displayed near the upper-right corner of the window to save your updated event information.
Subscribing to Calendars
From within Calendar, it is possible to subscribe to read-only Google, Yahoo!, or calendars saved in the .ics format. To subscribe to a calendar, which enables you to view events created on other devices or services, but not edit or create new events within those calendars, follow these steps:
1. From the iPad’s Home screen, launch Settings.
2. Tap on the Mail, Contacts, Calendars option.
3. Under the Accounts heading on the right side of the Settings screen, tap the Add Account option.
4. From the bottom of the list of account types, tap the Other option.
5. When the Other menu appears on the right side of the display, tap the Add Subscribed Calendar option.
6. In the Subscription window that appears, enter the address for the calendar you want to subscribe to in the field labeled Server. Enter this information using the following format: myserver.com/cal.ics.
7. Tap the Next icon that’s located in the upper-right corner of the screen to validate the subscription, and then tap the Save button. Your tablet must be connected to the Internet to do this.
If you use the Calendar app on a Mac, for example, you can publish (and share) a Calendar via a web server and make it available to be subscribed to on your iPad. This is a useful feature if you want to share Calendar-related data, such as a conference schedule, with other people and make events displayable on their respective devices (within the Calendar app) but not give those people the ability to edit or modify listed events.
From the Calendar app on your Mac, select the calendar you want to publish from the listing on the left side of the screen (on your Mac). After it’s highlighted, click on the Edit pull-down menu and then click on the Share Calendar... option. When prompted, create a name for the calendar and one at a time, enter the name or email addresses for the people you want to share the calendar with (or tap on the Public option).
The Apple website also publishes dozens of read-only calendars that you can subscribe to on your iPad. These read-only calendars list major holidays, game schedules for your favorite sports teams, moon phases, new song releases on iTunes, new DVD releases, and more. For a listing of these calendars, visit www.apple.com/downloads/macosx/calendars.
If your primary work schedule is handled on a computer or network that is compatible with the industry-standard CalDAV format, you can easily sync this data with the Calendar app on your iPad. To subscribe to a CalDAV calendar, launch Settings on your iPad, and then choose the Mail, Contacts, Calendars option. Tap the Add Account option, and then choose Other from the bottom of the list.
When the Other screen appears, select the Add CalDAV Account option. A CalDAV window displays, and you are prompted to enter the server address (cal.example.com), your username, password, and a description for the calendar. This is information you can obtain from your company’s network system administrator or IT department.
After entering all the requested information in the CalDAV window on your iPad, tap the Next button to verify the account. Tap the Save button when this process is completed. The events included in the calendar you just subscribed to now appear in their own color-coded calendar when you launch the Calendar app on your iPad.
Finding an Event
In addition to viewing the Day, Week, or Month view in Calendar to find individual events, use the Search option. Tap the Search icon in the top-right corner of the screen (to the left of the Add Event icon), and then use the virtual keyboard to enter any keyword or phrase associated with the event you’re looking for.
Or, from the iPad’s Home screen, place your finger near the center of the screen and swipe downward in order to access the tablet’s main Spotlight Search feature.
In the Search field that appears, enter a keyword, search phrase, or date associated with an event. When a list of relevant items is displayed, tap the event you want to view.
Tip
You can also use Siri to help you find a appointment. Activate Siri and say something like, “When am I meeting with [name]?” or “When is my next meeting?”
Inviting People to Meetings or Events
The Calendar app is compatible with Microsoft Exchange as well as the Calendar app running on any other Mac, iPhone, or iPad. Thus, if you have the appropriate feature turned on and your company uses a CalDAV-supported scheduling app on its network, you can invite other people on that network to your events and respond to other people’s event invites.
To respond to an event invitation, your iPad must have access to the Internet. When you receive an invitation, a notice is placed in the Calendar app’s Inbox. Tap the Inbox option to view options enabling you to see who the invitation is from and who is attending the event. You can also set your iPad to alert you of the meeting and add comments of your own that pertain to the meeting invite.
As the invitee, you can then accept or decline the invitation or tap the Maybe option. The person who invited you to the event automatically receives your response.
Customizing the Calendar App
There are many ways to customize the Calendar app beyond choosing between the Day, Week, Month, or Year view. For example, from within the Calendar app you can set audible alerts to remind you of upcoming events. To customize the audio alert you hear, launch Settings and select the Sounds option from the left side of the screen. Next, tap the Calendar Alerts option displayed on the right side of the screen and choose a sound or music clip to use as the audible alert.
Tip
If you have the ability to receive meeting or event invites from others, from Settings, tap the Mail, Contacts, Calendars option. Then scroll down to the Calendars heading and make sure the Shared Calendar Alerts option is turned on. This enables you to be notified when you receive a new group invitation for a Shared Calendar Event. Turn on the New Invitation Alerts option to be alerted when an individual invites you to a single event.
Also from Settings, listed under the Calendars heading on the right side of the display, it’s possible to determine how far back in your schedule you want to sync appointment data between your iPad and iCloud (or another scheduling app). Tap on the Sync option to do this. Your options include Events 2 Weeks Back, Events 1 Month Back, Events 3 Months Back, Events 6 Months Back, or All Events.
When the Time Zone Support option is turned on and you’ve selected the major city that you’re in or near, all alarms are activated based on that city’s time zone. However, when you travel, turn off this option. With Time Zone Support turned off, the iPad determines the current date and time based on the location and time zone you’re in (when it’s connected to the Internet) and adjusts all your alarms to go off at the appropriate time for that time zone.
To access the Time Zone Support feature, launch Settings and select the Mail, Contacts, Calendars option. On the right side of the screen, scroll down to the options listed under Calendars, and then tap the Time Zone Support option. When the Time Zone Support screen appears, you see a virtual on/off switch. When it’s turned on, below the switch is a Time Zone option. Tap it and then choose your home city (or a city within the time zone you’re in).
Meanwhile, the Default Alert Times option (shown in Figure 4.7) enables the Calendar app to automatically generate alerts. These auto alerts can be scheduled for the day of the event (at 9 a.m.), one day before the event (at 9 a.m.), two days before the event (at 9 a.m.), or one week before the event. You can adjust the settings differently for Birthdays, Events, and All-Day Events.

FIGURE 4.7 To customize the Calendar app from within Settings, select the Mail, Contacts, Calendars option on the left side of the screen and then scroll down to the Calendars heading.
If you have birthdays displayed in the Calendar app (using data from the Contacts app), this feature reminds you of upcoming birthdays with ample time to send a card or gift.
Managing multiple calendars simultaneously is common, such as maintaining separate calendars for personal and work-related events. From the Mail, Contacts, Calendars screen within Settings, tap on the Default Calendar option to choose which calendar is used as the default when new events are added. As you’re entering the event, however, you can always change the calendar.
Syncing Scheduling Data with Your Primary Computer or Smartphone
Depending on whether you want to sync your Calendar app with a standalone PC or Mac or wirelessly access scheduling data on a network, the process for setting up the connection and syncing scheduling data is slightly different.
Syncing Calendar Data with a PC or Mac Using iTunes Sync
The process for syncing data between the Calendar app and your primary computer using the iTunes sync process involves connecting the two devices using the white USB cable that came with your iPad. You also need the free iTunes software to be running on your primary computer. Customize the Sync Calendars option within iTunes on your computer, which is found under the Info tab when your iPad is connected to your PC or Mac and iTunes is running.
Using the Wireless iTunes Sync process, you can sync your iPad with your Mac or PC that’s running the iTunes Software, as long as the two devices are connected to the same wireless network. This feature does not work over the Internet, so you need to be within close proximity to your primary computer to perform the data sync.
Syncing Calendar Data Wirelessly Using iCloud
It’s also possible (and recommended) to sync your Calendar data with other iOS mobile devices, as well as your computer(s), using Apple’s iCloud online service. After you have created an iCloud account, set up your iPad for automatic Calendar app syncing.
To do this, launch Settings and select the iCloud option displayed on the left side of the screen. On the right side of the screen, when the iCloud submenu appears, make sure the Calendars option is turned on.
You also must turn on Calendar syncing via iCloud on your computer(s), iPhone, and/or other iOS mobile devices that are linked to the same iCloud account. Once you do this, the online version of the Calendar app is available to you as well by visiting www.icloud.com.
Syncing Calendar Data Wirelessly with Scheduling Software on a Microsoft Exchange–Compatible Network
To set up the Calendar app to sync data with Microsoft Exchange–compatible scheduling software used in a corporate environment, launch Settings on your tablet and choose the Mail, Contacts, Calendars option.
Tap the Add Account option, and then select Microsoft Exchange from the menu displayed on the right side of the screen. Enter your account information when prompted. This information is typically supplied by your company’s system administrator or IT department.
As you’re setting up the Microsoft Exchange connection with your iPad, be sure to add a check mark next to the Calendar option so you can sync this data.
Tip
Many company networks and virtual private networks (VPNs) utilize scheduling software that is CalDAV-compatible. To synchronize your scheduling information between your tablet and a CalDAV-compatible calendar/scheduling software package on a corporate network, contact your company’s IT department or system administrator to obtain the necessary account settings and passwords to make this connection.
On your iPad, set up this connection from the Settings app. If your company’s system administrator or IT department is not able to help you sync your tablet with the company’s network, make an appointment with an Apple Genius at any Apple Store or call AppleCare’s toll-free phone number (800-APL-CARE) and have a technical support person walk you through the setup process.
Syncing Calendar Data Wirelessly with Google Calendar, Yahoo! Calendar, AOL, or Outlook.com
If you maintain your scheduling information using an online-based scheduling application, such as Google Calendar or Yahoo! Calendar, you can use your iPad to wirelessly sync scheduling data.
To set this up, launch Settings on your iPad; select the Mail, Contacts, Calendars option; and then tap the Add Account option.
Choose the Google, Yahoo!, AOL, or Outlook.com option based on where you maintain an online-based calendar. When prompted, enter your name, the existing email address and password used for that service, and a brief description for the account.
Finally, tap the services you want to link with your iPad, such as Calendars, Contacts, and so on. The available options vary based on the service you use. To sync your calendar data between the online service and the Calendar app, be sure to turn on the virtual switch associated with the Calendars option.
Tip
Thanks to Facebook integration with iOS 7, it’s possible to set it up so your Calendar app syncs event-related details with your online Facebook Events calendar. To do this, launch Settings, tap on the Facebook option, and then turn on the virtual switch associated with the Calendar app that’s listed under the “Allow These Apps To Use Your Account” heading.
Caution
If you opt to sync your data between your iPad and an online service (such as Google, Yahoo!, AOL, Outlook.com, or Microsoft Exchange), be sure to turn off iCloud syncing for the Calendar app. Otherwise, you may wind up with duplicate entries.
Using the Clock App
The Clock app that comes preinstalled with iOS 7 is designed to serve as a world clock (enabling you to view the current time in numerous cities simultaneously), an alarm clock, a stopwatch, and a countdown timer. When you launch this app, you’ll see four command icons displayed along the bottom of the screen that enable you to choose which function you want to utilize.
What Time is it in Tokyo, London, and Dallas?
When you tap on the World Clock option, displayed along the top of the screen are six clock faces, each of which can represent a different city (shown in Figure 4.8). When you swipe your finger from right to left along the clock faces, six additional clocks are revealed.

Tap on the Add clock icon to create a new clock associated with any major city on the planet. Or once a clock is associated with a city, tap on the Edit option that’s displayed near the upper-left corner of the screen to change the city each clock face is associated with. When you do this, the Choose a City window appears. In the search field, enter the name of any major city in the world or scroll down the detailed list that’s displayed and tap on your selection.
Once a clock face is associated with a city, it displays the current time in that city. Plus, the city is displayed (along with the current time and temperature) on the world map found in the lower section of the screen (see Figure 4.9).

FIGURE 4.9 You can set as many separate alarms for the alarm clock as you want and then turn each of them on or off separately.
As you’re looking at the World Clock display, tap on any clock face for a specific city to view a full-screen version of that clock.
Using Your iPad as a Reliable Alarm Clock
Unlike the wake-up call services offered by most hotels, which are notoriously unreliable, you can use your iPad as an alarm clock. You can set an alarm to sound anytime you wish and have the tablet play the audio alert of your choosing or a song that’s stored in the Music app.
To use this feature, launch the Clock app and tap on the Alarm icon at the bottom of the screen. To set a new alarm, tap on the plus sign icon that’s displayed at the upper-right corner of the screen. The Add Alarm window is displayed. Once an Alarm is created, you always have the option to edit it (shown in Figure 4.9).
From the Add Alarm window, you can choose whether the alarm will repeat and, if so, when. Tap on the Sound option to choose an alarm sound (or a song that’s stored on your tablet) for each separate alarm. As a preview of the alarm is playing, use the Volume Up or Volume Down button to adjust its volume.
Tip
Just like a traditional alarm clock, you can set the Alarm within the Clock app to offer a snooze option. From the Add Alarm window, turn on the virtual switch associated with the Snooze option to activate this feature.
You can also custom create the label associated with each alarm. The default option is Alarm, but you can change it to anything you’d like, such as Wake Up, Meeting, or Take Medication. Finally, use the dials to choose the time you want each alarm set for. The Alarm feature enables you to set as many separate alarms as you’d like, but each must be set one at a time.
A listing for each alarm that’s programmed into the Clock app is displayed on the Alarm screen. To edit any of the alarms, tap on the Edit button that’s displayed near the upper-left corner of the screen. You can then turn on or off individual alarms by tapping on their listing and then turning on or off the virtual switch that’s associated with each.
Using the Stopwatch and Timer Features
The Stopwatch feature of the Clock app enables you to time events and monitor how long they take down to a fraction of a second. You can pause the stopwatch at any time, restart or reset the timer, or use the stopwatch’s lap feature. The Stopwatch feature starts at 00:00.0 and counts upward.
The Timer feature of the Clock app enables you to set a timer for a specific period. Then, after you start the timer (by tapping on the Start button), the timer counts down and sounds an alarm when it reaches zero. You can pause or resume the timer at any time by tapping on the Pause or Resume button.
You can use the Stopwatch or Timer feature for a wide range of tasks, such as tracking the length of phone calls or meetings.
Tip
Siri also works very well with the alarm clock and timer features of the Clock app. You can tell Siri to set an alarm by saying, “Set an alarm for 7:30 a.m. tomorrow” or “Set a wake-up call for 7 a.m. tomorrow.” You can also set a timer by telling Siri to “Set a timer for 15 minutes,” for example. You can also say something like, “Wake me up in four hours.”
If you need to know what time it is in a specific country or city, just ask Siri by saying, “What time is it in London?” You can also ask for the current time or date where you are by asking, “What’s today’s date?” or “What time is it?”