
10. Finding and Installing Apps from the App Store
In This Chapter
![]() Accessing the App Store from your iPad
Accessing the App Store from your iPad
![]() Discovering why some apps are free and some are not
Discovering why some apps are free and some are not
![]() Finding and downloading the best apps for you
Finding and downloading the best apps for you
Yes, the iPad is a sleek piece of hardware with lots of capabilities, but it’s ultimately the iOS 7 (or later) operating system and the collection of apps on your tablet that make it capable of doing so much.
In the past two years or so, tremendous strides have been made in terms of the capabilities of third-party apps, particularly those used by business professionals. Thanks to optional apps, the iPad can be used for many different work-related tasks, such as word processing, spreadsheet management, time management/scheduling, credit card processing, online banking, database management, online social networking, brainstorming, videoconferencing, project/task management, managing emails, and much more.
From the App Store, you can find, download, and install optional apps for your iPad that greatly expand its capabilities. However, with literally hundreds of thousands of third-party apps available, the task of finding the right app(s) to meet your personal or professional needs can be daunting. For every task the iPad can perform using an app, there are most likely at least a handful of app choices, from different developers, that offer very similar functionality.
The pricing for apps varies greatly. Plus, a growing number of apps allow for or require in-app purchases or a paid subscription to fully utilize them.
Note
After you purchase an app from the App Store, all future updates to that app are free. However, some developers have begun renaming apps when a major revision is done, requiring users to repurchase the app.
Apple’s App Store: One-Stop Shopping for iPad Apps
If you want to add apps to your iPad, the only way to do this is to acquire them from Apple’s App Store. There are two ways to access the App Store to find, purchase, download, and install apps onto your tablet.
First, you can use the App Store app, which comes preinstalled on your iPad. To use it, your tablet must have access to the Internet.
Note
Some apps that have a large file associated with them cannot be downloaded and installed using the App Store app if you’re connected to the Internet via a cellular data connection. Either a Wi-Fi connection is necessary or you’ll need to download certain apps using the iTunes software on your primary computer (to access the App Store) and then transfer those apps to your tablet using the iTunes sync process. The majority of apps, however, can be downloaded and installed directly onto your iPad using a 3G, 4G (LTE), or Wi-Fi connection via the App Store app.
The second option for finding, purchasing, downloading, and installing apps is to access the App Store through the iTunes software on your primary computer and then transfer the acquired apps to your tablet using the iTunes sync process or iCloud.
Regardless of how you visit the App Store, you first need to set up an Apple ID account and have a major credit card or debit card linked to the account to make purchases.
If you don’t have a major credit card or debit card that you want to link with your Apple ID account so you can purchase apps from the App Store, it’s possible to purchase prepaid iTunes gift cards from Apple or most places that sell prepaid gift cards, such as convenience stores, supermarkets, and pharmacies.
iTunes gift cards can be used to make app purchases or in-app purchases, plus buy content (music, TV shows, movies, audiobooks, etc.), from the iTunes Store. Prepaid iTunes gift cards are available in many different denominations.
Understanding the App Store
When you open the App Store app (shown in Figure 10.1), a handful of command icons and tabs are displayed along the top and bottom of the screen that are used to navigate your way around the online-based store.

If you already know the name of the app you want to find, tap the Search field, which is located in the upper-right corner of the App Store app’s screen. Using the virtual keyboard, enter the name of the app. Tap the Search key on the virtual keyboard to begin the search.
Tip
You also can perform a search based on a keyword or phrase that describes an app or app category, such as word processing, to-do lists, time management, credit card processing, or photo editing.
When you perform a search in the App Store, the search results are displayed using app preview boxes. Each preview box contains the name of the app, the name of its developer, its average star-based rating, the number of ratings it has received (the number in parentheses), a logo or icon for the app, and one sample screen shot from the app (shown in Figure 10.2).
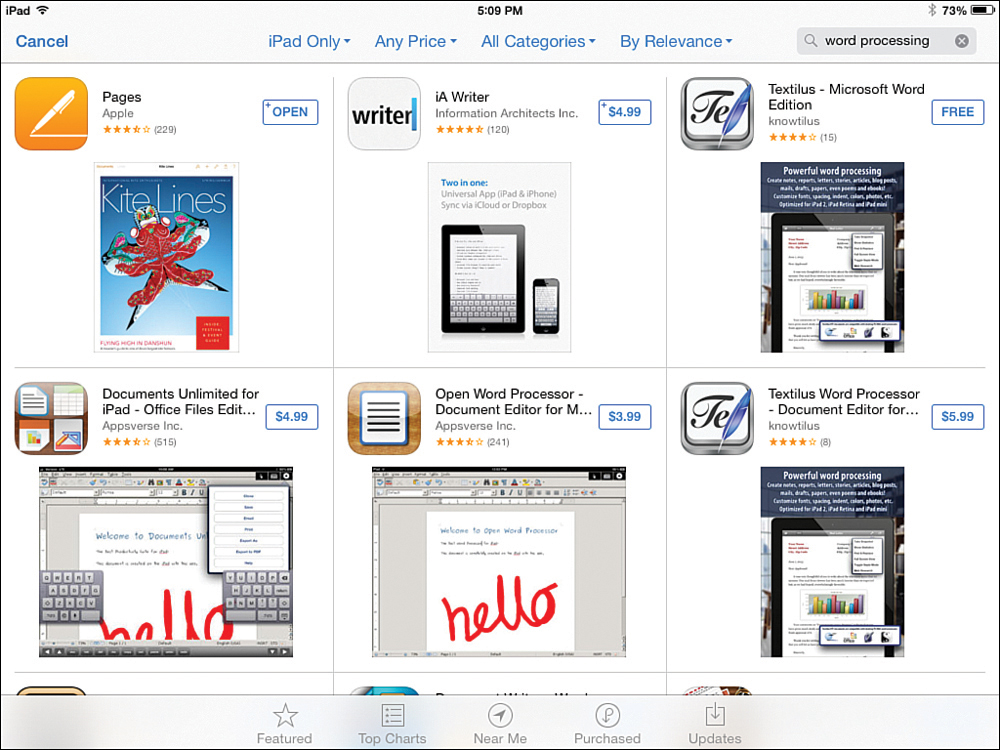
FIGURE 10.2 After performing a search within the App Store, related search results are displayed within individual app preview boxes.
As you’re looking at an app’s preview box, tap on the app’s title or logo to view a detailed description for the app, or tap on the Price icon to acquire and download the app immediately. When you access the App Store from your iPad (using the App Store app), by default, iPad-specific and hybrid apps are listed. When you tap on the iPad Only pull-down menu that’s displayed near the top center of the screen, it’s possible to select the iPhone Only option in order to see previews of iPhone apps (that also run on the iPad). These apps, however, are not formatted for the iPad’s larger screen.
Tip
In each app description screen, its price is listed in a price button. If you notice a plus sign icon displayed in the upper-left corner of the price button, this indicates that the app you’re looking at is designed for both the iPad and iPhone and adapts accordingly, based on the device it’s being used on.
In general, when choosing apps for your iPad, look for iPad-specific apps first and then look for hybrid apps that are designed for both iPad and iPhone. Apps that are iPhone-specific run fine on an iPad, but the app’s graphics and user interface are formatted for the iPhone’s smaller screen.
Note
Within an app’s Price button, if you see a price listed that is the one-time purchase price for the app. If the word Free appears within the box, the app is free of charge to download, but it may still have in-app purchases associated with it. If you see the word Open within the Price button, this means the app is already installed on your tablet. If the word Install appears within the Price box, this means you have previously purchased the app and it’s stored within your online-based iCloud account, but it is not currently installed on your tablet. In this case, tap Install to download and (re)install the app, for free.
Displayed along the bottom of the main App Store screen are five command icons: Featured, Top Charts, Near Me, Purchased, and Updates. If you don’t know the exact name of an app you’re looking for, some of these icons can help you browse the App Store and discover iOS mobile device apps that might be of interest to you.
Discovering Featured Apps
Tap the Featured icon to see a listing of what Apple considers to be new or noteworthy apps or “Hot Apps.” The apps displayed on this screen are divided into several categories, including New and Noteworthy and What’s Hot. Also on this screen are ever changing “featured” categories that Apple creates. When back-to-school season was upon us in August, for example, the theme for a “featured” category was Back To School.
Under the New and Noteworthy heading within the Featured screen, a handful of app listings are displayed. Use a horizontal swipe motion with your finger to scroll through all of the listings in this section. You can also tap the See All command that’s displayed next to the New and Noteworthy heading to see more of the relevant listings presented on one screen.
Tip
As you’re looking at the Featured page in the App Store, tap on one of the app category tabs that are displayed along the top center of the screen to narrow down your search. Be sure to tap on the More tab to view a comprehensive listing of app categories, including Finance, Lifestyle, News, Productivity, Reference, Travel, and Utilities.
Categories: Finding Apps by Topic or Genre
As you’re viewing the main Featured screen in the App Store, tap on one of the Categories tabs displayed along the top of the App Store screen to access all the apps that fall into any one of the App Store’s more than 20 main categories. When you tap the More icon, a menu of all app categories is shown (see Figure 10.3). Tap the category that most interests you to browse through listings of apps in that category.

FIGURE 10.3 Browse apps in the App Store that fit into a specific category by first selecting a category that’s of interest.
When you select a category, the apps for that category are displayed under several different headings. Once again, tap on the See All option displayed next to each heading to see more of the related app listings. As you’re looking at the app listings, you can learn more about a particular app by tapping on its graphic icon or title. Then, you can purchase, download, and install the app by tapping its price button. (For free apps, when you tap the Free button, the app automatically downloads and installs.)
Top Charts: Seeing What Apps Other iPad Users are Using
Tap the Top Charts icon near the bottom of the App Store app’s screen to access listings of the most popular Paid, Free, and Top Grossing iPad apps (shown in Figure 10.4). This is a general listing of all currently popular apps, so it constantly changes.

FIGURE 10.4 The Top Charts screen shows three separate listings: Paid, Free, and Top Grossing apps. Tap on the Categories option (in the upper-left corner of the screen) to narrow down the Charts list to select a specific app category.
Tip
While looking at the Top Charts screen, tap on the Categories option (found in the top-left corner of the screen) and select a specific app category. The Top Charts now displays only popular apps from the selected category, such as Business or Finance.
Use your finger to swipe several times (in an upward direction) along each of the three Charts listings to view the entire list. Each listing begins with the number-one most popular app and then displays the next 299 apps in order based on their sales or popularity. Keep in mind that these lists are comprised of apps from all categories.
Near Me: Discovering What Apps People Located in Your Geographic Area are Using
Thanks to the Location Services feature built in to iOS 7, your tablet always knows where you are. By tapping on the Near Me feature, it’s easy to discover what apps iPad and iPhone users who are in close geographic proximity to you are shopping for. This feature is particularly useful for finding apps from local news and media outlets when you’re traveling.
Tip
As you browse through various apps, if you find one that’s of interest, instead of purchasing it, it’s possible to add it to your Wish List. To do this, tap on the Share icon that’s displayed on the app’s Description screen and then select the Add To Wish List option (shown in Figure 10.5).

FIGURE 10.5 Access the Share menu from any app’s Description screen to add it to your Wish List or send it to someone else as a gift.
From the Share menu, it’s also possible to purchase a non-free app and send it to someone else as a gift. To do this, tap on the Gift icon. To share details about the app with others, tap the Messages, Mail, Twitter, or Facebook icon.
To view your Wish List, tap on the Wish List icon that’s displayed to the immediate left of the Search field when accessing the main App Store screen (refer to Figure 10.1).
Note
To manage your App Store account or redeem iTunes Gift Cards, when you scroll to the very bottom of the main Featured screen of the App Store (as well as several other subsection pages in the App Store), you see three buttons: Account [Your Apple ID Username], Redeem, and Send Gift.
Tap the Account icon to manage your Apple ID account and update your credit card information, if necessary. Tap the Redeem icon to redeem a prepaid iTunes Gift Card. Tap on the Send Gift option to send someone else a prepaid iTunes Gift Card via email.
Accessing Your Purchased Apps
When you tap the Purchased icon displayed near the bottom of the App Store screen, a complete listing of all apps you’ve purchased to date using your Apple ID is displayed. Near the top of this screen are two command tabs. Tap on All to see a listing that includes all apps you’ve previously acquired (including free apps). Tap on the Not On This iPad tab to view only apps you’ve previously acquired that are not currently stored on your tablet.
Any of the listed apps, which are now stored online within your iCloud account, can be downloaded and installed onto your tablet, including your previous iPhone or iPod touch app purchases. To do this, simply tap the Install button (which looks like a cloud-shaped icon with a downward-pointing arrow) that’s displayed with an app’s listing.
Tip
If you also own and use an iPhone or iPod touch that’s linked to the same iCloud account, anytime you purchase an iPad/iPhone hybrid app, you can install it on any or all of your iOS devices without having to purchase the same app multiple times.
How to Acquire an App from the App Store
To purchase an app (or download and install a free app), tap on the Price icon that’s associated with its listing or that’s displayed within its description screen. Upon doing this, the price button changes from blue and white to green and white and says Buy. If it’s a free app, this new button is labeled Install. Tap the Buy or Install button to confirm your purchase and/or download and install decision.
An Apple ID Password window displays on the screen next. Your Apple ID username is already displayed, but you must manually enter your Apple ID password. Type your Apple ID password, and then tap the OK button. The app automatically downloads and installs itself on your iPad. This process can take between 15 seconds and several minutes. When the app is installed, the app icon for the new app appears on your tablet’s Home screen. Within the App Store, the Price icon associated with the app now says Open.
Caution
Some free apps are, in fact, free. However, they might ultimately require you to pay for a content subscription or make in-app purchases to fully utilize the app. When looking at an app’s description screen, if in-app purchases are possible (or required), this will be mentioned when you tap on the Top In-App Purchases option, which displays only if applicable.
Learning About an App Before Making a Purchase
Before committing to a purchase, as you’re looking at an app’s listing or preview box from within the App Store, tap its title or graphic icon to reveal a detailed description window for that app.
An app’s description page (like the one shown in Figure 10.6) displays the app’s title, logo, and average star-based rating (along with the number of ratings it has received) near the top of the screen, along with a detailed description of the app when you tap on the Details tab and scroll downward. Several sample screen shots from the app are also displayed on the main description page.

FIGURE 10.6 From an app’s description page, you can learn all about a specific app. This information can help you decide whether it’s of interest to you or relevant to your needs.
Tip
When viewing an app’s description page, tap on the Details tab to view a detailed description of the app and see sample screen shots from it. Tap on the Reviews tab to see its star-based ratings chart and read detailed reviews of the app that were written by your fellow iPad users. Tap on the Related tab to view a listing of apps offered by the same developer and/or that are somehow related to the app you’re viewing.
When the Details tab is selected, displayed below the command tabs are sample screen shots from the app. Using your finger, swipe along the screen shots in a right-to-left motion to view all of the images. Tap on an image to view it in full-screen mode. Then, tap on the Done button to exit out of full-screen mode and return to the description page.
Tip
Take a look at an app’s sample screen shots to get a firsthand look at the graphics quality and user interface of the app. This is one way to determine the overall quality of the app, based on its visual layout and appeal. When you visit an app developer’s website, however, you can sometimes watch demo videos of the app in use.
Below the screen shots is a detailed, text-based description of the app. It was written and submitted to Apple by the app’s developer or publisher. To read the entire description for an app, you might have to tap on the More option associated with it.
As you scroll down on an app’s description page, the What’s New heading displays information about the newest features added to the app. Periodically, apps get updated with new versions. The What’s New section informs you about new features, as well as any problems with the app that have recently been fixed.
After the What’s New section, as you again scroll downward, the Information section for the app (shown in Figure 10.7) displays the app’s developer, category, the date it was last updated, the current version number, the file size, the app’s rating, and the system requirements for the app.

FIGURE 10.7 The Information section of an app’s description page provides additional details about the app, including its file size and system requirements.
If in-app purchases are available (or required), you’ll discover this by tapping on the Show In-App Purchases option that’s displayed in conjunction with the In-App Purchases section within an app’s Description page (if applicable). What in-app purchases are available, as well as their prices and descriptions, are listed.
Tip
Tap on the Developer Website option near the bottom of an app’s description page to launch Safari and visit the app developer’s own website or the promotional website created by the app developer for the particular app you’re looking at.
To learn about an app’s update history, tap on the Version History option.
When you tap on the Reviews tab that’s part of every app’s description page, you’ll have the option to “Like” the app on Facebook, plus view a star-based ratings chart, and be able to read text-based reviews of the app written by people who have already purchased and used it.
The App Store Ratings are based on a five-star system. Anyone who purchases or downloads an app has the option to rate it. A top rating is five stars. From the Ratings Summary chart (shown in Figure 10.8), you can see how many people have rated an app; discover the app’s average rating; and then see a breakdown of how many one-star, two-star, three-star, four-star, and five-star ratings the app has received.

FIGURE 10.8 Every app description contains an average rating and a rating summary chart. Use it to quickly see what other iPad users think about the app you’re currently looking at.
Obviously, an app with a large number of five-star ratings is probably excellent, and an app that consistently earns three stars or less is probably not so great or is loaded with bugs.
Keep scrolling down to read full reviews that your fellow iPad users have written about that app. These reviews often describe the best features of the app and/or its worst problems.
While reviewing an app’s description page, if you want to be reminded of the app’s existence (without downloading it), or you want to tell a friend about the app, tap the Share icon that’s displayed near the upper-right corner of the description page and then tap on one of the icons that are displayed in the Share pop-up window (such as Mail, Message, Twitter, Facebook, or Copy Link) that appears.
To exit an app’s description page and continue browsing the App Store, tap anywhere outside the description window that contains the app information (such as the left or right margin of the screen) or tap on one of the command icons that’s displayed near the top or bottom of the screen.
Visiting the App Store from iTunes on Your Computer
The second method of finding, purchasing, downloading, installing, and updating apps is to use the latest version of the iTunes software on your primary computer to access the iTunes Store. Click the iTunes Store option displayed on the left side of the screen, under the Store heading. Your computer must be connected to the Internet to access the iTunes Store.
When the main iTunes Store launches within iTunes, click the App Store tab displayed near the top of the screen. You see a screen that’s similar to the Featured page of the App Store when you access it from your iPad using the App Store app.
Free Apps
Free apps cost nothing to download and install on your tablet. Some programmers and developers release free apps out of pure kindness and to share their creations with the iPad-using public. These are fully functional apps.
There are also free apps that serve as demo versions of paid apps. These are scaled-down versions of apps, or they have some type of limitation. For example, in some cases, basic features or functions of the app are locked in the free version but are later made available if you upgrade to the paid, premium, or “pro” version of the app.
A third category of free apps is fully functional apps that display ads as part of their content. In exchange for using the app, you must view ads, which offer the option to click on offers from within the app to learn more about the product or service being advertised.
A fourth category of free apps serves as a shell for premium (paid) content that must be loaded into the app to make it fully functional.
A fifth category of free apps relates to those offered by retailers and online merchants who offer a specialized shopping app used to access their own online store.
The final type of free app is fully functional, but it enables the user to make in-app purchases to add features or functionality to the app or to unlock premium content. The core app, without the extra content, is free.
Paid Apps
After you purchase an app, you own it and can use it as often as you like without incurring additional fees. You simply pay a fee for the app upfront, which is typically between $.99 and $9.99. All future upgrades of the app are free of charge. In some cases, paid apps also offer in-app purchase options to access premium content.
Subscription-Based Apps
Apps based on subscriptions, such as monthly magazines, are typically free, but you pay a recurring subscription fee for content, which is automatically downloaded into the app. Many digital editions of newspapers, such as The New York Times and The Wall Street Journal, utilize a subscription app model, as do hundreds of different magazines.
In-App Purchases
The ability to make in-app purchases is a special function in some free and paid apps. The important thing to note is that, as you’re actually using the app, you can purchase additional content or add new features and functionality to the app by making in-app purchases. The ability to make in-app purchases has become very popular and is being used by app developers in a variety of ways.
Caution
The price you pay for an app does not translate directly to the quality or usefulness of that app. There are some free or very inexpensive apps that are extremely useful and packed with features that can really enhance your iPad experience. However, there are costly apps that are poorly designed, filled with bugs, don’t live up to expectations, or don’t offer the functionality promised in the app’s Description page (which is content provided by the app’s developer, not Apple).
The price of each app is set by the developer or programmer that created or is selling the app. Instead of using the price as a determining factor if you’re evaluating several apps that appear to offer similar functionality, be sure to read the app’s customer reviews carefully and pay attention to the star-based rating the app has received. The user reviews and ratings are a much better indicator of the app’s quality and usefulness than the price of the app.
Quick Tips for Finding Apps
As you explore the App Store, it’s easy to become overwhelmed by the sheer number of apps that are available for your iPad. Spending time browsing the App Store introduces you to the many different types of apps that are available and provides you with insight about how you can utilize your tablet in your personal or professional life.
However, you can save a lot of time searching for apps if you already know the app’s exact title, or if you know what type of app you’re looking for. In this case, you can enter either the app’s exact title or a keyword description of the app in the App Store’s Search field to see a list of relevant matches.
If you’re looking for vertical market apps with specialized functionality that caters to your industry or profession, enter that industry or profession (or keywords associated with it) in the Search field. For example, enter keywords such as medical imaging, radiology, plumbing, telemarketing, CRM, portfolio management, or sales.
As you’re evaluating an app before downloading it, use these tips to help you determine whether it’s worth installing onto your tablet:
![]() Figure out what type of features or functionality you want to add to your iPad.
Figure out what type of features or functionality you want to add to your iPad.
![]() Using the Search field, find apps designed to handle the tasks you have in mind. Chances are that you can easily find a handful of apps created by different developers that are designed to perform the same basic functionality. You can then pick which is the best based on the description, screen shots, and list of features each app offers. Compare the various apps by reading their descriptions and viewing the screen shots.
Using the Search field, find apps designed to handle the tasks you have in mind. Chances are that you can easily find a handful of apps created by different developers that are designed to perform the same basic functionality. You can then pick which is the best based on the description, screen shots, and list of features each app offers. Compare the various apps by reading their descriptions and viewing the screen shots.
![]() Check the customer reviews and ratings for the app. This is a useful tool to quickly determine whether the app actually works as described. Keep in mind that an app’s description in the App Store is written by the app’s developer and is designed to sell apps. The customer reviews and star-based ratings are created by fellow iPad users who have tried the app firsthand. When reading reviews, look for consistencies between many reviews by different people. Don’t just rely on one or two positive reviews when there are a dozen or more negative ones, or vice versa.
Check the customer reviews and ratings for the app. This is a useful tool to quickly determine whether the app actually works as described. Keep in mind that an app’s description in the App Store is written by the app’s developer and is designed to sell apps. The customer reviews and star-based ratings are created by fellow iPad users who have tried the app firsthand. When reading reviews, look for consistencies between many reviews by different people. Don’t just rely on one or two positive reviews when there are a dozen or more negative ones, or vice versa.
![]() If an app has only a few ratings or reviews and they’re mixed, you might need to try the app for yourself to determine whether it is useful to you. However, if an app has many reviews that are overwhelmingly negative (three stars or less), that’s a strong indication that the app does not perform as described or that it’s loaded with bugs.
If an app has only a few ratings or reviews and they’re mixed, you might need to try the app for yourself to determine whether it is useful to you. However, if an app has many reviews that are overwhelmingly negative (three stars or less), that’s a strong indication that the app does not perform as described or that it’s loaded with bugs.
![]() If an app offers a free (trial) version, download and test that version of the app before you purchase the premium version. You can always delete any app that you try but don’t wind up liking or needing.
If an app offers a free (trial) version, download and test that version of the app before you purchase the premium version. You can always delete any app that you try but don’t wind up liking or needing.
![]() Ideally, you want to install apps on your iPad that were designed specifically for the iPad, so if you have a choice, opt for the iPad-specific edition of an app first.
Ideally, you want to install apps on your iPad that were designed specifically for the iPad, so if you have a choice, opt for the iPad-specific edition of an app first.
![]() As a business professional, browse specific Categories of the App Store that are more apt to offer apps you can utilize on-the-job. Some of the app Categories to focus on include Business, Finance, News, Productivity, Reference, and Utilities.
As a business professional, browse specific Categories of the App Store that are more apt to offer apps you can utilize on-the-job. Some of the app Categories to focus on include Business, Finance, News, Productivity, Reference, and Utilities.
![]() Many of the businesses and financial institutions you already work with may have their own proprietary app. In addition, many popular PC and Mac software packages now have related apps that allow for the wireless exchange of data between a primary computer (or network) and the iPad. Plus, there are many online-based applications and services that can also utilize a specialized iPad app in order to sync and share data.
Many of the businesses and financial institutions you already work with may have their own proprietary app. In addition, many popular PC and Mac software packages now have related apps that allow for the wireless exchange of data between a primary computer (or network) and the iPad. Plus, there are many online-based applications and services that can also utilize a specialized iPad app in order to sync and share data.
If your business uses a FileMaker Pro database, for example, the FileMaker Go app can be used to access that database from a tablet. Or, if you’re already using the QuickBooks software on your Mac or PC, an app-based version of QuickBooks (as well as other third-party financial apps) provides remote access to your financial data from your tablet.
While using the Mac version of VIPOrbit, you can sync contact and scheduling data with the iPad version of this software, or if you’re an Evernote user, for example, the Mac or PC version of Evernote is fully compatible with the iPad version.
In terms of online-based apps, if you’re a Google Docs user, for example, there are many iPad apps that allow you to work with your Google Docs data and files directly from your Internet-connected tablet.
Be sure to check the App Store to determine if an iOS app related to the PC or Mac software you frequently use is available.
Keeping Your Apps Up-to-Date
Periodically, app developers release new versions of their apps. Thanks to iOS 7, as long as your iPad has Internet access, by default it will automatically check for new app updates regularly, and when updates are available, they’ll be downloaded and installed for you.
From within Settings, you can turn on or off the auto-update feature and then decide whether or not a cellular data connection or just a Wi-Fi connection will work. To adjust this, launch Settings, tap on the iTunes & App Store option, and from the iTunes & App Store submenu turn on or off the Updates option (found under the Automatic Downloads heading). Then turn on or off the Use Cellular Data option.
If you have Updates turned off, you can manually check for and install app updates. To do this from within the App Store app, tap on the Updates icon that’s displayed near the bottom-right corner of the screen. A listing of all apps that require an update, if any, are displayed. Tap on the Update icon associated with each app, or tap on the Update All option to download and install the necessary app updates.