
6. Managing Information Using the Reminders and Notes Apps
In This Chapter
![]() Create and manage to-do lists
Create and manage to-do lists
![]() Compose, view, print, and share text-based notes using the Notes app
Compose, view, print, and share text-based notes using the Notes app
![]() Syncing app-specific data with iCloud and other mobile devices
Syncing app-specific data with iCloud and other mobile devices
On the surface, Reminders is a straightforward to-do list manager. However, after you start using this easy-to-use app, you may find it offers a plethora of useful features.
Reminders works seamlessly with Notification Center and iCloud and easily syncs with the Reminders app on your Mac (that’s running OS X Mountain Lion or OS X Mavericks) or iPhone, as well as with Outlook on your primary computer (a Mac or PC). Plus, you can create as many separate to-do lists as you need to properly manage your personal and professional life or various projects you’re responsible for.
Tip
Using iCloud, Reminders can automatically sync with your primary computer, iPhone, or other iOS devices. Be sure to turn on the iCloud functionality for Reminders from within the iCloud submenu of the Settings app to initiate real-time, automatic syncing.
Once this is done, from any computer or mobile device that’s connected to the Internet, it’s possible to access the online version of Reminders by pointing the web browser to www.iCloud.com. Log in with your Apple ID and password (or iCloud username and password), and then click on the Reminders app icon. The online version of the app is populated with the most recent version(s) of your to-do list(s) and app-related settings.
To make it easier for you to juggle tasks and keep track of deadlines and ongoing responsibilities, you can give every item on your to-do list a unique alarm, which can be associated with specific times, dates, or both.
When you launch Reminders for the first time, on the left side of the screen you see the control center for this app. On the right side of the screen (shown in Figure 6.1) is a simulated sheet of blank paper.

To begin creating a single to-do list, tap the top empty line on the right side of the Reminders screen. Using the virtual keyboard, enter the first item to be added to your list, and then tap the Return key on the keyboard.
When you tap the Return key, an empty circle displays in the margin, to the left of the item you just entered (as shown in Figure 6.2). You can later mark the completion of this task by tapping on this circle to fill it in. Then, at the bottom of the list, tap on the Show Completed option to display only items you’ve completed.

FIGURE 6.2 As soon as you create an item within a to-do list, an empty circle displays to the left of it.
Tip
It’s possible to use Siri to enter new to-do list items with verbal commands. To do this, activate Siri and begin your command by saying, “Remind me to...” or “Add [item] to my [list name].”
As you’re speaking, you can include a date and time for your reminder, which allows Siri to associate an alarm with that to-do list item. For example, you could say, “Remind me to pick up my dry cleaning tomorrow at 2 p.m.”
As you’re entering the to-do list item (or anytime after), tap on it to edit the entry. An Info icon (a circular icon with an “i” within it) appears to the right of the listing. Tap on this Info icon to access the Details window, and then customize the individual to-do item on the list. For example, you can change the item’s title or set an alarm by tapping on the Remind Me On A Day option. You can also set a Priority for the item, change the list it’s associated with, or add unlimited text-based notes to the item—all from the Details window (shown in Figure 6.3).
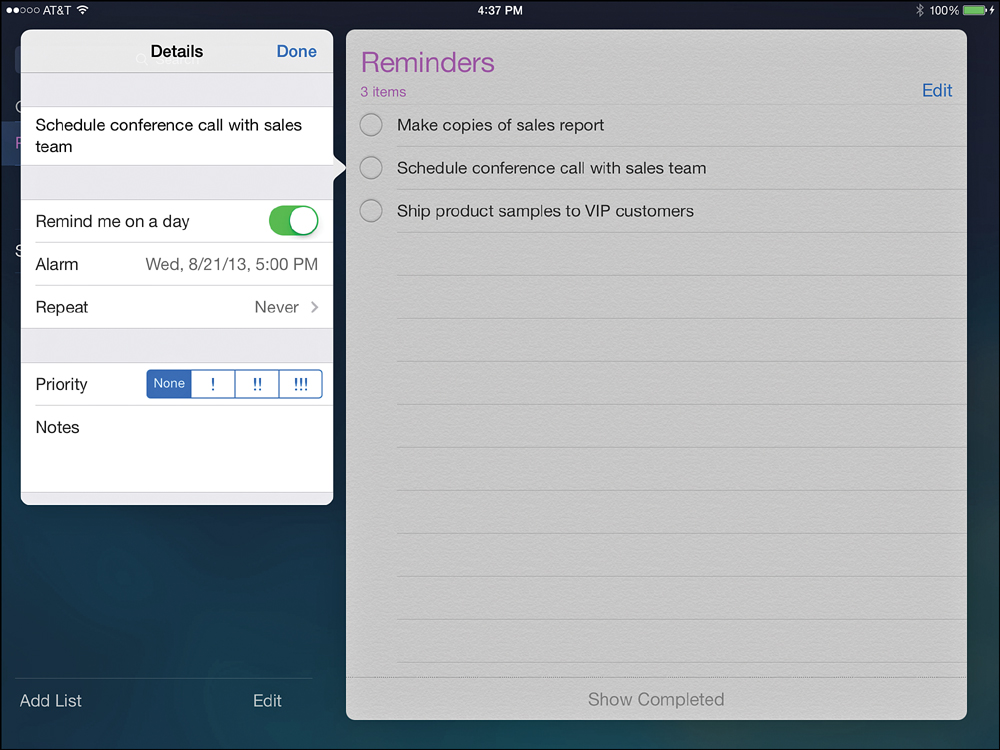
FIGURE 6.3 From the Details window, it’s possible to customize each list item, add an alert, or set a priority for it.
When you set a Priority, this does not impact the order in which items on your list are later displayed. It simply displays a Priority icon (up to three exclamation points) to the immediate left of an item listing. As you set a priority, your options include None, Low Priority (!), Medium Priority (!!), or High Priority (!!!).
After a to-do item on a list has been created, to delete it from the list altogether, swipe your finger from right to left across the listing. The Delete and More buttons appear. Tap the red-and-white Delete button to erase the item from the list. Tap on the More button to quickly access the Details menu that’s associated with the item.
Note
Alarms can be associated with each item in each of your to-do lists. You also have the option of creating a to-do list item without associating any type of alert or alarm with it.
When any alarm goes off that’s related to a to-do list item, a notification automatically displays as part of your iPad’s Notification Center, assuming you have this feature turned on.
To ensure Reminders works with the Notification Center, launch Settings and tap the Notification Center option. When the Notification Center submenu appears on the right side of the screen, tap the Reminders option. From the Reminders submenu, make sure the Show In Notification Center option is turned on. You can then modify the Include option and/or set up banners or alerts related to the Reminders app that appear when an alarm is generated by the app.
Tip
To alter the order that items within a specific list are displayed, as you’re viewing the list, tap on the Edit option that’s displayed near the top-right corner of the screen. Then, place your finger on the Move icon (which looks like three horizontal lines) that’s associated with the item listing you want to move up or down the list and drag it upward or downward. To delete the item, tap on the negative sign icon. When you’re done rearranging the list, tap on the Done option, which is displayed near the top-right corner of the screen.
Managing Multiple To-Do Lists Simultaneously
To create a new list from scratch, tap on the Add List option that’s displayed near the bottom-left corner of the Reminders app screen. If you have Reminders set up to sync with iCloud and with another online service, such as Yahoo! or Outlook.com, a Select Account pop-up menu appears with your available options. Choose where you want to save the new list.
When the New List heading appears near the top-center of the screen, type in the New List’s title and select a color for it. Tap the Done option to save this information and then begin populating the list with individual items, one at a time.
As you’re working with a specific to-do list, tap on the Edit option that’s displayed at the top-right corner of the screen in order to edit the list’s title and change the color associated with the list. Tap on the title to edit it, or tap on the Color option to change the list’s default color. Tap the Done option (displayed at the top-right corner of the screen) to save your changes.
Also while in Edit mode for a list, it’s possible to delete the list altogether by tapping the Delete List button at the bottom of the list.
You can also delete a list by tapping the Edit button at the bottom right of the left column of the Reminders screen and then tapping the red minus-sign icon to the left of the list name you wish you delete. To change the order of your lists, place your finger on the icon that looks like three horizontal lines and drag it upward or downward. To exit Edit mode, tap the Done button.
If you delete an entire list or an item from a list, that change immediately syncs with iCloud. There is no “undo” feature when you delete or edit a list or item.
In addition to managing general lists using the Reminders app, from the left side of the screen, you can create a date-specific “smart list” based on the time/date alerts you’ve set up for specific items. When you tap on the Scheduled option, a comprehensive listing of all items with an alarm scheduled for the current day, as well as future dates, will be displayed in chronological order. This information can also be displayed when you tap on the Today tab within Notification Center.
Tip
To quickly find items within any of your to-do lists, tap the Search field that’s displayed near the upper-left portion of the screen and then use the virtual keyboard to enter any text that is associated with what you’re looking for. From the Home screen, you also have the option to use the Spotlight Search feature in order to find Reminder-related information.
The Reminders app can be used to manage many different types of information in your personal and professional life.
Note
If you use the Reminders app on your iPhone, each list item can be associated with a date/time-based alarm or a location-based alarm. However, the iPad edition of the app does not currently support location-based alarms.
Setting Up Reminders to Work with iCloud and other Online Services
To set up the Reminders app to work with iCloud, launch Settings and tap on the iCloud option to access the iCloud submenu. Then, turn on the virtual switch that’s associated with the Reminders app. This only needs to be done once on your iPad, but it also needs to be done on each Mac and iPhone you use the Reminders app with.
Once you set up Reminders to sync with iCloud, you can access the iCloud.com website (www.iCloud.com) and utilize the online-based edition of Reminders (shown in Figure 6.4). This app is compatible with the iPad edition of Reminders and is automatically populated with your app-specific data.
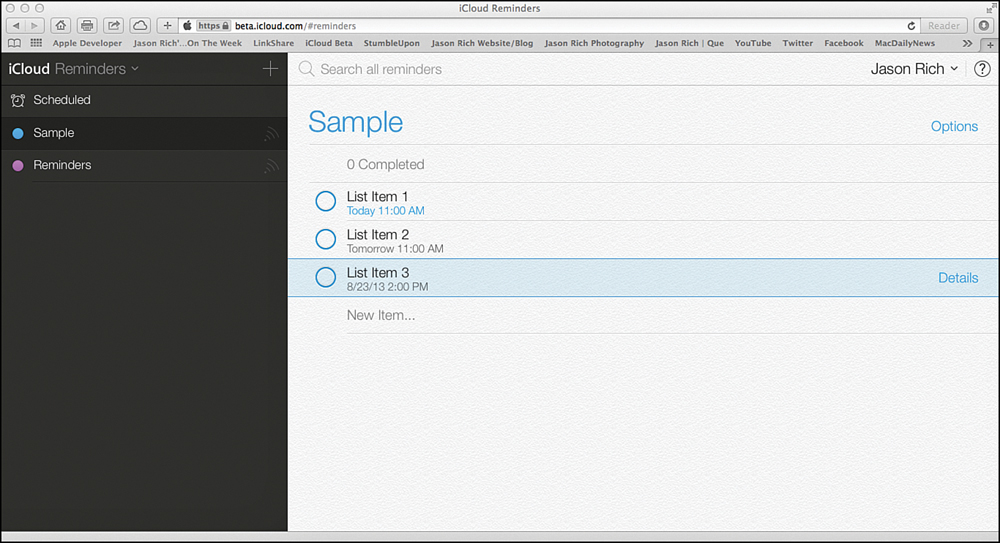
FIGURE 6.4 This is the online version of the Reminders app, accessible from www.iCloud.com. It is fully compatible with the iPad edition of the app.
Keep in mind, if you’re using the online app from someone else’s computer (or from a public computer within the business center of a hotel or an Internet café, for example), be sure to log off of your iCloud account when you’re done using the online version of the Reminders app. To do this, click on your username that’s displayed near the top-right corner of the browser window and then click on the Sign Out menu option. This also applies when using the iCloud.com version of Contacts, Calendar, Notes, Pages, Numbers, or Keynote.
To set up the Reminders app to work with Outlook; Outlook.com; Yahoo!; or another online-based service, such as one that’s compatible with Microsoft Exchange, launch Settings and tap on the Mail, Contacts, Calendars option. Next, tap on the Add Account option (found under the Accounts heading).
Choose the type of preexisting account you want to add. If the type of account isn’t listed within the Add Account menu, tap the Other option. When prompted, enter your account-specific username, password, and/or other information that’s requested. Once the account has been verified, be sure to turn on the virtual switch that’s associated with the Reminders option (which is shown within Figure 6.5, related to a Yahoo! account).
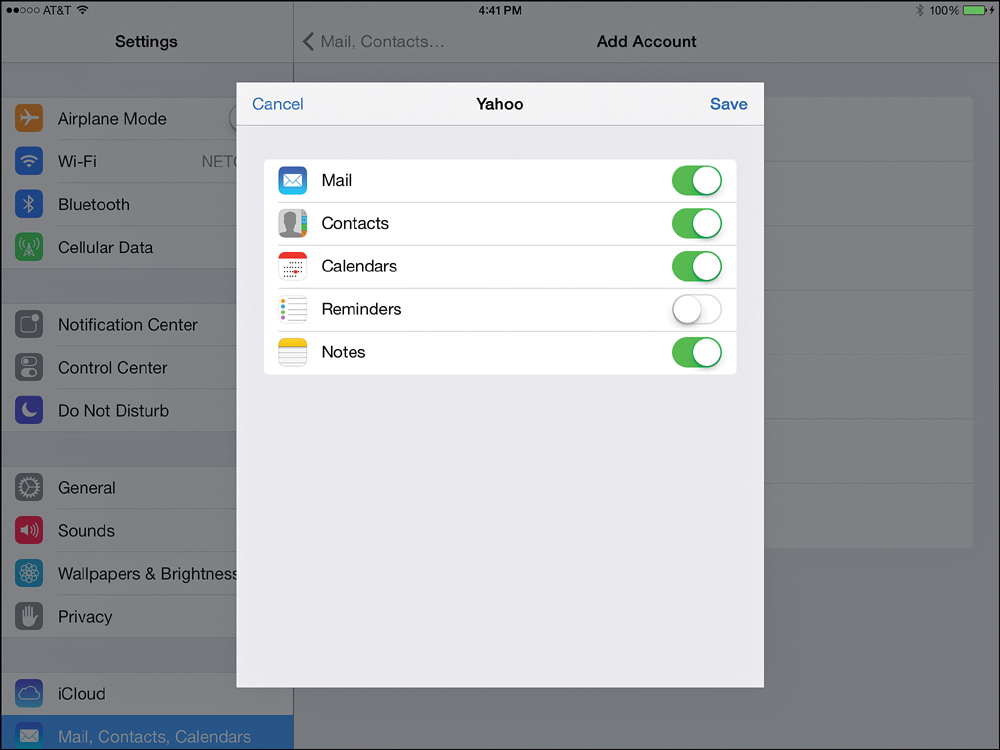
FIGURE 6.5 After setting up an online account within Settings, be sure to turn on the Reminders app sync feature for that online account. Shown here is the Settings submenu for customizing a Yahoo! account.
Using Your Tablet as a Note-Taking Device with the Notes App
While the Reminders app allows you to create, edit, view, and maintain detailed to-do lists that can be synced between your iOS mobile devices and Mac(s), the Notes app serves as a basic text editor that allows you to create, edit, view, and manage notes.
Note
The Notes app offers very basic formatting functionality, but if you need the features and functions of a full-featured word processor, you should use the optional Pages app or another word processing app on your iPad. Notes is designed more for basic note-taking, not word processing. There are also far more powerful note-taking apps available from the App Store that also allow you to write or even draw using a stylus, instead of typing.
Some third-party note-taking apps worth looking into include Evernote, Notepad+, Notes Plus, Microsoft OneNote, and Penultimate. Learn more about some of these apps in Chapter 15, “Discovering ‘Must-Have’ Business Apps.”
Just like Reminders, the Notes app comes preinstalled with iOS 7. In addition, a similar Notes app comes preinstalled on the iPhone, as well as Macs running OS X Mountain Lion or OS X Mavericks. Plus, an online edition of the Notes app is available on iCloud.com. So, if you set up this app to work with iCloud, all of your notes remain synced on all of your computers and/or iOS mobile devices that are linked to the same iCloud account.
On the iPad, the Notes app screen is divided into two sections (shown in Figure 6.6). On the left is a comprehensive listing of individual notes stored within the app, and on the right, a selected note can be viewed and edited.
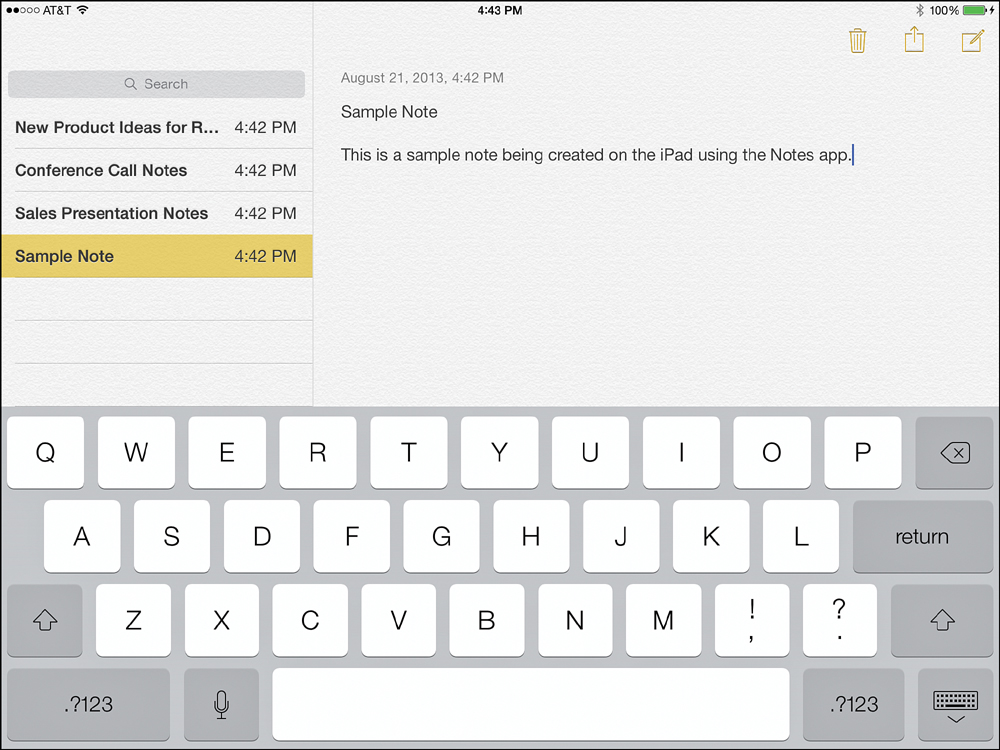
To create a new note, tap on the Compose icon that’s displayed near the top-right corner of the screen. On the virtual note page, begin typing your note using the virtual keyboard, activate the Dictation function, or utilize an external keyboard.
Note
By default, the first line of text you enter into a new note becomes that note’s title, which is displayed in the Notes listing on the left side of the screen.
When you’re done typing, dictating, or editing a note, tap on the Compose button to add another note, tap on a note in the listing to switch to that note, or exit the Notes app. Your note is automatically saved.
The left side of the main Notes screen allows you to see the title for each note that’s stored within the app. From this listing, to delete a note, swipe your finger from right to left across the note’s title. Confirm your decision by tapping on the Delete button. To open and view a note, tap on its listing.
Tap on the trash can icon to delete the note you’re currently viewing.
Tap on the Share icon to send the note to one or more recipients via email or the Message app. You can also print or copy a note by tapping on the appropriate option displayed within the Share menu. When you use the copy command the note’s content gets saved within your iPad’s virtual clipboard (so you can then paste the contents of the note into another app).
Tip
The Notes app works with the Select, Select All, Copy, Cut, and Paste features of iOS 7. Thus, you can select and copy text from one note and then paste it into another note or into another app altogether.
As you’re creating or viewing a note, press and hold your finger on any word to make the Copy, Select All, and/or Paste menu options appear. Once you select a word, you’ll also see a Define and Replace option displayed (shown in Figure 6.7).
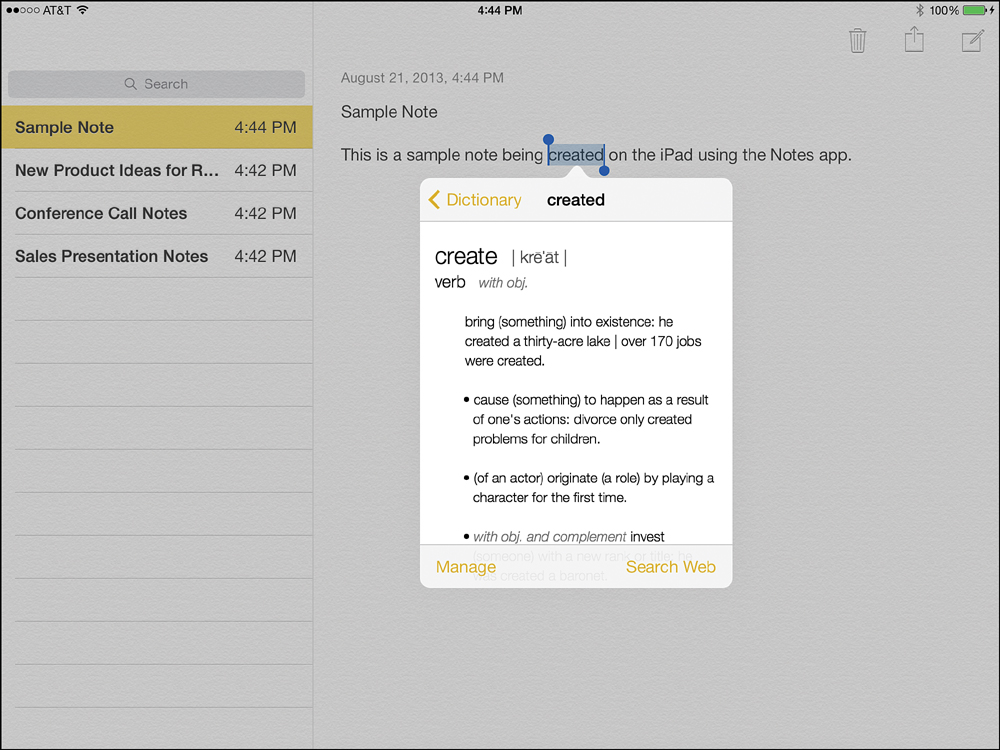
FIGURE 6.7 As you’re typing text into the Notes app, hold your finger on a word and tap on the Define option to view a definition (and the correct spelling) of that word.
It’s also possible to tap on Define to look up the definition of the selected work. A pop-up window displaying the definition is displayed. When you use this feature for the first time, you’re prompted to download the Dictionary tool. This process takes just 5–10 seconds and only needs to be done once.
Tip
Syncing notes with iCloud works exactly the same as syncing Contacts, Calendar’s or Reminders app-specific data; however, once iCloud is set up on your iOS device, you still need to turn on the iCloud syncing function that’s specific to the Notes app from the iCloud Control Panel within Settings.
Once you set up the Notes app to sync app-specific data with iCloud, access the iCloud.com website (www.icloud.com) at anytime using any computer or Internet-enabled device; log in to your account using your Apple ID and password (or iCloud username and password); and then click on the Notes app icon to use the online-based Notes app, which is populated with all of your Notes data from your iPhone, iPad, and/or Mac(s).
The Notes app’s functionality is relatively basic and straightforward. However, this app comes in particularly handy for jotting down ideas or memos without having to worry about formatting text (as you would when using a word-processing app). To help keep you organized, the time and date you create each note is automatically saved in conjunction with the note itself.
Tip
To quickly find content within a specific note, tap on the Search field that’s displayed near the top-left corner of the Notes app screen. Enter a keyword, date, or search phrase to quickly find similar content stored within the Notes app. To search your entire iPad for that content, however, you need to use the Spotlight Search feature from the Home screen.
Organizing Your Notes
The Notes app allows you to set up separate folders, within which you can store multiple notes. To do this, tap on the Folders button that’s displayed at the top-left corner of the screen to create or manage folders, which are then listed on the left side of the screen.
Certain Content within Notes is Interactive
Anytime you include an address, for example, within a note, tap on its link to launch the Maps app and view that address on a detailed map. Or when a website URL is included within a note, tap on it to launch Safari and visit that website.
Likewise, if you enter a day of the week, time, or date within a note, that information automatically becomes an active link. Then, when you tap on that link, you have the option to quickly create a new event within the Calendar app related to that link, without first having to launch the Calendar app. So, within a note, if the text says, “On Monday, July 7th, 2014...,” once you save that note, the Monday, July 7th, 2014, text is highlighted and underlined. Tap on it and a pop-up menu with the following options are displayed: Create Event, Show In Calendar, and Copy. Tap on Create Event to create a new event within the Calendar app. Tap Show In Calendar to simply view the Day View within the Calendar app for that date, or tap Copy to copy the date information into your iPad’s virtual clipboard and paste it elsewhere.
Meanwhile, if there are sentences or phrases that you use often within your notes, set up keyboard shortcuts for them to reduce the amount of typing that’s necessary. To do this, launch Settings, tap on General, select the Keyboard option, and then tap on Shortcuts.
For example, if you constantly incorporate the phrase, “For more information, please visit my website at www.JasonRich.com.” into notes, documents, emails, or instant messages, it’s possible to create a keyboard shortcut for that phrase, using the shortcut “FMI” (For More Information). Then, when you type FMI into almost any app, including Notes, the full phrase that “FMI” is associated with is incorporated into the app. This can be used as a time-saving tool, plus help reduce typos.