
8. Exploring Your World with the Maps App
In This Chapter
![]() Discovering the newly revamped Maps app
Discovering the newly revamped Maps app
![]() Obtaining turn-by-turn directions between any two locations
Obtaining turn-by-turn directions between any two locations
![]() Looking up businesses and landmarks
Looking up businesses and landmarks
![]() Seeing the world around you in 3D
Seeing the world around you in 3D
When you need to determine the quickest route to an important business meeting; find your way back to the office from an unfamiliar location; circumvent traffic in order to make your next flight; locate the closest hotel, gas station, or ATM; or discover a new restaurant to impress an important client, the Maps app, in conjunction with its newly expanded Yelp! integration, can help with all this and more.
With iOS 7, not only does the Maps app have a new look, it has been redesigned to provide new functionality, more detail, and improved accuracy. This latest version of Maps is more seamlessly integrated with other apps, including Contacts and Yelp! (as well as iPad functions, like Siri), plus it offers detailed, turn-by-turn directions that can be combined with real-time traffic notifications (if you turn on this feature).
For the Maps app to function properly, your iPad must have continuous Internet access. If you have a Wi-Fi + Cellular model, it’s possible to use this app from anywhere. When you do, turn on both the cellular and Wi-Fi connectivity for improved accuracy.
If you’re using a Wi-Fi–only iPad model, the Maps app is useful but can be used only while you’re within the radius of a Wi-Fi hotspot. Thus, you won’t be able to fully utilize the app’s turn-by-turn directions feature while on the move.
The Maps app can be used as a standalone GPS device for navigation in a car or while walking. In addition, Maps can be used to display a detailed map of any location using a standard, hybrid, satellite, or 3D (flyover) view that fully utilizes the Retina display that’s built in to the latest iPad models.
Tip
Even without using the turn-by-turn directions feature, it’s possible to look up the address of any business, landmark, or airport, for example, while your tablet is connected to the Web and then save the directions to that location or print them using a compatible AirPrint printer before you leave. From within the Contacts or Maps app, you can also look up and map out any address that’s stored within a Contacts entry.
Tip
To get the most use out of the Maps app, the main Location Services feature within your iPad (as well as Location Services for the app) must be turned on. To do this, launch Settings, tap on the Privacy option, and then tap on Location Services. From the Location Services submenu, turn on the virtual switch that’s displayed near the top of the screen (associated with Locations Services), and then scroll down and make sure the virtual switch that’s associated with the Maps app is also turned on.
Caution
Just as when using any GPS device for turn-by-turn directions, do not rely 100 percent on the directions you’re given. Pay attention as you’re driving and use common sense. If the Maps app tells you to drive down a one-way street or drive along a closed road, for example, ignore those directions and seek out an alternate route. Don’t become one of those people who literally drives into a lake or over a cliff because their GPS told them to. Yes, this does happen.
In addition, real-time, color-coded traffic conditions can be graphically overlaid onto maps (which show traffic jams and construction, for example), and when you look up a business, restaurant, point-of-interest, or landmark, the Maps app seamlessly integrates with Yelp! in order to display detailed information about specific locations.
The Yelp! information screens in the Maps app are interactive, so if you tap on a website URL, Safari launches and the related website is automatically loaded and displayed.
Tip
To enhance the capabilities of the Yelp! integration, download and install the optional (and free) Yelp! app from the App Store. Without the Yelp! app, when appropriate, the Maps app transfers you to the Yelp! website.
Tip
Another companion app that’s worth installing is Open Table (free). It allows you to find restaurants by location, price range, or food type, for example, plus view menus, read detailed reviews, and then make reservations online, directly from your iPad.
Note
Yelp! is a vast online database that contains more than 30 million reviews related to local businesses, stores, restaurants, hotels, tourist attractions, and points-of-interest. Reviews are created by everyday people, who share their experiences, thoughts, and photos. However, beyond user-provided reviews, Yelp! also offers details about many businesses and restaurants.
Don’t forget, Maps is fully compatible with Siri, which allows you to utilize voice commands and requests. For example, regardless of what you’re doing on the iPad, it’s possible to activate Siri and say, “How do I get home from here?” or “Where is the closest gas station?” and then have the Maps app provide you with the directions and map you need.
Anytime you’re viewing a map within the Maps app, tap on the My Location icon (which looks like a northeast-pointing arrow) that’s displayed near the bottom-left corner of the screen to pinpoint and display your exact location on the map. Your location is displayed using a pulsating blue dot. If for some reason the Maps app loses its Internet signal temporarily, tap on this My Location icon again to reestablish your location.
Overview of the Maps App’s Screen
Displayed in the top-left corner of the main Maps app screen (shown in Figure 8.1) is the Directions option. Tap on it to enter a Start and End location and then obtain detailed driving, walking, or public transportation directions between those two points.
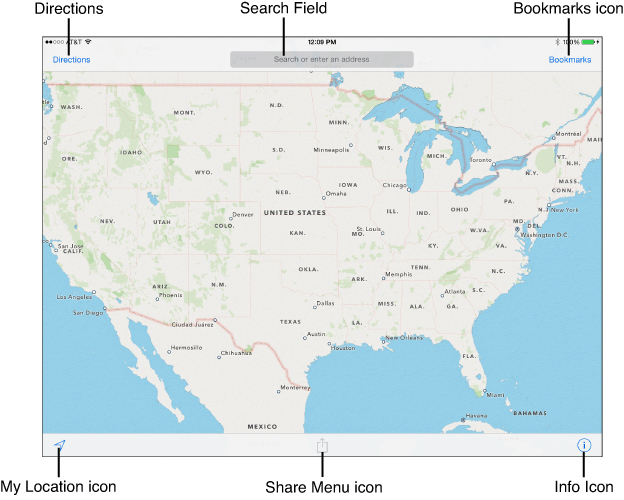
FIGURE 8.1 The first time you launch the Maps app, by default, a map of The United States is displayed if you have this set as your home country or region.
Note
Depending on the two points you enter, walking directions may not be applicable or viable. Currently, if you request public transportation directions between two addresses, you’re redirected to the App Store in order to seek out an alternate app. Thus, if you’re relying on public transportation to get around a popular city, such as New York, the District of Columbia, Boston, London, or Paris, download an app specifically designed for that public transportation system. Use the Search option within the App Store to find one of these apps. For example, enter the search phrase “London Tube Map” to find a variety of interactive apps to help you navigate your way around London’s subway/train system.
Displayed at the top-center of the screen is the Search field. Use it to find and map out any address. Here, you can enter a complete address (house/building number, street, city, state) or provide less specific information, such as just a city, state, or country. For example, within the Search field, enter United States to see a map of the entire country. Or, enter California to view a map of the state. You also have the option to enter Los Angeles, California, to view a more detailed map of the city, or enter a specific street address located within Los Angeles to view it on a detailed map that shows specific streets (and street names).
Once the Maps app finds the location you’re looking for, you can zoom in or zoom out manually on that map to see more or less detail. Plus, you can change the Map view and switch between the Standard, Hybrid, Satellite, 3D, and/or Flyover view (each of which is explained shortly).
Tip
Within the Search field of the Maps app, enter the name of any contact within your Contacts database to find and display an address for that contact. As you perform a search, the contents of your iOS device (including the Contacts app) are searched, followed by a web-based search, if applicable.
Anytime a particular location is specified on the map, such as results of a Search, those results are displayed using virtual red push-pins. Tap on a push-pin to view more details about that location and to access a separate Location window.
As you’re looking at the main Maps screen, however, look to the upper-right corner to find the Bookmarks option. Just like Safari, the Maps app allows you to store bookmarks for specific locations. When you tap on the Bookmarks option, three command tabs are displayed near the bottom of the window. They’re labeled Bookmarks, Recents, and Contacts (shown in Figure 8.2).
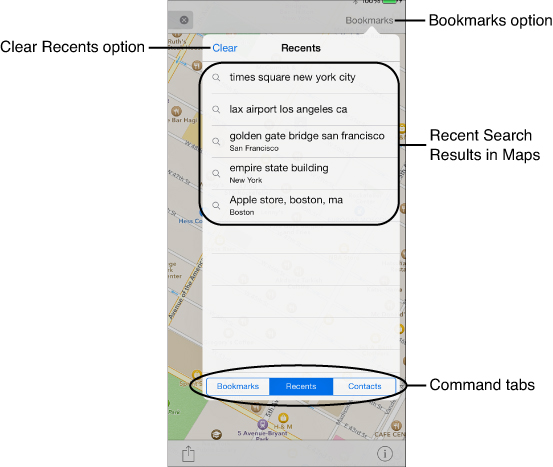
FIGURE 8.2 Near the bottom of the Bookmarks window are three tabs, labeled Bookmarks, Recents, and Contacts.
Tapping on the Bookmarks tab reveals a list of previously saved locations. Tap on the Edit button to edit, delete, or reorder this list, or swipe your finger from left to right across a Bookmark listing to delete it.
Tap on the Recents tab to view a list of recently searched or viewed locations. To clear this list, tap on the Clear button that’s displayed near the top-left corner of the window.
When you tap on the Contacts tab, the All Contacts listing is displayed. This shows a comprehensive list of all entries stored within your Contacts database. Whether you’re looking at the Bookmarks, Recents, or All Contacts list, tap on one of the listings to view that location on a map.
Again, as you’re looking at the main Maps screen, the center area of the display is used to showcase maps. Remember, in most cases, you can zoom in or zoom out on the map you’re looking at. You can also use your finger to move around within that map and see other areas of it.
Displayed near the bottom-left corner of the screen is the My Location icon (it looks like a northeast-pointing arrow). At anytime a map is displayed, tap on this icon to locate and display (or update) your current location on the map. This feature is useful if you look up another destination and then want to quickly see where you’re currently located in comparison to that other location. However, when you’re using the Maps app for turn-by-turn directions, your iPad keeps track of your location in real-time and displays this on the map as you’re in motion.
Note
As you’re viewing a Standard, Hybrid, or Satellite map, tap on the 3D button that’s displayed near the bottom-left corner of the screen to switch to a 3D view. Many people find the 3D view more visually interesting, although it doesn’t reveal any new onscreen information that could not be seen using the Maps app’s Standard, Hybrid, or Satellite view.
When you’re viewing a map of a popular city or metropolitan area, the 3D button is automatically replaced by the Flyover icon. The Flyover feature offers a true, 3D-looking map of a city from the perspective of an airplane cockpit. From this view, use your finger to move around on the screen and see a bird’s-eye view of a city, which is visually impressive and highly detailed.
The Info icon is now displayed near the bottom-right corner of the main Maps screen. When you tap on this circular “i” icon, a new window pops up that allows you to quickly switch between the Standard, Hybrid, or Satellite map view. Simply tap on one of the labeled tabs that are displayed near the top of this window (shown in Figure 8.3).

Displayed to the left of the Info icon, along the bottom of the main Maps screen is a Share icon. Tap on this icon to share map details you’re currently viewing with others via the Message, Mail, Twitter, or Facebook app. The Share menu of the Maps app is shown in Figure 8.4.

FIGURE 8.4 The Share menu within the Maps app allows you to quickly share details about a location with others, plus create a bookmark for a specific location for later reference.
Tip
The newly redesigned Share menu includes an Add Bookmark button. Tap on this to save the currently viewed location as a Maps bookmark for later reference.
The Maps App’s Info Screen
The Maps app’s Info screen displays several command buttons and command tabs. The command buttons are labeled Drop A Pin, Print Map, and Show (or Hide) Traffic.
The Drop a Pin Command
When you tap on the Drop A Pin option, the full Maps screen returns. Now, tap anywhere on that map to place a virtual push-pin. The new push-pin is displayed in purple, instead of red. Once a push-pin is placed, it’s possible to view detailed information about that particular location, including its exact address. You can then tap on the displayed Info icon to view a Location Menu that offers a handful of menu options, including: Directions To Here, Directions From Here, Transit Directions, Create New Contact, Add To Existing Contact, Remove Pin, Add Bookmark, or Report A Problem.
The Print Map Command
If you have a wireless printer linked to your tablet via AirPrint, tap on the Print button to create a print-out of whatever is displayed on the screen, whether it’s a detailed map, a text-based list of turn-by-turn directions to a destination, or a listing of search results (such as restaurants or gas stations in a particular area).
When you tap on the Print button, the Print options window is displayed. Select an AirPrint-compatible printer and the number of copies you want printed; then tap on the Print button. If you have a color printer linked to your iPad, you can print maps (or color-coded directions) in full-color.
Note
If you encounter a serious problem with the Maps app or an error in the mapping, use the Report A Problem feature to contact Apple. When you do this, a menu appears with a handful of options relating to different types of Maps-related problems. Choose one and then follow the onscreen prompts to further explain the problem you’ve encountered. Tap the Send option to email your correction to Apple. This does not guarantee, however, that Apple will quickly fix the error or problem you’ve encountered.
The Show/Hide Traffic Option
Regardless of which map view you’re looking at, you can have color-coded, real-time traffic information superimposed on the map. This feature can help you avoid traffic jams and construction and allows you to seek an alternate route before you get stuck in the traffic.
Note
Mild traffic is showcased on a map using yellow, while heavy traffic is depicted in red. When construction is being done on a roadway, separate construction icons (displayed in yellow or red) are displayed on the map.
Tip
The Show Traffic feature works much better when you’re viewing a zoomed-in version of a map that shows a lot of street-level detail. Figure 8.5 shows moderate traffic conditions (a dashed orange line) near the famous intersection of Hollywood Blvd. and Highland, in Hollywood, California.

FIGURE 8.5 An orange line along a roadway indicates moderate traffic when you have the Show Traffic feature turned on within the Maps app.
Use the Show Traffic feature to help plan your route in advance, and seek out an alternate route if necessary, to avoid being late for an important meeting or flight, for example.
The Standard, Hybrid, and Satellite Tabs
Displayed along the top of the Maps Info window are the three map view command tabs—Standard, Hybrid, and Satellite. The Standard map view (shown in Figure 8.6) displays a traditional-looking, multicolored map on the screen. Street names and other important information are labeled and displayed on the map.
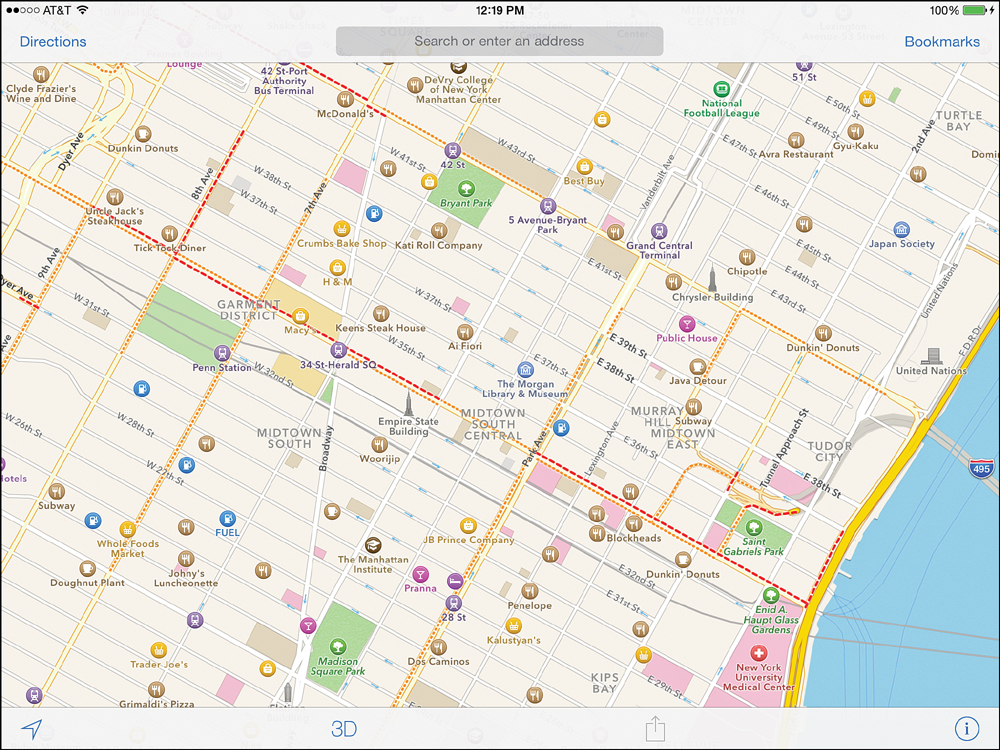
FIGURE 8.6 The Standard map view shows a traditional, multicolored map with street names and other points-of-interest listed on it. Shown here is part of midtown Manhattan.
The Satellite view uses high-resolution and extremely detailed satellite imagery to show maps from an overhead view, while the Hybrid map view showcases the same satellite imagery but overlays street names and other important information, similar to the information you’d see using the Standard view.
Tip
Anytime you’re viewing a map, you can switch between Map views. Then from the main Maps screen, tap on the My Location icon to display your exact location on the map and/or tap on the 3D icon to add a three-dimensional element to the map. If a Flyover view is available, the Flyover icon is displayed instead of the 3D icon.
Obtaining Turn-By-Turn Directions between Two Locations
The turn-by-turn directions feature of the Maps app is not only easy to use, it’s also extremely useful. Tap on the Directions option that’s displayed near the top-left corner of the screen. The Start and End fields, as well as the reverse directions, driving, walking, and public transportation icons, are displayed (shown in Figure 8.7). Within the Start field, the default option is your Current Location. However, to change this, tap on the field and enter any starting address. Then tap on the End field and enter any ending address.

FIGURE 8.7 Fill in the Start and End fields to obtain detailed, turn-by-turn directions between any two locations that you choose.
Tip
Displayed below the Start and End field are recent locations you’ve utilized within the Maps app. Scroll up or down this list using your finger, or tap on any entry to use it as your Start or End location.
Within the Start and End fields, you can enter a Contact entry’s name, a full address, a city and state, just a state, or just a country. You can use two-letter state abbreviations, and you don’t have to worry about using upper- and lowercase letters. The app understands what you’re typing either way. For example, you can type “New York, NY”; “new york, ny”; “ny, ny”; or “New York, New York” and get the same result. This goes for contacts or business names as well.
When the Start and End fields have been filled in, tap on the car-shaped icon near the top-center of the screen to access detailed driving directions. Or, tap on the person-shaped icon to obtain walking directions between those two locations.
Next, tap in the Route option that’s displayed near the upper-right corner of the screen. There’s also a Route button displayed on the virtual keyboard. A route overview map (shown in Figure 8.8) is displayed. The green push-pin represents your starting location, and the red-push pin represents your ending location. If you selected Driving directions, the Maps app displays between one and three possible routes between the Start and End locations.

FIGURE 8.8 A sample route overview map shows your Start and End locations on one map, plus up to three possible driving routes to get there.
The primary route (Route 1) is outlined on the route overview map with a dark blue line. If you see a 3 Routes flag along your main route, tap on it to reveal up to two alternate routes. Then, if available, one or two alternate routes are outlined with light blue lines and labeled Route 2 and Route 3.
Tip
Turn on the Show Traffic option to display current traffic conditions along the three routes, and then choose the one with the least congestion or construction. Tap on the Route 1, Route 2, or Route 3 flag to select your route. Route 1 is the default selection.
Tap on the Start button that’s displayed near the upper-right corner of the screen to begin the real-time, turn-by-turn directions. Just like when using a standalone GPS device, a voice guides you through each turn, while also displaying related information on the main map screen (shown in Figure 8.9).

FIGURE 8.9 The Maps app shows detailed, turn-by-turn directions on the map screen, plus speaks to you as you’re driving.
While the turn-by-turn directions are being displayed, the Standard map view is used. Your ETA, as well as how much time is left in your trip and the distance from your destination, is displayed near the top-center of the screen. Tap the Overview option to return to the route overview map or tap the End option to exit out of the turn-by-turn directions feature and return to the main Maps screen.
Follow the voice and onscreen prompts until you reach your destination. If you press the Home button, you can return to the Home screen and launch another app while the Maps feature is still running and then return to the turn-by-turn directions by tapping on the blue bar at the top of the screen that says Touch To Return To Navigation. This also works when you launch another app.
Viewing a Listing of Turns to Your Destination
After entering Start and End locations using the Directions feature of the Maps app, before tapping Start to obtain real-time turn-by-turn directions, tap on the Listing option that’s displayed near the bottom-center of the screen to view text-based directions to your destination.
Use your finger to scroll up or down on this list or tap on one of the individual directions to jump to the map that shows that step.
Looking Up Contact Entries, Businesses, Restaurants, Landmarks, and Points-of-Interest
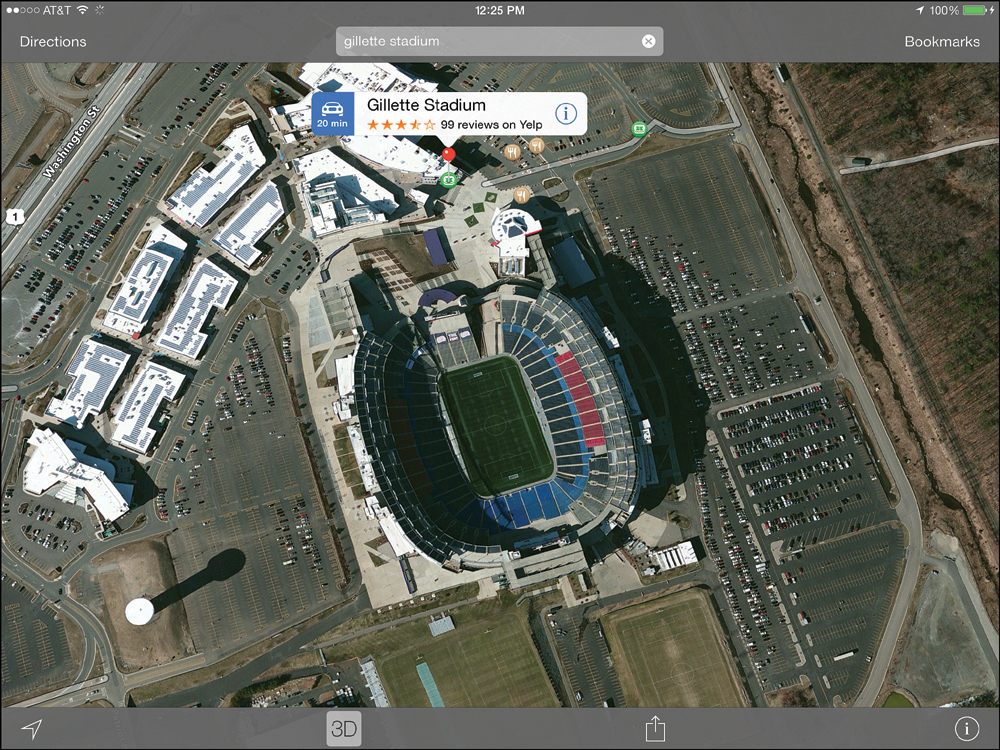
One of the other primary uses of the Maps app is to find and display addresses, contacts, businesses, points-of-interest, or landmarks on a map screen. To do this, from the main Maps screen, type what you’re looking for into the Search field. In Figure 8.10, Gillette Stadium in Foxboro, MA (home of the New England Patriots), was entered into the search field.
Here are some examples of what you can enter into the Search field:
![]() A full address for almost any location in the world. This displays a map of that specific location.
A full address for almost any location in the world. This displays a map of that specific location.
![]() An intersection (such as 42nd street and Broadway or Hollywood and Highland).
An intersection (such as 42nd street and Broadway or Hollywood and Highland).
![]() A city and state. This displays a map of that area.
A city and state. This displays a map of that area.
![]() A state. This displays a state map.
A state. This displays a state map.
![]() A country. This displays a country-wide map.
A country. This displays a country-wide map.
![]() A person or business name from your Contacts database. This displays the corresponding address on a map.
A person or business name from your Contacts database. This displays the corresponding address on a map.
![]() The name of a business, restaurant, or point-of-interest followed by the city and state.
The name of a business, restaurant, or point-of-interest followed by the city and state.
![]() Just the name of a business, restaurant, or point-of-interest. The Maps app looks in the most recent search area for what you’re looking for, or if it’s a known landmark (such as The White House or the Empire State Building), for example, the app finds and displays it.
Just the name of a business, restaurant, or point-of-interest. The Maps app looks in the most recent search area for what you’re looking for, or if it’s a known landmark (such as The White House or the Empire State Building), for example, the app finds and displays it.
![]() The type of business or service you’re looking for. For example, type gas station, hospital, seafood restaurants, or post office.
The type of business or service you’re looking for. For example, type gas station, hospital, seafood restaurants, or post office.
Tip
If you’re looking for businesses or services in your immediate area, tap on the My Location icon first, so the iPad pinpoints your location, and then enter what you’re searching for. No city or state needs to be entered. If you don’t tap on the My Location icon first, you need to enter what you’re looking for, followed by the city, a comma, and the state in order to find local search results. Otherwise, the Maps app defaults to the last search location.
Using the Interactive Location Screens to Find More Information
Once search results are displayed on the map, in the form of virtual push-pins, tap on any push-pin to view an information banner for a location on a map. In Figure 8.11, a search for Apple Store locations in Los Angeles was performed and displayed on the map.
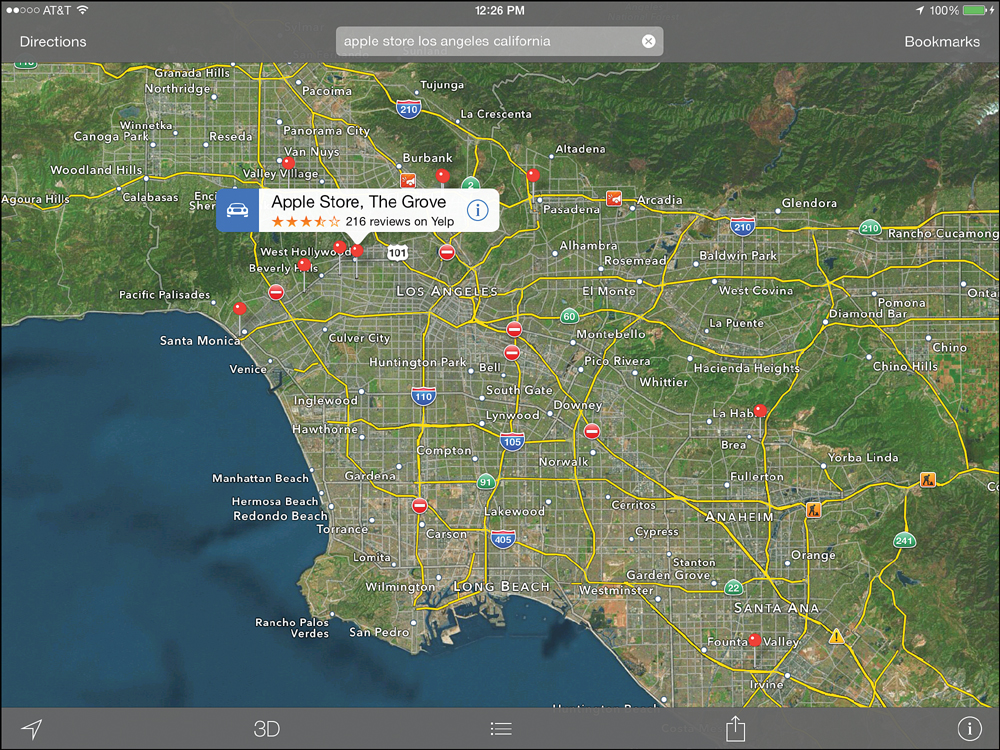
FIGURE 8.11 A search for Apple stores in the Los Angeles area was performed. The results are shown as red virtual push-pins on this hybrid view map.
Tap on one push-pin and then tap on the left side of the information banner to obtain “quick” turn-by-turn directions from your current location. Or, tap on the Info icon on the right side of the listing to view an interactive Location screen.
A separate Location window (shown in Figure 8.12) displays details about that search result using details from the Maps app, the Internet, and Yelp!. Tap on the Info tab on the Location window to view the phone number, address, website URL, and/or other information for that search result. What information is displayed depends on whether it’s a business, restaurant, point-of-interest, or tourist attraction, for example.
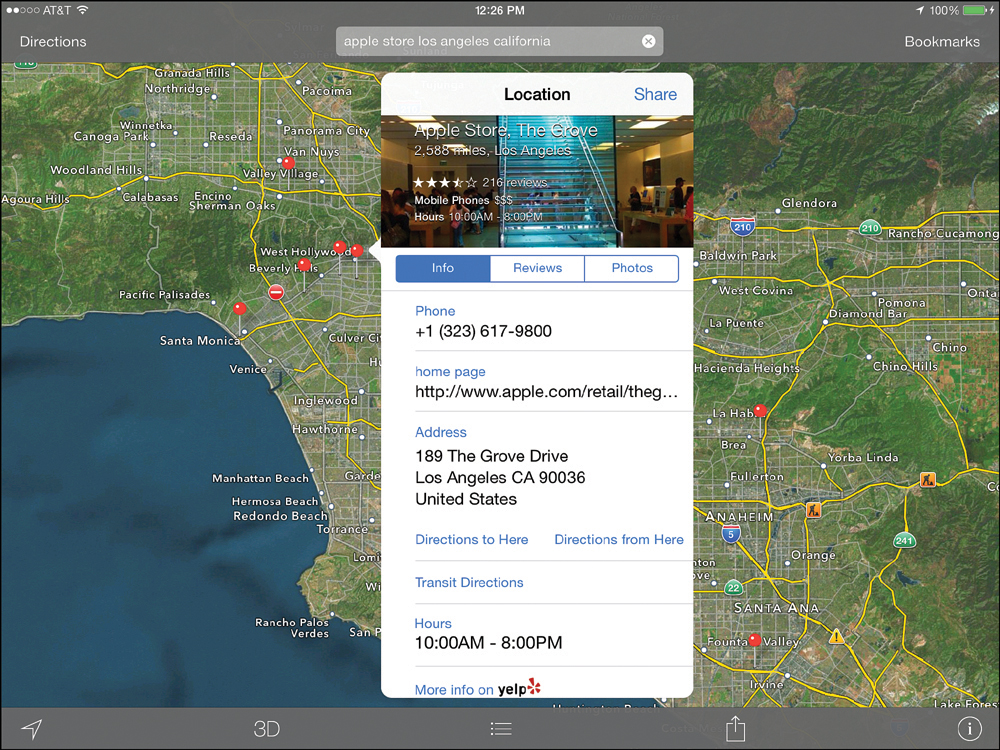
FIGURE 8.12 A detailed Location window combines location information with details about that location obtained from Yelp!. Information about the Apple Store at The Grove shopping center in Los Angeles is shown here.
Tip
When looking at multiple search results on a map, tap on Listing icon to view a text-based, interactive listing of the search results.
Scroll down on the Location window to see the Directions To Here and Directions From Here options (as well as a Transit Directions option). Tap on any of these to obtain directions to or from your current location to the address listed on the screen.
Tap on the More Info On Yelp! option to launch the Yelp! app or visit the Yelp! website to view more detailed information about that location.
The Create New Contact, Add To Existing Contact, Add Bookmark, and Report A Problem options are available by scrolling down within the Location window as long as you have the Info tab at the top of the window highlighted.
Within the Location window, tap on the Reviews tab to view Yelp!-related star-based ratings and text-based reviews from other Yelp! users, or tap on the Photos tab to view photos of that location, including photos uploaded by other Yelp! users. You can also contribute your own star-based rating, review, or photos for a location.
Tip
If you look up information about a restaurant, for example, the Location screen includes Yelp!-related information, such as the type of food served, the menu price range (using dollar sign symbols), the hours of operation, and potentially a website link that allows you to view the restaurant’s menu. You can also determine if the restaurant delivers or accepts reservations.
If reservations are accepted, use the optional Open Table app to make reservations online. You can also activate Siri and say, “Make a reservation for [number of people] for [day and time].”
The Maps App’s Flyover View
While the 3D feature makes looking at Standard, Hybrid, and Satellite maps more interesting, the Flyover map view that’s available for many major cities is just plain cool, although it doesn’t really serve a navigation purpose. This feature, however, can be used to help you get acquainted with the layout of a city and allow you to take a virtual tour of its skyline from your iPad.
When it’s available (from the Hybrid or Satellite view), the 3D icon that’s normally displayed near the lower-left corner of the Maps screen is replaced with the Flyover icon (which looks like a building). Tap on it to switch to a stunning Flyover map view (shown in Figure 8.13).

Tip
When using the 3D or Flyover view, you can zoom in or out on the map, plus change the perspective by placing two fingers (side-by-side) on the screen and moving them up or down together. You can also use just one finger to move up, down, left, or right to view a different area of the map and scroll around.
The Maps App Integrates Nicely with Other Apps
Just like before, the Maps app works nicely with other apps on your iPad. For example, from the Contacts app, as you’re viewing a specific entry, tap on any address to launch the Maps app and view that location on a map. This also works from within Safari as you’re surfing the Web (if an address is displayed as part of a web page) or while using the Mail app, if an address is displayed in an email message.
Using Siri with the Maps App
Of course, the Maps app also works with Siri, enabling you to access directions, look up maps, and pinpoint locations using verbal commands.
For directions, simply activate Siri (press and hold the Home button for about 2 seconds). When you hear the tone, say something like, “How do I get to [location]?” or “Look up the address for [contact name].”
You can also ask, “Where is [person from your Contacts database or any business name] in [city and/or state] located?” or say, “Show me the address of [landmark or destination, such as The Lincoln Memorial in Washington, DC].”
Thanks to Siri’s integration with Yelp! and other services, you can also say something like, “Find me a Chinese restaurant in Boston, MA,” or “Where’s the nearest coffee shop?”, and then look at a pop-up window that shows your search results with Yelp!-related information. You can then view the search results in the Maps app with a single tap.
Tip
You can always activate Siri and ask, “How do I get home?” or “How do I get back to work?” Siri will activate the Maps app and promptly display detailed directions from your current location. For this to work, you must first associate your own information with Siri by creating a detailed entry for yourself in the Contacts app and then linking it to Siri from within Settings. To do this, Launch Settings; tap on Mail, Contacts, Calendars; scroll down to the My Info option on the right side of the screen; then link your personal Contacts entry.
By linking relatives in your Contacts entry using the Related People field, you can then use Siri and ask questions like, “How do I get to my mom’s office?” or “Where does my brother live?”
Maps App Alternatives
As a business person on-the-go, you may rely on the iPad’s navigation capabilities often (especially if you have an iPad Wi-Fi + Cellular model) to help you make your way more efficiently around your home city or to easily find your destination when traveling in an unfamiliar location.
If the Maps app doesn’t offer the features and functionality you need, consider visiting the App Store and installing either the free Google Maps app or the BringGo app ($49.00–$59.99), which transforms your tablet into a full-featured GPS system that’s ideally suited for the needs of business travelers.
Tip
To find these and other navigation apps, launch the App Store app, tap on the Categories option, and choose Navigation or use the App Store app’s Search field.
Caution
Keep in mind, the Maps app relies heavily on Internet access. If you’re using a cellular data connection, which is necessary to use turn-by-turn directions while on-the-go, and have a monthly usage allocation, using the Maps app often could quickly use a significant portion of this allocation.